深入剖析(JDK)ArrayQueue源碼
前言
在本篇文章當中主要給大家介紹一個比較簡單的JDK為我們提供的容器ArrayQueue,這個容器主要是用數組實現的一個單向隊列,整體的結構相對其他容器來説就比較簡單了。
ArrayQueue內部實現
在談ArrayQueue的內部實現之前我們先來看一個ArrayQueue的使用例子:
public void testQueue() {
    ArrayQueue<Integer> queue = new ArrayQueue<>(10);
    queue.add(1);
    queue.add(2);
    queue.add(3);
    queue.add(4);
    System.out.println(queue);
    queue.remove(0); // 這個參數只能為0 表示刪除隊列當中第一個元素,也就是隊頭元素
    System.out.println(queue);
    queue.remove(0);
    System.out.println(queue);
}
// 輸出結果
[1, 2, 3, 4]
[2, 3, 4]
[3, 4]首先ArrayQueue內部是由循環數組實現的,可能保證增加和刪除數據的時間複雜度都是$O(1)$,不像ArrayList刪除數據的時間複雜度為$O(n)$。在ArrayQueue內部有兩個整型數據head和tail,這兩個的作用主要是指向隊列的頭部和尾部,它的初始狀態在內存當中的佈局如下圖所示:
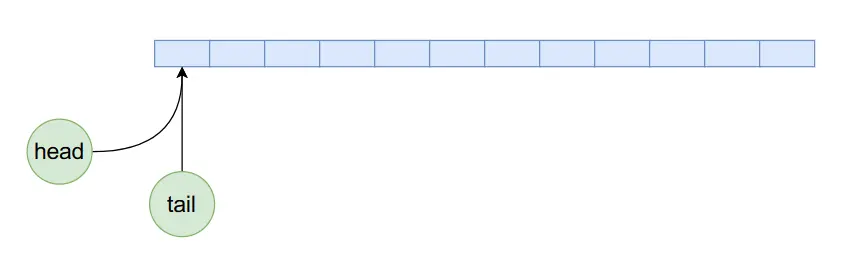
因為是初始狀態head和tail的值都等於0,指向數組當中第一個數據。現在我們向ArrayQueue內部加入5個數據,那麼他的內存佈局將如下圖所示:
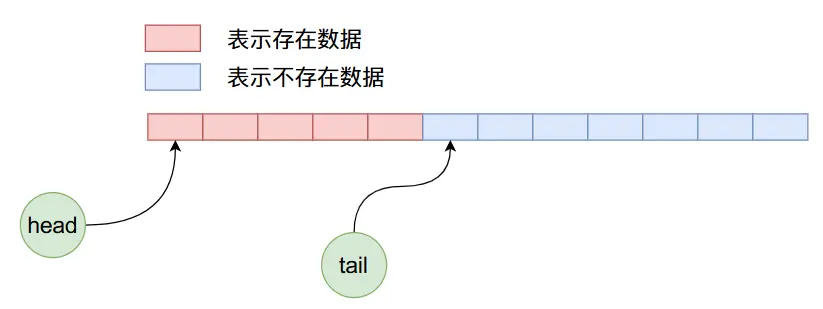
現在我們刪除4個數據,那麼上圖經過4次刪除操作之後,ArrayQueue內部數據佈局如下:
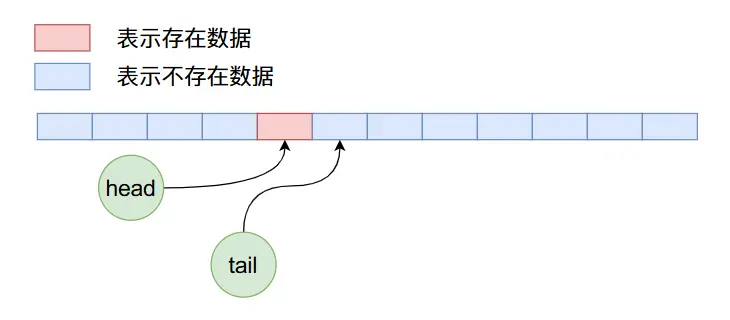
在上面的狀態下,我們繼續加入8個數據,那麼佈局情況如下:
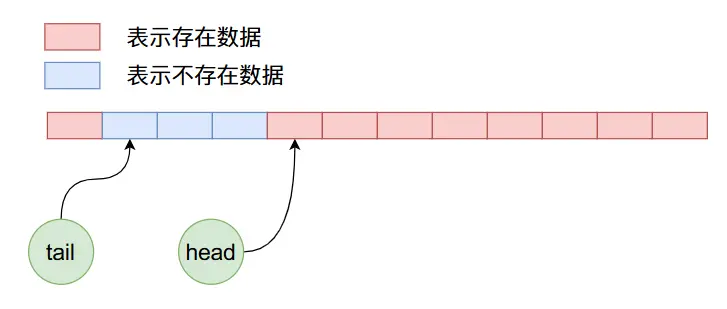
我們知道上圖在加入數據的時候不僅將數組後半部分的空間使用完了,而且可以繼續使用前半部分沒有使用過的空間,也就是説在ArrayQueue內部實現了一個循環使用的過程。
ArrayQueue源碼剖析
構造函數
public ArrayQueue(int capacity) {
    this.capacity = capacity + 1;
    this.queue = newArray(capacity + 1);
    this.head = 0;
    this.tail = 0;
}

@SuppressWarnings("unchecked")
private T[] newArray(int size) {
    return (T[]) new Object[size];
}
上面的構造函數的代碼比較容易理解,主要就是根據用户輸入的數組空間長度去申請數組,不過他具體在申請數組的時候會多申請一個空間。
add函數
public boolean add(T o) {
    queue[tail] = o;
    // 循環使用數組
    int newtail = (tail + 1) % capacity;
    if (newtail == head)
        throw new IndexOutOfBoundsException("Queue full");
    tail = newtail;
    return true; // we did add something
}上面的代碼也相對比較容易看懂,在上文當中我們已經提到了ArrayQueue可以循環將數據加入到數組當中去,這一點在上面的代碼當中也有所體現。
remove函數
public T remove(int i) {
    if (i != 0)
        throw new IllegalArgumentException("Can only remove head of queue");
    if (head == tail)
        throw new IndexOutOfBoundsException("Queue empty");
    T removed = queue[head];
    queue[head] = null;
    head = (head + 1) % capacity;
    return removed;
}從上面的代碼當中可以看出,在remove函數當中我們必須傳遞參數0,否則會拋出異常。而在這個函數當中我們只會刪除當前head下標所在位置的數據,然後將head的值進行循環加1操作。
get函數
public T get(int i) {
    int size = size();
    if (i < 0 || i >= size) {
        final String msg = "Index " + i + ", queue size " + size;
        throw new IndexOutOfBoundsException(msg);
    }
    int index = (head + i) % capacity;
    return queue[index];
}get函數的參數表示得到第i個數據,這個第i個數據並不是數組位置的第i個數據,而是距離head位置為i的位置的數據,瞭解這一點,上面的代碼是很容易理解的。
resize函數
public void resize(int newcapacity) {
    int size = size();
    if (newcapacity < size)
        throw new IndexOutOfBoundsException("Resizing would lose data");
    newcapacity++;
    if (newcapacity == this.capacity)
        return;
    T[] newqueue = newArray(newcapacity);
    for (int i = 0; i < size; i++)
        newqueue[i] = get(i);
    this.capacity = newcapacity;
    this.queue = newqueue;
    this.head = 0;
    this.tail = size;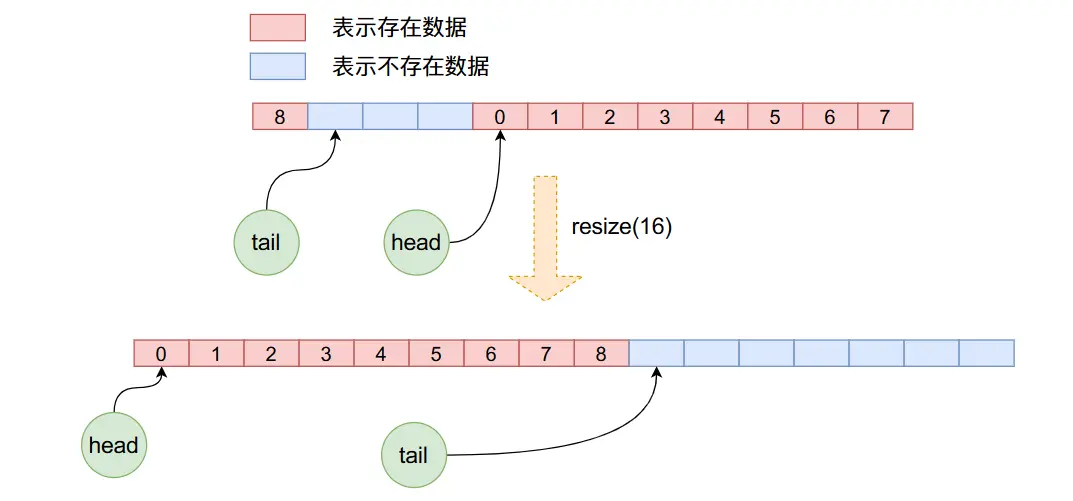
}在resize函數當中首先申請新長度的數組空間,然後將原數組的數據一個一個的拷貝到新的數組當中,注意在這個拷貝的過程當中,重新更新了head與tail,而且並不是簡單的數組拷貝,因為在之前的操作當中head可能已經不是了0,因此新的拷貝需要我們一個一個的從就數組拿出來,讓後放到新數組當中。下圖可以很直觀的看出這個過程:
總結
在本篇文章當中主要給大家介紹了ArrayQueue的內部實現過程和原理,並且看了ArrayQueue的源代碼,有圖的輔助整個閲讀的過程應該是比較清晰的,ArrayQueue也是一個比較簡單的容器,JDK對他的實現也比較簡單。
以上就是本文所有的內容了,希望大家有所收穫,我是LeHung,我們下期再見!!!(記得點贊收藏哦!)
更多精彩內容合集可訪問項目:https://github.com/Chang-LeHu...
關注公眾號:一無是處的研究僧,瞭解更多計算機(Java、Python、計算機系統基礎、算法與數據結構)知識。