


前言
本篇博客主要是記錄手寫這些這數據結構的底層實現,加深對線性結構的理解,實現自己的一個小型數據結構庫,也會進行簡單的時間複雜度分析,對不同的實現進行比較和優化,即側重於代碼實現。由於數據結構是實踐性比較強的一個科目,希望大家在看這篇博客時,自己也去寫一下代碼,看一下運行結果是不是自己想要的,我也會貼出我的運行結果來進行分析。
數組
數組介紹
數組是在內存中存儲相同數據類型的連續的空間,最大的優點:查詢快速。
數組最好應用於“索引有語意”的情況,例如索引代表學生學號,我們可以根據學號獲取這個學生對象的信息。但並非所有有語意的索引都適用於數組,例如身份證號,我們不可能拿身份證號作為索引,因為身份證長度是18位數,而且身份證號也不是連續的,這樣會浪費很大的內存空間。
數組也可以處理“索引沒有語意”的情況,若索引沒有語意時,如何表示沒有元素?我們應該如何去添加元素、如何去刪除元素呢?為了解決這些問題,我們可以基於Java的數組,二次封裝屬於我們自己的數組。
自定義數組
我們通過創建一個自定義數組,來實現對數組的增刪改查,以及數組進行擴容,現在我們先通過定義一個整型數組來實現,後面再通過泛型來達到通用的效果。
1.先創建一個實體類:Array
public class Array {

    private int[] data;
    private int size;

}
2.為我們的數組添加一些基本的方法,比如構造器、獲取數組容量大小、獲取數組中元素個數、判斷數組是否為空、判斷是否包含某個元素的方法
    //有參構造--- 根據用户分配的初始容量進行創建數組
    public Array(int capacity){
        data = new int[capacity];
        size = 0;
    }

    //創建無參構造 --- 當用户未指定初始容量時,我們可以設置一個初始容量大小
    public Array(){
        this(10);
    }

    //創建一個獲取容量大小的方法
    public int getCapacity(){
        return data.length;
    }

    //創建一個獲取數組中元素個數的方法
    public int getSize(){
        return size;
    }

    //判斷數組是否為空
    public boolean isEmpty(){
        return size == 0;
    }

    //是否包含某個元素
    public boolean contains(int e) {
        for(int i = 0; i < this.size; ++i) {
            if (this.data[i] == e) {
                return true;
            }
        }
        return false;
    }
實現數組的增刪改查方法
1.向數組中添加元素
在指定索引位置添加一個新元素
    // 在指定索引的位置插入一個新元素e
    public void add(int index, int e){
        //判斷索引是否合法
        if(index < 0 || index > size){
            throw new IllegalArgumentException("Add failed. Require index >= 0 and index <= size.");
        }
        //判斷數組是否已滿
        if(size == data.length){
            throw new IllegalArgumentException("Add failed. Array is full.");
        }
        //把索引為index以及index之後的元素,都向右移動一個位置
        for(int i = size - 1; i >= index ; i --){
            data[i + 1] = data[i];
        }
        //在指定index的位置添加新元素e
        data[index] = e;
        //維護size的值
        size ++;
    }
在所有元素前添加一個新元素
    // 在所有元素前添加一個新元素
    public void addFirst(int e){
        add(0, e);
    }
在所有元素後添加一個新元素
    // 在所有元素前添加一個新元素
    public void addLast(int e){
        add(size, e);
    }
2.修改數組中的元素
通過索引修改數組中的元素
    public void set(int index, int e){
        if(index < 0 || index >= size)
            throw new IllegalArgumentException("Set failed. Index is illegal.");
        //由於數組支持隨機訪問,根據索引即可找到所需要修改的元素
        data[index] = e;
    }
3.查找元素
通過index索引,獲取元素
    public int get(int index){
        //判斷用户輸入的索引值是否合法
        if(index < 0 || index >= size)
            throw new IllegalArgumentException("Get failed. Index is illegal.");
        return data[index];
    }
查找某個元素的索引
    public int find(int e) {
        for(int i = 0; i < this.size; ++i) {
            if (this.data[i] == e) {
                return i;
            }
        }
        //未找到該元素,則返回-1
        return -1;
    }
4.刪除元素
刪除指定位置的元素,並返回刪除的元素
    // 從數組中刪除index位置的元素, 返回刪除的元素
    public int remove(int index){
        //索引合法性判斷
        if(index < 0 || index >= size)
            throw new IllegalArgumentException("Remove failed. Index is illegal.");
        //保存待刪除的元素
        int ret = data[index];
        //把index位置之後的所有元素,都向左移動一個位置
        for(int i = index + 1 ; i < size ; i ++)
            data[i - 1] = data[i];
        //維護size的值
        size --;
        return ret;
}-
刪除第一個元素
  // 從數組中刪除第一個元素, 返回刪除的元素
  public int removeFirst(){
      return remove(0);
  }
刪除最後一個元素
  public int removeLast(){
      return remove(size - 1);
  }
刪除數組中的指定元素
  // 從數組中刪除元素e
  public void removeElement(int e){
      int index = find(e);
      if(index != -1)
          remove(index);
  }
5.重寫toString()
  @Override
  public String toString(){
      //通過StringBuilderl來拼接字符串
      StringBuilder res = new StringBuilder();
      //自定義輸出格式
      res.append(String.format("Array: size = %d , capacity = %d\n", size, data.length));
      res.append('[');
      for(int i = 0 ; i < size ; i ++){
          res.append(data[i]);
          if(i != size - 1)
              res.append(", ");
      }
      res.append(']');
      return res.toString();
  }
對我們數組的增刪改查方法進行測試,我們可以在主函數中進行測試:
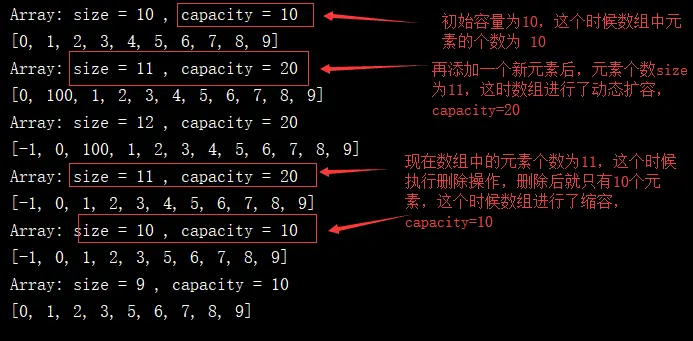
  public static void main(String[] args) {
      Array arr = new Array(20);
      for(int i = 0 ; i < 10 ; i ++){
          //執行添加元素操作 --- 新增到元素末尾
          arr.addLast(i);
      }
      System.out.println(arr);// [0, 1, 2, 3, 4, 5, 6, 7, 8, 9]

      //將新元素插入到指定位置
      arr.add(1, 100);
      System.out.println(arr);// [0, 100, 1, 2, 3, 4, 5, 6, 7, 8, 9]

      //將新元素添加到第一個位置
      arr.addFirst(-1);
      System.out.println(arr);// [-1, 0, 100, 1, 2, 3, 4, 5, 6, 7, 8, 9]

      //刪除指定位置的元素
      arr.remove(2);
      System.out.println(arr);// [-1, 0, 1, 2, 3, 4, 5, 6, 7, 8, 9]

      //刪除指定元素
      arr.removeElement(4);
      System.out.println(arr);// [-1, 0, 1, 2, 3, 5, 6, 7, 8, 9]

      //刪除第一個位置的元素
      arr.removeFirst();
      System.out.println(arr);// [0, 1, 2, 3, 5, 6, 7, 8, 9]
  }
經測試,我們自定義數組的增刪改查等基本操作已經實現了,不過我們現在寫的自定義數組,只能存儲整型數據,為了適用性更好,我們可以把我們的自定義數組改為泛型,如下:
public class Array<E> {

  private E[] data;
  private int size;

  public Array(int capacity){
      //無法定義為new E[capacity] ,使因為jdk1.5之後才支持泛型的,由於歷史版本遺留問題
      // 這裏只能進行強轉
      this.data = (E[]) new Object[capacity];
      this.size = 0;
  }

  //創建無參構造 --- 當用户未指定初始容量時,我們可以設置一個初始容量大小
  public Array(){
      this(10);
  }

  //創建一個獲取容量大小的方法
  public int getCapacity(){
      return this.data.length;
  }

  //創建一個獲取數組中元素個數的方法
  public int getSize() {
      return this.size;
  }

  //判斷數組是否為空
  public boolean isEmpty() {
      return this.size == 0;
  }

  // 向所有元素後添加一個新元素
  public void addLast(E e){
//        //判斷數組中是否還有空位置
//        if (size == data.length) {
//            throw new IllegalArgumentException("AddLast failed. Array is full.");
//        }
//        //因為size始終表示數組中元素為空的第一個索引
//        data[size] = e;
//        //添加元素後,需要改變size的值
//        size++;
      add(size,e);
  }

  //在所有元素前添加一個新元素 --- 將新元素添加到索引為0的位置
  public void addFirst(E e){
//        //判斷數組中是否還有空位置
//        if (size == data.length) {
//            throw new IllegalArgumentException("AddLast failed. Array is full.");
//        }
//        //需要將所有元素向後移一個位置,然後把新元素加入到索引為0的位置
//        for(int i = size - 1; i >= 0 ; i --){
//            //向後賦值
//            data[i + 1] = data[i];
//        }
//        data[0] = e;
//        size ++;
      add(0,e);
  }

  // 在指定索引的位置插入一個新元素e
  public void add(int index, E e){

      if(size == data.length){
          throw new IllegalArgumentException("Add failed. Array is full.");
      }

      if(index < 0 || index > size){
          throw new IllegalArgumentException("Add failed. Require index >= 0 and index <= size.");
      }

      for(int i = size - 1; i >= index ; i --){
          data[i + 1] = data[i];
      }
      data[index] = e;
      size ++;
  }

  // 獲取index索引位置的元素
  public E get(int index){
      //判斷用户輸入的索引值是否合法
      if(index < 0 || index >= size)
          throw new IllegalArgumentException("Get failed. Index is illegal.");
      return data[index];
  }

  //查找某個元素的索引
  public int find(E e) {
      for(int i = 0; i < this.size; ++i) {
          if (this.data[i] == e) {
              return i;
          }
      }
      return -1;
  }

  // 修改index索引位置的元素為e
  public void set(int index, E e){
      if(index < 0 || index >= size)
          throw new IllegalArgumentException("Set failed. Index is illegal.");
      data[index] = e;
  }

  //是否包含某個元素
  public boolean contains(E e) {
      for(int i = 0; i < this.size; ++i) {
          if (this.data[i] == e) {
              return true;
          }
      }
      return false;
  }

  //刪除指定位置的元素
  public void remove(int index) {
      //索引合法性判斷
      if (index >= 0 && index < this.size) {
          for(int i = index + 1; i < this.size; ++i) {
              //向前賦值
              this.data[i - 1] = this.data[i];
          }
          //刪除元素後,修改size的值
          --this.size;
      } else {
          throw new IllegalArgumentException("Remove failed. Index is illegal.");
      }
  }

  //刪除第一個元素
  public void removeFirst() {
      this.remove(0);
  }

  //刪除最後一個元素
  public void removeLast() {
      this.remove(this.size - 1);
  }

  //刪除數組中的指定元素
  public void removeElement(E e) {
      //先查找指定元素所在的索引位置
      int index = this.find(e);
      //刪除指定索引位置的元素
      this.remove(index);
  }


  @Override
  public String toString(){

      StringBuilder res = new StringBuilder();
      res.append(String.format("Array: size = %d , capacity = %d\n", size, data.length));
      res.append('[');
      for(int i = 0 ; i < size ; i ++){
          res.append(data[i]);
          if(i != size - 1)
              res.append(", ");
      }
      res.append(']');
      return res.toString();
  }
}
修改為泛型之後,我們可以通過自定義一個學生類,來使用我們的自定義數組進行增刪查改操作,測試是否有問題:
public class Student {
  private String name;
  private int score;

  public Student(String studentName, int studentScore) {
      this.name = studentName;
      this.score = studentScore;
  }

  public String toString() {
      return String.format("Student(name: %s, score: %d)", this.name, this.score);
  }

  public static void main(String[] args) {
      Array arr = new Array();
      //執行添加元素操作 --- 新增到元素末尾
      arr.addLast(new Student("Lucy", 100));
      arr.addLast(new Student("Bob", 66));
      arr.addLast(new Student("Tina", 88));
      System.out.println(arr);

      //刪除指定位置的元素
      arr.remove(2);
      System.out.println(arr);

      //將新元素插入到指定位置
      arr.add(1,new Student("LiHua", 75));
      System.out.println(arr);
  }
}
動態數組
當數組中的元素存滿時,再執行添加操作,這個時候會拋出數組元素已滿的異常信息,我們希望我們的自定義數組可以進行動態擴容,我們可以通過寫一個重置數組容量的方法,這個方法只允許在數組類內部調用,不允許用户直接調用,所以需要設置成私有的。
  //將數組空間的容量變成newCapacity大小
  private void resize(int newCapacity){
      E[] newData = (E[]) new Object[newCapacity];
      for (int i=0;i<size;i++){
          newData[i] = data[i];
      }
      data = newData;
  }
寫好了resize()後,現在讓我們來重寫之前的添加和刪除方法:
添加操作:為了防止在添加的時候,拋出數組已滿的異常,我們可以在向數組中添加元素的時候,判斷數組受否已滿,若滿了,則進行擴容操作,這裏我們擴容為原來的2倍public void add(int index, E e){ if(index < 0 || index > size){ throw new IllegalArgumentException("Add failed. Require index >= 0 and index <= size."); } if(size == data.length){ //throw new IllegalArgumentException("Add failed. Array is full."); //若數組滿了,則進行擴容操作 this.resize(data.length * 2); } for(int i = size - 1; i >= index ; i --){ data[i + 1] = data[i]; } data[index] = e; size ++; }刪除操作:為了不浪費內存,在刪除元素時,我們可以判斷數組中元素的個數是否是數組容量的一半,若是的話,這個時候就對數組進行縮容操作,以達到節省內存的目的
  // 從數組中刪除index位置的元素, 返回刪除的元素
  public E remove(int index){
      if(index < 0 || index >= size)
          throw new IllegalArgumentException("Remove failed. Index is illegal.");

      E ret = data[index];
      for(int i = index + 1 ; i < size ; i ++)
          data[i - 1] = data[i];
      size --;
      data[size] = null; // 方便GC機制回收
      //當數組的元素個數為數組長度的一半時,進行縮容操作
      if(size == data.length / 2)
          resize(data.length / 2);
      return ret;
  }
現在我們來測試我們的擴容和縮容方法:
  public static void main(String[] args) {

      Array<Integer> arr = new Array<>();
      for(int i = 0 ; i < 10 ; i ++)
          arr.addLast(i);
      System.out.println(arr);

      arr.add(1, 100);
      System.out.println(arr);

      arr.addFirst(-1);
      System.out.println(arr);

      arr.remove(2);
      System.out.println(arr);

      arr.removeElement(4);
      System.out.println(arr);

      arr.removeFirst();
      System.out.println(arr);
  }
運行結果分析:
時間複雜度分析
常見的算法複雜度:O(1),O(n),O(lgn),O(nlgn),O(n^2)
大O描述的是算法的運行時間和輸入數據之間的關係
例如下面這段代碼:public static int sum(int[] nums){ int sum = 0; for (int num : nums) { sum = sum + num; } return sum; }這段代碼的算法複雜度為O(n)。n是nums中的元素個數,這個算法的運行時間是和nums中元素的個數呈線性關係的。好了,上面是關於算法複雜度的簡單描述,我們來看下我們自定義數組中添加操作的算法複雜度吧:
- 添加操作:由於算法複雜度是按照最壞的情況來計算的,所以這裏添加的算法複雜度為O(n)
addLast(e) -------- O(1)
addFirst(e) --------- O(n),因為向數組中第一個元素位置添加元素,需要將這些元素都向右移動一個位置,這和元素的個數呈線性關係,若數組中元素的個數越多,組需要花費的時間越長
add(index,e) ----- O(n/2) =O(n) - 刪除操作同添加操作,算法複雜度為O(n)
- 修改操作的算法複雜度為O(1),這個是數組的最大優勢,也就是支持隨機訪問,只要我們知道所查元素的索引。
-
查找操作:get(index) --- O(1) ,contains(e)和find(e)的時間複雜度都為O(n),因為需要遍歷這個數據中的所有元素。
棧
棧介紹
棧也是一種線性結構,相比數組,棧對應的操作是數組的子集。棧只能從一端添加元素,也只能從這端取出元素,這一端成為棧頂,棧是一種“先進後出”的數據結構,即 LIFO(Last In First Out)
一些常見的棧應用:比如:撤銷操作,程序調用的系統棧,括號匹配等問題。
棧中常用的方法:
void push(Object obj); //進棧
Object pop(); //出棧
Object peek(); //查看棧頂的元素
int getSize(); //查看棧中元素的個數
boolean isEmpty(); //判斷棧是否為空
定義棧接口
由於用户在調用棧進行操作時,完全不用關心棧的底層是如何實現的,因此我們可以定義一個 接口來供用户調用,下面就讓我們基於之前實現的自定義動態數組,來實現棧的這些基本操作:
public interface Stack<E> {

    /**
     * 獲取棧中元素的個數
     * @return
     */
    int getSize();

    /**
     * 判斷棧是否為空
     * @return
     */
    boolean isEmpty();

    /**
     * 入棧
     * @param e
     */
    void push(E e);

    /**
     * 出棧
     * @return
     */
    E pop();

    /**
     * 查看棧頂元素
     * @return
     */
    E peek();
}
基於數組實現棧的基本操作
public class ArrayStack<E> implements Stack<E> {

    //這裏的Array是我們的自定義動態數組
    private Array<E> array;

    //有參構造器,為棧分配指定空間
    public ArrayStack(int capacity) {
        this.array = new Array(capacity);
    }

    //無參構造器,調用動態數組的無參構造進行賦值
    public ArrayStack(){
        this.array = new Array<>();
    }

    //獲取棧的容量
    public int getCapacity() {
        return this.array.getCapacity();
    }

    @Override
    public int getSize() {
        //直接調用動態數組的getSize()
        return this.array.getSize();
    }

    @Override
    public boolean isEmpty() {
        return this.array.isEmpty();
    }

    @Override
    public void push(E e) {
        //向棧中添加元素,調用動態數組的向最後一個元素位置的添加方法
        this.array.addLast(e);
    }

    @Override
    public E pop() {
        //獲取棧頂的元素,即動態數組的最後一個元素
        E e = this.array.get(array.getSize() - 1);
        //刪除動態數組中最後一個元素
        this.array.removeLast();
        return e;
    }

    @Override
    public E peek() {
        return this.array.get(array.getSize() - 1);
    }

    //重寫toString()
    @Override
    public String toString() {
        StringBuilder res = new StringBuilder();
        res.append("Stack: ");
        res.append('[');
        for (int i=0; i<this.getSize(); i++){
            res.append(this.array.get(i));
            if (i != this.getSize()-1 ){
                res.append(',');
            }
        }
        res.append("] top");
        return res.toString();
    }

}
現在來測試我們基於動態數組實現的棧:
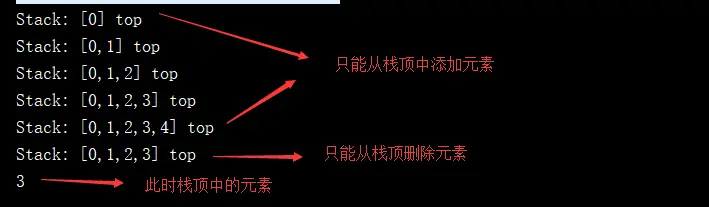
    public static void main(String[] args) {
        Stack<Integer> stack = new ArrayStack();

        for(int i = 0; i < 5; ++i) {
            //入棧
            stack.push(i);
            System.out.println(stack);
        }
        //出棧
        stack.pop();
        System.out.println(stack);
        //打印出棧頂的元素
        System.out.println(stack.peek());
    }
測試代碼的運行結果分析:
使用棧實現“括號匹配”問題
該問題是leetcode官網上的一個問題,題目描述如圖:
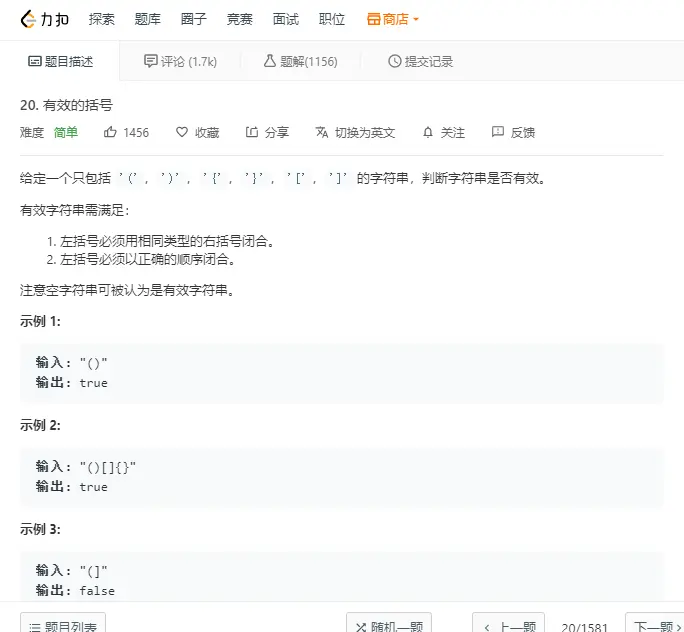
關於括號匹配問題,具體實現如下:
public boolean isValid(String s) {

        Stack<Character> stack = new Stack<>();

        for (int i=0; i<s.length(); i++){
            if (s.charAt(i) != '(' && s.charAt(i) != '[' && s.charAt(i) != '{'){
                if (stack.isEmpty()) return false;
                char topChar = stack.pop();
                if (topChar == '(' && s.charAt(i) != ')') return false;
                if (topChar == '[' && s.charAt(i) != ']') return false;
                if (topChar == '{' && s.charAt(i) != '}') return false;
            }else {
                stack.push(s.charAt(i));
            }
        }
        return stack.isEmpty();
    }
隊列
隊列介紹
隊列也是一種線性結構,相比數組,隊列對應的操作是數組的子集,隊列只能從一端(隊尾)添加元素,只能從另一端(隊首)取出元素。隊列是一種先進先出的數據結構(先到先得),即FIFO(First In First Out).
隊列中常用的操作:
- void enqueue(Object obj); //入隊
- Object dequeue(); //出隊
- Object getFront(); //獲取隊首的元素
- int getSize(); //獲取隊列中元素的個數
-
boolean isEmpty(); //判斷隊列是否為空
定義隊列接口
和棧操作一樣,我們不需要讓用户知道隊列底層是如何實現的,只知道如何調用就行了,所以我們創建一個接口,包含這些隊列的基本方法:
public interface Queue<E> {

  /**
   * 入隊
   * @param e 入隊的元素
   */
  void enqueue(E  e);

  /**
   * 出隊
   * @return 出隊的元素
   */
  E dequeue();

  /**
   * 獲取隊首的元素
   * @return 隊首的元素
   */
  E getFront();

  /**
   * 判斷隊列是否為空
   * @return
   */
  boolean isEmpty();

  /**
   * 獲取隊列中的元素
   * @return
   */
  int getSize();
}
數組隊列
有了隊列接口後,我們現在來通過自定義的動態數組實現隊列的基本操作:
public class ArrayQueue<E> implements Queue<E>{

  private Array<E> array;


  //有參構造 --- 用户可以自定義隊列的大小
  public ArrayQueue(int capacity) {
      this.array = new Array<E>(capacity);
  }

  //無參構造
  public ArrayQueue(){
      array = new Array<E>();
  }

  //入隊操作 -- 相當於向動態數組末尾添加元素
  @Override
  public void enqueue(E e) {
      array.addLast(e);
  }

  //出隊操作 --- 相當於刪除動態數組的第一個元素
  @Override
  public E dequeue() {
      return array.removeFirst();
  }

  //獲取隊首的元素
  @Override
  public E getFront() {
      return array.getFirst();
  }

  //判斷隊列是否未空
  @Override
  public boolean isEmpty() {
      return array.isEmpty();
  }

  //返回隊列中元素的個數
  @Override
  public int getSize() {
      return array.getSize();
  }

  //獲取隊列的容量大小
  public int getCapacity(){
      return array.getCapacity();
  }

  //重寫toString() --- 自定義輸出格式
  @Override
  public String toString() {
      StringBuilder builder = new StringBuilder();
      builder.append("Queue: "); //隊列
      builder.append("front["); //隊首
      for (int i=0; i<array.getSize(); i++){
          builder.append(array.get(i));
          //如果不是最後一個元素,則在元素後面追加','
          if (i != array.getSize()-1 ){
              builder.append(",");
          }
      }
      builder.append("]trail"); //隊尾
      return builder.toString();
  }
}
數組隊列測試,我們可以住方法中寫我們的測試代碼:
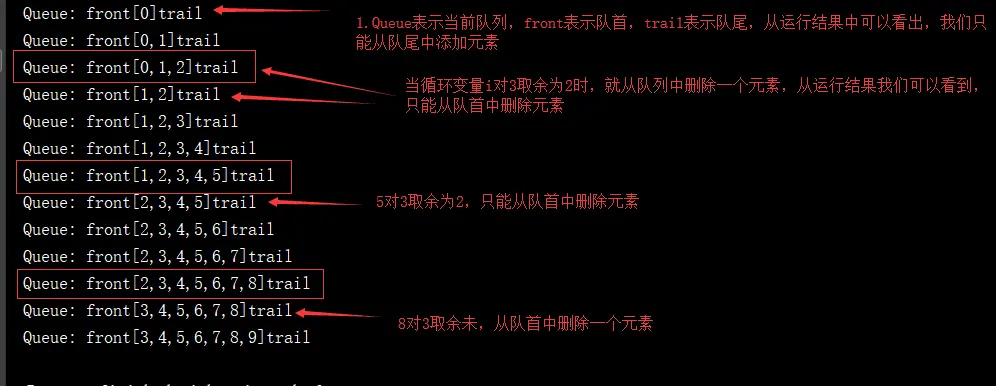
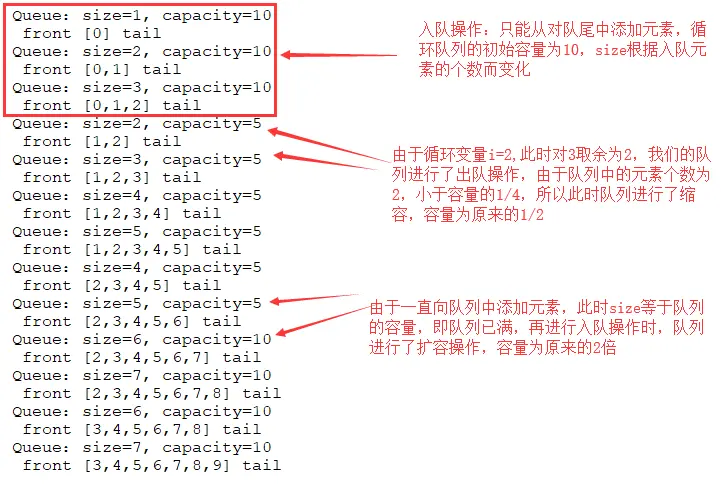
  public static void main(String[] args) {

      ArrayQueue<Integer> queue = new ArrayQueue<>();
      for(int i = 0 ; i < 10 ; i ++){
          queue.enqueue(i);
          System.out.println(queue);
          //當餘數為2時,就從隊列中刪除一個元素
          if(i % 3 == 2){
              queue.dequeue();
              System.out.println(queue);
          }
      }
  }
測試代碼的運行結果分析如下:
數組隊列的時間複雜度分析:
入隊:由於是向數組中最後一個元素末尾添加元素,不需要關心數組中元素的個數,所以時間複雜度為O(1);
出隊:由於出隊操作,我們始終是刪除的數組第一個元素,實際上是將待刪除的元素之後的所有元素都想前移動一個位置,所以出隊操作執行的時間與數組的中元素的個數呈線性關係,時間複雜度為O(n).循環隊列
由於數組隊列的出隊操作的時間複雜度為O(n),效率是比較低的,為了提升程序性能,降低時間複雜度,讓出隊操作的時間複雜度也是O(1),我們引入了循環隊列。
循環隊列的實現思路:
我們可以使用Java給我們提供的數組來表示隊列,並且定義兩個變量,一個變量(front)用來表示隊首元素所在的索引,另一個變量(tail)表示隊尾待添加元素的索引,這樣在入隊時,直接將元素天添加到隊尾位置就可以了,即索引為trail的位置;在進行出隊操作時,我們也可以通過front索引來獲取隊首元素,並進行刪除,這樣就可以實現隊列的入隊和出隊操作的時間複雜度都為O(1)了。同時為了節約空間內存,刪除元素後,釋放的空間,我們在添加新的元素時,是可以放在這些位置上的,就像一個環一樣,不過要留出一個空位置,用來表示這個隊列為空,即當front == tai時表示為空。
代碼實現如下:public class LoopQueue<E> implements Queue<E> { //注意這裏的data類型為E[],並不是Array private E[] data; //隊首元素的索引 private int front; //隊尾待添加元素的索引 private int tail; //隊列中元素的個數 private int size; //有參構造 public LoopQueue(int capacity){ //這裏要比用户分配的空間多1,是為了處理循環隊列為空和已滿的問題 this.data = (E[])new Object[capacity+1]; this.front = 0; this.tail = 0; this.size = 0; } //無參構造 public LoopQueue(){ this(10); } //判斷隊列是否未空 @Override public boolean isEmpty() { return this.front == this.tail; } //獲取隊列中元素的個數 @Override public int getSize() { return this.size; } //獲取隊列的容量 public int getCapacity() { //這這裏需要減去1,因為這一個空間是輔助我們去實現循環隊列入隊出隊操作的 return this.data.length - 1; } //獲取隊首的元素 @Override public E getFront() { //判斷隊列是否為空 if (this.isEmpty()){ throw new IllegalArgumentException("Queue is empty."); } return this.data[this.front]; } //入隊操作 @Override public void enqueue(E e) { //判斷隊列是否已滿 if ((this.tail+1) % this.data.length == this.front){ //若滿了,則對該隊列進行擴容 this.resize(getCapacity() * 2); } //將該元素加入隊尾 this.data[this.tail] = e; //修改tail的值 -- 需要考慮到tail的值是(data.length-1)時 this.tail = (this.tail+1) % data.length; //修改size的值 this.size ++ ; } //出隊操作 @Override public E dequeue() { //判斷隊列是否為空 if (this.isEmpty()){ throw new IllegalArgumentException("Cannot dequeue from an empty queue."); }else { //獲取隊首的元素 E e = this.data[this.front]; //修改front的值 this.front = (this.front + 1) % this.data.length; //修改size的值 --this.size; //為了節約空間,當隊列中的元素為當前隊列的1/4時,進行縮容 //要保證空間縮容為原來的1/2時,容量不為0 if (this.size == this.getCapacity() / 4 && this.getCapacity() / 2 != 0){ this.resize(this.getCapacity()/2); } return e; } } //修改隊列的空間大小 private void resize(int capacity){ //創建一個新數組 E[] newData = (E[])(new Object[capacity+1]); //把原隊列中的值放入新數組中 for (int i=0; i<this.size; i++){ //注意:要保持隊列的數據結構特性,即需要保持數據的先進先出的數據格式 //注意超出數組長度的情況 -- 通過對數組長度取餘數來避免 newData[i] = this.data[(i + this.front) % this.data.length ]; } this.data = newData; this.front = 0; this.tail = this.size; } //重寫toString() --- 自定義我們的輸出格式 @Override public String toString() { StringBuilder builder = new StringBuilder(); //獲取當前 隊列的元素個數和容量大小 builder.append(String.format("Queue:size=%d, capacity=%d\n ",this.getSize(),this.getCapacity())); //隊首 builder.append("front ["); //取餘數是為了防止下標越界 for (int i = this.front;i != this.tail;i = (i+1)%this.data.length){ builder.append(this.data[i]); if ((i+1) % this.data.length != tail){ builder.append(","); } } builder.append("] tail"); return builder.toString(); } }我們在主方法中寫我們的測試代碼:
  public static void main(String[] args) {
      Queue<Integer> queue = new LoopQueue();

      for(int i = 0; i < 10; ++i) {
          queue.enqueue(i);
          System.out.println(queue);
          if (i % 3 == 2) {
              queue.dequeue();
              System.out.println(queue);
          }
      }

  }
測試代碼的運行結果分析:
數組隊列和循環隊列的性能比較
現在循環隊列就已經實現了,前面説到循環隊列的入隊和出隊操作的時間複雜度都為O(1),而數組隊列的出隊操作的時間複雜度為O(n),現在讓我們來簡單設計一個程序, 來比較數組隊列和循環隊列進行入隊操作和出隊操作所需要的時間吧。
public class QueueCompare {

  //測試隊列進行入隊和出隊操作所花費的時間
  public static Long testQueue(Queue<Integer> queue,int num){
      //獲取系統的當前時間 --- 毫秒
      long startTime = System.currentTimeMillis();
      Random random = new Random();
      int i;
      for (i=0; i<num; i++){
          //在隊列中添加一個整數範圍內的隨機數
          queue.enqueue(random.nextInt(Integer.MAX_VALUE));
      }
      for (i=0; i<num; i++){
          //出隊操作
          queue.dequeue();
      }
      //獲取進行入隊和出隊操作後的當前時間 --- 毫秒
      long endTime = System.currentTimeMillis();
      return endTime-startTime;
  }

  public static void main(String[] args) {
      //比較10萬個整數的入隊和出隊操作所花費的時間
      int num = 100000;
      //數組隊列耗時
      Queue<Integer> arrayQueue = new ArrayQueue<>();
      Long time1 = testQueue(arrayQueue, num);
      System.out.println("ArrayQueue, time: " + time1 + " ms");
      //循環隊列耗時
      Queue<Integer> loopQueue = new LoopQueue<>();
      Long time2 = testQueue(loopQueue, num);
      System.out.println("loopQueue, time: " + time2 + " ms");

  }

}
在我這台電腦上的運行結果如下:
我們可以從結果中看到,運行結果差距還是很大的,所以這也體現了算法的重要性,以及O(n)和O(1)的區別。鏈表:最基礎的動態數據結構
鏈表介紹
鏈表也是一種線性結構,但與數組、棧和隊列不同的是,鏈表是一種動態數據結構。雖然 我們創建的動態的數組也能進行擴容操作,但底層是依賴於靜態數組的,其實質還是靜態數據結構。
為什麼鏈表很重要?
1.鏈表是真正的動態數據結構,也是最簡單的動態數據結構
2.鏈表可以幫助我們更深入的理解引用(即C語言種的指針)
3.幫助我們更深入的理解遞歸
4.輔助組成其他的數據結構
鏈表數據存儲在“節點”中(Node)中,其優點是真正的動態,不需要處理固定容量的問題,但缺點正是數組的優點,就是喪失了隨機訪問能力。數組最好用於索引有語意的情況,它最大的優點是支持快速查詢,即支持隨機訪問;而鏈表不適合用於索引有語意的情況,它最大的有點是動態的。
鏈表的最基本元素是節點,現在讓我們自己手動來寫一個最簡單的鏈表類:public class LinkedList<E> { //鏈表的頭結點 private Node head; //鏈表的長度 private int size; //以為鏈表是動態的數據結構,所以不需要分配容量 public LinkedList(){ this.head = null; this.size = 0; } // 獲取鏈表中元素的個數 public int getSize(){ return this.size; } // 返回鏈表是否為空 public boolean isEmpty(){ return size == 0; } //設置成為內部類,是為了對用户屏蔽鏈表的內部實現 private class Node{ //存儲這個節點的數據 public E e; //指向下一個節點的引用 public Node next; public Node(E e, Node next) { this.e = e; this.next = next; } public Node(E e){ this(e, null); } public Node(){ this(null, null); } //我們只需要輸出這個節點的數據信息 @Override public String toString() { return e.toString(); } } }實現鏈表的增刪改查操作
在自己手寫鏈表底層實現的時候,有不用懂得最好用筆和紙,把這些節點的指向關係畫出來,因為圖形化的才是最直觀的,也能幫助我們更好的理解。
1.向鏈表中添加元素// 在鏈表頭添加新元素 public void addFirst(E e){ // Node node = new Node(e); // node.next = head; // head = node; //上面三行代碼可以合併成一行代碼 head = new Node(e, head); size ++; } // 在鏈表的index(0-based)位置添加新元素e // 在鏈表中index並不是一個常用的操作,因為鏈表不支持隨機訪問 public void add(int index,E e){ //判斷index是否合法 //注意:與數組不同的是,鏈表這裏的index是可以等於size的,此時表示在鏈表末尾添加元素 if (index <0 || index > size){ throw new IllegalArgumentException("Add failed. Illegal index."); } //判斷是否是向頭節點中添加元素 if (index == 0){ this.addFirst(e); }else { Node prev = head; for (int i = 0;i< index-1 ;i++){ prev = prev.next; } // Node node = new Node(e); // node.next = prev.next; // prev.next = node; //上面三行代碼可以合併成一行代碼 prev.next = new Node(e,prev.next); size ++ ; } } //在鏈表末尾添加元素 public void addLast(E e){ this.add(size,e); }下面我們也可以通過為鏈表添加一個虛擬的頭結點,來實現鏈表的添加方法,就不用對頭結點進行單獨處理,如下:
  //設置虛擬頭結點
  private Node dummyHead;
  private int size;

  public LinkedList() {
      //虛擬頭結點不存數據,始終為空
      this.dummyHead = new Node();
      this.size = 0;
  }

  // 獲取鏈表中的元素個數
  public int getSize(){
      return size;
  }

  // 返回鏈表是否為空
  public boolean isEmpty(){
      return size == 0;
  }

  // 在鏈表的index(0-based)位置添加新的元素e
// 在鏈表中不是一個常用的操作,練習用:)
  public void add(int index,E e){
      //判斷索引是否合法
      if (index<0 || index > size){
          throw new IllegalArgumentException("Add failed. Illegal index.");
      }
      Node prev = dummyHead;
      for (int i=0; i<index; i++){
          prev = prev.next;
      }
      prev.next = new Node(e,prev.next);
      size ++ ;
  }

  // 在鏈表頭添加新的元素e
  public void addFirst(E e){
      this.add(0,e);
  }

  // 在鏈表末尾添加新的元素e
  public void addLast(E e){
      this.add(size,e);
  }
2.修改元素:下面我們使用為為鏈表添加一個虛擬頭結點的方式,來進行修改鏈表中的元素
  // 獲得鏈表的第index(0-based)個位置的元素
  public E get(int index){
      //這裏把index=size也排除是因為最後一個節點所指向的節點為空
      if (index < 0 || index >= size){
          throw new IllegalArgumentException("Get failed. Illegal index.");
      }
      Node curr = dummyHead.next;
      for (int i=0; i<index; i++){
          curr = curr.next;
      }
      return curr.e;
  }

  // 獲得鏈表的第一個元素
  public E getFirst(){
      return get(0);
  }

  // 獲得鏈表的最後一個元素
  public E getLast(){
      return get(size - 1);
  }

  // 查找鏈表中是否有元素e
  public boolean contains(E e){
      Node curr = dummyHead.next;
      while (curr != null){
          if (curr.e.equals(e)) return true;
          curr = curr.next;
      }
      return false;
  }
修改鏈表中的指定位置的元素
  // 修改鏈表的第index(0-based)個位置的元素為e
  public void set(int index,E e){
      if (index < 0 || index >= size){
          throw new IllegalArgumentException("Get failed. Illegal index.");
      }
      Node curr = dummyHead.next;
      for (int i=0; i<index; i++){
          curr = curr.next;
      }
      curr.e = e;
  }
3.刪除元素
 // 從鏈表中刪除index(0-based)位置的元素, 返回刪除的元素
  public E remove(int index){
      if (index < 0 || index >= size){
          throw new IllegalArgumentException("remove failed. Illegal index.");
      }

      Node prev = dummyHead;
      for (int i=0; i<index; i++){
          prev = prev.next;
      }

      //待刪除的元素
      Node delNode = prev.next;
      prev.next = delNode.next;
      //方便GC機制回收
      delNode.next = null;
      size -- ;
      return delNode.e;
  }

  // 從鏈表中刪除第一個元素, 返回刪除的元素
  public E removeFirst(){
      return this.remove(0);
  }

  // 從鏈表中刪除最後一個元素, 返回刪除的元素
  public E removeLast(){
      return this.remove(size-1);
  }

  // 從鏈表中刪除元素e
  public void removeElement(E e){
      Node prev = dummyHead;
      while ( prev.next != null ){
          //如果找到被刪除的元素,就跳出循環
          if (prev.next.e.equals(e)) break;
          prev = prev.next;
      }

      if (prev.next != null){
         Node delNode = prev.next;
         prev.next = delNode.next;
         delNode.next = null;
         size -- ;
      }
  }
重寫我們自定義鏈表的toString()
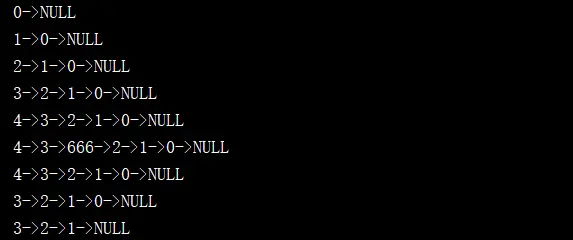
  @Override
  public String toString(){
      StringBuilder res = new StringBuilder();

      Node cur = dummyHead.next;
      while(cur != null){
          res.append(cur + "->");
          cur = cur.next;
      }
      res.append("NULL");

      return res.toString();
  }
對自定義鏈表的增刪改查方法進行測試:
  public static void main(String[] args) {
      LinkedList<Integer> linkedList = new LinkedList<>();
      for(int i = 0 ; i < 5 ; i ++){
          linkedList.addFirst(i);
          System.out.println(linkedList);
      }

      linkedList.add(2, 666);
      System.out.println(linkedList);

      linkedList.remove(2);
      System.out.println(linkedList);

      linkedList.removeFirst();
      System.out.println(linkedList);

      linkedList.removeLast();
      System.out.println(linkedList);
  }
測試代碼的運行結果如下:
通過自定義鏈表實現棧
public class LinkedStack<E> implements Stack<E> {
  //基於自定義鏈表實現棧結構
  private LinkedList<E> linkedList = new LinkedList<>();

  @Override
  public int getSize() {
      return this.linkedList.getSize();
  }

  @Override
  public boolean isEmpty() {
      return this.linkedList.isEmpty();
  }

  @Override
  public void push(E e) {
      this.linkedList.addFirst(e);
  }

  @Override
  public E pop() {
      return this.linkedList.removeFirst();
  }

  @Override
  public E peek() {
      return this.linkedList.getFirst();
  }

  @Override
  public String toString() {
      StringBuilder res = new StringBuilder();
      res.append("Stack: top ");
      res.append(this.linkedList);
      return res.toString();
  }

  //測試自定義棧
  public static void main(String[] args) {
      LinkedListStack<Integer> stack = new LinkedListStack();

      for(int i = 0; i < 5; ++i) {
          stack.push(i);
          System.out.println(stack);
      }

      stack.pop();
      System.out.println(stack);
  }
}
通過自定義鏈表實現隊列
public class LinkedListQueue<E> implements Queue<E> {

  //head指向頭結點,tail指向下次添加元素的位置
  private Node head, tail;
  private int size;

  //不寫也可以,和系統自動生成的無參構造器作用效果相同
  public LinkedListQueue(){
      head = null;
      tail = null;
      size = 0;
  }

  //入隊 -- 只能從隊尾添加元素
  @Override
  public void enqueue(E e) {
      if (tail == null){
          tail = new Node(e);
          head = tail;
      }else {
          tail.next = new Node(e);
          tail = tail.next;
      }
      size ++ ;
  }

  //出隊操作 -- 只能從隊首刪除元素
  @Override
  public E dequeue() {
      if (isEmpty()) {
          throw new IllegalArgumentException("Cannot dequeue from an empty queue.");
      }

      Node delNode = head;
      head = head.next;
      delNode.next = null;
      if (head == null) tail=null;
      size -- ;
      return delNode.e;
  }

  //獲取隊首的元素
  @Override
  public E getFront() {
      if(isEmpty())
          throw new IllegalArgumentException("Queue is empty.");
      return head.e;
  }

  @Override
  public boolean isEmpty() {
      return size == 0;
  }

  @Override
  public int getSize() {
      return size;
  }

  @Override
  public String toString() {
      StringBuilder res = new StringBuilder();
      res.append("Queue: front ");
      Node curr = head;
      while (curr != null){
          res.append(curr.e+"->");
          curr = curr.next;
      }
      res.append("NULL tail");
      return res.toString();
  }

  private class Node{
      public E e;
      public Node next;

      public Node(E e, Node next){
          this.e = e;
          this.next = next;
      }

      public Node(E e){
          this(e, null);
      }

      public Node(){
          this(null, null);
      }

      @Override
      public String toString(){
          return e.toString();
      }
  }


  public static void main(String[] args){

      LinkedListQueue<Integer> queue = new LinkedListQueue<>();
      for(int i = 0 ; i < 10 ; i ++){
          queue.enqueue(i);
          System.out.println(queue);

          if(i % 3 == 2){
              queue.dequeue();
              System.out.println(queue);
          }
      }
  }
}
運行結果:
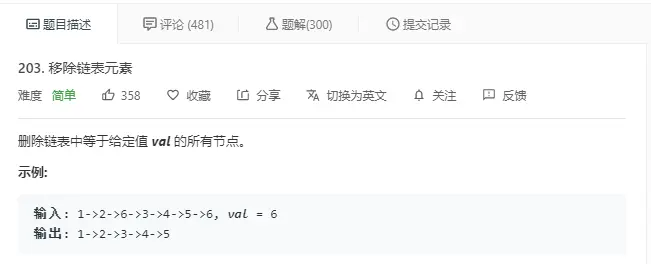
現在讓我們來看一個leetcode上關於鏈表的簡單例題,就是力扣上的203號題,題目描述如下:
實現如下://leetcode上的題:刪除給定鏈表中和指定元素相等的所有元素 public ListNode removeElements(ListNode head, int val) { //當給定的鏈表為空時,直接返回 if (head == null) { return head; }else { ListNode prev; //當頭節點的值和val相等時 --- 相當於刪除頭結點 while (head != null && head.val == val){ prev = head; head = head.next; prev.next = null; } prev = head; while (prev.next != null){ if (prev.next.val == val){ ListNode delNode = prev.next; prev.next = delNode.next; delNode.next = null; }else { prev = prev.next; } } } return head; }遞歸
我們在使用遞歸時,要注意遞歸函數的“宏觀語意”,遞歸函數就是一個函數,完成一個功能。可以理解為把待解決的複雜問題轉化為求解最基本的問題。
例1://計算arr[i...n)這個區間內所有數字的和 -- 使用遞歸 private static int sum(int[] arr,int i){ //把複雜為題化為求解最基本的問題 if (i == arr.length) return 0; //將sum(arr,I+1) 遞歸方法理解為為可以解決求arr[(i+1)...n)這個區間內所有數字的和 return arr[i] + sum(arr,i+1); } public static int sum(int[] arr){ return sum(arr, 0); }例2:使用遞歸解決刪除鏈表中元素的問題
思路:由於鏈表具有天然遞歸性,Node可以表示一個節點,也可以表示一個鏈表,所以我們可以把給定的鏈表分為頭結點和head.next,調用遞歸方法判斷head.next中師傅含有待刪除元素,然後返回已經刪除該元素的鏈表,在判斷頭結點中元素是否和待刪除元素相等,若相等則返回head.next,否則返回head,實現代碼如下:public ListNode removeElements(ListNode head, int val) { if (head == null) return head; ListNode res = removeElements(head.next, val); if (head.val == val) { return res; }else { head.next = res; return head; } }上述代碼也可以使用三目運算符來簡化我們的代碼,如下:
  public ListNode removeElements(ListNode head, int val) {
      if (head == null) return head;
      head.next = removeElements(head.next, val);
      return head.val == val ? head.next : head;
  }
遞歸在動態數據結構中是很常用的,因為很多問題使用遞歸比非遞歸更容易解決,在後面學習樹的過程中,我們也將頻繁使用遞歸,數據結構的線性結構學習筆記就記錄到這裏了。


本文已收錄至我的個人網站:程序員波特,主要記錄Java相關技術系列教程,共享電子書、Java學習路線、視頻教程、簡歷模板和麪試題等學習資源,讓想要學習的你,不再迷茫。


