

第四十九章 WiFi路由實驗
1)實驗平台:正點原子DNESP32S3開發板
2)章節摘自【正點原子】ESP32-S3使用指南—IDF版 V1.6
3)購買鏈接:https://detail.tmall.com/item.htm?&id=768499342659
4)全套實驗源碼+手冊+視頻下載地址:http://www.openedv.com/docs/boards/esp32/ATK-DNESP32S3.html
5)正點原子官方B站:https://space.bilibili.com/394620890
6)正點原子DNESP32S3開發板技術交流羣:132780729


本章節實驗作者把ESP32-S3配置為STA模式,即連接附近的熱點。STA模式相關知識請讀者查看上一章節的內容。
本章分為如下幾個小節:
49.1 硬件設計
49.2 軟件設計
49.3 下載驗證
49.1 硬件設計
1.例程功能
本章實驗功能簡介:掃描附近的WIFI信號,並連接到一個真實存在的 WIFI 熱點。
2.硬件資源
1)LED燈
LED-IO1
2)XL9555
IIC_INT-IO0(需在P5連接IO0)
IIC_SDA-IO41
IIC_SCL-IO42
3)SPILCD
CS-IO21
SCK-IO12
SDA-IO11
DC-IO40(在P5端口,使用跳線帽將IO_SET和LCD_DC相連)
PWR- IO1_3(XL9555)
RST- IO1_2(XL9555)
4)ESP32-S3內部WiFi
3.原理圖
本章實驗使用的WiFi為ESP32-S3的片上資源,因此並沒有相應的連接原理圖。
49.2 軟件設計
49.2.1 程序流程圖
程序流程圖能幫助我們更好的理解一個工程的功能和實現的過程,對學習和設計工程有很好的主導作用。下面看看本實驗的程序流程圖:
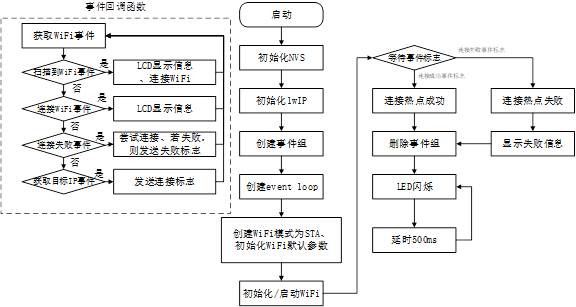
圖49.2.1.1 程序流程圖
49.2.2 程序解析
在本章節實驗中,我們只關心main.c文件內容即可,該文件內容如下:
i2c_obj_t i2c0_master;
/* 鏈接wifi名稱 */
#define DEFAULT_SSID        "123"
/* wifi密碼 */
#define DEFAULT_PWD         "aa1234567"
/* 事件標誌 */
static EventGroupHandle_t   wifi_event;
#define WIFI_CONNECTED_BIT  BIT0
#define WIFI_FAIL_BIT       BIT1
static const char *TAG = "static_ip";
char lcd_buff[100] = {0};

/* WIFI默認配置 */
#define WIFICONFIG()   {                            \
    .sta = {                                        \
        .ssid = DEFAULT_SSID,                       \
        .password = DEFAULT_PWD,                    \
        .threshold.authmode = WIFI_AUTH_WPA2_PSK,   \
    },                                              \
}

/**
 * @brief       鏈接顯示
 * @param       flag:2->鏈接;1->鏈接失敗;0->再鏈接中
 * @retval      無
 */
void connet_display(uint8_t flag)
{
    if(flag == 2)
    {
        lcd_fill(0,90,320,240,WHITE);
        sprintf(lcd_buff, "ssid:%s",DEFAULT_SSID);
        lcd_show_string(0, 90, 240, 16, 16, lcd_buff, BLUE);
        sprintf(lcd_buff, "psw:%s",DEFAULT_PWD);
        lcd_show_string(0, 110, 240, 16, 16, lcd_buff, BLUE);
    }
    else if (flag == 1)
    {
        lcd_show_string(0, 90, 240, 16, 16, "wifi connecting fail", BLUE);
    }
    else
    {
        lcd_show_string(0, 90, 240, 16, 16, "wifi connecting......", BLUE);
    }
}

/**
 * @brief       WIFI鏈接糊掉函數
 * @param       arg:傳入網卡控制塊
 * @param       event_base:WIFI事件
 * @param       event_id:事件ID
 * @param       event_data:事件數據
 * @retval      無
 */
static void wifi_event_handler(void *arg, esp_event_base_t event_base,
int32_t event_id, void *event_data)
{
    static int s_retry_num = 0;

    /* 掃描到要連接的WIFI事件 */
    if (event_base == WIFI_EVENT && event_id == WIFI_EVENT_STA_START)
    {
        connet_display(0);
        esp_wifi_connect();
    }
    /* 連接WIFI事件 */
    else if (event_base == WIFI_EVENT && event_id == WIFI_EVENT_STA_CONNECTED)
    {
        connet_display(2);
    }
    /* 連接WIFI失敗事件 */
else if (event_base == WIFI_EVENT &&
event_id == WIFI_EVENT_STA_DISCONNECTED)
    {
        /* 嘗試連接 */
        if (s_retry_num < 20)
        {
            esp_wifi_connect();
            s_retry_num++;
            ESP_LOGI(TAG, "retry to connect to the AP");
        }
        else
        {
            xEventGroupSetBits(wifi_event, WIFI_FAIL_BIT);
        }

        ESP_LOGI(TAG,"connect to the AP fail");
    }
    /* 工作站從連接的AP獲得IP */
    else if(event_base == IP_EVENT && event_id == IP_EVENT_STA_GOT_IP)
    {
        ip_event_got_ip_t* event = (ip_event_got_ip_t*) event_data;
        ESP_LOGI(TAG, "static ip:" IPSTR, IP2STR(&event->ip_info.ip));
        s_retry_num = 0;
        xEventGroupSetBits(wifi_event, WIFI_CONNECTED_BIT);
    }
}

/**
 * @brief       WIFI初始化
 * @param       無
 * @retval      無
 */
void wifi_sta_init(void)
{
    static esp_netif_t *sta_netif = NULL;
    wifi_event= xEventGroupCreate();    /* 創建一個事件標誌組 */
    /* 網卡初始化 */
    ESP_ERROR_CHECK(esp_netif_init());
    /* 創建新的事件循環 */
    ESP_ERROR_CHECK(esp_event_loop_create_default());
    sta_netif= esp_netif_create_default_wifi_sta();
    assert(sta_netif);
    wifi_init_config_t cfg = WIFI_INIT_CONFIG_DEFAULT();
ESP_ERROR_CHECK( esp_event_handler_register(WIFI_EVENT, ESP_EVENT_ANY_ID,
                                            &wifi_event_handler, NULL) );
ESP_ERROR_CHECK( esp_event_handler_register(IP_EVENT, IP_EVENT_STA_GOT_IP,
                                            &wifi_event_handler, NULL) );
    ESP_ERROR_CHECK(esp_wifi_init(&cfg));
    wifi_config_t  wifi_config = WIFICONFIG();
    ESP_ERROR_CHECK(esp_wifi_set_mode(WIFI_MODE_STA));
    ESP_ERROR_CHECK( esp_wifi_set_config(ESP_IF_WIFI_STA, &wifi_config) );
    ESP_ERROR_CHECK(esp_wifi_start());

    /* 等待鏈接成功後、ip生成 */
    EventBits_t bits = xEventGroupWaitBits(wifi_event,
            WIFI_CONNECTED_BIT | WIFI_FAIL_BIT,
            pdFALSE,
            pdFALSE,
            portMAX_DELAY);

    /* 判斷連接事件 */
    if (bits & WIFI_CONNECTED_BIT)
    {
        ESP_LOGI(TAG, "connected to ap SSID:%s password:%s",
                 DEFAULT_SSID, DEFAULT_PWD);
    }
    else if (bits & WIFI_FAIL_BIT)
    {
        connet_display(1);
    }
    else
    {
        ESP_LOGE(TAG, "UNEXPECTED EVENT");
    }

    vEventGroupDelete(wifi_event);
}

/**
 * @brief       程序入口
 * @param       無
 * @retval      無
 */
void app_main(void)
{
    /* 省略代碼...... */
    wifi_sta_init();

    while (1)
    {
        LED_TOGGLE();
        vTaskDelay(500);
    }
}
從上述源碼中,作者首先創建了事件組、WiFi事件回調函數,並配置WiFi為STA模式。當系統搜索到可連接的熱點時,它會嘗試與該熱點建立連接。如果連接成功,則會在LCD上顯示連接信息,併發送一個連接事件標誌。如果連接失敗,系統會嘗試發送20次連接請求,直到沒有收到任何連接回復為止。此時,會發送一個連接失敗事件標誌。通過查看這些連接事件標誌,我們可以確定熱點是否成功連接。
49.3 下載驗證
程序下載成功後,需要利用手機或其他設備創建一個WiFi熱點。在創建熱點時,需要注意提供正確的賬號名和密碼,以確保程序能夠成功連接。同時,確保程序中要連接的熱點賬號與密碼與所創建的熱點一致。當LCD顯示熱點的賬號名和密碼時,此時ESP32-S3設備已經與熱點連接成功了,否則,LCD提示連接失敗,如下圖所示:

圖49.3.1 SPILCD顯示效果圖

