


前面教程中,我們學習到了如何構建 RAG 系統,以及對 RAG 系統進行效果提升、速度優化、功能擴展等等方面。
本教程我們將在此基礎上進一步介紹最近很火的Agentic RAG,它是RAG的變種,但更加智能,讓我們開始吧!
如果把 RAG 比作帶着書本去考試的考生,那麼Agentic RAG就是同時帶着老師和書一起去考試的考生!
Agentic RAG 就是整合了 AI Agent 的 RAG。本文將先從 RAG、AI Agent 等概念為基礎引出 Agentic RAG;然後詳細介紹 Agentic RAG 的基本原理和組成;緊接着介紹為什麼要用 Agentic RAG,並與傳統的 RAG 進行對比;最後介紹如何搭建一個 Agentic RAG。
一、基本概念
什麼是 Agentic RAG ? 讓我們將這個複雜的概念先拆解為 RAG 和 AI Agent(Agentic 就是引入了 AI Agent)來逐個進行介紹。
(一)回顧 RAG 系統
首先讓我們先回顧一下 RAG 的基本概念。
1. 基本概念
檢索增強生成(Retrieval-Augmented Generation,簡稱RAG)技術是一種利用外掛知識源為大語言模型補充上下文來強化輸入從而提高大語言模型生成內容質量,並減少幻覺(hallucinations,幻覺即 LLM 自信地編造信息隨意發揮生成的不真實的內容)的技術。
打個比方來説,RAG就是一個帶着書本去考試的考生。考題就是輸入,書本就是外掛的知識庫,考生就是大模型,考生作答的內容就是大模型生成的內容。一般來説如果一門閉卷考能夠帶着教科書去考試,那答卷的分數都會很高,這也正是RAG能提高大模型生成內容質量的一個形象解釋。
2. 基本組件
RAG 主要包括了兩個組件:
- 檢索組件(Retrieval Component):檢索組件用於根據輸入去匹配知識庫中的信息,打個比方就是帶着考題去教科書中搜索答案。
- 生成組件(Generative Component):生成組件用於把輸入和檢索到的信息送給大模型來生成高質量的回覆,打個比方就是:考生結合題目和從教科書中找到的內容來回答試題。
3. 工作流程
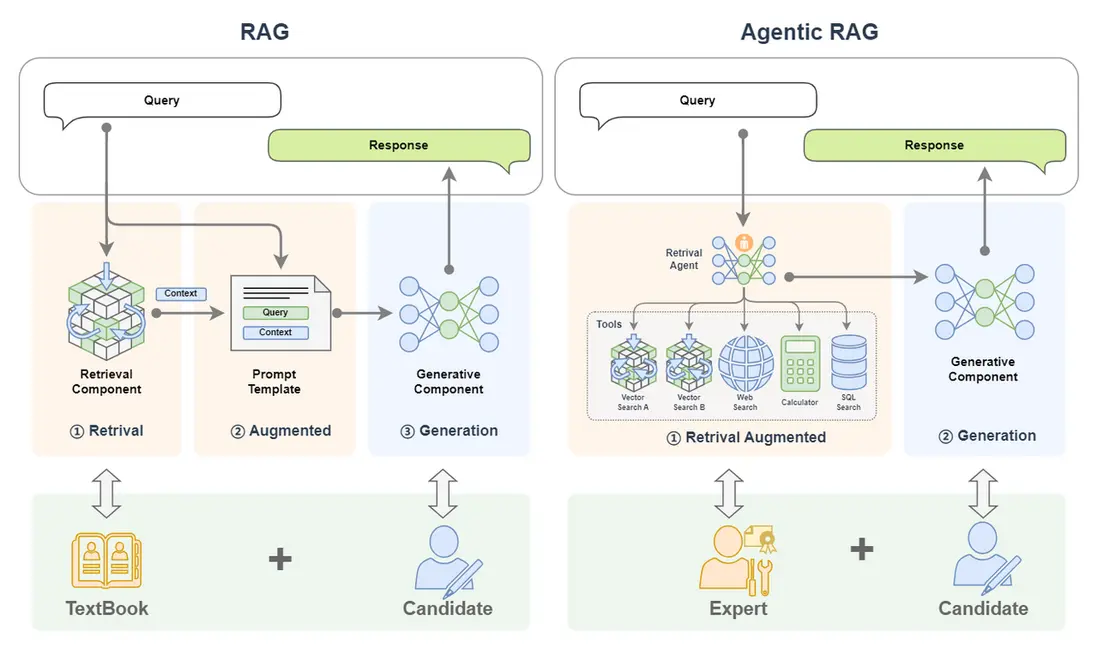
RAG (Retrieval-Augmented Generation)這個名字已經將這個技術的工作流程給揭示了出來,讓我們結合圖示並將名字進行拆解來看:
(1)首先我們輸入一個 query:
- Retrieval:檢索,query 首先被用於在一個知識庫中進行檢索(這裏簡化了 RAG 中embedding、向量化等細節,詳細可見往期教程 [第2講:10分鐘上手一個最小可用RAG系統],知識庫中的文檔以及 query 都會被向量化以便進行相似度計算,下文圖中 Vector Search 對應的就是對知識庫的搜索);
- Augmented:增強,將檢索到的內容(context)與我們輸入的 query 進行拼接,以達到增強 query 的效果;
- Generation:生成,將上一步增強後的 query 送入到 LLM 大模型來生成回覆的內容。
(2)將生成的內容返回。

(二)AI Agent 簡介
1. 基本概念
首先Agent是什麼?中文中常見翻譯為:代理人。
我們要做一件事,一般有兩種方式:一是自己一步一步來達成;另外就是找個人,這個人就叫做代理人,我們全權授權給代理人而不用關心他怎麼做,只管他能幫我們達到目的。前者我們需要操心每個細節,而後者我們可以坐享其成。
所以 Agent 的一個特點就是:不需要我們去關心達成某個任務的細節,而只需要放心把任務交給他,讓他去幫我們達成。
回到AI 智能體(AI Agent),AI Agent 一般被認為是一個具有特定角色和任務的 LLM,它可以訪問記憶和外部工具。
但我覺得 AI 智能體更像是一個人,我們請來的代理人。我更願意把它比作一個有着高度專業能力的人——專家。LLM 是其大腦,藉助他聰明的大腦,他可以自動規劃步驟,結合反饋反覆採取行動(比如調用工具)來解決手頭的任務,整個過程不需要我們操心,我們只需要放權讓他去做就好!
想象你是一位國王,當你想擴張領土的時候,你並不需要自己親歷親為,你只需要找代理人——你的大將(即:帶兵作戰的專家),放權讓大將去做,他自己會規劃作戰計劃(規劃)、調兵遣將(調用工具)、衝鋒陷陣(採取行動)。你只需要等待他凱旋的好消息。這個大將就像是我們的 AI 智能體。
2. 基本組件
一個 AI Agent 主要由下面組件構成:
- LLM:這個是智能體的大腦,對應大將軍的大腦;
- 記憶(Memory):智能體的記憶,對應了大將軍對某個領土擴張任務從開始到結束的所有記憶,甚至是之前的戰鬥記憶;
- 規劃(Planning):智能體可以進行反思、自我批評、自動路由(採取行動)等,對應了國王放權給大將軍,讓他能按照自己的想法去達成任務;
- 工具(Tools):是智能體可以調用的工具,對應大將軍可以調用的兵力,可以使用的武器等等;

3. 工作流程
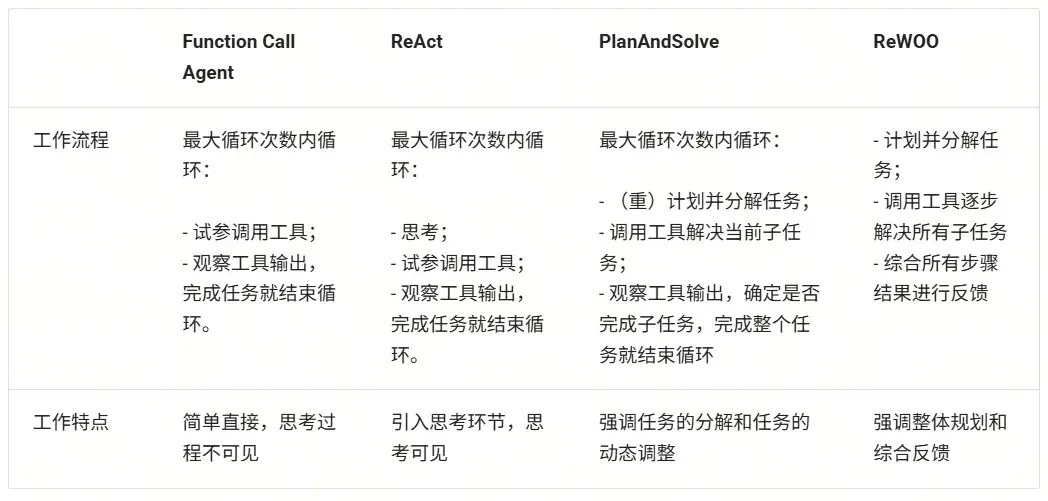
AI Agent 有很多類型的工作流程,這裏介紹幾種常見的工作流程:Function Call Agent、ReAct、PlanAndSolve 以及 ReWOO。AI 智能體的工作流程主要就是其行為模式,就像是一個人做事的行為習慣:
- Function Call Agent:在該智能體接到任務後,它會不斷嘗試以各種參數調用工具和觀察輸出,直到解決問題或達到最大重複次數。
- ReAct:該智能體接到任務後,它會先思考,然後再嘗試調用工具和觀察輸出,不斷重複這個過程直到解決問題或達到最大重複次數。
- PlanAndSolve:該智能體接到任務後,會先計劃把任務分解,然後嘗試解決當前步驟任務,根據當前步驟的結果來繼續執行任務或者重新計劃後面的任務,直到任務被解決或達到最大重複次數。
- ReWOO:該智能體接到任務後,也會先計劃把任務分解,然後將所有步驟全部執行完畢,綜合所有步驟的結果來進行反饋。
(1)Function Call Agent
Function Call Agent 主要包括以下的流程:
- 行動(Action):Agent 收到一個 query 後,它會直接行動,比如去調用某個工具;
- 觀察(Observation): Agent 觀察到行動的反饋,比如工具的輸出。
上面過程會不斷循環往復,如果觀察到行動的反饋沒問題,滿足了 query 的要求,或者達到了最大的迭代次數,那麼 Agent 會退出並返回結果 response。

我們可以在LazyLLM中使用AI Agent,首先定義工具,然後把定義好的工具註冊進 LazyLLM 中,之後就可以定義模型,並使用 FunctionCall Agent:
from typing import Literal
import json
import lazyllm
from lazyllm.tools import fc_register, FunctionCall, FunctionCallAgent
@fc_register("tool")
def get_current_weather(location: str, unit: Literal["fahrenheit", "celsius"] = "fahrenheit"):
    ...
@fc_register("tool")
def get_n_day_weather_forecast(location: str, num_days: int, unit: Literal["celsius", "fahrenheit"] = 'fahrenheit'):
    ...
llm = lazyllm.TrainableModule("internlm2-chat-20b").start()  # or llm = lazyllm.OnlineChatModule()
tools = ["get_current_weather", "get_n_day_weather_forecast"]
fc = FunctionCall(llm, tools)
query = "What's the weather like today in celsius in Tokyo and Paris."
ret = fc(query)
print(f"ret: {ret}")
agent = FunctionCallAgent(llm, tools)
ret = agent(query)
print(f"ret: {ret}")

(2)React
React 主要包括以下的流程:
- 思考(Thought): Agent 在收到 query 後,它會先給出下一步要採取的行動;
- 行動(Action): Agent 會採取並執行一個行動,比如使用工具(或者繼續思考);
- 觀察(Observation): Agent 觀察行動的反饋,比如工具的輸出;
上面過程也是會不斷循環往復,直到滿足 query 的請求,或者達到了最大的迭代次數。

ReactAgent 執行流程和 FunctionCallAgent 的執行流程一樣,唯一區別是prompt 不同,並且 ReactAgent 每一步都要有 Thought 輸出,而普通 FunctionCallAgent 可能只有工具調用的信息輸出,沒有 content 內容。示例如下:
import lazyllm
from lazyllm.tools import fc_register, ReactAgent
@fc_register("tool")
def multiply_tool(a: int, b: int) -> int:
    return a * b
@fc_register("tool")
def add_tool(a: int, b: int):
    return a + b
tools = ["multiply_tool", "add_tool"]
llm = lazyllm.OnlineChatModule(source="sensenova", model="DeepSeek-V3")
agent = ReactAgent(llm, tools)
query = "What is 20+(2*4)? Calculate step by step."
res = agent(query)
print(res)

(3)PlanAndSolve
PlanAndSolve 主要包括以下的流程:
- 計劃(Plan):Agent 在收到 query 後,它會將這個任務分解為更小的子任務;
- 行動(Action): Agent 對當前的子任務進行執行;
- 觀察(Observation): Agent 觀察當前行動的結果,如果解決問題就返回,如果僅解決當前子任務就繼續執行計劃,如果沒解決當前子任務就重新計劃後續步驟;

* 注意: 上圖中 ② Action x 1 表示每次行動只執行一個子任務(不會全部將子任務執行完,區別 ReWOO的對應流程中的 ② Action x N)。
PlanAndSolveAgent由兩個組件組成:首先,將整個任務分解為更小的子任務,其次,根據計劃執行這些子任務。最後結果作為答案進行輸出。
import lazyllm
from lazyllm.tools import fc_register, PlanAndSolveAgent
@fc_register("tool")
def multiply(a: int, b: int) -> int:
    return a * b
@fc_register("tool")
def add(a: int, b: int):
    return a + b
llm = lazyllm.OnlineChatModule(source="sensenova", model="DeepSeek-V3")
tools = ["multiply", "add"]
agent = PlanAndSolveAgent(llm, tools=tools)
query = "What is 20+(2*4)? Calculate step by step."
ret = agent(query)
print(ret)

(4)ReWOO
ReWOO (Reasoning WithOut Observation) 主要包括以下流程:
- 計劃(Plan):Agent 在收到 query 後,它會生成一個計劃表,計劃表中包含了這個任務分解的更小子任務,子任務間的執行結果用佔位符表示;
- 行動(Action): Agent 對每個子任務依次進行執行(調用工具),將結果都填入計劃表的佔位符中;
- 解決(Solve): Agent 觀察所有行動的反饋,將結果response返回給用户;

ReWOOAgent 包含三個部分:Planner 、 Worker 和 Solver。
其中, Planner 使用可預見推理能力為複雜任務創建解決方案藍圖; Worker 通過工具調用來與環境交互,並將實際證據或觀察結果填充到指令中; Solver 處理所有計劃和證據以制定原始任務或問題的解決方案。
import lazyllm
from lazyllm import fc_register, ReWOOAgent, deploy
import wikipedia
@fc_register("tool")
def WikipediaWorker(input: str):
    try:
        evidence = wikipedia.page(input).content
        evidence = evidence.split("\n\n")[0]
    except wikipedia.PageError:
        evidence = f"Could not find [{input}]. Similar: {wikipedia.search(input)}"
    except wikipedia.DisambiguationError:
        evidence = f"Could not find [{input}]. Similar: {wikipedia.search(input)}"
    return evidence
@fc_register("tool")
def LLMWorker(input: str):
    llm = lazyllm.OnlineChatModule(stream=False)
    query = f"Respond in short directly with no extra words.\n\n{input}"
    response = llm(query, llm_chat_history=[])
    return response
tools = ["WikipediaWorker", "LLMWorker"]
llm = lazyllm.TrainableModule("Qwen2-72B-Instruct-AWQ").deploy_method(deploy.vllm).start()
agent = ReWOOAgent(llm, tools=tools)
query = "What is the name of the cognac house that makes the main ingredient in The Hennchata?"
ret = agent(query)
print(ret)

讓我們簡單總結如下:
4. 簡化Agent工作流程
在Agent開發中,重複造輪子、工具接口不統一、上下文管理複雜等問題讓開發流程冗長且低效。
為了解決這些難點,我們可以通過“MCP協議+LazyLLM”的框架,提升開發效率、降低門檻,讓開發者能專注於核心業務和創新設計,從而推動大模型應用更快落地。
(1)MCP協議的基本概念
MCP(Model Context Protocol,模型上下文協議)是由Anthropic公司於2024年11月推出的一種開放標準協議,旨在讓大語言模型能夠“無縫連接”外部工具和數據源。
簡單來説,MCP就是為了解決開頭那些痛點而生的“標準化利器”。一個更形象的比喻是:MCP 相當於 AI 應用的USB-C接口。
正如USB-C統一了不同品牌電子設備的充電和數據接口一樣,MCP則標準化了AI與外部世界交互的方式,使得模型能夠以標準化的形式高效調用數據庫、工具和網絡搜索等多種資源,從而實現模型與外部系統的高效聯動。
換句話説,過去每接入一個新工具就頭大的“接口不統一”問題,有了MCP後就像使用統一接口的外設一樣,插上就能用。這樣一來,無需二次開發,多種數據庫、Web API、文件系統、GitHub…海量而強大的功能統統都可以通過這一個協議輕鬆接入。

以前,想讓AI Agent查天氣、讀PDF、執行Python代碼,可能需要針對每個功能寫一堆集成代碼,其中包含工具的描述、入參等等,並封裝成“工具(Tool)”給到模型。
而有了MCP,只需要把符合需求的MCP服務器接上,模型就會自動知道有什麼工具可用、該如何調用,並且輸入輸出格式也是統一好的。

整個過程就像給筆記本電腦插上擴展塢的瞬間,額外冒出HDMI、SD卡、網線等接口等繁瑣的對接細節由協議幫你搞定,從此開發者無需關心那些轉換過程。
因此,MCP的出現大幅提升了AI Agent應用開發的效率。
(2)MCP的技術架構
從技術架構上看,MCP遵循的是典型的客户端-服務器模型,它把AI應用的內部邏輯和外部擴展功能解耦為三個核心模塊:

1️⃣Host(主機)
指運行AI應用(類似支持AI對話的IDE插件如Cursor、桌面應用如Claude Desktop以及我們所創建的智能體應用)本身的宿主環境。Host負責提供AI交互環境,並在內部啓動MCP Client。
2️⃣Client(客户端)
運行在Host內部的客户端,它與MCP Server建立連接,充當AI應用和外部世界溝通的橋樑。MCP客户端維持與服務器的 1:1 連接,當AI模型需要調用工具或獲取數據時,都是由Client按照協議與Server通信來完成。
3️⃣Server(服務器)
MCP服務器提供具體的功能和數據,相當於AI大腦可以遠程調用的外設。一個服務器上通常會暴露幾類內容供AI使用:
- Tools(工具):允許大模型調用的功能函數。例如代碼執行、網頁瀏覽、發送郵件等,這些能力都可以作為可調用的工具由Server打包並提供給AI。
- Resources(資源):給大模型提供的數據或內容。例如數據庫記錄、文件內容、瀏覽網頁截圖等,Server可以將這些外部數據通過協議發送給AI應用,以充當LLM的上下文。
- Prompts(提示模板):預設的可複用提示詞模板或交互工作流。Server可以儲存一些常用提示詞,按需提供給AI,避免每次都從零編寫複雜提示。
更多MCP技術架構的細節可查閲:https://modelcontextprotocol.io/docs/concepts/architecture
通過上述架構,過去東拼西湊解決的難題,現在有了明確的協議規範可循,那麼,MCP、Agent、LLM、Tool Call...這些名詞之間到底有什麼關係?
- LLM是Agent的“大腦”,能夠根據輸入信息(如系統提示詞、用户指令、歷史對話信息、可用工具集信息等),輸出對應的文字內容,其中可能是階段性的工具調用信息,也有可能是任務完成後的最終輸出內容。
- Tool Call是LLM經過大量訓練後具備的一種工具調用能力,這種能力允許LLM能夠綜合歷史信息和可用工具信息,動態決策並輸出格式化的工具調用指令(決定使用哪個工具、工具調用時具體傳入什麼參數),通過這種指令指導Agent正確的完成工具調用,從而實現特定動作(如操作文件、執行代碼)、獲取必要信息(如返回網頁爬蟲結果)。
- MCP Server則是遵循MCP協議的工具供應商,其提供給Agent強大的工具集,以供LLM辨識並執行Tool Call,同時接收Agent給到的Tool Call指令,安全的與外部資源進行交互,以實現特定動作或返回特定信息。
- Agent作為智能體應用與用户交互的唯一入口,在接收到任務指令後,會有序地調用LLM、各種工具,以完成任務。
(3)實踐:在LazyLLM中使用MCP
針對MCP,LazyLLM提供了兩種接入方式:直接接入和部署並遠程接入。
- 直接接入:將指定MCP Server的啓動配置直接給到lazyllm.tools.MCPClient,以Stdio模式啓動Server,並獲取Agent可調用的工具集。
- 部署並遠程接入:針對一些資源佔用高,或者期望啓動的MCP Server可複用的場景,LazyLLM支持MCP Server的一鍵部署,只需一行命令,便可以將MCP Server單獨啓動,隨後便可以SSE模式遠程接入MCP Server。
具體來説,步驟如下:
1️⃣配置LazyLLM所需要的所有依賴
首先參考 https://docs.lazyllm.ai/zh-cn/latest/ 的Getting started部分,安裝LazyLLM並完成環境配置。
同時,由於MCP Server的使用依賴Node.js和npm,可參考https://nodejs.org/en/download 完成最新版本的安裝和配置。
2️⃣利用已有的MCP服務
若需接入已有的 MCP 服務(如高德地圖的地理位置服務),可通過 LazyLLM 的 MCPClient 工具直接連接,無需自行部署 Server。
SSE URL 接入(以高德 MCP 為例):
無需啓動本地 Server,直接通過服務提供商提供的 SSE 長連接 URL 配置 Client。需將”xxx”替換為自己的key。
(創建key:https://lbs.amap.com/api/mcp-server/create-project-and-key)
import lazyllm
from lazyllm.tools.agent import ReactAgent
from lazyllm.tools import MCPClient
mcp_configs = {
    "amap_mcp": {
        "url": "http://mcp.amap.com/sse?key=xxx"
    }
}
client = MCPClient(command_or_url=mcp_configs["amap_mcp"]["url"])
llm = lazyllm.OnlineChatModule(source='qwen', model='qwen-max-latest', stream=False)
agent = ReactAgent(llm=llm.share(), tools=client.get_tools(), max_retries=15)
print(agent("查詢北京的天氣"))

3️⃣使用直接接入的方式調用MCP
- 配置獲取
我們選擇一個文件管理 MCP Server 並獲取啓動配置:
{
    "mcpServers": {
        "filesystem": {
            "command": "npx",
            "args": [
                "-y",
                "@modelcontextprotocol/server-filesystem",
                "/Users/username/Desktop"
            ]
        }
    }
}
注意,如果你是Windows系統,command需要使用"cmd",同時啓動參數開頭需要加上"/c"。啓動配置會有些變化:
{
    "mcpServers": {
        "filesystem": {
            "command": "cmd",
            "args": [
                "/c",
                "npx",
                "-y",
                "@modelcontextprotocol/server-filesystem",
                "/Users/username/Desktop"
            ]
        }
    }
}
- MCP接入
隨後便可使用LazyLLM的MCPClient工具實現MCP Server的接入(這裏的路徑示例/xxx/xxx/xxx)。
import lazyllm
from lazyllm.tools import MCPClient
config = {"command": "npx", "args": ["-y", "@modelcontextprotocol/server-filesystem", "/xxx/xxx/xxx"]}
client = MCPClient(command_or_url=config["command"], args=config["args"], env=config.get("env"))
- 工具集獲取
>>> tools = client.get_tools()
Secure MCP Filesystem Server running on stdio
Allowed directories: [ '/Users/username/Desktop' ]
>>> tools
[<function generate_lazyllm_tool.<locals>.dynamic_lazyllm_func at 0x7f269cad11c0>, <function generate_lazyllm_tool.<locals>.dynamic_lazyllm_func at 0x7f269c91e520>, <function generate_lazyllm_tool.<locals>.dynamic_lazyllm_func at 0x7f269c91d800>, <function generate_lazyllm_tool.<locals>.dynamic_lazyllm_func at 0x7f269c91d8a0>, <function generate_lazyllm_tool.<locals>.dynamic_lazyllm_func at 0x7f269c91e5c0>, <function generate_lazyllm_tool.<locals>.dynamic_lazyllm_func at 0x7f269c91e0c0>, <function generate_lazyllm_tool.<locals>.dynamic_lazyllm_func at 0x7f269c91d940>, <function generate_lazyllm_tool.<locals>.dynamic_lazyllm_func at 0x7f269c91e480>, <function generate_lazyllm_tool.<locals>.dynamic_lazyllm_func at 0x7f269c91db20>, <function generate_lazyllm_tool.<locals>.dynamic_lazyllm_func at 0x7f269c91da80>, <function generate_lazyllm_tool.<locals>.dynamic_lazyllm_func at 0x7f269c91dda0>]
代碼講解:
調用client.get\_tools()可以獲取當前連接的MCP Server中所有的工具(在異步環境中,以下代碼改為tools = await client.aget\_tools()即可)。
同時,LazyLLM支持開發者通過傳入工具名稱列表至方法的方式獲取特定的工具集,例如client.get\_tools(["tool\_name1", "tool_name2"])。
- 工具調用
代碼講解:
遍歷從MCP Server獲取的tools,其中每個成員都是一個函數。每個功能函數都有函數名(name)、函數描述(doc,包含了功能描與參數描述)以及入參聲明(annotations),調用對應函數時,只需要傳入正確的參數即可。
下面給出兩個函數調用的例子:
- 調用文件讀取工具read_file,傳入所需入參path,即可獲取讀取文件後的返回信息;
- 調用獲取有權限路徑工具list\_allowed\_directories,該工具無需任何入參,傳入空即可獲得工具返回。
>>> for t in tools:
...     print(f"\nTool name:\n{t.__name__}\nTool desc:\n{t.__doc__}\nTool params:\n{t.__annotations__}\n")
...
Tool name:
read_file
Tool desc:
Read the complete contents of a file from the file system. Handles various text encodings and provides detailed error messages if the file cannot be read. Use this tool when you need to examine the contents of a single file. Only works within allowed directories.
Args:
    path (str): type: string.
Tool params:
{'path': <class 'str'>}
Tool name:
write_file
Tool desc:
Create a new file or completely overwrite an existing file with new content. Use with caution as it will overwrite existing files without warning. Handles text content with proper encoding. Only works within allowed directories.
Args:
    path (str): type: string.
    content (str): type: string.
Tool params:
{'path': <class 'str'>, 'content': <class 'str'>}
......
Tool name:
list_allowed_directories
Tool desc:
Returns the list of directories that this server is allowed to access. Use this to understand which directories are available before trying to access files.
Args:
    No parameters.
Tool params:
{}
>>> t1 = tools[0]
>>> t1.__name__
'read_file'
>>> t1(path="xxx/xxx/xxx/test.md")
Secure MCP Filesystem Server running on stdio
Allowed directories: [ 'xxx/xxx/xxx' ]
'Tool call result:\nReceived text message:\nThis is a test file for LazyLLM and MCP.\n\nEnd\n'
>>> t2 = tools[-1]
>>> t2.__name__
'list_allowed_directories'
>>> t2()
Secure MCP Filesystem Server running on stdio
Allowed directories: [ 'xxx/xxx/xxx' ]
'Tool call result:\nReceived text message:\nAllowed directories:\n/xxx/xxx/xxx'
4️⃣使用LazyLLM部署MCP Server並接入
LazyLLM支持MCP Server的一鍵部署,只需一行命令,便可以將MCP Server單獨啓動,主程序可使用SSE模式接入MCP Server。
- 一鍵部署MCP Server
選擇瀏覽器工具 playwright(https://github.com/microsoft/playwright-mcp ),獲取配置信息:
{
    "mcpServers": {
        "playwright": {
            "command": "npx",
            "args": [
                "@playwright/mcp@latest"
            ]
        }
    }
}
在命令行中只需要使用“lazyllm deploy mcp_server xxxxxx”命令,並配置host、port,即可完成MCP Server的部署。由於linux環境沒有GUI,這裏演示Windows環境下的啓動命令:
lazyllm deploy mcp_server --sse-port 11238 cmd -- /c npx @playwright/mcp@latest
啓動後如下所示:

- 接入部署完成的MCP Server
我們可以在其他程序中傳入url,以SSE的方式接入MCP Server,注意,這裏的url需要加上'/sse',否則無法正常運行:
>>> config = {"url": "http://127.0.0.1:11238/sse"}
>>> client = MCPClient(command_or_url=config["url"])
用以上方式接入MCP Server後,具體的工具獲取、工具調用方式與直接接入保持一致。
5️⃣LazyLLM調用MCP工具
步驟 1:獲取工具列表
tools = client.get_tools()  # 同步獲取
# 或 tools = await client.aget_tools()  # 異步環境
步驟 2:查看工具詳情
for t in tools:
    print(f"Tool name: {t.__name__}")
    print(f"Tool desc: {t.__doc__}")
    print(f"Tool params: {t.__annotations__}\n")
步驟 3:調用MCP工具
以讀取文件工具為例,假設 tools[0] 為 read_file。
t1 = tools[0]
result = t1(path="xxx/xxx/xxx/test.md")

6️⃣LazyLLM+MCP智能體Demo
接下來我們使用filesystem+playwright,結合LazyLLM的Agent模塊,創建一個智能體:
import lazyllm
import lazyllm.tools.agent
from lazyllm.tools import ReactAgent
import MCPClient
if __name__ == "__main__":
    mcp_configs = {
        "file_system": {
            "command": "cmd",
            "args": [
                "/c",
                "npx",
                "-y",
                "@modelcontextprotocol/server-filesystem",
                "./"
            ]
        },
        "play_wright": {
            "url": "http://127.0.0.1:11244/sse"
        }
    }
client1 = MCPClient(command_or_url=mcp_configs["file_system"]["command"], args=mcp_configs["file_system"]["args"])
client2 = MCPClient(command_or_url=mcp_configs["play_wright"]["url"])
llm = lazyllm.OnlineChatModule(source="deepseek")
agent = ReactAgent(llm=llm.share(), tools=client1.get_tools()+client2.get_tools(), max_retries=15)
print(agent("瀏覽谷歌新聞,並寫一個今日新聞簡報,以markdown格式保存至本地。"))
通過本次實踐,我們可以瞭解到,MCP Server的出現直接省去了Agent開發環節中工具研發和調試的成本,大大提升了研發效率。LazyLLM對於MCP提供了靈活的接入方式,讓開發者使用MCP的成本大大降低。
總結:
在大模型時代,開發效率就是核心競爭力。從頭造輪子或許可以練手,但在真正落地AI應用的過程中,我們更應該把寶貴的時間和腦力,留給真正創造價值的部分——如業務邏輯設計、用户體驗優化、創新交互方式等,而不是重複造工具、上下文拼接等基礎組件。
MCP 提供了一套高效、統一的標準協議;LazyLLM 則提供了一套靈活的MCP接入方案,讓每一個開發者都能輕鬆上手,快速構建屬於自己的智能Agent應用,從而站在社區和開源生態的“肩膀”上看得更遠、做得更多。
(4)理性看待 MCP
儘管MCP簡化了開發流程,但需注意其侷限性:
- 依賴性風險:過度依賴第三方MCP服務可能導致業務受制於外部穩定性與政策變化。
- 工具選擇:MCP沒有解決當前Agent的一個困境:當工具比較多的時候,如何快速而準確地選到最合適的工具。
開發者應根據實際需求權衡選擇,優先在輕量級場景中嘗試MCP,逐步驗證其適用性。

(三)Agentic RAG 簡介
1. 基本概念
Agentic RAG 是 RAG 的一種擴展,它通過引入 AI智能體 來增強 RAG 的功能,使得系統能夠執行更復雜的任務。
舉個例子,如果説 RAG 是帶着書本去考試的考生,AI Agent 是專家,那麼 Agentic RAG 就是帶着專家去考試的考生!
簡單來看,下圖中,單個 LLM 就好比一個去參加閉卷考的學生;我們給這個學生帶本書,那麼就可以獲得一個RAG;如果我們把書替換為專家,那我們就獲得了一個 Agentic RAG。

2. 基本架構
Agentic RAG 就是引入了 AI智能體的 RAG。
前面的示例中,我們將 RAG 的搜索組件(Retrieval Component)給替換為了單AI智能體。
除此之外我們還可以將搜索組件給替換為多AI智能體,甚至也可以把生成組件(Generative Component)給替換為AI 智能體。
(1)單 Agent RAG
下面是一個常見的 Agentic RAG,其中的 AI Agent 模塊提供了兩個外掛知識庫、一個網絡搜索工具、一個計算器和一個數據庫,這樣智能體可以根據上下文的需求,決定從哪裏來檢索信息。並且如果在一輪檢索中不能獲得滿意的信息,智能體還可以再次重新檢索(它可以自動更換檢索的關鍵詞,選取不同的工具等等)。

在 Agentic RAG 中,可以將 AI 智能體融入檢索組件,形成 Retrieval Agent。檢索過程變得智能,智能體能根據 query 循環檢索,動態優化結果。同時,智能體可接入網絡、數據庫等多種工具,突破單一知識庫限制,獲取更豐富、準確的上下文信息。
單Agent RAG的工作流程可以拆解為:
- 用户輸入Query → Agent動態規劃檢索策略
- 多次檢索(更換關鍵詞/工具)→ 多源數據融合
- 結果增強 → LLM生成回覆
引入智能體後,查詢過程實現自動化與智能化,系統可自主多輪檢索,無需人工干預即可提升信息匹配效果。
(2)多 Agent RAG
我們還可以引進專家組!是的就是多Agent智能體,下圖中 Retrieval Agent A 專家負責兩個知識庫的檢索,Retrieval Agent B 專家負責網絡搜索,Retrieval Agent C 專家負責兩個數據庫的搜索,他們都是各個數據源的搜索專家,最後有一個Retrieval Agent 專家作為總指揮,他擅長搜索任務的分配。

如果你想,我們當然也可以把生成模塊給替換為一個 AI 智能體,如下圖所示。這樣我們就擁有了兩個專家,一個專家負責檢索,另外一個專家負責生成內容。
如下圖所示,檢索專家擁有很多途徑來自主決策檢索信息,生成專家也可以邊搜索邊生成內容,如果它覺得生成的內容不滿意,還會自動重新生成!

3. 工作流程
在 Agentic RAG 中,可以將 AI 智能體融入到不同的組件中,一般常見的是將檢索組件替換為 AI 智能體(變成:Retrieval Agent)。這也就意味着檢索組件將變得智能,可以根據 query 不斷地去檢索來獲取更加豐富和準確的上下文。
同時由於 AI 智能體可以接入很多工具,這極大增強了檢索的能力,甚至如果在知識庫中無法檢索到合適的內容,AI 智能體也能從網絡、數據庫或者其他一切可訪問的工具中來獲得更多的內容。
讓我們以單 Agent RAG 為例,如下圖所示,來看一下在不同的智能體工作流下是如何完成檢索的。
1️⃣首先,一條 query 被傳給了智能體①
- 如果智能體是 Function Call Agent,那麼它會根據 query 來不斷調用工具,並觀察查詢到的信息,以此不斷循環②直到查詢到令它滿意的信息,或者達到最大循環次數;
- 如果智能體是 React,那麼它先根據 query 來做個思考,然後開始調用工具,並觀察查詢到的信息,以此不斷循環②,也是直到查詢到令它滿意的信息,或達到最大循環次數;
- 如果智能體是 PlanAndSolve,那麼它會先根據 query 來做個計劃將查詢任務進行分解為子任務,然後它開始執行子任務,比如調用查詢知識庫的工具,在知識庫返回信息後,它會觀察結果,如果結果不滿意它會重新修改計劃,如果結果還行它會繼續沿着計劃執行下一個子任務,以此不斷循環②,直到最後完成它自己制定的所有任務而獲得查詢的信息;
- 如果智能體是 ReWOO,那麼它也會根據 query 來做個計劃,將查詢任務分解為子任務,然後它會依次將子任務全部執行完畢②,最後將綜合所有的執行結果來給出它查詢的結果。
2️⃣在智能體查詢到信息後,就回到了經典的 RAG 工作流:查詢到的信息(已經是被智能體將 query 融合增強後的結果)③會被送給 LLM 來完成內容生成任務④。
至此,一個單 Agent RAG 的工作流程就完成了。
從中我們可以看出,在查詢階段,由於我們引入了智能體,查詢變得更加智能,智能體會自己不斷去查詢,我們不用操心查詢的過程,以及擔心只查一次找不到匹配的信息。

二、引入動機
Agentic RAG 僅是在原有 RAG 的工作流中將其組件替換為了智能體。為什麼要這樣?為什麼要搞出 Agentic RAG? 或者説為什麼要給 RAG 中引入智能體?
一個很簡單原因就是為了讓它更強大!更加智能化。

-
經典的 RAG 僅進行單次查詢,如果單次無法召回到合適的文檔信息,那麼後續的生成過程的效果是無法保障的。
但是 Agentic RAG 可以進行多次查詢(multiple query),如果此次召回效果不好,智能體會自動更換表示方式或更換工具進行檢索;
-
經典的 RAG 的數據來源很單一,往往只有一個知識庫。
但是 Agentic RAG 可以接入大量的知識庫,而且不止於此,它還可以接入數據庫,甚至是聯網搜索,這意味着 Agentic RAG 的數據來源是多樣的(multi source);
多樣的數據源,不僅可以補充單數據源的信息不足,擁有更多的信息;
多樣的數據源,也可以對查詢到的信息進行相互佐證,保障查詢結果的準確性;
- Agentic RAG 額外還有多工具調用的能力,這充滿了無限的功能(multi-function),它可以對信息進行處理和加工;
- Agentic RAG 更重要的是它可以智能決策(smart decision-making)!它可以自動制定計劃來實現複雜的查詢過程。整個過程都不需要我們操心。
可以想象這就是帶着一本教科書和帶着專家去考試的區別!
三、搭建實現
讓我們從一個基礎的 RAG 開始,然後示例在 LazyLLM 中如何註冊工具並使用 React AI 智能體,最後將兩者結合實現一個簡單的 Agentic RAG。
(一)搭建基礎 RAG
在之前教程的基礎上,我們可以使用 LazyLLM 來快速搭建一個 RAG 應用。該應用的邏輯如下:

具體代碼如下所示,在這個RAG中,我們設置了個檢索器 Retriever 和 Reranker 用於檢索知識庫。
(代碼GitHub鏈接:https://github.com/LazyAGI/Tutorial/blob/7abc91dbb82a007a78731845dd8c360ac0cc1e75/rag/codes/chapter18/basic_rag.py)
import lazyllm
from lazyllm import pipeline, bind, OnlineEmbeddingModule, SentenceSplitter, Document, Retriever, Reranker

prompt = 'You will play the role of an AI Q&A assistant and complete a dialogue task. In this task, you need to provide your answer based on the given context and question.'

documents = Document(dataset_path="rag_master", embed=OnlineEmbeddingModule(), manager=False)
documents.create_node_group(name="sentences", transform=SentenceSplitter, chunk_size=1024, chunk_overlap=100)

with pipeline() as ppl:
    ppl.retriever = Retriever(documents, group_name="sentences", similarity="cosine", topk=1)
    ppl.reranker = Reranker("ModuleReranker", model=OnlineEmbeddingModule(type="rerank"), topk=1, output_format='content', join=True) | bind(query=ppl.input)
    ppl.formatter = (lambda nodes, query: dict(context_str=nodes, query=query)) | bind(query=ppl.input)
    ppl.llm = lazyllm.OnlineChatModule(stream=False).prompt(lazyllm.ChatPrompter(prompt, extro_keys=["context_str"]))

if __name__ == "__main__":
    lazyllm.WebModule(ppl, port=range(23467, 24000)).start().wait()
讓我們運行一下看看結果:

(二)AI智能體 React
Agentic RAG 就是引入了 AI 智能體的 RAG,這裏讓我們用 LazyLLM 來註冊一個假的知識庫搜索工具,實現一個 React:
(代碼GitHub鏈接:https://github.com/LazyAGI/Tutorial/blob/main/rag/codes/chapter18/react.py)
import json
import lazyllm
from lazyllm import fc_register, ReactAgent

@fc_register("tool")
def search_knowledge_base(query: str):
    '''
    Get info from knowledge base in a given query.

    Args:
        query (str): The query for search knowledge base.
    '''
    return "無形"

llm = lazyllm.OnlineChatModule(stream=False)

tools = ["search_knowledge_base"]
agent = ReactAgent(llm, tools)

if __name__ == "__main__":
    res = agent("何為天道?")
    print("Result: \n", res)
讓我們嘗試來運行一下:

有了 React,我們就可以將它的工具替換為 RAG 中的 Retriever 和 Reranker 來作為一個真實的知識庫。讓它可以調用檢索器:
import lazyllm
from lazyllm import (pipeline, bind, OnlineEmbeddingModule, SentenceSplitter, Reranker,
                     Document, Retriever, fc_register, ReactAgent)

documents = Document(dataset_path="rag_master", embed=OnlineEmbeddingModule(), manager=False)
documents.create_node_group(name="sentences", transform=SentenceSplitter, chunk_size=1024, chunk_overlap=100)
with pipeline() as ppl_rag:
    ppl_rag.retriever = Retriever(documents, group_name="sentences", similarity="cosine", topk=3)
    ppl_rag.reranker = Reranker("ModuleReranker", model=OnlineEmbeddingModule(type="rerank"), topk=1, output_format='content', join=True) | bind(query=ppl_rag.input)

@fc_register("tool")
def search_knowledge_base(query: str):
    '''
    Get info from knowledge base in a given query.

    Args:
        query (str): The query for search knowledge base.
    '''
    return ppl_rag(query)

tools = ["search_knowledge_base"]
llm = lazyllm.OnlineChatModule(stream=False)

agent = ReactAgent(llm, tools)

if __name__ == "__main__":
    res = agent("何為天道?")
    print("Result: \n", res)
運行結果如下:

(三)實現 Agentic RAG
讓我們將 RAG 的檢索組件替換為帶單個知識庫的React,實現下面邏輯(這裏簡單起見,只用了一個知識庫作為工具)

對應代碼如下:
(代碼GitHub鏈接:https://github.com/LazyAGI/Tutorial/blob/main/rag/codes/chapter18/rag_react.py)
import lazyllm
from lazyllm import (pipeline, bind, OnlineEmbeddingModule, SentenceSplitter, Reranker,
                     Document, Retriever, fc_register, ReactAgent)

prompt = 'You will play the role of an AI Q&A assistant and complete a dialogue task. In this task, you need to provide your answer based on the given context and question.'

documents = Document(dataset_path="rag_master", embed=OnlineEmbeddingModule(), manager=False)
documents.create_node_group(name="sentences", transform=SentenceSplitter, chunk_size=1024, chunk_overlap=100)
with pipeline() as ppl_rag:
    ppl_rag.retriever = Retriever(documents, group_name="sentences", similarity="cosine", topk=3)
    ppl_rag.reranker = Reranker("ModuleReranker", model=OnlineEmbeddingModule(type="rerank"), topk=1, output_format='content', join=True) | bind(query=ppl_rag.input)

@fc_register("tool")
def search_knowledge_base(query: str):
    '''
    Get info from knowledge base in a given query.

    Args:
        query (str): The query for search knowledge base.
    '''
    return ppl_rag(query)

tools = ["search_knowledge_base"]

with pipeline() as ppl:
    ppl.retriever = ReactAgent(lazyllm.OnlineChatModule(stream=False), tools)
    ppl.formatter = (lambda nodes, query: dict(context_str=nodes, query=query)) | bind(query=ppl.input)
    ppl.llm = lazyllm.OnlineChatModule(stream=False).prompt(lazyllm.ChatPrompter(prompt, extro_keys=["context_str"]))

if __name__ == "__main__":
    lazyllm.WebModule(ppl, port=range(23467, 24000)).start().wait()
效果如下:

至此一個簡單的 Agentic RAG 我們就實現了。
(四)更多的嘗試
你可以嘗試使用不同的 AI 智能體工作流來替換上面的 React:
-
FunctionCallAgent代碼GitHub鏈接
(https://github.com/LazyAGI/Tutorial/blob/main/rag/codes/chapter18/rag_functioncall.py)
-
PlanAndSolveAgent代碼GitHub鏈接
(https://github.com/LazyAGI/Tutorial/blob/main/rag/codes/chapter18/rag_planandsolve.py)
-
ReWOOAgent代碼GitHub鏈接
(https://github.com/LazyAGI/Tutorial/blob/main/rag/codes/chapter18/rag_rewoo.py)
from lazyllm import FunctionCallAgent, PlanAndSolveAgent, ReWOOAgent

# Use FunctionCallAgent:
ppl.retriever = FunctionCallAgent(lazyllm.OnlineChatModule(), tools)
# Use PlanAndSolveAgent:
ppl.retriever = PlanAndSolveAgent(lazyllm.OnlineChatModule(), tools)
# Use ReWOOAgent:
ppl.retriever = ReWOOAgent(lazyllm.OnlineChatModule(), tools)
這裏我們嘗試將ReactAgent 分別替換為FunctionCallAgent, PlanAndSolveAgent, ReWOOAgent來查看效果:
1. FunctionCallAgent
FunctionCallAgent的效果:

2. PlanAndSolveAgent
PlanAndSolveAgent的效果:

3. ReWOOAgent
ReWOOAgent的效果:

甚至你也可以引入多AI智能體,以及更多的RAG組件!快試試看吧。
四、擴展案例:多Agent RAG
為提升複雜問題的覆蓋率與響應質量,還可以引入多Agent RAG的架構設計:
🔧 Agent 分工
- 檢索Agent:根據查詢內容確定檢索工具(本地知識庫/網絡搜索)。
- Agent A(知識庫專家):負責本地知識庫的高效檢索,優先處理結構化、穩定信息。
- Agent B(網絡搜索專家):執行網頁搜索、數據內容提取,並寫入本地。
檢索完成後,所有結果統一送入LLM生成響應,保證語言質量與上下文一致性。

MCP網絡搜索工具定義與註冊
# MCP-Search Web and Save Local
mcp_client1 = lazyllm.tools.MCPClient(command_or_url="python", args=["-m", "mcp_server_fetch"],)
search_agent = CustomReactAgent(llm=lazyllm.OnlineChatModule(source="sensenova", stream=False),
    stream=False, custom_prompt=search_prompt, tools=mcp_client1.get_tools())

@fc_register("tool")
def search_web(query: str):
    '''
    Perform targeted web content retrieval using a combination of search terms and URL.
    This tool processes both natural language requests and specific webpage addresses
    to locate relevant online information.
    Args:
        query (str): Combined input containing search keywords and/or target URL
                   (e.g., "AI news from https://example.com/tech-updates")
    '''
    query += search_prompt
    res = search_agent(query)
    return res
RAG工具定義與註冊+應用編排
# RAG-Retriever
documents = Document(dataset_path='path/to/kb', manager=False)
documents.add_reader('*.json', process_json)
with pipeline() as ppl_rag:
    ppl_rag.retriever = Retriever(documents, Document.CoarseChunk,
        similarity="bm25", topk=1, output_format='content', join='='*20)
@fc_register("tool")
def search_knowledge_base(query: str):
    '''
    Get info from knowledge base in a given query.
    Args:
        query (str): The query for search knowledge base.
    '''
    res = ppl_rag(query)
    return res

# Agentic-RAG:
tools = ['search_knowledge_base', 'search_web']
with pipeline() as ppl:
    ppl.retriever = CustomReactAgent(lazyllm.OnlineChatModule(stream=False), tools, agent_prompt, stream=False)
    ppl.formatter = (lambda nodes, query: dict(context_str=nodes, query=query)) | bind(query=ppl.input)
    ppl.llm = lazyllm.OnlineChatModule(stream=False).prompt(lazyllm.ChatPrompter(gen_prompt, extra_keys=["context_str"]))
# Launch: Web-UI
lazyllm.WebModule(ppl, port=range(23467, 24000), stream=True).start().wait()

五、多模態Agentic RAG論文系統

(一)配置兩個MCP工具及Agent
(代碼GitHub鏈接:https://github.com/LazyAGI/Tutorial/blob/main/rag/courseware\_codes/chapter18/mcp\_agent.py)
import json
import lazyllm
from lazyllm import ReactAgent
mcp_client1 = lazyllm.tools.MCPClient(
    command_or_url="python",
    args=["-m", "mcp_simple_arxiv"],
)
mcp_client2 = lazyllm.tools.MCPClient(
    command_or_url="python",
    args=["-m", "mcp_server_calculator"],
)
llm = lazyllm.OnlineChatModule(stream=False)
paper_agent = ReactAgent(llm, mcp_client1.get_tools(), return_trace=True)
calculator_agent = ReactAgent(llm, mcp_client2.get_tools(), return_trace=True)
環境中需提前安裝好兩個工具:
pip install mcp-simple-arxiv
pip install mcp-server-calculator
(二)應用編排
(代碼GitHub鏈接:https://github.com/LazyAGI/Tutorial/blob/7abc91dbb82a007a78731845dd8c360ac0cc1e75/rag/courseware\_codes/chapter18/paper\_assistant_multimodal.py#L25)
# 構建 rag 工作流和統計分析工作流
rag_ppl = build_paper_rag()
sql_ppl = build_statistical_agent()
# 搭建具備知識問答和統計問答能力的主工作流
def build_paper_assistant():
    llm = OnlineChatModule(source='qwen', stream=False)
    vqa = lazyllm.OnlineChatModule(source="sensenova",\
        model="SenseNova-V6-Turbo").prompt(lazyllm.ChatPrompter(gen_prompt))
    with pipeline() as ppl:
        ppl.ifvqa = lazyllm.ifs(
            lambda x: x.startswith('<lazyllm-query>'),
            lambda x: vqa(x), lambda x:x)
        with IntentClassifier(llm) as ppl.ic:
            ppl.ic.case["論文問答", rag_ppl]
            ppl.ic.case["統計問答", sql_ppl]
            ppl.ic.case["計算器", calculator_agent]
            ppl.ic.case["網頁最新論文搜索", paper_agent]
    return ppl
if __name__ == "__main__":
    main_ppl = build_paper_assistant()
    lazyllm.WebModule(main_ppl, port=23459, static_paths="./images", encode_files=True).start().wait()
更多技術內容,歡迎移步 "LazyLLM" 討論!