


背景

隨着5G技術的發展,物聯網邊緣側主要應用於數據傳輸量大、安全要求高以及數據實時處理等行業與應用場景中。其中,邊緣計算是一種分佈式計算模式,其將計算資源和數據處理能力推向接近數據源的邊緣設備,以減少延遲並提高響應速度。
對前端領域而言,面對邊緣場景下的應用開發也發生了相應的變化,其通常需要考慮邊緣側與終端側的實現方式,並且還需考慮相較於傳統 B/S 架構下的部署方案。本文旨在通過工業互聯網場景下的一個實踐案例,淺析面向邊緣情形下的前端研發模式升級,以期能夠給有邊緣場景應用開發需求的讀者提供一定的思路與借鑑。
架構設計
相較於傳統前端研發場景,面對邊緣情境下的前端研發模式,最重要的變化在於其環境的特殊性,包括:網絡、存儲等。在前期調研了部署環境後,為考慮用户體驗,故而從架構設計上對整體系統進行了如下分層,分別是:應用層、服務層、平台層,如下圖所示:
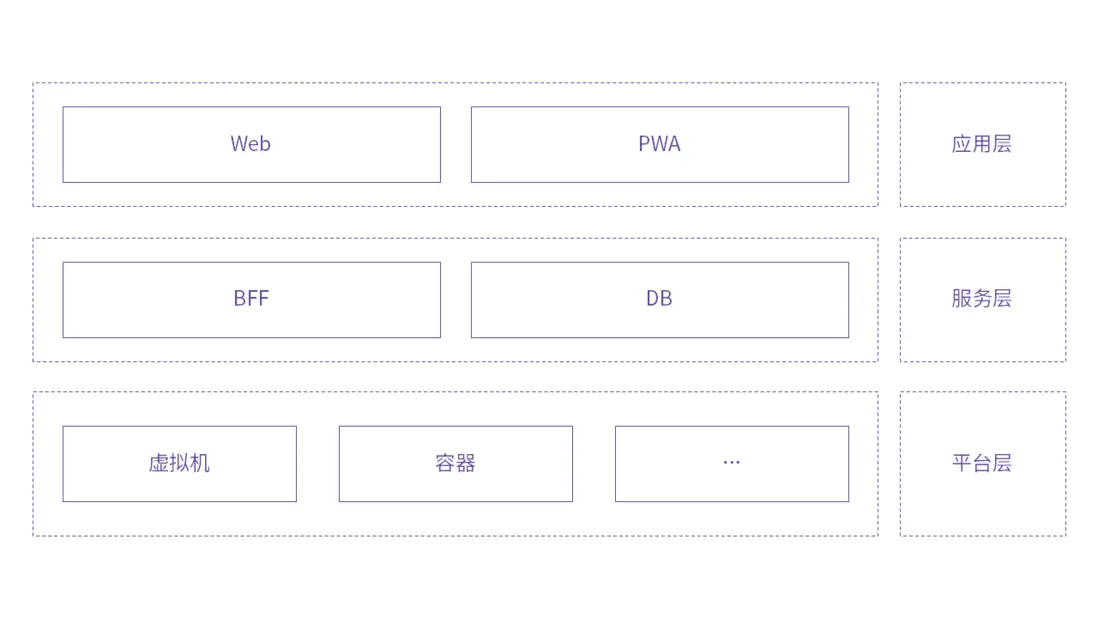
其中,應用層為了更好的體現離線與 Web 各自的優勢,故而採用“Web+PWA”的形式進行呈現;案例中業務邏輯較為簡單,服務層採用以Node.js為主的BFF形式的Serverless進行處理;對於平台層,本身案例應用部署環境為虛擬機環境,但考慮到多端的一致性,故而也支持容器化的部署。
技術選型
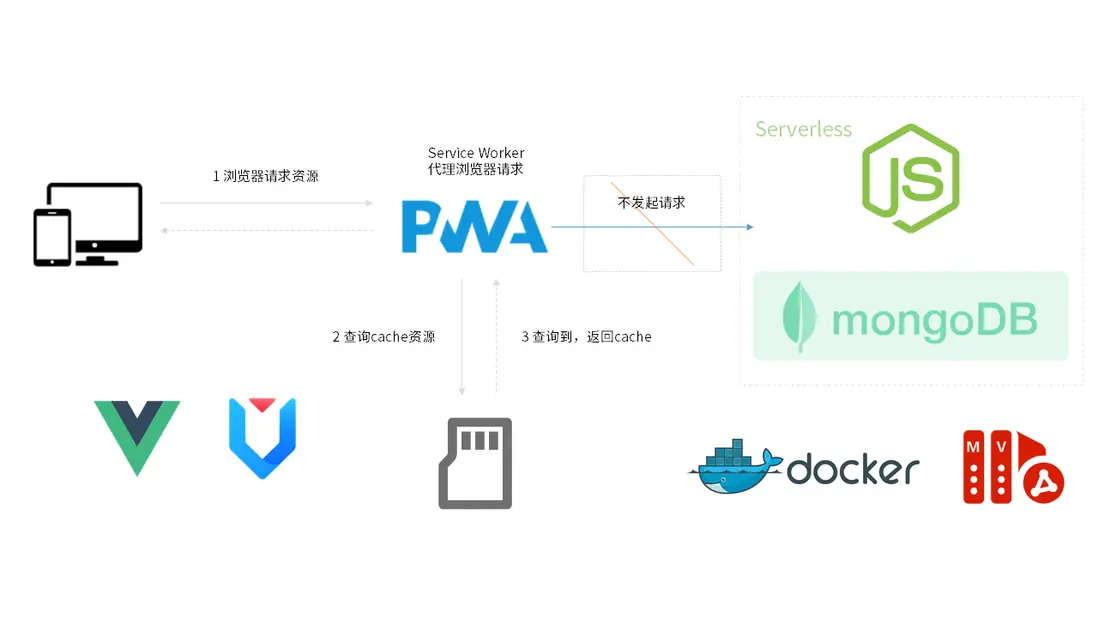
前期調研後,由於虛擬機Windows側可能需要兼容IE 11,故而選擇以Vue 2.x為主的全家桶構建,同時安裝 PWA 的相關依賴。BFF側,提供以mongoDB + Node.js的類 Serverless 服務,通過Docker容器、虛擬機及其他runtime進行調度,如下圖所示:
源碼分析
端側
目錄結構
- public
    - img
        - icons----------------------------------------------------- PWA所需icon物料
            - android-chrome-192x192.png
            - android-chrome-512x512.png
            - android-chrome-maskable-192x192.png
            - android-chrome-maskable-512x512.png
            - apple-touch-icon-60x60.png
            - apple-touch-icon-76x76.png
            - apple-touch-icon-120x120.png
            - apple-touch-icon-152x152.png
            - apple-touch-icon-180x180.png
            - apple-touch-icon.png
            - favicon-32x32.png
            - favicon.svg
            - msapplication-icon-144x144.png
            - mstile-150x150.png
            - safari-pinned-tab.svg
    - favicon.ico
    - index.html
    - robots.txt
- src
    - api
        - auth------------------------------------------------------- 登錄接口
        - list------------------------------------------------------- 列表及查詢接口
    - assets
        - logo.png
    - components
        - Footer.vue------------------------------------------------- 底部組件
        - Header.vue------------------------------------------------- 頭部組件
        - Item.vue--------------------------------------------------- 列表組件
        - Layout.vue------------------------------------------------- 佈局組件
    - router
        - index.js--------------------------------------------------- 路由攔截等相關邏輯
        - routes.js-------------------------------------------------- 路由表
    - store
        - index.js
    - styles
        - index.less
    - utils
        - http.js---------------------------------------------------- 封裝http請求,axios攔截器
    - views
        - Home.vue--------------------------------------------------- 首頁,用於路由表層級渲染
        - Login.vue-------------------------------------------------- 登錄頁
        - NotFound.vue----------------------------------------------- 路由未匹配頁
    - App.vue-------------------------------------------------------- 根組件
    - main.js-------------------------------------------------------- Webpack打包的入口
    - registerServiceWorker.js--------------------------------------- PWA聲明週期,service worker處理邏輯
- base.config.js----------------------------------------------------- 基礎配置,用於腳手架讀取
- default.conf------------------------------------------------------- nginx的conf配置
核心邏輯
router
構建路由表,用於處理頁面的跳轉,是一個樹形結構,代碼如下:
const routes = [
  {
    path: "/login",
    name: "Login",
    component: () => import("@/views/Login.vue"),
  },
  {
    path: "/",
    name: "/",
    redirect: "/home",
    component: () => import("@/components/Layout.vue"),
    children: [
      {
        path: "/home",
        name: "Home",
        component: () => import("@/views/Home.vue"),
        children: [
          {
            path: "/home/equipment",
            name: "Equipment",
            children: [
              {
                path: "/home/equipment/management",
                name: "Management",
                children: [
                  {
                    path: "/home/equipment/management/cpe",
                    name: "CPE",
                  },
                  {
                    path: "/home/equipment/management/hub",
                    name: "Hub",
                  },
                  {
                    path: "/home/equipment/management/switch",
                    name: "Switch",
                  },
                  {
                    path: "/home/equipment/management/robot",
                    name: "Robot",
                  },
                ],
              },
            ],
          },
        ],
      },
    ],
  },
  {
    path: "*",
    name: "NotFound",
    component: () => import("@/views/NotFound.vue"),
  },
];

export default routes;對於router的入口,需要處理一下登錄的攔截,使用路由攔截進行處理,代碼如下:
import Vue from "vue";
import VueRouter from "vue-router";

Vue.use(VueRouter);

import routes from "./routes";

const router = new VueRouter({
  mode: "hash",
  base: process.env.BASE_URL,
  routes,
});

router.beforeEach(async (to, from, next) => {
  if (to.path === "/login") {
    next();
  } else {
    const token = sessionStorage.getItem("token");
    if (!token) {
      next("/login");
    } else {
      next();
    }
  }
});

export default router;
store
對於狀態管理,需要對整體業務邏輯進行統一處理,由於比較簡單,不需要用modules進行隔離,代碼如下:
import Vue from "vue";
import Vuex from "vuex";
import createPersistedstate from "vuex-persistedstate";
Vue.use(Vuex);

const store = new Vuex.Store({
  state: {
    mode: "",
    searchValue: "",
    count: 0,
    checkedList: [],
  },
  mutations: {
    changeMode(state, p) {
      state.mode = p;
    },
    changeValue(state, v) {
      state.searchValue = v;
    },
    changeCount(state, n) {
      state.count = n;
    },
    addItem(state, id) {
      console.log("addItem", id);
      if (state.checkedList.indexOf(id) == -1) {
        state.checkedList.push(id);
      }
      console.log("checkedList", state.checkedList);
    },
    deleteItem(state, id) {
      console.log("deleteItem", id);
      const idx = state.checkedList.indexOf(id);
      if (idx != -1) {
        state.checkedList.splice(idx, 1);
      }
      console.log("checkedList", state.checkedList);
    },
  },
  actions: {},
  modules: {},
  plugins: [
    createPersistedstate({
      key: "vwaver-iiot-end",
    }),
  ],
});

export default store;
views
對於登錄頁,進行一個簡單的驗證,代碼如下:
<template>
  <div class="login-view">
    <section class="login-box">
      <div class="login-box-header">
        <img
          class="login-box-logo"
          :src="require('@/assets/logo.png')"
          alt="logo"
        />
        <span class="login-box-title">{{ title }}</span>
      </div>
      <Form class="login-box-form" :form="form">
        <FormItem>
          <Input
            v-decorator="[
              'uname',
              { rules: [{ required: true, message: '請輸入用户名!' }] },
            ]"
            placeholder="請輸入用户名"
          >
            <Icon
              slot="prefix"
              type="user"
              style="color: rgba(0, 0, 0, 0.25);"
            />
          </Input>
        </FormItem>
        <FormItem>
          <Input
            v-decorator="[
              'password',
              {
                rules: [
                  { required: true, message: 'Please input your Password!' },
                ],
              },
            ]"
            type="password"
            placeholder="請輸入密碼"
          >
            <Icon
              slot="prefix"
              type="lock"
              style="color: rgba(0, 0, 0, 0.25);"
            />
          </Input>
        </FormItem>
      </Form>
      <Button class="login-box-button" type="primary" @click="handleLogin">
        登錄
      </Button>
    </section>
  </div>
</template>

<script>
import { Form, Input, Button, Icon } from "ant-design-vue";

import { APILogin } from "@/api/auth";

const { title } = require("../../base.config");

export default {
  name: "Login",
  components: {
    Form,
    FormItem: Form.Item,
    Input,
    Button,
    Icon,
  },
  data() {
    return {
      form: this.$form.createForm(this, { name: "login" }),
      title,
    };
  },
  methods: {
    handleLogin() {
      this.form.validateFields(async (err, values) => {
        if (!err) {
          console.log("Received values of form: ", values);
          const res = await APILogin(values);
          console.log("res", res);
          if (res.success) {
            sessionStorage.setItem(`token`, res.data.token);
            this.$router.push("/");
          }
        }
      });
    },
  },
};
</script>

<style lang="less" scoped>
.login-view {
  width: 100%;
  height: 100%;
  background: linear-gradient(135deg, #513691, #61499b);
  display: flex;
  justify-content: center;
  align-items: center;

  .login-box {
    border: 1px solid #ececec;
    background: #fcfcfc;
    width: 80%;
    border-radius: 8px;
    box-shadow: 0 0 10px #ccc;
    display: flex;
    flex-direction: column;
    padding: 2rem 0;
    align-items: center;

    &-header {
      display: flex;
      align-items: center;
      justify-content: center;
      margin-bottom: 10px;
    }

    &-logo {
      height: 24px;
    }

    &-title {
      font-weight: bold;
      font-size: 24px;
      background: linear-gradient(135deg, #513691, #61499b);
      background-clip: text;
      color: transparent;
      margin-left: 6px;
    }

    &-form {
      width: 80%;
    }

    &-button {
      width: 80%;
      background: linear-gradient(135deg, #513691, #61499b);
      border-color:  #61499b;
    }
  }
}
</style>對於Home頁面,需要對頁面的路由進行相應的渲染,代碼如下:
<template>
  <div class="home">
    <section v-if="$store.state.mode != 'search'" class="home-nav">
      <Breadcrumb separator=">">
        <BreadcrumbItem v-for="item in nav" :key="item.path">
          <a :href="'#' + item.path">{{ item.name }}</a>
        </BreadcrumbItem>
      </Breadcrumb>
    </section>
    <section class="home-list">
      <Item
        :mode="$store.state.mode"
        v-for="l in list"
        :key="l.id"
        :title="l.title"
        :subTitle="l.subTitle"
        :id="l.id"
        @jump="handleJump"
        :count="
          l.children.filter((l) => $store.state.checkedList.indexOf(l) != -1)
            .length
        "
        :children="l.children"
        :prev="l.prev"
      />
    </section>
  </div>
</template>

<script>
import { Breadcrumb } from "ant-design-vue";
import Item from "@/components/Item";
import { APIList, APINav, APISearch } from "@/api/list";
import { mapMutations } from "vuex";

export default {
  name: "Home",
  components: {
    Breadcrumb,
    BreadcrumbItem: Breadcrumb.Item,
    Item,
  },
  data() {
    return {
      nav: [],
      list: [],
      count: 0,
    };
  },
  mounted() {
    console.log("$route", this.$route);
    console.log("$router", this.$router);
    if (this.$mode !== "search") {
      this.onGetList();
      this.onGetNav();
    } else {
      this.onSearchList();
    }
  },
  watch: {
    "$route.path": {
      handler(val, oldVal) {
        console.log("val", val);
        if (oldVal != val) {
          this.onGetList();
        }
      },
    },
    "$store.state.mode": {
      handler(val) {
        if (val == "search") {
          this.list = this.onSearchList();
        }
      },
    },
    "$store.state.searchValue": {
      handler(value) {
        if (value) {
          this.onSearchList();
        }
      },
    },
  },
  beforeDestroy() {},
  methods: {
    ...mapMutations(["changeCount"]),
    handleJump(id) {
      console.log("id", id);
      this.$router.push({
        path: `${this.$route.path}/${id}`,
      });
      this.$router.go(0);
    },
    async onGetList() {
      const res = await APIList({
        params: {
          name: this.$route.name,
        },
      });
      console.log("APIList", res);
      if (res.success) {
        this.list = res.data.list;
      }
    },
    async onGetNav() {
      const res = await APINav({
        params: {
          name: this.$route.name,
        },
      });
      console.log("APINav", res);
      if (res.success) {
        this.nav = res.data.nav;
      }
    },
    async onSearchList() {
      const res = await APISearch({
        value: this.$store.state.searchValue,
      });
      console.log("APISearch", res);
      if (res.success) {
        this.list = res.data.list;
        console.log("list.length", this.list.length);
        this.changeCount(this.list.length);
      }
    },
  },
};
</script>

<style lang="less" scoped>
// 鼠標hover時候的顏色
/deep/ .ant-checkbox-wrapper:hover .ant-checkbox-inner,
.ant-checkbox:hover .ant-checkbox-inner,
.ant-checkbox-input:focus + .ant-checkbox-inner {
  border: 1px solid #61499b !important;
}
// 設置默認的顏色
/deep/ .ant-checkbox {
  .ant-checkbox-inner {
    border: 1px solid #61499b;
    background-color: transparent;
  }
}
// 設置選中的顏色
/deep/ .ant-checkbox-checked .ant-checkbox-inner,
.ant-checkbox-indeterminate .ant-checkbox-inner {
  background-color: #61499b;
  border: 1px solid #61499b;
}

.home {
  width: 100%;
  height: calc(100% - 3rem);

  &-nav {
    background: #fdfdfd;
    padding: 0.25rem 0.5rem;
  }

  &-list {
  }
}
</style>
components
對於頂部搜索,實現組件Header,代碼如下:
<template>
  <div class="header">
    <Search v-model="value" @search="handleSearch" />
  </div>
</template>

<script>
import { Input } from "ant-design-vue";
import { APISearch } from "@/api/list";
import { mapMutations } from "vuex";
export default {
  name: "Header",
  components: {
    Search: Input.Search,
  },
  data() {
    return {
      value: "",
    };
  },
  methods: {
    ...mapMutations(["changeMode", "changeValue"]),
    async handleSearch(value) {
      console.log("value", value);
      const res = await APISearch({
        value,
      });
      console.log("search", res);
      if (value) {
        this.changeMode("search");
        this.changeValue(value);
      } else {
        this.changeMode("");
        this.changeValue(value);
        this.$router.go(0);
      }
    },
  },
};
</script>

<style lang="less" scoped>
.header {
  height: 1rem;
  width: 100%;
  background: #fff;
  display: flex;
  justify-content: center;
  align-items: center;
  padding: 0 0.5rem;
}
</style>對於底部顯示數量,實現組件Footer,代碼如下:
<template>
  <div class="footer">
    <template v-if="mode == 'search'">
      <span class="footer-text">已搜到{{ $store.state.count }}項</span>
    </template>
    <span class="footer-text" v-else>
      已選{{ $store.state.checkedList.length }}項
    </span>
  </div>
</template>

<script>
export default {
  name: "Footer",
  props: {
    mode: {
      type: String,
    },
  },
};
</script>

<style lang="less" scoped>
.footer {
  width: 100%;
  height: 2rem;
  background: #fff;
  padding: 0.25rem 0.5rem;

  &-text {
    color: #1778fe;
    font-weight: bold;
  }
}
</style>
對於列表的每項的顯示,則進行一個統一的抽離,這也是本案例中最為核心的一個組件,代碼如下:
<template>
  <div class="item">
    <section class="item-left">
      <Checkbox
        @change="handleChange"
        :indeterminate="indeterminate"
        :checked="checkAll"
      />
      <div class="item-left-text">
        <span class="item-left-title">{{ title }}</span>
        <span v-if="mode == 'search'" class="item-left-subtitle">
          {{ subTitle }}
        </span>
      </div>
    </section>
    <section
      v-if="children.length != 0"
      class="item-right"
      @click="handleClick"
    >
      <span class="item-right-count"
        >已選 {{ checkAll ? children.length : count }}</span
      >
      <Icon type="right" />
    </section>
  </div>
</template>

<script>
import { Checkbox, Icon } from "ant-design-vue";
import { mapMutations } from "vuex";
import routes from "@/router/routes";

console.log("children", routes[1].children);

const createTree = (children) => {
  const r = [];
  children.forEach((child) => {
    const key = child.path.split("/").pop();
    if (child.children) {
      r.push({
        key,
        children: createTree(child.children),
      });
    } else {
      r.push({
        key,
      });
    }
  });
  return r;
};

const tree = createTree(routes[1].children);

console.log("tree", tree);

export default {
  name: "Item",
  props: {
    mode: {
      type: String,
    },
    title: {
      type: String,
      default: "",
    },
    subTitle: {
      type: String,
      default: "",
    },
    count: {
      type: Number,
      default: 0,
    },
    id: {
      type: String,
    },
    children: {
      type: Array,
    },
    prev: {
      type: Array,
    },
  },
  components: {
    Checkbox,
    Icon,
  },
  data() {
    return {
      checkAll: false,
      indeterminate: false,
    };
  },
  watch: {},
  methods: {
    handleClick() {
      this.$emit("jump", this.id);
    },
    handleChange(e) {
      console.log("e", e.target.checked, this.id);
      if (e.target.checked) {
        this.checkAll = true;
        this.indeterminate = false;
        if (this.children.length != 0) {
          this.children.forEach((child) => {
            this.addItem(child);
          });
        }
        this.addItem(this.id);
      } else {
        this.checkAll = false;
        this.indeterminate = false;
        if (this.children.length != 0) {
          this.children.forEach((child) => {
            this.deleteItem(child);
          });
        }
        this.deleteItem(this.id);
        if (this.prev.length != 0) {
          this.prev.forEach((pre) => {
            this.deleteItem(pre);
          });
        }
      }
    },
    ...mapMutations(["addItem", "deleteItem"]),
  },
  mounted() {
    console.log("this.id", this.id);
    if (this.$store.state.checkedList.includes(this.id)) {
      this.checkAll = true;
    } else {
      this.checkAll = false;
      this.children.forEach((child) => {
        if (this.$store.state.checkedList.includes(child)) {
          this.indeterminate = true;
        }
      });
    }
  },
};
</script>

<style lang="less" scoped>
.item {
  padding: 0.25rem 0.5rem;
  margin: 1px 0;
  background: #fff;
  display: flex;
  justify-content: space-between;
  align-items: center;

  &-left {
    display: flex;
    align-items: center;
    &-text {
      margin-left: 0.125rem;
      display: flex;
      flex-direction: column;
    }

    &-subtitle {
      color: #ccc;
      margin-top: 0.125rem;
    }
  }

  &-right {
    flex: right;

    &-count {
      margin-right: 0.125rem;
    }
  }

  &-right:hover {
    cursor: pointer;
    color: #1778fe;
  }
}
</style>
邊側
目錄結構
- db
  - __resource__
  - __temp__
- edge
  - model.js
  - operator.js
  - read.js
  - sync.js
  - utils.js
  - write.js
- public
    - index.html
- routes
    - api
    - auth.js-------------------------------------------------------- 登錄接口
    - list.js-------------------------------------------------------- 列表及查詢接口
    - object.js------------------------------------------------------ 對象存儲接口
- app.js------------------------------------------------------------- express應用
- cluster.js--------------------------------------------------------- 用於監聽app.js
- router.js---------------------------------------------------------- 統一的路由
- minio.js----------------------------------------------------------- minio設置
- mongodb.js--------------------------------------------------------- mongodb設置
- run.sh------------------------------------------------------------- wasmedge邊緣運行時
核心邏輯
app.js
BFF採用簡單的express服務,實例化入口app,代碼如下:
const express = require("express");
const app = express();
const bodyParser = require("body-parser");

app.use(express.static("public"));

app.use(bodyParser.json());
app.use(
  bodyParser.urlencoded({
    extended: false,
  })
);

app.use("/auth", require("./routes/auth"));

app.use("/list", require("./routes/list"));

app.use('/object', require('./routes/object'));

app.listen(4000, () => {
  console.log("server running");
});
cluster.js
基於child_process構建app的監聽,代碼如下:
var fork = require("child_process").fork;

//保存被子進程實例數組
var workers = [];

//這裏的被子進程理論上可以無限多
var appsPath = ["./app.js"];

var createWorker = function(appPath) {
  //保存fork返回的進程實例
  var worker = fork(appPath); //監聽子進程exit事件

  worker.on("exit", function() {
    console.log("worker:" + worker.pid + "exited");
    delete workers[worker.pid];
    createWorker(appPath);
  });

  workers[worker.pid] = worker;
  console.log("Create worker:" + worker.pid);
};

//啓動所有子進程
for (var i = appsPath.length - 1; i >= 0; i--) {
  createWorker(appsPath[i]);
}

//父進程退出時殺死所有子進程
process.on("exit", function() {
  for (var pid in workers) {
    workers[pid].kill();
  }
});
routes
對於鑑權部分,採用jwt進行驗證,代碼如下:
const router = require("../router");
const jwt = require("jsonwebtoken");

const { mongoose } = require("../mongodb");

const Schema = mongoose.Schema;

const expireTime = 60 * 60;

router.post("/login", async function (req, res) {
  const { uname, upwd } = req.body;

  const registerSchema = new Schema({
    uname: String,
    upwd: String,
  });

  const Register = mongoose.model("Register", registerSchema);

  const register = new Register({
    uname,
    upwd,
  });

  const token = jwt.sign({ uname, upwd }, "auth", { expiresIn: expireTime });

  register.save().then(
    (result) => {
      console.log("成功的回調", result);

      res.json({
        code: "0",
        data: {
          token,
        },
        msg: "成功",
        success: true,
      });
    },
    (err) => {
      console.log("失敗的回調", err);

      res.json({
        code: "-1",
        data: {
          err: err,
        },
        msg: "失敗",
        success: false,
      });
    }
  );
});

module.exports = router;
對於列表及查詢相關接口,代碼如下:
const router = require("../router");
const url = require("url");

const { mongoose } = require("../mongodb");

const Schema = mongoose.Schema;

const navMapSchema = new Schema({
    Home: [{ name: String, path: String }],
    Equipment: [{ name: String, path: String }],
    Management: [{ name: String, path: String }],
    CPE: [{ name: String, path: String }],
    Hub: [{ name: String, path: String }],
    Switch: [{ name: String, path: String }],
    Robot: [{ name: String, path: String }],
  }),
  columnMapSchema = new Schema({
    Home: [
      {
        id: String,
        title: String,
        subTitle: String,
        prev: [String],
        children: [String],
      },
    ],
    Equipment: [
      {
        id: String,
        title: String,
        subTitle: String,
        prev: [String],
        children: [String],
      },
    ],
    Management: [
      {
        id: String,
        title: String,
        subTitle: String,
        prev: [String],
        children: [String],
      },
    ],
    CPE: [
      {
        id: String,
        title: String,
        subTitle: String,
        prev: [String],
        children: [String],
      },
    ],
    Hub: [
      {
        id: String,
        title: String,
        subTitle: String,
        prev: [String],
        children: [String],
      },
    ],
    Switch: [
      {
        id: String,
        title: String,
        subTitle: String,
        prev: [String],
        children: [String],
      },
    ],
    Robot: [
      {
        id: String,
        title: String,
        subTitle: String,
        prev: [String],
        children: [String],
      },
    ],
  });
const NavMap = mongoose.model("NavMap", navMapSchema),
  ColumnMap = mongoose.model("ColumnMap", columnMapSchema);

// 簡單化操作,設計時可對mongodb數據庫進行更細粒度的集合處理
const navMap = new NavMap({
  Home: [
    {
      name: "全部",
      path: "/home",
    },
  ],
  Equipment: [
    {
      name: "全部",
      path: "/home",
    },
    {
      name: "工業設備",
      path: "/home/equipment",
    },
  ],
  Management: [
    {
      name: "全部",
      path: "/home",
    },
    {
      name: "工業設備",
      path: "/home/equipment",
    },
    {
      name: "設備管理",
      path: "/home/equipment/management",
    },
  ],
  CPE: [
    {
      name: "全部",
      path: "/home",
    },
    {
      name: "工業設備",
      path: "/home/equipment",
    },
    {
      name: "設備管理",
      path: "/home/equipment/management",
    },
    {
      name: "CPE設備",
      path: "/home/equipment/management/cpe",
    },
  ],
  Hub: [
    {
      name: "全部",
      path: "/home",
    },
    {
      name: "工業設備",
      path: "/home/equipment",
    },
    {
      name: "設備管理",
      path: "/home/equipment/management",
    },
    {
      name: "Hub設備",
      path: "/home/equipment/management/hub",
    },
  ],
  Switch: [
    {
      name: "全部",
      path: "/home",
    },
    {
      name: "工業設備",
      path: "/home/equipment",
    },
    {
      name: "設備管理",
      path: "/home/equipment/management",
    },
    {
      name: "交換機設備",
      path: "/home/equipment/management/switch",
    },
  ],
  Robot: [
    {
      name: "全部",
      path: "/home",
    },
    {
      name: "工業設備",
      path: "/home/equipment",
    },
    {
      name: "設備管理",
      path: "/home/equipment/management",
    },
    {
      name: "機器人設備",
      path: "/home/equipment/management/robot",
    },
  ],
});

router.get("/nav", async function (req, res) {
  const { name } = url.parse(req.url, true).query;
  console.log("/nav", name);
  console.log("nav", navMap[`${name}`]);
  navMap.save().then(
    (result) => {
      console.log("成功的回調", result);
      res.json({
        code: "0",
        data: {
          nav: navMap[`${name}`],
        },
        msg: "成功",
        success: true,
      });
    },
    (err) => {
      console.log("失敗的回調", err);

      res.json({
        code: "-1",
        data: {
          err: err,
        },
        msg: "失敗",
        success: false,
      });
    }
  );
});

const columnMap = new ColumnMap({
  Home: [
    {
      id: "equipment",
      title: "工業設備",
      subTitle: "全部",
      prev: [],
      children: [
        "management",
        "cpe",
        "camera",
        "wifi",
        "hub",
        "usb",
        "ethernet",
        "switch",
        "two",
        "three",
        "four",
        "robot",
        "arm",
        "leg",
      ],
    },
  ],
  Equipment: [
    {
      id: "management",
      title: "設備管理",
      subTitle: "全部 - 工業設備",
      prev: ["equipment"],
      children: [
        "cpe",
        "camera",
        "wifi",
        "hub",
        "usb",
        "ethernet",
        "switch",
        "two",
        "three",
        "four",
        "robot",
        "arm",
        "leg",
      ],
    },
  ],
  Management: [
    {
      id: "cpe",
      title: "CPE設備",
      subTitle: "全部 - 工業設備 - 設備管理",
      prev: ["equipment", "management"],
      children: ["camera", "wifi"],
    },
    {
      id: "hub",
      title: "Hub設備",
      subTitle: "全部 - 工業設備 - 設備管理",
      prev: ["equipment", "management"],
      children: ["usb", "ethernet"],
    },
    {
      id: "switch",
      title: "交換機設備",
      subTitle: "全部 - 工業設備 - 設備管理",
      prev: ["equipment", "management"],
      children: ["two", "three", "four"],
    },
    {
      id: "robot",
      title: "機器人設備",
      subTitle: "全部 - 工業設備 - 設備管理",
      prev: ["equipment", "management"],
      children: ["arm", "leg"],
    },
  ],
  CPE: [
    {
      id: "camera",
      title: "攝像頭",
      prev: ["equipment", "management", "cpe"],
      subTitle: "全部 - 工業設備 - 設備管理 - CPE設備",
      children: [],
    },
    {
      id: "wifi",
      title: "WiFi",
      prev: ["equipment", "management", "cpe"],
      subTitle: "全部 - 工業設備 - 設備管理 - CPE設備",
      children: [],
    },
  ],
  Hub: [
    {
      id: "usb",
      title: "USB Hub",
      prev: ["equipment", "management", "hub"],
      subTitle: "全部 - 工業設備 - 設備管理 - Hub設備",
      children: [],
    },
    {
      id: "ethernet",
      title: "Ethernet Hub",
      prev: ["equipment", "management", "hub"],
      subTitle: "全部 - 工業設備 - 設備管理 - Hub設備",
      children: [],
    },
  ],
  Switch: [
    {
      id: "two",
      title: "二層交換機",
      prev: ["equipment", "management", "switch"],
      subTitle: "全部 - 工業設備 - 設備管理 - 交換機設備",
      children: [],
    },
    {
      id: "three",
      title: "三層交換機",
      prev: ["equipment", "management", "switch"],
      subTitle: "全部 - 工業設備 - 設備管理 - 交換機設備",
      children: [],
    },
    {
      id: "four",
      title: "四層交換機",
      prev: ["equipment", "management", "switch"],
      subTitle: "全部 - 工業設備 - 設備管理 - 交換機設備",
      children: [],
    },
  ],
  Robot: [
    {
      id: "arm",
      title: "機械臂",
      prev: ["equipment", "management", "robot"],
      subTitle: "全部 - 工業設備 - 設備管理 - 機器人設備",
      children: [],
    },
    {
      id: "leg",
      title: "腿式機器人",
      prev: ["equipment", "management", "robot"],
      subTitle: "全部 - 工業設備 - 設備管理 - 機器人設備",
      children: [],
    },
  ],
});

router.get("/columns", async function (req, res) {
  const { name } = url.parse(req.url, true).query;
  console.log("/columns", name);

  columnMap.save().then(
    (result) => {
      console.log("成功的回調", result);
      res.json({
        code: "0",
        data: {
          list: columnMap[`${name}`],
        },
        msg: "成功",
        success: true,
      });
    },
    (err) => {
      console.log("失敗的回調", err);

      res.json({
        code: "-1",
        data: {
          err: err,
        },
        msg: "失敗",
        success: false,
      });
    }
  );
});

router.post("/search", async function (req, res) {
  const { value } = req.body;
  console.log("/columns", value);

  const names = Object.values(columnMap).flat();

  console.log("names", names);
  const list = names.filter((f) => f.title.indexOf(value) != -1);

  res.json({
    code: "0",
    data: {
      list,
    },
    msg: "成功",
    success: true,
  });
});
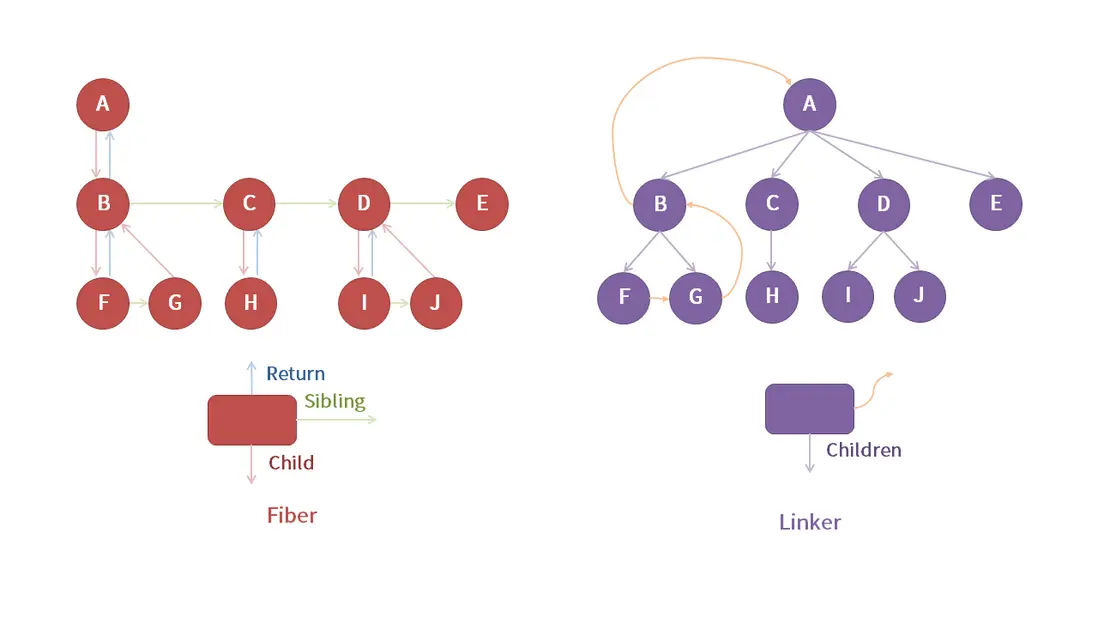
module.exports = router;其中,對於樹形結構的構建,採用雙向鏈表的形式進行prev及children的派發,如下圖所示:
router.js
構建統一的 express 路由,用於各routes模塊的引用,代碼如下:
const express = require('express');
const router = express.Router();

module.exports = router;
minio.js
使用minio來對對象存儲中的資源進行處理,邊緣側對網絡要求較高,對於某些離線場景,需要將靜態資源託管到本地,代碼如下:
const Minio = require('minio');

// 對於靜態資源,在邊緣側可進行圖片、視頻等靜態資源計算和緩存,與邊緣側部署存儲方式有關
const minio = key => {
    return new Minio.Client({
        endPoint: 'ip',
        port: 9090,
        useSSL: false,
        accessKey: 'accessKey',
        secretKey: 'secretKey'
    });
}

module.exports = minio;對於同步操作,可以使用edge目錄下的sync模塊進行處理,代碼如下:
const axios = require("axios");
const fs = require("fs");

const url = "http://localhost:4000",
  bucketName = "bucketName",
  destDirName = "db/__resource__";

const prefixFilter = (prefix) => prefix.substring(0, prefix.length - 1);

const createImage = (bucketName, objectName) => {
  axios
    .post(`${url}/object/presignedGetObject`, {
      bucketName: bucketName,
      objectName: objectName,
    })
    .then((res) => {
      if (res.data.success) {
        axios({
          method: "get",
          url: res.data.data,
          responseType: "arraybuffer",
        }).then((r) => {
          fs.writeFile(
            `./${destDirName}/${objectName}`,
            r.data,
            "binary",
            function (err) {
              if (err) console.error(err);
              console.log(`創建圖片${objectName}成功`);
            }
          );
        });
      }
    });
};

const recursive = (bucketName, prefix) => {
  axios
    .post(`${url}/object/listObjects`, {
      bucketName: bucketName,
      prefix: prefix,
      pageNum: -1,
    })
    .then((res) => {
      console.log("獲取圖片信息", res.data.data);
      if (res.data.success) {
        return res.data.data.lists;
      }
    })
    .then((data) => {
      data?.forEach((d) => {
        if (d.prefix) {
          if (fs.existsSync(`./${destDirName}/${prefixFilter(d.prefix)}`)) {
            recursive(bucketName, d.prefix);
          } else {
            fs.promises
              .mkdir(`./${destDirName}/${prefixFilter(d.prefix)}`)
              .then(() => {
                recursive(bucketName, d.prefix);
              })
              .catch((err) => console.error(err));
          }
        } else {
          if (/\.(png|svg|jepg|jpg|gif|mp4|mp3|avi|flv)$/.test(d.name)) {
            console.log("d.name", d.name);
            createImage(bucketName, d.name);
          }
        }
      });
    });
};

recursive(bucketName, "");
mongodb.js
對於數據的存儲與隔離,則採用“邊側+雲側”的方式進行備份存儲。其中,對於雲側,使用mongodb進行數據的存儲與操作,代碼如下:
const mongoose = require('mongoose');

const uname = 'admin',
      upwd = 'abc123';

const url = [
    'ip:port',
    // 127.0.0.1:27017 本地啓動的mongodb
];

// console.log(`mongodb://${uname}:${upwd}@${url.join(',')}`)


async function db() {
    await mongoose.connect(`mongodb://${uname}:${upwd}@${url.join(',')}`);
}

exports.db = db;

exports.mongoose = mongoose;
對於邊緣側,則可以使用模擬的集合操作來進行磁盤的掛載與存儲,代碼如下:
// model.js
exports.DOCUMENTS_SCHEMA = {
  _name: String,
  _collections: Array,
};

exports.COLLECTIONS_SCHEMA = {
  _id: String,
};

// operator.js
const { read } = require('./read');

const { write } = require('./write');

exports.find = async (...args) => await read('FIND', ...args);

exports.remove = async (...args) => await write('REMOVE', ...args);

exports.add = async (...args) => await write('ADD', ...args);

exports.update = async (...args) => await write('UPDATE', ...args);

// read.js
const {
    isExit,
    genCollection,
    genDocument,
    findCollection,
    findLog,
    stringify,
    fs,
    compose,
    path
} = require('./utils');

exports.read = async (method, ...args) => {
    let col = '', log = '';
    const isFileExit = isExit(args[0], `${args[1]}_${args[2]['phone']}.json`);
    console.log('isFileExit', isFileExit)
    const doc = genDocument(...args);
    switch (method) {
        case 'FIND':
            col = compose( stringify, findCollection )(doc, genCollection(...args));
            log = compose( stringify, findLog, genCollection )(...args);
            break;
    };

    if(isFileExit) {
        return fs.promises.readFile(path.resolve(__dirname, `../db/${args.slice(0,2).join('/')}`), {encoding: 'utf-8'}).then(res => {
            console.log('res', res);
            console.log(log)
            return {
                flag: true,
                data: res,
            };
        })
    } else {
        return {
            flag: false,
            data: {}
        };
    }
};

// write.js
const {
    isExit,
    fs,
    path,
    stringify,
    compose,
    genCollection,
    addCollection,
    addLog,
    updateCollection,
    updateLog,
    removeCollection,
    removeLog,
    genDocument
} = require('./utils');

exports.write = async (method, ...args) => {
    console.log('write args', args, typeof args[2]);
    const isDirExit = isExit(args.slice(0, 1));
    const doc = genDocument(...args);
    let col = '', log = '';
    switch (method) {
        case 'ADD':
            col = compose( stringify, addCollection )(doc, genCollection(...args));
            log = compose( stringify, addLog, genCollection )(...args);
            break;
        case 'REMOVE':
            col = compose( stringify, removeCollection )(doc, genCollection(...args));
            log = compose( stringify ,removeLog, genCollection )(...args);
            break;
        case 'UPDATE':
            col = compose( stringify, updateCollection )(doc, genCollection(...args));
            log = compose( stringify, updateLog, genCollection )(...args);
            break;
    }

    if (!isDirExit) {
        return fs.promises.mkdir(path.resolve(__dirname, `../db/${args[0]}`))
            .then(() => {
                console.log(`創建數據庫${args[0]}成功`);
                return true;
            })
            .then(flag => {
                if (flag) {
                    return fs.promises.writeFile(path.resolve(__dirname, `../db/${args.slice(0,2).join('/')}`), col)
                        .then(() => {
                            console.log(log);
                            return true;
                        })
                        .catch(err => console.error(err))
                }
            })
            .catch(err => console.error(err))
    } else {
        return fs.promises.writeFile(path.resolve(__dirname, `../db/${args.slice(0,2).join('/')}`), col)
            .then(() => {
                console.log(log)
                return true;
            })
            .catch(err => console.error(err))
    }
};對於工具函數utils,代碼如下:
// utils
const { DOCUMENTS_SCHEMA, COLLECTIONS_SCHEMA } = require('./model');

const { v4: uuidv4 } = require('uuid');

const path = require('path');

const fs = require('fs');

exports.path = path;
exports.uuid = uuidv4;
exports.fs = fs;

exports.compose = (...funcs) => {
    if(funcs.length===0){
        return arg=>arg;
    }
    if(funcs.length===1){
        return funcs[0];
    }
    return funcs.reduce((a,b)=>(...args)=>a(b(...args)));
};

exports.stringify = arg => JSON.stringify(arg);

exports.isExit = (...args) => fs.existsSync(path.resolve(__dirname, `../db/${args.join('/')}`));

console.log('DOCUMENTS_SCHEMA', DOCUMENTS_SCHEMA);

exports.genDocument = (...args) => {
    return {
        _name: args[1],
        _collections: []
    }
};

console.log('COLLECTIONS_SCHEMA', COLLECTIONS_SCHEMA);

exports.genCollection = (...args) => {
    return {
        _id: uuidv4(),
        ...args[2]
    }
};

exports.addCollection = ( doc, col ) => {
    doc._collections.push(col);
    return doc;
};

exports.removeCollection = ( doc, col ) => {
    for(let i = 0; i < doc._collections.length; i++) {
        if(doc._collections[i][`_id`] == col._id) {
            doc._collections.splice(i,1)
        }
    }
    return doc;
};

exports.findCollection = ( doc, col ) => {
    return doc._collections.filter(f => f._id == col._id)[0];
};

exports.updateCollection = ( doc, col ) => {
    doc._collections = [col];
    return doc;
};

exports.addLog = (arg) => {
    return `增加了集合 ${JSON.stringify(arg)}`
};

exports.removeLog = () => {
    return `移除集合成功`
};

exports.findLog = () => {
    return `查詢集合成功`
};

exports.updateLog = (arg) => {
    return `更新了集合 ${JSON.stringify(arg)}`
};
run.sh
對於邊緣側,由於其自身的環境限制,通常來説構建邊緣側運行時便成為了邊緣計算性能好壞的關鍵因素。近年來,各大廠商及開發者都致力於對邊緣側運行時環境的探索。
其中,個人以為以“Rust+WebAssembly"的運行時構建技術方案相對來説具有一定的優勢。首先,Rust自身是內存安全的,其對邊緣場景有着天然的優勢;其次,WebAssembly是各大語言轉換方案中的一種重要橋樑,尤其對於以大前端為技術底座的體系而言,更可謂是恰如其分的彌補了前端體系的缺陷;最後,基於“rust+wasm”的方案相較於docker而言具有更小的初始體積。故而,這裏採用了業界已有的WasmEdge的現成運行時方案,運行腳本代碼如下:
# 下載wasmedge邊緣運行時
wget https://github.com/second-state/wasmedge-quickjs/releases/download/v0.5.0-alpha/wasmedge_quickjs.wasm

# 運行邊緣側node.js服務
$ wasmedge --dir .:. wasmedge_quickjs.wasm app.js
雲側
目錄結構
- go
  - compute
    - machine.go
    - metal.go
    - service.go
  - network
    - balance.go
    - virtual.go
  - storage
    - block.go
    - container.go
    - file.go
    - object.go
  - build.sh
  - main.go
- src
    - database.js----------------------------------------------------- 雲數據庫封裝
    - index.js-------------------------------------------------------- 雲函數sdk打包入口
    - storage.js------------------------------------------------------ 雲存儲封裝
- minio.yaml---------------------------------------------------------- 雲端對象存儲部署
- mongo.yaml---------------------------------------------------------- 雲端數據庫部署
核心邏輯
go
go部分是進行雲中間件相關產物的構建,這裏不是前端Serverless構建的核心,需要配合雲產商或者雲相關的部門進行協作,這裏以go語言為基礎藍本,簡寫下相關產品的一些偽碼邏輯
database.js
基於雲端數據庫產品的封裝,對於Serverless而言,主要是以mongodb的NoSQL數據庫為主
storage.js
基於雲端存儲產品的封裝,包括:對象存儲、塊存儲、文件存儲等
index.js
Serverless雲函數相關的sdk封裝,代碼如下:
import database from './database';
import storage from './storage';

function cloud() {
    console.log('vwaver-cloud-sdk');
}

cloud.prototype.database = database;

cloud.prototype.storage = storage;

export default cloud;
minio.yaml
對於雲平台的對象存儲,採用minio的k8s相關部署,代碼如下:
apiVersion: v1
kind: Pod
metadata:
  labels:
    app: minio
  name: minio
spec:
  containers:
  - name: minio
    image: quay.io/minio/minio:latest
    command:
    - /bin/bash
    - -c
    args:
    - minio server /minio --console-address :9090
    volumeMounts:
    - mountPath: /minio
      name: minio-volume
  volumes:
  - name: minio-volume
    hostPath:
      path: /mnt/minio
      type: DirectoryOrCreate
---
apiVersion: v1
kind: Service
metadata:
  name: minio
spec:
  type: ClusterIP
  selector:
    app: minio
  ports:
  - port: 9090
    targetPort: 9090
mongo.yaml
對於雲平台的mongodb數據庫,部署代碼如下:
apiVersion: apps/v1
kind: Deployment
metadata:
  name: mongodb
  labels:
    app: mongodb
spec:
  replicas: 3
  selector:
    matchLabels:
      app: mongodb
  template:
    metadata:
      labels:
        app: mongodb
    spec:
      containers:
      - name: mongodb
        image: hub.docker.com/mongo:latest
        imagePullPolicy: Always
        resources:
            limits:
              cpu: 5
              memory: 10G
            requests:
              cpu: 1
              memory: 1G
        env:
          - name: MONGO_INITDB_ROOT_USERNAME  # 設置用户名
            value: admin
          - name: MONGO_INITDB_ROOT_PASSWORD  # 設置密碼
            value: abc123
        volumeMounts:
          - mountPath: /mongodb
            name: mongodb-volume
      volumes:
        - name: mongodb-volume
          hostPath:
            path: /mnt/mongodb
            type: DirectoryOrCreate
---
apiVersion: v1
kind: Service
metadata:
  name: mongodb
spec:
  type: ClusterIP
  selector:
    app: mongodb
  ports:
  - port: 27017
    targetPort: 27017
總結
對於本次應用構建,對於業務的邏輯而言,其實還是相對簡單的,但是對於環境的部署與調試帶來的不確定性還是需要各位開發者去思考和延展的,尤其是對於複雜邊緣場景的生產化過程,其本身的複雜性也要遠遠超過業務邏輯本身,可進行如下總結:
- 端側:提供高適配性能的應用兼容,要注意某些特殊尺寸及渲染引擎剪切造成的功能問題
- 邊側:渲染場景中對於離線要求較高,提供高性能的
runtime是重中之重,例如:wasmedge(rust+wasm) - 雲側:提供基於
k8s或者k3s的服務編排集羣,支持Serverless化,提供雲、邊、端一致性的環境部署及開發
業務開發本身並不僅僅是考察如何對業務邏輯進行拆解,更重要的是能夠透過業務本身來思考今後開發過程中的研發模式以及一些痛點問題的解決與規避,前端工程師並不僅僅是一個業務邏輯的實現者,更要是問題的發現者,發現問題、解決問題並形成一套統一的模板方案,這才是工程師的標準與要求,共勉!!!
最後,本次業務實踐的代碼也進行了開源,有需要的同學可以進行查看,如果覺得還可以還可以的話,歡迎點個 star~
- vwaver-iiot-end
- vwaver-iiot-edge
- vwaver-iiot-cloud
參考
- 【華為雲 IoTEdge 學習筆記】四大常見邊緣場景如何深度使用
- 史上最全的邊緣計算應用場景
- UCS(優勢)—邊緣計算五大典型應用場景
- 一文讀懂邊緣計算及其應用場景
- 帶你走進 PWA 在業務中的實踐方案
- 現代化 Web 開發實踐之 PWA
- PWA 技術在遊戲落地中的探索
- 使用 workbox 開發 PWA
- PWA實踐/應用(Google Workbox)
- k8s部署MongoDB
- Minio官網
- WasmEdge官網
- Mongoose官網
- 邊緣雲上的微服務:使用 WasmEdge 和 Rust 構建高性能且安全的應用


