


作者: vivo 互聯網客户端團隊- Zhang Qin
本文從桌面掛件開發過程中遇到的GIF圖片難以加載的問題展開,分別介紹了現有的掛件中加載GIF圖片的兩種可行方案——ViewFlipper和AnimatedImageDrawable,同時闡述了兩種的方案的優缺點。然後針對現有方案中的痛點,結合現有方案,提出通過網絡下發GIF並通過逐幀解析得到幀圖片,再採用ViewFlipper來實現加載的方案,解決痛點中的引入資源過多導致包體增大的問題,使掛件既能不增加包體又能展示GIF。
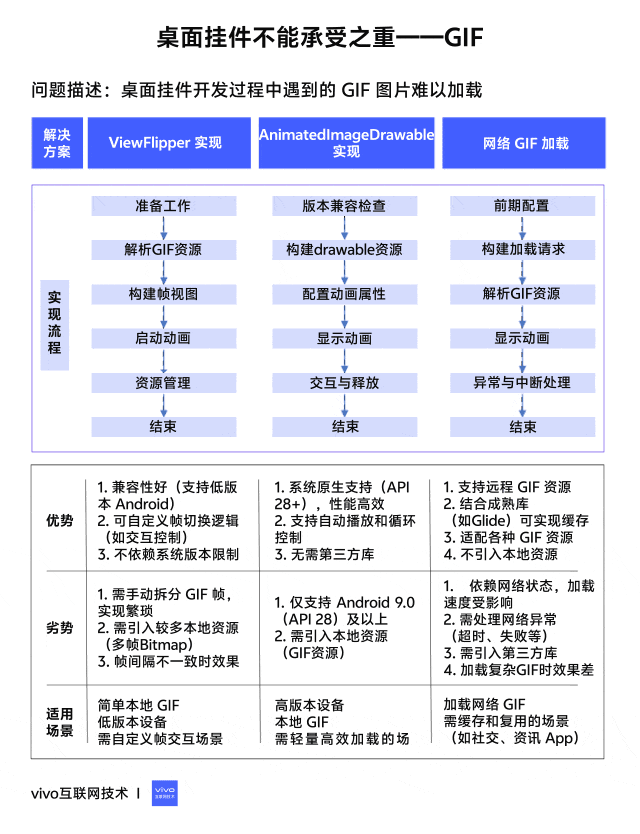
1分鐘看圖掌握核心觀點👇
一、背景
眾所周知,Android原生的原子組件(AppWidget,又名桌面掛件)所能使用的View有限,僅能支持如下的:
layout(佈局):
-
AdapterViewFlipper
-
FrameLayout
-
GridLayout
-
GridView
-
LinearLayout
-
ListView
-
RelativeLayout
-
StackView
-
ViewFlipper
widgets(小部件):
-
AnalogClock
-
Button
-
Chronometer
-
ImageButton
-
ImageView
-
ProgressBar
-
TextClock
-
TextView
從API 31開始,還支持如下的小部件和佈局:
-
CheckBox
-
RadioButton
-
RadioGroup
-
Switch
需要注意一點,除了上述這些之外,其餘所有的都不支持,包括繼承自這些類的子類同樣也不支持。因此我們能夠看出,開發AppWidget的侷限性比較大,只有限定的佈局和小部件能夠使用,且不能通過繼承來實現自定義的炫酷效果。這裏也解釋了為什麼筆者一開始不直接使用Lottie、PAG等來實現複雜的動畫,完全是被限制了。
不僅如此,組件內由於使用的都是Remoteviews,Remoteviews可以在其它進程中進行顯示,我們可以跨進程更新它的界面。Remoteviews在Android中的主要應用是通知欄和桌面掛件。也正式掛件中使用的是Remoteviews,所以我們不能像普通Android應用一樣使用findViewById或者viewbinding來獲取View的對象並通過view對象來設置相應的屬性等。在掛件中只能使用Remoteviews中的一些方法,這些方法基本都是通過反射方式進行封裝來實現的,比如設置ImageView的圖片,Remoteviews中只提供瞭如下四種方法:
/**
 * Equivalent to calling {@link ImageView#setImageResource(int)}
 *
 * @param viewId The id of the view whose drawable should change
 * @param srcId The new resource id for the drawable
 */
publicvoidsetImageViewResource(@IdResint viewId, @DrawableResint srcId){
    setInt(viewId, "setImageResource", srcId);
}

/**
 * Equivalent to calling {@link ImageView#setImageURI(Uri)}
 *
 * @param viewId The id of the view whose drawable should change
 * @param uri The Uri for the image
 */
publicvoidsetImageViewUri(@IdResint viewId, Uri uri){
    setUri(viewId, "setImageURI", uri);
}

/**
 * Equivalent to calling {@link ImageView#setImageBitmap(Bitmap)}
 *
 * @param viewId The id of the view whose bitmap should change
 * @param bitmap The new Bitmap for the drawable
 */
publicvoidsetImageViewBitmap(@IdResint viewId, Bitmap bitmap){
    setBitmap(viewId, "setImageBitmap", bitmap);
}

/**
 * Equivalent to calling {@link ImageView#setImageIcon(Icon)}
 *
 * @param viewId The id of the view whose bitmap should change
 * @param icon The new Icon for the ImageView
 */
publicvoidsetImageViewIcon(@IdResint viewId, Icon icon){
    setIcon(viewId, "setImageIcon", icon);
}
從源碼中可以看到,setImageViewResource 方法只能傳入int類型的資源,也就是在資源文件中的資源ID,除此之外就是Bitmap、Uri和Icon類型,無法支持Drawable等類型。由此可見,組件中的View其實只能包含普通View的一部分功能,限制比較明顯。
二、掛件加載 GIF 的可行方案
言歸正傳,首先,我們介紹下在組件中加載GIF的可行方案,主要有兩種:
2.1 方案一:使用ViewFlipper來實現逐幀動畫的效果
此方案是利用Remoteviews支持的ViewFlipper控件,配合多個ImageView來循環顯示,達到類似逐幀動畫的效果。佈局內容如下:
<ViewFlipper
    android:layout_width="40dp"
    android:layout_height="40dp"
    android:layout_gravity="end|center_vertical"
    android:autoStart="true"
    android:flipInterval="90">

    <ImageView
        android:layout_width="40dp"
        android:layout_height="40dp"
        android:src="@drawable/before_sign_in_anim0" />

    <ImageView
        android:layout_width="40dp"
        android:layout_height="40dp"
        android:src="@drawable/before_sign_in_anim15" />

    <ImageView
        android:layout_width="40dp"
        android:layout_height="40dp"
        android:src="@drawable/before_sign_in_anim28" />

    <ImageView
        android:layout_width="40dp"
        android:layout_height="40dp"
        android:src="@drawable/before_sign_in_anim43" />

    <ImageView
        android:layout_width="40dp"
        android:layout_height="40dp"
        android:src="@drawable/before_sign_in_anim57" />

    <ImageView
        android:layout_width="40dp"
        android:layout_height="40dp"
        android:src="@drawable/before_sign_in_anim71" />

    <ImageView
        android:layout_width="40dp"
        android:layout_height="40dp"
        android:src="@drawable/before_sign_in_anim85" />

    <ImageView
        android:layout_width="40dp"
        android:layout_height="40dp"
        android:src="@drawable/before_sign_in_anim100" />
</ViewFlipper>ViewFlipper中的一些常用方法如下:
-
setInAnimation:設置View或ImageView進入屏幕時使用的動畫
-
setOutAnimation:設置View或ImageView退出屏幕時使用的動畫
-
showNext:調用該方法來顯示ViewFlipper裏的下一個View或ImageView
-
showPrevious:調用該方法來顯示ViewFlipper的上一個View或ImageView
-
setFilpInterval:設置View或ImageView之間切換的時間間隔
-
startFlipping:使用上面設置的時間間隔來開始切換所有的View或ImageView,切換會循環進行
-
stopFlipping:停止View或ImageView切換
-
isAutoStart:是否自動開始播放
在作為動畫設置時,需要在xml文件中設置autoStart屬性為true,保證動畫能夠自動播放。
優點:
-
各版本兼容性好,ViewFlipper是API 11時引入的,目前應該不會有比這低的了;
缺點:
-
ImageView過多,代碼也多,修改替換麻煩;
-
在Remoteviews中,ViewFlipper的很多方法無法使用,比如停止播放等。
2.2 方案二:使用AnimatedImageDrawable來顯示GIF動畫
Android 9.0 中引入了一個新的Drawable來顯示GIF圖片:AnimatedImageDrawable,對應的xml標籤是<animated-image>,這樣一來,我們可以直接將一個GIF圖片before_sign_in.gif放到drawable目錄中,然後新建一個before_sign_in_anim.xml來引用:
<?xml version="1.0" encoding="utf-8"?>
<animated-image xmlns:android="http://schemas.android.com/apk/res/android"
    android:autoStart="true"
    android:autoMirrored="true"
    android:src="@drawable/ic_test_gif" />
其中的ic_test_gif就是我們的.gif文件。
我們可以看下AnimatedImageDrawable的屬性:
<!-- Drawable used to draw animated images(gif). -->
    <declare-styleable name="AnimatedImageDrawable">
        <!-- Identifier of the image file. This attribute is mandatory.
             It must be an image file with multiple frames, e.g. gif or webp -->
        <attr name="src" />
        <!-- Indicates if the drawable needs to be mirrored when its layout direction is
             RTL(right-to-left). -->
        <attr name="autoMirrored" />
        <!-- Replace the loop count in the encoded data. A repeat count of 0 means that
             the animation will play once, regardless of the number of times specified
             in the encoded data. Setting this to infinite(-1) will result in the
             animation repeating as long as it is displayed(once start() is called). -->
        <attr name="repeatCount"/>
        <!-- When true, automatically start animating. The default is false, meaning
             that the animation will not start until start() is called. -->
        <attr name="autoStart" />
    </declare-styleable>
從中我們可以發現,這裏可以設置repeatCount循環次數,設置為0的話表示只播放一次。
此時,我們只需要將drawable設置給ImageView即可,在Remoteviews中,考慮到版本兼容問題,我們通過如下方式設置:
remoteViews.setImageViewResource(
    R.id.abnormal_static_cat,
    if (Build.VERSION.SDK_INT >= Build.VERSION_CODES.P) {
        R.drawable.before_sign_in_anim
    } else {
        R.drawable.before_sign_in_static
    }
)優點:資源少,一個GIF只要一個xml,且替換簡單;
缺點:只有Android9以上的系統可以用。
2.3 現有方案的痛點
上述描述的兩種方案中,都會引入很多資源文件,這必然會增加應用的包體,導致包體增大不少,因此可以考慮通過服務端下發的方式來實現,那麼問題就來了:
1)如果通過方案一,那麼客户端必須寫定一個xml,寫定一定數量的ImageView來供下發的圖片加載,當然了,可以動態的添加,但這裏是組件,動態添加會比普通的view動態添加稍微麻煩些,這個我們後面再説。
2)如果通過方案二,那麼就有問題了,前面已經提到了,組件裏面的ImageView是不支持通過Drawable對象來設置內容的,這就導致了就算我們能夠得到AnimatedImageDrawable對象,我們也沒辦法設置,況且要得到這樣一個Drawable,也比較困難(沒有深究如何得到)。
戛然而止了,兩個方案實現起來聽着都不太靠譜,那麼有沒有什麼好的方案呢?
三、可行方案探索
3.1 初探
想到這裏,大家可能會問,為什麼不使用Glide呢?這個強大的圖片加載庫總不會沒有這樣的方法吧?
確實,Glide給AppWidget提供了專門的圖片加載方式,其實現方式如下:
val appwidgetTarget = AppWidgetTarget(context, R.id.abnormal_static_cat, remoteViews, ComponentName(context, TestWidgetProvider::class.java))
Glide.with(context)
   .asBitmap()
   .load(url)
   .into(appwidgetTarget)
但是從上面可以看出,這個只能加載Bitmap,如果是asGif,則在into時沒有target這個選項,只能into(ImageView)。因此這個方法也行不通。
3.2 思索與嘗試
這裏還要説一點,如果是將圖片下載到手機本地,再去讀取本地文件,還需要考慮存儲權限的問題,而這裏是原子組件,如果需要請求權限,那麼就得找一個落地頁去承載,且組件的卡片上最好也需要有這個説明,這樣的話UI改動會比較大,且如果沒有同意權限就會出現展示不了圖片的情況,這也很不友好。
綜上,只能在請求網絡圖片時就把GIF加載出來,這樣既不需要上述的那些繁瑣的權限授予過程,也不會增加包體的大小。
受到上面第一個方案的啓發,我們可以把GIF圖的逐幀圖片取出來,然後通過方案一來展示,這樣就能實現了。
3.2.1 獲取網絡 GIF 圖片
首先是拿到網絡的GIF圖片,這裏我們採用Glide來獲取(Glide還是好用啊),採用Glide還有一個好處是,Glide會針對圖片作緩存,這樣我們重複加載同一張圖不會重複消耗流量:
Glide.with(context)
    .asGif()
    .load(url)
    .diskCacheStrategy(DiskCacheStrategy.ALL)
    .submit(432, 432)
    .get()
3.2.2 得到 GIF 的逐幀圖片
然後是將得到的GIF進行解析,得到逐幀的圖片,這裏我們引入一個工具庫:implementation("pl.droidsonroids.gif:android-gif-drawable:1.2.24"),該庫在Vhub上已有上傳,可以直接使用:
@WorkerThread
fun getAllFrameBitmapByUrl(context: Context, url: String): MutableList<Bitmap> {
    val frameBitmaps: MutableList<Bitmap> = ArrayList()
    var gifDrawable: GifDrawable? = null
    try {
        val gif = Glide.with(context)
            .asGif()
            .load(url)
            .diskCacheStrategy(DiskCacheStrategy.ALL)
            .submit(432, 432)
            .get()
        gifDrawable = GifDrawable(gif.buffer)
        val totalCount = gifDrawable.numberOfFrames
        for(i in 0 until totalCount){
            frameBitmaps.add(gifDrawable.seekToFrameAndGet(i))
        }
    } catch (t: Throwable) {
        VLog.e(TAG, "getAllFrameBitmapByUrl Error.", t)
    } finally {
        gifDrawable?.stop()
    }
    return frameBitmaps
}
這樣我們就得到了包含GIF所有幀圖片的列表了(美滋滋~),接下來就可以根據方案一處理每一幀的圖片了。
3.2.3 加載
然後,就報錯了,lang.IllegalArgumentException: RemoteViews for widget update exceeds maximum bitmap memory usage (used: 236588800, max: 15396480)。由於Remoteviews是跨進程的傳輸,並不是傳統意義上的view,其內部是通過Binder來實現的,因此當ImageView去setImageBitmap的時候,需要注意設置進去的bitmap是否超過了大小限制。
最大的Size公式為:The total Bitmap memory used by the RemoteViews object cannot exceed that required to fill the screen 1.5 times, ie. (screen width x screen height x 4 x 1.5) bytes.也就是RemoteViews 對象使用的總 Bitmap 內存不能超過填滿屏幕 1.5 倍所需的內存,即 (屏幕寬度 x 屏幕高度 x 4 x 1.5) 字節。這個在AppWidgetServiceImpl.java中有相應的定義:
privatevoidcomputeMaximumWidgetBitmapMemory(){
    Display display = mContext.getDisplayNoVerify();
    Point size = new Point();
    display.getRealSize(size);
    // Cap memory usage at 1.5 times the size of the display
    // 1.5 * 4 bytes/pixel * w * h ==> 6 * w * h
    mMaxWidgetBitmapMemory = 6 * size.x * size.y;
}
而且,RemoteViews源碼內部維護了一個:BitmapCache mBitmapCache, 每次設置bitmap進來,都會被緩存起來,最終計算RemoteViews佔用內存大小的話,也會把這塊算進去。
/**
     * Call a method taking one Bitmap on a view in the layout for this RemoteViews.
     * @more
     * <p class="note">The bitmap will be flattened into the parcel if this object is
     * sent across processes, so it may end up using a lot of memory, and may be fairly slow.</p>
     *
     * @param viewId The id of the view on which to call the method.
     * @param methodName The name of the method to call.
     * @param value The value to pass to the method.
     */
    publicvoidsetBitmap(@IdResint viewId, String methodName, Bitmap value){
        addAction(new BitmapReflectionAction(viewId, methodName, value));
    }

...

    BitmapReflectionAction(@IdResint viewId, String methodName, Bitmap bitmap) {
       this.bitmap = bitmap;
       this.viewId = viewId;
       this.methodName = methodName;
       bitmapId = mBitmapCache.getBitmapId(bitmap);
    }

...

    publicintgetBitmapId(Bitmap b){
        if (b == null) {
            return -1;
        } else {
            int hash = b.hashCode();
            int hashId = mBitmapHashes.get(hash, -1);
            if (hashId != -1) {
                return hashId;
            } else {
                if (b.isMutable()) {
                    b = b.asShared();
                }
                mBitmaps.add(b);
                mBitmapHashes.put(mBitmaps.size() - 1, hash);
                mBitmapMemory = -1;
                return (mBitmaps.size() - 1);
           }
       }
   }
這裏由於GIF解析出來的幀圖片太多,如果每一張都設置的話,確實太多了,那麼就需要採取採樣的方式,目前設定的是每5張中取一張,然後設置了每一張圖片的大小也不能超過閾值,另外總體也設置了一個閾值,防止超過報錯。這裏就會出現兩個問題,一個是單張圖片限制了大小閾值,必定會出現壓縮、採樣,導致單張圖片質量下降,不像原先那麼高清,第二個是幀圖片太多,就算單張限制了閾值,總體也會超過總體的閾值,在超過總體前一幀時直接return,這樣就會導致最終的動畫和GIF相比可能被截斷。反覆試驗,找了個相對平衡的點,既保證單張圖片的清晰度,也保證整體的完整性,但這個方案不夠健壯,會隨着GIF圖的變化出現不同的問題。
下面介紹下上面説的這個方案,原理上基本清晰,就是通過ViewFlipper,向其中動態添加ImageView,每一個ImageView加載一幀圖片,從而達到動畫效果。
val viewFlipper = RemoteViews(context.packageName, R.layout.sign_in_view_flipper)
var allSize = 0
kotlin.run {
    frameBitmaps.forEachIndexed { index, it ->
        logger.d("allSize = $allSize, index = $index")
        if (index % 5 != 0) {
            return@forEachIndexed
        }
        val ivRemoteViews = RemoteViews(context.packageName, R.layout.sign_in_per_frame_bitmap_view)
        var bitmapSize = GifDownloadUtils.getBitmapSize(it)
        var bitmap = it
        val matrix = Matrix()
        var scale = 432f / bitmap.width
        logger.d("start, bitmapSize = $bitmapSize")
        matrix.setScale(scale, scale)
        while (bitmapSize >= GifDownloadUtils.MAX_WIDGET_BITMAP_MEMORY) {
            bitmap = Bitmap.createBitmap(bitmap, 0, 0, bitmap.width, bitmap.height, matrix, true)
            bitmapSize = GifDownloadUtils.getBitmapSize(bitmap)
            logger.d("bitmapSize = $bitmapSize, scale = $scale")
            scale /= 2f
            matrix.setScale(scale, scale)
        }
        allSize += bitmapSize
        logger.d("allSize = $allSize")
        if (allSize >= GifDownloadUtils.maxTotalWidgetBitmapMemory()) {
            return@run
        }
        ivRemoteViews.setImageViewBitmap(R.id.iv_per_frame, bitmap)
        viewFlipper.addView(R.id.view_flipper, ivRemoteViews)
    }
}

logger.d("addView")
// 這裏是由於addView添加的View都會顯示在最上面,所以這裏通過在原卡片中添加相同id的view,先把原卡的移除,再把新建的添加進去,達到更新的效果,這樣佈局的層級就還是原先的層級。
remoteViews.removeAllViews(R.id.view_flipper)
remoteViews.addView(R.id.view_flipper, viewFlipper)
其中frameBitmaps就是上面獲得的所有圖片。
到這裏網絡GIF圖片的加載也基本完成了。
四、總結
上述提出的加載網絡GIF的方案,雖然解決了現有方案中加載GIF需要引入很多圖片資源或者GIF資源,導致包體大小增加的問題,但是如果GIF圖片本身質量較高,通過新方案可能會降低GIF的質量。
上述三種方案的優缺點和適用場景總結如下:
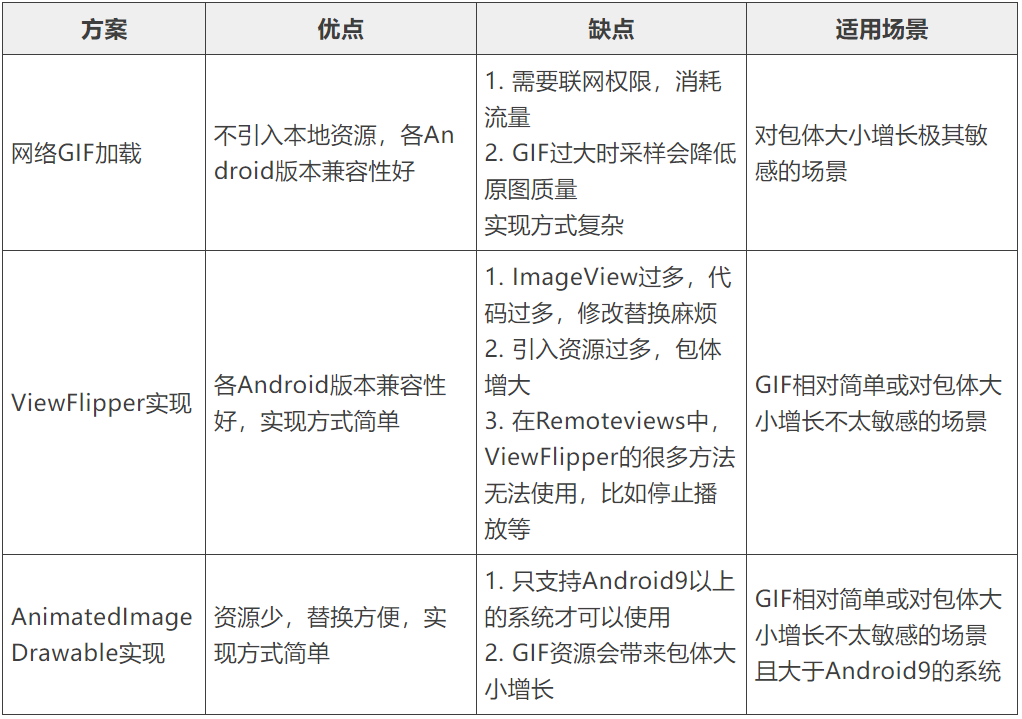
總而言之,具體採用哪種方案需要根據實際開發的具體需要來實現,綜合方案的優缺點和適用場景來選擇。
