一. 概述
1.為什麼使用SpringBoot
Spring雖然有很多優點, 但是Spring框架的搭建非常麻煩
1. 配置麻煩,而且很多都是模版化的配置(固定的)
2. 需要添加很多依賴, 例如web層依賴jackson組件,需要我們自己添加, 版本也可能不匹配
基於以上兩點,spring官方推出了SpringBoot .
2. 搭建
new project ---- java ----Maven
添加父工程 (不放在dependencies裏面)
<!--依賴的父級工程-->
<parent>
<groupId>org.springframework.boot</groupId>
<artifactId>spring-boot-starter-parent</artifactId>
<version>2.6.6</version>
<relativePath/>
</parent>
添加依賴
<!--添加基本的 springweb 依賴-->
<dependencies>
<dependency>
<groupId>org.springframework.boot</groupId>
<artifactId>spring-boot-starter-web</artifactId>
</dependency>
</dependencies>
添加打包插件(不放在dependencies裏面)
<!--打包插件-->
<build>
<plugins>
<plugin>
<groupId>org.springframework.boot</groupId>
<artifactId>spring-boot-maven-plugin</artifactId>
<version>2.6.6</version>
</plugin>
</plugins>
</build>
添加啓動類
package com.ffyc.news;

import org.mybatis.spring.annotation.MapperScan;
import org.springframework.boot.SpringApplication;
import org.springframework.boot.autoconfigure.SpringBootApplication;
import org.springframework.scheduling.annotation.EnableScheduling;

/*springboot應用的啓動類*/

@SpringBootApplication
//@EnableScheduling
@MapperScan("com.ffyc.news.dao")
public class NewsApplication {

    public static void main(String[] args) {
        SpringApplication.run(NewsApplication.class);
    }
}
創建web層 service層 dao層 model層 config層(配置層) interceptor層(攔截器)
在resources下創建applicantion.yml文件(配置值的文件)
3. 配置值文件
application.properties
屬性文件格式,內容為鍵值對 server.port=8080
properties 格式比較簡單,沒有什麼難度,在此我們以第二種 yaml 格式為例.
application.yml(重要)
yml 是 YAML(YAML Ain’t Markup Language)語言的文件,以數據為中心.
1.yaml 基本語法: 語法結構:key:空格 value; ( 注意: 空格不能省略)
2. 以空格的縮進來控制層級關係,只要是左邊對齊的一列數據都是同一個層級的;
3. 字面量直接寫在後面就可以,字符串默認不用加上雙引號或者單引號;
4. 以#作為註釋符號.
5. 使用@Value 註解標籤將配置文件中的內容映射到類中的屬性. @Value("${user.name}")
4. Spring數據訪問管理
數據源配置
為了連接數據庫需要引入 jdbc 支持,在 pom.xml 中添加依賴 (記得添加 mysql 驅動依賴)
<dependency>
<groupId>org.springframework.boot</groupId>
<artifactId>spring-boot-starter-jdbc</artifactId>
</dependency>
在 application.yml 中配置數據源信息(本次使用的是阿里數據源)
spring:
datasource:
driver-class-name: com.mysql.cj.jdbc.Driver
#url: jdbc:mysql://127.0.0.1:3306/newsdb?serverTimezone=Asia/Shanghai
url: jdbc:mysql://192.168.244.128:3306/newsdb?serverTimezone=Asia/Shanghai
username: root
password: root
type: com.alibaba.druid.pool.DruidDataSource #指定數據庫連接管理類
initialSize: 5
maxActive: 20
添加阿里數據源依賴
<!-- 阿里數據源 -->
<dependency>
<groupId>com.alibaba</groupId>
<artifactId>druid</artifactId>
<version>1.1.10</version>
</dependency>
複製一個前端項目, 刪除裏面不需要的文件和配置
5. 解決跨域問題
出現此錯誤需要解決跨域問題
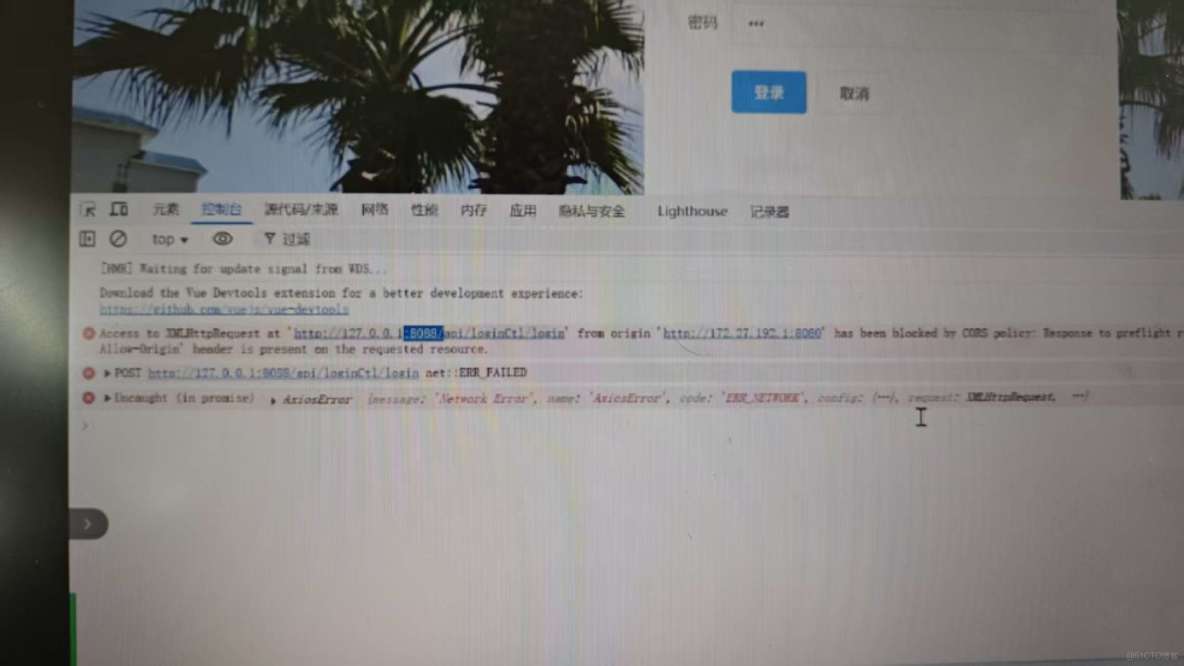
添加配置類
package com.ffyc.news.config;


import org.springframework.context.annotation.Bean;
import org.springframework.context.annotation.Configuration;
import org.springframework.web.cors.CorsConfiguration;
import org.springframework.web.cors.UrlBasedCorsConfigurationSource;
import org.springframework.web.filter.CorsFilter;
import java.util.Collections;


@Configuration//配置類,啓動時被掃描
public class CorsConfig {

    @Bean//等價於<bean id="" class=""/>配置我們的類(創建 配置 和返回對象),交給spring管理
    public CorsFilter corsFilter() {
        CorsConfiguration corsConfiguration = new CorsConfiguration();
        //1,允許任何來源
        corsConfiguration.setAllowedOriginPatterns(Collections.singletonList("*"));
        //2,允許任何請求頭
        corsConfiguration.addAllowedHeader(CorsConfiguration.ALL);
        //3,允許任何方法
        corsConfiguration.addAllowedMethod(CorsConfiguration.ALL);
        //4,允許憑證
        corsConfiguration.setAllowCredentials(true);

        UrlBasedCorsConfigurationSource source = new UrlBasedCorsConfigurationSource();
        source.registerCorsConfiguration("/**", corsConfiguration);
        return new CorsFilter(source);
    }


}
雖然springboot簡化了spring應用的搭建,將一些常用的基礎組件自動配置
但是項目中會用到各種各樣的組件,有的組件springboot沒有提供自動配置,
需要我們自己來配置
springboot不使用xml文件配置,而是使用Java代碼中配置
6.token攔截器
操作: 登錄成功後在後端生成token, 在前端瀏覽器保存token
在util包下導入jwt(秘鑰獲得token),並添加依賴.
package com.ffyc.news.util;
import com.auth0.jwt.JWT;
import com.auth0.jwt.algorithms.Algorithm;
import com.auth0.jwt.interfaces.DecodedJWT;
import com.auth0.jwt.interfaces.JWTVerifier;
import com.ffyc.news.model.Admin;
import com.ffyc.news.model.User;
import java.util.Date;
import java.util.HashMap;
import java.util.Map;
/**
* JWT工具類
*/
public class JWTUtil {
/**
* 根據用户id,賬號生成token
* @param admin
* @return
*/
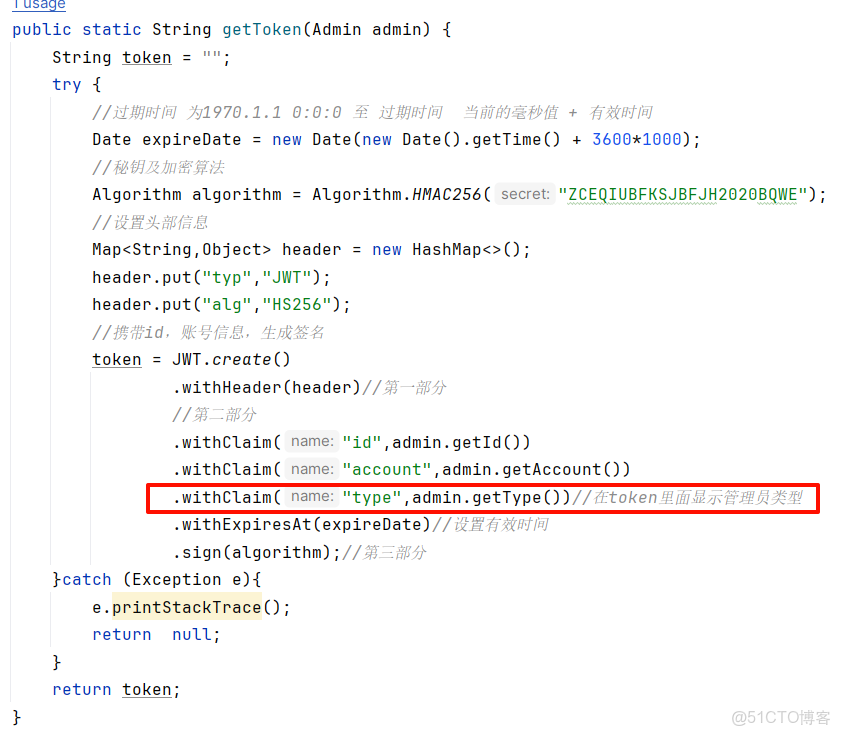
public static String getToken(Admin admin) {
String token = "";
try {
//過期時間 為1970.1.1 0:0:0 至 過期時間 當前的毫秒值 + 有效時間
Date expireDate = new Date(new Date().getTime() + 3600*1000);
//秘鑰及加密算法
Algorithm algorithm = Algorithm.HMAC256("ZCEQIUBFKSJBFJH2020BQWE");
//設置頭部信息
Map<String,Object> header = new HashMap<>();
header.put("typ","JWT");
header.put("alg","HS256");
//攜帶id,賬號信息,生成簽名
token = JWT.create()
.withHeader(header)//第一部分
//第二部分
.withClaim("id",admin.getId())
.withClaim("account",admin.getAccount())
.withClaim("type",admin.getType())//在token裏面顯示管理員類型
.withExpiresAt(expireDate)//設置有效時間
.sign(algorithm);//第三部分
}catch (Exception e){
e.printStackTrace();
return null;
}
return token;
}
public static String getUserToken(User user) {
String token = "";
try {
//過期時間 為1970.1.1 0:0:0 至 過期時間 當前的毫秒值 + 有效時間
Date expireDate = new Date(new Date().getTime() + 3600*24*14*1000);
//秘鑰及加密算法
Algorithm algorithm = Algorithm.HMAC256("ZCEQIUBFKSJBFJH2020BQWE");
//設置頭部信息
Map<String,Object> header = new HashMap<>();
header.put("typ","JWT");
header.put("alg","HS256");
//攜帶id,賬號信息,生成簽名
token = JWT.create()
.withHeader(header)//第一部分
//第二部分
.withClaim("id",user.getId())
.withClaim("email",user.getEmail())
.withExpiresAt(expireDate)//設置有效時間
.sign(algorithm);//第三部分
}catch (Exception e){
e.printStackTrace();
return null;
}
return token;
}
/**
* 驗證token是否有效
* @param token
* @return
*/
public static boolean verify(String token){
try {
//驗籤
Algorithm algorithm = Algorithm.HMAC256("ZCEQIUBFKSJBFJH2020BQWE");
JWTVerifier verifier = JWT.require(algorithm).build();
DecodedJWT jwt = verifier.verify(token);
return true;
} catch (Exception e) {//當傳過來的token如果有問題,拋出異常
return false;
}
}
/**
* 獲得token 中playload部分數據,按需使用
* @param token
* @return
*/
public static DecodedJWT getTokenInfo(String token){
return JWT.require(Algorithm.HMAC256("ZCEQIUBFKSJBFJH2020BQWE")).build().verify(token);
}
public static Admin getOperAdmin(String token){
DecodedJWT decodedJWT = JWTUtil.getTokenInfo(token);
int adminid = decodedJWT.getClaim("id").asInt();
Admin admin = new Admin();
admin.setId(adminid);
return admin;
}
}<!--jwt組件-->
<dependency>
<groupId>com.auth0</groupId>
<artifactId>java-jwt</artifactId>
<version>3.8.2</version>
</dependency>
操作: 在後端創建token驗證攔截器,並配置攔截器
添加攔截器
package com.ffyc.news.interceptor;

import com.auth0.jwt.JWT;
import com.fasterxml.jackson.databind.ObjectMapper;
import com.ffyc.news.model.Result;
import com.ffyc.news.util.JWTUtil;
import org.springframework.web.servlet.HandlerInterceptor;

import javax.servlet.http.HttpServletRequest;
import javax.servlet.http.HttpServletResponse;

//攔截器
public class TokenInterceptor implements HandlerInterceptor {
    @Override
    public boolean preHandle(HttpServletRequest request, HttpServletResponse response, Object handler) throws Exception {
        String token =request.getHeader("token");
        System.out.println("token 認證攔截器:"+token);
        if(JWTUtil.verify(token)){//認證token
            return true;//離開攔截器,繼續向後到達自定義處理器
        }else {
            response.setContentType("text/html;charset=utf-8");//設置響應內容的格式

            Result result = new Result(401,"token認證失敗",null);
            response.getWriter().write(new ObjectMapper().writeValueAsString(result));
            return false;//不繼續向後執行
        }
    }
}
配置攔截器
package com.ffyc.news.config;

import com.ffyc.news.interceptor.TokenInterceptor;
import com.ffyc.news.interceptor.UserTokenInterceptor;
import org.springframework.context.annotation.Configuration;
import org.springframework.web.servlet.config.annotation.*;

@Configuration
public class WebConfig implements WebMvcConfigurer{
    //添加(配置)攔截器
	public void addInterceptors(InterceptorRegistry registry) {
		//添加(配置)管理員攔截器
		InterceptorRegistration inter =  registry.addInterceptor(new TokenInterceptor());//註冊自己的攔截器
		inter.addPathPatterns("/api/**"); //進入攔截器的地址 (管理員需要攔截的地址)
		inter.excludePathPatterns("/api/loginCtl/login");//不進入攔截器的地址
       //添加(配置)用户攔截器
		InterceptorRegistration userInter =  registry.addInterceptor(new UserTokenInterceptor());//註冊自己的攔截器
		userInter.addPathPatterns("/user/userCtl/**"); //進入攔截器的地址 (管理員需要攔截的地址)
		//以下不需要進入攔截器
		userInter.excludePathPatterns("/user/userCtl/createCode");//生成郵箱驗證碼不進入攔截器的地址
		userInter.excludePathPatterns("/user/userCtl/saveUser");//註冊保存不進入攔截器的地址
		userInter.excludePathPatterns("/user/userCtl/create");//生成圖形驗證碼不進入攔截器的地址
		userInter.excludePathPatterns("/user/userCtl/login");//用户登錄不進入攔截器的地址

	}

}
7. 管理員管理
數據初始化: 建一張admin表,並填充幾個數據

查詢基本的管理員列表
為列表添加查詢條件功能
前端( 注意: 添加在el-card下面就好了 )
<!-- 查詢條件-->
<el-row :gutter="20">
<el-col :span="6">
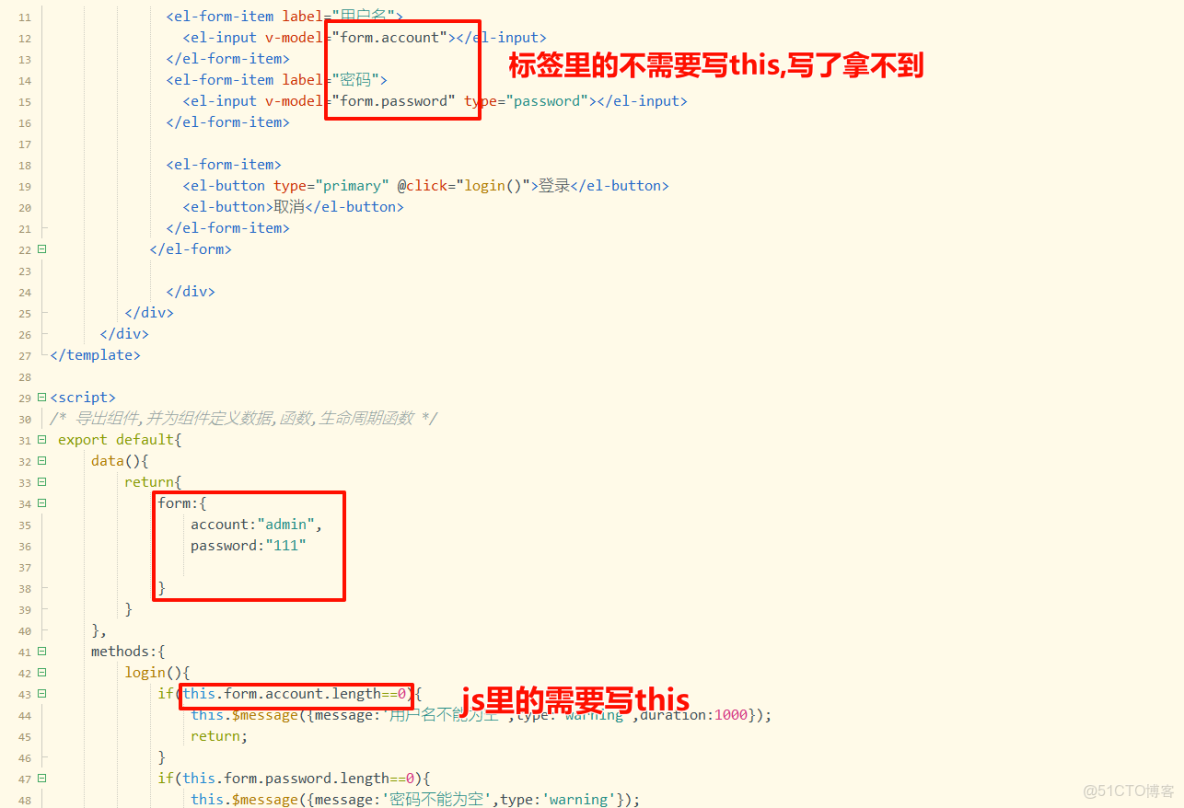
<el-input placeholder="賬號" v-model="form.account"></el-input>
</el-col>
<el-col :span="6">
<el-input placeholder="電話" v-model="form.phone"></el-input>
</el-col>
<el-col :span="6">
<el-button type="primary" icon="el-icon-search" @click="findList()" >查詢</el-button>
</el-col>
</el-row>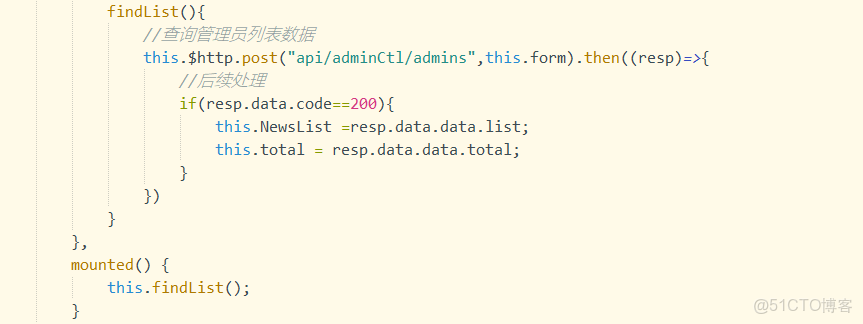
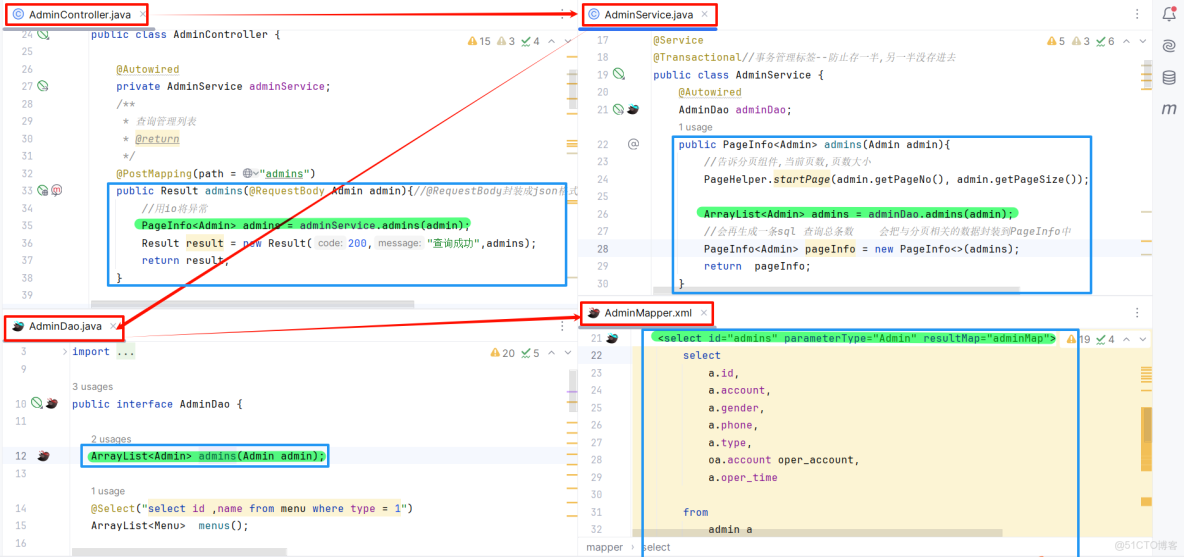
後端:大部分和基礎查詢的寫法一致,少部分有改變 例如:
將數據封裝在admin對象裏面,同時添加判斷
<resultMap id="adminMap" type="Admin">
    <id column="id" property="id"></id>
    <result column="account" property="account"></result>
    <result column="gender" property="gender"></result>
    <result column="phone" property="phone"></result>
    <result column="type" property="type"></result>
    <result column="oper_time" property="operTime"></result>
        <!--封裝操作人對象數據-->
        <association property="admin" javaType="Admin">
            <result column="oper_account" property="account"></result>
        </association>

</resultMap>

<select id="admins" parameterType="Admin" resultMap="adminMap">
        select
            a.id,
            a.account,
            a.gender,
            a.phone,
            a.type,
            oa.account oper_account,
            a.oper_time

        from
            admin a
                inner join admin oa
                           on a.adminid = oa.id
        where a.type = 1
        <if test="account!=''">
            and a.account=#{account}
        </if>
        <if test="phone!=''">
            and a.phone=#{phone}
        </if>

    </select>
8. 分頁組件
1. 後端使用mybatis分頁組件, 快捷實現後端分頁功能
添加分頁組件依賴
<!-- pagehelper依賴 -->
<dependency>
<groupId>com.github.pagehelper</groupId>
<artifactId>pagehelper-spring-boot-starter</artifactId>
<version>1.2.5</version>
</dependency>
applicantion.yml中
spring: main: allow-circular-references: true #開始支持spring循環依賴
public PageInfo<Admin> admins(Admin admin){
        //告訴分頁組件,當前頁數,頁數大小,會自動算出開始位置,並且會在sql後面自動添加limit語句
        PageHelper.startPage(admin.getPageNo(), admin.getPageSize());
        ArrayList<Admin> admins = adminDao.admins(admin);
        //會再生成一條sql 查詢總條數    會把與分頁相關的數據封裝到PageInfo中
        PageInfo<Admin> pageInfo = new PageInfo<>(admins);
        return  pageInfo;
    }
2. 前端使用elementui
<!-- 分頁組件-->
<el-pagination
@size-change="handleSizeChange"
@current-change="handleCurrentChange"
:current-page="form.pageNo"
:page-sizes="[2,4,6,8]"
:page-size="form.pageSize"
layout="total, sizes, prev, pager, next, jumper"
:total="total">
</el-pagination>

9. 新增管理員對話框
導入導入--註冊組件--使用組件
添加方法,打開對話框(this.$refs.add.dialogVisible =true;)----調用方法
修改之前的div內容(例如this. form)
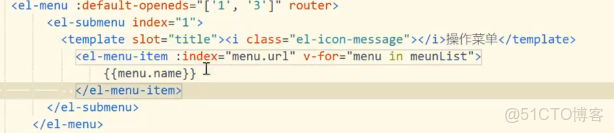
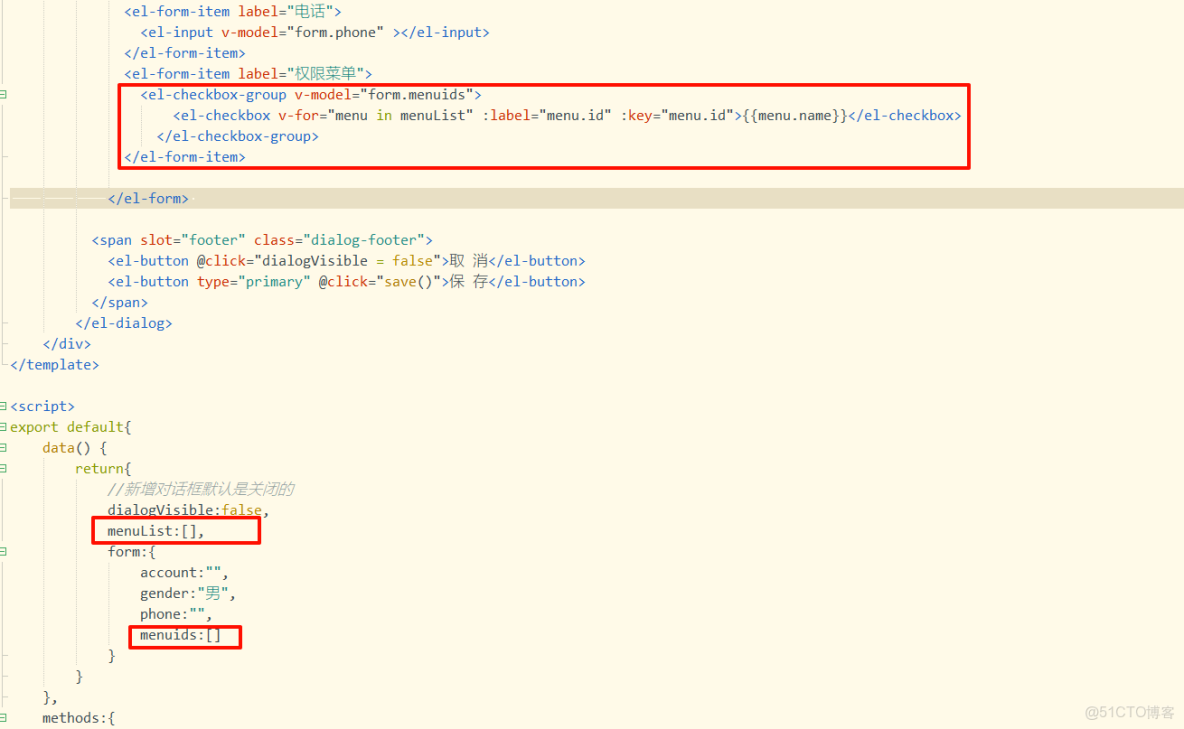
10.動態顯示菜單數據
(1)搭建靜態菜單信息
順序: controller層---service層---dao層---mapper層
注意: menu是以ArrayList數組的形式返回
簡單的數據直接以註解的形式在dao層查詢, 不用到mapper層
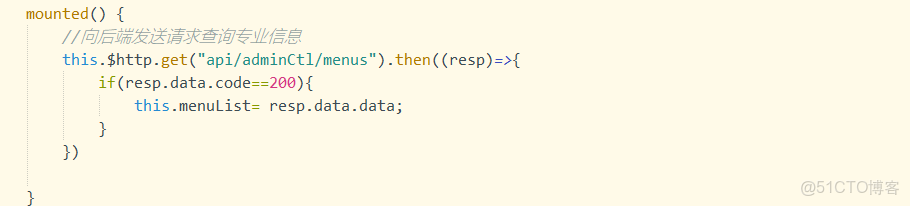
(2)動態查詢菜單信息
組件格式可以通過elementUI查找 (這裏只展示部分代碼)
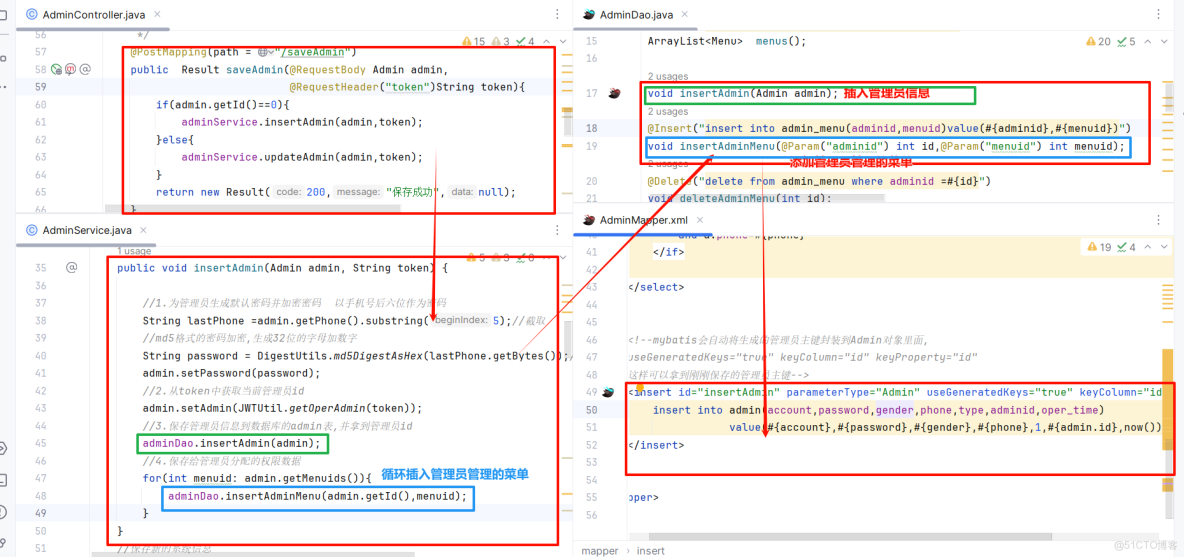
11.新增並保存管理員
(1)後端接收
注意: token需要添加註解 @RequestHeader("token")
1.為管理員生成默認密碼並加密密碼
2.從token中獲取當前管理員id
3.保存管理員信息到數據庫的admin表,並拿到管理員id
4.保存給管理員分配的權限數據
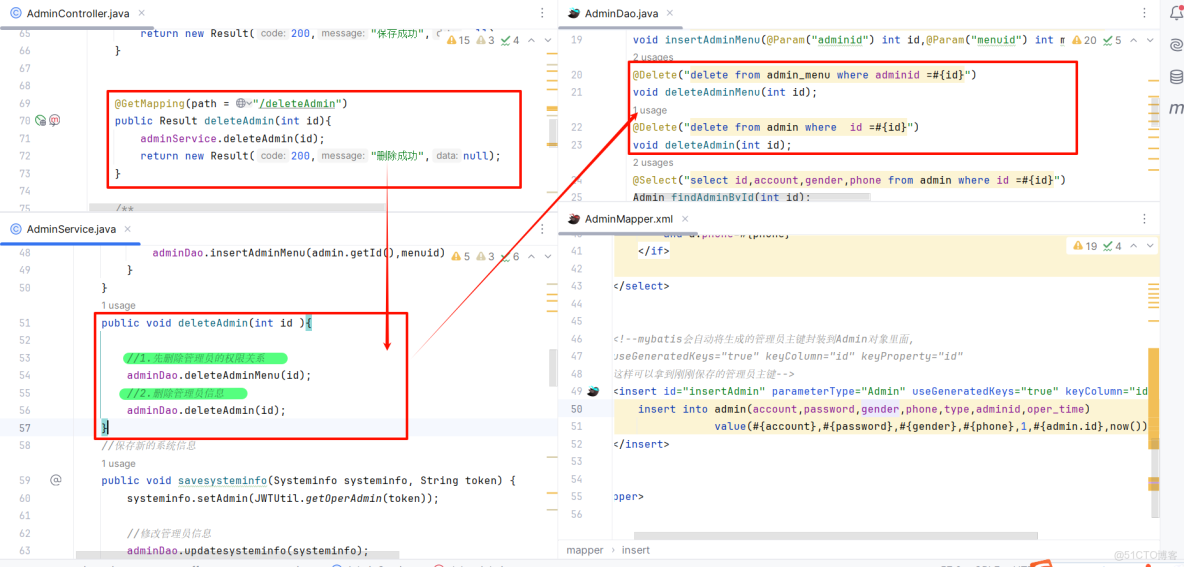
12. 刪除管理員
注意: 先刪除關係表, 再刪除管理員
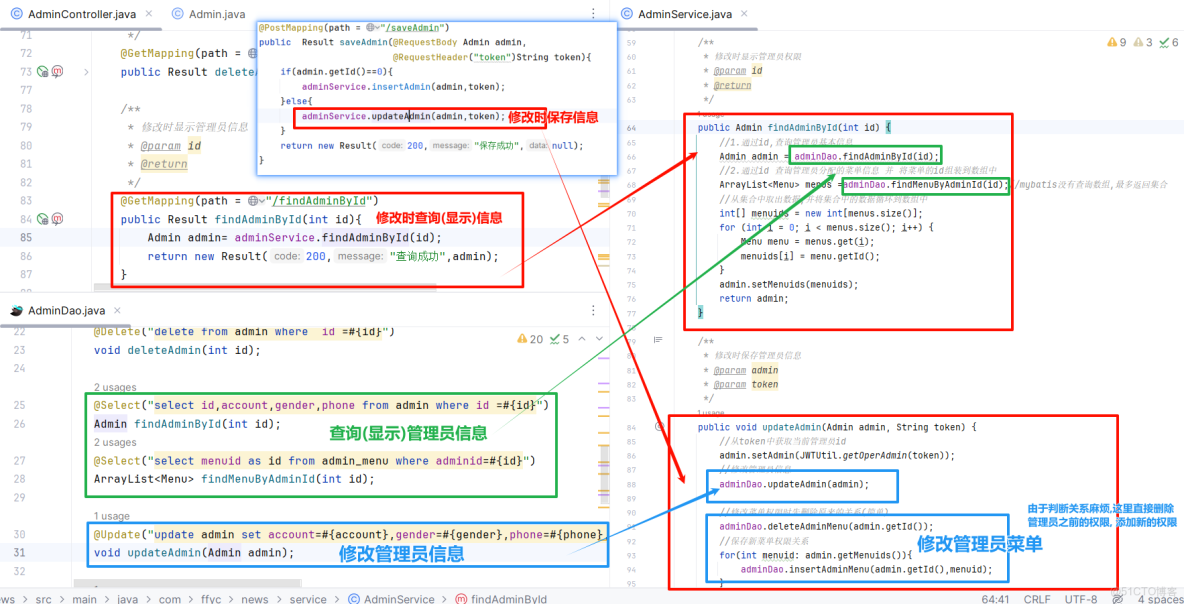
13.修改管理員
14.添加登錄時密碼加密
修改登錄
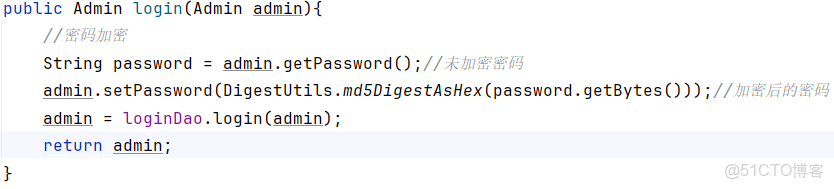
修改jwt密碼加密

15. 動態循環查詢菜單
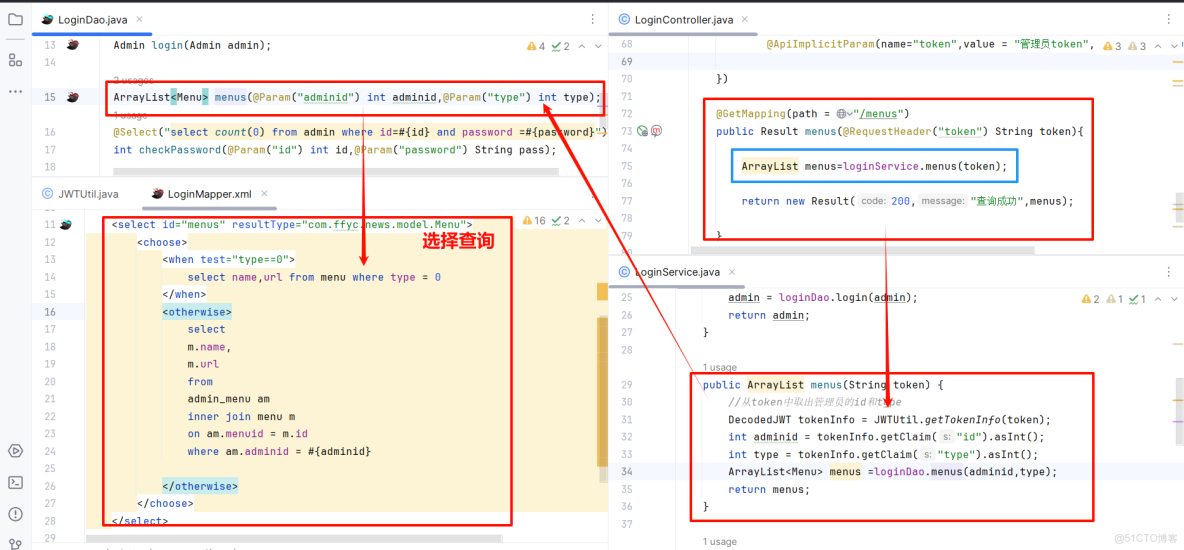
注意: 兩個參數以上時傳遞參數需要使用註解