笑而不語是一種豁達,痛而不言是一種歷練。時間改變着一切,一切改變着我們,曾經看不慣,受不了的,如今不過淡然一笑。
成熟,不是看破,而是看淡,原先看不慣的如今習慣了,曾經想要的,現在不需要了,開始執着的,後來很曬脱了...
成長的路上,人總要沉澱下來,過一段寧靜而自醒的日子,來整理自己,沉澱再沉澱,然後成為一個温柔而強大的人!
目前公司的業務線中存在許多未進行前後端分離的 Spring MVC 項目,其中前端使用 JQuery 操作 DOM,後端使用 Freemarker 模板引擎進行渲染。由於有許多產品需求需要在 React 項目和 Spring MVC 項目中都實現,如果兩邊都獨立開發,工作量必然會增加很多。因此,我們需要設計一種方法,將 React 組件適配應用到 Spring MVC 項目中,以降低不必要的人力成本,併為將來漸進式項目重構打下基礎。
設計方案
一個常見的設計思想是將業務組件封裝為一個獨立的模塊,其中包含掛載和卸載函數。通過使用構建工具將該模塊打包成一個優化過的 JavaScript bundle,並將其上傳到 CDN(內容分發網絡)。當瀏覽器加載頁面時,引入該 JavaScript bundle,然後通過調用掛載函數,將該組件動態地掛載到指定的容器元素上。
當涉及到大範圍的組件應用於 MVC(Model-View-Controller)頁面時,簡單的設計思想可能會面臨一些挑戰和不足之處:
- 命令行工具:每個組件都需要經過適配封裝、構建、版本控制以及上傳
CDN過程,如果每一個組件都採用手動處理,工作量勢必會增加。為了減少手動處理,可以通過編寫命令行工具,可以將這些步驟整合到一個流程中,並簡化操作。這樣,每次適配一個組件時,只需要運行相應的腳本或命令,自動完成封裝、構建、版本控制和上傳的工作。這種自動化的方式可以節省時間和精力,並確保一致性和可靠性; - 版本維護:需要制定一套版本管理策略,以確保
JavaScript bundle的版本控制,每次構建生成的bundle都生成一個新的版本,並自動部署到CDN上,而不是手動維護上傳版本。並且,為了方便所有應用方使用版本一致並實現同時更新,建議創建一個版本映射文件或數據庫。該文件/數據庫記錄每個應用所使用的bundle版本,並提供一個統一的接口供應用方查詢和更新版本; -
公共依賴和代碼拆分:每個組件都依賴於相同的基礎庫(比如
React、ReactDOM、lodash、axios、@casstime/bricks等),將這些重複的庫打包進每個組件的bundle中不夠優雅,重複的代碼會導致打包後的文件體積增大,影響應用程序的加載性能。可以考慮將這些共享的基礎庫提取為一個公共bundle,通過CDN分發,並在MVC頁面中引入這個公共bundle。這樣可以避免重複打包這些庫,減小bundle的大小,可以利用瀏覽器的緩存機制,減少重複加載的請求,提高應用程序的性能;├─┬ @casstime/bre-suit-detail-popup │ ├── react@18.2.0 │ ├── react-dom@18.2.0 │ ├── lodash-es@4.17.21 │ ├── axios@0.19.2 │ ├── @casstime/bricks@2.13.8 │ ├── @casstime/bre-media-preview@1.115.1 │ │ ├── react@18.2.0 │ │ ├── react-dom@18.2.0 │ │ ├── @casstime/bricks@2.13.8 │ │ └── lodash-es@4.17.21 │ ├── @casstime/bre-thumbnail@1.102.0 │ │ ├── react@18.2.0 │ │ ├── react-dom@18.2.0 │ │ ├── @casstime/bricks@2.13.8 │ │ ├── axios@0.19.2 │ │ └── react-dom@18.2.0 - 樣式隔離:為了確保組件樣式既可以被外部修改覆蓋,又能與外部樣式隔離,組件內部樣式定義採用
BEM(Block Element Modifier)命名規範。然而,在MVC項目中,BEM命名規範並不能完全隔離組件樣式與外部樣式的影響。這是因為MVC項目中存在一些不規範的樣式定義,比如使用標籤選擇器和頻繁使用!important來提高樣式的優先級(例如.classname span { font-size: 20px !important; }),這可能會影響到組件樣式的隔離性。
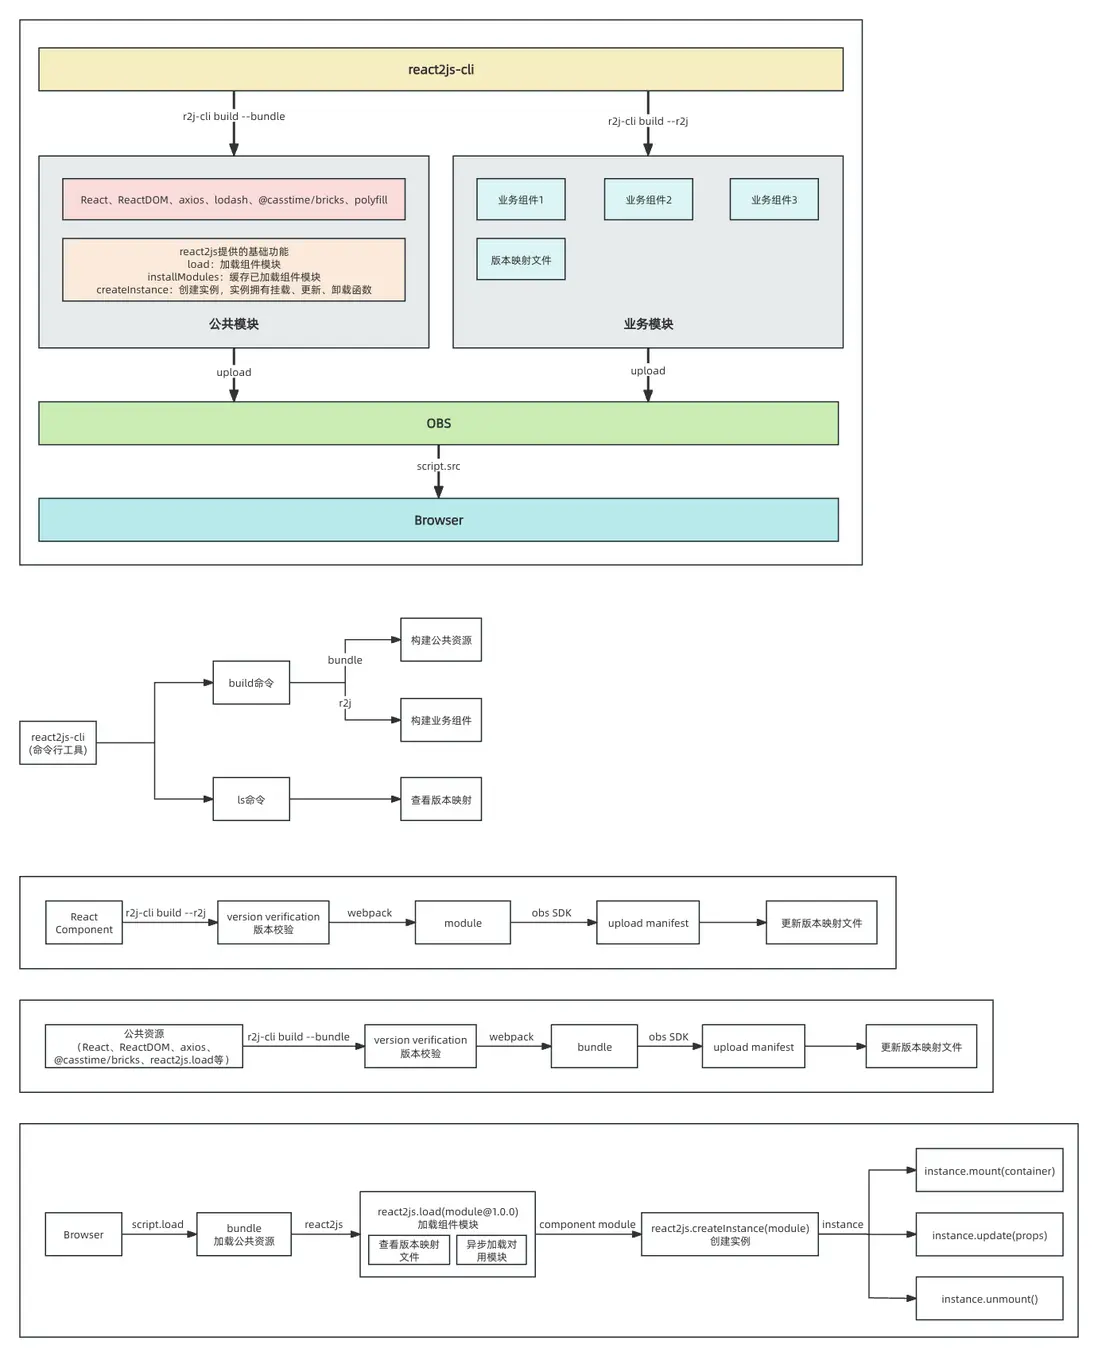
綜合考慮之後,可以對整個架構設計進行如下調整:
實現落地
搭建命令行工具
使用 yargs 庫可以方便地搭建命令行工具
(1)安裝 yargs 庫:
yarn add yargs(2)創建一個新的文件,例如 bin/r2j-cli.js,作為命令行工具的入口文件
#!/usr/bin/env node

require("yargs")
  .scriptName("r2j-cli")
  .commandDir("../commands")
  .demandCommand(1, "您最少需要提供一個參數")
  .usage("Usage: $0 <command> [options]")
  .example(
    "$0 build r2j -n demo -v 1.0.0 -e index.tsx",
    "將業務組件轉化成控件"
  )
  .example(
    "$0 ls -n demo",
    "列舉指定模塊的版本"
  )
  .help("h").argv;
(3)在package.json中添加bin字段,將命令行工具的入口文件關聯到一個可執行的命令
{
  "bin": {
    "r2j-cli": "./bin/r2j-cli.js"
  },
}
(4)在項目根目錄下創建一個名為 commands 的文件夾,並在該文件夾中創建兩個命令腳本文件,build.js 和 ls.js
// build.js
const path = require("path");
const fs = require("fs");

// r2j-cli build <strategy>命令在業務組件根目錄下執行
const dir = fs.realpathSync(process.cwd());
const { name = '', version = '' } = require(path.resolve(dir, 'package.json'));
const entry = path.resolve(dir, 'index.tsx');

exports.command = 'build <strategy>'; // strategy指定構建策略,分為bundle和r2j兩種
exports.desc = '將業務組件轉化成控件';
exports.builder = {
  // 參數定義
  name: {
    alias: 'n',
    describe: '包名',
    type: 'string',
    demand: false,
    // 默認為業務組件根目錄package.json的name
    default: name
  },
  // 這裏不能定義成version,與命令行存在的參數version重名,會導致設置option不成功
  componentVersion: {
    alias: 'v',
    describe: '版本',
    type: 'string',
    demand: false,
    // 默認為業務組件根目錄package.json的version
    default: version
  },
  entry: {
    alias: 'e',
    describe: '入口文件路徑',
    type: 'string',
    demand: false,
    // 默認入口文件為業務組件根目錄下index.tsx
    default: entry
  },
  mode: {
    alias: 'm',
    describe: '指定構建環境',
    type: 'string',
    demand: false,
    // 默認用“生產”模式構建,壓縮混淆處理
    default: 'production'
  },
};

exports.handler = function () {
  /** 1、解析命令參數 */

  /** 2、版本校驗 */

  /** 3、執行構建 */

  /** 4、上傳構建產物 */

  /** 5、更新版本日誌 */
};
// ls.js
exports.command = 'ls';
exports.desc = '列舉指定模塊的版本';
exports.builder = {
name: {
alias: 'n',
describe: '包名',
type: 'string',
demand: false, // 非必需,沒有提供包名列舉所有模塊的版本清單
},
};
exports.handler = function () {
/** 1、解析命令參數 */
/** 2、獲取版本日誌,輸出控制枱 */
};build 命令
當搭建命令行腳本框架後,你可以開始補全 build <strategy> 命令的處理函數。首先,需要處理命令參數,並將其賦值給全局環境變量,因為這些命令參數將在 webpack.config.js 配置腳本中使用。
exports.handler = function (argv) {
  /** 1、解析命令參數 */
  const { strategy, name, componentVersion, entry, mode } = argv;
  // 因為命令參數在webpack.config.js配置腳本中會被使用,所以此處將其賦值到全局環境變量
  process.env.STRATEGY = argv.strategy || 'r2j';
  process.env.NAME = argv.name;
  process.env.VERSION = argv.componentVersion;
  process.env.ENTRY = path.resolve(process.cwd(), argv.entry);
  process.env.MODE = argv.mode;

  /** 2、版本校驗 */

  /** 3、執行構建 */

  /** 4、上傳構建產物 */

  /** 5、更新版本日誌 */
};
在構建之前校驗指定的版本是否已經存在,你可以引入 OBS Node.js SDK 開發包,並調用提供的方法判斷對象存儲服務中是否已經存在該版本。如果版本已經存在,你可以在原有基礎上遞增版本號,並更新 package.json 文件中的 version 屬性。
// config.js
exports.COMPONENT_DIRNAME = 'xxx/xxx'; // 對應桶的存放目錄

// obs.js
const ObsClient = require('esdk-obs-nodejs');
const readline = require('readline');
const chalk = require('chalk');
const path = require('path');
const fs = require('fs');
const moment = require('moment');
const { COMPONENT_DIRNAME } = require('./config');

process.env.OBS_ACCESS_KEY = process.env.OBS_ACCESS_KEY || 'your OBS_ACCESS_KEY';
process.env.OBS_ACCESS_KEY_SECRET = process.env.OBS_ACCESS_KEY_SECRET || 'your OBS_ACCESS_KEY_SECRET';
process.env.ACCESS_OBS_SERVER = process.env.ACCESS_OBS_SERVER || 'your ACCESS_OBS_SERVER';
process.env.OBS_BUCKET = process.env.OBS_BUCKET || 'your OBS_BUCKET';

// 單例模式創建實例
const Singleton = (() => {
  let instance; // 單例實例
  const createInstance = () => {
    // 創建ObsClient實例
    return new ObsClient({
      access_key_id: process.env.OBS_ACCESS_KEY,
      secret_access_key: process.env.OBS_ACCESS_KEY_SECRET,
      server: process.env.ACCESS_OBS_SERVER,
    });
  };

  return {
    getClient: () => {
      if (instance) return instance;
      return createInstance();
    },
    closeClient: () => {
      // 關閉obsClient
      if (instance) instance.close();
    }
  }
})();

// 檢查文件在obs是否存在
const checkIfExists = async (fileName) => {
  try {
    // 獲取對象屬性
    const result = await Singleton.getClient().getObjectMetadata({
      Bucket: process.env.OBS_BUCKET,
      Key: path.join(COMPONENT_DIRNAME, fileName)
    });
    // 如果能獲取到,則表明該版本存在
    if (result.CommonMsg && result.CommonMsg.Status === 200) return true;
    return false;
  } catch (error) {
    Singleton.closeClient();
    console.log(chalk.red(error));
    process.exit(1);
  }
}

// 拼接文件名,比如:@casstime/bre-upload@1.0.0
const joinedFileName = (version) => {
  const { NAME, VERSION } = process.env;
  return `${NAME}@${version || VERSION}.js`;
}

/** readline 是創建交互式命令庫,創建一個 rl 實例 */
const rl = readline.createInterface({
  input: process.stdin,
  output: process.stdout
});

/** 判斷版本是否已經存在 */
const checkVersion = async (version) => {
  const isExist = await checkIfExists(joinedFileName(version));
  if (isExist) {
    // 如果版本號已經存在,在現有的版本號基礎上升級
    const regex = /^(\d+)\.(\d+)\.(\d+)(?:-(.*))?$/;
    let [_, major, minor, patch, preRelease] = version.match(regex);

    let versionComponents = [parseInt(major, 10), parseInt(minor, 10), parseInt(patch, 10)];
    let index = 2; // 從 patch 組件開始

    while (index >= 0) {
      if (versionComponents[index] < 100) {
        versionComponents[index]++;
        break;
      } else {
        versionComponents[index] = 0;
        index--;
      }
    }

    if (componentIndex < 0) {
      console.log(chalk.red('版本維護以達到上限!'));
      process.exit(0);
    }

    [major, minor, patch] = versionComponents;

    const defaultVersion = `${major}.${minor}.${patch}${preRelease ? `-${preRelease}` : ''}`;
    return await new Promise((resolve) => {
      rl.question(chalk.yellow(`${version} 該版本已存在, 請指定新的版本(如果按回車鍵,會默認在原來版本上升級版本號 ${defaultVersion}): `), async (newVersion) => {
        if (newVersion.trim() === '') {
          newVersion = defaultVersion; // 設置默認回答的version
        }
        newVersion = await checkVersion(newVersion);
        resolve(newVersion);
      });
    })
  } else {
    rl.close();
    return version;
  }
}

/** 更新package.json中的version */
const updatePackageVersion = (version) => {
  const pkgPath = path.resolve(fs.realpathSync(process.cwd()), 'package.json');
  // 讀取 package.json 文件
  fs.readFile(pkgPath, 'utf8', (err, data) => {
    if (err) {
      console.error('Error reading package.json:', err);
      process.exit(1);
    }

    try {
      const packageData = JSON.parse(data);
      // 修改 version 字段的值
      packageData.version = version; // 設置新的版本號
      // 保存修改後的 package.json 文件
      fs.writeFile(pkgPath, JSON.stringify(packageData, null, 2), 'utf8', (err) => {
        if (err) {
          console.error('Error writing package.json:', err);
          return;
        }
        console.log(chalk.green('package.json version updated successfully.\n'));
      });
    } catch (err) {
      console.error('Error parsing package.json:', err);
    }
  });
}

// build.js
exports.handler = async function () {
  /** 1、解析命令參數 */

  /** 2、版本校驗 */
  const actualVersion = await checkVersion(process.env.VERSION);
  if (process.env.VERSION !== actualVersion) {
    process.env.VERSION = actualVersion;
    // 更新package.json中的version
    updatePackageVersion(actualVersion); // 異步更新package.json中的version字段
  }
  /** 3、執行構建 */

  /** 4、上傳構建產物 */

  /** 5、更新版本日誌 */
};
在解析參數和版本校驗之後,你將獲得業務組件的入口文件和構建版本號等重要參數。接下來,你可以執行 react2js-cli 項目中的構建腳本,開始構建過程。
const { execSync } = require('child_process');
// build.js
exports.handler = function () {
  /** 1、解析命令參數 */

  /** 2、版本校驗 */

  /** 3、執行構建 */
  const cliRoot = path.normalize(path.resolve(__dirname, '..'));
  execSync(`cd ${cliRoot} && npm run build`); // 同步
  /** 4、上傳構建產物 */

  /** 5、更新版本日誌 */
};
要在 react2js-cli 項目的根目錄的 package.json 文件中配置 build 命令
{
  "scripts": {
    "build": "rimraf dist && webpack",
  }
}
要根據需求配置 webpack 的 webpack.config.js 腳本,以滿足以下要求:
-
區分構建公共模塊和業務組件的導出方式:
- 公共模塊的導出應全部掛載到全局對象。
- 業務組件的導出應放在
react2js.installModules對象上,並進行緩存處理,避免每次重新請求拉取。
- 公共模塊的導出應全部掛載到全局對象。
- 配置外部依賴,使業務組件所依賴的公共模塊不應包含在業務組件的構建結果中,而是在運行時從外部獲取。
// utils/config
exports.CDN_DOMAIN = 'xxxxxx'; // CDN域名

exports.ORIGIN_SITE = 'xxxxxx'; // 源站域名

exports.COMPONENT_DIRNAME = 'xxxxx/xxxxx'; // 桶存放組件的目錄

exports.publicPath = `${exports.CDN_DOMAIN}/${exports.COMPONENT_DIRNAME}/`;

// postcss.config.js
module.exports = {
  plugins: [
    // postcss-flexbugs-fixes 插件的作用就是根據已知的 Flexbox 兼容性問題,自動應用修復,以確保在各種瀏覽器中獲得更一致和可靠的 Flexbox 佈局。
    require('postcss-flexbugs-fixes'),
    require('postcss-preset-env')({
      autoprefixer: {
        flexbox: 'no-2009',
      },
      stage: 3,
    }),
    require('postcss-normalize')(),
  ],
  map: {
    // source map 選項
    inline: true, // 將源映射嵌入到 CSS 文件中
    annotation: true // 為 CSS 文件添加源映射的註釋
  }
}

// webpack.config.js
const path = require("path");
const loaderUtils = require("loader-utils");
const { IgnorePlugin, BannerPlugin, ProvidePlugin } = require("webpack");
const { WebpackManifestPlugin } = require("webpack-manifest-plugin");
const { joinedFileName } = require("./utils/obs");
const { publicPath } = require("./utils/config");

// babel-preset-react-app 預設,該預設要求明確指定環境變量的值
process.env.BABEL_ENV = "production";
process.env.MODE = process.env.MODE || "production";

const getLibrary = () => {
  if (process.env.STRATEGY === "bundle") return "";
  /**
   * output.library配置項的字符串或數組形式來定義層級變量
   * 你可以使用點號(.)來表示層級關係 `react2js.installModules.${process.env.NAME}@${process.env.VERSION}`
   * 當頁面加載了組件模塊後,會緩存在react2js.installModules變量中,待頁面再次使用該組件模塊時,可以使用緩存數據,防止頁面多次使用一個組件模塊多次加載請求
   */
  return [
    "react2js",
    "installModules",
    `${process.env.NAME}@${process.env.VERSION}`,
  ];
};

/**
 * 配置external
 * 在構建業務組件時,公共模塊不參與構建,因此配置external
 */
const getExternals = () => {
  if (process.env.STRATEGY === "bundle") return {};
  return {
    react: "React",
    "react-dom": "ReactDOM",
    axios: "axios",
    lodash: "_",
    "@casstime/bricks": "bricks", // bricks.Button
  };
};

// style files regexes
const cssRegex = /\.css$/;
const cssModuleRegex = /\.module\.css$/;
const sassRegex = /\.(scss|sass)$/;
const sassModuleRegex = /\.module\.(scss|sass)$/;

const getStyleLoaders = (cssOptions, preProcessor) => {
  const loaders = [
    {
      loader: require.resolve("style-loader"),
      options: {
        injectType: "singletonStyleTag",
      },
    },
    {
      loader: require.resolve("css-loader"),
      options: cssOptions,
    },
    {
      loader: require.resolve("postcss-loader"),
    },
  ].filter(Boolean);
  if (preProcessor) {
    loaders.push(
      {
        // resolve-url-loader 是一個用於處理 CSS 文件中相對路徑的 Webpack 加載器。它可以為 CSS 文件中的相對路徑解析和處理,以確保在使用 CSS 中的相對路徑引用文件時,能夠正確地解析和定位這些文件
        loader: require.resolve("resolve-url-loader"),
        options: {
          sourceMap: true,
        },
      },
      {
        loader: require.resolve(preProcessor),
        options: {
          sourceMap: true,
        },
      }
    );
  }
  return loaders;
};

const getCSSModuleLocalIdent = (
  context,
  localIdentName,
  localName,
  options
) => {
  // Use the filename or folder name, based on some uses the index.js / index.module.(css|scss|sass) project style
  const fileNameOrFolder = context.resourcePath.match(
    /index\.module\.(css|scss|sass)$/
  )
    ? "[folder]"
    : "[name]";
  // Create a hash based on a the file location and class name. Will be unique across a project, and close to globally unique.
  const hash = loaderUtils.getHashDigest(
    path.posix.relative(context.rootContext, context.resourcePath) + localName,
    "md5",
    "base64",
    5
  );
  // Use loaderUtils to find the file or folder name
  const className = loaderUtils.interpolateName(
    context,
    fileNameOrFolder + "_" + localName + "__" + hash,
    options
  );
  // remove the .module that appears in every classname when based on the file.
  return className.replace(".module_", "_");
};

module.exports = {
  target: "web", // 指定打包後的代碼的運行環境,,默認選項 web
  mode: process.env.MODE,
  devtool: false,
  entry: process.env.ENTRY, // 入口文件路徑
  output: Object.assign(
    {
      filename: joinedFileName(), // 輸出文件名,@casstime/bre-upload@1.1.1
      path: path.resolve(__dirname, "dist"), // 輸出目錄路徑
      publicPath, // 指定在瀏覽器中訪問打包後資源的公共路徑
      libraryTarget: "umd",
    },
    process.env.STRATEGY === "bundle" ? {} : { library: getLibrary() }
  ),
  module: {
    rules: [
      {
        oneOf: [
          {
            test: /\.(js|mjs|jsx|ts|tsx)$/, // 匹配以 .js 結尾的文件
            // exclude: /node_modules/, // 排除 node_modules 目錄
            use: {
              // 使用 babel-loader 進行處理
              loader: "babel-loader",
              options: {
                cacheDirectory: true,
                presets: [
                  [
                    /**
                     * babel-preset-react-app 是一個由 Create React App (CRA) 提供的預設,用於處理 React 應用程序的 Babel 配置。
                     * 它是一個封裝了一系列 Babel 插件和預設的預配置包,旨在簡化 React 應用程序的開發配置。
                     * babel-preset-react-app 預設,該預設要求明確指定環境變量的值
                     */
                    require.resolve("babel-preset-react-app"),
                    {
                      // 當 useBuiltIns 設置為 false 時,構建工具將不會自動引入所需的 polyfills 或內置函數。這意味着您需要手動在代碼中引入所需的 polyfills 或使用相應的內置函數。
                      useBuiltIns: false,
                    },
                  ],
                ],
                plugins: [
                  // 可選:您可以在這裏添加其他需要的 Babel 插件
                  ["@babel/plugin-transform-class-properties", { loose: true }],
                  ["@babel/plugin-transform-private-methods", { loose: true }],
                  [
                    "@babel/plugin-transform-private-property-in-object",
                    { loose: true },
                  ],
                ].filter(Boolean),
              },
            },
          },
          {
            test: cssRegex,
            exclude: cssModuleRegex,
            use: getStyleLoaders({
              importLoaders: 1,
              sourceMap: false,
              // 啓用 ICSS 模式。這將使每個 CSS 類名被視為全局唯一,並且可以在不同的模塊之間共享。
              modules: {
                mode: "icss",
              },
            }),
            // Don't consider CSS imports dead code even if the
            // containing package claims to have no side effects.
            // Remove this when webpack adds a warning or an error for this.
            // See https://github.com/webpack/webpack/issues/6571
            // sideEffects 是一個用於配置 JavaScript 模塊的標記,用於向編譯工具(如Webpack)提供關於模塊副作用的信息。它的作用是幫助編譯工具進行優化,以刪除不必要的模塊代碼或執行其他優化策略。
            // 在許多情況下,編譯工具默認假設所有模塊都具有副作用,因此不會執行某些優化,以確保模塊的行為不受影響。然而,許多模塊實際上是沒有副作用的,這給優化帶來了機會。
            sideEffects: true,
          },
          // Adds support for CSS Modules (https://github.com/css-modules/css-modules)
          // using the extension .module.css
          {
            test: cssModuleRegex,
            use: getStyleLoaders({
              importLoaders: 1,
              sourceMap: false,
              modules: {
                // local(局部模式):在局部模式下,每個 CSS 類名都將具有局部作用域,只在當前模塊中有效。這種模式下,Webpack 會為每個模塊生成唯一的類名,以確保樣式的隔離性和避免全局命名衝突。
                // global(全局模式):在全局模式下,所有的 CSS 類名都是全局唯一的,可以在整個項目中共享和重用。這種模式下,Webpack 不會對類名進行修改或局部化,而是將其視為全局定義的樣式。
                mode: "local",
                getLocalIdent: getCSSModuleLocalIdent,
              },
            }),
          },
          // Opt-in support for SASS (using .scss or .sass extensions).
          // By default we support SASS Modules with the
          // extensions .module.scss or .module.sass
          {
            test: sassRegex,
            exclude: sassModuleRegex,
            use: getStyleLoaders(
              {
                importLoaders: 3,
                sourceMap: false,
                modules: {
                  mode: "icss",
                },
              },
              "sass-loader"
            ),
            // Don't consider CSS imports dead code even if the
            // containing package claims to have no side effects.
            // Remove this when webpack adds a warning or an error for this.
            // See https://github.com/webpack/webpack/issues/6571
            sideEffects: true,
          },
          // Adds support for CSS Modules, but using SASS
          // using the extension .module.scss or .module.sass
          {
            test: sassModuleRegex,
            use: getStyleLoaders(
              {
                importLoaders: 3,
                sourceMap: false,
                modules: {
                  mode: "local",
                  getLocalIdent: getCSSModuleLocalIdent,
                },
              },
              "sass-loader"
            ),
          },
          /**
           * parser 屬性用於配置資源模塊的解析器選項。在這裏,我們使用了 dataUrlCondition 選項來設置轉換為 data URL 的條件。maxSize 屬性設置為 8 * 1024,表示文件大小小於等於 8KB(8192字節)的文件將被轉換為 data URL,超過該大小的文件將被輸出為獨立的文件。
           * 請注意,這段配置利用了 Webpack 5 的內置處理能力,不再需要額外的加載器(如 url-loader 或 file-loader)。Webpack 5 的 asset 模塊類型提供了更簡潔和集成化的資源處理方式。
           * asset/resource 發送一個單獨的文件並導出 URL。之前通過使用 file-loader 實現。
           * asset/inline 導出一個資源的 data URI。之前通過使用 url-loader 實現。
           * asset/source 導出資源的源代碼。之前通過使用 raw-loader 實現。
           * asset 在導出一個 data URI 和發送一個單獨的文件之間自動選擇。之前通過使用 url-loader,並且配置資源體積限制實現。
           */
          {
            test: [/\.bmp$/, /\.gif$/, /\.jpe?g$/, /\.png$/],
            type: "asset",
            generator: {
              filename: "[name].[hash][ext]",
            },
            parser: {
              dataUrlCondition: {
                maxSize: 4 * 1024, // 4kb
              },
            },
          },
          {
            test: /\.svg$/,
            use: [
              {
                // 用於將 SVG 文件轉換為 React 組件的 Webpack loader
                loader: require.resolve("@svgr/webpack"),
                options: {
                  prettier: false,
                  svgo: false,
                  svgoConfig: {
                    plugins: [{ removeViewBox: false }],
                  },
                  titleProp: true,
                  ref: true,
                },
              },
            ],
            issuer: {
              and: [/\.(ts|tsx|js|jsx|md|mdx)$/],
            },
          },
          {
            exclude: [/\.(js|mjs|jsx|ts|tsx)$/, /\.html$/, /\.json$/],
            type: "asset/resource",
            generator: {
              filename: "[name].[hash:8][ext]",
            },
          },
        ].filter(Boolean),
      },
    ],
  },
  plugins: [
    // WebpackManifestPlugin 是一個 Webpack 插件,用於生成一個 manifest 文件,其中包含構建過程中生成的文件和它們的映射關係。這個 manifest 文件可以用於在運行時動態地獲取構建生成的文件路徑。
    new WebpackManifestPlugin({
      // 指定生成的 manifest 文件的名稱
      fileName: "asset-manifest.json",
      // 指定生成的 manifest 文件中的所有文件路徑的基本路徑。默認情況下,路徑是相對於輸出目錄的。您可以使用此參數來指定其他基本路徑
      basePath: path.resolve(__dirname, "dist"),
      // 指定生成的 manifest 文件中的所有文件的公共路徑前綴。這可以在需要將資源部署到 CDN 或其他不同位置的情況下非常有用。
      publicPath,
      // 一個布爾值,指定是否將清單文件寫入磁盤,默認為 true。如果設置為 false,清單文件將只存在於內存中,不會寫入磁盤。
      writeToFileEmit: true,
      // 指定哪些文件將被包含在生成的 manifest 文件中。默認情況下,所有輸出的文件都會被包含。您可以通過設置此參數為一個函數來進行更細粒度的控制。
      generate: (seed, files, entrypoints) => {
        // 返回一個對象,包含特定的文件和入口點
        // 根據需要自定義生成邏輯
        return {
          files: files.reduce((manifest, file) => {
            return Object.assign(manifest, { [file.name]: file.path });
          }, seed),
          entrypoints: entrypoints.main.map((fileName) =>
            path.join(publicPath, fileName)
          ),
        };
      },
    }),
    new IgnorePlugin({
      resourceRegExp: /^\.\/locale$/,
      contextRegExp: /moment$/,
    }),
    new BannerPlugin({
      banner: path.dirname(joinedFileName(), ".js"), // 版本信息文本
      entryOnly: true, // 只在入口文件中添加版本信息
    }),
  ].filter(Boolean),
  // 配置模塊解析的規則
  resolve: {
    // 指定可以省略的模塊擴展名
    extensions: [".ts", ".tsx", ".jsx", ".mjs", ".js", ".json"],
  },
  // externals 選項告訴 Webpack 不將它們打包進最終的輸出文件中,而是在運行時從外部獲取
  externals: getExternals(),
};
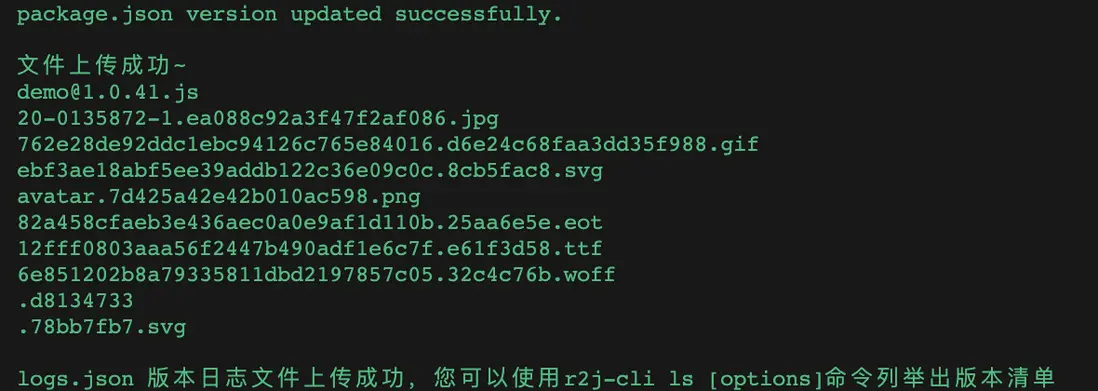
在執行完構建後,需要將生成的資源產物上傳至 OBS(對象存儲服務),使用 OBS Node.js SDK 實現上傳操作。
// obs.js
const upload = async (source, destination) => {
  try {
    const result = await Singleton.getClient().putObject({
      Bucket: process.env.OBS_BUCKET,
      // objectKey是指bucket下目的地
      Key: destination,
      // 文件目錄文件
      SourceFile: source  // localfile為待上傳的本地文件路徑,需要指定到具體的文件名
    });
    if (result.CommonMsg && result.CommonMsg.Status === 200) return true;
    return false;
  } catch (error) {
    Singleton.closeClient();
    console.log(chalk.red(error));
    return false;
  }
}
// 上傳構建產物清單
const uploadManifest = async () => {
  try {
    const assetManifest = require(path.resolve(__dirname, '../dist/asset-manifest.json'));
    const result = await Promise.all(Object.keys(assetManifest.files).map((key) => {
      const basename = path.basename(assetManifest.files[key]);
      const destination = path.join(COMPONENT_DIRNAME, basename);
      const dirname = path.dirname(key);
      const source = path.join(dirname, basename);

      return upload(source, destination);
    }));

    if (result.every(r => !!r)) {
      const uploadFilesStr = Object.values(assetManifest.files).map((value) => path.basename(value)).join('\n');
      console.log(chalk.green(`文件上傳成功~\n${uploadFilesStr}\n`));
    } else {
      console.log(chalk.red('文件上傳失敗~'));
    }
  } catch (error) {
    console.log(chalk.red(error));
    process.exit(1);
  }
};

// build.js
const { uploadManifest } = require('../utils/obs');

exports.handler = async function () {
  /** 1、解析命令參數 */

  /** 2、版本校驗 */

  /** 3、執行構建 */

  /** 4、上傳構建產物 */
  await uploadManifest();
  /** 5、更新版本日誌 */
};
在完成構建產物上傳至 OBS 後,需要更新版本映射文件來記錄版本信息。下面是描述版本數據結構的設計:
- 版本映射文件可以採用
JSON格式進行存儲,以便於讀寫和解析。 - 使用對象數組的形式表示不同組件的版本信息。
- 每個組件對象包含名稱、描述和版本數組。
- 每個版本對象包含版本號、日期等屬性,用於記錄具體的版本信息。
[
  {
    "name": "demo",
    "description": "這是一個組件插件",
    "versions": [
      {
        "version": "1.1.2",
        "date": "2023-09-26 14:00:00"
      },
      {
        "version": "1.1.1",
        "date": "2023-09-25 14:00:00"
      }
    ]
  },
  {
    "name": "example",
    "description": "這是一個示例組件",
    "versions": [
      {
        "version": "2.0.0",
        "date": "2023-09-26 15:30:00"
      },
      {
        "version": "1.9.3",
        "date": "2023-09-25 16:45:00"
      }
    ]
  }
]
通過在 OBS 中維護版本映射文件記錄每個組件的版本號。每當有新版本的組件產物上傳至 OBS 時,通過讀取版本映射文件,更新相應組件的版本數組,並將更新後的版本映射文件保存回 OBS。
// 文本下載
const download = async (objectname) => {
  try {
    const result = await Singleton.getClient().getObject({
      Bucket: process.env.OBS_BUCKET,
      Key: objectname
    });
    if (result.CommonMsg.Status < 300 && result.InterfaceResult) {
      // 讀取對象內容
      return result.InterfaceResult.Content;
    } else {
      Singleton.closeClient();
      console.log(chalk.red('該包名還沒有版本日誌'));
      return '';
    }
  } catch (error) {
    Singleton.closeClient();
    console.log(chalk.red(error));
    process.exit(1);
  }
}
/**
 * 生成版本日誌文件
 */
const updateLogs = async () => {
  try {
    const isExist = await checkIfExists('logs.json');
    const pkgPath = path.resolve(fs.realpathSync(process.cwd()), 'package.json');
    const pkg = require(pkgPath);
    let logJson = '';
    if (isExist) {
      // 存在
      const content = await download(path.join(COMPONENT_DIRNAME, 'logs.json'));
      if (content) {
        let flag = false;
        const logs = JSON.parse(content);
        logs.forEach((log) => {
          if (log.name === process.env.NAME) {
            flag = true;
            log.versions = [{ version: joinedFileName(), date: moment().format('YYYY-MM-DD HH:mm:ss') }].concat(log.versions);
          }
        })
        if (!flag) {
          logs.push({ name: process.env.NAME, desc: pkg.description, versions: [{ version: joinedFileName(), date: moment().format('YYYY-MM-DD HH:mm:ss') }] });
        }
        logJson = logs;
      }
    } else {
      // 不存在
      logJson = [{ name: process.env.NAME, desc: pkg.description, versions: [{ version: joinedFileName(), date: moment().format('YYYY-MM-DD HH:mm:ss') }] }];
    }

    if (logJson) {
      // 寫入本地,並且上傳至obs
      fs.writeFileSync(path.resolve(__dirname, '../dist/logs.json'), JSON.stringify(logJson), 'utf8', (err) => {
        if (err) {
          console.error('Error writing JSON file:', err);
        } else {
          console.log('logs.json has been successfully generated.');
        }
      });
      // 上傳至
      const source = path.resolve(__dirname, '../dist/logs.json');
      const destination = path.join(COMPONENT_DIRNAME, 'logs.json');
      await upload(source, destination);
      console.log(chalk.green(`logs.json 版本日誌文件上傳成功,您可以使用r2j-cli ls [options]命令列舉出版本清單`));
    }
  } catch (error) {
    console.log(chalk.red(error));
    process.exit(1);
  }
}
// build.js
const { uploadManifest } = require('../utils/obs');

exports.handler = async function () {
  /** 1、解析命令參數 */

  /** 2、版本校驗 */

  /** 3、執行構建 */

  /** 4、上傳構建產物 */

  /** 5、更新版本日誌 */
  await updateLogs();
};
ls 命令
完成補全 build <strategy> 命令的處理函數,接下來再來補全簡單的 ls 命令的處理函數。這裏使用 treeify 將扁平的版本數據轉換為樹狀結構,以更好地組織和展示版本之間的關係。
const path = require("path");
const treeify = require('treeify');
const chalk = require('chalk');
const { download } = require("../utils/obs");
const { COMPONENT_DIRNAME } = require('../utils/config');

exports.command = 'ls';

exports.desc = '列舉指定模塊的版本';

exports.builder = {
  name: {
    alias: 'n',
    describe: '包名',
    type: 'string',
    demand: false,
  },
}

exports.handler = async (argv) => {
  /** 1、解析命令參數 */
  const componentName = argv.name; // 包名
  /** 2、獲取版本日誌,輸出控制枱 */
  const content = await download(path.join(COMPONENT_DIRNAME, 'logs.json'));
  if (content) {
    try {
      let logs = JSON.parse(content);
      if (componentName) {
        // 列舉出指定包名的版本清單
        logs = logs.filter((log) => log.name === componentName);
      }

      if (logs.length) {
        const logTree = logs.reduce((obj, log) => {
          obj[log.name] = {
            desc: log.desc,
            versions: log.versions.reduce((versionObj, item) => {
              versionObj[item.version] = item.date;
              return versionObj;
            }, {})
          }
          return obj;
        }, {});
        console.log(chalk.green(treeify.asTree(logTree, true)));
      } else {
        console.log(chalk.red('沒有查詢到版本日誌'));
      }
    } catch (error) {
      console.log(chalk.red(error));
    }
  }
  process.exit(0);
}
當執行 r2j-cli ls -n demo 可以列舉出 demo 所有的版本清單
抽離公共依賴和封裝基礎函數
我們已經完成開發了一個命令行工具,可以將業務組件構建為 JavaScript bundle,並將其存儲到 OBS(Object Storage Service)上。其中,為了優化業務組件的 JavaScript bundle 大小,計劃將這些公共依賴模塊集成到一個公共模塊中,以減少業務組件的 bundle 大小,並確保頁面只需要引入一次。
此外,公共模塊還需提供一些基礎函數(如組件加載、掛載、更新和卸載等)以及一些 polyfill 來兼容舊版本的瀏覽器。
公共依賴
// ./common/index.js
export * as React from 'react';
export * as ReactDOM from 'react-dom';
export * as axios from 'axios';
export * as _ from 'lodash-es';
import './polyfill';
export * as react2js from './base'; // 基礎函數
export * as bricks from '@casstime/bricks';
import '@casstime/bricks/dist/bricks.production.css';
基礎函數
// ./common/base.tsx
const { CDN_DOMAIN, COMPONENT_DIRNAME } = require("../utils/config");

// 加載函數
export const load = (moduleId) => {
  if (!moduleId) {
    console.error('模塊id不能為空');
    return null;
  }

  // 模塊是否已經加載過,如是,則返回緩存數據
  if (moduleId in react2js.installModules) {
    return Promise.resolve(react2js.installModules[moduleId]);
  }

  return new Promise((resolve) => {
    const src = `${CDN_DOMAIN}/${COMPONENT_DIRNAME}/${moduleId}.js`;
    const onload = () => {
      if (moduleId in react2js.installModules) {
        resolve(react2js.installModules[moduleId]);
      } else {
        resolve(undefined);
      }
    }

    const script = document.createElement('script');
    script.src = src;
    script.type = "text/javascript";
    script.onload = onload;

    document.head.appendChild(script);
  })
}

// 創建實例,通過實例掛載、更新、卸載
export const createInstance = (C, props, container) => {
  if (!C) return null;

  const renderChildren = (children) => {
    if (typeof children === 'string') {
      return <span>{children}</span>;
    }

    if (React.isValidElement(children)) {
      return children;
    }

    if (Array.isArray(children)) {
      return children.map((child, index) => (
        <div key={index}>{renderChildren(child)}</div>
      ));
    }

    return null;
  }

  // 用組件包裹一層,控件內層組件的更新
  const Warp = (props) => {
    const [state, setState] = React.useState(props);
    const ref = React.useRef();

    React.useEffect(() => {
      instance.getRef = () => ref;
      instance.getProps = () => state;
      instance.updateState = (newState) => setState(Object.assign(state, newState));
    }, [])

    return <C {...state} ref={ref}>{props.children ? renderChildren(props.children) : null}</C>
  }

  const instance = {
    ele: React.createElement(Warp, props),
    root: null,
    getRef: () => void 0,
    getProps: () => void 0,
    updateState: () => void 0,
    mount: (container) => {
      if (container instanceof HTMLElement) {
        const root = ReactDOM.createRoot(container);
        instance.root = root;
        root.render(instance.ele);
      }
    },
    unmount: () => {
      if (instance.root) {
        instance.root.unmount()
      }
    }
  };

  if (container instanceof HTMLElement) {
    instance.mount(container);
  }

  return instance;
}
polyfill
// ./common/polyfill.js
/** 打包polyfill,react-app-polyfill去除core-js */

if (typeof Promise === "undefined") {
  // Rejection tracking prevents a common issue where React gets into an
  // inconsistent state due to an error, but it gets swallowed by a Promise,
  // and the user has no idea what causes React's erratic future behavior.
  require("promise/lib/rejection-tracking").enable();
  self.Promise = require("promise/lib/es6-extensions.js");
}

// Make sure we're in a Browser-like environment before importing polyfills
// This prevents `fetch()` from being imported in a Node test environment
if (typeof window !== "undefined") {
  // fetch() polyfill for making API calls.
  require("whatwg-fetch");
}

// Object.assign() is commonly used with React.
// It will use the native implementation if it's present and isn't buggy.
Object.assign = require("object-assign");

require("raf").polyfill();
require("regenerator-runtime/runtime");
common 命令
然後在 react2js-cli 項目的根目錄的 package.json 文件中配置 common 命令
{
  "scripts": {
    "common": "node ./scripts/common-cli.js"
  }
}
common-cli.js 命令腳本執行構建並且上傳公共模塊
const path = require("path");
const chalk = require("chalk");
const { execSync } = require("child_process");
const { checkIfExists, upload, download, updateLogs } = require("../utils/obs");
const { COMPONENT_DIRNAME } = require("../utils/config");

/**
 * 執行命令格式:node ./scripts/common-cli.js --STRATEGY=bundle --NAME=bundle --ENTRY=./bundle/index.js --MODE=development --VERSION=1.0.0
 */

// 解析鍵值對參數
const parseKeyValueArgs = (args) => {
  const keyValueArgs = {};

  for (let i = 0; i < args.length; i++) {
    const arg = args[i];

    // 檢查參數是否是鍵值對格式
    if (arg.startsWith("--") && arg.includes("=")) {
      const [key, value] = arg.slice(2).split("=");
      keyValueArgs[key] = value;
    }
  }

  return keyValueArgs;
};

// 獲取最新bundle版本
const fetchCommonVersion = async (componentName) => {
  const content = await download(path.join(COMPONENT_DIRNAME, "logs.json"));
  if (content) {
    try {
      const logs = JSON.parse(content);
      // 列舉出指定包名的版本清單
      const { versions } = logs.filter((log) => log.name === componentName)[0];
      const { version } = versions[0];
      const vsr = path.basename(version, ".js").split("@")[1];
      const regex = /^(\d+)\.(\d+)\.(\d+)(?:-(.*))?$/;
      let [_, major, minor, patch, preRelease] = vsr.match(regex);
      if (parseInt(patch, 10) < 100) {
        patch = parseInt(patch, 10) + 1;
      } else {
        if (parseInt(minor, 10) < 100) {
          minor = parseInt(minor, 10) + 1;
        } else {
          if (parseInt(major, 10) < 100) {
            major = parseInt(major, 10) + 1;
          } else {
            console.log(chalk.red("版本維護以達到上限!"));
            process.exit(1);
          }
        }
      }
      const defaultVersion = `${major}.${minor}.${patch}${preRelease ? `-${preRelease}` : ""
        }`;
      return defaultVersion;
    } catch (error) {
      console.log(chalk.red(error));
      process.exit(1);
    }
  }
  console.log(chalk.red("不存在版本日誌文件"));
  process.exit(1);
};

// 上傳文件
const uploadCommon = async () => {
  const manifest = require(path.resolve(
    __dirname,
    "../dist/asset-manifest.json"
  ));
  const fileName = path.basename(manifest.entrypoints[0]);
  const isExist = await checkIfExists(fileName);
  if (isExist) {
    console.log(
      chalk.yellow(`${fileName} 文件已存在,請重新設置版本號構建上傳`)
    );
    process.exit(0);
  }
  console.log(chalk.blue(`正在上傳 ${fileName} ...`));
  const result = await Promise.all(
    Object.keys(manifest.files).map((key) => {
      const source = path.join(
        path.dirname(key),
        path.basename(manifest.files[key])
      );
      const destination = path.join(
        COMPONENT_DIRNAME,
        path.basename(manifest.files[key])
      );

      return upload(source, destination);
    })
  );

  if (result.every((r) => !!r)) {
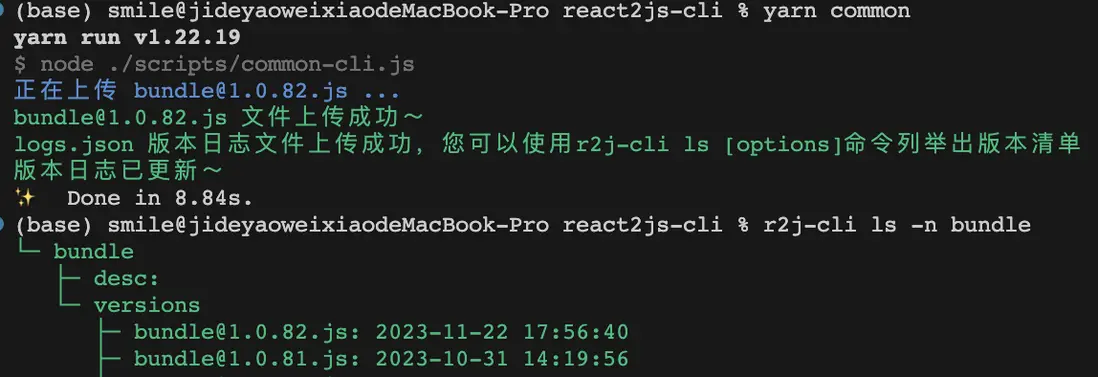
    console.log(chalk.green(`${fileName} 文件上傳成功~`));
    /** 更新版本日誌 */
    const [NAME, VERSION] = path.basename(fileName, ".js").split("@");
    process.env.NAME = NAME;
    process.env.VERSION = VERSION;
    await updateLogs();
    console.log(chalk.green(`版本日誌已更新~`));
  } else {
    console.log(chalk.red(`${fileName} 文件上傳失敗!`));
  }

  process.exit(0);
};

const bootstrap = async () => {
  const cliRoot = path.normalize(path.resolve(__dirname, ".."));
  // 切換到根目錄下
  execSync(`cd ${cliRoot}`);

  // 刪除dist目錄
  execSync("rimraf dist");

  // 注入環境變量、執行構建
  const args = process.argv.slice(2);
  const keyValueArgs = parseKeyValueArgs(args); // 解析鍵值對參數

  const STRATEGY = keyValueArgs.STRATEGY || "bundle";
  const NAME = keyValueArgs.NAME || "bundle";
  const ENTRY = keyValueArgs.ENTRY || "./bundle/index.js";
  const MODE = keyValueArgs.MODE || "development";
  const VERSION = keyValueArgs.VERSION || (await fetchCommonVersion(NAME));

  execSync(
    `cross-env STRATEGY=${STRATEGY} NAME=${NAME} ENTRY=${ENTRY} MODE=${MODE} VERSION=${VERSION} webpack`
  );

  // 上傳公共模塊
  uploadCommon();
};

bootstrap();
在 react2js-cli 項目的根目錄執行 npm run common
樣式隔離
太棒了!現在我們可以舉一個例子來演示如何將 React 組件構建為一個 bundle,並將其用於原生頁面。假設我們有一個簡單的 React 組件叫做 Demo,它可以控制彈出一個簡單的模態框。
// index.tsx
import React, { useState } from 'react';
import { Button, Modal } from '@casstime/bricks';

import '@casstime/bricks/dist/bricks.production.css';

const Demo = () => {

  const [visible, setVisible] = useState(false);
  const showModal = () => {
    setVisible(true);
  };

  const hideModal = () => {
    setVisible(false);
  };

  const onCancel = () => {
    setVisible(false);
  };

  const onOk = () => {
    setVisible(false);
  };

  return (
    <div>
      <Button onClick={showModal}><span>Open</span></Button>
      <Modal
        keyboard={hideModal}
        visible={visible}
        onClose={hideModal}
        onOk={onOk}
        onCancel={onCancel}
        title="我是標題"
      >
        <div>彈窗內容</div>
      </Modal>
    </div>
  );
}

export default Demo;
在 Demo/package.json 中添加構建命令
{
  "scripts": {
    "r2j": "r2j-cli build r2j -n demo -m development",
  }
}
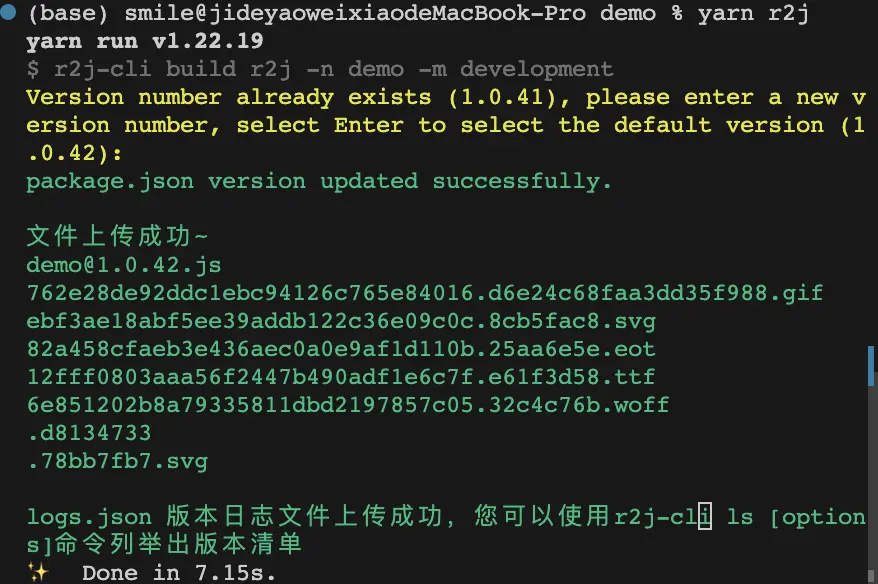
在 /Demo 目錄下執行 npm run r2j 命令
在 /react2js-cli 目錄下執行 npm run common 命令
接下來,創建一個 index.html 文件,並在其中引入 bundle.js@1.0.83 和 demo@1.0.42
<!DOCTYPE html>
<html lang="en">

<head>
  <meta charset="UTF-8">
  <meta name="viewport" content="width=device-width, initial-scale=1.0">
  <title>Document</title>
  <script src="https://xxxx/test/components/bundle@1.0.83.js"></script>
  <style>
    div, span {
      color: #222;
    }
  </style>
</head>

<body>
  <div id="root"></div>

  <script>
    react2js.load("demo@1.0.42").then((module) => {
      console.log('module', module);
      if (module) {
        react2js.createInstance(module.App.default, {}, document.getElementById("root"));
      }
    })
  </script>
</body>
</html>
現在,使用任何瀏覽器打開 index.html 文件,可以看到點擊按鈕時會彈出模態框
仔細觀擦你會發現添加的全局樣式 div, span { color: #222222; } 覆蓋了組件內部樣式,導致按鈕的字體顏色變為黑色,而正常情況下應該是白色。這種情況很常見,特別是在引入全局樣式庫(如 Bootstrap)時,其中可能包含修改原生標籤樣式的規則,從而影響到組件內部樣式。
另外,項目中使用 !important 提高樣式優先級的寫法也可能影響到組件內部樣式。
所以,樣式隔離顯得尤其重要。在處理樣式隔離時,通常有多種方法可供選擇。例如,可以使用 BEM 規範編寫樣式,使用 CSS Modules 將樣式限定在組件的作用域內,或者使用 CSS-in-JS 庫(如 styled-components 或 Emotion),它們可以將樣式直接嵌入到組件中。
然而,這些方法都無法完全避免全局標籤樣式對組件內部樣式的影響。這就是為什麼我們需要一種天然的作用域隔離機制,就像 iframe 一樣。而原生的 Web 標準提供了這種能力,即 Shadow DOM。
Shadow DOM 允許將組件的樣式、結構和行為封裝在一個獨立的作用域內,與外部文檔的樣式和元素隔離開來。通過使用 Shadow DOM,組件的樣式規則只適用於組件內部,不會泄漏到外部文檔的樣式中,也不會受到全局樣式的干擾。
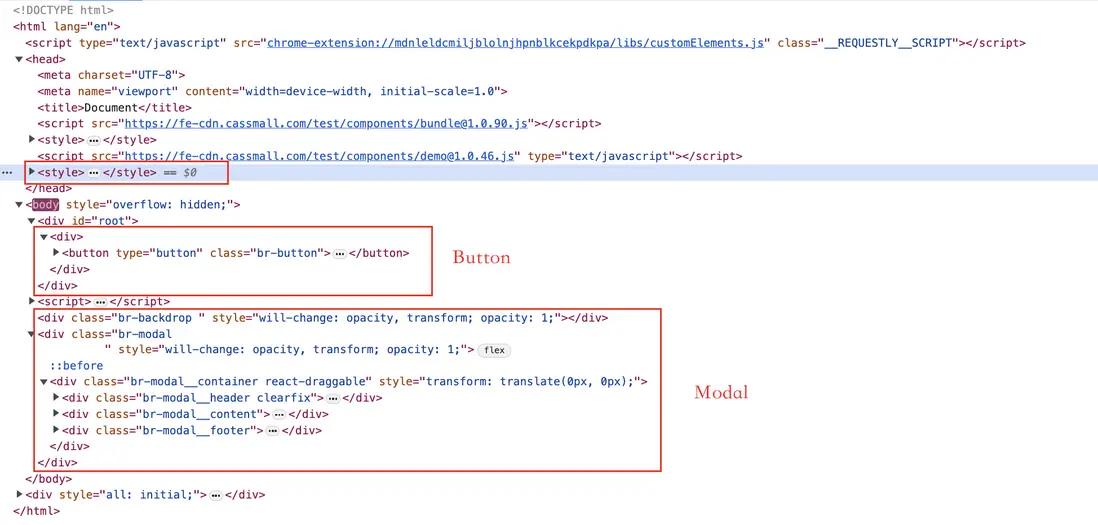
在點擊按鈕觸發模態框(Modal)組件時,通常存在兩種掛載方式。一種是將模態框掛載到 body 元素下,另一種是掛載到指定的元素下。不論使用哪種方式,模態框元素和按鈕元素是分離的。因此,在實現樣式隔離時,不僅需要將按鈕(Button)元素包裹在 Shadow DOM 中,還需要將模態框(Modal)元素進行包裹。
同時,為了確保樣式的自治性,還需要將組件樣式應用於按鈕和模態框。通過 Shadow DOM 將這些以 style 標籤的形式插入到 head 中的組件樣式應用於按鈕和模態框。這樣可以確保按鈕和模態框在樣式上具有獨立性,不受全局樣式的影響。
隔離處理
組件樣式庫 @casstime/bricks/dist/bricks.production.css 中存在一些全局標籤和類名樣式
為了確保組件的樣式不會影響外部,並且外部樣式不會影響組件的內部,可以採取以下處理方式:
1、在加載公共模塊或掛載組件時,將樣式以 <style> 標籤的形式插入到 <head> 元素中。為了限定樣式的影響範圍,可以給每個樣式規則添加一個父類 react-component,例如將 span { color: #222; } 變成 .react-component span { color: #222; }。同時,給組件的容器元素添加類名 react-component,這樣就限制了組件樣式的影響範圍。然而,需要注意的是,在 bricks.production.css 中可能含有 html, body {} 樣式規則,直接將其變為 .react-component html, .react-component body {} 是沒有意義的。為了解決這個問題,可以直接將 html, body {} 樣式賦予容器元素 .react-component {}。
// patch-css.scss
.react-component {
  margin: 0;
  padding: 0;
  border: 0;
  font-size: 100%;
  font: inherit;
  vertical-align: baseline;
  color: #2a2b2c;
  font-size: 12px;
  font-family: "Microsoft Yahei", -apple-system, BlinkMacSystemFont, "Helvetica Neue", Helvetica, Roboto, Arial, "PingFang SC", "Hiragino Sans GB", SimSun, sans-serif;
  line-height: 1.5;
}

// index.js
export * as React from 'react';
export * as ReactDOM from 'react-dom';
export * as axios from 'axios';
export * as _ from 'lodash-es';
import './polyfill';
export * as react2js from './base';
export * as bricks from '@casstime/bricks';
import '@casstime/bricks/dist/bricks.production.css';
import './patch-css.scss';
給每個樣式規則添加一個父類 react-component
// postcss.config.js
module.exports = {
  plugins: [
    // postcss-prefix-selector 為選擇器添加 .parent 類名前綴
    require('postcss-prefix-selector')({
      prefix: '.react-component',
      exclude: [/\.react-component/],
      transform: function (prefix, selector, prefixedSelector, filePath, rule) {
        return prefixedSelector;
      }
    }),
    // postcss-flexbugs-fixes 插件的作用就是根據已知的 Flexbox 兼容性問題,自動應用修復,以確保在各種瀏覽器中獲得更一致和可靠的 Flexbox 佈局。
    require('postcss-flexbugs-fixes'),
    require('postcss-preset-env')({
      autoprefixer: {
        flexbox: 'no-2009',
      },
      stage: 3,
    }),
    require('postcss-normalize')(),
  ],
  map: {
    // source map 選項
    inline: true, // 將源映射嵌入到 CSS 文件中
    annotation: true // 為 CSS 文件添加源映射的註釋
  }
}
父類 react-component 不能被模塊化
const getCSSModuleLocalIdent = (
  context,
  localIdentName,
  localName,
  options
) => {
  // 通過postcss添加的父類react-component不能被模塊化
  if (localName === "react-component") return localName;
  // Use the filename or folder name, based on some uses the index.js / index.module.(css|scss|sass) project style
  const fileNameOrFolder = context.resourcePath.match(
    /index\.module\.(css|scss|sass)$/
  )
    ? "[folder]"
    : "[name]";
  // Create a hash based on a the file location and class name. Will be unique across a project, and close to globally unique.
  const hash = loaderUtils.getHashDigest(
    path.posix.relative(context.rootContext, context.resourcePath) + localName,
    "md5",
    "base64",
    5
  );
  // Use loaderUtils to find the file or folder name
  const className = loaderUtils.interpolateName(
    context,
    fileNameOrFolder + "_" + localName + "__" + hash,
    options
  );
  // remove the .module that appears in every classname when based on the file.
  return className.replace(".module_", "_");
};
2、將以 <style> 標籤的形式插入到 <head> 元素中的組件樣式應用於 Shadow DOM 中。在構建過程中,可以為這些樣式元素添加一個獨有的類名,例如 react-component-style,以便在應用樣式時進行識別。
{
  loader: require.resolve("style-loader"),
  options: {
  injectType: "singletonStyleTag",
    attributes: { class: "react-component-style" },
  },
},
然後,在掛載組件時將這些樣式應用於 Shadow DOM
const styleSheets = [];
const globalStyles = document.querySelectorAll(".react-component-style");
globalStyles.forEach((ele) => {
  const styleSheet = new CSSStyleSheet();
  styleSheet.replaceSync(ele.textContent);
  styleSheets.push(styleSheet);
})
shadowRoot.adoptedStyleSheets = styleSheets;
調整掛載函數
在掛載函數中,你需要檢查當前瀏覽器是否支持 Shadow DOM,並據此選擇掛載方式。如果支持 Shadow DOM,則以 Shadow DOM 形式將組件掛載到容器元素;如果不支持,則直接將組件掛載到容器元素。
mount: (container) => {
  if (container instanceof HTMLElement) {
    if (document.body.attachShadow) {
      const shadowHost = container;
      // 當 mode 設置為 "open" 時,頁面中的 JavaScript 可以通過影子宿主的 shadowRoot 屬性訪問影子 DOM 的內部
      const shadowRoot = shadowHost.shadowRoot || shadowHost.attachShadow({ mode: "open" });

      // 判斷是否已經掛載,如果沒有掛載則創建包裹元素
      if (!shadowRoot.querySelector(".react-component")) {
        const wrap = document.createElement("div");
        wrap.classList.add("react-component");
        shadowRoot.appendChild(wrap);
      }

      // 應用全局樣式
      if (shadowHost.getAttribute("data-isAdopted") !== "true") {
        const styleSheets = [];
        const globalStyles = document.querySelectorAll(".react-component-style");
        globalStyles.forEach((ele) => {
          const styleSheet = new CSSStyleSheet();
          styleSheet.replaceSync(ele.textContent);
          styleSheets.push(styleSheet);
        })
        shadowRoot.adoptedStyleSheets = styleSheets;
        shadowHost.setAttribute("data-isAdopted", "true");
      }

      // 掛載到包裹元素
      const root = ReactDOM.createRoot(shadowRoot.querySelector(".react-component") || container);
      instance.root = root;
      root.render(instance.ele);
    } else {
      // 直接將組件掛載到容器元素
      container.classList.add("react-component");
      const root = ReactDOM.createRoot(container);
      instance.root = root;
      root.render(instance.ele);
    }
  }
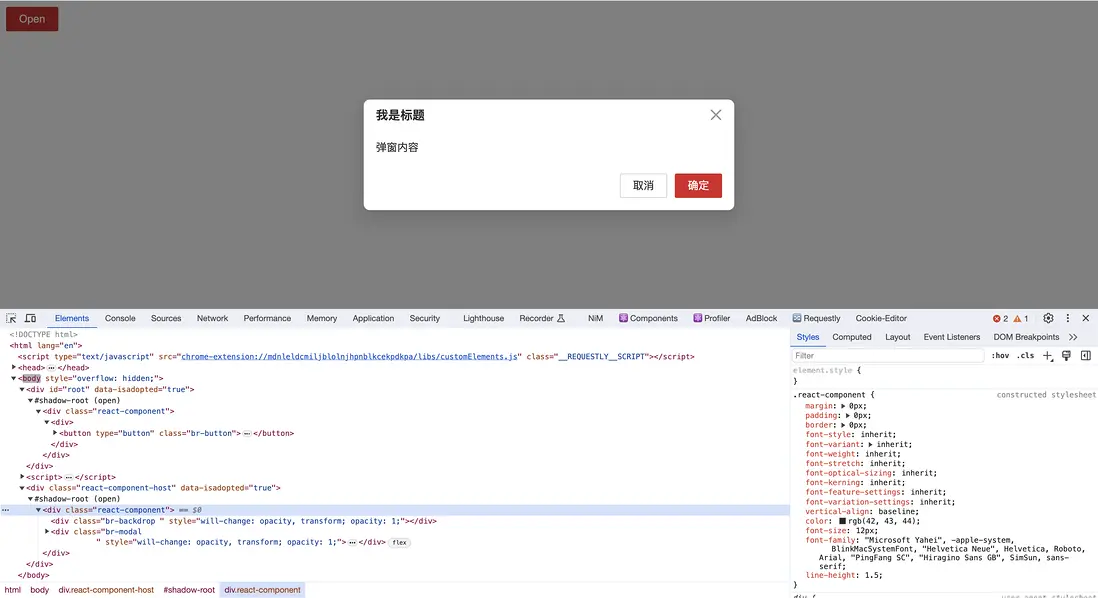
},點擊按鈕觸發模態框(Modal)組件,可以看到 Modal 部分還沒有包裹在 Shadow DOM 中,並且樣式也有問題
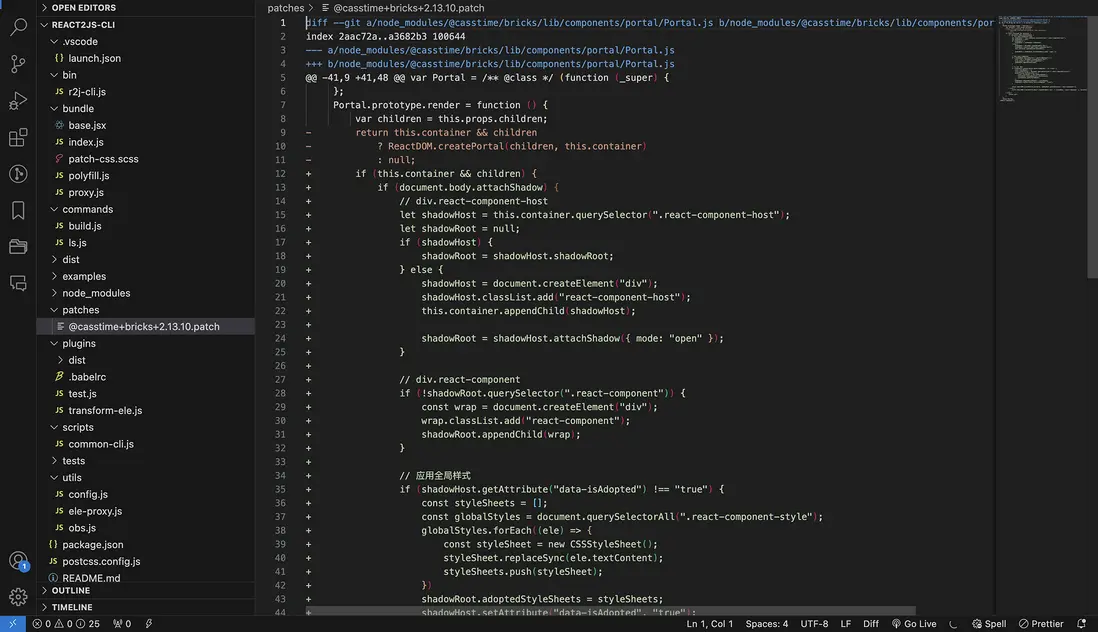
在掛載 Modal 組件時也需要進行 Shadow DOM 封裝,以確保 Modal 組件的樣式不會受到外部樣式的影響,可以先不直接對 @casstime/bricks 中 Modal 組件修改升級,暫時使用 patch-package 工具對 @casstime/bricks 組件庫進行補丁處理。
1、安裝 patch-package
# 使用 npm 安裝
npm install -g patch-package

# 使用 Yarn 安裝
yarn global add patch-package
2、創建補丁文件
Modal 依賴 Portal 實現模態框,對 Portal 的 render 方法作如下修改:
// 修改前
Portal.prototype.render = function () {
    var children = this.props.children;
    return this.container && children
        ? ReactDOM.createPortal(children, this.container)
        : null;
};

// 修改後
Portal.prototype.render = function () {
    var children = this.props.children;
    if (this.container && children) {
        if (document.body.attachShadow) {
            // div.react-component-host,所有modal共用一個shadowHost
            let shadowHost = this.container.querySelector(".react-component-host");
            let shadowRoot = null;
            if (shadowHost) {
                shadowRoot = shadowHost.shadowRoot;
            } else {
                shadowHost = document.createElement("div");
                shadowHost.classList.add("react-component-host");
                this.container.appendChild(shadowHost);

                shadowRoot = shadowHost.attachShadow({ mode: "open" });
            }

            // div.react-component
            if (!shadowRoot.querySelector(".react-component")) {
                const wrap = document.createElement("div");
                wrap.classList.add("react-component");
                shadowRoot.appendChild(wrap);
            }

            // 應用全局樣式
            if (shadowHost.getAttribute("data-isAdopted") !== "true") {
                const styleSheets = [];
                const globalStyles = document.querySelectorAll(".react-component-style");
                globalStyles.forEach((ele) => {
                    const styleSheet = new CSSStyleSheet();
                    styleSheet.replaceSync(ele.textContent);
                    styleSheets.push(styleSheet);
                })
                shadowRoot.adoptedStyleSheets = styleSheets;
                shadowHost.setAttribute("data-isAdopted", "true");
            }

            return ReactDOM.createPortal(children, shadowRoot.querySelector(".react-component"));
        } else {
            return ReactDOM.createPortal(React.createElement('div', { className: 'react-component' }, children), this.container);
        }
    } else {
        return null;
    }
};
在項目的根目錄下,運行以下命令 npx patch-package <package-name> 創建補丁文件,這將在項目的根目錄下創建一個名為 patches 的目錄,並在其中創建與 <package-name> 包對應的補丁文件。例如,如果你要對 @casstime/bricks 組件庫進行補丁
npx patch-package @casstime/bricks然後,重新執行構建 npm run common
Shadow DOM 內操作 DOM
我們將 demo 修改一下,在彈出模態框時修改提示內容
import React, { useState } from 'react';
import { Button, Modal } from '@casstime/bricks';

import '@casstime/bricks/dist/bricks.production.css';

const App = () => {

  const [visible, setVisible] = useState(false);
  const showModal = () => {
    setVisible(true);
    setTimeout(() => {
      // 修改彈窗文案
      (document.getElementById("modal-content") as HTMLDivElement).innerText = 'hello world';
    }, 200);
  };

  const hideModal = () => {
    setVisible(false);
  };

  const onCancel = () => {
    setVisible(false);
  };

  const onOk = () => {
    setVisible(false);
  };

  return (
    <div>
      <Button onClick={showModal}><span>Open</span></Button>
      <Modal
        keyboard={hideModal}
        visible={visible}
        onClose={hideModal}
        onOk={onOk}
        onCancel={onCancel}
        title="我是標題"
      >
        <div id='modal-content'>彈窗內容</div>
      </Modal>
    </div>
  );
}

export default App;
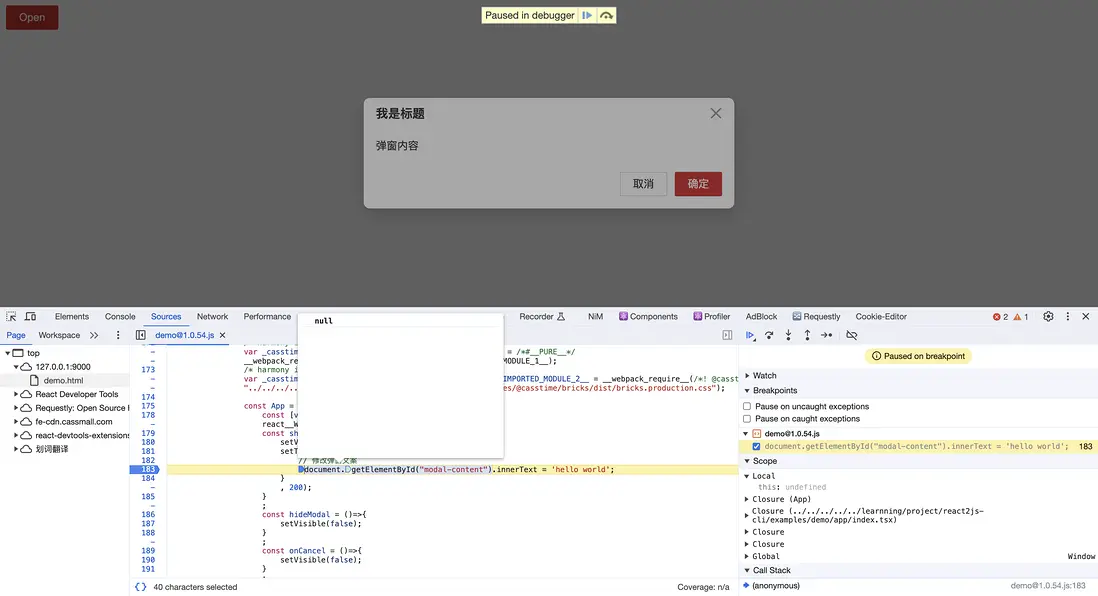
你會發現內容並沒有被修改,控制枱報錯指出 document.getElementById("modal-content") 沒有找到指定的元素
在使用 Shadow DOM 時,無法直接使用 document 對象從外層獲取 Shadow DOM 內部的元素。為了解決這個問題,併兼容兩種掛載方式,你可以考慮對所有操作 DOM 的地方進行攔截代理。通過創建一個代理對象,你可以攔截對 document 對象的操作,比如 document.querySelector("xxxx"); 使用代理對象代替 document 對象,eleProxy(document).querySelector("xxxx");。
需要對所有針對元素的操作進行攔截代理時,我們編寫一個 Babel 插件來實現這個功能
// transform-ele.js
module.exports = function ({ types: t }) {
  return {
    visitor: {
      MemberExpression(path) {
        const targetProxyProps = [
          "getElementById",
          "getElementsByClassName",
          "getElementsByName",
          "getElementsByTagName",
          "getElementsByTagNameNS",
          "querySelector",
          "querySelectorAll",
        ];
        // console.log('path.node.property.name', path.node.property.name);
        if (targetProxyProps.includes(path.node.property.name)) {
          path.node.object = t.callExpression(t.identifier("eleProxy"), [
            path.node.object,
          ]);
        }
      },
    },
  };
};
在 webpack.config.js 中配置使用
{
  test: /\.(js|mjs|jsx|ts|tsx)$/, // 匹配以 .js 結尾的文件
  // exclude: /node_modules/, // 排除 node_modules 目錄
  use: {
    // 使用 babel-loader 進行處理
    loader: "babel-loader",
    options: {
      cacheDirectory: true,
      presets: [
        [
          /**
           * babel-preset-react-app 是一個由 Create React App (CRA) 提供的預設,用於處理 React 應用程序的 Babel 配置。
           * 它是一個封裝了一系列 Babel 插件和預設的預配置包,旨在簡化 React 應用程序的開發配置。
           * babel-preset-react-app 預設,該預設要求明確指定環境變量的值
           */
          require.resolve("babel-preset-react-app"),
          {
            // 當 useBuiltIns 設置為 false 時,構建工具將不會自動引入所需的 polyfills 或內置函數。這意味着您需要手動在代碼中引入所需的 polyfills 或使用相應的內置函數。
            useBuiltIns: false,
          },
        ],
      ],
      plugins: [
        // 可選:您可以在這裏添加其他需要的 Babel 插件
        ["@babel/plugin-transform-class-properties", { loose: true }],
        ["@babel/plugin-transform-private-methods", { loose: true }],
        [
          "@babel/plugin-transform-private-property-in-object",
          { loose: true },
        ],
        // 操作dom元素代理
        process.env.STRATEGY === "r2j" && require.resolve("./plugins/transform-ele"),
      ].filter(Boolean),
    },
  },
},
實現一個名為 eleProxy 的方法,用於包裹元素並返回代理對象,以攔截元素獲取操作,可以按照以下方式編寫代碼:
/**
 * eleProxy.js
 * 1、【外部獲取內部】在shadow dom中通過document獲取元素;
 * 2、【內部獲取內部】在shadow dom中通過shadow dom內部節點獲取元素;
 * 3、【外部獲取外部】document獲取外部元素;
 */
export const eleProxy = (obj) => {
  return new Proxy(obj, {
    get(target, prop) {
      const targetProxyProps = [
        "getElementById",
        "getElementsByClassName",
        "getElementsByName",
        "getElementsByTagName",
        "getElementsByTagNameNS",
        "querySelector",
        "querySelectorAll",
      ];
      if (targetProxyProps.includes(prop)) {
        if (target instanceof Node) {
          const shadowRoot = target.getRootNode();
          const isInShadowDOM = shadowRoot instanceof ShadowRoot;
          if (isInShadowDOM) {
            // 內部獲取內部
            return function (selectors) {
              return target[prop](selectors);
            };
          } else {
            return function (selectors) {
              const ele = target[prop](selectors);
              if (ele instanceof HTMLCollection && ele.length) {
                // 外部獲取外部,獲取多個 getElementsByClassName
                return ele;
              } else if (ele instanceof NodeList && ele.length) {
                // 外部獲取外部,獲取多個 querySelectorAll
                return ele;
              } else if (ele instanceof HTMLElement) {
                // 外部獲取外部,獲取一個
                return ele;
              } else {
                // 外部獲取內部
                const getAllShadowRoots = (root) => {
                  const shadowRoots = [];

                  const walker = document.createTreeWalker(
                    root,
                    NodeFilter.SHOW_ELEMENT,
                    {
                      acceptNode(node) {
                        if (node.shadowRoot) {
                          return NodeFilter.FILTER_ACCEPT;
                        }
                        return NodeFilter.FILTER_SKIP;
                      },
                    }
                  );

                  while (walker.nextNode()) {
                    shadowRoots.push(walker.currentNode.shadowRoot);
                  }
                  return shadowRoots;
                };

                const shadowRoots = getAllShadowRoots(document);
                for (let shadowRoot of shadowRoots) {
                  // 自定義的 getElementsByName 方法
                  shadowRoot.getElementsByName = function (name) {
                    const elements = this.querySelectorAll(`[name="${name}"]`);
                    return elements;
                  };

                  // 自定義的 getElementsByClassName 方法
                  shadowRoot.getElementsByClassName = function (className) {
                    const elements = this.querySelectorAll(`.${className}`);
                    return elements;
                  };

                  // 自定義的 getElementsByTagName 方法
                  shadowRoot.getElementsByTagName = function (tagName) {
                    const elements = this.querySelectorAll(tagName);
                    return elements;
                  };

                  // 自定義的 getElementsByTagNameNS 方法
                  shadowRoot.getElementsByTagNameNS = function (
                    namespaceURI,
                    tagName
                  ) {
                    const elements = this.querySelectorAll(
                      `${namespaceURI}|${tagName}`
                    );
                    return elements;
                  };

                  // shadowRoot原型鏈上有getElementById、querySelector
                  const ele = shadowRoot[prop](selectors);
                  if (ele instanceof HTMLCollection && ele.length) {
                    return ele;
                  } else if (ele instanceof NodeList && ele.length) {
                    return ele;
                  } else if (ele instanceof HTMLElement) {
                    return ele;
                  }
                }

                // 沒有獲取到
                if (
                  [
                    "getElementsByClassName",
                    "getElementsByName",
                    "getElementsByTagName",
                    "getElementsByTagNameNS",
                  ].includes(prop)
                ) {
                  return [];
                } else {
                  return null;
                }
              }
            };
          }
        } else {
          return function (selectors) {
            return target[prop](selectors);
          };
        }
      }
    },
  });
};
然後,作為公共模塊導出
export * as React from 'react';
export * as ReactDOM from 'react-dom';
export * as axios from 'axios';
export * as _ from 'lodash-es';
import './polyfill';
export * as react2js from './base';
export * as bricks from '@casstime/bricks';
export { eleProxy } from './eleProxy';
import '@casstime/bricks/dist/bricks.production.css';
import './patch-css.scss';
最後,執行構建運行頁面,可以看到能正確獲取元素
測試更多案例,都能正常運行
總結
至此,已經完成了對 React 組件如何應用於 MVC 項目的方案設計和落地實現。如果您在這個過程中遇到了任何錯誤或者有其他更好的設計思路,我很願意與你一同交流。


