


原文鏈接:優雅的使用Webstack打造個人網址導航
前言
一款基於 WebStackPage 的 Hexo 主題。本人選擇的是 hexo-theme-webstack。
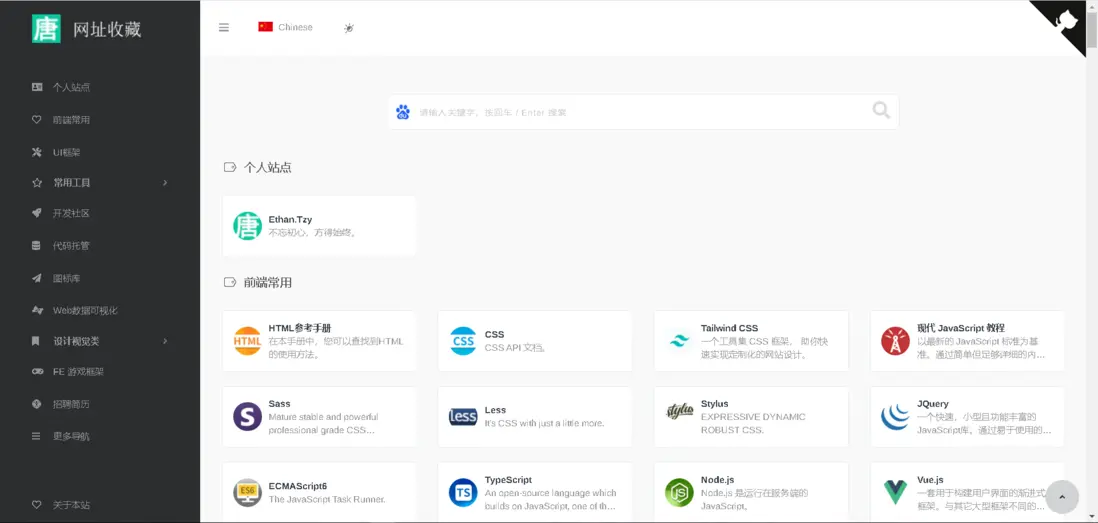
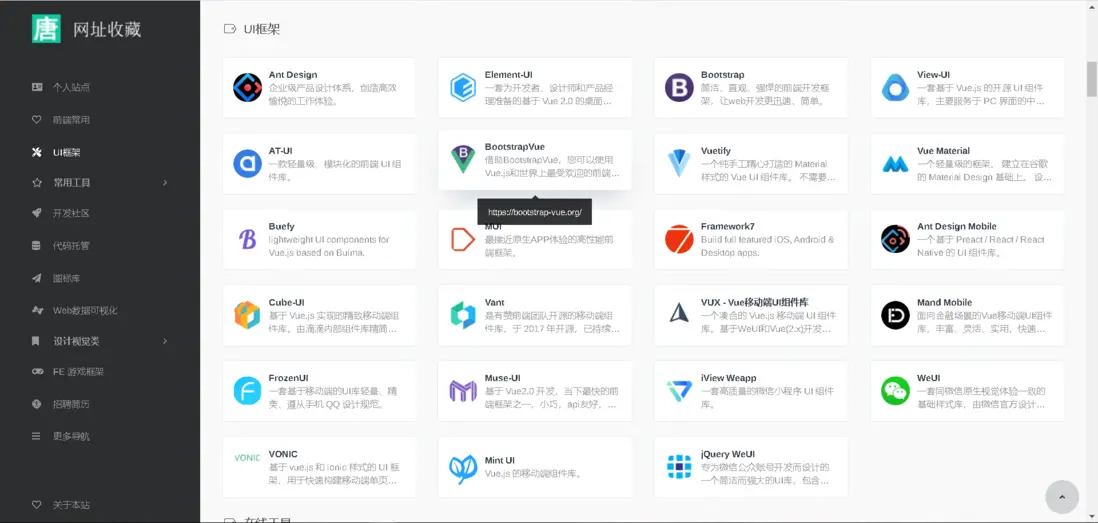
效果預覽
具體效果請移步 個人網址導航。
步驟
-
在目標路徑(我這裏選的路徑為【D:/studytype/My_Blog】)打開cmd命令窗口,執行
hexo init初始化項目。hexo init Nav_Tzy(項目名) -
進入
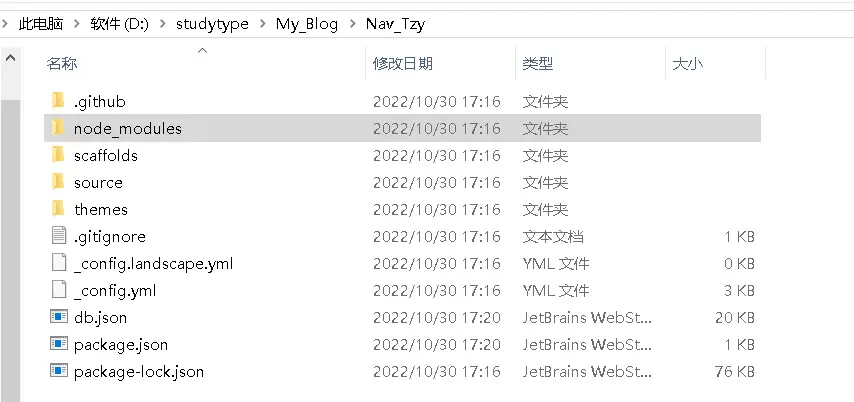
Nav_Tzy,輸入npm i安裝相關依賴。cd Nav_Tzy //進入Nav_Tzy文件夾 npm i執行完命令之後,文件目錄大概如下圖:
【node_modules】:依賴包
【scaffolds】:生成文章的一些模板
【source】:用來存放你的文章
【themes】:主題
【.npmignore】:發佈時忽略的文件(可忽略)
【_config.landscape.yml】:主題的配置文件
【_config.yml】:博客的配置文件
【package.json】:項目名稱、描述、版本、運行和開發等信息 -
安裝主題
# hexo >= 4.0
git clone https://github.com/HCLonely/hexo-theme-webstack themes/webstack
# hexo >= 5.0 npm install hexo-theme-webstack -S -
應用主題
修改站點配置文件_config.yml,把主題改為webstack,注意這裏初始值是landscape。theme: webstack將根目錄下
_config.landscape.yml改名為_config.webstack.yml。
將【D:/studytype/My_Blog/Nav_Tzy/node_modules/hexo-theme-webstack】下的_config.example.yml中的內容複製到根目錄下的_config.webstack.yml。 -
編譯運行
hexo g && hexo s打開瀏覽器,輸入地址:http://localhost:4000/,即可看到如下效果:

配置
網站圖標
favicon: /favicon.icobanner
banner: /images/webstack_banner_cn.png網站 logo
- expanded: 側邊欄展開式左上角的 logo
- collapsed: 側邊欄收起式左上角的 logo
- dark: 頂欄為暗色時左上角的 logo, 僅 about 頁面生效
logo:
  expanded: /images/logo@2x.png
  collapsed: /images/logo-collapsed@2x.png
  dark: /images/logo_dark@2x.png
flag
語言標識。
- icon: 語言圖標,默認僅有flag-cn和flag-us, 其他圖標自行尋找存放於主題目錄/source/images/flags/
- name: 語言名稱
- default: 該語言是否為默認語言
- index: 頁面鏈接
flag:
  - name: Chinese
    default: true
    icon: flag-cn
    index: /index.html
search
是否顯示搜索框。
search: trueuserDefinedSearchData
自定義搜索引擎。
- custom: 是否啓用自定義配置
- thisSearch: 當前搜索引擎的搜索鏈接
- thisSearchIcon: 當前搜索引擎的圖標鏈接,格式為url(圖片鏈接)
- hotStatus: 是否啓用搜熱詞功能
- data: 多搜索引擎配置
- name: 搜索引擎名字 img: 搜索引擎的搜索鏈接 url: 搜索引擎的圖標鏈接,格式為url(圖片鏈接)
userDefinedSearchData:
  custom: true
  thisSearch: https://www.baidu.com/s?wd=
  thisSearchIcon: url(https://www.baidu.com/favicon.ico)
  hotStatus: true
  data:
    - name: 百度
      img: url(https://www.baidu.com/favicon.ico)
      url: https://www.baidu.com/s?wd=
    - name: 谷歌
      img: url(https://www.google.com/favicon.ico)
      url: https://www.google.com/search?q=
githubCorner
右上角的 github corner , 將 href 的屬性改為自己的 github 地址即可。
githubCorner: '<a href="https://github.com/tzy13755126023/" class="github-corner" aria-label="View source on GitHub"><svg width="80" height="80" viewBox="0 0 250 250" style="fill:#151513; color:#fff; position: absolute; top: 0; border: 0; right: 0;" aria-hidden="true"><path d="M0,0 L115,115 L130,115 L142,142 L250,250 L250,0 Z"></path><path d="M128.3,109.0 C113.8,99.7 119.0,89.6 119.0,89.6 C122.0,82.7 120.5,78.6 120.5,78.6 C119.2,72.0 123.4,76.3 123.4,76.3 C127.3,80.9 125.5,87.3 125.5,87.3 C122.9,97.6 130.6,101.9 134.4,103.2" fill="currentColor" style="transform-origin: 130px 106px;" class="octo-arm"></path><path d="M115.0,115.0 C114.9,115.1 118.7,116.5 119.8,115.4 L133.7,101.6 C136.9,99.2 139.9,98.4 142.2,98.6 C133.8,88.0 127.5,74.4 143.8,58.0 C148.5,53.4 154.0,51.2 159.7,51.0 C160.3,49.4 163.2,43.6 171.4,40.1 C171.4,40.1 176.1,42.5 178.8,56.2 C183.1,58.6 187.2,61.8 190.9,65.4 C194.5,69.0 197.7,73.2 200.1,77.6 C213.8,80.2 216.3,84.9 216.3,84.9 C212.7,93.1 206.9,96.0 205.4,96.6 C205.1,102.4 203.0,107.8 198.3,112.5 C181.9,128.9 168.3,122.5 157.7,114.1 C157.9,116.9 156.7,120.9 152.7,124.9 L141.0,136.5 C139.8,137.7 141.6,141.9 141.8,141.8 Z" fill="currentColor" class="octo-body"></path></svg></a><style>.github-corner:hover .octo-arm{animation:octocat-wave 560ms ease-in-out}@keyframes octocat-wave{0%,100%{transform:rotate(0)}20%,60%{transform:rotate(-25deg)}40%,80%{transform:rotate(10deg)}}@media (max-width:500px){.github-corner:hover .octo-arm{animation:none}.github-corner .octo-arm{animation:octocat-wave 560ms ease-in-out}}</style>'since
建站年份,顯示在頁面底部。
since: 2020menu
側邊欄菜單設置。
- name: 分組名
- icon: 分組圖標
config: [主要]分組內容(詳細設置查看Config),如果有二級菜單則不需要此項! - submenu: 二級菜單,如果有二級菜單則不需要
config, 此選項內容包含name,icon,config選項
menu:
  - name: 常用工具
    icon: far fa-star
    config: hotTools
  - name: 其他工具
    icon: fas fa-tools
    submenu:
      - name: 開發工具
        icon: fas fa-tools
        config: devTools
      - name: 我的博客
        icon: fas fa-blog
        config: myBlog
expandAll
是否將側邊欄全部展開。
expandAll: trueabout
側邊欄的關於本站。
- url: 關於頁面鏈接
- name: 在側邊欄顯示的文字
- icon: 圖標
about:
  url: /about/
  icon: far fa-heart
  name: 關於本站
busuanzi
不蒜子統計。
- enable: 是否啓用不蒜子統計
- position: 訪問量顯示位置, footer顯示在頁腳, sidebar顯示在側邊欄
- pv: 訪問量顯示的內容, $pv會被替換為訪問量
- uv: 訪客數顯示的內容, $uv會被替換為訪客數
busuanzi:
  enable: true
  position: sidebar
  pv: 本站總訪問量$pv
  uv: 本站總訪客數$uv
config
網站內容設置。
- name: 網站名稱
- url: 網站鏈接
- img: 網站圖標
- description: 網站描述
- name: Ethan.Tzy
  url: https://tzy1997.com/
  img: https://bu.dusays.com/2022/05/17/6283c38e6368f.ico
  description: 不忘初心,方得始終。
關聯設置名稱並添加網站
在menu和submenu中設置的config的內容為此選項的名稱。
例menu:
menu:
  - name: 常用工具
    icon: far fa-star
config: hotTools則常用工具分組裏的網站有以下兩種添加方式:
-
在主題的_config.yml裏添加:
hotTools: - name: Ethan.Tzy url: https://tzy1997.com/ img: https://bu.dusays.com/2022/05/17/6283c38e6368f.ico description: 不忘初心,方得始終。 - name: Github url: https://github.com/ img: /images/logos/github.png description: 面向開源及私有軟件項目的託管平台。 -
在站點根目錄/source/_data/(沒有自行創建)內新建hotTools.yml文件,文件內容如下:
- name: Ethan.Tzy
url: https://tzy1997.com/
img: https://bu.dusays.com/2022/05/17/6283c38e6368f.ico
description: 不忘初心,方得始終。 -
name: Github
url: https://github.com/
img: /images/logos/github.png
description: 面向開源及私有軟件項目的託管平台。
以上兩種方式任選一種即可,建議使用第二種。
這裏只寫了部分配置,更多詳細配置 請參考 hexo-theme-webstack 。
部署
如果你瞭解過【Hexo + Butterfly】的搭建流程,想必【Hexo + Webstack】對於你來説也不會太難。
你可以將編譯出來的文件夾【D:/studytype/My_Blog/Nav_Tzy/public】丟進你的服務器目錄。也可以部署到 Github 上,方法同【Hexo + Butterfly】一樣。
例如,我的個人站的地址是【tzy1997.com】,個人導航站的地址【nav.tzy1997.com】,我只需將【個人導航站】以外鏈的形式嵌入【個人站】即可。
如果你沒有服務器,沒有多餘的 Github(不想那麼麻煩的話),可以使用下面本站所使用的方法:
將編譯出來的【D:/studytype/My_Blog/Nav_Tzy/public/index.html】直接丟進【Hexo + Butterfly】項目中。然後跳過 Hexo 的編譯即可。
在這裏需要將【index.html】重新命名(xxx.html),避免與【Hexo + Butterfly】項目的根頁面衝突。
將【xxx.html】文件丟進【BlogRoot/soruce】文件夾中,然後在站點配置文件【BlogRoot/_config.yml】,修改skip_render屬性即可。
skip_render: ['xxx.html'] # 跳過多個目錄,或者多個文件最後在【Hexo + Butterfly】主題配置文件中的menu將頁面嵌入即可。例如:
  首頁: / || fas fa-home
  其他||fa-fw fas fa-coffee:
    需求牆: /demandWall/ || fa fa-bug
    網址收藏: https://tzy1997.com/nav.html || fa-fw fas fa-infinity
到此,你學廢了嗎?
有問題記得及時留言!


