本文由曹裏林同學原創。
簡介
TinyEditor 是一個框架無關的富文本編輯器,既可以在原生 JavaScript 項目中使用,也可以在 Vue、React 等前端框架中使用。
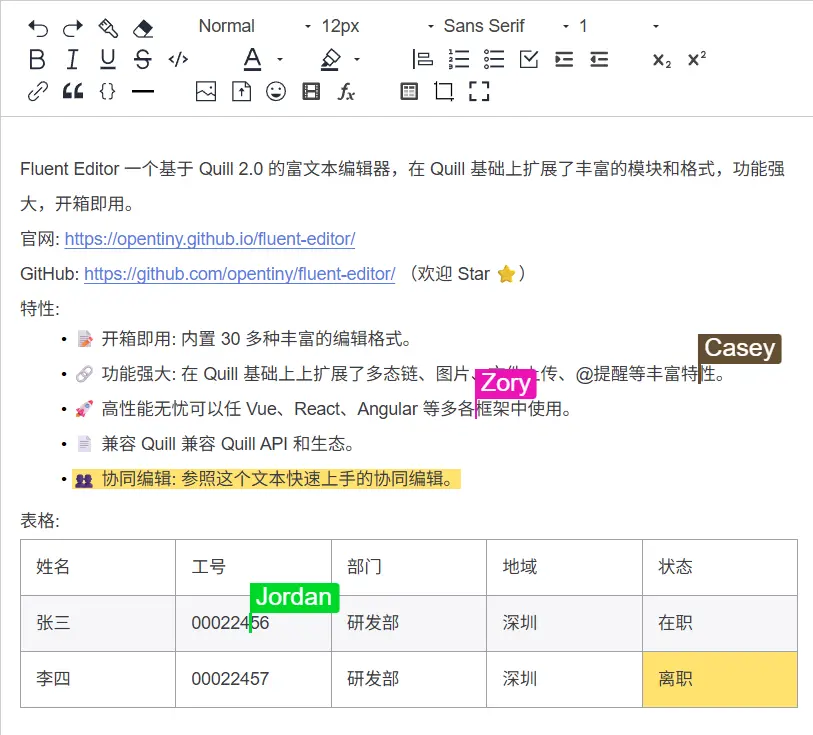
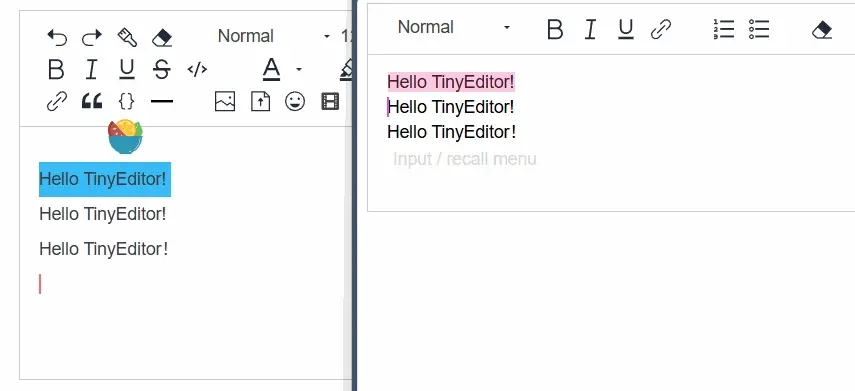
本篇文章帶來的是如何使用 TinyEditor 最新的協同編輯模塊快速部署多人實時協作編輯。
前端集成
1、安裝TinyEditor
首先需要安裝 TinyEditor
pnpm i @opentiny/fluent-editor
編寫 Html 引入 TinyEditor 和對應的樣式
@import '@opentiny/fluent-editor/style.css';
<div id="editor">
  <p>Hello TinyEditor!</p>
</div>
<!---->
import FluentEditor from '@opentiny/fluent-editor'

const editor = new FluentEditor('#editor', {
  theme: 'snow',
})
至此已經引入了 TinyEditor 編輯器,接下來安裝協同編輯模塊。
2、安裝協同編輯模塊
安裝額外依賴
pnpm i quill-cursors y-protocols y-quill yjs y-indexeddb y-websocket
引入協同編輯模塊
import FluentEditor, { CollaborationModule } from '@opentiny/fluent-editor'
FluentEditor.register('modules/collaborative-editing', CollaborationModule, true)
編輯器基礎配置:通過配置 serverUrl 和 roomName, 雙方進行協同編輯通信
const editor = new FluentEditor('#editor', {
  theme: 'snow',
  modules: {
    'collaborative-editing': {
      provider: {
        type: 'websocket',
        options: {
          serverUrl: 'wss://demos.yjs.dev/ws',  // 正式環境更換成正式服務地址
          roomName: 'Tiny-Editor-Demo-juejin',  // 雙方通信的房間名
        },
      },
    },
  },
})
現在協同編輯已經可用。
3、Provider配置
Provider 是協同編輯的核心,它負責管理客户端和服務器之間的數據同步。TinyEditor 支持多種 Provider 類型,最常見的是 WebSocket Provider 和 WebRTC Provider。
WebSocket Provider
這是最常用的連接方式,通過標準的 WebSocket 協議與後端服務器進行通信。
示例配置:
const editor = new FluentEditor('#editor', {
  modules: {
    'collaborative-editing': {
      provider: {
        type: 'websocket',
        options: {
          serverUrl: 'wss://demos.yjs.dev/ws',
          roomName: 'my-unique-document-id',
        },
      },
    },
  },
});
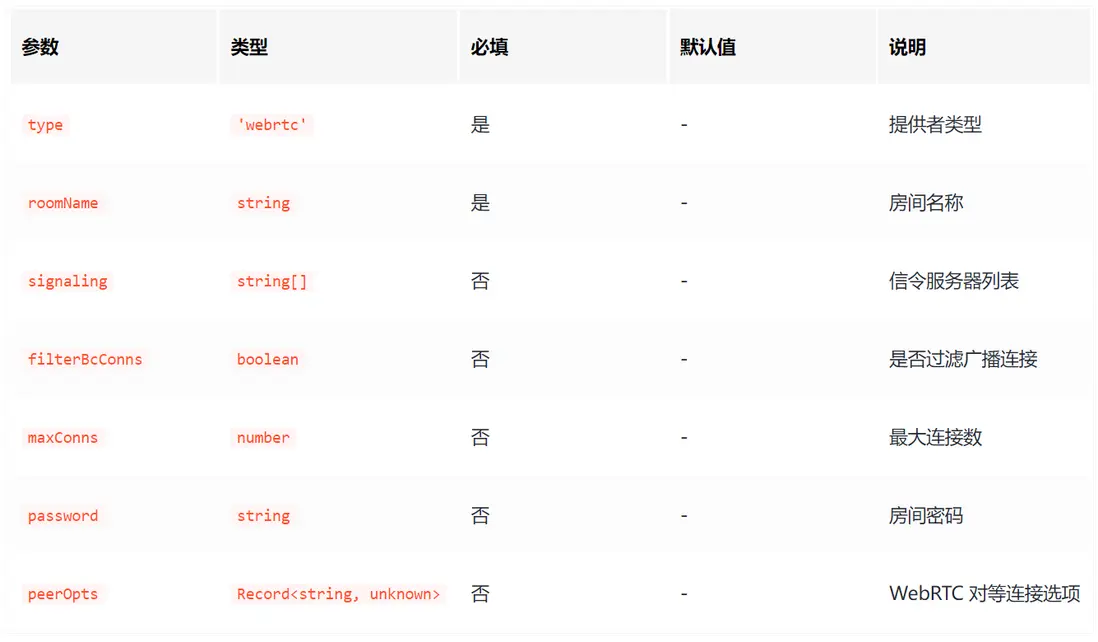
WebRTC Provider
注意: 需要額外安裝 WebRTC 依賴 pnpm i y-webrtc。使用這種方式採用點對點連接,不需要中心化的 WebSocket 服務器,更適合低延遲和對網絡拓撲有特殊要求的場景。
示例配置:
const editor = new FluentEditor('#editor', {
  modules: {
    'collaborative-editing': {
      provider: {
        type: 'webrtc',
        options: {
          roomName: 'tiny-editor-webrtc-demo',
          signaling: ['wss://signaling.yjs.dev'],
        },
      },
    },
  },
});
4、Awareness 配置
Awareness 模塊負責同步用户的在線狀態、光標位置和選區。通過配置,你可以自定義用户的顯示信息。
Awareness 實現用户在線狀態、光標位置等信息的實時同步。每個用户的在線狀態、名稱、顏色、光標位置等會自動廣播給其他協作者,實現多人編輯時的身份和操作可視化。
Awareness 結構
示例配置:
awareness: {
  state: {
    name: `user${Math.random().toString(36).substring(2, 8)}`,
    color: `#${Math.floor(Math.random() * 16777215).toString(16)}`
  },
  timeout: 30000,
}
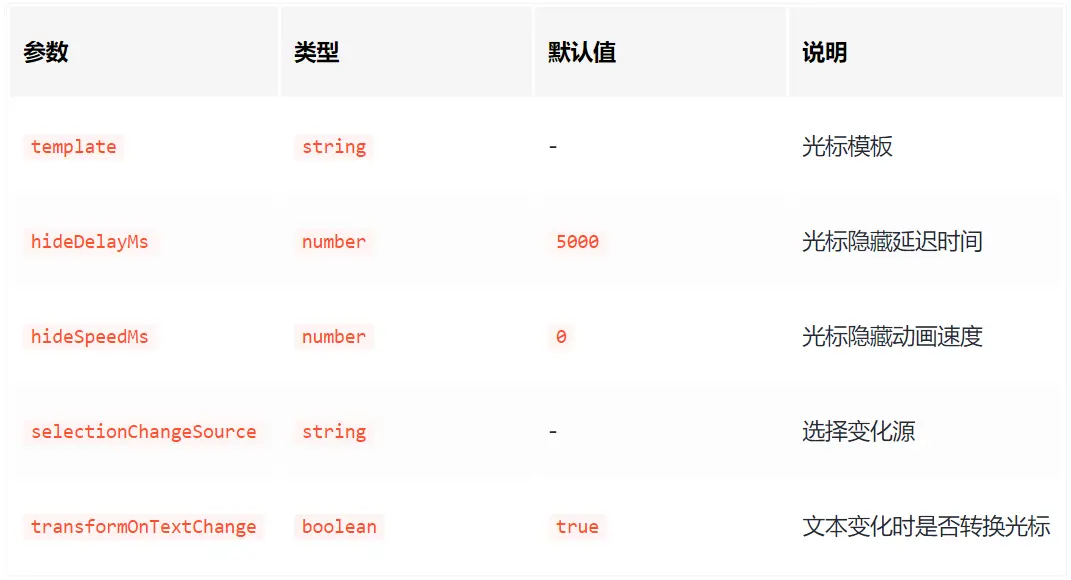
5、Cursor 配置
cursors 默認開啓,並且支持以下配置(詳細配置可見 quill-cursors):
注意光標模板內的類名不可變
示例配置:
const CURSOR_CLASSES = {
  SELECTION_CLASS: 'ql-cursor-selections',
  CARET_CONTAINER_CLASS: 'ql-cursor-caret-container',
  CARET_CLASS: 'ql-cursor-caret',
  FLAG_CLASS: 'ql-cursor-flag',
  NAME_CLASS: 'ql-cursor-name',
}

cursors: {
  template: `
    <span class="${CURSOR_CLASSES.SELECTION_CLASS}"></span>
    <span class="${CURSOR_CLASSES.CARET_CONTAINER_CLASS}">
      <span class="${CURSOR_CLASSES.CARET_CLASS}"></span>
    </span>
    <div class="${CURSOR_CLASSES.FLAG_CLASS}">
      <small class="${CURSOR_CLASSES.NAME_CLASS}"></small>
    </div>
  `,
  hideDelayMs: 300,
  hideSpeedMs: 300,
  transformOnTextChange: true,
}
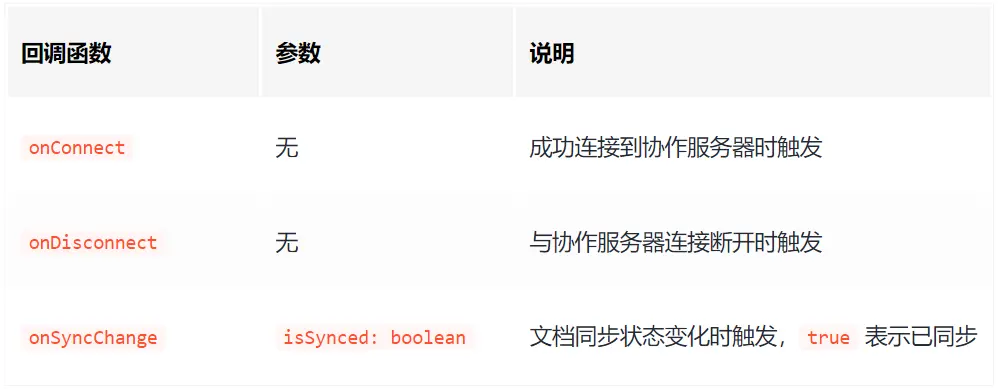
6、事件回調
後端部署
TinyEditor 的協同編輯後端服務已為你準備好 Docker 鏡像,只需簡單幾步即可快速部署,無需複雜的本地環境配置。
1、準備 Docker 環境
確保你的機器上已安裝 Docker 和 Docker Compose。
2、拉取鏡像並配置
在您的項目根目錄下創建 docker-compose.yml 文件。
docker-compose.yml 此文件定義了兩個服務:mongodb(用於數據持久化)和 websocket-server(協同編輯後端服務)。
-
如果您沒有可用的 MongoDB 服務:
- 請使用完整的 docker-compose.yml 文件,它會自動啓動一個名為 mongodb 的服務。
-
如果您已經有可用的 MongoDB 服務:
- 您不需要啓動 mongodb 服務(可以將其從 docker-compose.yml 文件中刪除或註釋掉)。
- 您只需修改 websocket-server 服務中的 MONGODB\_URL 環境變量,將其指向您現有的 MongoDB 實例地址。
services:
  mongodb:
    image: mongo:latest
    container_name: yjs-mongodb
    restart: always
    ports:
      - "27017:27017"
    environment:
      MONGO_INITDB_ROOT_USERNAME: admin # 設置 MongoDB 初始用户名
      MONGO_INITDB_ROOT_PASSWORD: admin!123 # 設置 MongoDB 初始密碼
    volumes:
      - mongodb_data:/data/db

websocket-server:
    image: yinlin124/collaborative-editor-backend:latest
    container_name: yjs-websocket-server
    restart: always
    ports:
      - "${PORT:-1234}:${PORT:-1234}"
    environment:
      HOST: ${HOST:-0.0.0.0} # 設置後端監聽的網絡接口
      PORT: ${PORT:-1234} # 默認 1234 端口,可以使用環境變量修改
      MONGODB_URL: ${MONGODB_URL:-mongodb://admin:admin!123@mongodb:27017/?authSource=admin} # 如果你使用自己的 mongodb 服務需要修改此項
      MONGODB_DB: ${MONGODB_DB:-tinyeditor} # 數據庫名稱
      MONGODB_COLLECTION: ${MONGODB_COLLECTION:-documents} # 集合名稱

    depends_on:
      - mongodb

volumes:
  mongodb_data:
如果你需要更換映射端口等,可創建 .env 文件按照下面的參數值更改環境變量:
3、一鍵啓動服務
在項目根目錄下運行 docker-compose 命令,Docker 會自動下載鏡像、創建容器並啓動服務。
docker compose up -d後端啓動後將前端編輯器配置中的 serverUrl 改成對應的服務器 IP:port。
更多需求
如果你有自定義持久化或者自定義 provider 等需求可查看文檔:https://opentiny.github.io/tiny-editor/docs/demo/collaborativ...,有任何問題也可到倉庫提 issue。
關於OpenTiny
歡迎加入 OpenTiny 開源社區。添加微信小助手:opentiny-official 一起參與交流前端技術~\
🌐 官網:https://opentiny.design\
📦 GitHub:https://github.com/opentiny (歡迎star)
OpenTiny NEXT 正式發佈,官網、文檔、示例、Demo 一站配齊。未來已來,歡迎上車!
同時歡迎大家進入代碼倉庫 Star🌟TinyEngine、TinyVue、TinyNG、TinyCLI、TinyEditor\~
如果你也想要共建,可以進入代碼倉庫,找到 good first issue標籤,一起參與開源貢獻\~


