


原文轉載自「劉悦的技術博客」https://v3u.cn/a_id_190
我們知道,在前端界有一個共識:速度就是生命,帶寬就是金錢。怎樣將頁面加載速度有效提升是無數前端工程師無時不刻在思考的課題,目前的網絡環境中,除了視頻,圖片仍舊是佔用流量較大的一部分,對於app端尤其如此,因此,如何在保證圖片視覺不失真的前提下縮小圖片體積,對於節省帶寬和電池電量都十分重要,因此Google在十年前提出了一種新的圖片壓縮格式 :WebP,給圖片的優化提供了新的方向。
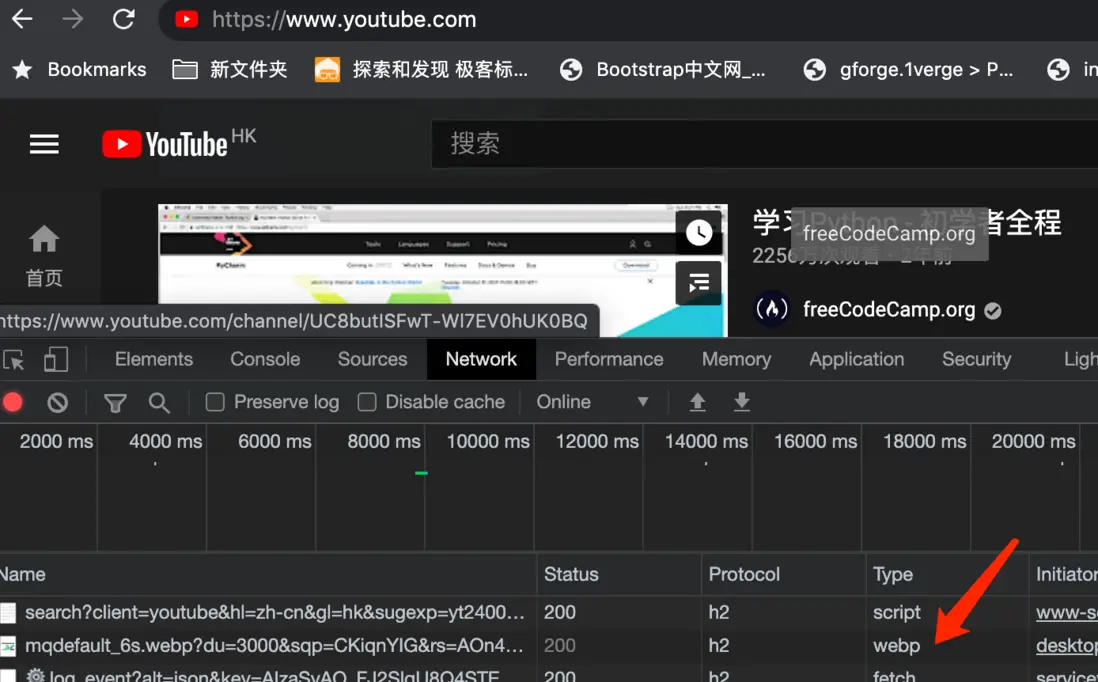
WebP的優勢在於它具有更優的圖像數據壓縮算法,在擁有肉眼幾乎無法識別差異的圖像質量前提下,帶來更小的圖片體積,同時具備了無損和有損的壓縮模式、Alpha 透明以及動畫的特性,從JPEG 和 PNG 上的轉化效果都非常突出、穩定和統一,全球著名視頻網站YouTube的視頻縮略圖採用WebP後,網頁加載速度提升了10%,提升效果可見一斑:
本次我們以本站為例子,使用Python3對站內圖片進行無損壓縮和轉換,同時利用Nginx針對Webp圖片判斷請求頭來對老版本瀏覽器做向下兼容,實現Webp圖片的無縫切換。
首先,將網站的圖片轉換為Webp格式,這裏我們使用PIL庫,該庫廣泛用於Python中的圖像處理,並且PIL圖像庫中最重要的類是Image類,該類在模塊中以相同的名稱定義。
安裝PIL:
python3 -m pip install --upgrade pip
python3 -m pip install --upgrade Pillow
可以通過open方法加載圖像文件並且展示它:
from PIL import Image
img = Image.open('sample.jpg')
img.show()
Image.convert()方法可以返回該圖像的轉換後的副本。此方法可通過調色板轉換像素。當前版本支持“ L”,“ RGB”和“ CMYK”之間的所有格式轉換。save(fp,format)使用兩個輸入參數,第一個是保存轉換後的文件的文件路徑(fp),第二個是要轉換成的文件格式。
轉換JPG到PNG:
from PIL import Image
img = Image.open('sample.jpg').convert('RGB')
img.save('sample.jpg.png', 'png')
轉換PNG到JPG:
from PIL import Image
img = Image.open('sample.png').convert('RGB')
img.save('sample.png.jpeg', 'jpeg')
轉換PNG到WEBP:
from PIL import Image
img = Image.open('sample.png').convert('RGB')
img.save('sample.png.webp', 'webp')
轉換JPG到WEBP:
from PIL import Image
img = Image.open('sample.jpg').convert('RGB')
img.save('sample.jpg.webp', 'webp')
看起來相當簡單,有的時候,我們可能需要把某個目錄下的圖片進行批量轉換,首先讀取所有需要轉換的圖片:
import os

files = os.listdir('/opt/img')

images = [file for file in files if file.endswith(('jpg','png','jpeg'))]

print(images)

liuyue:mytornado liuyue$ python3 "/Users/liuyue/wodfan/work/mytornado/test_webp.py"
['qrcode.png', 'touxiang_1.png', 'code.jpeg', 'test.png', 'touxiang1.jpg', 'logo_dark.png', 'logo.png', 'touxiang.png', 'code1.jpeg']
liuyue:mytornado liuyue$
隨後建立轉換方法:
def convert_image(image_path, image_type):

    im = Image.open(image_path)
    print(image_path)
    im = im.convert('RGB')
    image_name = image_path.split('.')[0]
    print(f"This is the image name: {image_name}")

    if not os.path.exists(f"{image_path}.webp"):

        if image_type == 'jpg' or image_type == 'png' or image_type == 'jpeg':
            im.save(f"{image_name}.{image_type}.webp", 'webp')
        else:
            raise Error
這裏我們將轉換後的副本統一加上後綴.webp
之後進行轉換操作:
for image in images:
    if image.endswith('jpg'):
        convert_image(image, image_type='jpg')
    elif image.endswith('jpeg'):
        convert_image(image, image_type='jpg')
    elif image.endswith('png'):
        convert_image(image, image_type='png')
    else:
        raise Error
這裏需要注意的是,是在原圖文件名基礎上加入後綴.webp,而不是覆蓋原圖後綴,這樣後面替換圖片內容時會更加方便。
接下來的課題就是怎樣判斷客户端的瀏覽器是否支持Webp格式的圖片,目前ios和新版的Safari瀏覽器已經對webp進行了適配,但是對於老版本的系統和瀏覽器怎麼向下兼容是一個令人頭疼的問題。
可以在前端通過js腳本來進行判斷:
window.isSupportWebp = false;//是否支持
(function() {
    var img = new Image();
    function getResult(event) {
        //如果進入加載且圖片寬度為1(通過圖片寬度值判斷圖片是否可以顯示)
        window.isSupportWebp = event && event.type === 'load' ? img.width == 1 : false;
    }
    img.onerror = getResult;
    img.onload = getResult;
    img.src = 'data:image/webp;base64,UklGRiQAAABXRUJQVlA4IBgAAAAwAQCdASoBAAEAAwA0JaQAA3AA/vuUAAA='; //一像素圖片
})();

console.log(window.isSupportWebp);
true
原理就是加載一像素的webp判斷是否顯示成功,如果window.isSupportWebp為true我們就可以將webp後綴加載否則就加載原後綴的圖片,但是基於前端的解決方案需要修改大量的代碼,同時如果判斷業務邏輯放在頁面裏無形中也增加了頁面負擔,有沒有方法在不變動代碼邏輯的前提下,可以自動切換圖片後綴呢?答案就在後端的Nginx。
我們知道瀏覽器的每個請求頭中都帶有"Accept"字段,例如:
Accept:image/webp,image/apng,image/*,*/*;q=0.8此時通過nginx對Accept進行判斷,如果帶有webp,説明該瀏覽器支持webp,我們就由後端加載webp,如果頭部沒有webp字樣,説明瀏覽器不支持,此時nginx繼續加載原後綴文件,這也就是為什麼之前在圖片轉換過程中要保留原始圖片文件的原因。
首先打開nginx的mime.types文件,查看nginx是否配置webp,如果沒有需要手動加上:
vim /etc/nginx/mime.types可以看到全部文件類型:
types {
    text/html                                        html htm shtml;
    text/css                                         css;
    text/xml                                         xml;
    image/gif                                        gif;
    image/jpeg                                       jpeg jpg;
    application/javascript                           js;
    application/atom+xml                             atom;
    application/rss+xml                              rss;

    text/mathml                                      mml;
    text/plain                                       txt;
    text/vnd.sun.j2me.app-descriptor                 jad;
    text/vnd.wap.wml                                 wml;
    text/x-component                                 htc;

    image/png                                        png;
    image/svg+xml                                    svg svgz;
    image/tiff                                       tif tiff;
    image/vnd.wap.wbmp                               wbmp;
    image/webp                                       webp;
    image/x-icon                                     ico;
    image/x-jng                                      jng;
"/etc/nginx/mime.types" 97L, 5231C                            22,5         頂端
    application/octet-stream                         deb;
    application/octet-stream                         dmg;
    application/octet-stream                         iso img;
    application/octet-stream                         msi msp msm;

    audio/midi                                       mid midi kar;
    audio/mpeg                                       mp3;
    audio/ogg                                        ogg;
    audio/x-m4a                                      m4a;
    audio/x-realaudio                                ra;

    video/3gpp                                       3gpp 3gp;
    video/mp2t                                       ts;
    video/mp4                                        mp4;
    video/mpeg                                       mpeg mpg;
    video/quicktime                                  mov;
    video/webm                                       webm;
    video/x-flv                                      flv;
    video/x-m4v                                      m4v;
    video/x-mng                                      mng;
    video/x-ms-asf                                   asx asf;
    video/x-ms-wmv                                   wmv;
    video/x-msvideo                                  avi;
}
主要查看有沒有webp,如果沒有進行添加:
image/webp webp;隨後修改主配置文件:
vim /etc/nginx/nginx.conf在http配置中加上webp文件的判斷邏輯:
map $http_accept $webp_suffix {
    default   "";
    "~*webp"  ".webp";
}
同時在server中配置邏輯,如果支持就將頭部信息替換為webp後綴文件:
location ~* ^/v3u/Public/images/.+\.(png|jpe?g)$ {
  add_header Vary Accept;
  try_files $uri$webp_suffix $uri =404;
}
完整配置如下:
user root;
worker_processes auto;
error_log /var/log/nginx/error.log;
pid /run/nginx.pid;

# Load dynamic modules. See /usr/share/doc/nginx/README.dynamic.
include /usr/share/nginx/modules/*.conf;

events {
    worker_connections 1024;
}

http {
    log_format  main  '$remote_addr - $remote_user [$time_local] "$request" '
                      '$status $body_bytes_sent "$http_referer" '
                      '"$http_user_agent" "$http_x_forwarded_for"';

    access_log  /var/log/nginx/access.log  main;

    map $http_accept $webp_suffix {
    default   "";
    "~*webp"  ".webp";
}

    sendfile            on;
    tcp_nopush          on;
    tcp_nodelay         on;
    keepalive_timeout   65;
    types_hash_max_size 2048;

    include             /etc/nginx/mime.types;
    default_type        application/octet-stream;

        gzip on;
        gzip_min_length  1k;
        gzip_buffers     4 16k;
        gzip_http_version 1.0;
        gzip_comp_level 2;
        gzip_types       text/plain application/x-javascript text/css application/xml text/javascript application/x-httpd-php image/jpeg image/gif image/png;
        gzip_vary on;
        gzip_disable msie6;

    open_file_cache max=1000 inactive=20s;
    open_file_cache_valid 30s;
    open_file_cache_min_uses 5;
    open_file_cache_errors off;

    # Load modular configuration files from the /etc/nginx/conf.d directory.
    # See http://nginx.org/en/docs/ngx_core_module.html#include
    # for more information.
    include /etc/nginx/conf.d/*.conf;

    server {

        location ~* ^/v3u/Public/images/.+\.(png|jpe?g)$ {
  add_header Vary Accept;
  try_files $uri$webp_suffix $uri =404;
}

        include /etc/nginx/default.d/*.conf;

        location / {
        }


        error_page 404 /404.html;
            location = /40x.html {
        }

        error_page 500 502 503 504 /50x.html;
            location = /50x.html {
        }
    }

#include vhost/*.conf;
}
修改好配置文件之後,先不要着急重啓服務器,檢測一下配置文件語法:
[root@iz2ze0ndt5s9wq2s6ff8g6z nginx]# nginx -t
nginx: the configuration file /etc/nginx/nginx.conf syntax is ok
nginx: configuration file /etc/nginx/nginx.conf test is successful
[root@iz2ze0ndt5s9wq2s6ff8g6z nginx]#
如果沒有問題,重啓服務:
systemctl restart nginx.service現在讓我們來測試一下,以本站的logo圖片為例子,如果是不支持webp格式的瀏覽器,比如低版本的Safari(13.0.3):
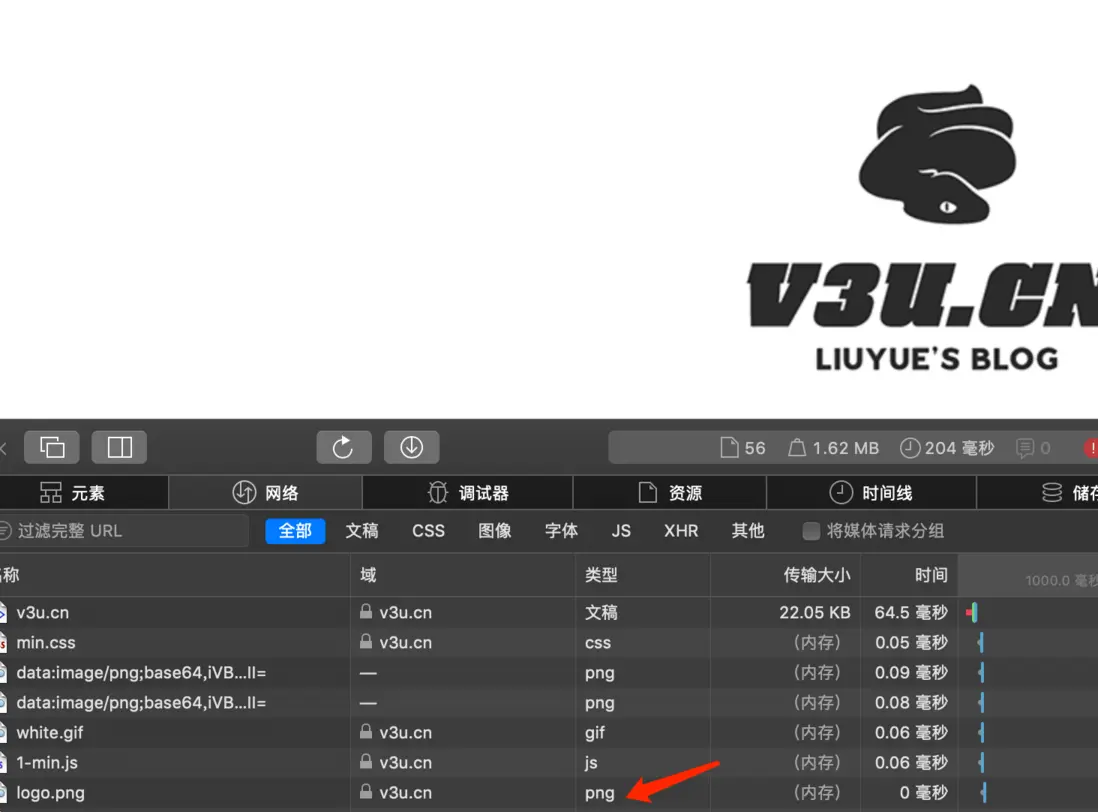
可以看到加載圖片的類型保持了原圖片後綴:png
現在換一個瀏覽器,使用支持webp的chrome(88.0.4324):
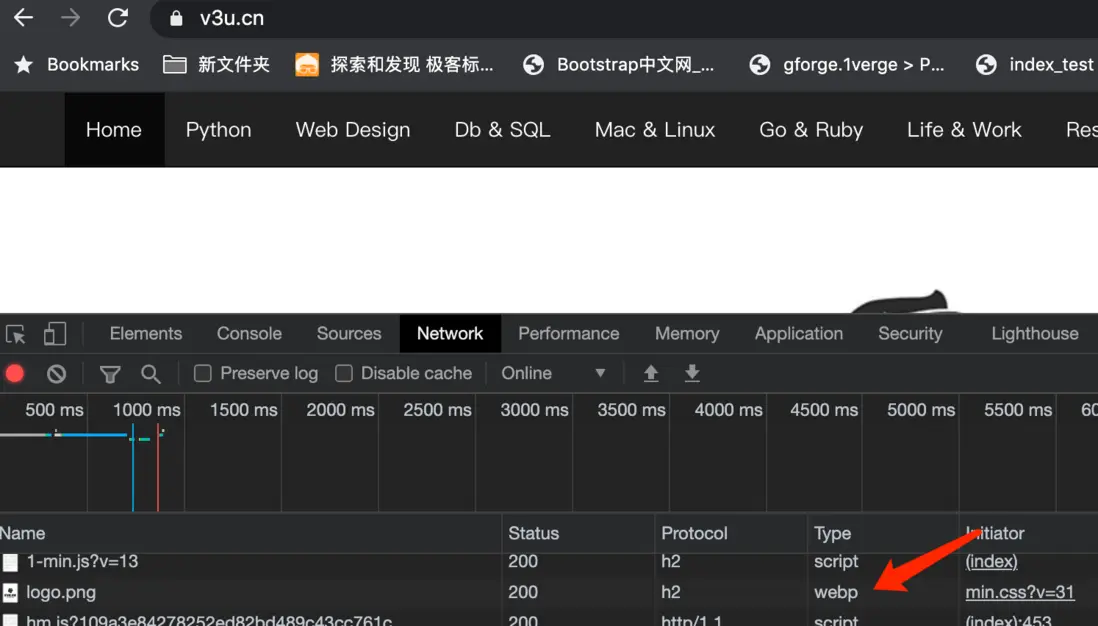
可以看到已經自動切換為webp格式了,讓我們再次通過google的頁面性能打分工具PageSpeedInsights對本站進行評測: https://developers.google.com...

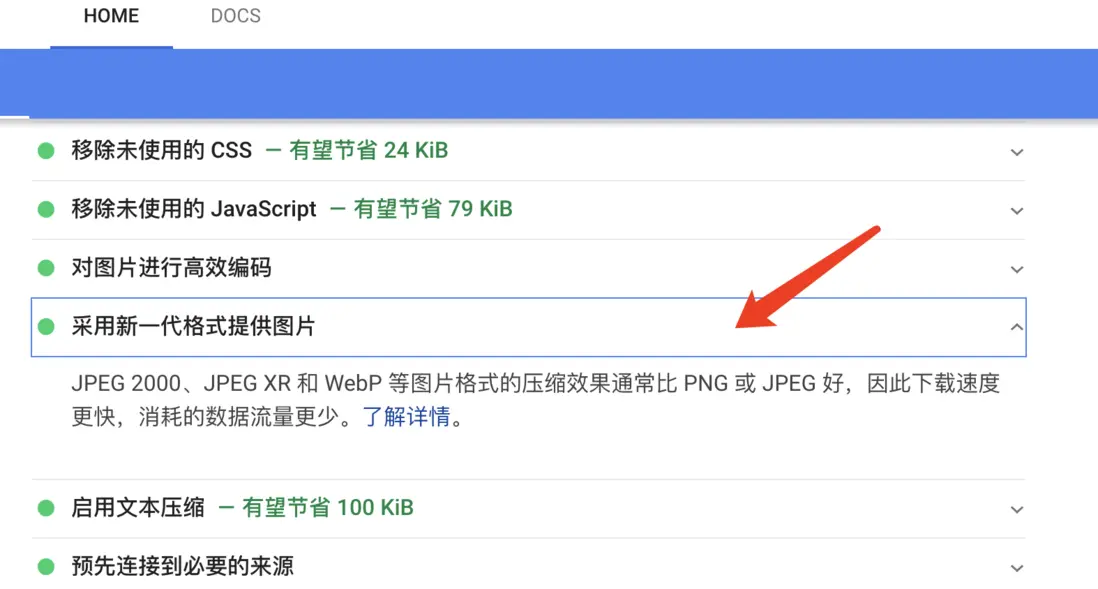
一望而知,頁面加載速度得到了提升,並且在Google的頁面優化建議中,已經達成了採用新一代格式提供圖片的要求。
結語:當然了,其實Nginx是可以對圖片進行實時壓縮的,但是那樣需要單獨安裝模塊以及其他服務的介入,這對於低版本服務器無疑是要耗費成本的,所以本方案就是通過python3腳本提前將圖片轉換好,再用nginx判斷一下即可,僅僅一個腳本+兩行配置文件即可完成系統升級,看起來此方案是最佳選擇,既沒有前端代碼侵入,也不需要各種複雜的配置和服務搭建。相信在不遠的將來,基於google開源的VP8視頻編碼格式的 WebM 視頻也將會大面積的替代傳統的mp4格式,前端架構的性能優化,始終是業界亙古不變的課題之一。
原文轉載自「劉悦的技術博客」 https://v3u.cn/a_id_190


