


背景
MongoDB 誕生之初,便以出色的易用性與詳盡的驅動程序文檔脱穎而出,堪稱對傳統關係型數據庫的一次重要革新,也正因如此,它迅速成為開發者社區的熱門之選。
然而,隨着其許可模式從開源轉向 SSPL 許可證,MongoDB 的授權機制變得日趨複雜——這一變化直接導致它不再適配大量開源項目,同時也讓許多處於早期階段的商業項目難以將其納入技術選型。
在此背景下,越來越多用户開始尋求 MongoDB 的文檔數據庫替代方案,其中,FerretDB 與搭載 DocumentDB 插件的 PostgreSQL 組合,憑藉兼容特性與靈活的許可優勢,成為了極具競爭力的優質選擇。
DocumentDB 作為一個微軟開發的引擎,用來驅動基於 vCore 的 Azure Cosmos DB for MongoDB,它引入了 BSON 數據類型,並提供 API 以便在原生 PostgreSQL 中無縫操作。
有不少人已經注意到,剛剛發佈的 IvorySQL 4.6 有一個新特性是提供了兼容 MongoDB 的解決方案:使用 FerretDB 和 DocumentDB 提供兼容 MongoDB 的解決方案。這一解決方案使得 IvorySQL 4.6 除了兼容 Oracle 之外也兼容了 MongoDB。
ivydocumentdb 是基於微軟 DocumentDB 並適配了 IvorySQL 的項目。它提供了面向文檔的 NoSQL 數據庫的原生實現,使用户能夠在 IvorySQL 框架下,對 BSON(Binary JSON,二進制 JSON)數據類型進行無縫的 CRUD(創建、讀取、更新、刪除)操作。
本文將介紹如何使用 ivydocumentdb,在本地搭建一個含 DocumentDB 插件的 IvorySQL 環境,以平替 MongoDB。
安裝方法
安裝環境:CentOS Stream 9
下載源碼
sudo dnf install -y git
git clone https://github.com/IvorySQL/ivydocumentdb.git
cd ivydocumentdb && git checkout IVYDOCDB_REL_4_STABLE
創建臨時文件夾並複製安裝腳本
sudo dnf install -y wget curl cmake unzip
sudo mkdir -p /tmp/install_setup
sudo cp ./scripts/* /tmp/install_setup
sudo chmod 777 /tmp/install_setup/*
準備編譯環境
sudo dnf install -y epel-release
sudo dnf install -y bison readline-devel zlib-devel openssl-devel
sudo dnf groupinstall -y 'Development Tools'
sudo dnf config-manager --set-enabled crb
sudo dnf install -y perl-IPC-Run
sudo dnf install -y  gnupg2        tzdata pkgconf-pkg-config cmake       glibc-langpack-en     gcc     gdb      bison     flex     readline-devel     zlib-devel     krb5-devel     libtool     libicu-devel     openssl-devel perl-Test-Harness perl-core libxml2-devel
安裝 IvorySQL 並編譯相關插件
export MAKE_PROGRAM=cmake && sudo INSTALL_DEPENDENCIES_ROOT=/tmp/install_setup /tmp/install_setup/install_setup_libbson.sh

sudo INSTALL_DEPENDENCIES_ROOT=/tmp/install_setup /tmp/install_setup/install_setup_postgres.sh -d "/var/local/ivorysql/ivory-4" -v 4

sudo env "PATH=/var/local/ivorysql/ivory-4/bin:$PATH" IVORYVERSION=4 INSTALL_DEPENDENCIES_ROOT=/tmp/install_setup /tmp/install_setup/install_setup_rum_oss.sh

sudo env "PATH=/var/local/ivorysql/ivory-4/bin:$PATH" IVORYVERSION=4 INSTALL_DEPENDENCIES_ROOT=/tmp/install_setup /tmp/install_setup/install_setup_citus_core_oss.sh 12

sudo env "PATH=/var/local/ivorysql/ivory-4/bin:$PATH" IVORYVERSION=4 INSTALL_DEPENDENCIES_ROOT=/tmp/install_setup /tmp/install_setup/install_citus_indent.sh


sudo env "PATH=/var/local/ivorysql/ivory-4/bin:$PATH"  IVORYVERSION=4 INSTALL_DEPENDENCIES_ROOT=/tmp/install_setup /tmp/install_setup/install_setup_system_rows.sh

sudo env "PATH=/var/local/ivorysql/ivory-4/bin:$PATH"  IVORYVERSION=4 INSTALL_DEPENDENCIES_ROOT=/tmp/install_setup /tmp/install_setup/install_setup_pg_cron.sh

sudo INSTALL_DEPENDENCIES_ROOT=/tmp/install_setup /tmp/install_setup/install_setup_intel_decimal_math_lib.sh

sudo INSTALL_DEPENDENCIES_ROOT=/tmp/install_setup /tmp/install_setup/install_setup_pcre2.sh

sudo env "PATH=/var/local/ivorysql/ivory-4/bin:$PATH"  INSTALL_DEPENDENCIES_ROOT=/tmp/install_setup IVORYVERSION=4 /tmp/install_setup/install_setup_pgvector.sh

sudo dnf install -y proj-devel libxml2-devel json-c-devel geos-devel

sudo env "PATH=/var/local/ivorysql/ivory-4/bin:$PATH"  INSTALL_DEPENDENCIES_ROOT=/tmp/install_setup IVORYVERSION=4 /tmp/install_setup/install_setup_postgis.sh
編譯並安裝 ivydocumentdb
sudo env "PATH=/var/local/ivorysql/ivory-4/bin:$PATH" make
sudo env "PATH=/var/local/ivorysql/ivory-4/bin:$PATH" make install
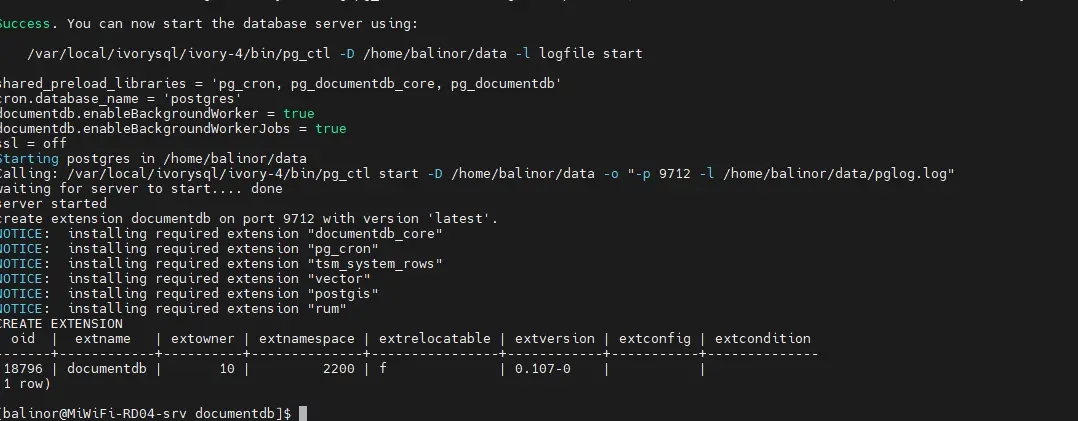
env "PATH=/var/local/ivorysql/ivory-4/bin:$PATH" IVY_VERSION_USED=4 /tmp/install_setup/start_oss_server.sh -d ~/data當看到如下圖所示內容,DocumentDB 就安裝成功了。
使用方法
連接數據庫並測試
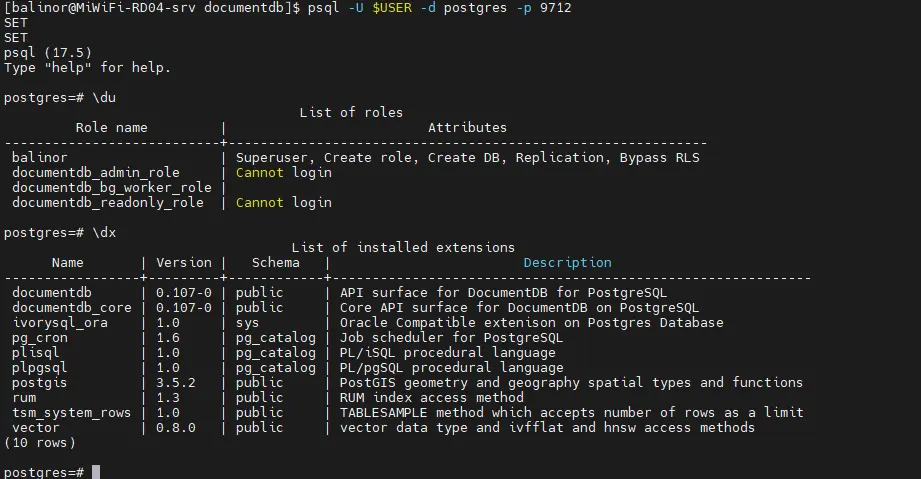
為檢查 DocumentDB 插件是否正常工作,需要連接數據庫進行增刪改查操作。
psql -U $USER -d postgres -p 9712
創建文檔並插入數據:
SELECT documentdb_api.create_collection('documentdb','patient');

select documentdb_api.insert_one('documentdb','patient', '{ "patient_id": "P001", "name": "Alice Smith", "age": 30, "phone_number": "555-0123", "registration_year": "2023","conditions": ["Diabetes", "Hypertension"]}');
select documentdb_api.insert_one('documentdb','patient', '{ "patient_id": "P002", "name": "Bob Johnson", "age": 45, "phone_number": "555-0456", "registration_year": "2023", "conditions": ["Asthma"]}');
select documentdb_api.insert_one('documentdb','patient', '{ "patient_id": "P003", "name": "Charlie Brown", "age": 29, "phone_number": "555-0789", "registration_year": "2024", "conditions": ["Allergy", "Anemia"]}');
select documentdb_api.insert_one('documentdb','patient', '{ "patient_id": "P004", "name": "Diana Prince", "age": 40, "phone_number": "555-0987", "registration_year": "2024", "conditions": ["Migraine"]}');
select documentdb_api.insert_one('documentdb','patient', '{ "patient_id": "P005", "name": "Edward Norton", "age": 55, "phone_number": "555-1111", "registration_year": "2025", "conditions": ["Hypertension", "Heart Disease"]}');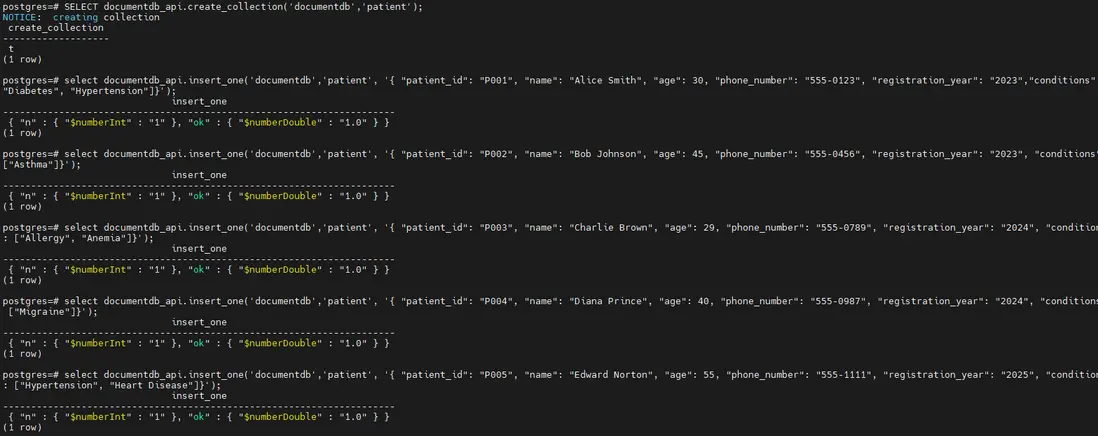
查詢剛剛插入的數據:
SELECT document FROM documentdb_api.collection('documentdb','patient');
至此,用户就可以在 IvorySQL 上使用 documentdb_api 進行增刪改查了。
FerretDB
最後,我們需要使用 FerretDB 作為一個 Proxy,將 MongoDB 5.0+ wire 協議查詢轉換為 SQL,並使用帶有 DocumentDB 擴展的 IvorySQL 作為數據庫引擎,完成對 MongoDB 的平替。
wget https://github.com/FerretDB/FerretDB/releases/download/v2.5.0/ferretdb-amd64-linux && chmod 777 ferretdb-amd64-linux
ferretdb-amd64-linux --postgresql-url "postgres://<username>:<user_password>@localhost:9712/postgres"
FerretDB 具體介紹及使用方式,可以參考 FerretDB 官網。
此時,FerretDB 就完成了部署,MongoDB 客户端通過 FerretDB 的 27017 端口及 IvorySQL 數據庫的用户名密碼,連上含 DocumentDB 插件的 IvorySQL,就可以順利完成增刪改查等操作。
總結
通過本文的步驟,我們成功在 CentOS Stream 9 環境下搭建了含 DocumentDB 插件的 IvorySQL 環境,並結合 FerretDB 實現了對 MongoDB 的平替。該方案不僅解決了 MongoDB 因 SSPL 許可證帶來的適配難題,還藉助 IvorySQL 本身兼容 Oracle 的特性,為企業提供了更靈活、多元的數據庫選擇。
對於開源項目或早期商業項目而言,此方案無需擔心複雜的許可機制,同時能通過熟悉的 SQL 操作與 MongoDB 客户端交互,降低了技術遷移成本。後續,開發者可基於該環境進一步探索數據備份策略、性能優化方案,或結合實際業務場景擴展更多功能,充分發揮 IvorySQL 與 FerretDB 組合的優勢,為業務發展提供穩定可靠的數據庫支撐。


