

由於圖片和格式解析問題,可前往 閲讀原文
前端自動化測試在提高代碼質量、減少錯誤、提高團隊協作和加速交付流程方面發揮着重要作用。它是現代軟件開發中不可或缺的一部分,可以幫助開發團隊構建可靠、高質量的應用程序
單元測試(Unit Testing)和端到端測試(End-to-End Testing)是兩種常見的測試方法,它們在測試的範圍、目的和執行方式上有所不同。單元測試和端到端測試不是相互排斥的,而是互補的。它們在不同的層面和階段提供了不同的價值,共同構成了一個全面的測試策略
單測和端測區別
單元測試(Unit)
- 單元測試關注於最小的可測試單元,如函數、方法或模塊
- 目的是驗證代碼中的每個獨立單元(如函數)是否按照預期工作
- 通常是自動化的、快速執行的,且不依賴於外部資源或其他模塊
- 驗證單個代碼單元的行為,提供快速反饋,並幫助捕獲和修復問題
端到端測試(End-to-End)
- 從用户角度出發,測試整個應用程序的功能和流程
- 模擬真實的用户交互和場景,從應用程序的外部進行測試。跨多個模塊、組件和服務進行,以確保整個應用程序的各個部分正常協同工作
- 涉及用户界面(UI)交互、網絡請求、數據庫操作等,以驗證整個應用程序的功能和可用性
總之,單元測試主要關注代碼內部的正確性,而端到端測試關注整體功能和用户體驗。結合使用這兩種測試方法可以提高軟件的質量和可靠性。在項目中尤其是公共依賴如組件庫至少都需要單測,端測相對來説比較繁瑣點,但是也是程序穩定的重要驗證渠道
Cypress
這裏選擇Cypress作為端測框架,Cypress 是一個用於前端端到端(End-to-End,E2E)測試的開源測試框架。它被設計用於對 Web 應用程序進行自動化測試,可以模擬用户與應用程序進行交互的行為,並驗證應用程序的功能和用户體驗
安裝使用
你可以選擇自己的npm包管理器進行安裝
➜ npm install cypress -D配置npm腳本打開cypress
{
    "scripts": {
        "test:e2e": "cypress open"
    }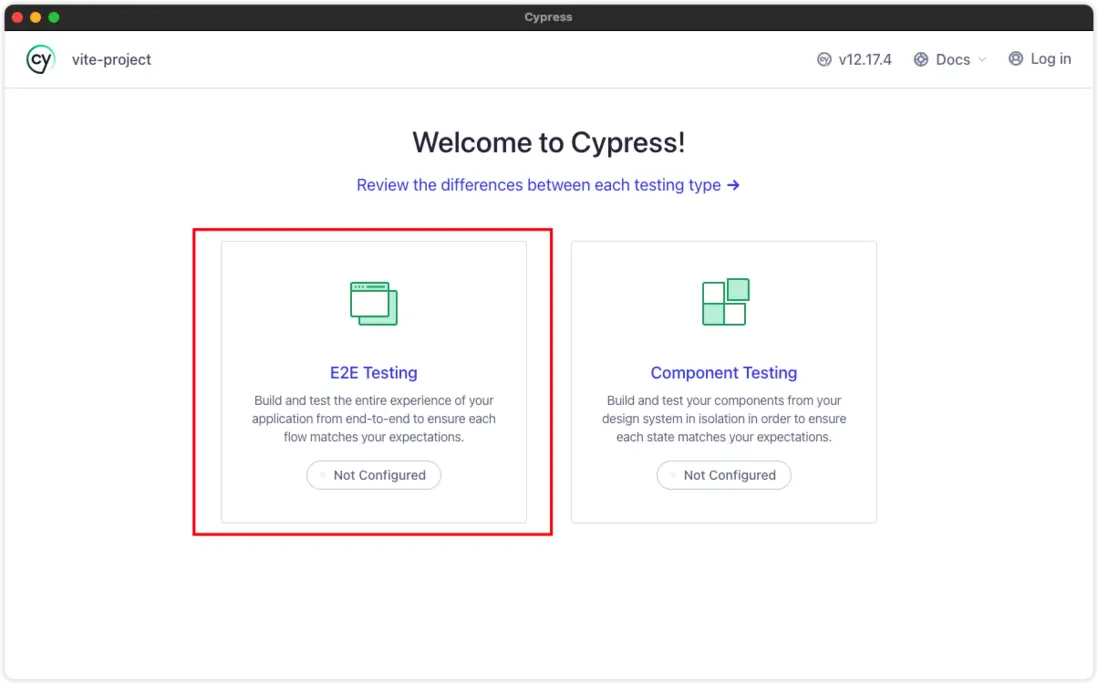
}或者直接使用./node_modules/.bin/cypress open。啓動後出彈出cypress的界面,可以進行端到端測試和組件測試。從下圖界面可以看出不管是端測還是組件測試都沒有配置(Not Configured),這裏我們選擇第一個端到端測試:
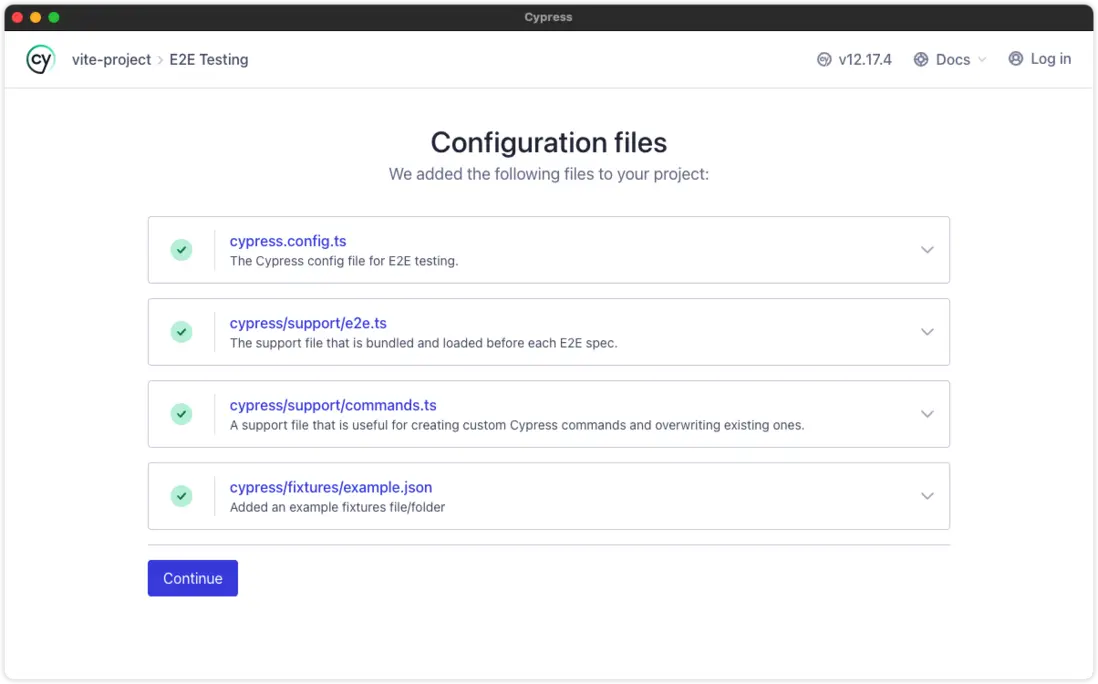
進去後由於是初次使用cypress會引導對項目做初始化配置,點擊Continue會在項目中生成對應的文件:
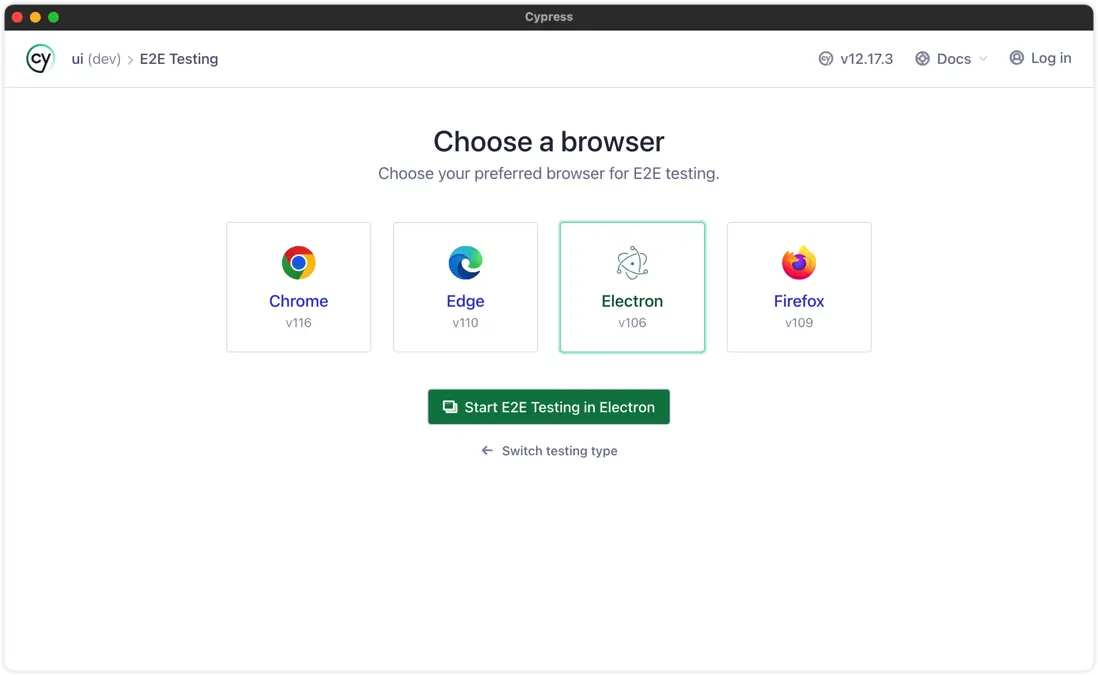
端到端測試cypress會檢測本地計算機安裝的瀏覽器,你可以選擇要用哪個瀏覽器進行測試,或者使用electron。這裏我選擇使用electron
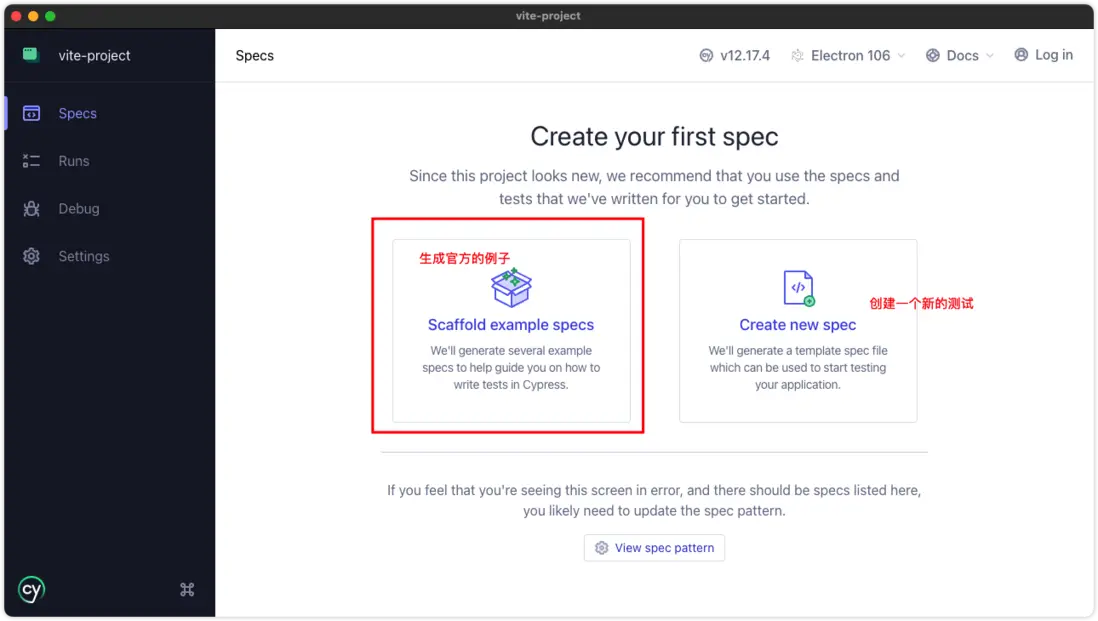
進來後就到了測試用例界面,初次下載不會有任何測試用例的。界面會引導你去創建第一個測試用例,左側用來生成官方的測試例子,其可以作為用例的參考;右側自己來創建測試用例,初次使用我們先點擊生成官方例子:
下圖便是官方的測試例子,可以看到有很多,對應的文件路徑在cypress/e2e下
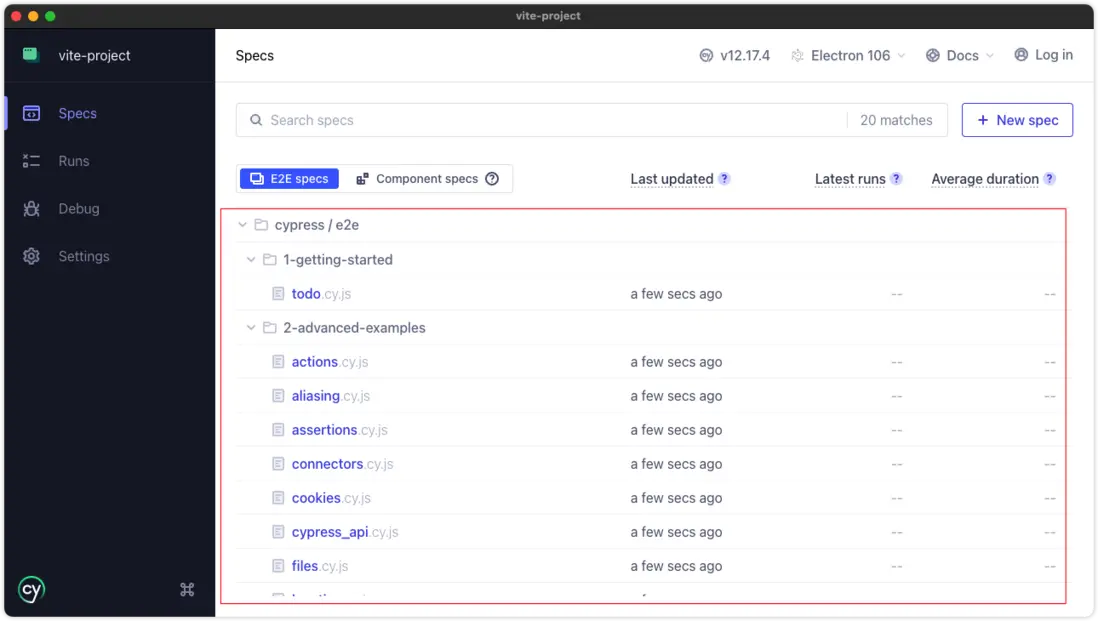
這些單測例子中隨便點擊一個就會測試對應的用例,這裏我們點擊todo.cy.js就可以開始測試了
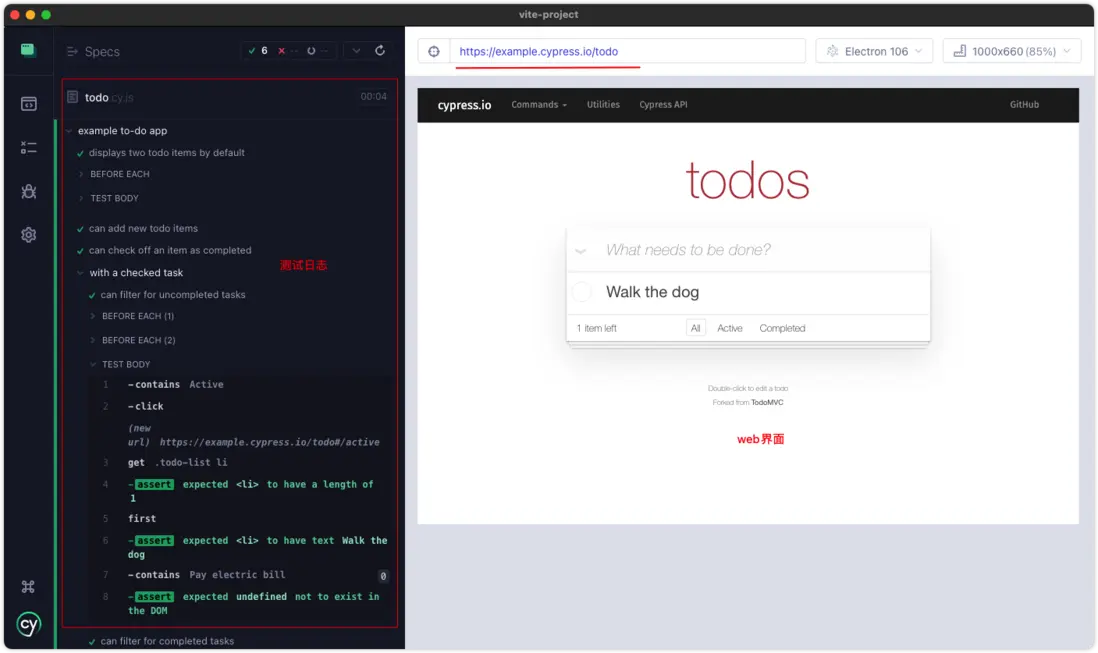
可以看到測試界面主要包含兩大板塊,左側主要是測試日誌、統計、快照之類,右側便是web界面。cypress會根據測試用例模擬用户行為,並生成對應的日誌;web界面會顯示每個步驟的形態,就好像是用户在操作一樣

<div class='img-title'>動圖演示</div>
除了使用open打開對應的界面外,也可以使用終端進行測試不用打開界面,只需要執行cypress run命令即可
配置
cypress配置包括全局、端測、組件測試幾個方面,可以通過cypress.config.js配置文件進行配置:
const { resolve } = require("path");
const { defineConfig } = require("cypress");

module.exports = defineConfig({
  // 端測配置
  e2e: {},
  // 組件測試配置
  component: {},
  /* 其他的全局配置 */
});
以下是一些常見的配置:
- baseUrl:端測訪問的基本地址,比如測試本地的web服務
http://localhost:8080,這樣在測試用例中就可以使用相對路徑了 - specPattern:測試用例文件,包含單測和組件測試,支持glob形式。這樣就可以自定義測試用例的位置了
- fixturesFolder:用來存放測試mock數據,默認讀取根路徑下的
cypress/fixtures路徑下的文件,你可以通過此屬性修改對應的測試數據路徑 - supportFile:自定義全局配置、功能函數、自定義命令、環境變量等等,在每個測試文件執行前都會先加載執行全局的配置文件。默認的路徑為
cypress/support/**,可以自行修改,如果沒有全局的配置請設置成false - experimentalRunAllSpecs:值為true時測試界面會有一個測試全部用例的按鈕,默認會false
- video:當執行
cypress run進行測試後生成對應的視頻文件,設置成false不會生成 - screenshotsFolder:快照保存路徑,默認路徑
cypress/screenshots - videosFolder:視頻保存路徑,默認路徑
cypress/videos - screenshotOnRunFailure:當
cypress run失敗時生成對應的快照 - downloadsFolder:當測試用例中下載文件時保存的路徑
- viewportWidth / viewportHeight:設置界面視口大小,可以模擬不同尺寸的屏幕
有的配置對於 e2e和Component 都有,可以在全局配置,也可以在不同類型的測試中進行覆蓋,基本配置就説這麼多,更多配置參考 官方文檔
大概的配置結構如下:
<root>
├── cypress.config.js # 配置文件
├── cypress
│     ├── fixtures # 測試數據
│   │     └── user.json
│     └── supports # 全局配置
│         └── index.js
基本端測
這裏我們嘗試使用端測來測試Vue3的組件,端測我們要提供頁面真實的模擬用户的交互等等,所以需要一個web服務應用,內部使用我們待測試的vue組件,然後模擬用户行為
- 搭建web服務,假設這裏使用vite搭建一個web應用
-
配置cypress的單測
baseUrl,這樣在用例中就可以使用相對地址了module.exports = defineConfig({ e2e: { baseUrl: "http://localhost:10020", // 配置web基本地址 video: false, # 不生成視頻 screenshotOnRunFailure: false, # 不生成快照 supportFile: false, # 不設置全局配置 specPattern: "src/**/*.e2e.(tsx|ts)", # 設置端測用例的位置 }, }); -
新建button組件的測試用例:
// src/button/__tests__/button.e2e.tsx /// <reference types="cypress" /> describe("首頁測試", () => { it("測試外觀", () => { cy.visit("/button"); cy.get(".i-btn").contains("按鈕").trigger("click"); }); }); - 啓動測試:
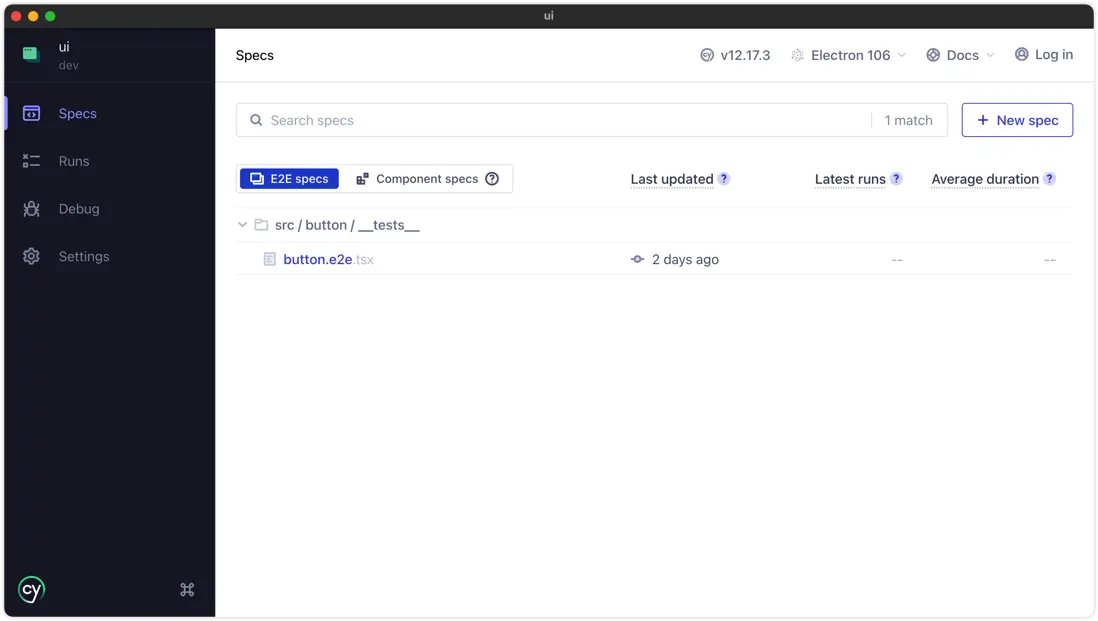
npm run test:e2e - 可以看到我們的界面已經有了剛剛新建的測試用例文件了
- 點擊測試用例開始測試:

<div class='img-title'>動圖演示</div>
因為比較簡單執行的比較快。左側的測試日誌鼠標移到對應的位置會顯示對應的快照
以上便是一個最簡單上手的端測用例,比較簡單相應你已經也成功了。其他更多的測試用例api這裏不做過多介紹,其實和jest差不多,你可以通過 官方文檔 瞭解更多
代碼覆蓋率
cypress也支持代碼覆蓋率的報告,通過安裝對應的插件就可以輕鬆搞定
➜ npm i @cypress/code-coverage babel-plugin-istanbul -D添加babel配置
// .babelrc
{
  "plugins": ["istanbul"]
}
添加全局功能配置:
// cypress/support/index.js
import '@cypress/code-coverage/support';
對cypress進行配置:
// cypress.config.ts
const { resolve } = require("path");
const { defineConfig } = require("cypress");

module.exports = defineConfig({
  e2e: {
    setupNodeEvents(on, config) {
      require('@cypress/code-coverage/task')(on, config);
      on('file:preprocessor', require('@cypress/code-coverage/use-babelrc'));

      return config;
    },
    supportFile: "cypress/supports/index.js",
  },
});
更多請參考對應的 官方文檔
鈎子函數
在 Cypress 測試框架中,有一些鈎子函數可以用於在測試執行的不同階段執行額外的操作或設置。這些鈎子函數是 Cypress 提供的全局函數,可以在測試文件中使用
- before: 函數在每個測試套件(describe 塊)運行之前執行,並且只會執行一次。它可以用於設置測試套件級別的準備工作,例如初始化測試數據、登錄用户等
- after: 函數在每個測試套件(describe 塊)運行完畢之後執行,並且只會執行一次。它可以用於清理測試套件級別的資源,例如清除測試數據、退出登錄等
- beforeEach: 函數在每個測試用例(it 塊)運行之前執行。它通常用於設置每個測試用例的前置條件,例如重置狀態、模擬請求等
- afterEach: 函數在每個測試用例(it 塊)運行完畢之後執行。它通常用於清理每個測試用例的後續操作,例如清除臨時數據、還原狀態等
常見問題
項目中可能會使用Jest進行單元測試、cypress進行端到端測試,由於jest和cypress有着形同的api,如:describe、it等等,會出現類型衝突的錯誤。這裏我是在tsconfig中屏蔽掉cypress測試文件就可以了
{
  "compilerOptions": {},
  "exclude": ["src/**/*.e2e.tsx"] // 屏蔽掉cypress測試用例
}
測試前端組件
這裏我們先定義一個LazyComponent組件,主要就是來懶加載目標組件,根據網絡情況呈現最終的顯示結果:
// 參考代碼
export const LazyComponent = function (opts: ILazyComponent) {
  let delay = 300; // 默認300ms
  let LoadingComponent = LazyLoading;
  let errorComponent = LazyError;
  let loader: () => Promise<any>;
  let requiredCache = true;

  if (isFunction(opts)) {
    loader = opts;
  } else {
    loader = opts.loader;
    LoadingComponent = opts.loadingComponent || LoadingComponent;
    errorComponent = opts.errorComponent || errorComponent;
    delay = opts.delay ?? delay;
    requiredCache = opts.cache ?? requiredCache;
  }

  const isSpin = isFunction(opts) ? true : opts?.isSpin ?? true;
  const minSkeleton = isFunction(opts) ? 2 : opts?.minSkeleton ?? 2;
  const withCard = isFunction(opts) ? true : opts?.withCard ?? true;

  return defineComponent({
    render() {
      const Component: any = defineAsyncComponent({
        loader: () =>
          new Promise(async (resolve, reject) => {
            try {
              const cacheKey = loader?.toString();
              const isCached = lazyComponentsCache.has(cacheKey);
              if (isCached) return resolve(lazyComponentsCache.get(cacheKey));
              await sleep(delay);
              const res = await loader();
              requiredCache && lazyComponentsCache.set(cacheKey, res);
              if (lazyComponentsCache.size > MAX_CACHE_SIZE) {
                lazyComponentsCache.delete(lazyComponentsCache.keys().next().value);
              }
              resolve(res);
            } catch (err) {
              console.error("【LazyComponent Fail】", err);
              reject(err);
            }
          }),
        loadingComponent: () => (
          <LoadingComponent
            minSkeleton={minSkeleton}
            withCard={withCard}
            isSpin={isSpin}
          />
        ),
        errorComponent,
        delay: 0,
      });
      return <Component />;
    },
  });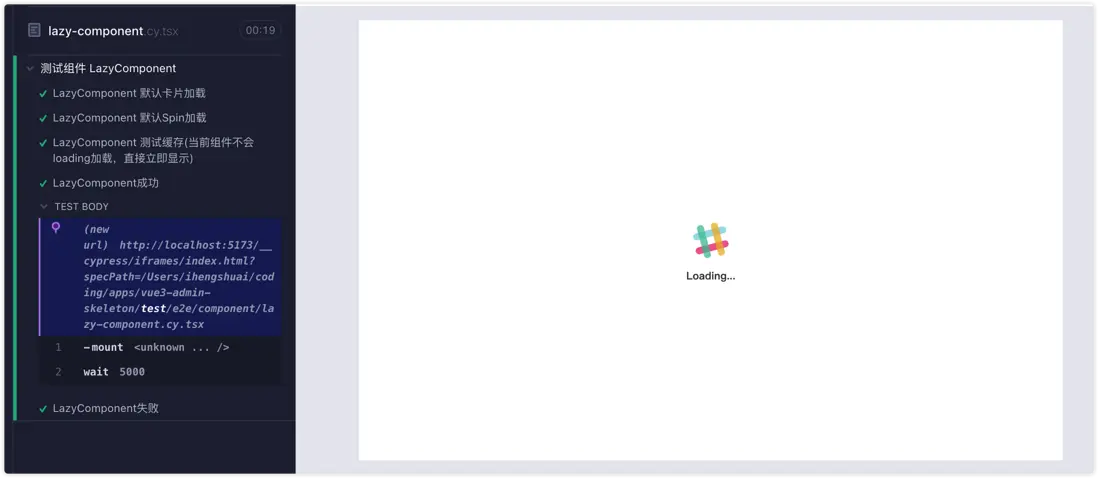
};然後我們創建一個組件測試用例文件lazy-component.cy.tsx,然後根據不同的條件去渲染預期的頁面效果
import { CustomLoading } from "~/client/components/common/loading";
import { LazyComponent } from "~/client/layout/page/lazy-component";
import AnalysisPage from "~/client/views/dashboard/analysis";

describe("測試組件 LazyComponent", () => {
  it("LazyComponent 默認卡片加載", () => {
    cy.mount(
      LazyComponent({
        loader: () => Promise.resolve(<span>我是最終組件1</span>),
        withCard: true,
        isSpin: false,
        minSkeleton: 5,
        delay: 3000,
      })
    );
    cy.wait(4000);
  });

  it("LazyComponent 默認Spin加載", () => {
    cy.mount(
      LazyComponent({
        loader: () => Promise.resolve(<span>我是最終組件2</span>),
        withCard: false,
        isSpin: true,
        delay: 3000,
      })
    );
    cy.wait(5000);
  });

  it("LazyComponent 測試緩存(當前組件不會loading加載,直接立即顯示)", () => {
    cy.mount(
      LazyComponent({
        loader: () => Promise.resolve(<span>我是最終組件2</span>),
        withCard: true,
        delay: 3000,
      })
    );
    cy.wait(5000);
  });

  it("LazyComponent成功", () => {
    cy.mount(
      LazyComponent({
        loader: () => Promise.resolve(<AnalysisPage />),
        loadingComponent: () => (
          <CustomLoading>
            <strong>Loading...</strong>
          </CustomLoading>
        ),
        delay: 3000,
      })
    );
    cy.wait(5000);
  });

  it("LazyComponent失敗", () => {
    cy.mount(
      LazyComponent({
        loader: () => Promise.resolve(<h3>出錯了...</h3>),
        loadingComponent: () => <div style={{ color: "red", "font-size": "24px", textAlign: "center" }}>請稍後...</div>,
        delay: 2000,
      })
    );
  });
});
測試流程概覽:
參考文檔
- Jest官方文檔
- Jest最佳實踐
- vscode-jest
- Cypress guide
- cypress-realworld-app
- cypress-component-testing-apps

由於圖片和格式解析問題,可前往 閲讀原文