


由於格式和圖片解析問題,可前往 閲讀原文
前端自動化測試在提高代碼質量、減少錯誤、提高團隊協作和加速交付流程方面發揮着重要作用。它是現代軟件開發中不可或缺的一部分,可以幫助開發團隊構建可靠、高質量的應用程序
單元測試(Unit Testing)和端到端測試(End-to-End Testing)是兩種常見的測試方法,它們在測試的範圍、目的和執行方式上有所不同。單元測試和端到端測試不是相互排斥的,而是互補的。它們在不同的層面和階段提供了不同的價值,共同構成了一個全面的測試策略
單測和端測區別
單元測試(Unit)
- 單元測試關注於最小的可測試單元,如函數、方法或模塊
- 目的是驗證代碼中的每個獨立單元(如函數)是否按照預期工作
- 通常是自動化的、快速執行的,且不依賴於外部資源或其他模塊
- 驗證單個代碼單元的行為,提供快速反饋,並幫助捕獲和修復問題
端到端測試(End-to-End)
- 從用户角度出發,測試整個應用程序的功能和流程
- 模擬真實的用户交互和場景,從應用程序的外部進行測試。跨多個模塊、組件和服務進行,以確保整個應用程序的各個部分正常協同工作
- 涉及用户界面(UI)交互、網絡請求、數據庫操作等,以驗證整個應用程序的功能和可用性
總之,單元測試主要關注代碼內部的正確性,而端到端測試關注整體功能和用户體驗。結合使用這兩種測試方法可以提高軟件的質量和可靠性。在項目中尤其是公共依賴如組件庫至少都需要單測,端測相對來説比較繁瑣點,但是也是程序穩定的重要驗證渠道
單元測試 - Jest
這裏使用Jest作為單元測試工具,Jest 是一個用於 JavaScript 應用程序的開源測試框架。它是由 Facebook 開發和維護的,通常用於單元測試。Jest 具有簡單易用的 API、豐富的功能和強大的斷言庫,廣泛應用於前端開發和 Node.js 環境中
安裝
➜ npm install jest -D初始化
使用npx進行交互式生成默認的配置文件,它會提示你每步的選擇:
➜ npx jest --init
The following questions will help Jest to create a suitable configuration for your project

✔ Would you like to use Jest when running "test" script in "package.json"? … yes
✔ Would you like to use Typescript for the configuration file? … no
✔ Choose the test environment that will be used for testing › jsdom (browser-like)
✔ Do you want Jest to add coverage reports? … yes
✔ Which provider should be used to instrument code for coverage? › v8
✔ Automatically clear mock calls, instances, contexts and results before every test? … yes

✏️  Modified test/package.json

📝  Configuration file created at test/jest.config.js
默認配置文件大概是下面的內容:配置中有很多註釋提供我們參考,對於默認的配置就不用刪除多語的註釋了,方便參考。通常都是對需要的配置項做修改即可
const config = {
  // All imported modules in your tests should be mocked automatically
  // automock: false,

  // Automatically clear mock calls, instances, contexts and results before every test
  clearMocks: true,

  // Indicates whether the coverage information should be collected while executing the test
  collectCoverage: true,

  // An array of glob patterns indicating a set of files for which coverage information should be collected
  // collectCoverageFrom: undefined,

  // The directory where Jest should output its coverage files
  coverageDirectory: "coverage",

  // An array of regexp pattern strings used to skip coverage collection
  // coveragePathIgnorePatterns: [
  //   "/node_modules/"
  // ],

  // Indicates which provider should be used to instrument code for coverage
  coverageProvider: "v8",
  // Make calling deprecated APIs throw helpful error messages
  // errorOnDeprecated: false,

  // A list of paths to directories that Jest should use to search for files in
  // roots: [
  //   "<rootDir>"
  // ],

  // The test environment that will be used for testing
  testEnvironment: "jsdom",
  // 省略其他...
};

module.exports = config;
常用的配置:
- collectCoverage:boolean值,用來生成覆蓋率報告,通常也可以使用命令行
--coverage參數生成 - moduleFileExtensions:對於引入文件可以省去文件後綴,jest會根據規則一一匹配
-
moduleNameMapper:模塊匹配規則,告訴jest改模塊的匹配路徑
{ moduleNameMapper: { // 當匹配到 .css 等結尾的文件時對應 /__mocks__/style-mock.ts 文件 "\\.(css|less|scss|sass)$": "<rootDir>/__mocks__/style-mock.ts", // 當匹配 @ui 開頭的的對應到 src 文件夾 "@ui/(.*)": "<rootDir>/src/$1", }, } - setupFiles:在測試環境準備後和安裝jest框架前做一些配置,常用來添加一些全局環境模擬數據
- setupFilesAfterEnv:在安裝jest框架後對jest做一些擴展,相比setupFiles更加通用
- testEnvironment:jest模擬的環境,可以選擇node、jsdom來模擬node和瀏覽器環境
- testMatch:指定要測試哪些文件
- transform:使用一些插件對代碼進行轉義以便jest可以理解,如設置tsx轉義
以上是最基本的配置,jest的配置還是很多的,還要官方有列舉了一個表可以隨時翻閲不用死記
轉譯器
Jest中有轉義器的概念來幫助它理解編寫的代碼,可以比做babel對代碼做一些轉換來兼容瀏覽器,差不多一樣的道理
-
模塊引用轉換
在單個測試文件中都會引入我們編寫的代碼,然後對此代碼的功能進行測試,而前端通常都是以esmodule的形式進行函數的導出,jest默認使用的是commonjs,對於module語法jest不認識就會報錯
import { sum } from "../core"; // 報錯

describe("第一個測試", () => {
    // ...
})
那麼可以對jest添加轉義器將esmodule模塊的代碼轉換成commonjs就可以了。打開配置文件:
// jest.config.js
{
  transform: {
    "^.+\\.(ts|tsx|js|jsx)$": [
      "babel-jest",
      {
        presets: [["@babel/preset-env", { targets: { node: "current" } }]]
      },
    ],
  },
}
上面使用了
babel-jest和@babel/preset-env的依賴包需要安裝下:➜ npm i babel-jest @babel/preset-env -D這樣就可以解決esmodule語法不識別的問題
-
轉換typescript:目前項目中的文件都是以ts編寫的,而默認情況下jest只識別js文件的,那麼就需要對ts進行轉譯讓jest識別
// jest.config.js
{
  transform: {
    "^.+\\.(ts|tsx|js|jsx)$": [
      "babel-jest",
      {
        presets: [/* 其它... */["@babel/preset-typescript"]]
      },
    ],
  },
}
需要安裝對應的
@babel/preset-typescript;除了使用ts轉義器也可以使用ts-jest直接運行ts代碼得益於ts的轉譯插件可以讓jest的測試文件(或配置文件)都寫成ts類型的,而在ts文件中對於不識別的jest工具會報錯或者沒有提示,安裝jest的類型文件包
@types/jest來告訴ts對應的jest類型,然後進行配置:// tsconfig.json { "types": ["jest"] } -
轉換jsx:假如項目中使用了jsx那麼也要對jsx進行轉義,這裏以vue jsx為例
// jest.config.ts
{
  transform: {
    "^.+\\.(ts|tsx|js|jsx)$": [
      "babel-jest",
      {
        // 省略其他
        plugins: ["@vue/babel-plugin-jsx"],
      },
    ],
  },
}
基本斷言
基本環境配置好後,就到了測試的時間了,我們先來最簡單的配置用起
// __tests__/demo.spec.ts
import { sum } from "src/utils";

describe("第一個測試", () => {
  it("分組1", () => {
    expect(sum(1, 2)).toBe(3);
  });
});

// 或者不用分組
test("第一個測試", () => {
  expect(sum(1, 2)).toBe(3);
});
這裏介紹下幾個關鍵字基本概念:
- describe:用來描述當前測試的整體內容
- it:用來分組測試
- test:用來描述當前測試,無分組
- expect:判斷參數的值,其的返回值有多個斷言方法,上面使用了
toBe也就是等於的意思。除了次此斷言有很多斷言的條件,你可以點擊這裏閲讀官方文檔
執行測試
# 現在package中配置 jest 腳本,然後執行測試
➜ npm run test # npx jest
 PASS  __tests__/demo.spec.ts
  第一個測試
    ✓ 分組1 (2 ms)

----------|---------|----------|---------|---------|-------------------
File      | % Stmts | % Branch | % Funcs | % Lines | Uncovered Line #s
----------|---------|----------|---------|---------|-------------------
All files |     100 |      100 |     100 |     100 |
 utils.ts |     100 |      100 |     100 |     100 |
----------|---------|----------|---------|---------|-------------------
Test Suites: 1 passed, 1 total
Tests:       1 passed, 1 total
Snapshots:   0 total
Time:        0.519 s
Ran all test suites.
✨  Done in 1.02s.
可以看到對應的測試文件、分組以及測試覆蓋率
路徑映射
上面在測試代碼時會先引入對應的工具代碼,如果都使用相對路徑引入會顯得很麻煩。在項目中通常都喜歡使用@這種方式引入文件,在測試環境依然可以使用,這樣也可以和項目中的文件路徑保持一致
配置路徑映射需要滿足兩個條件:
- jest識別路徑映射
- ts識別路徑映射(如果項目中用了ts)
配置jest路徑映射
// jest.config.ts
{
  moduleNameMapper: {
    "@/(.*)": "<rootDir>/src/$1",
  },
}
配置tsconfig
// tsconfig.json
{
  "paths": {
    "@/*": ["src/*"]
   }
}
這樣在測試文件中就可以使用路徑映射降低心智負擔
// __tests__/demo.spec.ts
import { sum } from "@/utils";除了手動設置外還可以將tsconfig中的path直接作為路徑映射,這樣就減少了多處的修改。實現這一功能需要藉助ts-jest工具包,不同這個自己也可以寫個邏輯實現
// jest.config.ts
const { pathsToModuleNameMapper } = require('ts-jest/utils')
const { compilerOptions } = require('./tsconfig')

export default {
  moduleNameMapper: pathsToModuleNameMapper(compilerOptions.paths, {
    prefix: "<rootDir>/",
  }),
}
dom測試
jest支持瀏覽器環境,使用瀏覽器環境時需要安裝對應的包,請根據版本可以選擇jsdom或jest-environment-jsdom包進行安裝,這裏jest版本為28+使用後者。測試文件修改如下:
// __tests__/demo.spec.ts
describe("第一個測試", () => {
  it("分組1", () => {
    // 使用 localStorage API
    localStorage.setItem('a', '1');
    expect(localStorage.getItem(('a'))).toBe('1')
  });
});
運行測試用例:
➜ npm run test
PASS  __tests__/demo.spec.ts
  第一個測試
    ✓ 分組1 (2 ms)

----------|---------|----------|---------|---------|-------------------
File      | % Stmts | % Branch | % Funcs | % Lines | Uncovered Line #s
----------|---------|----------|---------|---------|-------------------
All files |       0 |        0 |       0 |       0 |
----------|---------|----------|---------|---------|-------------------
Test Suites: 1 passed, 1 total
Tests:       1 passed, 1 total
Snapshots:   0 total
Time:        0.701 s, estimated 1 s
Ran all test suites.
✨  Done in 1.13s.
異步測試
jest可以使用多種方式進行異步代碼測試,通常使用promise、async就可以了
- 使用promise
- async/await
- 回調
這裏模擬一個異步方法,通過上面的三種方式進行測試
// src/utils
export function getUser(name: string) {
  return new Promise((resolve) => {
    setTimeout(() => resolve(name), 1000);
  });
}
使用Promise
// __tests__/demo.spec.ts
import { getUser } from "@/utils";

describe("測試異步代碼", () => {
  it("promise調用方式測試", () => {
    const user = "小明";
    // 使用then
    getUser(user).then((res) => {
      expect(res).toBe(user);
    });
  });


  it("使用resolves測試promise", () => {
    const user = "小李";
    // 使用 .resolves 方式,注意這裏要 return
    return expect(getUser(user)).resolves.toBe(user);
  })
});
使用async測試
// __tests__/demo.spec.ts
import { getUser } from "@/utils";

describe("測試異步代碼", () => {
  it("使用async測試", async () => {
    const user = "小明";
    const res = await getUser(user)
    expect(res).toBe(user);
  })
});
使用回調函數
回調函數默認通常是以前那種回調寫法,這裏需要對以上的異步函數進行調整,讓其換成回調函數模式
// 接受一個cb,這裏固定返回的值為true,沒有錯誤
export function getUser(cb: (error: any, data: any) => void) {
  setTimeout(() => {
    cb(null, true);
  }, 500);
}

// 定義測試
describe("測試異步代碼", () => {
  it("使用回調函數", (done) => {
    function cb(error: any, data: any) {
      if (error) {
        done(error);
        return;
      }
      try {
        expect(data).toBe(true);
        done();
      } catch (err) {
        done(err); // 這裏一定要使用try catch,防止出錯時沒有執行done
      }
    }
    getUser(cb);
  });
});回調模式一定要執行done函數,如果沒有執行則會被認為超時錯誤
模擬函數
假設要模擬一個工具函數的內部實現,可以使用mock函數來判斷函數內部的值是否達到預期
定義個待測試的函數forEach
export function forEach(items: number[], callback: (num: number) => void) {
  for (let index = 0; index < items.length; index++) {
    callback(items[index]);
  }
}
添加測試用例:
// __tests__/demo.spec.ts
import { forEach } from "@/utils";

// 模擬函數
const mockFn = jest.fn((x: number) => x + 1);

test("模擬函數", () => {
  forEach([0, 1], mockFn);

  expect(mockFn.mock.calls).toHaveLength(2);
  expect(mockFn.mock.calls[0][0]).toBe(0);
  expect(mockFn.mock.calls[1][0]).toBe(1);
  expect(mockFn.mock.results[0].value).toBe(1);
});
更多關於模擬函數的例子請查看文檔 和 API
定時器
Jest可以通過一個函數轉換計時器以便允許你控制時間流量
假設測試如下定時器代碼:
export function useTimer(cb?: Function) {
  setTimeout(() => cb && cb(), 1000);
}
編寫測試用例:
import { useTimer } from "@/utils";

jest.useFakeTimers();
jest.spyOn(global, "setTimeout");

test("test timer", () => {
  const cb = jest.fn();
  useTimer(cb);

  expect(cb).not.toBeCalled();

  // 執行所有的定時器
  jest.runAllTimers();

  expect(cb).toBeCalled();
});
更多見官方文檔
setup配置
寫測試的時候你經常需要在運行測試前做一些準備工作,和在運行測試後進行一些收尾工作。 Jest 提供輔助函數來處理這個問題
這其中包括beforeEach、afterEach、beforeAll、afterAll,其中前兩者在每個測試前都會執行一次,後者在文件中只會執行一次
覆蓋率
除了對程序進行斷言外,jest還收集代碼的測試覆蓋率並生成對應的報告,包括:某個函數內部的測試覆蓋率、整個文件的覆蓋率,要想達到覆蓋率100%,就要測試到每個文件的所有代碼、每個函數內部的所有分支條件
開啓覆蓋率
可以通過配置文件
// jest.config.ts
// 主要涉及到這兩個配置
export default {
  collectCoverage: true, // 啓用
  coverageDirectory: "coverage", // 報告生成位置
}
通過cli,執行腳本時帶上參數
➜ npx jest --coverage測試覆蓋率
假設我們有這麼一個函數
export function whatType(arg: any) {
  const type = Object.prototype.toString.call(arg)
  if (type === '[object String]') {
    return 'string';
  } else if (type === '[object Boolean]') {
    return 'boolean';
  }
}
添加測試用例
import { whatType } from "@/utils";

describe("測試覆蓋率", () => {
  it("函數條件覆蓋率", () => {
    expect(whatType(true)).toBe("boolean");
  });
});
執行測試用例
➜ npm run test
 PASS  __tests__/demo.spec.ts
  測試覆蓋率
    ✓ 函數條件覆蓋率 (1 ms)

----------|---------|----------|---------|---------|-------------------
File      | % Stmts | % Branch | % Funcs | % Lines | Uncovered Line #s
----------|---------|----------|---------|---------|-------------------
All files |   96.77 |       50 |     100 |   96.77 |
 index.ts |   96.77 |       50 |     100 |   96.77 | 4
----------|---------|----------|---------|---------|-------------------
Test Suites: 1 passed, 1 total
Tests:       1 passed, 1 total
Snapshots:   0 total
Time: 0.486 s, estimated 1 s- File:測試的文件
- Stmts:測試中被執行的代碼語句的比例
- Branch:測試代碼條件分支比例
- Funcs:測試中被執行函數比例
- Lines:測試中被執行代碼行數比例
- Uncovered Line:沒有測試到的行數
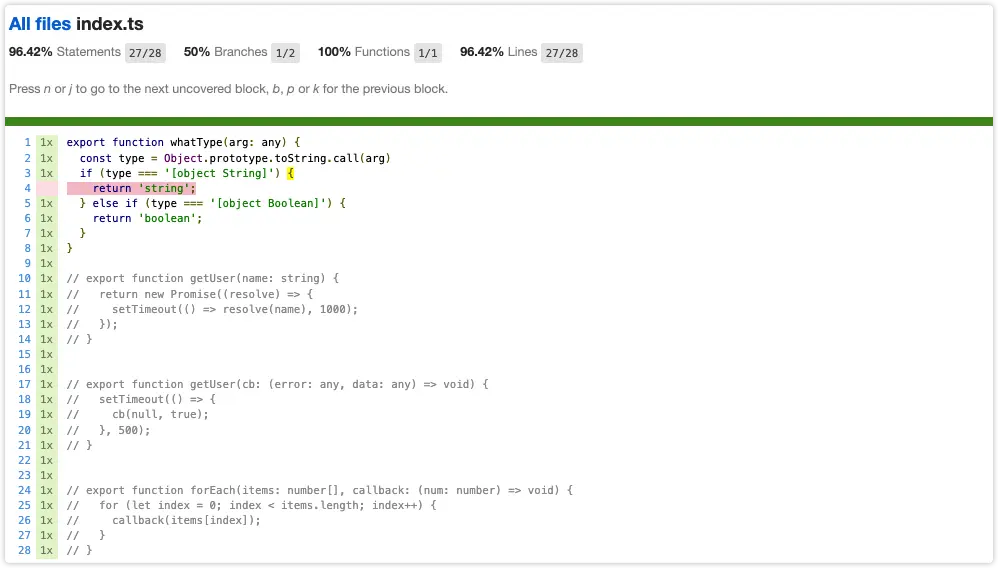
除了查看終端的表格外,還可以使用更直觀的報告,文件報告的結構大概如下:
coverage
├── clover.xml # xml格式
├── coverage-final.json # json格式
├── lcov-report # html格式
│   ├── base.css
│   ├── block-navigation.js
│   ├── favicon.png
│   ├── index.html # 主頁面入口
│   ├── index.ts.html
│   ├── other.ts.html
│   ├── prettify.css
│   ├── prettify.js
│   ├── sort-arrow-sprite.png
│   └── sorter.js
└── lcov.info
一般都來查看HTML報告,打開報告頁面

可以點擊對應的文件查看更詳細的報告
Vue組件測試
jest也可以對vue組件進行測試,vue官方提供了 vue2版本工具包(vue-test) 和 vue3版本工具包(@vue/test-utils),這裏基於vue3組件進行測試
安裝對應的依賴:
➜ npm install @vue/test-utils -D對於Jestv28+以上版本還需要添加以下配置:
// jest.config.ts
export default {
  testEnvironmentOptions: {
    customExportConditions: ["node", "node-addons"],
  },
}
創建一個簡單的Button組件:
import { defineComponent } from "vue";

export default defineComponent({
  render(){
    return <button>按鈕</button>
  }
})
添加測試用例:
import { mount } from "@vue/test-utils";
import Button from "@/components/Button";

test("測試vue組件", () => {
  const wrapper = mount({
    setup() {
      return () => {
        return <Button />;
      };
    },
  });
  expect(wrapper.text()).toBe('按鈕')
})
運行測試
➜ npm run test
 PASS  __tests__/demo.spec.tsx
  ✓ 測試vue組件 (9 ms)

------------|---------|----------|---------|---------|-------------------
File        | % Stmts | % Branch | % Funcs | % Lines | Uncovered Line #s
------------|---------|----------|---------|---------|-------------------
All files   |     100 |      100 |     100 |     100 |
 Button.tsx |     100 |      100 |     100 |     100 |
------------|---------|----------|---------|---------|-------------------
Test Suites: 1 passed, 1 total
Tests:       1 passed, 1 total
Snapshots:   0 total
Time:        0.633 s
添加全局組件,當單測某個組件時,組件內部引用的其它組件會因為沒有引用而報錯,定義全局組件可以解決這個問題
// jest.setup.ts
import { config } from "@vue/test-utils";
import Button from "@/button/src/button";
import Icon from "@/button/src/icon";

config.global.components = {
  Button,
  Icon,
};
配置jest
// jest.config.ts
export default {
  setupFiles: ["<rootDir>/jest.setup.ts"],
}
這裏不對vue工具包API過多的解釋,更多的API使用可以查看官方文檔,vue2版本的可以查看這裏

由於格式和圖片解析問題,可前往 閲讀原文


