
【注】本文節譯自:GraphQL - Quick Guide (tutorialspoint.com)
在本章中,我們將學習 GraphQL 的環境設置。 要執行本教程中的示例,您將需要以下內容:
- 運行 Linux、macOS 或 Windows 的計算機。
- 網絡瀏覽器,最好是最新版本的 Google Chrome。
- 安裝了最新版本的 Node.js。建議使用最新的 LTS 版本。
- 已安裝適用於 VSCode 的擴展 GraphQL 的 Visual Studio Code 或您選擇的任何代碼編輯器。
如何使用 Nodejs 構建 GraphQL 服務器
我們將詳細介紹使用 Nodejs 構建 GraphQL 服務器的步驟,如下所示:
第 1 步 - 驗證節點和 Npm 版本
安裝 NodeJs 後,在終端上使用以下命令驗證 node 和 npm 的版本:
C:\Users\Admin>node -v
v8.11.3

C:\Users\Admin>npm -v
5.6.0
第 2 步 - 創建項目文件夾並在 VSCode 中打開 項目的根文件夾可以命名為 test-app。
按照以下説明使用 Visual Studio 代碼編輯器打開文件夾:
C:\Users\Admin>mkdir test-app
C:\Users\Admin>cd test-app
C:\Users\Admin\test-app>code.
第 3 步 - 創建 package.json 並安裝依賴項
創建 package.json 文件,該文件將包含 GraphQL 服務器應用程序的所有依賴項。
{
   "name": "hello-world-server",
   "private": true,
   "scripts": {
      "start": "nodemon --ignore data/ server.js"
   },
   "dependencies": {
      "apollo-server-express": "^1.4.0",
      "body-parser": "^1.18.3",
      "cors": "^2.8.4",
      "express": "^4.16.3",
      "graphql": "^0.13.2",
      "graphql-tools": "^3.1.1"
   },
   "devDependencies": {
      "nodemon": "1.17.1"
   }
}
使用下面給出的命令安裝依賴項:
C:\Users\Admin\test-app>npm install步驟 4 - 在數據文件夾中創建平面文件數據庫
在這一步中,我們使用平面文件來存儲和檢索數據。創建文件夾 data 並添加兩個文件 student.json 和 Colleges.json。
以下是 Colleges.json 文件:
[
    {
       "id": "col-101",
       "name": "AMU",
       "location": "Uttar Pradesh",
       "rating":5.0
    },

    {
       "id": "col-102",
       "name": "CUSAT",
       "location": "Kerala",
       "rating":4.5
    }
 ]
以下是 student.json 文件:
[
    {
       "id": "S1001",
       "firstName":"Mohtashim",
       "lastName":"Mohammad",
       "email": "mohtashim.mohammad@tutorialpoint.org",
       "password": "pass123",
       "collegeId": "col-102"
    },

    {
       "id": "S1002",
       "email": "kannan.sudhakaran@tutorialpoint.org",
       "firstName":"Kannan",
       "lastName":"Sudhakaran",
       "password": "pass123",
       "collegeId": "col-101"
    },

    {
       "id": "S1003",
       "email": "kiran.panigrahi@tutorialpoint.org",
       "firstName":"Kiran",
       "lastName":"Panigrahi",
       "password": "pass123",
       "collegeId": "col-101"
    }
 ]
第 5 步 - 創建數據訪問層
我們需要創建加載數據文件夾內容的數據存儲。在這種情況下,我們需要集合變量、學生和大學。每當應用程序需要數據時,它就會使用這些集合變量。
在項目文件夾中創建文件 db.js,如下所示:
const { DataStore } = require('notarealdb');

const store = new DataStore('./data');

module.exports = {
   students:store.collection('students'),
   colleges:store.collection('colleges')
};
第 6 步 - 創建模式文件,schema.graphql
在當前項目文件夾中創建模式文件並添加以下內容:
type Query  {
   test: String
}
第 7 步 - 創建解析器文件,resolvers.js
在當前項目文件夾中創建解析器文件並添加以下內容:
const Query = {
    test: () => 'Test Success, GraphQL server is up & running !!'
 }
 module.exports = {Query}
第 8 步 - 創建 Server.js 並配置 GraphQL
創建服務器文件並按如下方式配置 GraphQL:
const bodyParser = require('body-parser');
const cors = require('cors');
const express = require('express');
const db = require('./db');

const port = process.env.PORT || 9000;
const app = express();

const fs = require('fs')
const typeDefs = fs.readFileSync('./schema.graphql',{encoding:'utf-8'})
const resolvers = require('./resolvers')

const {makeExecutableSchema} = require('graphql-tools')
const schema = makeExecutableSchema({typeDefs, resolvers})

app.use(cors(), bodyParser.json());

const  {graphiqlExpress,graphqlExpress} = require('apollo-server-express')
app.use('/graphql',graphqlExpress({schema}))
app.use('/graphiql',graphiqlExpress({endpointURL:'/graphql'}))

app.listen(
   port, () => console.info(
      `Server started on port ${port}`
   )
);
第 9 步 - 運行應用程序並使用 GraphiQL 進行測試
驗證項目 test-app 的文件夾結構如下:
test-app /
   -->package.json
   -->db.js
   -->data
      students.json
      colleges.json
   -->resolvers.js
   -->schema.graphql
   -->server.js
運行命令 npm start,如下所示:
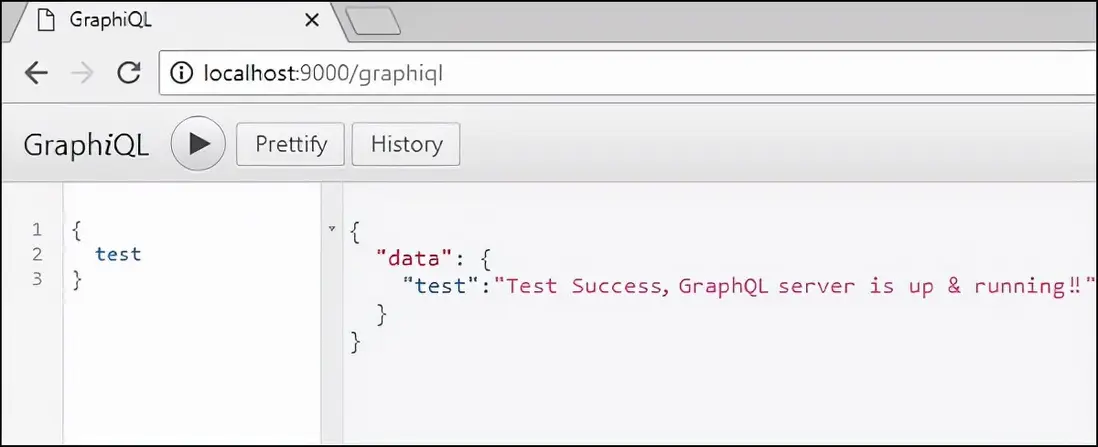
C:\Users\Admin\test-app>npm start服務器運行在 9000 端口,因此我們可以使用 GraphiQL 工具測試應用程序。打開瀏覽器並輸入 URL http://localhost:9000/graphiql 。在編輯器中輸入以下查詢:
{
  test
}
來自服務器的響應如下:
{
    "data": {
        "test": "Test Success, GraphQL server is running !!"
    }
}