場景
作為剛剛接觸 Three.js 的小白,在工作中遇到下面的需求:
- 加載一個 3D 模型
- 通過代碼切換預設的任意模型的視角
最終效果(在線示例):
👆基於官方示例增加的控制代碼
我們通過官方示例可以知道,只要使用 OrbitControls 就可以通過鼠標調整模型的視角。可是,能不能通過代碼,切換特定的視角呢?有沒有官方的 API 可以實現這個交互呢?小白暫時未能找到拿來即用的示例代碼。
基本原理
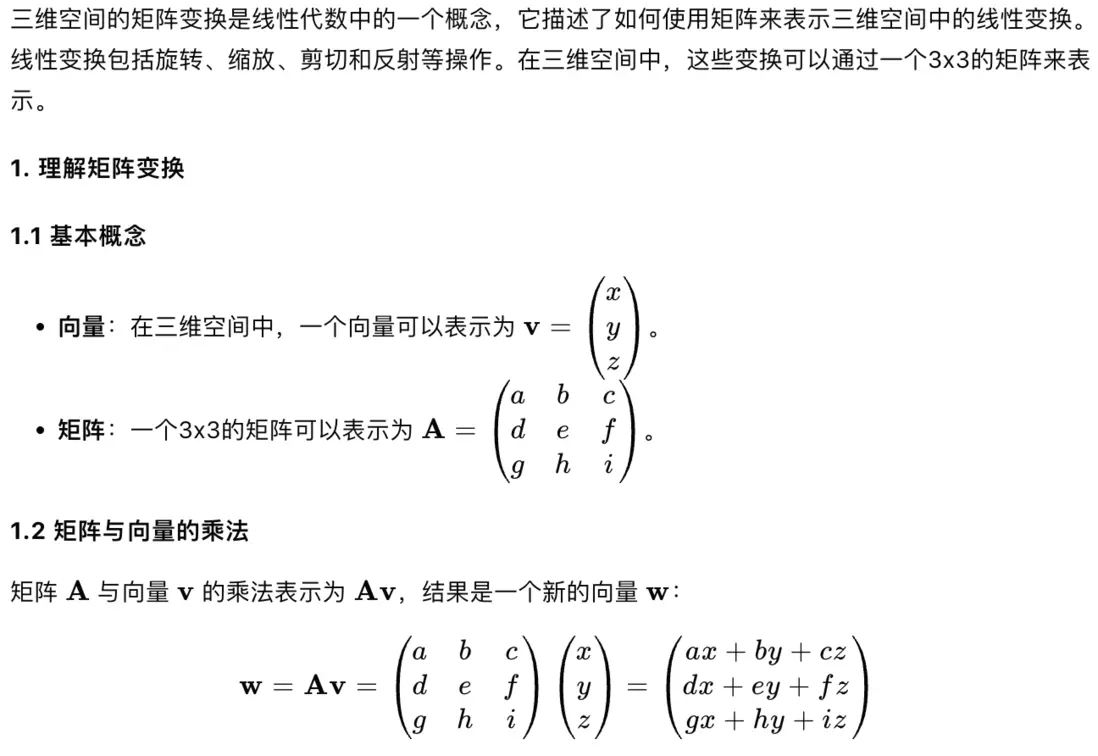
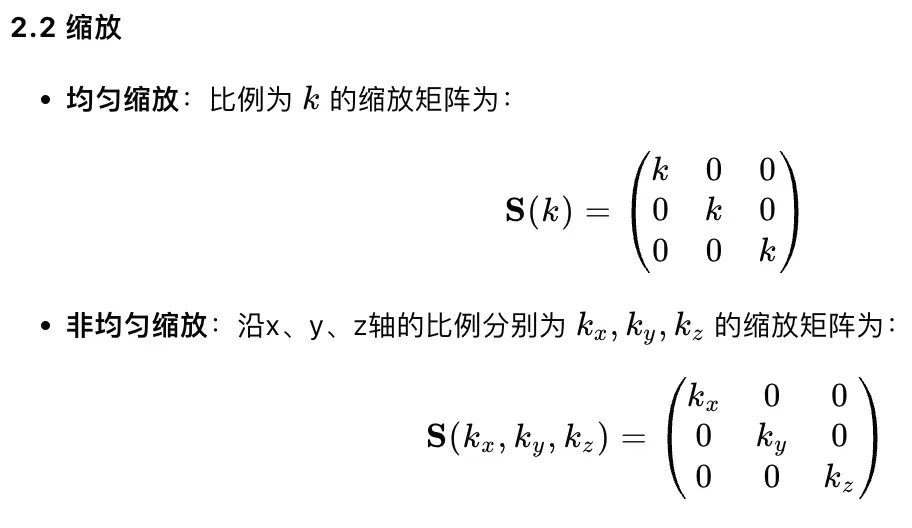
通過 AI 可以得知相關矩陣變化的公式原理:
通過 AI,我們還能得到上面原理的核心算法代碼:
  // Function to multiply matrix and point
  function multiplyMatrixAndPoint(matrix, point) {
    let result = []
    for (let i = 0; i < matrix.length; i++) {
      result[i] =
        matrix[i][0] * point[0] +
        matrix[i][1] * point[1] +
        matrix[i][2] * point[2]
    }
    return result
  }

  function rotatePoint(x, y, z, rotateZ, rotateY) {
    // Convert degrees to radians
    const radZ = (rotateZ * Math.PI) / 180
    const radY = (rotateY * Math.PI) / 180

    // Rotation matrix around Z-axis
    const Rz = [
      [Math.cos(radZ), -Math.sin(radZ), 0],
      [Math.sin(radZ), Math.cos(radZ), 0],
      [0, 0, 1],
    ]

    // Rotation matrix around Y-axis
    const Ry = [
      [Math.cos(radY), 0, Math.sin(radY)],
      [0, 1, 0],
      [-Math.sin(radY), 0, Math.cos(radY)],
    ]

    // Apply rotation matrices
    let pointAfterZ = this.multiplyMatrixAndPoint(Rz, [x, y, z])
    let finalPoint = this.multiplyMatrixAndPoint(Ry, pointAfterZ)

    return finalPoint
  }
輸入:起始點 x, y, z;繞着 Z 軸旋轉的角度;繞着 Y 軸旋轉的角度;
輸出:旋轉後的新座標 [x,y,z];
動畫
基於上面座標的計算,還要實現新舊座標變化的過渡動畫,這裏可以用瀏覽器 API 的 requestAnimationFrame 實現:
  /**
   * 淡入淡出
   * https://www.cnblogs.com/cloudgamer/archive/2009/01/06/Tween.html
   * @param t 當前時間
   * @param b 初始值
   * @param c 增/減量
   * @param d 持續時間
   */
  cubicEaseInOut(t, b, c, d) {
    if ((t /= d / 2) < 1) return (c / 2) * t * t * t + b
    return (c / 2) * ((t -= 2) * t * t + 2) + b
  }

  rotateAnimate(fromZ, toZ, fromY, toY, fromDistance, toDistance, duration) {
    return new Promise((resolve) => {
      let time = 0

      cancelAnimationFrame(this.timer)
      const fn = () => {
        let degZ = this.cubicEaseInOut(time, fromZ, toZ - fromZ, duration)
        let degY = this.cubicEaseInOut(time, fromY, toY - fromY, duration)
        let distance =
          this.cubicEaseInOut(
            time,
            fromDistance * 1000,
            toDistance * 1000 - fromDistance * 1000,
            duration,
          ) / 1000

        if (time < duration) {
          time += 10
        }

        if (time >= duration) {
          degZ = toZ
          degY = toY
        }

        if (camera) {
          // 旋轉後
          const posRotated = this.rotatePoint(
            this.cameraPos.x,
            this.cameraPos.y,
            this.cameraPos.z,
            degZ,
            degY,
          )

          // 縮放後
          const posZoomed = this.zoom(
            posRotated[0],
            posRotated[1],
            posRotated[2],
            distance,
          )

          // 偏移後
          this.camera.position.x = posZoomed[0]
          this.camera.position.y = posZoomed[1]
          this.camera.position.z = posZoomed[2]

          camera.lookAt(scene.position)
        }

        if (time < duration) {
          this.timer = requestAnimationFrame(fn)
        } else {
          cancelAnimationFrame(this.timer)

          resolve(true)
        }
      }

      this.timer = requestAnimationFrame(fn)
    })
  }
以 Z 軸旋轉為例,主要邏輯就是 fromZ, toZ,代表從原來的角度 fromZ 漸變成新的角度 toZ,通過緩動函數 cubicEaseInOut,得出每一幀動畫需要變化的角度,該角度通過上面的矩陣變換旋轉,就可以得出該幀的新座標。
把這些邏輯包裝一下:
// 切換鏡頭視角工具
class ViewAnimate {
  scene
  camera

  timer = 0

  lastRotateZ = 0
  lastRotateY = 0
  lastDistance = 1

  cameraPos = {
    x: 0,
    y: 0,
    z: 0,
  }

  radius = 0

  constructor(scene, camera, cameraPos) {
    this.scene = scene
    this.camera = camera
    this.cameraPos = cameraPos
    this.radius = Math.abs(cameraPos.x)
  }

  /**
   * 淡入淡出
   * https://www.cnblogs.com/cloudgamer/archive/2009/01/06/Tween.html
   * @param t 當前時間
   * @param b 初始值
   * @param c 增/減量
   * @param d 持續時間
   */
  cubicEaseInOut(t, b, c, d) {
    if ((t /= d / 2) < 1) return (c / 2) * t * t * t + b
    return (c / 2) * ((t -= 2) * t * t + 2) + b
  }

  // Function to multiply matrix and point
  multiplyMatrixAndPoint(matrix, point) {
    let result = []
    for (let i = 0; i < matrix.length; i++) {
      result[i] =
        matrix[i][0] * point[0] +
        matrix[i][1] * point[1] +
        matrix[i][2] * point[2]
    }
    return result
  }

  rotatePoint(x, y, z, rotateZ, rotateY) {
    // Convert degrees to radians
    const radZ = (rotateZ * Math.PI) / 180
    const radY = (rotateY * Math.PI) / 180

    // Rotation matrix around Z-axis
    const Rz = [
      [Math.cos(radZ), -Math.sin(radZ), 0],
      [Math.sin(radZ), Math.cos(radZ), 0],
      [0, 0, 1],
    ]

    // Rotation matrix around Y-axis
    const Ry = [
      [Math.cos(radY), 0, Math.sin(radY)],
      [0, 1, 0],
      [-Math.sin(radY), 0, Math.cos(radY)],
    ]

    // Apply rotation matrices
    let pointAfterZ = this.multiplyMatrixAndPoint(Rz, [x, y, z])
    let finalPoint = this.multiplyMatrixAndPoint(Ry, pointAfterZ)

    return finalPoint
  }

  zoom(x, y, z, distance) {
    const m = [
      [distance, 0, 0],
      [0, distance, 0],
      [0, 0, distance],
    ]
    const pointAfterZ = this.multiplyMatrixAndPoint(m, [x, y, z])
    return pointAfterZ
  }

  rotateAnimate(fromZ, toZ, fromY, toY, fromDistance, toDistance, duration) {
    return new Promise((resolve) => {
      let time = 0

      cancelAnimationFrame(this.timer)
      const fn = () => {
        let degZ = this.cubicEaseInOut(time, fromZ, toZ - fromZ, duration)
        let degY = this.cubicEaseInOut(time, fromY, toY - fromY, duration)
        let distance =
          this.cubicEaseInOut(
            time,
            fromDistance * 1000,
            toDistance * 1000 - fromDistance * 1000,
            duration,
          ) / 1000

        if (time < duration) {
          time += 10
        }

        if (time >= duration) {
          degZ = toZ
          degY = toY
        }

        if (camera) {
          // 旋轉後
          const posRotated = this.rotatePoint(
            this.cameraPos.x,
            this.cameraPos.y,
            this.cameraPos.z,
            degZ,
            degY,
          )

          // 縮放後
          const posZoomed = this.zoom(
            posRotated[0],
            posRotated[1],
            posRotated[2],
            distance,
          )

          // 偏移後
          this.camera.position.x = posZoomed[0]
          this.camera.position.y = posZoomed[1]
          this.camera.position.z = posZoomed[2]

          camera.lookAt(scene.position)
        }

        if (time < duration) {
          this.timer = requestAnimationFrame(fn)
        } else {
          cancelAnimationFrame(this.timer)

          resolve(true)
        }
      }

      this.timer = requestAnimationFrame(fn)
    })
  }

  async view(config) {
    if (camera) {
      await this.rotateAnimate(
        this.lastRotateZ,
        config.rotateZ,
        this.lastRotateY,
        config.rotateY,
        this.lastDistance,
        config.distance,
        config.duration,
      )

      this.lastRotateZ = config.rotateZ
      this.lastRotateY = config.rotateY
      this.lastDistance = config.distance
    }
  }
}
使用的時候:
const viewAnimate = new ViewAnimate(scene, camera, cameraPosition)

// 視角切換序列,可以自行添加更多
viewAnimate
  .view({
    rotateZ: 90,
    rotateY: 180,
    distance: 0.5,
    duration: 1000,
  })
  .then(() =>
    viewAnimate.view({
      rotateZ: 0,
      rotateY: 0,
      distance: 1,
      duration: 1000,
    }),
  )
  .then(() =>
    viewAnimate.view({
      rotateZ: 30,
      rotateY: -120,
      distance: 2,
      duration: 1000,
    }),
  )
  .then(() =>
    viewAnimate.view({
      rotateZ: 0,
      rotateY: 0,
      distance: 1,
      duration: 1000,
    }),
  )
如果內容對您有一點點幫助,請給我一個贊吧!


