


前言
在前端框架Angular中,組件之間的通信很基礎也很重要,不同組件間的通信方式也不同,掌握組件間的通信方式會更加深刻的理解和使用Angular框架。

本文講解不同類型組件間的不同通信方式,文中所有示例均提供源碼,您可以 在線編輯預覽 或 下載本地調試,相信通過本文您一定可以掌握組件通信這一知識點。
父組件傳子組件
@Input方式
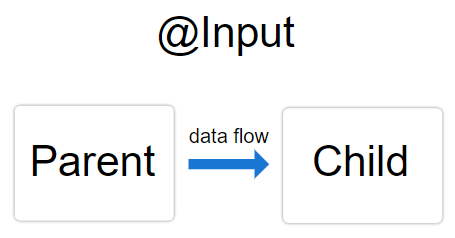
@Input()裝飾器允許父組件更新子組件中的數據,分為4步:
第一步:在父組件app.component.ts中定義要傳遞給子組件的數據parentMsg。
export class AppComponent {
  parentMsg: string = 'parent component message!';
}
第二步:在父組件app.component.html中的子組件標籤<app-child>中定義屬性[childMsg](子組件接收數據變量)來綁定父組件的數據parentMsg。
<app-child [childMsg]="parentMsg"></app-child>
第三步:在子組件child.component.ts中引入@Input()裝飾器,修飾childMsg接收父組件的傳值。
import { Input } from '@angular/core';

export class ChildComponent {
  @Input() childMsg: string = '';
}
第四步:在子組件child.component.html中通過模板標籤{{childMsg}}展示數據。
<div>父組件傳值內容:{{ childMsg }}</div>
最終展示效果如下,您可以通過 在線示例 預覽效果和編輯調試:

説明:這裏要理解父組件html中通過[]定義了一個子組件的屬性,該值必須與子組件中所定義的變量名一致,而等號右邊的值為父組件要傳遞的屬性名,示例中是將父組件中parentMsg的值綁定在子組件childMsg屬性上。
子組件傳父組件
@Output()方式
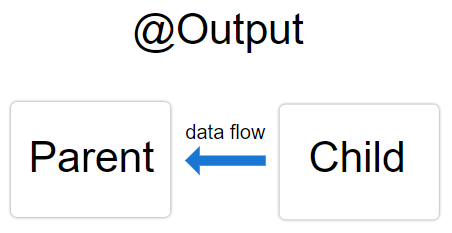
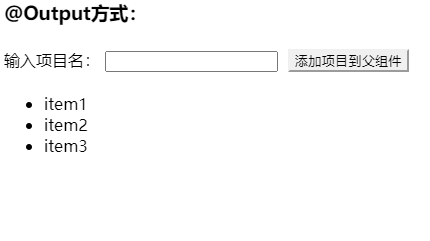
@Output()裝飾器允許數據從子組件傳給父組件,分為6步:
第一步:在子組件child.component.ts中引入Output和EventEmitter,通過@Output()來修飾一個EventEmitter實例的變量newItemEvent。
import { Component, Output, EventEmitter } from '@angular/core';

export class ChildComponent {
  @Output() newItemEvent = new EventEmitter<string>();
}
第二步:在子組件child.component.html中添加點擊事件,獲取輸入內容,點擊按鈕觸發addNewItem()方法。
<label>輸入項目名:<input type="text" #newItem /></label>
<button type="button" (click)="addNewItem(newItem.value)">
  添加項目到父組件
</button>
第三步:在子組件child.component.ts中通過newItemEvent的emit()方法,把數據發送到父組件。
export class ChildComponent {
  @Output() newItemEvent = new EventEmitter<string>();

  addNewItem(value: string) {
    this.newItemEvent.emit(value);
  }
}
第四步:在父組件app.component.html中子組件標籤<app-child>中添加父組件方法addItem($event)綁定到子組件的newItemEvent發射器事件上,其中$event為子組件的傳遞的值。
<app-child (newItemEvent)="addItem($event)"></app-child>
第五步:在父組件app.component.ts中通過addItem($event)方法獲取處理數據。
export class AppComponent implements AfterViewInit {
  items = ['item1', 'item2', 'item3'];

  addItem(newItem: string) {
    this.items.push(newItem);
  }
}
第六步:在父組件app.component.html中遍歷items展示數據。
<ul>
  <li *ngFor="let item of items">{{ item }}</li>
</ul>
最終展示效果如下,您可以通過 在線示例 預覽效果和編輯調試:
説明:這裏要理解關鍵的第四步事件連接(newItemEvent)="addItem($event)"含義,左側是父組件監聽子組件創建的一個發射器newItemEvent,右側是父組件的addItem($event)方法。子組件通過發射器的emit(value)方法廣播傳遞值到父組件,父組件通過addItem($event)中的$event接收傳值,完成通信。
本地變量方式
在父組件模板裏,新建一個本地變量來代表子組件,可以利用這個變量來讀取子組件的屬性和調用子組件的方法。分為2步:
第一步:在子組件child.component.ts中定義count變量和addOne()方法。
export class ChildComponent {
  count: number = 0;
  addOne() {
    this.count++;
  }
}
第二步:在父組件app.component.html中子組件標籤<app-child>中添加本地變量#child,點擊按鈕觸發點擊事件,通過本地變量調用子組件方法child.addOne()。
<app-child #child></app-child>
<button type="button" (click)="child.addOne()">加1</button>
最終展示效果如下,您可以通過 在線示例 預覽效果和編輯調試:

説明:在子組件標籤中通過#+變量名的方式新建一個本地變量代表子組件的引用。本地變量方式使用簡單明瞭,但也有侷限性,只能在模板html中使用,無法在ts文件中使用。
@ViewChild方式
通過@ViewChild裝飾器,將子組件注入到父組件。分為4步:
第一步:在子組件child.component.ts中定義count變量和add()方法。
export class ChildComponent {
  count: number = 0;
  add(num: number) {
    this.count = this.count + num;
  }
}
第二步:在父組件app.component.html中子組件標籤<app-child>中添加標籤引用#child,點擊按鈕觸發點擊事件,執行方法add()。
<app-child #child></app-child>
<button type="button" (click)="add(2)">加2</button>
第三步:在父組件app.component.ts中引入ViewChild,@viewchild傳入標籤引用字符child,由變量child接收。除了使用標籤引用child,你也可以通過直接傳入子組件ChildComponent實現子組件的引用。
import { Component, ViewChild } from '@angular/core';
import { ChildComponent } from './child/child.component';

export class AppComponent {
  // 第一種方法:傳入組件引用名child
  @ViewChild('child') private child: any;
  // 第二種方法:傳入組件實例ChildComponent
  @ViewChild(ChildComponent) private child: ChildComponent;
}
第四步:在父組件app.component.ts中方法add()中調用子組件的add()方法。
export class AppComponent {
    add(num: number) {
        this.child.add(num);
    }
}
最終展示效果如下,您可以通過 在線示例 預覽效果和編輯調試:

説明:@ViewChild的作用是聲明對子組件元素的實例引用,意思是通過注入的方式將子組件注入到@ViewChild容器中,你可以想象成依賴注入的方式注入,只不過@ViewChild不能在構造器constructor中注入,因為@ViewChild()會在ngAfterViewInit()回調函數之前執行,我們可以測試下:
import { Component, ViewChild, AfterViewInit } from '@angular/core';
import { ChildComponent } from './child/child.component';

export class AppComponent implements AfterViewInit {
  @ViewChild('child') private child: any;

  constructor() {
    console.log('constructor func', this.child); // undefined
  }

  ngAfterViewInit() {
    console.log('ngAfterViewInit func', this.child);
  }
}
最終展示效果如下,您可以通過 在線示例 預覽效果和編輯調試:

通過打印結果我們可以看到在構造函數constructor()中,this.child的值為undefined,並沒有注入到父組件,但在ngAfterViewInit()生命週期鈎子中注入成功了。
不相關組件
對於不相關聯的組件,我們會使用其他中間媒介的方式進行通信,以下不相關組件的通信方式仍適用於父子組件。
service服務方式
組件間共享一個service服務,那麼組件之間就可以通過service實現通信。
示例中我們使用rxjs中的BehaviorSubject,它是Subject的一種變體,可以存儲最後一條數據或者初始默認值,並會在訂閲時發送其當前值。您可以通過RxJS官網進行了解,當然通過文中的説明,您還是可以瞭解其具體實現的功能。
我們創建兩個不相關的組件A和B,組件A發佈數據,組件B接收數據,通過服務文件data.service.ts進行關聯實現。
在公共文件目錄下創建service服務文件data.service.ts,代碼如下:
import { Injectable } from '@angular/core';
// 1.引入
import { BehaviorSubject } from 'rxjs';

@Injectable({
  providedIn: 'root',
})
export class DataService {
  // 2.創建subject
  subject: BehaviorSubject<any> = new BehaviorSubject<any>(0);

  constructor() {}
}
引入BehaviorSubject,創建一個BehaviorSubject, 默認值設為0。 記得在app.module.ts文件中引入公共data.service.ts文件,並聲明。
import { DataService } from './data.service';

@NgModule({
  providers: [DataService],
})
export class AppModule {}
創建組件A,用於發佈數據,a.component.ts實現代碼如下:
import { Component } from '@angular/core';
// 1. 引入
import { DataService } from '../data.service';

@Component({
  selector: 'app-a',
  templateUrl: './a.component.html',
})
export class AComponent {
  // 2. 註冊
  constructor(public dataService: DataService) {}

  inputValue: string = '';

  send(): void {
    // 3. 發佈
    this.dataService.subject.next(this.inputValue);
  }
}
引入service文件,在constructor()中注入服務依賴dataService,使用服務中subject的next()方法發佈廣播數據。
創建組件B,用於接收數據,b.component.ts實現代碼如下:
import { Component } from '@angular/core';
// 1. 引入
import { Subscription } from 'rxjs';
import { DataService } from '../data.service';

@Component({
  selector: 'app-b',
  templateUrl: './b.component.html',
})
export class BComponent {
  data: any;

  // 2. subscription
  subscription: Subscription;

  constructor(public dataService: DataService) {
    // 3. 訂閲
    this.subscription = this.dataService.subject.subscribe((data) => {
      this.data = data;
    });
  }

  ngOndestry(): void {
    // 4. 取消訂閲
    this.subscription.unsubscribe();
  }
}
引入Subscription,使用服務中subject的subscribe()方法創建一個訂閲者,當組件A數據被髮布後就可以接收到數據。最後在銷燬時記得取消訂閲,否則會導致泄露。
最終展示效果如下,您可以通過 在線示例 預覽效果和編輯調試:
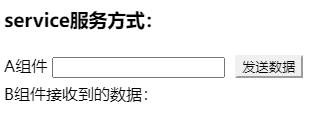
説明:示例中組件A和B都引入了同一個服務service,service服務則巧妙利用BehaviorSubject實現數據的發佈和訂閲,在兩個組件中進行數據的通信,是不是沒有想象的那麼難~
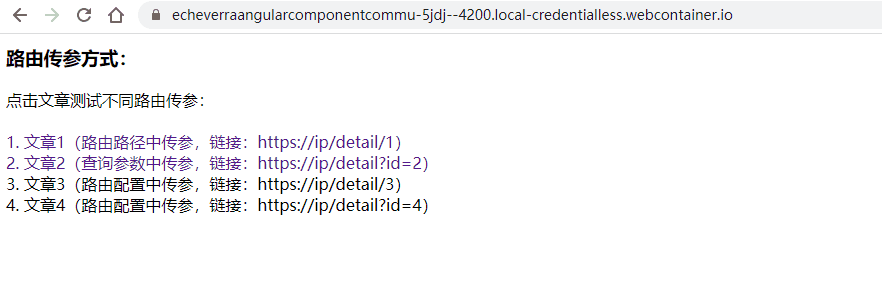
路由傳參方式
路由傳參有多種方式,首先我們新建一個路由模塊app-routing.module.ts,代碼如下:
import { NgModule } from '@angular/core';
import { RouterModule, Routes } from '@angular/router';
import { AppComponent } from './app.component';
import { DetailComponent } from './detail/detail.component';

// 配置路由
const routes: Routes = [
  { path: 'detail', component: DetailComponent },
  { path: 'detail/:id', component: DetailComponent },
];

@NgModule({
  imports: [RouterModule.forRoot(routes)],
  exports: [RouterModule],
})
export class AppRoutingModule {}
引入路由相關的RouterModule和Routes,引入跳轉文章詳情組件DetailComponent,配置好路由routes,當路徑為detail或detail/:id時,會加載DetailComponent組件,其中:id為佔位符,可以在組件ts文件中獲取id值。
創建好路由模塊我們還需要在根模塊app.module.ts中導入。
import { AppRoutingModule } from './app-routing.module';

@NgModule({
  declarations: [...],
  imports: [AppRoutingModule],
  providers: [DataService],
  bootstrap: [AppComponent],
})
export class AppModule {}
在app.component.html文件中添加<router-outlet></router-outlet>路由佔位符,Angular框架會根據當前的路由器狀態將不同組件動態填充它。
配置完路由準備工作,我們來具體看下有哪些路由傳參方式。
路由路徑傳參
路由路徑中傳參,鏈接形式為:https://ip/detail/1。
在app.component.html中使用路由指令routerLink的方式在路由路徑中傳參。
<a [routerLink]="['/detail',1]">
1.文章1(路由路徑中傳參,鏈接:https://ip/detail/1)
</a>
在detail組件detail.component.ts中使用當前路由對象ActivatedRoute獲取路由傳遞的參數。
import { Component, OnInit } from '@angular/core';
import { ActivatedRoute, Params } from '@angular/router';
@Component({
selector: 'app-detail',
templateUrl: './detail.component.html',
})
export class DetailComponent implements OnInit {
id: any;
constructor(private routeInfo: ActivatedRoute) {}
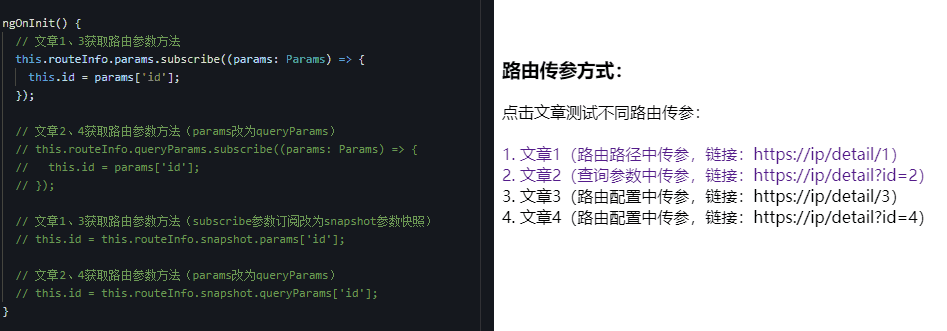
ngOnInit() {
// 獲取路由參數方法
this.routeInfo.params.subscribe((params: Params) => {
this.id = params['id'];
});
}
}
查詢參數傳參
查詢參數中傳參,鏈接形式為:https://ip/detail?id=2。
在app.component.html中同樣使用路由指令routerLink,在queryParams查詢參數中傳遞數據。
<a [routerLink]="['/detail']" [queryParams]="{ id: 2 }">
2. 文章2(查詢參數中傳參,鏈接:https://ip/detail?id=2)
</a>
在detail組件detail.component.ts中使用當前路由對象ActivatedRoute獲取路由傳遞的參數。
import { Component, OnInit } from '@angular/core';
import { ActivatedRoute, Params } from '@angular/router';

@Component({
  selector: 'app-detail',
  templateUrl: './detail.component.html',
})
export class DetailComponent implements OnInit {
  id: any;

  constructor(private routeInfo: ActivatedRoute) {}

  ngOnInit() {
    // 獲取路由參數方法(params改為queryParams)
    this.routeInfo.queryParams.subscribe((params: Params) => {
      this.id = params['id'];
    });
  }
}
仔細觀察會發現,第一種路由路徑中傳參使用的是this.routeInfo.queryParams獲取數據,而第二種查詢參數中傳參使用的是this.routeInfo.queryParams,一定要注意這個區別。
路由配置傳參
除了在app.component.html中使用路由指令routerLink,我們還可以在app.component.ts文件中通過路由配置中傳參。
在app.component.html文件中綁定兩個點擊方法toArticle3()和toArticle4()。
<a (click)="toArticle3()">
3. 文章3(路由配置中傳參,鏈接:https://ip/detail/3)</a>

<a (click)="toArticle4()">
4. 文章4(路由配置中傳參,鏈接:https://ip/detail?id=4)</a>
在app.component.ts文件中通過路由Router的navigate()方法實現跳轉。
import { Component } from '@angular/core';
import { Router } from '@angular/router';

@Component({
  selector: 'app-root',
  templateUrl: './app.component.html',
  styleUrls: ['./app.component.css'],
})
export class AppComponent {

  constructor(private router: Router) {}

  toArticle3() {
    // 路由跳轉文章3
    this.router.navigate(['/detail', 3]);
  }

  toArticle4() {
    // 路由跳轉文章4
    this.router.navigate(['/detail'], { queryParams: { id: 4 } });
  }
}
雖然是通過路由配置傳參跳轉,但我們仍然可以發現,文章3和文章1的跳轉鏈接一致,文章4和文章2的跳轉鏈接一致,本質上也是路由路徑傳參和查詢參數傳參。所以在detail.component.ts中,接收路由參數的方法是一致的。
import { Component, OnInit } from '@angular/core';
import { ActivatedRoute, Params } from '@angular/router';

@Component({
  selector: 'app-detail',
  templateUrl: './detail.component.html',
})
export class DetailComponent implements OnInit {
  id: any;

  constructor(private routeInfo: ActivatedRoute) {}

  ngOnInit() {
    // 文章3路由參數獲取(params)
    this.routeInfo.params.subscribe((params: Params) => {
      this.id = params['id'];
    });

    // 文章4路由參數獲取(queryParams)
    this.routeInfo.queryParams.subscribe((params: Params) => {
      this.id = params['id'];
    });
  }
}
最終展示效果如下,您可以通過 在線示例 預覽效果和編輯調試:
這裏需要説明下,在線示例中點擊文章url並未發生改變,這是因為stackblitz工具機制的問題,你可以點擊在線示例界面的Open in New Tab按鈕,在單獨頁面打開可規避該問題。
延伸:示例中的獲取路由參數都是使用subscribe參數訂閲的方式,還有一種snapshot參數快照的方式。如獲取文章1路由參數寫法為:this.id = this.routeInfo.snapshot.params['id'];,獲取文章2路由參數寫法為:this.id = this.routeInfo.snapshot.queryParams['id'];,可以看到同樣是params與queryParams的區別。
snapshot參數快照和subscribe參數訂閲兩者的區別在於,當路由地址不變的情況下,若參數變化,snapshot參數快照獲取的參數值不變,subscribe參數訂閲獲取的參數值會變化。
我們使用snapshot參數快照測試一下文章1和文章3,效果如下:
那麼snapshot參數快照獲取的參數為什麼不發生變化了呢?這是由於第一次點擊文章1跳轉detail組件,constructor()和ngOnInit()會被調用一次,再次點擊文章3,由於detail組件頁面已經被創建了,ngOnInit()方法不會再次被調用,所以路由參數id依然保存着第一次被創建時候的值1。
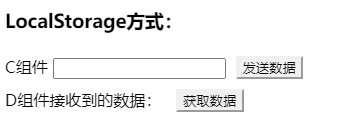
LocalStorage方式
當然你也可以使用本地存儲這種比較通用的方式在組件間通信。
創建C組件c.component.ts將數據存儲到key為cValue的localStorage中,代碼如下:
import { Component } from '@angular/core';

@Component({
  selector: 'app-c',
  templateUrl: './c.component.html',
})
export class CComponent {
  constructor() {}

  inputValue: string = '';

  send(): void {
    // 存儲數據
    window.localStorage.setItem('cValue', this.inputValue);
  }
}
創建D組件d.component.ts獲取localStorage中cValue的值。
import { Component } from '@angular/core';

@Component({
  selector: 'app-d',
  templateUrl: './d.component.html',
})
export class DComponent {
  data: any;

  constructor() {}

  getValue() {
    // 獲取數據
    this.data = window.localStorage.getItem('cValue');
  }
}
最終展示效果如下,您可以通過 在線示例 預覽效果和編輯調試:
注:這裏沒有使用sessionStorage存儲是因為localStorage生命週期是永久的,而sessionStorage生命週期僅為當前標籤頁,如果兩個組件分別在兩個標籤頁,那麼使用sessionStorage是無法實現通信的。
服務端通信方式
最後一種通信方式是藉助後台傳輸數據,如A組件調接口發送數據data存儲到後台,再由B組件調接口獲取數據data,實現數據通信,這裏就不做演示了。
總結
Angular組件間的通信方式是多種多樣的,對於不同情景我們可以採用合適的方式進行通信。
本文每個示例的重點我都有詳細的説明,並延展一些相關知識。示例都是我自己一點點親手敲的,從0到1研究示例實現方案,雖然花費了很長時間,但加深鞏固了知識,之前忽略的一些知識細節也得到了補充,建議大家在學習的同時最好也能動手實現。
好啦,以上就是Angular組件間各種通信方式的所有內容,希望對你有所幫助,如有問題可通過我的博客https://echeverra.cn或微信公眾號echeverra聯繫我。
你學“廢”了麼?
(完)
