項目是使用create-app-rewired生成的react項目,使用gulp自動上傳打包文件到服務器,建議只在測試環境和模擬環境使用。
1.安裝gulp,gulp-ssh包
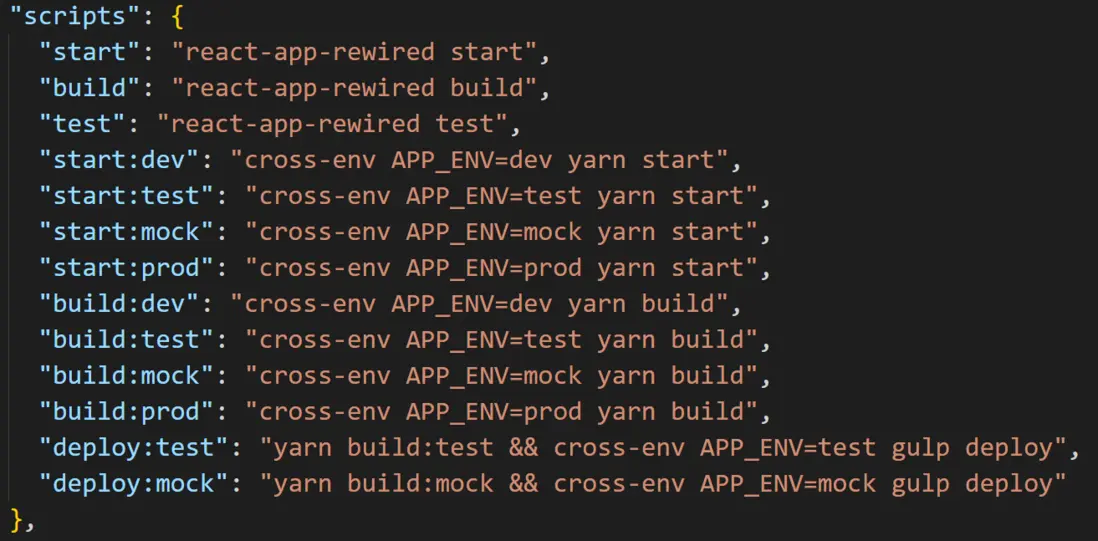
2.編寫腳本
3.修改config-overrides.js,將打包文件分環境生成
4.編寫gulp配置文件gulpfile.js
const { src, task, series } = require("gulp");
const GulpSSH = require("gulp-ssh");
const { APP_ENV } = process.env;//獲取系統環境
const LOCAL_PATH = `./build/${APP_ENV}/**/*`;//本地目錄

let remotePath = "/home/web/project";//遠程服務器目錄
let config = {
    test: [
        {
            remotePath,
            deleteCommand: `rm -rf ${remotePath}/*`,
            ssh: {
                host: "*.*.*.*",//測試站
                port: 22,
                username: '***',
                password: "***",//明文存放
            }
        }
    ],
     mock: [
         {
             remotePath,
             deleteCommand: `rm -rf ${remotePath}/*`,
             ssh: {
                 host: "*.*.*.*",//模擬站
                 port: 22,
                 username: '***',
                 password: "***",//明文存放
             }
         },
     ]
}

task("deploy", cb => {
    let sshConfigs = config[APP_ENV] || [];//配置
    let seriesArray = [];//任務隊列
    for (let i = 0; i < sshConfigs.length; i++) {
        const { remotePath, deleteCommand, ssh } = sshConfigs[i] || {};
        let gulpSSH = new GulpSSH({
            ignoreErrors: false,
            sshConfig: ssh
        });
        seriesArray.push(series(function step1() {
            console.log(`開始清除目標服務器文件,ip:${ssh.host},命令:${deleteCommand}`);
            return gulpSSH.shell(deleteCommand);
        }, function step2() {
            console.log(`開始上傳文件到目標服務器,源目錄:${LOCAL_PATH},目標目錄:${remotePath}`);
            return src(LOCAL_PATH).pipe(gulpSSH.dest(remotePath));
        }));
    }
    series(seriesArray)();
    cb();
})
5.執行腳本 yarn deploy:test 即可
注意點
上傳對象服務器
自動上傳建議只上傳測試站,模擬站等,不要自動上傳生產,避免誤操作
對象服務器密碼明文問題
對象服務器會明文存放在對象上,不安全,可以通過aes進行加解密
步驟:
- 在 https://www.sojson.com/encrypt.html 上使用aes加鹽將密碼進行加密
- 將加密後的密碼寫在password上
- 添加crypto-js,執行yarn add crypto-js -d
-
將gulpfile.js修改為如下
const { src, task, series } = require("gulp");
const GulpSSH = require("gulp-ssh");
const aesCrypto = require("crypto-js/aes");
const utf8Encode = require("crypto-js/enc-utf8");
const { APP_ENV } = process.env;//獲取系統環境
const LOCAL_PATH = `./build/${APP_ENV}/**/*`;//本地目錄
const salt = "******";//鹽

let remotePath = "/home/web/project";//遠程服務器目錄
let config = {
 test: [
     {
         remotePath,
         deleteCommand: `rm -rf ${remotePath}/*`,
         ssh: {
             host: "*.*.*.*",//測試站
             port: 22,
             username: '***',
             encode: "***",//密文存放
         }
     }
 ],
  mock: [
      {
          remotePath,
          deleteCommand: `rm -rf ${remotePath}/*`,
          ssh: {
              host: "*.*.*.*",//模擬站
              port: 22,
              username: '***',
              encode: "***",//密文存放
          }
      },
  ]
}

task("deploy", cb => {
 let sshConfigs = config[APP_ENV] || [];//配置
 let seriesArray = [];//任務隊列
 for (let i = 0; i < sshConfigs.length; i++) {
     const { remotePath, deleteCommand, ssh } = sshConfigs[i] || {};
     ssh.password = aesCrypto.decrypt(ssh.encode, salt).toString(utf8Encode);//添加密碼解密
     let gulpSSH = new GulpSSH({
         ignoreErrors: false,
         sshConfig: ssh
     });
     seriesArray.push(series(function step1() {
         console.log(`開始清除目標服務器文件,ip:${ssh.host},命令:${deleteCommand}`);
         return gulpSSH.shell(deleteCommand);
     }, function step2() {
         console.log(`開始上傳文件到目標服務器,源目錄:${LOCAL_PATH},目標目錄:${remotePath}`);
         return src(LOCAL_PATH).pipe(gulpSSH.dest(remotePath));
     }));
 }
 series(seriesArray)();
 cb();
})


