


本文基於 Netty 4.1.56.Final 版本進行討論
時光芿苒,歲月如梭,好久沒有給大家更新 Netty 相關的文章了,在斷更 Netty 的這段日子裏,筆者一直在持續更新 Linux 內存管理相關的文章 ,目前為止,算是將 Linux 內存管理子系統相關的主幹源碼較為完整的給大家呈現了出來,同時也結識了很多喜歡內核的讀者,經常在後台留言討論一些代碼的設計細節,在這個過程中,我們相互分享,相互學習,濃濃的感受到了大家對技術那份純粹的熱愛,對於我自己來説,也是一種激勵,學習,提高的機會。
之前系列文章的視角一直是停留在內核態,筆者試圖從 Linux 內核的角度來為大家揭秘內存管理的本質,那麼從今天開始,我們把視角在往上挪一挪,從內核態轉換到用户態,繼續沿着內存管理這條主線,來看一看用户態的內存管理是如何進行的。
接下來筆者計劃用三篇文章的篇幅為大家剖析一下 Netty 的內存管理模塊,本文是第一篇,主要是圍繞 Netty 內存管理的外圍介紹一下 ByteBuf 的總體設計。

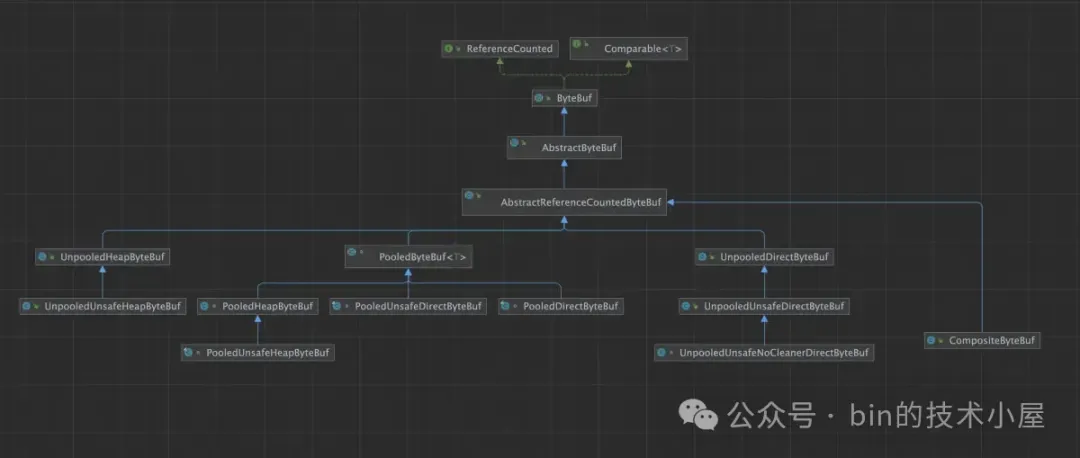
別看 ByteBuf 體系涉及到的類比較多,一眼望過去比較頭大,但是我們按照不同的視角,將它們一一分類,整個體系脈絡就變得很清晰了:
- 從 JVM 內存區域佈局的角度來看,Netty 的 ByteBuf 主要分為 HeapByteBuf(堆內) 和 DirectByteBuf(堆外)這兩種類型。
- 從內存管理的角度來看,Netty 的 ByteBuf 又分為 PooledByteBuf (池化)和 UnpooledByteBuf(非池化)兩種子類型。一種是被內存池統一管理,另一種則和普通的 ByteBuf 一樣,用的時候臨時創建,不用的時候釋放。
- 從內存訪問的角度來看,Netty 又將 ByteBuf 分為了 UnsafeByteBuf 和普通的 ByteBuf。UnsafeByteBuf 主要是依賴 Unsafe 類提供的底層 API 來直接對內存地址進行操作。而普通 ByteBuf 對內存的操作主要是依賴 NIO 中的 ByteBuffer。
- 從內存回收的角度來看,ByteBuf 又分為了帶 Cleaner 的 ByteBuf 以及不帶 Cleaner 的 NoCleanerByteBuf,Cleaner 在 JDK 中是用來釋放 NIO ByteBuffer 背後所引用的 Native Memory 的,內存的釋放由 JVM 統一管理。而 NoCleanerByteBuf 背後的 Native Memory 則需要我們進行手動釋放。
- 從內存佔用統計的角度來説,Netty 又近一步將 ByteBuf 分為了 InstrumentedByteBuf 和普通的 ByteBuf,其中 InstrumentedByteBuf 會帶有內存佔用相關 Metrics 的統計供我們進行監控,而普通的 ByteBuf 則不帶有熱任何 Metrics。
- 從零拷貝的角度來看,Netty 又引入了 CompositeByteBuf,目的是為多個 ByteBuf 在聚合的時候提供一個統一的邏輯視圖,將多個 ByteBuf 聚合成一個邏輯上的 CompositeByteBuf,而傳統的聚合操作則是首先要分配一個大的 ByteBuf,然後將需要聚合的多個 ByteBuf 中的內容在拷貝到新的 ByteBuf 中。CompositeByteBuf 避免了分配大段內存以及內存拷貝的開銷。注意這裏的零拷貝指的是 Netty 在用户態層面自己實現的避免內存拷貝的設計,而不是 OS 層面上的零拷貝。
- 另外 Netty 的 ByteBuf 支持引用計數以及自動地內存泄露探測,如果有內存泄露的情況,Netty 會將具體發生泄露的位置報告出來。
- Netty 的 ByteBuf 支持擴容,而 NIO 的 ByteBuffer 則不支持擴容,
在將 Netty 的 ByteBuf 設計體系梳理完整之後,我們就會發現,Netty 的 ByteBuf 其實是對 JDK ByteBuffer 的一種擴展和完善,所以下面筆者的行文思路是與 JDK ByteBuffer 對比着進行介紹 Netty 的 ByteBuf ,有了對比,我們才能更加深刻的體會到 Netty 設計的精妙。

1. JDK 中的 ByteBuffer 設計有何不妥
筆者曾在 《一步一圖帶你深入剖析 JDK NIO ByteBuffer 在不同字節序下的設計與實現》 一文中完整的介紹過 JDK ByteBuffer 的整個設計體系,下面我們來簡短回憶一下 ByteBuffer 的幾個核心要素。
public abstract class Buffer {
    private int mark = -1;
    private int position = 0;
    private int limit;
    private int capacity;
}
- capacity 規定了整個 Buffer 的容量,具體可以容納多少個元素。capacity 之前的元素均是 Buffer 可操作的空間,JDK 中的 ByteBuffer 是不可擴容的。
- position 用於指向 Buffer 中下一個可操作性的元素,初始值為 0。對於 Buffer 的讀寫操作全部都共用這一個 position 指針,在 Buffer 的寫模式下,position 指針用於指向下一個可寫位置。在讀模式下,position 指針指向下一個可讀位置。
- limit 用於限定 Buffer 可操作元素的上限,position 指針不能超過 limit。
由於 JDK ByteBuffer 只設計了一個 position 指針,所以我們在讀寫 ByteBuffer 的時候需要不斷的調整 position 的位置。比如,利用 flip() ,rewind(),compact(),clear() 等方法不斷的進行讀寫模式的切換。
一些具體的場景體現就是,當我們對一個 ByteBuffer 進行寫入的時候,隨着數據不斷的向 ByteBuffer 寫入,position 指針會不斷的向後移動。在寫入操作完成之後,如果我們想要從 ByteBuffer 讀取剛剛寫入的數據就麻煩了。
由於 JDK 在對 ByteBuffer 的設計中讀寫操作都是混用一個 position 指針,所以在讀取 ByteBuffer 之前,我們還需要通過 flip() 調整 position 的位置,進行讀模式的切換。

    public final Buffer flip() {
        limit = position;
        position = 0;
        mark = -1;
        return this;
    }
當我們將 ByteBuffer 中的數據全部讀取完之後,如果再次向 ByteBuffer 寫入數據,那麼還需要重新調整 position 的位置,通過 clear() 來進行寫模式的切換。

    public final Buffer clear() {
        position = 0;
        limit = capacity;
        mark = -1;
        return this;
    }
如果我們只是部分讀取了 ByteBuffer 中的數據而不是全部讀取,那麼在寫入的時候,為了避免未被讀取的部分被接下來的寫入操作覆蓋,我們則需要通過 compact() 方法來切換寫模式。

class HeapByteBuffer extends ByteBuffer {

    //HeapBuffer中底層負責存儲數據的數組
    final byte[] hb;

    public ByteBuffer compact() {
        System.arraycopy(hb, ix(position()), hb, ix(0), remaining());
        position(remaining());
        limit(capacity());
        discardMark();
        return this;
    }

    public final int remaining() {
        return limit - position;
    }

   final void discardMark() {
        mark = -1;
    }
}
從上面列舉的這些讀寫 ByteBuffer 場景可以看出,當我們在操作 ByteBuffer 的時候,需要時刻保持頭腦清醒,對 ByteBuffer 中哪些部分是可讀的,哪些部分是可寫的要有一個清醒的認識,稍不留神就會出錯。在複雜的編解碼邏輯中,如果使用 ByteBuffer 的話,就需要不斷的進行讀寫模式的切換,切的切的人就傻了。
除了對 ByteBuffer 的相關操作比較麻煩之外,JDK 對於 ByteBuffer 沒有設計池化管理機制,而面對大量需要使用堆外內存的場景,我們就需要不斷的創建 DirectBuffer,DirectBuffer 在使用完之後,回收又是個問題。
JDK 自身對於 DirectBuffer 的回收是有延遲的,我們需要等到一次 FullGc ,這些 DirectBuffer 背後引用的 Native Memory 才能被 JVM 自動回收。所以為了及時回收這些 Native Memory ,我們又需要操心 DirectBuffer 的手動釋放。
JDK 的 ByteBuffer 不支持引用計數,沒有引用計數的設計,我們就無從得知一個 DirectBuffer 被引用了多少次,又被釋放了多少次,面對 DirectBuffer 引起的內存泄露問題,也就無法進行自動探測。
另外 JDK 的 ByteBuffer 不支持動態按需自適應擴容,當一個 ByteBuffer 被創建出來之後,它的容量就固定了。但實際上,我們很難在一開始就能準確的評估出到底需要多大的 ByteBuffer。分配的容量大了,會造成浪費。分配的容量小了,我們又需要每次在寫入的時候判斷剩餘容量是否足夠,如果不足,又需要手動去申請一個更大的 ByteBuffer,然後在將原有 ByteBuffer 中的數據遷移到新的 ByteBuffer 中,想想都麻煩。
還有就是當多個 JDK 的 ByteBuffer 在面對合併聚合的場景,總是要先創建一個更大的 ByteBuffer,然後將原有的多個 ByteBuffer 中的內容在拷貝到新的 ByteBuffer 中。這就涉及到了內存分配和拷貝的開銷。
那為什麼不能利用原有的這些 ByteBuffer 所佔用的內存空間,在此基礎上只創建一個邏輯上的視圖 ByteBuffer,將對視圖 ByteBuffer 的邏輯操作全部轉移到原有的內存空間上,這樣一來不就可以省去重新分配內存以及內存拷貝的開銷了麼 ?
下面我們就來一起看下,Netty 中的 ByteBuf 是如何解決並完善上述問題的~~~
2. Netty 對於 ByteBuf 的設計與實現
在之前介紹 JDK ByteBuffer 整體設計的時候,筆者是以 HeapByteBuffer 為例將 ByteBuffer 的整個設計體系串聯起來的,那麼本文筆者將會用 DirectByteBuf 為大家串聯 Netty ByteBuf 的設計體系。
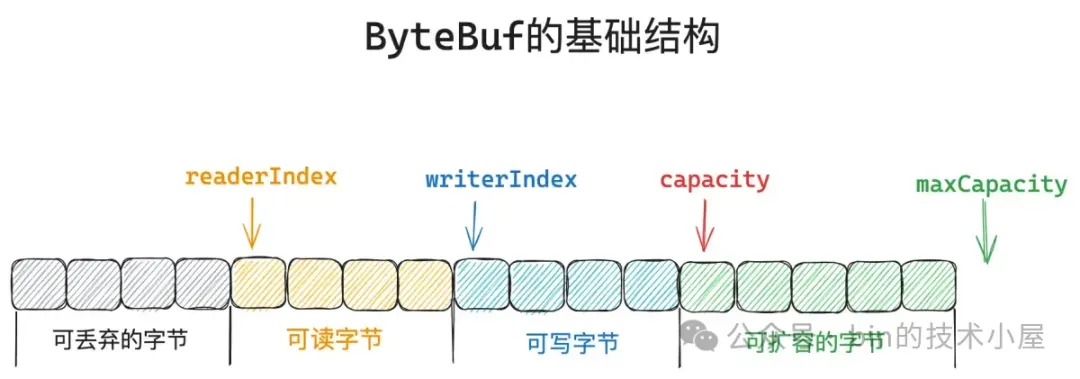
2.1 ByteBuf 的基本結構
public abstract class AbstractByteBuf extends ByteBuf {
    int readerIndex;
    int writerIndex;
    private int markedReaderIndex;
    private int markedWriterIndex;
    private int maxCapacity;
}

public class UnpooledDirectByteBuf extends AbstractReferenceCountedByteBuf {
    private int capacity;
}
為了避免 JDK ByteBuffer 在讀寫模式下共用一個 position 指針所引起的繁瑣操作,Netty 為 ByteBuf 引入了兩個指針,readerIndex 用於指向 ByteBuf 中第一個可讀字節位置,writerIndex 用於指向 ByteBuf 中第一個可寫的字節位置。有了這兩個獨立的指針之後,我們在對 Netty ByteBuf 進行讀寫操作的時候,就不需要進行繁瑣的讀寫模式切換了。與之對應的 markedReaderIndex,markedWriterIndex 用於支持 ByteBuf 相關的 mark 和 reset 操作,這一點和 JDK 中的設計保持一致。
    @Override
    public ByteBuf markReaderIndex() {
        markedReaderIndex = readerIndex;
        return this;
    }

    @Override
    public ByteBuf resetReaderIndex() {
        readerIndex(markedReaderIndex);
        return this;
    }

    @Override
    public ByteBuf markWriterIndex() {
        markedWriterIndex = writerIndex;
        return this;
    }

    @Override
    public ByteBuf resetWriterIndex() {
        writerIndex(markedWriterIndex);
        return this;
    }
由於 JDK ByteBuffer 在設計上不支持擴容機制,所以 Netty 為 ByteBuf 額外引入了一個新的字段 maxCapacity,用於表示 ByteBuf 容量最多隻能擴容至 maxCapacity。
    @Override
    public int calculateNewCapacity(int minNewCapacity, int maxCapacity) {
        if (minNewCapacity > maxCapacity) {
            throw new IllegalArgumentException(String.format(
                    "minNewCapacity: %d (expected: not greater than maxCapacity(%d)",
                    minNewCapacity, maxCapacity));
        }
    }
Netty ByteBuf 的 capacity 與 JDK ByteBuffer 中的 capacity 含義保持一致,用於表示 ByteBuf 的初始容量大小,也就是下面在創建 UnpooledDirectByteBuf 的時候傳入的 initialCapacity 參數。
public class UnpooledDirectByteBuf extends AbstractReferenceCountedByteBuf {
// Netty ByteBuf 底層依賴的 JDK ByteBuffer
ByteBuffer buffer;
// ByteBuf 初始的容量,也是真正的內存佔用
private int capacity;
public UnpooledDirectByteBuf(ByteBufAllocator alloc, int initialCapacity, int maxCapacity) {
// 設置最大可擴容的容量
super(maxCapacity);
this.alloc = alloc;
// 按照 initialCapacity 指定的初始容量,創建 JDK ByteBuffer
setByteBuffer(allocateDirect(initialCapacity), false);
}
void setByteBuffer(ByteBuffer buffer, boolean tryFree) {
// UnpooledDirectByteBuf 底層會依賴一個 JDK 的 ByteBuffer
// 後續對 UnpooledDirectByteBuf 的操作, Netty 全部會代理到 JDK ByteBuffer 中
this.buffer = buffer;
// 初始指定的 ByteBuf 容量 initialCapacity
capacity = buffer.remaining();
}
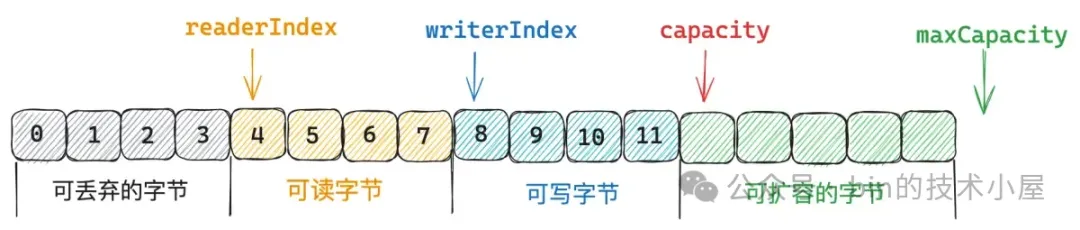
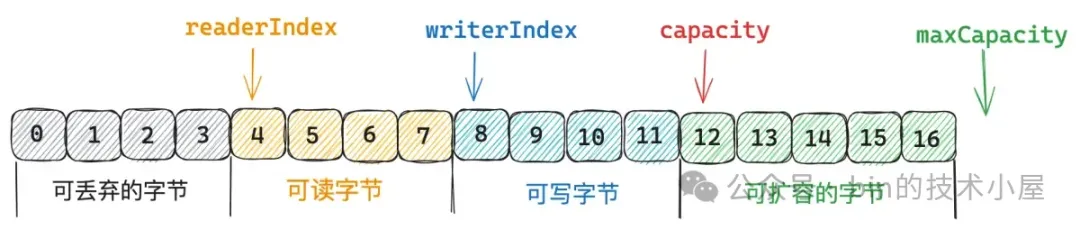
}由此一來,Netty 中的 ByteBuf 就會被 readerIndex,writerIndex,capacity,maxCapacity 這四個指針分割成四個部分,上圖中筆者以按照不同的顏色進行了區分。
- 其中
[0 , capacity)這部分是創建 ByteBuf 的時候分配的初始容量,這部分是真正佔用內存的,而[capacity , maxCapacity)這部分表示 ByteBuf 可擴容的容量,這部分還未分配內存。 [0 , readerIndex)這部分字節是已經被讀取過的字節,是可以被丟棄的範圍。[readerIndex , writerIndex)這部分字節表示 ByteBuf 中可以被讀取的字節。[writerIndex , capacity)這部分表示 ByteBuf 的剩餘容量,也就是可以寫入的字節範圍。
這四個指針他們之間的關係為 :0 <= readerIndex <= writerIndex <= capacity <= maxCapacity。
  private static void checkIndexBounds(final int readerIndex, final int writerIndex, final int capacity) {
        if (readerIndex < 0 || readerIndex > writerIndex || writerIndex > capacity) {
            throw new IndexOutOfBoundsException(String.format(
                    "readerIndex: %d, writerIndex: %d (expected: 0 <= readerIndex <= writerIndex <= capacity(%d))",
                    readerIndex, writerIndex, capacity));
        }
    }
當我們對 ByteBuf 進行讀取操作的時候,需要通過 isReadable 判斷 ByteBuf 是否可讀。以及通過 readableBytes 判斷 ByteBuf 具體還有多少字節可讀。當 readerIndex 等於 writerIndex 的時候,ByteBuf 就不可讀了。 [0 , readerIndex) 這部分字節就可以被丟棄了。
    @Override
    public boolean isReadable() {
        return writerIndex > readerIndex;
    }

    @Override
    public int readableBytes() {
        return writerIndex - readerIndex;
    }
當我們對 ByteBuf 進行寫入操作的時候,需要通過 isWritable 判斷 ByteBuf 是否可寫。以及通過 writableBytes 判斷 ByteBuf 具體還可以寫多少字節。當 writerIndex 等於 capacity 的時候,ByteBuf 就不可寫了。
   @Override
    public boolean isWritable() {
        return capacity() > writerIndex;
    }

    @Override
    public int writableBytes() {
        return capacity() - writerIndex;
    }
當 ByteBuf 的容量已經被寫滿,變為不可寫的時候,如果繼續對 ByteBuf 進行寫入,那麼就需要擴容了,但擴容後的 capacity 最大不能超過 maxCapacity。
    final void ensureWritable0(int minWritableBytes) {
        // minWritableBytes 表示本次要寫入的字節數
        // 獲取當前 writerIndex 的位置
        final int writerIndex = writerIndex();
        // 為滿足本次的寫入操作,預期的 ByteBuf 容量大小
        final int targetCapacity = writerIndex + minWritableBytes;
        // 如果 targetCapacity 在(capacity , maxCapacity] 之間,則進行擴容
        if (targetCapacity >= 0 & targetCapacity <= capacity()) {
            // targetCapacity 在 [0 , capacity] 之間,則無需擴容,本來就可以滿足
            return;
        }
        // 擴容後的 capacity 最大不能超過 maxCapacity
        if (checkBounds && (targetCapacity < 0 || targetCapacity > maxCapacity)) {
            throw new IndexOutOfBoundsException(String.format(
                    "writerIndex(%d) + minWritableBytes(%d) exceeds maxCapacity(%d): %s",
                    writerIndex, minWritableBytes, maxCapacity, this));
        }

        ..... 擴容 ByteBuf ......
    }
2.2 ByteBuf 的讀取操作
明白了 ByteBuf 基本結構之後,我們來看一下針對 ByteBuf 的讀寫等基本操作是如何進行的。Netty 支持以多種基本類型為粒度對 ByteBuf 進行讀寫,除此之外還支持 Unsigned 基本類型的轉換以及大小端的轉換。下面筆者以 Byte 和 Int 這兩種基本類型為例對 ByteBuf 的讀取操作進行説明。
ByteBuf 中的 get 方法只是單純地從 ByteBuf 中讀取數據,並不改變其 readerIndex 的位置,我們可以通過 getByte 從 ByteBuf 中的指定位置 index 讀取一個 Byte 出來,也可以通過 getUnsignedByte 從 ByteBuf 讀取一個 Byte 並轉換成 UnsignedByte 。
public abstract class AbstractByteBuf extends ByteBuf {
    @Override
    public byte getByte(int index) {
        // 檢查 index 的邊界,index 不能超過 capacity(index < capacity)
        checkIndex(index);
        return _getByte(index);
    }

    @Override
    public short getUnsignedByte(int index) {
        // 將獲取到的 Byte 轉換為 UnsignedByte
        return (short) (getByte(index) & 0xFF);
    }

    protected abstract byte _getByte(int index);
}
其底層依賴的是一個抽象方法 _getByte,由 AbstractByteBuf 具體的子類負責實現。比如,在 UnpooledDirectByteBuf 類的實現中,直接將 _getByte 操作代理給其底層依賴的 JDK DirectByteBuffer。
public class UnpooledDirectByteBuf  {
    // 底層依賴 JDK 的 DirectByteBuffer
    ByteBuffer buffer;

    @Override
    protected byte _getByte(int index) {
        return buffer.get(index);
    }
}
而在 UnpooledUnsafeDirectByteBuf 類的實現中,則是通過 sun.misc.Unsafe 直接從對應的內存地址中讀取。
public class UnpooledUnsafeDirectByteBuf {
    // 直接操作 OS 的內存地址
    long memoryAddress;
    @Override
    protected byte _getByte(int index) {
        // 底層依賴 PlatformDependent0,直接通過內存地址讀取 byte
        return UnsafeByteBufUtil.getByte(addr(index));
    }

    final long addr(int index) {
        // 獲取偏移 index 對應的內存地址
        return memoryAddress + index;
    }
}

final class PlatformDependent0 {
  // sun.misc.Unsafe
  static final Unsafe UNSAFE;
  static byte getByte(long address) {
        return UNSAFE.getByte(address);
    }
}
Netty 另外還提供了批量讀取 Bytes 的操作,比如我們可以通過 getBytes 方法將 ByteBuf 中的數據讀取到一個字節數組 byte[] 中,也可以讀取到另一個 ByteBuf 中。
    @Override
    public ByteBuf getBytes(int index, byte[] dst) {
        getBytes(index, dst, 0, dst.length);
        return this;
    }

    public abstract ByteBuf getBytes(int index, byte[] dst, int dstIndex, int length);

    @Override
    public ByteBuf getBytes(int index, ByteBuf dst, int length) {
        getBytes(index, dst, dst.writerIndex(), length);
        // 調整 dst 的  writerIndex
        dst.writerIndex(dst.writerIndex() + length);
        return this;
    }

    // 注意這裏的 getBytes 方法既不會改變原來 ByteBuf 的 readerIndex 和 writerIndex
    // 也不會改變目的 ByteBuf 的 readerIndex 和 writerIndex
    public abstract ByteBuf getBytes(int index, ByteBuf dst, int dstIndex, int length);
通過 getBytes 方法將原來 ByteBuf 的數據讀取到目的 ByteBuf 之後,原來 ByteBuf 的 readerIndex 不會發生變化,但是目的 ByteBuf 的 writerIndex 會重新調整。
對於 UnpooledDirectByteBuf 類的具體實現來説自然是將 getBytes 的操作直接代理給其底層依賴的 JDK DirectByteBuffer。對於 UnpooledUnsafeDirectByteBuf 類的具體實現來説,則是通過 UNSAFE.copyMemory 直接根據內存地址進行拷貝。
而 ByteBuf 中的 read 方法則不僅會從 ByteBuf 中讀取數據,而且會改變其 readerIndex 的位置。比如,readByte 方法首先會通過前面介紹的 _getByte 從 ByteBuf 中讀取一個字節,然後將 readerIndex 向後移動一位。
   @Override
    public byte readByte() {
        checkReadableBytes0(1);
        int i = readerIndex;
        byte b = _getByte(i);
        readerIndex = i + 1;
        return b;
    }
同樣 Netty 也提供了從 ByteBuf 中批量讀取數據的方法 readBytes,我們可以將一個 ByteBuf 中的數據通過 readBytes 方法讀取到另一個 ByteBuf 中。但是這裏,Netty 將會改變原來 ByteBuf 的 readerIndex 以及目的 ByteBuf 的 writerIndex。
   @Override
    public ByteBuf readBytes(ByteBuf dst, int length) {
        readBytes(dst, dst.writerIndex(), length);
        // 改變 dst 的 writerIndex
        dst.writerIndex(dst.writerIndex() + length);
        return this;
    }
另外我們還可以明確指定 dstIndex,使得我們可以從目的 ByteBuf 中的某一個位置處開始拷貝原來 ByteBuf 中的數據,但這裏只會改變原來 ByteBuf 的 readerIndex,並不會改變目的 ByteBuf 的 writerIndex。這也很好理解,因為我們在寫入目的 ByteBuf 的時候已經明確指定了 writerIndex(dstIndex),自然在寫入完成之後,writerIndex 的位置並不需要改變。
    @Override
    public ByteBuf readBytes(ByteBuf dst, int dstIndex, int length) {
        checkReadableBytes(length);
        getBytes(readerIndex, dst, dstIndex, length);
        // 改變原來 ByteBuf 的 readerIndex
        readerIndex += length;
        return this;
    }
除此之外,Netty 還支持將 ByteBuf 中的數據讀取到不同的目的地,比如,讀取到 JDK ByteBuffer 中,讀取到 FileChannel 中,讀取到 OutputStream 中,以及讀取到 GatheringByteChannel 中。
public abstract ByteBuf readBytes(ByteBuffer dst);
public abstract ByteBuf readBytes(OutputStream out, int length) throws IOException;
public abstract int readBytes(GatheringByteChannel out, int length) throws IOException;
public abstract int readBytes(FileChannel out, long position, int length) throws IOException;
Netty 除了支持以 Byte 為粒度對 ByteBuf 進行讀寫之外,還同時支持以多種基本類型對 ByteBuf 進行讀寫,這裏筆者以 Int 類型為例進行説明。
我們可以通過 readInt() 從 ByteBuf 中讀取一個 Int 類型的數據出來,隨後 ByteBuf 的 readerIndex 向後移動 4 個位置。
   @Override
    public int readInt() {
        checkReadableBytes0(4);
        int v = _getInt(readerIndex);
        readerIndex += 4;
        return v;
    }

    protected abstract int _getInt(int index);
````
同理,真正負責讀取數據的方法 _getInt 方法需要由 AbstractByteBuf 具體的子類實現,但這裏和 _getByte 不同的是,_getInt 需要考慮字節序的問題,**由於網絡協議採用的是大端字節序傳輸,所以 Netty 的 ByteBuf 默認也是大端字節序**。

在 UnpooledDirectByteBuf 的實現中,同樣也是將 getInt 的操作直接代理給其底層依賴的 JDK DirectByteBuffer。
public class UnpooledDirectByteBuf {
@Override
protected int _getInt(int index) {
    // 代理給其底層依賴的 JDK DirectByteBuffer
    return buffer.getInt(index);
}
}
在 UnpooledUnsafeDirectByteBuf 的實現中,由於是通過 `sun.misc.Unsafe` 直接對內存地址進行操作,所以需要考慮字節序轉換的細節。Netty 的 ByteBuf 默認是大端字節序,所以這裏直接依次將低地址的字節放到 Int 數據的高位就可以了。
public class UnpooledUnsafeDirectByteBuf {
@Override
protected int _getInt(int index) {
    return UnsafeByteBufUtil.getInt(addr(index));
}
}
final class UnsafeByteBufUtil {
static int getInt(long address) {
    return PlatformDependent.getByte(address) << 24 |
           (PlatformDependent.getByte(address + 1) & 0xff) << 16 |
           (PlatformDependent.getByte(address + 2) & 0xff) <<  8 |
           PlatformDependent.getByte(address + 3)  & 0xff;
}
}
同時 Netty 也支持以小端字節序來從 ByteBuf 中讀取 Int 數據,這裏就涉及到字節序的轉換了。
@Override
public int readIntLE() {
    checkReadableBytes0(4);
    int v = _getIntLE(readerIndex);
    readerIndex += 4;
    return v;
}
protected abstract int _getIntLE(int index);
在 UnpooledDirectByteBuf 的實現中,首先通過其依賴的 JDK DirectByteBuffer 以大端序讀取一個 Int 數據,然後通過 `ByteBufUtil.swapInt` 切換成小端序返回。public class UnpooledDirectByteBuf {
@Override
protected int _getIntLE(int index) {
    // 切換字節序,從大端變小端
    return ByteBufUtil.swapInt(buffer.getInt(index));
}
}
在 UnpooledUnsafeDirectByteBuf 的實現中,則是直接將低地址上的字節依次放到 Int 數據的低位上就可以了。public class UnpooledUnsafeDirectByteBuf {
@Override
protected int _getIntLE(int index) {
    return UnsafeByteBufUtil.getIntLE(addr(index));
}
}
final class UnsafeByteBufUtil {
static int getIntLE(long address) {
    return PlatformDependent.getByte(address) & 0xff |
           (PlatformDependent.getByte(address + 1) & 0xff) <<  8 |
           (PlatformDependent.getByte(address + 2) & 0xff) << 16 |
           PlatformDependent.getByte(address + 3) << 24;
}
}
另外 Netty 也支持從 ByteBuf 中讀取基本類型的 `Unsigned 類型`。
@Override
public long readUnsignedInt() {
    return readInt() & 0xFFFFFFFFL;
}

@Override
public long readUnsignedIntLE() {
    return readIntLE() & 0xFFFFFFFFL;
}
其他基本類型的相關讀取操作實現的邏輯都是大同小異,筆者就不一一列舉了。
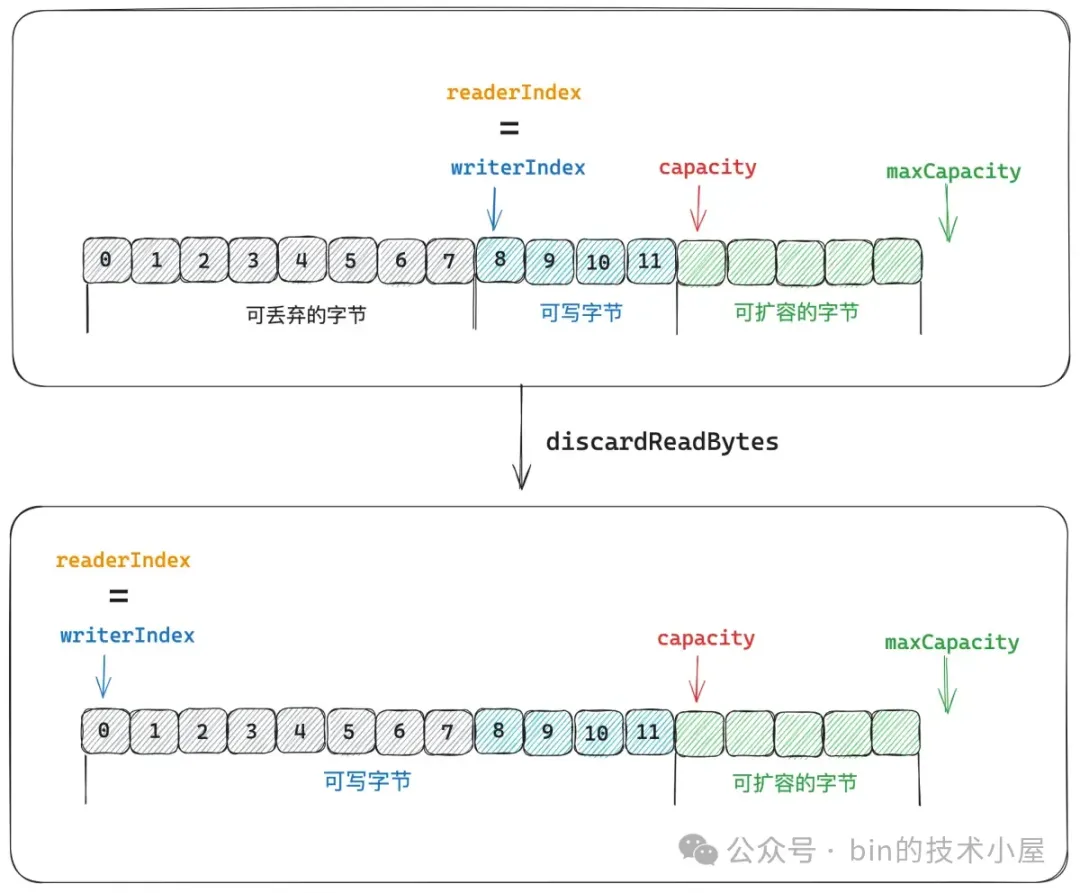
### 2.3 discardReadBytes
隨着 readBytes 方法的不斷調用, ByteBuf 中的 readerIndex 也會不斷的向後移動,Netty 對 readerIndex 的設計有兩層語義:
1. 第一層的語義比較明顯,就是用來表示當前 ByteBuf 的讀取位置,當我們調用 readBytes 方法的時候就是從 readerIndex 開始讀取數據,當 readerIndex 等於 writerIndex 的時候,ByteBuf 就不可讀取了。
2. 第二層語義比較含蓄,它是用來表示當前 ByteBuf 可以被丟棄的字節數,因為 readerIndex 用來指示當前的讀取位置,那麼位於 readerIndex 之前的字節肯定是已經被讀取完畢了,已經被讀取的字節繼續駐留在 ByteBuf 中就沒有必要了,還不如把空間騰出來,還能在多寫入些數據。
所以一個 ByteBuf 真正的剩餘可寫容量的計算方式除了上小節中介紹的 `writableBytes()` 方法返回的字節數之外還需要在加上 readerIndex。
@Override
public int writableBytes() {
    return capacity() - writerIndex;
}
舉個具體點的例子就是,當我們準備向一個 ByteBuf 寫入 n 個字節時,如果 `writableBytes()` 小於 n,那麼就表示當前 ByteBuf 的剩餘容量不能滿足本次寫入的字節數。
但是 `readerIndex + writableBytes() ` 大於等於 n , 則表示如果我們將 ByteBuf 中已經讀取的字節數丟棄的話,那麼就可以滿足本次寫入的請求。
在這種情況下,我們就可以使用 `discardReadBytes()` 方法將 readerIndex 之前的字節丟棄掉,這樣一來,可寫的字節容就可以滿足本次寫入要求了,那麼如果丟棄呢 ?
我們先來看 `readerIndex < writerIndex` 的情況,這種情況下表示 ByteBuf 中還有未讀取的字節。
ByteBuf 目前可讀取的字節範圍為:` [readerIndex, writerIndex)`,位於 readerIndex 之前的字節均可以被丟棄,接下來我們就需要將 ` [readerIndex, writerIndex)` 這段範圍的字節全部拷貝到 ByteBuf 最前面,直接覆蓋 readerIndex 之前的字節。
然後調整 readerIndex 和 writerIndex 的位置,因為 readerIndex 之前的字節現在已經全部被可讀字節覆蓋了,所以 readerIndex 重新調整為 0 ,writerIndex 向前移動 readerIndex 大小。這樣一來,當前 ByteBuf 的可寫容量就多出了 readerIndex 大小。
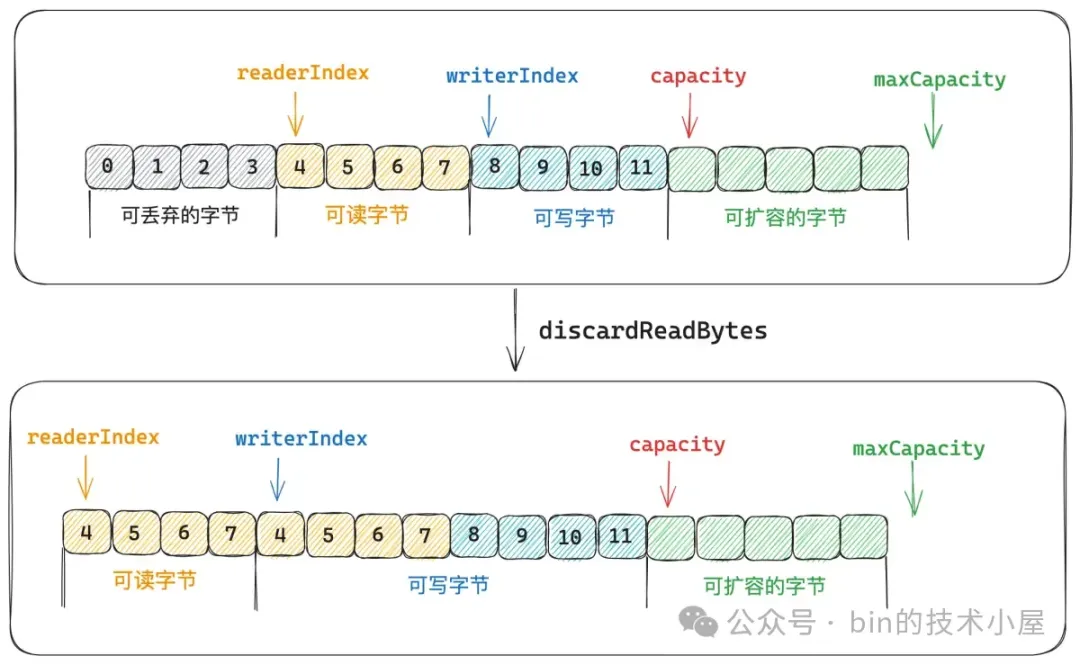
另外一種情況是 `readerIndex = writerIndex` 的情況,這種情況下表示 ByteBuf 中已經沒有可讀字節了。
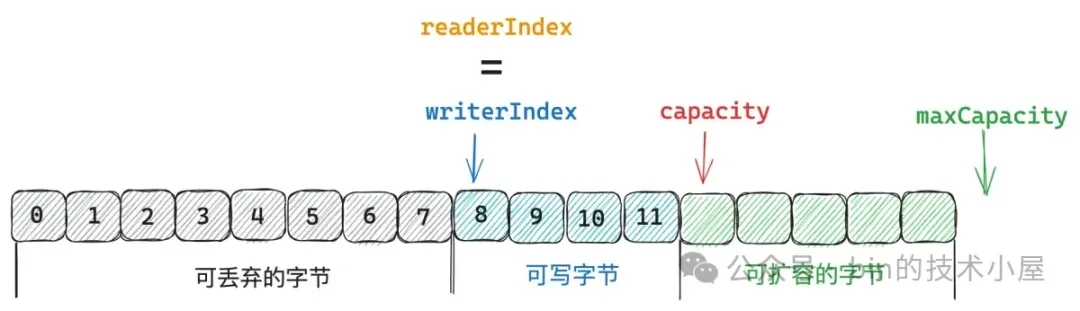
既然 ByteBuf 中已經沒有任何可讀字節了,自然也就不需要將可讀字節拷貝到 ByteBuf 的開頭了,直接將 readerIndex 和 writerIndex 重新調整為 0 即可。
public abstract class AbstractByteBuf extends ByteBuf {
@Override
public ByteBuf discardReadBytes() {
    // readerIndex 為 0 表示沒有可以丟棄的字節
    if (readerIndex == 0) {
        return this;
    }

    if (readerIndex != writerIndex) {
        // 將 [readerIndex, writerIndex) 這段字節範圍移動到 ByteBuf 的開頭
        // 也就是丟棄 readerIndex 之前的字節
        setBytes(0, this, readerIndex, writerIndex - readerIndex);
        // writerIndex 和 readerIndex 都向前移動 readerIndex 大小
        writerIndex -= readerIndex;
        // 重新調整 markedReaderIndex 和 markedWriterIndex 的位置
        // 都對應向前移動 readerIndex 大小。
        adjustMarkers(readerIndex);
        readerIndex = 0;
    } else {
        // readerIndex = writerIndex 表示當前 ByteBuf 已經不可讀了
        // 將 readerIndex 之前的字節全部丟棄,ByteBuf 恢復到最初的狀態
        // 整個 ByteBuf 的容量都可以被寫入
        ensureAccessible();
        adjustMarkers(readerIndex);
        writerIndex = readerIndex = 0;
    }
    return this;
}
}
如果 ByteBuf 存在可以被丟棄的字節的時候(readerIndex > 0),只要我們調用 `discardReadBytes()` 就會無條件丟棄 readerIndex 之前的字節。

Netty 還另外提供了 `discardSomeReadBytes()` 方法進行有條件丟棄字節,丟棄條件有如下兩種:

1. 當 ByteBuf 已經不可讀的時候,則無條件丟棄已讀字節。

2. 當已讀的字節數超過整個 ByteBuf 一半容量時才會丟棄已讀字節。否則無條件丟棄的話,收益就不高了。
@Override
public ByteBuf discardSomeReadBytes() {
    if (readerIndex > 0) {
        // 當 ByteBuf 已經不可讀了,則無條件丟棄已讀字節
        if (readerIndex == writerIndex) {
            adjustMarkers(readerIndex);
            writerIndex = readerIndex = 0;
            return this;
        }
        // 當已讀的字節數超過整個 ByteBuf 的一半容量時才會丟棄已讀字節
        if (readerIndex >= capacity() >>> 1) {
            setBytes(0, this, readerIndex, writerIndex - readerIndex);
            writerIndex -= readerIndex;
            adjustMarkers(readerIndex);
            readerIndex = 0;
            return this;
        }
    }
    return this;
}
Netty 設計的這個丟棄字節的方法在解碼的場景非常有用,由於 TCP 是一個面向流的網絡協議,它只會根據滑動窗口的大小進行字節流的發送,所以我們在應用層接收到的數據可能是一個半包也可能是一個粘包,反正不會是一個完整的數據包。
這就要求我們在解碼的時候,首先要判斷 ByteBuf 中的數據是否構成一個完成的數據包,如果構成一個數據包,才會去讀取 ByteBuf 中的字節,然後解碼,隨後 readerIndex 向後移動。
如果不夠一個數據包,那就需要將 ByteBuf 累積緩存起來,一直等到一個完整的數據包到來。一種極端的情況是,即使我們已經解碼很多次了,但是緩存的 ByteBuf 中仍然還有半包,由於不斷的會有粘包過來,這就導致 ByteBuf 會越來越大。由於已經解碼了很多次,所以 ByteBuf 中可以被丟棄的字節佔據了很大的內存空間,如果半包情況持續存在,將會導致 OutOfMemory。
所以 Netty 規定,如果已經解碼了 16 次之後,ByteBuf 中仍然有半包的情況,那麼就會調用這裏的 `discardSomeReadBytes()` 將已經解碼過的字節全部丟棄,節省不必要的內存開銷。
### 2.4 ByteBuf 的寫入操作
ByteBuf 的寫入操作與讀取操作互為相反的操作,每一個讀取方法 getBytes , readBytes , readInt 等都有一個對應的 setBytes , writeBytes , writeInt 等基礎類型的寫入操作。
和 get 方法一樣,set 相關的方法也只是單純的向 ByteBuf 中寫入數據,並不會改變其 writerIndex 的位置,我們可以通過 `setByte` 向 ByteBuf 中的某一個指定位置 index 寫入數據 value。
@Override
public ByteBuf setByte(int index, int value) {
    checkIndex(index);
    _setByte(index, value);
    return this;
}

protected abstract void _setByte(int index, int value);
執行具體的寫入操作同樣也是一個抽象方法,其具體的實現由 AbstractByteBuf 具體的子類負責。對於 UnpooledDirectByteBuf 的實現來説,_setByte 操作直接會代理給其底層依賴的 JDK DirectByteBuffer。
public class UnpooledDirectByteBuf {
// 底層依賴 JDK 的 DirectByteBuffer
ByteBuffer buffer;

@Override
protected void _setByte(int index, int value) {
    buffer.put(index, (byte) value);
}
}
對於 UnpooledUnsafeDirectByteBuf 的實現來説,則是直接通過 `sun.misc.Unsafe` 向對應的內存地址(memoryAddress + index)寫入 Byte。
public class UnpooledUnsafeDirectByteBuf {
// 直接操作 OS 的內存地址,不依賴 JDK 的 buffer
long memoryAddress;
@Override
protected void _setByte(int index, int value) {
    // 底層依賴 PlatformDependent0,直接向內存地址寫入 byte
    UnsafeByteBufUtil.setByte(addr(index), value);
}

final long addr(int index) {
    // 獲取偏移 index 對應的內存地址
    return memoryAddress + index;
}
}
final class PlatformDependent0 {
// sun.misc.Unsafe
static final Unsafe UNSAFE;
static void putByte(long address, byte value) {
UNSAFE.putByte(address, value);}
}
Netty 另外也提供了向 ByteBuf 批量寫入 Bytes 的操作,setBytes 方法用於向 ByteBuf 的指定位置 index 批量寫入一個字節數組 byte[] 中的數據。
@Override
public ByteBuf setBytes(int index, byte[] src) {
    setBytes(index, src, 0, src.length);
    return this;
}

public abstract ByteBuf setBytes(int index, byte[] src, int srcIndex, int length);
對於 UnpooledDirectByteBuf 的實現來説,同樣也是將 setBytes 的操作直接代理給 JDK DirectByteBuffer,將字節數組 byte[] 中的字節直接寫入 DirectByteBuffer 中。
對於 UnpooledUnsafeDirectByteBuf 的實現來説,則是直接操作字節數組和 ByteBuf 的內存地址,通過 `UNSAFE.copyMemory` 將字節數組對應內存地址中的數據拷貝到 ByteBuf 相應的內存地址上。
我們還可以通過 setBytes 方法將其他 ByteBuf 中的字節數據寫入到 ByteBuf 中。
@Override
public ByteBuf setBytes(int index, ByteBuf src, int length) {
    setBytes(index, src, src.readerIndex(), length);
    // 調整 src 的  readerIndex
    src.readerIndex(src.readerIndex() + length);
    return this;
}

// 注意這裏的 setBytes 方法既不會改變原來 ByteBuf 的 readerIndex 和 writerIndex
// 也不會改變目的 ByteBuf 的 readerIndex 和 writerIndex
public abstract ByteBuf setBytes(int index, ByteBuf src, int srcIndex, int length);
**這裏需要注意的是被寫入 ByteBuf 的 writerIndex 並不會改變,但是原來 ByteBuf 的 readerIndex 會重新調整**。
ByteBuf 中的 write 方法底層依賴的是相關的 set 方法,不同的是 write 方法會改變 ByteBuf 中 writerIndex 的位置。比如,我們通過 `writeByte` 方法向 ByteBuf 中寫入一個字節之後,writerIndex 就會向後移動一位。
@Override
public ByteBuf writeByte(int value) {
    ensureWritable0(1);
    _setByte(writerIndex++, value);
    return this;
}
我們也可以通過 writeBytes 向 ByteBuf 中批量寫入數據,將一個字節數組中的數據或者另一個 ByteBuf 中的數據寫入到 ByteBuf 中,但是這裏,Netty 將會改變被寫入 ByteBuf 的 writerIndex 以及數據來源 ByteBuf 的 readerIndex。
@Override
public ByteBuf writeBytes(ByteBuf src, int length) {
    writeBytes(src, src.readerIndex(), length);
    // 調整數據來源 ByteBuf 的 readerIndex
    src.readerIndex(src.readerIndex() + length);
    return this;
}
如果我們明確指定了從數據來源 ByteBuf 中的哪一個位置(srcIndex)開始讀取數據,那麼數據來源 ByteBuf 中的 readerIndex 將不會被改變,只會改變被寫入 ByteBuf 的 writerIndex。
@Override
public ByteBuf writeBytes(ByteBuf src, int srcIndex, int length) {
    ensureWritable(length);
    setBytes(writerIndex, src, srcIndex, length);
    // 調整被寫入 ByteBuf 的 writerIndex
    writerIndex += length;
    return this;
}
除此之外,Netty 還支持從不同的數據來源向 ByteBuf 批量寫入數據,比如,從 JDK ByteBuffer ,從 FileChannel ,從 InputStream ,以及從 ScatteringByteChannel 中。
public ByteBuf writeBytes(ByteBuffer src)
public int writeBytes(InputStream in, int length)
public int writeBytes(ScatteringByteChannel in, int length) throws IOException
public int writeBytes(FileChannel in, long position, int length) throws IOException
Netty 除了支持以 Byte 為粒度向 ByteBuf 中寫入數據之外,還同時支持以多種基本類型為粒度向寫入 ByteBuf ,這裏筆者以 Int 類型為例進行説明。

我們可以通過 writeInt() 向 ByteBuf 寫入一個 Int 類型的數據,隨後 ByteBuf 的 writerIndex 向後移動 4 個位置。
@Override
public ByteBuf writeInt(int value) {
    ensureWritable0(4);
    _setInt(writerIndex, value);
    writerIndex += 4;
    return this;
}
protected abstract void _setInt(int index, int value);
和寫入 Byte 數據不同的是,這裏需要考慮字節序,Netty ByteBuf 默認是大端字節序,和網絡協議傳輸使用的字節序保持一致。這裏我們需要將待寫入數據 value 的高位依次放入到 ByteBuf 的低地址上。
public class UnpooledUnsafeDirectByteBuf {
@Override
protected void _setInt(int index, int value) {
    // 以大端字節序寫入 ByteBuf
    UnsafeByteBufUtil.setInt(addr(index), value);
}
}
final class UnsafeByteBufUtil {
static void setInt(long address, int value) {
        PlatformDependent.putByte(address, (byte) (value >>> 24));
        PlatformDependent.putByte(address + 1, (byte) (value >>> 16));
        PlatformDependent.putByte(address + 2, (byte) (value >>> 8));
        PlatformDependent.putByte(address + 3, (byte) value);
}
}
同時 Netty 也支持以小端字節序向 ByteBuf 寫入數據。
@Override
public ByteBuf writeIntLE(int value) {
    ensureWritable0(4);
    _setIntLE(writerIndex, value);
    writerIndex += 4;
    return this;
}
protected abstract void _setIntLE(int index, int value);
這裏需要將待寫入數據 value 的低位依次放到 ByteBuf 的低地址上。public class UnpooledUnsafeDirectByteBuf {
@Override
protected void _setIntLE(int index, int value) {
    // // 以小端字節序寫入 ByteBuf
    UnsafeByteBufUtil.setIntLE(addr(index), value);
}
}
final class UnsafeByteBufUtil {
static void setIntLE(long address, int value) {
        PlatformDependent.putByte(address, (byte) value);
        PlatformDependent.putByte(address + 1, (byte) (value >>> 8));
        PlatformDependent.putByte(address + 2, (byte) (value >>> 16));
        PlatformDependent.putByte(address + 3, (byte) (value >>> 24));
}
}
### 2.5 ByteBuf 的擴容機制
在每次向 ByteBuf 寫入數據的時候,Netty 都會調用 `ensureWritable0` 方法來判斷當前 ByteBuf 剩餘可寫容量(capacity - writerIndex)是否能夠滿足本次需要寫入的數據大小 minWritableBytes。如果剩餘容量不足,那麼就需要對 ByteBuf 進行擴容,但擴容後的容量不能超過 maxCapacity 的大小。
final void ensureWritable0(int minWritableBytes) {
    final int writerIndex = writerIndex();
    // 為滿足本次的寫入操作,預期的 ByteBuf 容量大小
    final int targetCapacity = writerIndex + minWritableBytes;
    // 剩餘容量可以滿足本次寫入要求,直接返回,不需要擴容
    if (targetCapacity >= 0 & targetCapacity <= capacity()) {
        return;
    }
    // 擴容後的容量不能超過 maxCapacity
    if (checkBounds && (targetCapacity < 0 || targetCapacity > maxCapacity)) {
        ensureAccessible();
        throw new IndexOutOfBoundsException(String.format(
                "writerIndex(%d) + minWritableBytes(%d) exceeds maxCapacity(%d): %s",
                writerIndex, minWritableBytes, maxCapacity, this));
    }

    // 如果 targetCapacity 在(capacity , maxCapacity] 之間,則進行擴容
    // fastWritable 表示在不涉及到 memory reallocation or data-copy 的情況下,當前 ByteBuf 可以直接寫入的容量
    // 對於 UnpooledDirectBuffer 這裏的 fastWritable = capacity - writerIndex
    // PooledDirectBuffer 有另外的實現,這裏先暫時不需要關注
    final int fastWritable = maxFastWritableBytes();
    // 計算擴容後的容量 newCapacity
    // 對於 UnpooledDirectBuffer 來説這裏直接通過 calculateNewCapacity 計算擴容後的容量。
    int newCapacity = fastWritable >= minWritableBytes ? writerIndex + fastWritable
            : alloc().calculateNewCapacity(targetCapacity, maxCapacity);

    // 根據 new capacity 對 ByteBuf 進行擴容
    capacity(newCapacity);
}
#### 2.5.1 newCapacity 的計算邏輯

ByteBuf 的初始默認 capacity 為 256 個字節,初始默認 maxCapacity 為 `Integer.MAX_VALUE` 也就是 2G 大小。
public abstract class AbstractByteBufAllocator implements ByteBufAllocator {
// ByteBuf 的初始默認 CAPACITY
static final int DEFAULT_INITIAL_CAPACITY = 256;
// ByteBuf 的初始默認 MAX_CAPACITY
static final int DEFAULT_MAX_CAPACITY = Integer.MAX_VALUE;

@Override
public ByteBuf directBuffer() {
    return directBuffer(DEFAULT_INITIAL_CAPACITY, DEFAULT_MAX_CAPACITY);
}
}
為滿足本次寫入操作,對 ByteBuf 的最小容量要求為 minNewCapacity,它的值就是在 `ensureWritable0` 方法中計算出來的 `targetCapacity `, 計算方式為: `minNewCapacity = writerIndex + minWritableBytes(本次將要寫入的字節數)`。
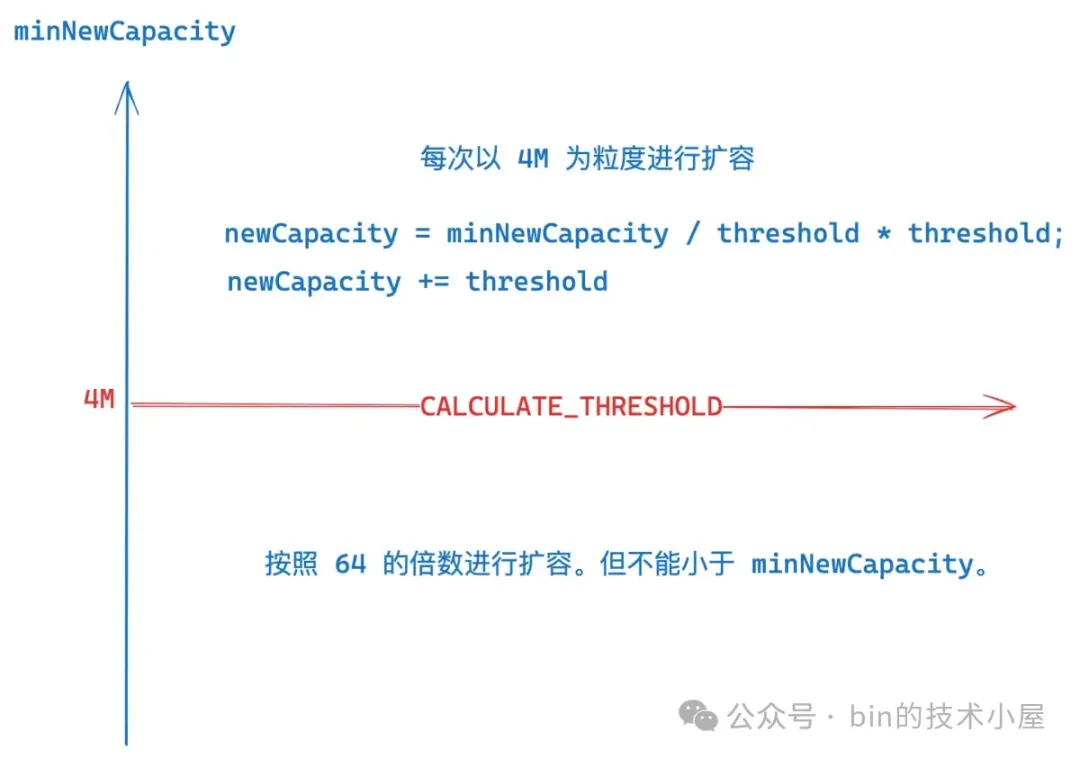
在 ByteBuf 的擴容邏輯中,Netty 設置了一個重要的閾值 `CALCULATE_THRESHOLD`, 大小為 4M,它決定了 ByteBuf 擴容的尺度。
// 擴容的尺度
static final int CALCULATE_THRESHOLD = 1048576 * 4; // 4 MiB page
如果 minNewCapacity 恰好等於 CALCULATE_THRESHOLD,那麼擴容後的容量 newCapacity 就是 4M。

如果 minNewCapacity 大於 CALCULATE_THRESHOLD,那麼 newCapacity 就會按照 4M 的尺度進行擴容,具體的擴容邏輯如下:

首先通過 `minNewCapacity / threshold * threshold` 計算出一個準備擴容之前的基準線,後面就會以此基準線為基礎,按照 CALCULATE_THRESHOLD 的粒度進行擴容。

該基準線的要求必須是 CALCULATE_THRESHOLD 的最小倍數,而且必須要小於等於 minNewCapacity。

什麼意思呢 ? 假設 minNewCapacity 為 5M,那麼它的擴容基準線就是 4M , 這種情況下擴容之後的容量 `newCapacity = 4M + CALCULATE_THRESHOLD = 8M` 。

如果計算出來的基準線超過了 `maxCapacity - 4M` , 那麼 newCapacity 直接就擴容到 maxCapacity 。

如果 minNewCapacity 小於 CALCULATE_THRESHOLD,那麼 newCapacity 就會從 64 開始,一直循環 double , 也就是按照 64 的倍數進行擴容。直到 newCapacity 大於等於 minNewCapacity。
    int newCapacity = 64;
    while (newCapacity < minNewCapacity) {
        newCapacity <<= 1;
    }
- 如果 minNewCapacity 在 `[0 , 64]` 這段範圍內 , 那麼擴容後的 newCapacity 就是 64
- 如果 minNewCapacity 在 `[65 , 128]` 這段範圍內 , 那麼擴容後的 newCapacity 就是 128 。
- 如果 minNewCapacity 在 `[129 , 256]` 這段範圍內 , 那麼擴容後的 newCapacity 就是 256 。
public abstract class AbstractByteBufAllocator implements ByteBufAllocator {
@Override
public int calculateNewCapacity(int minNewCapacity, int maxCapacity) {
    // 滿足本次寫入操作的最小容量 minNewCapacity 不能超過 maxCapacity
    if (minNewCapacity > maxCapacity) {
        throw new IllegalArgumentException(String.format(
                "minNewCapacity: %d (expected: not greater than maxCapacity(%d)",
                minNewCapacity, maxCapacity));
    }
    // 用於決定擴容的尺度
    final int threshold = CALCULATE_THRESHOLD; // 4 MiB page

    if (minNewCapacity == threshold) {
        return threshold;
    }

    // If over threshold, do not double but just increase by threshold.
    if (minNewCapacity > threshold) {
        // 計算擴容基準線。
        // 要求必須是 CALCULATE_THRESHOLD 的最小倍數,而且必須要小於等於 minNewCapacity
        int newCapacity = minNewCapacity / threshold * threshold;
        if (newCapacity > maxCapacity - threshold) {
            newCapacity = maxCapacity;
        } else {
            // 按照 threshold (4M)擴容
            newCapacity += threshold;
        }
        return newCapacity;
    }

    // Not over threshold. Double up to 4 MiB, starting from 64.
    // 按照 64 的倍數進行擴容。但 newCapacity 需要大於等於 minNewCapacity。
    int newCapacity = 64;
    while (newCapacity < minNewCapacity) {
        newCapacity <<= 1;
    }

    return Math.min(newCapacity, maxCapacity);
}
}
#### 2.5.2 ByteBuf 的擴容邏輯
public class UnpooledDirectByteBuf {
// 底層依賴 JDK 的 DirectByteBuffer
ByteBuffer buffer;
}
對於 UnpooledDirectByteBuf 來説,其底層真正存儲數據的地方其實是依賴 JDK 中的 DirectByteBuffer,擴容的邏輯很簡單,就是首先根據上一小節計算出的 newCapacity 重新分配一個新的 JDK DirectByteBuffer , 然後將原來 DirectByteBuffer 中的數據拷貝到新的 DirectByteBuffer 中,最後釋放原來的 DirectByteBuffer,將新的 DirectByteBuffer 設置到 UnpooledDirectByteBuf 中。
public class UnpooledDirectByteBuf {
void setByteBuffer(ByteBuffer buffer, boolean tryFree) {
    if (tryFree) {
        ByteBuffer oldBuffer = this.buffer;
        // 釋放原來的 buffer
        freeDirect(oldBuffer);
    }
    // 重新設置新的 buffer
    this.buffer = buffer;
    capacity = buffer.remaining();
}
}
對於 UnpooledUnsafeDirectByteBuf 來説,由於它直接依賴的是 OS 內存地址,對 ByteBuf 的相關操作都是直接操作內存地址進行,所以 UnpooledUnsafeDirectByteBuf 的擴容邏輯除了要執行上面的內容之外,還需要將新 DirectByteBuffer 的內存地址設置到 memoryAddress 中。
public class UnpooledUnsafeDirectByteBuf extends UnpooledDirectByteBuf {
// ByteBuf 的內存地址
long memoryAddress;

@Override
final void setByteBuffer(ByteBuffer buffer, boolean tryFree) {
    super.setByteBuffer(buffer, tryFree);
    // 設置成新 buffer 的內存地址
    memoryAddress = PlatformDependent.directBufferAddress(buffer);
}
}
下面是完整的擴容操作邏輯:
public class UnpooledDirectByteBuf {
// 底層依賴 JDK 的 DirectByteBuffer
ByteBuffer buffer;

@Override
public ByteBuf capacity(int newCapacity) {
    // newCapacity 不能超過 maxCapacity
    checkNewCapacity(newCapacity);
    int oldCapacity = capacity;
    if (newCapacity == oldCapacity) {
        return this;
    }
    // 計算擴容之後需要拷貝的字節數
    int bytesToCopy;
    if (newCapacity > oldCapacity) {
        bytesToCopy = oldCapacity;
    } else {
        ........ 縮容 .......
    }
    ByteBuffer oldBuffer = buffer;
    // 根據 newCapacity 分配一個新的 ByteBuffer(JDK)
    ByteBuffer newBuffer = allocateDirect(newCapacity);
    oldBuffer.position(0).limit(bytesToCopy);
    newBuffer.position(0).limit(bytesToCopy);
    // 將原來 oldBuffer 中的數據拷貝到 newBuffer 中
    newBuffer.put(oldBuffer).clear();
    // 釋放 oldBuffer,設置 newBuffer
    // 對於 UnpooledUnsafeDirectByteBuf 來説就是將 newBuffer 的地址設置到 memoryAddress 中
    setByteBuffer(newBuffer, true);
    return this;
}
}
#### 2.5.3 強制擴容

前面介紹的 ensureWritable 方法會檢查本次寫入的數據大小 minWritableBytes 是否超過 ByteBuf 的最大可寫容量:`maxCapacity - writerIndex`。
public ByteBuf ensureWritable(int minWritableBytes)
如果超過,則會拋出 `IndexOutOfBoundsException` 異常停止擴容,Netty 提供了另外一個帶有 force 參數的擴容方法,用來決定在這種情況下是否強制進行擴容。
public int ensureWritable(int minWritableBytes, boolean force)
當 minWritableBytes 已經超過 ByteBuf 的最大可寫容量得時候:

- `force = false` , 那麼停止擴容,直接返回,不拋異常。

- `force = true` , 則進行強制擴容,將 ByteBuf 擴容至 maxCapacity,但是如果當前容量已經達到了 maxCapacity,則停止擴容 。

帶 force 參數的 ensureWritable 並不會拋出異常,而是通過返回狀態碼來通知調用者 ByteBuf 的容量情況。

1. 返回 0 表示,ByteBuf 當前可寫容量可以滿足本次寫入操作的需求,不需要擴容

2. 返回 1 表示,本次寫入的數據大小已經超過了 ByteBuf 的最大可寫容量,但 ByteBuf 的容量已經達到了 maxCapacity,無法進行擴容。

3. 返回 3 表示,本次寫入的數據大小已經超過了 ByteBuf 的最大可寫容量,這種情況下,強制將容量擴容至 maxCapacity。

4. 返回 2 表示,執行正常的擴容邏輯。

返回值 0 和 2 均表示 ByteBuf 容量(擴容前或者擴容後)可以滿足本次寫入的數據大小,而返回值 1 和 3 表示 ByteBuf 容量(擴容前或者擴容後)都無法滿足本次寫入的數據大小。
@Override
public int ensureWritable(int minWritableBytes, boolean force) {
    // 如果剩餘容量可以滿足本次寫入操作,則不會擴容,直接返回
    if (minWritableBytes <= writableBytes()) {
        return 0;
    }

    final int maxCapacity = maxCapacity();
    final int writerIndex = writerIndex();
    // 如果本次寫入的數據大小已經超過了 ByteBuf 的最大可寫容量 maxCapacity - writerIndex
    if (minWritableBytes > maxCapacity - writerIndex) {
        // force = false , 那麼停止擴容,直接返回
        // force = true, 直接擴容到 maxCapacity,如果當前 capacity 已經等於 maxCapacity 了則停止擴容
        if (!force || capacity() == maxCapacity) {
            return 1;
        }
        // 雖然擴容之後還是無法滿足寫入需求,但還是強制擴容至 maxCapacity
        capacity(maxCapacity);
        return 3;
    }
    // 下面就是普通的擴容邏輯
    int fastWritable = maxFastWritableBytes();
    int newCapacity = fastWritable >= minWritableBytes ? writerIndex + fastWritable
            : alloc().calculateNewCapacity(writerIndex + minWritableBytes, maxCapacity);

    // Adjust to the new capacity.
    capacity(newCapacity);
    return 2;
}
#### 2.5.4 自適應動態擴容
Netty 在接收網絡數據的過程中,其實一開始是很難確定出該用多大容量的 ByteBuf 去接收的,所以 Netty 在一開始會首先預估一個初始容量 `DEFAULT_INITIAL (2048)`。
public class AdaptiveRecvByteBufAllocator {
static final int DEFAULT_INITIAL = 2048;}
用初始容量為 2048 大小的 ByteBuf 去讀取 socket 中的數據,在每一次讀取完 socket 之後,Netty 都會評估 ByteBuf 的容量大小是否合適。如果每一次都能把 ByteBuf 裝滿,那説明我們預估的容量太小了,socket 中還有更多的數據,那麼就需要對 ByteBuf 進行擴容,下一次讀取 socket 的時候就換一個容量更大的 ByteBuf。
private final class HandleImpl extends MaxMessageHandle {
    @Override
    public void lastBytesRead(int bytes) {
        // bytes 為本次從 socket 中真實讀取的數據大小
        // attemptedBytesRead 為 ByteBuf 可寫的容量大小,初始為 2048
        if (bytes == attemptedBytesRead()) {
            // 如果本次讀取 socket 中的數據將 ByteBuf 裝滿了
            // 那麼就對 ByteBuf 進行擴容,在下一次讀取的時候用更大的 ByteBuf 去讀
            record(bytes);
        }
        // 記錄本次從 socket 中讀取的數據大小
        super.lastBytesRead(bytes);
    }
}
Netty 會在一個 read loop 中不停的讀取 socket 中的數據直到數據被讀取完畢或者讀滿 16 次,結束 read loop 停止讀取。ByteBuf 越大那麼 Netty 讀取的次數就越少,ByteBuf 越小那麼 Netty 讀取的次數就越多,所以需要一種機制將 ByteBuf 的容量控制在一個合理的範圍內。

Netty 會統計每一輪 read loop 總共讀取了多少數據 —— totalBytesRead。
public abstract class MaxMessageHandle implements ExtendedHandle {
    // 用於統計在一輪 read loop 中總共接收到客户端連接上的數據大小
    private int totalBytesRead;
}
在每一輪的 read loop 結束之後,Netty 都會根據這個 totalBytesRead 來判斷是否應該對 ByteBuf 進行擴容或者縮容,這樣在下一輪 read loop 開始的時候,Netty 就可以用一個相對合理的容量去接收 socket 中的數據,儘量減少讀取 socket 的次數。
private final class HandleImpl extends MaxMessageHandle {
    @Override
    public void readComplete() {
            // 是否對 ByteBuf 進行擴容或者縮容
            record(totalBytesRead());
    }
}
**那麼在什麼情況下需要對 ByteBuf 擴容,每次擴容多少 ? 什麼情況下需要對 ByteBuf 進行縮容,每次縮容多少呢** ?

這就用到了一個重要的容量索引結構 ——  SIZE_TABLE,它裏邊定義索引了 ByteBuf 的每一種容量大小。相當於是擴縮容的容量索引表。每次擴容多少,縮容多少全部記錄在這個容量索引表中。
public class AdaptiveRecvByteBufAllocator {
// 擴容步長
private static final int INDEX_INCREMENT = 4;
// 縮容步長
private static final int INDEX_DECREMENT = 1;

// ByteBuf分配容量表(擴縮容索引表)按照表中記錄的容量大小進行擴縮容
private static final int[] SIZE_TABLE;
}
當索引容量`小於 512` 時,`SIZE_TABLE` 中定義的容量是從 `16` 開始按照 `16` 遞增。
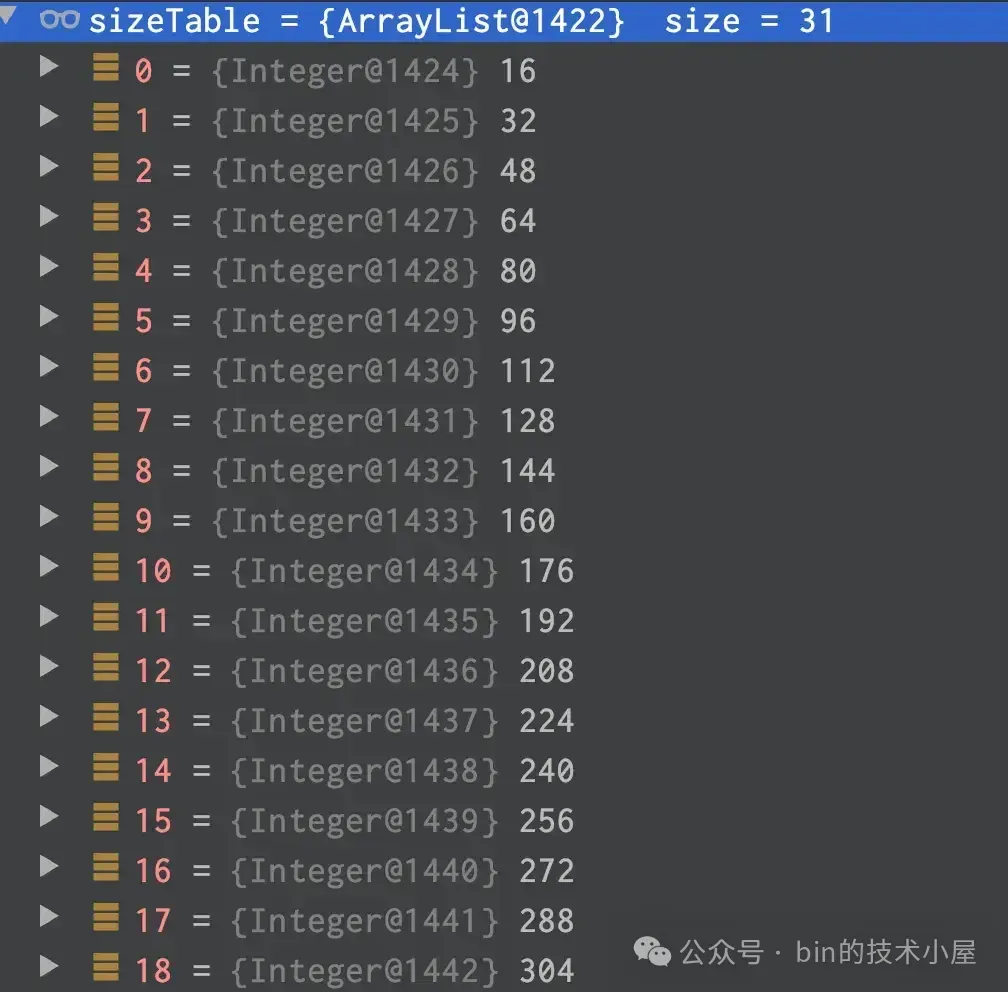
當索引容量`大於 512` 時,SIZE_TABLE 中定義的容量是按前一個索引容量的 `2 倍`遞增。
那麼當前 ByteBuf 的初始容量為 2048 , 它在 SIZE_TABLE 中的 index 為 33 。當一輪 read loop 讀取完畢之後,如果發現 totalBytesRead 在`SIZE_TABLE[index - INDEX_DECREMENT]` 與 `SIZE_TABLE[index]` 之間的話,也就是如果本輪 read loop 結束之後總共讀取的字節數在 [1024 , 2048] 之間。説明此時分配的 ByteBuf 容量正好,不需要進行縮容也不需要進行擴容。比如本次 totalBytesRead = 2000,正好處在 1024 與 2048 之間。説明 2048 的容量正好。
如果 totalBytesRead 小於等於 `SIZE_TABLE[index - INDEX_DECREMENT]`,也就是如果本輪 read loop 結束之後總共讀取的字節數小於等於1024。表示本次讀取到的字節數比當前 ByteBuf 容量的下一級容量還要小,説明當前 ByteBuf 的容量分配的有些大了,設置縮容標識`decreaseNow = true`。當下次 read loop 的時候如果繼續滿足縮容條件,那麼就開始進行縮容。縮容後的容量為 SIZE_TABLE[index - INDEX_DECREMENT],但不能小於SIZE_TABLE[minIndex](16)。
> 注意,這裏需要滿足兩次縮容條件才會進行縮容,且縮容步長為 1 (INDEX_DECREMENT),縮容比較謹慎。
如果 totalBytesRead 大於等於當前 ByteBuf 容量—— nextReceiveBufferSize 時,説明 ByteBuf 的容量有點小了,需要進行擴容。擴容後的容量為 `SIZE_TABLE[index + INDEX_INCREMENT]`,但不能超過 SIZE_TABLE[maxIndex](65535)。
> 滿足一次擴容條件就進行擴容,並且擴容步長為 4 (INDEX_INCREMENT), 擴容比較奔放。
    private void record(int actualReadBytes) {
        if (actualReadBytes <= SIZE_TABLE[max(0, index - INDEX_DECREMENT)]) {
            // 縮容條件觸發兩次之後就進行縮容
            if (decreaseNow) {
                index = max(index - INDEX_DECREMENT, minIndex);
                nextReceiveBufferSize = SIZE_TABLE[index];
                decreaseNow = false;
            } else {
                decreaseNow = true;
            }
        } else if (actualReadBytes >= nextReceiveBufferSize) {
            // 擴容條件滿足一次之後就進行擴容
            index = min(index + INDEX_INCREMENT, maxIndex);
            nextReceiveBufferSize = SIZE_TABLE[index];
            decreaseNow = false;
        }
    }
### 2.6 ByteBuf 的引用計數設計
Netty 為 ByteBuf 引入了引用計數的機制,在 ByteBuf 的整個設計體系中,所有的 ByteBuf 都會繼承一個抽象類 AbstractReferenceCountedByteBuf , 它是對接口 ReferenceCounted 的實現。
public interface ReferenceCounted {
 int refCnt();
 ReferenceCounted retain();
 ReferenceCounted retain(int increment);
 boolean release();
 boolean release(int decrement);
}
每個 ByteBuf 的內部都維護了一個叫做 refCnt 的引用計數,我們可以通過 `refCnt()` 方法來獲取 ByteBuf 當前的引用計數 refCnt。當 ByteBuf 在其他上下文中被引用的時候,我們需要通過 `retain()` 方法將 ByteBuf 的引用計數加 1。另外我們也可以通過 `retain(int increment)` 方法來指定 refCnt 增加的大小(increment)。

有對 ByteBuf 的引用那麼就有對 ByteBuf 的釋放,每當我們使用完 ByteBuf 的時候就需要手動調用 `release()` 方法將 ByteBuf 的引用計數減 1 。當引用計數 refCnt 變成 0 的時候,Netty 就會通過 `deallocate` 方法來釋放 ByteBuf 所引用的內存資源。這時 `release()` 方法會返回 true , 如果 refCnt 還不為 0 ,那麼就返回 false 。同樣我們也可以通過 `release(int decrement)` 方法來指定 refCnt 減少多少(decrement)。

#### 2.6.1 為什麼要引入引用計數

”在其他上下文中引用 ByteBuf “ 是什麼意思呢 ? 比如我們在線程 1 中創建了一個  ByteBuf,然後將這個 ByteBuf 丟給線程 2 進行處理,線程 2 又可能丟給線程 3, 而每個線程都有自己的上下文處理邏輯,比如對 ByteBuf 的處理,釋放等操作。這樣就使得 ByteBuf 在事實上形成了在多個線程上下文中被共享的情況。

面對這種情況我們就很難在一個單獨的線程上下文中判斷一個 ByteBuf 該不該被釋放,比如線程  1 準備釋放 ByteBuf 了,但是它可能正在被其他線程使用。所以這也是 Netty 為 ByteBuf 引入引用計數的重要原因,每當引用一次 ByteBuf 的時候就需要通過 `retain()` 方法將引用計數加 1, `release()` 釋放的時候將引用計數減 1 ,當引用計數為 0 了,説明已經沒有其他上下文引用 ByteBuf 了,這時 Netty 就可以釋放它了。

另外相比於 JDK DirectByteBuffer 需要依賴 GC 機制來釋放其背後引用的 Native Memory , Netty 更傾向於手動及時釋放 DirectByteBuf 。因為 JDK DirectByteBuffer 的釋放需要等到 GC 發生,由於 DirectByteBuffer 的對象實例所佔的 JVM 堆內存太小了,所以一時很難觸發 GC , 這就導致被引用的 Native Memory 的釋放有了一定的延遲,嚴重的情況會越積越多,導致 OOM 。而且也會導致進程中對 DirectByteBuffer 的申請操作有非常大的延遲。

而 Netty 為了避免這些情況的出現,選擇在每次使用完畢之後手動釋放 Native Memory ,但是不依賴 JVM 的話,總會有內存泄露的情況,比如在使用完了 ByteBuf 卻忘記調用 `release()` 方法來釋放。

所以為了檢測內存泄露的發生,這也是 Netty 為 ByteBuf 引入了引用計數的另一個原因,當 ByteBuf 不再被引用的時候,也就是沒有任何強引用或者軟引用的時候,如果此時發生 GC , 那麼這個 ByteBuf 實例(位於 JVM 堆中)就需要被回收了,這時 Netty 就會檢查這個 ByteBuf 的引用計數是否為 0 , 如果不為 0 ,説明我們忘記調用 `release()` 釋放了,近而判斷出這個 ByteBuf 發生了內存泄露。

在探測到內存泄露發生之後,後續 Netty 就會通過 `reportLeak()` 將內存泄露的相關信息以 `error` 的日誌級別輸出到日誌中。

看到這裏,大家可能不禁要問,不就是引入了一個小小的引用計數嘛,這有何難 ? 值得這裏大書特書嗎 ? 不就是在創建 ByteBuf 的時候將引用計數 refCnt 初始化為 1 , 每次在其他上下文引用的時候將 refCnt 加 1, 每次釋放的時候再將 refCnt 減 1 嗎 ?減到 0 的時候就釋放 Native Memory  ,太簡單了吧~~

事實上 Netty 對引用計數的設計非常講究,絕非如此簡單,甚至有些複雜,其背後隱藏着大大的性能考究以及對複雜併發問題的全面考慮,在性能與線程安全問題之間的反覆權衡。

#### 2.6.2 引用計數的最初設計

所以為了理清關於引用計數的整個設計脈絡,我們需要將版本回退到最初的起點 —— 4.1.16.Final 版本,來看一下原始的設計。
public abstract class AbstractReferenceCountedByteBuf extends AbstractByteBuf {
// 原子更新 refCnt 的 Updater
private static final AtomicIntegerFieldUpdater<AbstractReferenceCountedByteBuf> refCntUpdater =
        AtomicIntegerFieldUpdater.newUpdater(AbstractReferenceCountedByteBuf.class, "refCnt");
// 引用計數,初始化為 1
private volatile int refCnt;

protected AbstractReferenceCountedByteBuf(int maxCapacity) {
    super(maxCapacity);
    // 引用計數初始化為 1
    refCntUpdater.set(this, 1);
}

// 引用計數增加 increment
private ByteBuf retain0(int increment) {
    for (;;) {
        int refCnt = this.refCnt;
        // 每次 retain 的時候對引用計數加 1
        final int nextCnt = refCnt + increment;

        // Ensure we not resurrect (which means the refCnt was 0) and also that we encountered an overflow.
        if (nextCnt <= increment) {
            // 如果 refCnt 已經為 0 或者發生溢出,則拋異常
            throw new IllegalReferenceCountException(refCnt, increment);
        }
        // CAS 更新 refCnt
        if (refCntUpdater.compareAndSet(this, refCnt, nextCnt)) {
            break;
        }
    }
    return this;
}

// 引用計數減少 decrement
private boolean release0(int decrement) {
    for (;;) {
        int refCnt = this.refCnt;
        if (refCnt < decrement) {
            // 引用的次數必須和釋放的次數相等對應
            throw new IllegalReferenceCountException(refCnt, -decrement);
        }
        // 每次 release 引用計數減 1
        // CAS 更新 refCnt
        if (refCntUpdater.compareAndSet(this, refCnt, refCnt - decrement)) {
            if (refCnt == decrement) {
                // 如果引用計數為 0 ,則釋放 Native Memory,並返回 true
                deallocate();
                return true;
            }
            // 引用計數不為 0 ,返回 false
            return false;
        }
    }
}
}
在 4.1.16.Final 之前的版本設計中,確實和我們當初想象的一樣,非常簡單,創建 ByteBuf 的時候將 refCnt 初始化為 1。 每次引用 retain 的時候將引用計數加 1 ,每次釋放 release 的時候將引用計數減 1,在一個 for 循環中通過 CAS 替換。當引用計數為 0 的時候,通過 `deallocate()` 釋放 Native Memory。

#### 2.6.3 引入指令級別上的優化

4.1.16.Final 的設計簡潔清晰,在我們看來完全沒有任何問題,但 Netty 對性能的考究完全沒有因此止步,由於在 x86 架構下 XADD 指令的性能要高於 CMPXCHG 指令, compareAndSet 方法底層是通過 CMPXCHG 指令實現的,而 getAndAdd 方法底層是 XADD 指令。

所以在對性能極致的追求下,Netty 在 4.1.17.Final 版本中用 getAndAdd 方法來替換 compareAndSet 方法。
public abstract class AbstractReferenceCountedByteBuf extends AbstractByteBuf {
private volatile int refCnt;

protected AbstractReferenceCountedByteBuf(int maxCapacity) {
    super(maxCapacity);
    // 引用計數在初始的時候還是為 1
    refCntUpdater.set(this, 1);
}

private ByteBuf retain0(final int increment) {
    // 相比於 compareAndSet 的實現,這裏將 for 循環去掉
    // 並且每次是先對 refCnt 增加計數 increment
    int oldRef = refCntUpdater.getAndAdd(this, increment);
    // 增加完 refCnt 計數之後才去判斷異常情況
    if (oldRef <= 0 || oldRef + increment < oldRef) {
        // Ensure we don't resurrect (which means the refCnt was 0) and also that we encountered an overflow.
        // 如果原來的 refCnt 已經為 0 或者 refCnt 溢出,則對 refCnt 進行回退,並拋出異常
        refCntUpdater.getAndAdd(this, -increment);
        throw new IllegalReferenceCountException(oldRef, increment);
    }
    return this;
}

private boolean release0(int decrement) {
    // 先對 refCnt 減少計數 decrement
    int oldRef = refCntUpdater.getAndAdd(this, -decrement);
    // 如果 refCnt 已經為 0 則進行 Native Memory 的釋放
    if (oldRef == decrement) {
        deallocate();
        return true;
    } else if (oldRef < decrement || oldRef - decrement > oldRef) {
        // 如果釋放次數大於 retain 次數 或者 refCnt 出現下溢
        // 則對 refCnt 進行回退,並拋出異常
        refCntUpdater.getAndAdd(this, decrement);
        throw new IllegalReferenceCountException(oldRef, decrement);
    }
    return false;
}
}
在 4.1.16.Final 版本的實現中,Netty 是在一個 for 循環中,先對 retain 和 release 的異常情況進行校驗,之後再通過 CAS 更新 refCnt。否則直接拋出 IllegalReferenceCountException。採用的是一種悲觀更新引用計數的策略。
而在 4.1.17.Final 版本的實現中 , Netty 去掉了 for 循環,正好和 compareAndSet 的實現相反,而是先通過 getAndAdd 更新 refCnt,更新之後再來判斷相關的異常情況,如果發現有異常,則進行回退,並拋出 IllegalReferenceCountException。採用的是一種樂觀更新引用計數的策略。
比如在 retain 增加引用計數的時候,先對 refCnt 增加計數 increment,然後判斷原來的引用計數 oldRef 是否已經為 0 或者 refCnt 是否發生溢出,如果是,則需要對 refCnt 的值進行回退,並拋異常。
在 release 減少引用計數的時候,先對 refCnt 減少計數 decrement,然後判斷 release 的次數是否大於 retain 的次數防止 over-release ,以及 refCnt 是否發生下溢,如果是,則對 refCnt 的值進行回退,並拋異常。
#### 2.6.4 併發安全問題的引入
在 4.1.17.Final 版本的設計中,我們對引用計數的 retain 以及 release 操作都要比 4.1.16.Final 版本的性能要高,雖然現在性能是高了,但是同時引入了新的併發問題。
讓我們先假設一個這樣的場景,現在有一個 ByteBuf,它當前的 refCnt = 1 ,線程 1 對這個 ByteBuf 執行 `release()` 操作。
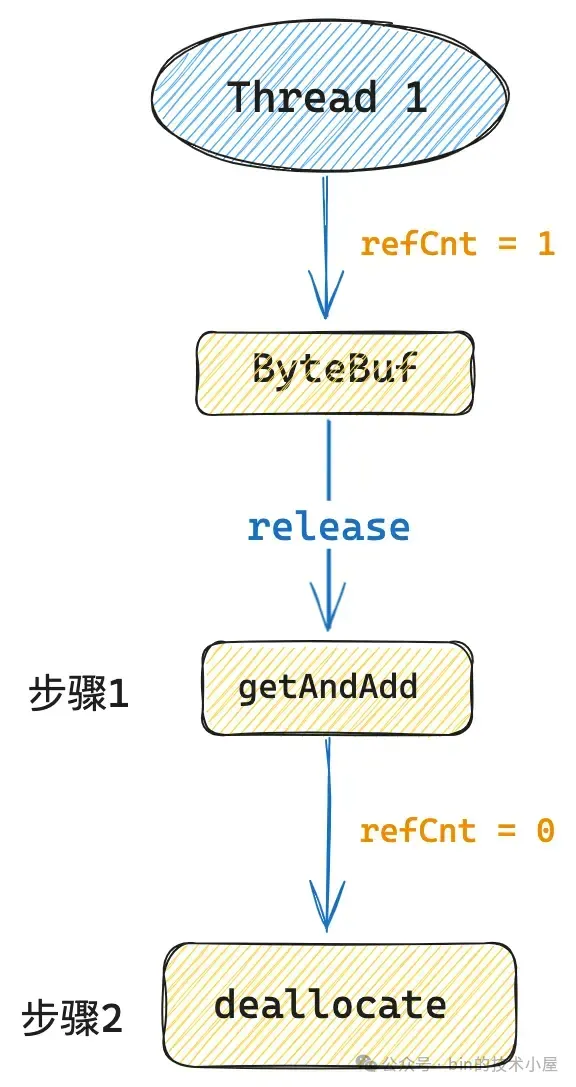
在 4.1.17.Final 的實現中,Netty 會首先通過 getAndAdd 將 refCnt 更新為 0 ,然後接着調用 `deallocate()` 方法釋放 Native Memory ,很簡單也很清晰是吧,讓我們再加點併發複雜度上去。
現在我們在上圖步驟一與步驟二之間插入一個線程 2 , 線程 2 對這個 ByteBuf 併發執行 `retain()` 方法。
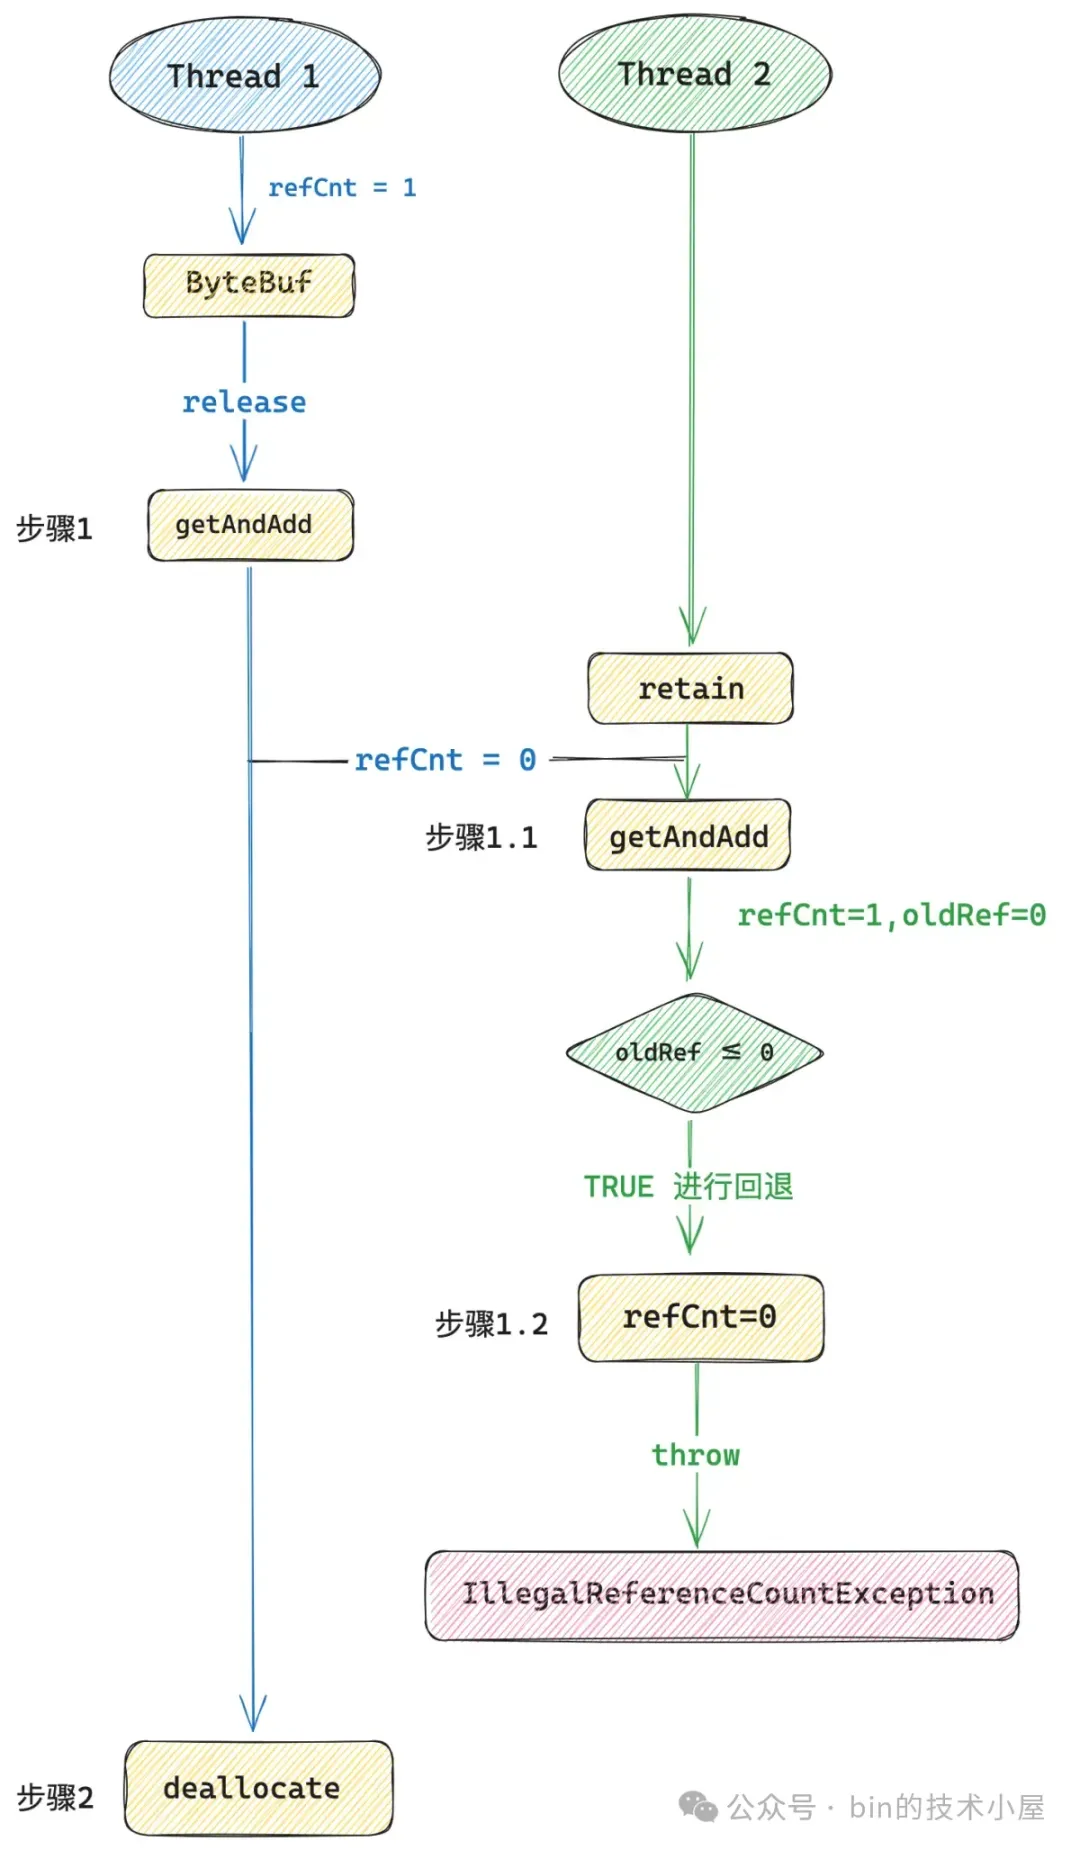
在 4.1.17.Final 的實現中,線程 2 首先通過 getAndAdd 將 refCnt 從 0 更新為 1,緊接着線程 2 就會發現 refCnt 原來的值 oldRef 是等於 0 的,也就是説線程 2 在調用 `retain()` 的時候,ByteBuf 的引用計數已經為 0 了,並且線程 1 已經開始準備釋放 Native Memory 了。
所以線程 2 需要再次調用 getAndAdd 方法將 refCnt 的值進行回退,從 1 再次回退到 0 ,最後拋出 IllegalReferenceCountException。這樣的結果顯然是正確的,也是符合語義的。畢竟不能對一個引用計數為 0 的 ByteBuf 調用 `retain()` 。
現在看來一切風平浪靜,都是按照我們的設想有條不紊的進行,我們不妨再加點併發複雜度上去。在上圖步驟 1.1 與步驟 1.2 之間在插入一個線程 3 , 線程 3 對這個 ByteBuf 再次併發執行 `retain()` 方法。
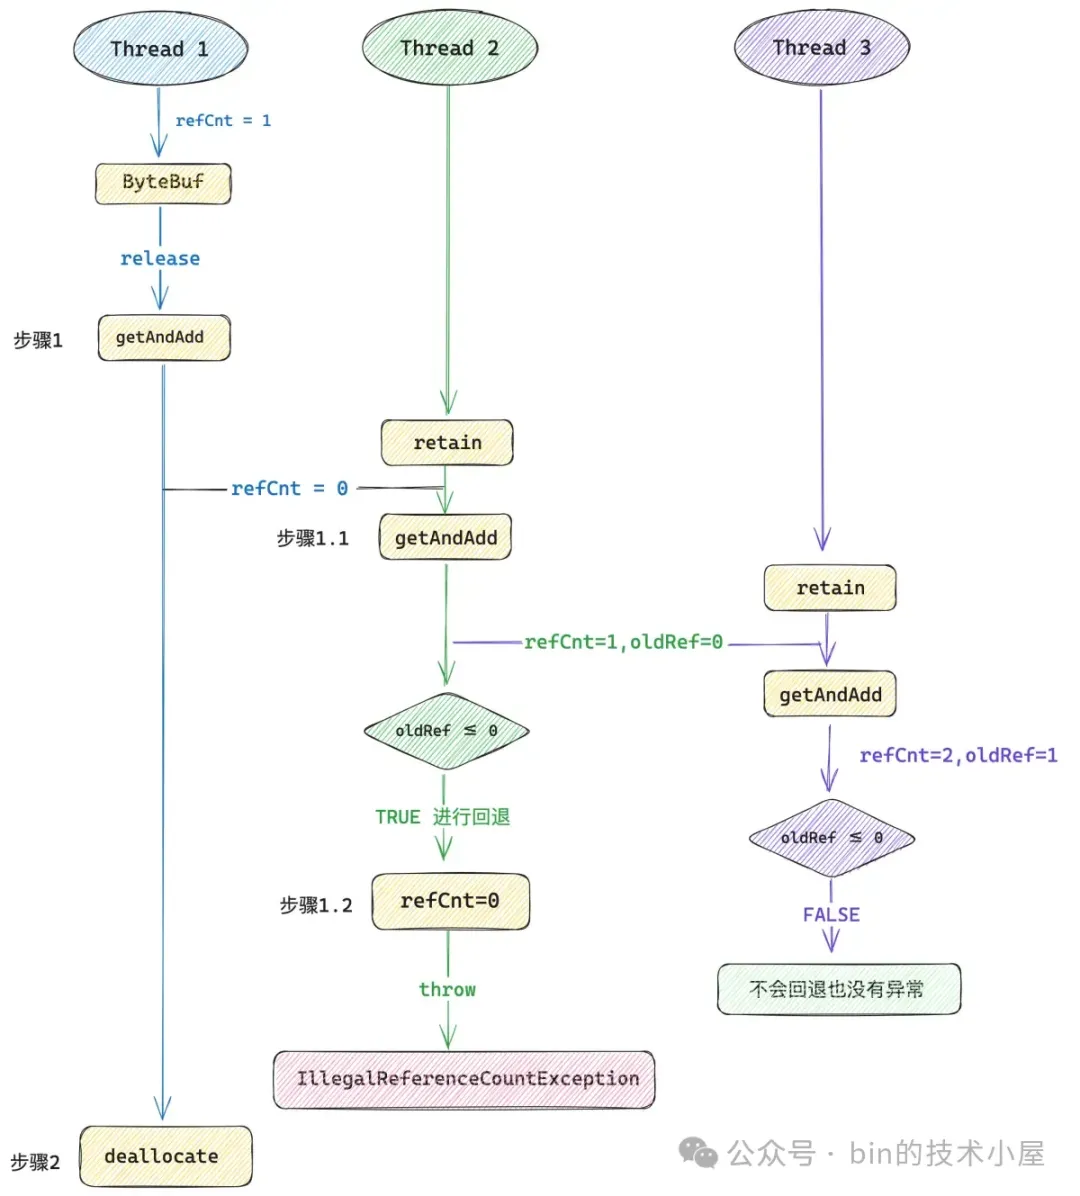
由於引用計數的更新(步驟 1.1)與引用計數的回退(步驟 1.2)這兩個操作並不是一個原子操作,如果在這兩個操作之間不巧插入了一個線程 3 ,線程 3 在併發執行 `retain()` 方法的時候,首先會通過 getAndAdd 將引用計數 refCnt 從 1 增加到 2 。
> **注意,此時線程 2 還沒來得及回退 refCnt , 所以線程 3 此時看到的 refCnt 是 1 而不是 0** 。
由於此時線程 3 看到的 oldRef 是 1 ,所以線程 3 成功調用 `retain()` 方法將 ByteBuf 的引用計數增加到了 2 ,並且不會回退也不會拋出異常。在線程 3 看來此時的 ByteBuf 完完全全是一個正常可以被使用的 ByteBuf。
緊接着線程 1 開始執行步驟 2 —— `deallocate()` 方法釋放 Native Memory,此後線程 3 在訪問這個 ByteBuf 的時候就有問題了,因為 Native Memory 已經被線程1 釋放了。
#### 2.6.5 在性能與併發安全之間的權衡
接下來 Netty 就需要在性能與併發安全之間進行權衡了,現在有兩個選擇,第一個選擇是直接回滾到 4.1.16.Final 版本,放棄 XADD 指令帶來的性能提升,之前的設計中採用的 CMPXCHG 指令雖然性能相對差一些,但是不會出現上述的併發安全問題。
因為 Netty 是在一個 for 循環中採用悲觀的策略來更新引用計數,先是判斷異常情況,然後在通過 CAS 來更新 refCnt。即使多個線程看到了 refCnt 的中間狀態也沒關係,因為接下來進行的 CAS 也會跟着失敗。
比如上邊例子中的線程 1 對 ByteBuf 進行 release 的時候,在線程 1 執行 CAS 將 refCnt 替換為 0 之前的這個間隙中,refCnt 是 1 ,如果在這個間隙中,線程 2 併發執行 retain 方法,此時線程 2 看到的 refCnt 確實為 1 ,它是一箇中間狀態,線程 2 執行 CAS 將 refCnt 替換為 2。
此時線程 1 執行 CAS 就會失敗,但會在下一輪 for 循環中將 refCnt 替換為 1,這是完全符合引用計數語義的。
另外一種情況是線程 1 已經執行完 CAS 將 refCnt 替換為 0 ,這時候線程 2 去 retain ,由於 4.1.16.Final 版本中的設計是先檢查異常後 CAS 替換,所以線程 2 首先會在 retain 方法中檢查到 ByteBuf 的 refCnt 已經為 0 ,直接拋出 IllegalReferenceCountException,並不會執行 CAS 。這同樣符合引用計數的語義,畢竟不能對一個引用計數已經為 0 的 ByteBuf 執行任何訪問操作。
第二個選擇是既要保留 XADD 指令帶來的性能提升,也要解決 4.1.17.Final 版本中引入的併發安全問題。毫無疑問,Netty 最終選擇的是這種方案。
在介紹 Netty 的精彩設計之前,我想我們還是應該在回顧下這個併發安全問題出現的根本原因是什麼 ?
在 4.1.17.Final 版本的設計中,Netty 首先是通過 getAndAdd 方法先對 refCnt 的值進行更新,如果出現異常情況,在進行回滾。而更新,回滾的這兩個操作並不是原子的,之間的中間狀態會被其他線程看到。
比如,線程 2 看到了線程 1 的中間狀態(refCnt = 0),於是將引用計數加到 1
, 在線程 2 進行回滾之前,這期間的中間狀態(refCnt = 1,oldRef = 0)又被線程 3 看到了,於是線程 3 將引用計數增加到了 2 (refCnt = 2,oldRef = 1)。 此時線程 3 覺得這是一種正常的狀態,但在線程 1 看來 refCnt 的值已經是 0 了,後續線程 1 就會釋放 Native Memory ,這就出問題了。
問題的根本原因其實是這裏的 refCnt 不同的值均代表不同的語義,比如對於線程 1 來説,通過 release 將 refCnt 減到了 0 ,這裏的語義是 ByteBuf 已經不在被引用了,可以釋放 Native Memory 。
隨後線程 2 通過 retain 將 refCnt 加到了 1 ,這就把 ByteBuf 語義改變了,表示該 ByteBuf 在線程 2 中被引用了一次。最後線程 3 又通過 retain 將 refCnt 加到了 2 ,再一次改變了 ByteBuf 的語義。
只要用到 XADD 指令來實現引用計數的更新,那麼就不可避免的出現上述併發更新 refCnt 的情況,關鍵是 refCnt 的值每一次被其他線程併發修改之後,ByteBuf 的語義就變了。這才是 4.1.17.Final 版本中的關鍵問題所在。
如果 Netty 想在同時享受 XADD 指令帶來的性能提升之外,又要解決上述提到的併發安全問題,就要重新對引用計數進行設計。首先我們的要求是繼續採用 XADD 指令來實現引用計數的更新,但這就會帶來多線程併發修改所引起的 ByteBuf 語義改變。
既然多線程併發修改無法避免,那麼我們能不能重新設計一下引用計數,讓 ByteBuf 語義無論多線程怎麼修改,它的語義始終保持不變。也就是説只要線程 1 將 refCnt 減到了 0 ,那麼無論線程 2 和線程 3 怎麼併發修改 refCnt,怎麼增加 refCnt 的值,refCnt 等於 0 的這個語義始終保持不變呢 ?
#### 2.6.6 奇偶設計的引入
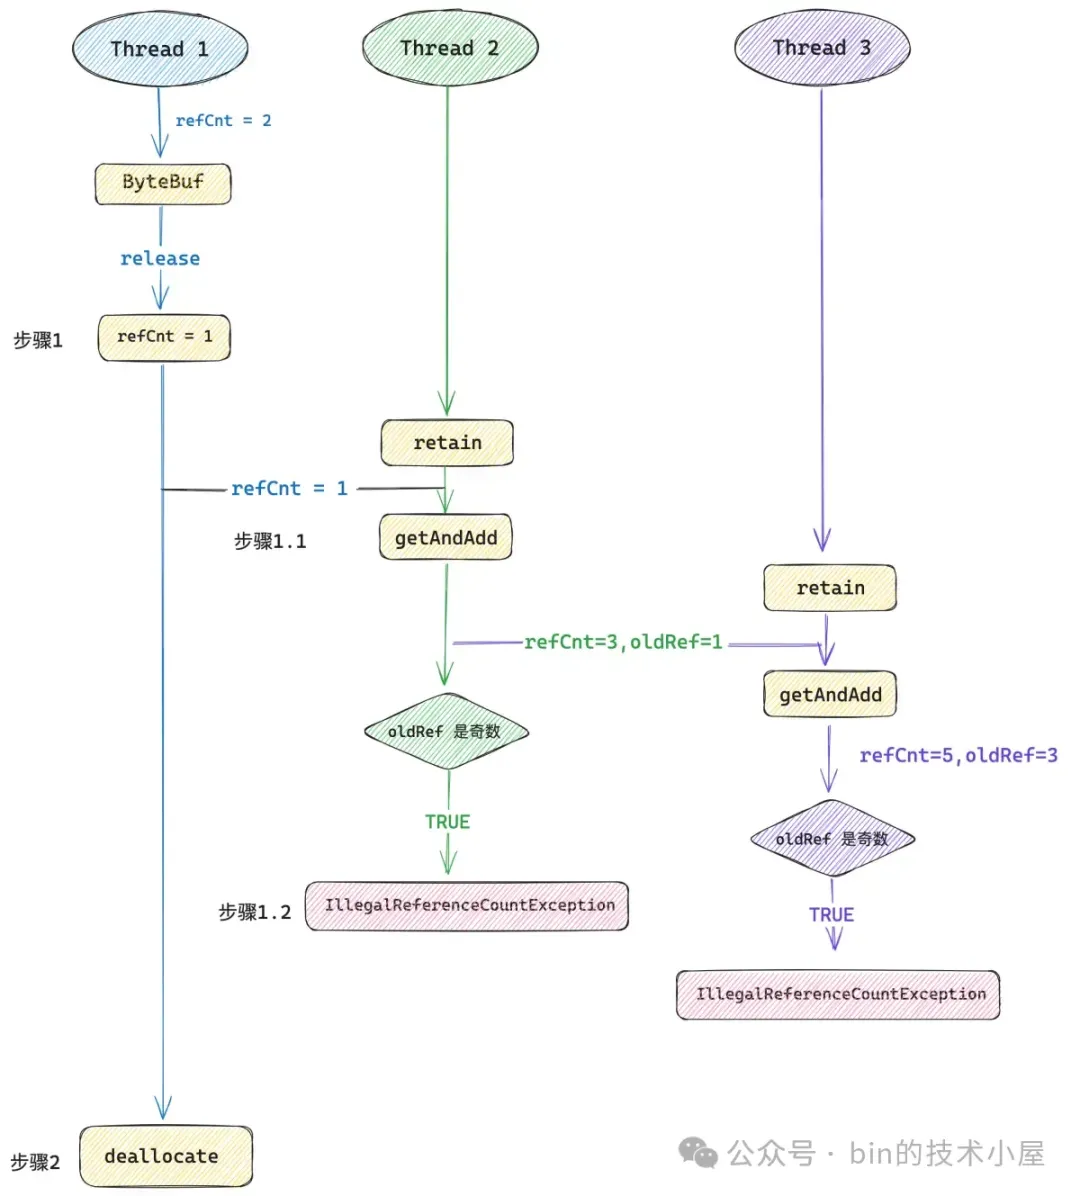
這裏 Netty 有一個極奇巧妙精彩的設計,引用計數的設計不再是邏輯意義上的 `0 , 1 , 2 , 3 .....`,而是分為了兩大類,要麼是偶數,要麼是奇數。
- 偶數代表的語義是 ByteBuf 的 refCnt 不為 0 ,也就是説只要一個 ByteBuf 還在被引用,那麼它的 refCnt 就是一個偶數,具體被引用多少次,可以通過 `refCnt >>> 1` 來獲取。
- 奇數代表的語義是 ByteBuf 的 refCnt 等於 0 ,只要一個 ByteBuf 已經沒有任何地方引用它了,那麼它的 refCnt 就是一個奇數,其背後引用的 Native Memory 隨後就會被釋放。
ByteBuf 在初始化的時候,refCnt 不在是 1 而是被初始化為 2 (偶數),每次 retain 的時候不在是對 refCnt 加 1 而是加 2 (偶數步長),每次 release 的時候不再是對 refCnt 減 1 而是減 2 (同樣是偶數步長)。這樣一來,只要一個 ByteBuf 的引用計數為偶數,那麼多線程無論怎麼併發調用 retain 方法,引用計數還是一個偶數,語義仍然保持不變。
public final int initialValue() {
    return 2;
}
當一個 ByteBuf 被 release 到沒有任何引用計數的時候,Netty 不在將 refCnt 設置為 0 而是設置為 1 (奇數),對於一個值為奇數的 refCnt,無論多線程怎麼併發調用 retain 方法和 release 方法,引用計數還是一個奇數,ByteBuf 引用計數為 0 的這層語義一直會保持不變。
我們還是以上圖中所展示的併發安全問題為例,在新的引用計數設計方案中,首先線程 1 對 ByteBuf 執行 release 方法,Netty 會將 refCnt 設置為 1 (奇數)。
線程 2 併發調用 retain 方法,通過 getAndAdd 將 refCnt 從 1 加到了 3 ,refCnt 仍然是一個奇數,按照奇數所表示的語義 —— ByteBuf 引用計數已經是 0 了,那麼線程 2 就會在 retain 方法中拋出 IllegalReferenceCountException。
線程 3 併發調用 retain 方法,通過 getAndAdd 將 refCnt 從 3 加到了 5,看到了沒 ,在新方案的設計中,無論多線程怎麼併發執行 retain 方法,refCnt 的值一直都只會是一個奇數,隨後線程 3 在 retain 方法中拋出 IllegalReferenceCountException。這完全符合引用計數的併發語義。
這個新的引用計數設計方案是在 4.1.32.Final 版本引入進來的,僅僅通過一個奇偶設計,就非常巧妙的解決了 4.1.17.Final 版本中存在的併發安全問題。現在新方案的核心設計要素我們已經清楚了,那麼接下來筆者將以 4.1.56.Final 版本來為大家繼續介紹下新方案的實現細節。
Netty 中的 ByteBuf 全部繼承於 AbstractReferenceCountedByteBuf,在這個類中實現了所有對 ByteBuf 引用計數的操作,對於 ReferenceCounted 接口的實現就在這裏。
public abstract class AbstractReferenceCountedByteBuf extends AbstractByteBuf {
// 獲取 refCnt 字段在 ByteBuf 對象內存中的偏移
// 後續通過 Unsafe 對 refCnt 進行操作
private static final long REFCNT_FIELD_OFFSET =
        ReferenceCountUpdater.getUnsafeOffset(AbstractReferenceCountedByteBuf.class, "refCnt");

// 獲取 refCnt 字段 的 AtomicFieldUpdater
// 後續通過 AtomicFieldUpdater 來操作 refCnt 字段
private static final AtomicIntegerFieldUpdater<AbstractReferenceCountedByteBuf> AIF_UPDATER =
        AtomicIntegerFieldUpdater.newUpdater(AbstractReferenceCountedByteBuf.class, "refCnt");

// 創建 ReferenceCountUpdater,對於引用計數的所有操作最終都會代理到這個類中
private static final ReferenceCountUpdater<AbstractReferenceCountedByteBuf> updater =
        new ReferenceCountUpdater<AbstractReferenceCountedByteBuf>() {
    @Override
    protected AtomicIntegerFieldUpdater<AbstractReferenceCountedByteBuf> updater() {
        // 通過 AtomicIntegerFieldUpdater 操作 refCnt 字段
        return AIF_UPDATER;
    }
    @Override
    protected long unsafeOffset() {
        // 通過 Unsafe 操作 refCnt 字段
        return REFCNT_FIELD_OFFSET;
    }
};
// ByteBuf 中的引用計數,初始為 2 (偶數)
private volatile int refCnt = updater.initialValue();
}
其中定義了一個 refCnt 字段用於記錄 ByteBuf 被引用的次數,由於採用了奇偶設計,在創建 ByteBuf 的時候,Netty 會將 refCnt 初始化為 2 (偶數),它的邏輯語義是該 ByteBuf 被引用一次。後續對 ByteBuf 執行 retain 就會對 refCnt 進行加 2 ,執行 release 就會對 refCnt 進行減 2 ,對於引用計數的單次操作都是以 2 為步長進行。

由於在 Netty 中除了 AbstractReferenceCountedByteBuf 這個專門用於實現 ByteBuf 的引用計數功能之外,還有一個更加通用的引用計數抽象類 AbstractReferenceCounted,它用於實現所有系統資源類的引用計數功能(ByteBuf 只是其中的一種內存資源)。

由於都是對引用計數的實現,所以在之前的版本中,這兩個類中包含了很多重複的引用計數相關操作邏輯,所以 Netty 在 4.1.35.Final  版本中專門引入了一個 ReferenceCountUpdater 類,將所有引用計數的相關實現聚合在這裏。

ReferenceCountUpdater 對於引用計數 refCnt 的操作有兩種方式,一種是通過 AtomicFieldUpdater 來對 refCnt 進行操作,我們可以通過 `updater()` 獲取到 refCnt 字段對應的 AtomicFieldUpdater。

另一種則是通過 Unsafe 來對 refCnt 進行操作,我們可以通過 `unsafeOffset()` 來獲取到 refCnt 字段在 ByteBuf 實例對象內存中的偏移。

按理來説,我們採用一種方式就可以對 refCnt 進行訪問或者更新了,那為什麼 Netty 提供了兩種方式呢 ?會顯得有點多餘嗎 ?這個點大家可以先思考下為什麼 ,後續在我們剖析到源碼細節的時候筆者在為大家解答。

好了,下面我們正式開始介紹新版引用計數設計方案的具體實現細節,第一個問題,在新的設計方案中,我們如何獲取 ByteBuf 的邏輯引用計數 ?
public abstract class ReferenceCountUpdater<T extends ReferenceCounted> {
public final int initialValue() {
    // ByteBuf 引用計數初始化為 2
    return 2;
}

public final int refCnt(T instance) {
    // 通過 updater 獲取 refCnt
    // 根據 refCnt 在  realRefCnt 中獲取真實的引用計數
    return realRefCnt(updater().get(instance));
}
// 獲取 ByteBuf 的邏輯引用計數
private static int realRefCnt(int rawCnt) {
    // 奇偶判斷
    return rawCnt != 2 && rawCnt != 4 && (rawCnt & 1) != 0 ? 0 : rawCnt >>> 1;
}
}
由於採用了奇偶引用計數的設計,所以我們在獲取邏輯引用計數的時候需要判斷當前 rawCnt(refCnt)是奇數還是偶數,它們分別代表了不同的語義。

- 如果 rawCnt 是奇數,則表示當前 ByteBuf 已經沒有任何地方引用了,邏輯引用計數返回 0.

- 如果 rawCnt 是偶數,則表示當前 ByteBuf 還有地方在引用,邏輯引用計數則為 `rawCnt >>> 1`。

realRefCnt 函數其實就是簡單的一個奇偶判斷邏輯,但在它的實現中卻體現出了 Netty 對性能的極致追求。比如,我們判斷一個數是奇數還是偶數其實很簡單,直接通過  `rawCnt & 1` 就可以判斷,如果返回 0 表示 rawCnt 是一個偶數,如果返回 1 表示 rawCnt 是一個奇數。

但是我們看到 Netty 在奇偶判斷條件的前面又加上了 `rawCnt != 2 && rawCnt != 4 ` 語句,這是幹嘛的呢 ?

其實 Netty 這裏是為了儘量用性能更高的 `==` 運算來代替 `&` 運算,但又不可能用 `==` 運算來枚舉出所有的偶數值(也沒這必要),所以只用 `==` 運算來判斷在實際場景中經常出現的引用計數,一般經常出現的引用計數值為 2 或者 4 , 也就是説 ByteBuf 在大部分場景下只會被引用 1 次或者 2 次,對於這種高頻出現的場景,Netty 用 `==` 運算來針對性優化,低頻出現的場景就回退到 `&` 運算。

> 大部分性能優化的套路都是相同的,我們通常不能一上來就奢求一個大而全的針對全局的優化方案,這是不可能的,也是十分低效的。往往最有效的,可以立竿見影的優化方案都是針對局部熱點進行專門優化。

對引用計數的設置也是一樣,都需要考慮奇偶的轉換,我們在 `setRefCnt` 方法中指定的參數 refCnt 表示邏輯上的引用計數 —— `0, 1 , 2 , 3 ....`,但要設置到 ByteBuf 時,就需要對邏輯引用計數在乘以 2 ,讓它始終是一個偶數。
public final void setRefCnt(T instance, int refCnt) {
    updater().set(instance, refCnt > 0 ? refCnt << 1 : 1); // overflow OK here
}
有了這些基礎之後,我們下面就來看一下在新版本的 retain 方法設計中,Netty 是如何解決 4.1.17.Final 版本存在的併發安全問題。首先 Netty 對引用計數的奇偶設計對於用户來説是透明的。引用計數對於用户來説仍然是普通的自然數 —— `0, 1 , 2 , 3 ....` 。
所以每當用户調用 retain 方法試圖增加 ByteBuf 的引用計數時,通常是指定邏輯增加步長 —— increment(用户視角),而在具體的實現角度,Netty 會增加兩倍的 increment (rawIncrement)到 refCnt 字段中。
public final T retain(T instance) {
    // 引用計數邏輯上是加 1 ,但實際上是加 2 (實現角度)
    return retain0(instance, 1, 2);
}

public final T retain(T instance, int increment) {
    // all changes to the raw count are 2x the "real" change - overflow is OK
    // rawIncrement 始終是邏輯計數 increment 的兩倍
    int rawIncrement = checkPositive(increment, "increment") << 1;
    // 將 rawIncrement 設置到 ByteBuf 的 refCnt 字段中
    return retain0(instance, increment, rawIncrement);
}

// rawIncrement = increment << 1
// increment 表示引用計數的邏輯增長步長
// rawIncrement 表示引用計數的實際增長步長
private T retain0(T instance, final int increment, final int rawIncrement) {
    // 先通過 XADD 指令將  refCnt 的值加起來
    int oldRef = updater().getAndAdd(instance, rawIncrement);
    // 如果 oldRef 是一個奇數,也就是 ByteBuf 已經沒有引用了,拋出異常
    if (oldRef != 2 && oldRef != 4 && (oldRef & 1) != 0) {
        // 如果 oldRef 已經是一個奇數了,無論多線程在這裏怎麼併發 retain ,都是一個奇數,這裏都會拋出異常
        throw new IllegalReferenceCountException(0, increment);
    }
    // don't pass 0!
    // refCnt 不可能為 0 ,只能是 1
    if ((oldRef <= 0 && oldRef + rawIncrement >= 0)
            || (oldRef >= 0 && oldRef + rawIncrement < oldRef)) {
        // 如果 refCnt 字段已經溢出,則進行回退,並拋異常
        updater().getAndAdd(instance, -rawIncrement);
        throw new IllegalReferenceCountException(realRefCnt(oldRef), increment);
    }
    return instance;
}
首先新版本的 retain0 方法仍然保留了 4.1.17.Final 版本引入的 XADD 指令帶來的性能優勢,大致的處理邏輯也是類似的,一上來先通過 getAndAdd 方法將 refCnt 增加 rawIncrement,對於 `retain(T instance)` 來説這裏直接加 2 。
然後判斷原來的引用計數 oldRef 是否是一個奇數,如果是一個奇數,那麼就表示 ByteBuf 已經沒有任何引用了,邏輯引用計數早已經為 0 了,那麼就拋出 IllegalReferenceCountException。
在引用計數為奇數的情況下,無論多線程怎麼對 refCnt 併發加 2 ,refCnt 始終是一個奇數,最終都會拋出異常。解決併發安全問題的要點就在這裏,一定要保證 retain 方法的併發執行不能改變原來的語義。
最後會判斷一下 refCnt 字段是否發生溢出,如果溢出,則進行回退,並拋出異常。下面我們仍然以之前的併發場景為例,用一個具體的例子,來回味一下奇偶設計的精妙之處。
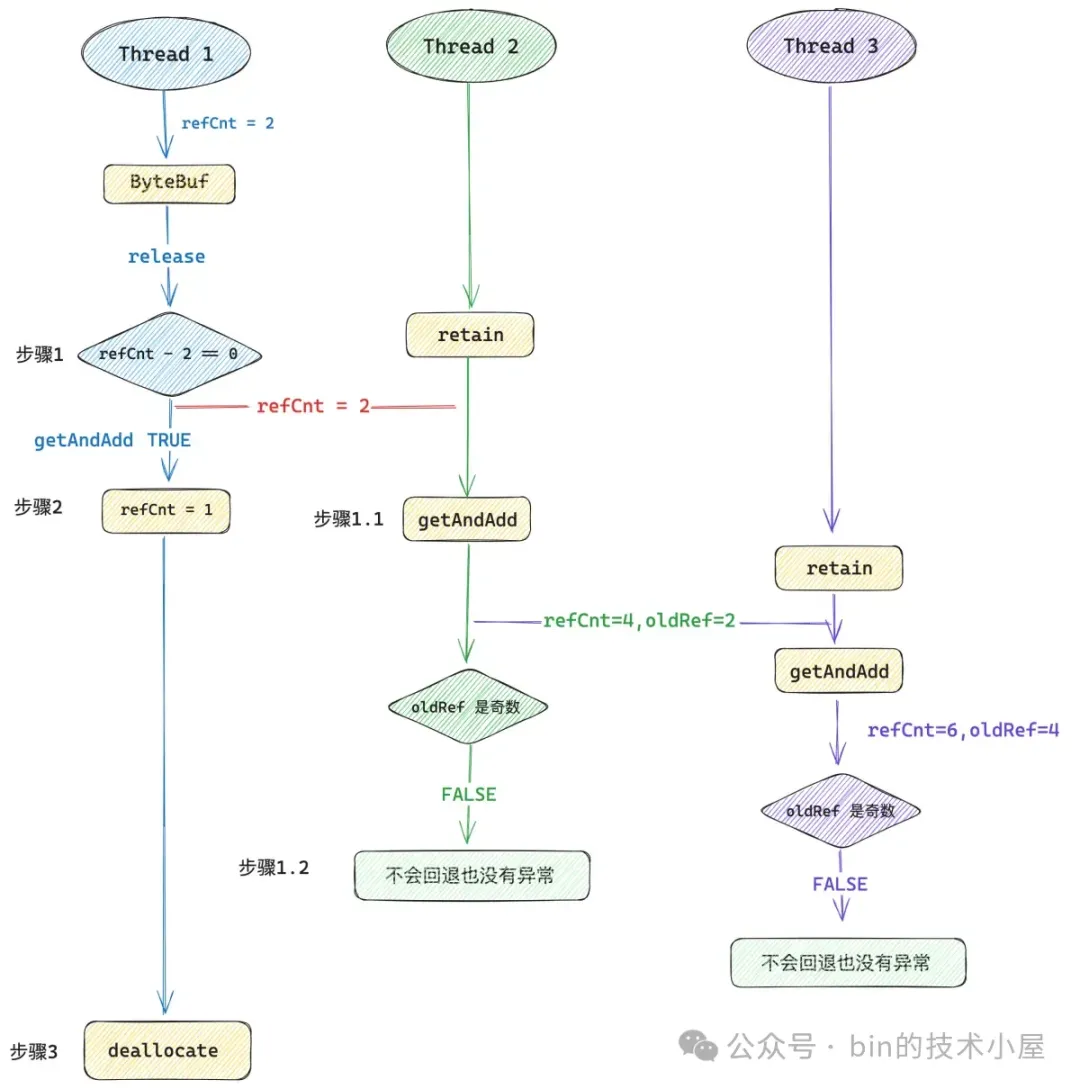
現在線程 1 對一個 refCnt 為 2 的 ByteBuf 執行 release 方法,這時 ByteBuf 的邏輯引用計數就為 0 了,對於一個沒有任何引用的 ByteBuf 來説,新版的設計中它的 refCnt 只能是一個奇數,不能為 0 ,所以這裏 Netty 會將 refCnt 設置為 1 。然後在步驟 2 中調用 deallocate 方法釋放 Native Memory。
線程 2 在步驟 1 和步驟 2 之間插入進來對 ByteBuf 併發執行 retain 方法,這時線程 2 看到的 refCnt 是 1,然後通過 getAndAdd 將 refCnt 加到了 3 ,仍然是一個奇數,隨後拋出 IllegalReferenceCountException 異常。
線程 3 在步驟 1.1 和步驟 1.2 之間插入進來再次對 ByteBuf 併發執行 retain 方法,這時線程 3 看到的 refCnt 是 3,然後通過 getAndAdd 將 refCnt 加到了 5 ,還是一個奇數,隨後拋出 IllegalReferenceCountException 異常。
這樣一來就保證了引用計數的併發語義 —— 只要一個 ByteBuf 沒有任何引用的時候(refCnt = 1),其他線程無論怎麼併發執行 retain 方法都會得到一個異常。
但是引用計數併發語義的保證不能單單隻靠 retain 方法,它還需要與 release 方法相互配合協作才可以,所以為了併發語義的保證 , release 方法的設計就不能使用性能更高的 XADD 指令,而是要回退到 CMPXCHG 指令來實現。
為什麼這麼説呢 ?因為新版引用計數的設計採用的是奇偶實現,refCnt 為偶數表示 ByteBuf 還有引用,refCnt 為奇數表示 ByteBuf 已經沒有任何引用了,可以安全釋放 Native Memory 。對於一個 refCnt 已經為奇數的 ByteBuf 來説,無論多線程怎麼併發執行 retain 方法,得到的 refCnt 仍然是一個奇數,最終都會拋出 IllegalReferenceCountException,這就是引用計數的併發語義 。
為了保證這一點,就需要在每次調用 retain ,release 方法的時候,以偶數步長來更新 refCnt,比如每一次調用 retain 方法就對 refCnt 加 2 ,每一次調用 release 方法就對 refCnt 減 2 。
但總有一個時刻,refCnt 會被減到 0 的對吧,在新版的奇偶設計中,refCnt 是不允許為 0 的,因為一旦 refCnt 被減到了 0 ,多線程併發執行 retain 之後,就會將 refCnt 再次加成了偶數,這又會出現併發問題。
而每一次調用 release 方法是對 refCnt 減 2 ,如果我們採用 XADD 指令實現 release 的話,回想一下 4.1.17.Final 版本中的設計,它首先進來是通過 getAndAdd 方法對 refCnt 減 2 ,這樣一來,refCnt 就變成 0 了,就有併發安全問題了。所以我們需要通過 CMPXCHG 指令將 refCnt 更新為 1。
這裏有的同學可能要問了,那可不可以先進行一下 if 判斷,如果 refCnt 減 2 之後變為 0 了,我們在通過 getAndAdd 方法將 refCnt 更新為 1 (減一個奇數),這樣一來不也可以利用上 XADD 指令的性能優勢嗎 ?
答案是不行的,因為 if 判斷與 getAndAdd 更新這兩個操作之間仍然不是原子的,多線程可以在這個間隙仍然有併發執行 retain 方法的可能,如下圖所示:
在線程 1 執行 if 判斷和 getAndAdd 更新這兩個操作之間,線程 2 看到的 refCnt 其實 2 ,然後線程 2 會將 refCnt 加到 4 ,線程 3 緊接着會將 refCnt 增加到 6 ,在線程 2 和線程 3 看來這個 ByteBuf 完全是正常的,但是線程 1 馬上就會釋放 Native Memory 了。
而且採用這種設計的話,一會通過 getAndAdd 對 refCnt 減一個奇數,一會通過 getAndAdd 對 refCnt 加一個偶數,這樣就把原本的奇偶設計搞亂掉了。
所以我們的設計目標是一定要保證在 ByteBuf 沒有任何引用計數的時候,release 方法需要原子性的將 refCnt 更新為 1 。 因此必須採用 CMPXCHG 指令來實現而不能使用 XADD 指令。
**再者説, CMPXCHG 指令是可以原子性的判斷當前是否有併發情況的,如果有併發情況出現,CAS 就會失敗,我們可以繼續重試。但 XADD 指令卻無法原子性的判斷是否有併發情況,因為它每次都是先更新,後判斷併發,這就不是原子的了。這一點,在下面的源碼實現中會體現的特別明顯**。
#### 2.6.7 儘量避免內存屏障的開銷
public final boolean release(T instance) {
    // 第一次嘗試採用 unSafe nonVolatile 的方式讀取 refCnf 的值
    int rawCnt = nonVolatileRawCnt(instance);
    // 如果邏輯引用計數被減到 0 了,那麼就通過 tryFinalRelease0 使用 CAS 將 refCnf 更新為 1
    // CAS 失敗的話,則通過 retryRelease0 進行重試
    // 如果邏輯引用計數不為 0 ,則通過 nonFinalRelease0 將 refCnf 減 2
    return rawCnt == 2 ? tryFinalRelease0(instance, 2) || retryRelease0(instance, 1)
            : nonFinalRelease0(instance, 1, rawCnt, toLiveRealRefCnt(rawCnt, 1));
}
這裏有一個小的細節再次體現出 Netty 對於性能的極致追求,refCnt 字段在 ByteBuf 中被 Netty 申明為一個 volatile 字段。
private volatile int refCnt = updater.initialValue();
我們對 refCnt 的普通讀寫都是要走內存屏障的,但 Netty 在 release 方法中首次讀取 refCnt 的值是採用 nonVolatile 的方式,不走內存屏障,直接讀取 cache line,避免了屏障開銷。
private int nonVolatileRawCnt(T instance) {
    // 獲取 REFCNT_FIELD_OFFSET
    final long offset = unsafeOffset();
    // 通過 UnSafe 的方式來訪問 refCnt , 避免內存屏障的開銷
    return offset != -1 ? PlatformDependent.getInt(instance, offset) : updater().get(instance);
}
那有的同學可能要問了,如果讀取 refCnt 的時候不走內存屏障的話,讀取到的 refCnt 不就可能是一個錯誤的值嗎 ?
事實上確實是這樣的,但 Netty 不 care , 讀到一個錯誤的值也無所謂,因為這裏的引用計數採用了奇偶設計,我們在第一次讀取引用計數的時候並不需要讀取到一個精確的值,既然這樣我們可以直接通過 UnSafe 來讀取,還能剩下一筆內存屏障的開銷。
那為什麼不需要一個精確的值呢 ?因為如果原來的 refCnt 是一個奇數,那無論多線程怎麼併發 retain ,最終得到的還是一個奇數,我們這裏只需要知道 refCnt 是一個奇數就可以直接拋 IllegalReferenceCountException 了。具體讀到的是一個 3 還是一個 5 其實都無所謂。
那如果原來的 refCnt 是一個偶數呢 ?其實也無所謂,我們可能讀到一個正確的值也可能讀到一個錯誤的值,如果恰好讀到一個正確的值,那更好。如果讀取到一個錯誤的值,也無所謂,因為我們後面是用 CAS 進行更新,這樣的話 CAS 就會更新失敗,我們只需要在一下輪 for 循環中更新正確就可以了。
如果讀取到的 refCnt 恰好是 2 ,那就意味着本次 release 之後,ByteBuf 的邏輯引用計數就為 0 了,Netty 會通過 CAS 將 refCnt 更新為 1 。
private boolean tryFinalRelease0(T instance, int expectRawCnt) {
    return updater().compareAndSet(instance, expectRawCnt, 1); // any odd number will work
}
如果 CAS 更新失敗,則表示此時有多線程可能併發對 ByteBuf 執行 retain 方法,邏輯引用計數此時可能就不為 0 了,針對這種併發情況,Netty 會在 retryRelease0 方法中進行重試,將 refCnt 減 2 。
private boolean retryRelease0(T instance, int decrement) {
    for (;;) {
        // 採用 Volatile 的方式讀取 refCnt
        int rawCnt = updater().get(instance),
        // 獲取邏輯引用計數,如果 refCnt 已經變為奇數,則拋出異常
        realCnt = toLiveRealRefCnt(rawCnt, decrement);
        // 如果執行完本次 release , 邏輯引用計數為 0
        if (decrement == realCnt) {
            // CAS 將 refCnt 更新為 1
            if (tryFinalRelease0(instance, rawCnt)) {
                return true;
            }
        } else if (decrement < realCnt) {
            // 原來的邏輯引用計數 realCnt 大於 1(decrement)
            // 則通過 CAS 將 refCnt 減 2
            if (updater().compareAndSet(instance, rawCnt, rawCnt - (decrement << 1))) {
                return false;
            }
        } else {
            // refCnt 字段如果發生溢出,則拋出異常
            throw new IllegalReferenceCountException(realCnt, -decrement);
        }
        // CAS 失敗之後調用 yield
        // 減少無畏的競爭,否則所有線程在高併發情況下都在這裏 CAS 失敗
        Thread.yield();
    }
}
從 retryRelease0 方法的實現中我們可以看出,CAS 是可以原子性的探測到是否有併發情況出現的,如果有併發情況,這裏的所有 CAS 都會失敗,隨後會在下一輪 for 循環中將正確的值更新到 refCnt 中。這一點 ,XADD 指令是做不到的。
如果在進入 release 方法後,第一次讀取的 refCnt 不是 2 ,那麼就不能走上面的 tryFinalRelease0 邏輯,而是在 nonFinalRelease0 中通過 CAS 將 refCnt 的值減 2 。
private boolean nonFinalRelease0(T instance, int decrement, int rawCnt, int realCnt) {
    if (decrement < realCnt
            && updater().compareAndSet(instance, rawCnt, rawCnt - (decrement << 1))) {
        // ByteBuf 的 rawCnt 減少 2 * decrement
        return false;
    }
    // CAS  失敗則一直重試,如果引用計數已經為 0 ,那麼拋出異常,不能再次 release
    return retryRelease0(instance, decrement);
}
到這裏,Netty 對引用計數的精彩設計,筆者就為大家完整的剖析完了,一共有四處非常精彩的優化設計,我們總結如下:
1. 使用性能更優的 XADD 指令來替換 CMPXCHG 指令。
2. 引用計數採用了奇偶設計,保證了併發語義。
3. 採用性能更優的 `==` 運算來替換 `&` 運算。
4. 能不走內存屏障就儘量不走內存屏障。
### 2.7 ByteBuf 的視圖設計
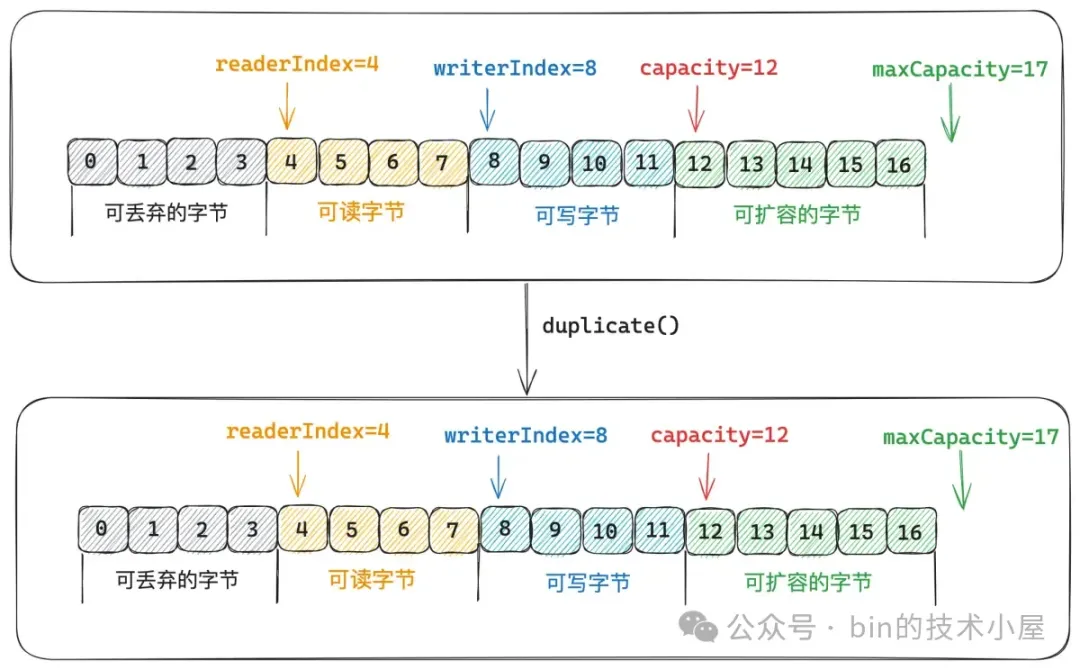
和 JDK 的設計一樣,Netty 中的 ByteBuf 也可以通過 `slice()` 方法以及 `duplicate()` 方法創建一個視圖 ByteBuf 出來,原生 ByteBuf 和它的視圖 ByteBuf 底層都是共用同一片內存區域,也就是説在視圖 ByteBuf 上做的任何改動都會反應到原生 ByteBuf 上。同理,在原生 ByteBuf 上做的任何改動也會反應到它的視圖 ByteBuf 上。我們可以將視圖 ByteBuf 看做是原生 ByteBuf 的一份淺拷貝。
原生 ByteBuf 和它的視圖 ByteBuf 不同的是,它們都有各自獨立的 readerIndex,writerIndex,capacity,maxCapacity。
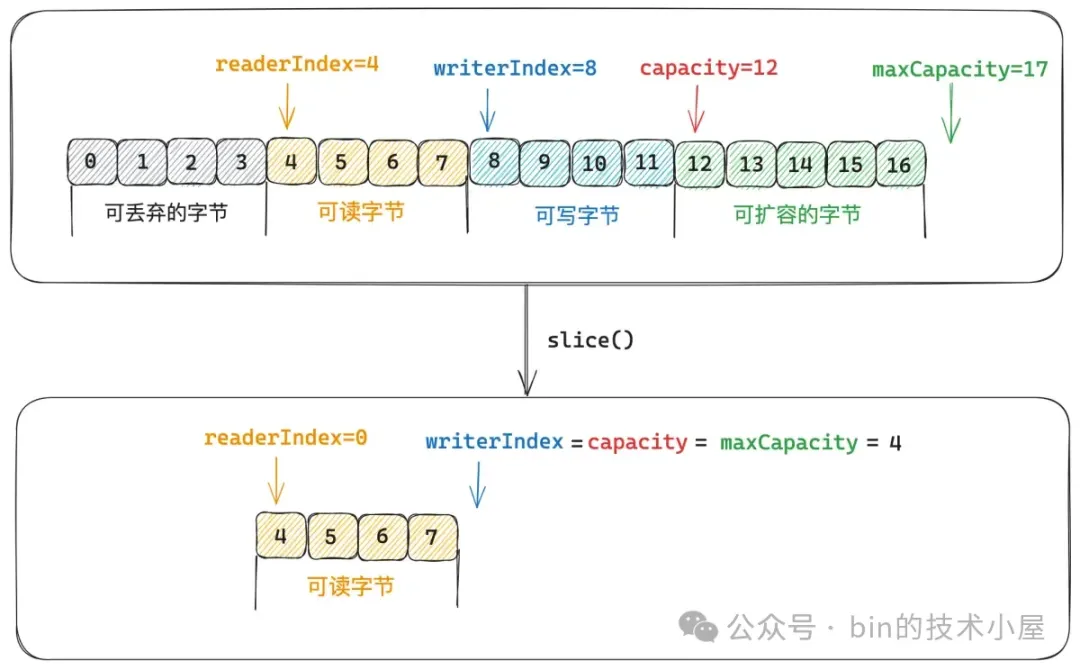
`slice()` 方法是在原生 ByteBuf 的 `[readerIndex , writerIndex)` 這段內存區域內創建一個視圖 ByteBuf。也就是原生 ByteBuf 和視圖 ByteBuf 共用 `[readerIndex , writerIndex)` 這段內存區域。視圖 ByteBuf 的數據區域其實就是原生 ByteBuf 的可讀字節區域。
視圖 ByteBuf 的 readerIndex = 0 , writerIndex = capacity = maxCapacity = 原生 ByteBuf 的 `readableBytes()` 。
@Override
public int readableBytes() {
    // 原生 ByteBuf
    return writerIndex - readerIndex;
}
下面我們來看一下 `slice() ` 方法創建視圖 ByteBuf 的邏輯實現:
public abstract class AbstractByteBuf extends ByteBuf {
@Override
public ByteBuf slice() {
    return slice(readerIndex, readableBytes());
}

@Override
public ByteBuf slice(int index, int length) {
    // 確保 ByteBuf 的引用計數不為 0
    ensureAccessible();
    return new UnpooledSlicedByteBuf(this, index, length);
}
}
Netty 會將 slice 視圖 ByteBuf 封裝在 UnpooledSlicedByteBuf 類中,在這裏會初始化 slice 視圖 ByteBuf 的 readerIndex,writerIndex,capacity,maxCapacity。
class UnpooledSlicedByteBuf extends AbstractUnpooledSlicedByteBuf {
UnpooledSlicedByteBuf(AbstractByteBuf buffer, int index, int length) {
    // index = readerIndex
    // length = readableBytes()
    super(buffer, index, length);
}

@Override
public int capacity() {
    // 視圖 ByteBuf 的 capacity 和 maxCapacity 相等
    // 均為原生 ByteBuf 的 readableBytes()
    return maxCapacity();
}
}
如上圖所示,這裏的 index 就是原生 ByteBuf 的 readerIndex = 4 ,index 用於表示視圖 ByteBuf 的內存區域相對於原生 ByteBuf 的偏移,因為視圖 ByteBuf 與原生 ByteBuf 共用的是同一片內存區域,針對視圖 ByteBuf 的操作其實底層最終是轉換為對原生 ByteBuf 的操作。

但由於視圖 ByteBuf  和原生 ByteBuf 各自都有獨立的 readerIndex 和 writerIndex,比如上圖中,視圖 ByteBuf 中的 readerIndex = 0 其實指向的是原生 ByteBuf 中 readerIndex = 4 的位置。所以每次在我們對視圖 ByteBuf 進行讀寫的時候都需要將視圖 ByteBuf 的 readerIndex 加上一個偏移(index)轉換成原生 ByteBuf 的 readerIndex,近而從原生 ByteBuf 中來讀寫數據。
@Override
protected byte _getByte(int index) {
    // 底層其實是對原生 ByteBuf 的訪問
    return unwrap()._getByte(idx(index));
}

@Override
protected void _setByte(int index, int value) {
    unwrap()._setByte(idx(index), value);
}
/**
 * Returns the index with the needed adjustment.
 */
final int idx(int index) {
    // 轉換為原生 ByteBuf 的 readerIndex 或者 writerIndex
    return index + adjustment;
}
` idx(int index)` 方法中的 adjustment 就是上面 UnpooledSlicedByteBuf 構造函數中的 index 偏移,初始化為原生 ByteBuf 的 readerIndex。
length 則初始化為原生 ByteBuf 的 `readableBytes()`,視圖 ByteBuf 中的 writerIndex,capacity,maxCapacity 都是用 length 來初始化。
abstract class AbstractUnpooledSlicedByteBuf extends AbstractDerivedByteBuf {
// 原生 ByteBuf
private final ByteBuf buffer;
// 視圖 ByteBuf 相對於原生 ByteBuf的數據區域偏移
private final int adjustment;

AbstractUnpooledSlicedByteBuf(ByteBuf buffer, int index, int length) {
    // 設置視圖 ByteBuf 的 maxCapacity,readerIndex 為 0
    super(length);
    // 原生 ByteBuf
    this.buffer = buffer;
    // 數據偏移為原生 ByteBuf 的 readerIndex
    adjustment = index;
    // 設置視圖 ByteBuf 的 writerIndex
    writerIndex(length);
}
}
但是通過 `slice()` 方法創建出來的視圖 ByteBuf 並不會改變原生 ByteBuf 的引用計數,這會存在一個問題,就是由於視圖 ByteBuf 和原生 ByteBuf 底層共用的是同一片內存區域,在原生 ByteBuf 或者視圖 ByteBuf 各自的應用上下文中他們可能並不會意識到對方的存在。

如果對原生 ByteBuf 調用 release 方法,恰好引用計數就為 0 了,接着就會釋放原生 ByteBuf 的 Native Memory 。此時再對視圖 ByteBuf 進行訪問就有問題了,因為  Native Memory 已經被原生 ByteBuf 釋放了。同樣的道理,對視圖 ByteBuf 調用 release 方法 ,也會對原生 ByteBuf 產生影響。

為此 Netty 提供了一個 `retainedSlice()` 方法,在創建 slice 視圖 ByteBuf 的同時對原生 ByteBuf 的引用計數加 1 ,兩者共用同一個引用計數。
@Override
public ByteBuf retainedSlice() {
    // 原生 ByteBuf 的引用計數加 1
    return slice().retain();
}
除了 `slice()` 之外,Netty 也提供了 `duplicate()` 方法來創建視圖 ByteBuf 。@Override
public ByteBuf duplicate() {
// 確保 ByteBuf 的引用計數不為 0
ensureAccessible();
return new UnpooledDuplicatedByteBuf(this);
}但和 `slice()` 不同的是, `duplicate()` 是完全復刻了原生 ByteBuf,復刻出來的視圖 ByteBuf 雖然與原生 ByteBuf 都有各自獨立的 readerIndex,writerIndex,capacity,maxCapacity。但他們的值都是相同的。duplicate 視圖 ByteBuf 也是和原生 ByteBuf 共用同一塊 Native Memory 。
public class DuplicatedByteBuf extends AbstractDerivedByteBuf {
// 原生 ByteBuf
private final ByteBuf buffer;

public DuplicatedByteBuf(ByteBuf buffer) {
    this(buffer, buffer.readerIndex(), buffer.writerIndex());
}

DuplicatedByteBuf(ByteBuf buffer, int readerIndex, int writerIndex) {
    // 初始化視圖 ByteBuf 的 maxCapacity 與原生的相同
    super(buffer.maxCapacity());
    // 原生 ByteBuf
    this.buffer = buffer;
    // 視圖 ByteBuf 的 readerIndex , writerIndex 也與原生相同
    setIndex(readerIndex, writerIndex);
    markReaderIndex();
    markWriterIndex();
}

@Override
public int capacity() {
    // 視圖 ByteBuf 的 capacity 也與原生相同
    return unwrap().capacity();
}
}
Netty 同樣也提供了對應的 `retainedDuplicate()` 方法,用於創建 duplicate 視圖 ByteBuf 的同時增加原生 ByteBuf 的引用計數。視圖 ByteBuf 與原生 ByteBuf 之間共用同一個引用計數。
@Override
public ByteBuf retainedDuplicate() {
return duplicate().retain();
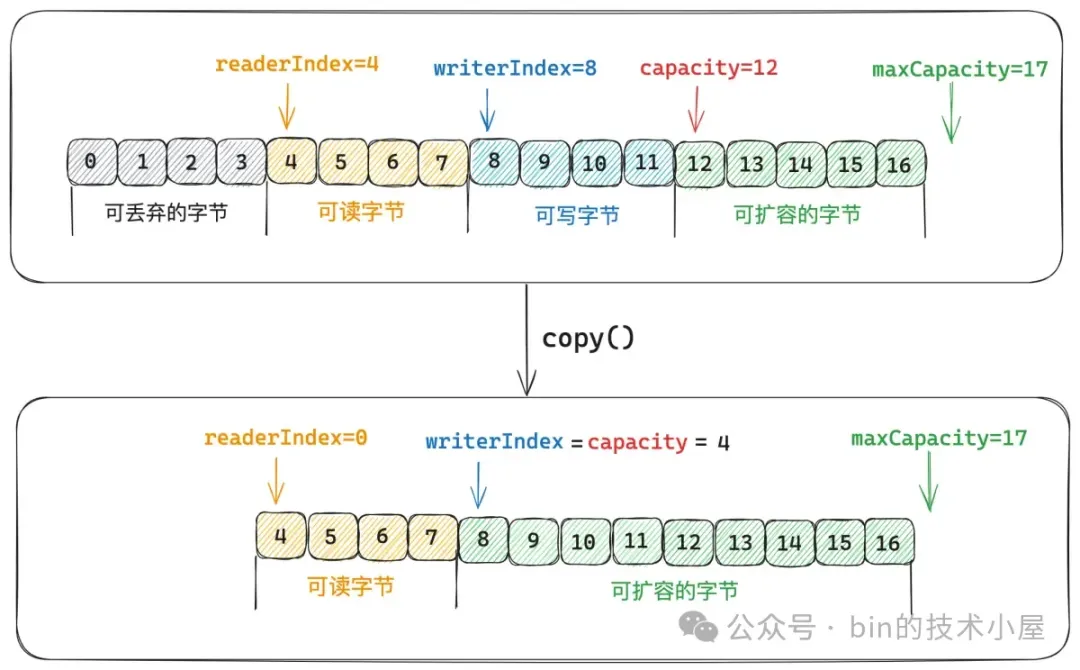
}上面介紹的兩種視圖 ByteBuf 可以理解為是對原生 ByteBuf 的一層淺拷貝,Netty 也提供了 `copy()` 方法來實現對原生 ByteBuf 的深拷貝,copy 出來的 ByteBuf 是原生 ByteBuf 的一個副本,兩者底層依賴的 Native Memory 是不同的,各自都有獨立的 readerIndex,writerIndex,capacity,maxCapacity 。
public abstract class AbstractByteBuf extends ByteBuf {
@Override
public ByteBuf copy() {
    // 從原生 ByteBuf 中的 readerIndex 開始,拷貝 readableBytes 個字節到新的 ByteBuf 中
    return copy(readerIndex, readableBytes());
}
}
`copy()` 方法是對原生 ByteBuf 的 ` [readerIndex , writerIndex) `這段數據範圍內容進行拷貝。copy 出來的 ByteBuf,它的 readerIndex = 0 , writerIndex = capacity = 原生 ByteBuf 的 `readableBytes()`。maxCapacity 與原生 maxCapacity 相同。
public class UnpooledDirectByteBuf {
@Override
public ByteBuf copy(int index, int length) {
    ensureAccessible();
    ByteBuffer src;
    try {
        // 將原生 ByteBuf 中 [index , index + lengh) 這段範圍的數據拷貝到新的 ByteBuf 中
        src = (ByteBuffer) buffer.duplicate().clear().position(index).limit(index + length);
    } catch (IllegalArgumentException ignored) {
        throw new IndexOutOfBoundsException("Too many bytes to read - Need " + (index + length));
    }
    // 首先新申請一段 native memory , 新的 ByteBuf 初始容量為 length (真實容量),最大容量與原生 ByteBuf 的 maxCapacity 相等
    // readerIndex = 0 , writerIndex = length
    return alloc().directBuffer(length, maxCapacity()).writeBytes(src);
}
}
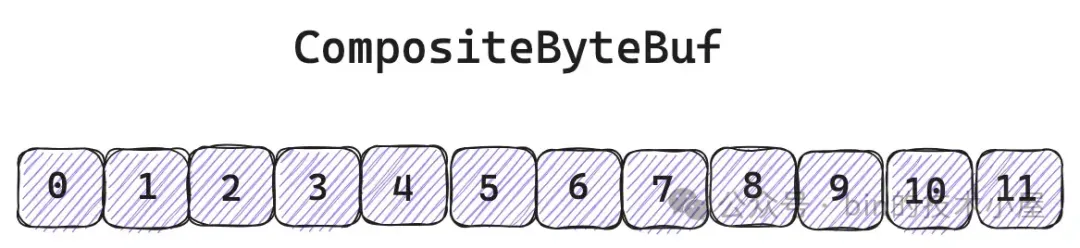
### 2.8 CompositeByteBuf 的零拷貝設計
這裏的零拷貝並不是我們經常提到的那種 OS 層面上的零拷貝,而是 Netty 在用户態層面自己實現的避免內存拷貝的設計。比如在傳統意義上,如果我們想要將多個獨立的 ByteBuf 聚合成一個 ByteBuf 的時候,我們首先需要向 OS 申請一段更大的內存,然後依次將多個 ByteBuf 中的內容拷貝到這段新申請的內存上,最後在釋放這些 ByteBuf 的內存。
這樣一來就涉及到兩個性能開銷點,一個是我們需要向 OS 重新申請更大的內存,另一個是內存的拷貝。Netty 引入 CompositeByteBuf 的目的就是為了解決這兩個問題。巧妙地利用原有 ByteBuf 所佔的內存,在此基礎之上,將它們組合成一個邏輯意義上的 CompositeByteBuf ,提供一個統一的邏輯視圖。
CompositeByteBuf 其實也是一種視圖 ByteBuf ,這一點和上小節中我們介紹的
SlicedByteBuf , DuplicatedByteBuf 一樣,它們本身並不會佔用 Native Memory,底層數據的存儲全部依賴於原生的 ByteBuf。
不同點在於,SlicedByteBuf,DuplicatedByteBuf 它們是在單一的原生 ByteBuf 基礎之上創建出的視圖 ByteBuf。而 CompositeByteBuf 是基於多個原生 ByteBuf 創建出的統一邏輯視圖 ByteBuf。
CompositeByteBuf 對於我們用户來説和其他的普通 ByteBuf 沒有任何區別,有自己獨立的 readerIndex,writerIndex,capacity,maxCapacity,前面幾個小節中介紹的各種 ByteBuf 的設計要素,在 CompositeByteBuf 身上也都會體現。
但從實現的角度來説,CompositeByteBuf 只是一個邏輯上的 ByteBuf,其本身並不會佔用任何的 Native Memory ,對於 CompositeByteBuf 的任何操作,最終都需要轉換到其內部具體的 ByteBuf 上。本小節我們就來深入到 CompositeByteBuf 的內部,來看一下 Netty 的巧妙設計。
#### 2.8.1 CompositeByteBuf 的總體架構
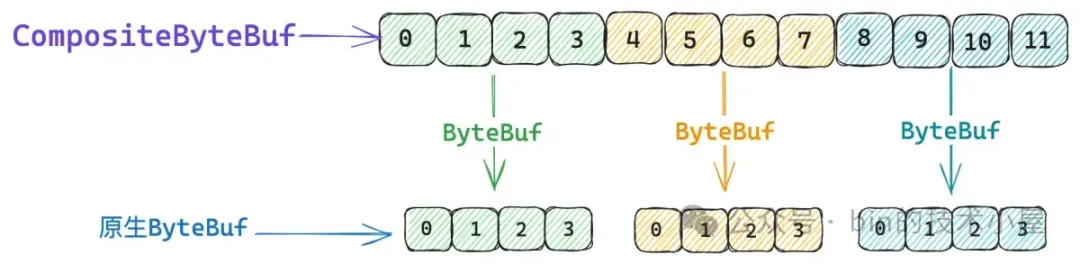
從總體設計上來講,CompositeByteBuf 包含如下五個重要屬性,其中最為核心的就是 components 數組,那些需要被聚合的原生 ByteBuf 會被 Netty 封裝在 Component 類中,並統一組織在 components 數組中。後續針對 CompositeByteBuf 的所有操作都需要和這個數組打交道。
public class CompositeByteBuf extends AbstractReferenceCountedByteBuf implements Iterable<ByteBuf> {
// 內部 ByteBuf 的分配器,用於後續擴容,copy , 合併等操作
private final ByteBufAllocator alloc;
// compositeDirectBuffer 還是 compositeHeapBuffer ?
private final boolean direct;
// 最大的 components 數組容量(16)
private final int maxNumComponents;
// 當前 CompositeByteBuf 中包含的 components 個數
private int componentCount;
// 存儲 component 的數組
private Component[] components; // resized when needed
}
maxNumComponents 表示 components 數組最大的容量,CompositeByteBuf 默認能夠包含 Component 的最大個數為 16,如果超過這個數量的話,Netty 會將當前 CompositeByteBuf 中包含的所有 Components 重新合併成一個更大的 Component。
public abstract class AbstractByteBufAllocator implements ByteBufAllocator {
static final int DEFAULT_MAX_COMPONENTS = 16;}
componentCount 表示當前 CompositeByteBuf 中包含的 Component 個數。每當我們通過 `addComponent` 方法向 CompositeByteBuf 添加一個新的 ByteBuf 時,Netty 都會用一個新的 Component 實例來包裝這個 ByteBuf,然後存放在 components 數組中,最後 componentCount 的個數加 1 。
CompositeByteBuf 與其底層聚合的真實 ByteBuf 架構設計關係,如下圖所示:

而創建一個 CompositeByteBuf 的核心其實就是創建底層的 components 數組,後續添加到該 CompositeByteBuf 的所有原生 ByteBuf 都會被組織在這裏。
private CompositeByteBuf(ByteBufAllocator alloc, boolean direct, int maxNumComponents, int initSize) {
    // 設置 maxCapacity
    super(AbstractByteBufAllocator.DEFAULT_MAX_CAPACITY);

    this.alloc = ObjectUtil.checkNotNull(alloc, "alloc");
    this.direct = direct;
    this.maxNumComponents = maxNumComponents;
    // 初始 Component 數組的容量為 maxNumComponents
    components = newCompArray(initSize, maxNumComponents);
}
這裏的參數 `initSize` 表示的並不是 CompositeByteBuf 所包含的字節數,而是初始包裝的原生 ByteBuf 個數,也就是初始 Component 的個數。components 數組的總體大小由參數 maxNumComponents 決定,但不能超過 16 。
private static Component[] newCompArray(int initComponents, int maxNumComponents) {
    // MAX_COMPONENT
    int capacityGuess = Math.min(AbstractByteBufAllocator.DEFAULT_MAX_COMPONENTS, maxNumComponents);
    // 初始 Component 數組的容量為 maxNumComponents
    return new Component[Math.max(initComponents, capacityGuess)];
}
現在我們只是清楚了 CompositeByteBuf 的一個基本骨架,那麼接下來 Netty 如何根據這個基本的骨架將多個原生 ByteBuf 組裝成一個邏輯上的統一視圖 ByteBuf 呢 ?
也就是説我們依據 CompositeByteBuf 中的 readerIndex 以及 writerIndex 進行的讀寫操作邏輯如何轉換到對應的底層原生 ByteBuf 之上呢 ? 這個是整個設計的核心所在。
下面筆者就帶着大家從外到內,從易到難地一一拆解 CompositeByteBuf 中的那些核心設計要素。從 CompositeByteBuf 的最外層來看,其實我們並不陌生,對於用户來説它就是一個普通的 ByteBuf,擁有自己獨立的 readerIndex ,writerIndex 。
但 CompositeByteBuf 中那些邏輯上看起來連續的字節,背後其實存儲在不同的原生 ByteBuf 中。不同 ByteBuf 的內存之間其實是不連續的。
那麼現在問題的關鍵就是我們如何判斷 CompositeByteBuf 中的某一段邏輯數據背後對應的究竟是哪一個真實的 ByteBuf,如果我們能夠通過 CompositeByteBuf 的相關 Index , 找到這個 Index 背後對應的 ByteBuf,近而可以找到 ByteBuf 的 Index ,這樣是不是就可以將 CompositeByteBuf 的邏輯操作轉換成對真實內存的讀寫操作了。
CompositeByteBuf 到原生 ByteBuf 的轉換關係,Netty 封裝在 Component 類中,每一個被包裝在 CompositeByteBuf 中的原生 ByteBuf 都對應一個 Component 實例。它們會按照順序統一組織在 components 數組中。
private static final class Component {
    // 原生 ByteBuf
    final ByteBuf srcBuf;
    // CompositeByteBuf 的 index 加上 srcAdjustment 就得到了srcBuf 的相關 index
    int srcAdjustment;
    // srcBuf 可能是一個被包裝過的 ByteBuf,比如 SlicedByteBuf , DuplicatedByteBuf
    // 被 srcBuf 包裝的最底層的 ByteBuf 就存放在 buf 字段中
    final ByteBuf buf;
    // CompositeByteBuf 的 index 加上 adjustment 就得到了 buf 的相關 index
    int adjustment;

    // 該 Component 在 CompositeByteBuf 視角中表示的數據範圍 [offset , endOffset)
    int offset;
    int endOffset;
}
一個 Component 在 CompositeByteBuf 的視角中所能表示的數據邏輯範圍是 `[offset , endOffset)`。
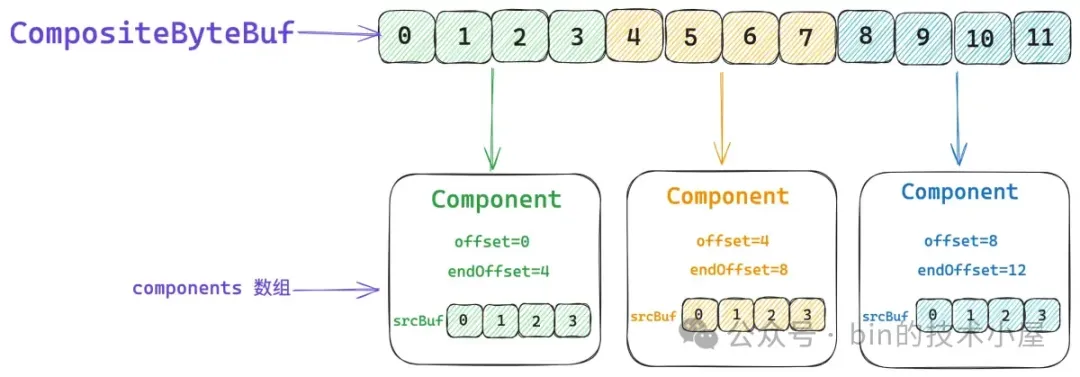
比如上圖中第一個綠色的 ByteBuf , 它裏邊存儲的數據組成了 CompositeByteBuf 中 `[0 , 4)` 這段邏輯數據範圍。第二個黃色的 ByteBuf,它裏邊存儲的數據組成了 CompositeByteBuf 中 `[4 , 8)` 這段邏輯數據範圍。第三個藍色的 ByteBuf,它裏邊存儲的數據組成了 CompositeByteBuf 中 `[8 , 12)` 這段邏輯數據範圍。 上一個 Component 的 endOffset 恰好是下一個 Component 的 offset 。
而這些真實存儲數據的 ByteBuf 則存儲在對應 Component 中的 srcBuf 字段中,當我們通過 CompositeByteBuf 的 readerIndex 或者 writerIndex 進行讀寫操作的時候,首先需要確定相關 index 所對應的 srcBuf,然後將 CompositeByteBuf 的 index 轉換為 srcBuf 的 srcIndex,近而通過 srcIndex 對 srcBuf 進行讀寫。
這個 index 的轉換就是通過 srcAdjustment 來進行的,比如,當前 CompositeByteBuf 的 readerIndex 為 5 ,它對應的是第二個黃色的 ByteBuf。而 ByteBuf 的 readerIndex 卻是 1 。
所以第二個 Component 的 srcAdjustment 就是 -4 , 這樣我們讀取 CompositeByteBuf 的時候,首先將它的 readerIndex 加上 srcAdjustment 就得到了 ByteBuf 的 readerIndex ,後面就是普通的 ByteBuf 讀取操作了。
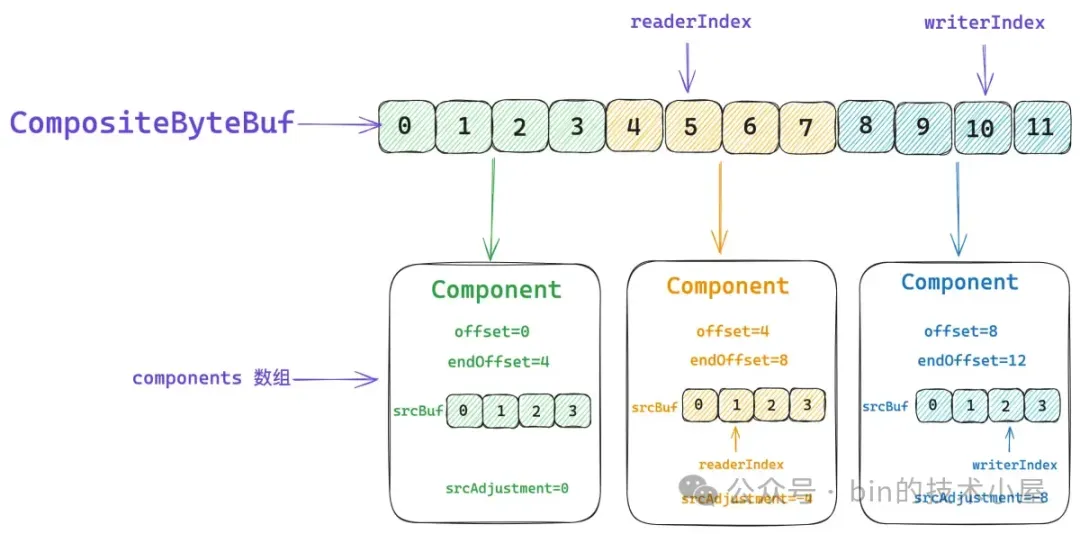
在比如説,我們要對 CompositeByteBuf 進行寫操作,當前的 writerIndex 為 10 ,對應的是第三個藍色的 ByteBuf,它的 writerIndex 為 2 。
所以第三個 Component 的 srcAdjustment 就是 -8 ,CompositeByteBuf 的 writerIndex 加上 srcAdjustment 就得到了 ByteBuf 的 writerIndex,後續就是普通的 ByteBuf 寫入操作。
   int srcIdx(int index) {
        // CompositeByteBuf 相關的 index 轉換成 srcBuf 的相關 index
        return index + srcAdjustment;
    }
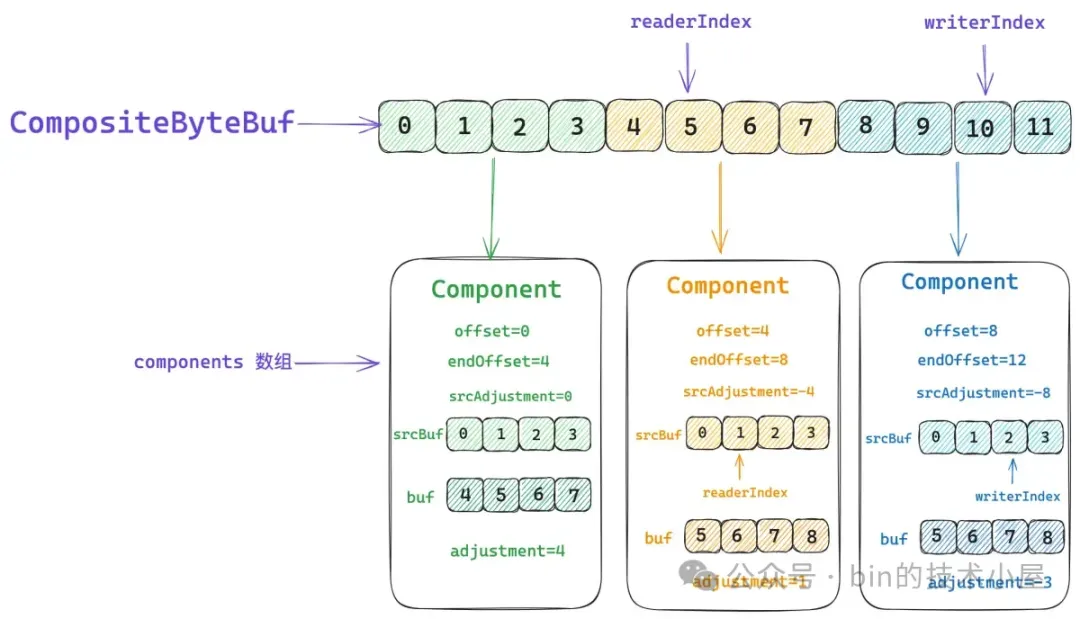
除了 srcBuf 之外,Component 實例中還有一個 buf 字段,這裏大家可能會比較好奇,為什麼設計了兩個 ByteBuf 字段呢 ?Component 實例與 ByteBuf 不是一對一的關係嗎 ?

srcBuf 是指我們通過 `addComponent` 方法添加到 CompositeByteBuf 中的原始 ByteBuf。而這個 srcBuf 可能是一個視圖 ByteBuf,比如上一小節中介紹到的 SlicedByteBuf 和 DuplicatedByteBuf。srcBuf 還可能是一個被包裝過的 ByteBuf,比如 WrappedByteBuf , SwappedByteBuf。

假如 srcBuf 是一個 SlicedByteBuf 的話,我們需要將它的原生 ByteBuf 拆解出來並保存在 Component 實例的 buf 字段中。事實上 Component 中的 buf 才是真正存儲數據的地方。
abstract class AbstractUnpooledSlicedByteBuf {
// 原生 ByteBuf
private final ByteBuf buffer;
}
與 buf 對應的就是 adjustment , 它用於將 CompositeByteBuf 的相關 index 轉換成 buf 相關的 index ,假如我們在向一個 CompositeByteBuf 執行 read 操作,它的當前 readerIndex 是 5,而 buf 的 readerIndex 是 6 。
所以在讀取操作之前,我們需要將 CompositeByteBuf 的 readerIndex 加上 adjustment 得到 buf 的 readerIndex,近而將讀取操作轉移到 buf 中。其實就和上小節中介紹的視圖 ByteBuf 是一模一樣的,在讀寫之前都需要修正相關的 index 。
@Override
public byte getByte(int index) {
    // 通過 CompositeByteBuf 的 index , 找到數據所屬的 component
    Component c = findComponent(index);
    // 首先通過 idx 轉換為 buf 相關的 index
    // 將對 CompositeByteBuf 的讀寫操作轉換為 buf 的讀寫操作
    return c.buf.getByte(c.idx(index));
}

int idx(int index) {
    // 將 CompositeByteBuf 的相關 index 轉換為 buf 的相關 index
    return index + adjustment;
 }
那麼我們如何根據指定的 CompositeByteBuf 的 index 來查找其對應的底層數據究竟存儲在哪個 Component 中呢 ?
核心思想其實很簡單,因為每個 Component 都會描述自己表示 CompositeByteBuf 中的哪一段數據範圍 —— `[offset , endOffset)`。所有的 Components 都被有序的組織在 components 數組中。我們可以通過二分查找的方法來尋找這個 index 到底是落在了哪個 Component 表示的範圍中。
這個查找的過程是在 `findComponent ` 方法中實現的,Netty 會將最近一次訪問到的 Component 緩存在 CompositeByteBuf 的 lastAccessed 字段中,每次進行查找的時候首先會判斷 index 是否落在了 lastAccessed 所表示的數據範圍內 —— `[ la.offset , la.endOffset)` 。
如果 index 恰好被緩存的 Component(lastAccessed)所包含,那麼就直接返回 lastAccessed 。
// 緩存最近一次查找到的 Component
private Component lastAccessed;

private Component findComponent(int offset) {
    Component la = lastAccessed;
    // 首先查找 offset 是否恰好落在 lastAccessed 的區間中
    if (la != null && offset >= la.offset && offset < la.endOffset) {
       return la;
    }
    // 在所有 Components 中進行二分查找
    return findIt(offset);
}
如果 index 不巧沒有命中緩存,那麼就在整個 components 數組中進行二分查找 :
private Component findIt(int offset) {
    for (int low = 0, high = componentCount; low <= high;) {
        int mid = low + high >>> 1;
        Component c = components[mid];
        if (offset >= c.endOffset) {
            low = mid + 1;
        } else if (offset < c.offset) {
            high = mid - 1;
        } else {
            lastAccessed = c;
            return c;
        }
    }

    throw new Error("should not reach here");
}
#### 2.8.2 CompositeByteBuf 的創建
好了,現在我們已經熟悉了 CompositeByteBuf 的總體架構,那麼接下來我們就來看一下 Netty 是如何將多個 ByteBuf 邏輯聚合成一個 CompositeByteBuf 的。
public final class Unpooled {
public static ByteBuf wrappedBuffer(ByteBuf... buffers) {
    return wrappedBuffer(buffers.length, buffers);
}
}
CompositeByteBuf 的初始 maxNumComponents 為 buffers 數組的長度,如果我們只是傳入一個 ByteBuf 的話,那麼就無需創建 CompositeByteBuf,而是直接返回該 ByteBuf 的 slice 視圖。

如果我們傳入的是多個 ByteBuf 的話,則將這多個 ByteBuf 包裝成 CompositeByteBuf 返回。
public final class Unpooled {
public static ByteBuf wrappedBuffer(int maxNumComponents, ByteBuf... buffers) {
    switch (buffers.length) {
    case 0:
        break;
    case 1:
        ByteBuf buffer = buffers[0];
        if (buffer.isReadable()) {
            // 直接返回 buffer.slice() 視圖
            return wrappedBuffer(buffer.order(BIG_ENDIAN));
        } else {
            buffer.release();
        }
        break;
    default:
        for (int i = 0; i < buffers.length; i++) {
            ByteBuf buf = buffers[i];
            if (buf.isReadable()) {
                // 從第一個可讀的 ByteBuf —— buffers[i] 開始創建 CompositeByteBuf
                return new CompositeByteBuf(ALLOC, false, maxNumComponents, buffers, i);
            }
            // buf 不可讀則 release
            buf.release();
        }
        break;
    }
    return EMPTY_BUFFER;
}
}
在進入 CompositeByteBuf 的創建流程之後,首先是創建出一個空的 CompositeByteBuf,也就是先把 CompositeByteBuf 的骨架搭建起來,這時它的 initSize 為 `buffers.length - offset` 。

注意 initSize 表示的並不是 CompositeByteBuf 初始包含的字節個數,而是表示初始 Component 的個數。offset 則表示從 buffers 數組中的哪一個索引開始創建 CompositeByteBuf,就是上面 CompositeByteBuf 構造函數中最後一個參數 i 。

隨後通過 `addComponents0` 方法為 buffers 數組中的每一個 ByteBuf 創建初始化 Component 實例,並將他們有序的添加到 CompositeByteBuf 的 components 數組中。

但這時 Component 實例的個數可能已經超過 maxNumComponents 限制的個數,那麼接下來就會在 `consolidateIfNeeded()` 方法中將當前 CompositeByteBuf 中的所有 Components 合併成一個更大的 Component。CompositeByteBuf 中的 components 數組長度是不可以超過 maxNumComponents 限制的,如果超過就需要在這裏合併。

最後設置當前 CompositeByteBuf 的 readerIndex 和 writerIndex,在初始狀態下 CompositeByteBuf 的 readerIndex 會被設置為 0 ,writerIndex 會被設置為最後一個 Component 的 endOffset 。
CompositeByteBuf(ByteBufAllocator alloc, boolean direct, int maxNumComponents,
        ByteBuf[] buffers, int offset) {
    // 先初始化一個空的 CompositeByteBuf
    // initSize 為 buffers.length - offset
    this(alloc, direct, maxNumComponents, buffers.length - offset);
    // 為所有的 buffers 創建  Component 實例,並添加到 components 數組中
    addComponents0(false, 0, buffers, offset);
    // 如果當前 component 的個數已經超過了 maxNumComponents,則將所有 component 合併成一個
    consolidateIfNeeded();
    // 設置 CompositeByteBuf 的 readerIndex = 0
    // writerIndex 為最後一個 component 的 endOffset
    setIndex0(0, capacity());
}
#### 2.8.3 shiftComps 為新的 ByteBuf 騰挪空間
在整個 CompositeByteBuf 的構造過程中,最核心也是最複雜的步驟其實就是 `addComponents0` 方法,將多個 ByteBuf 有序的添加到 CompositeByteBuf 的 components 數組中看似簡單,其實還有很多種複雜的情況需要考慮。

複雜之處在於這些 ByteBuf 需要插在 components 數組的哪個位置上 ? 比較簡單直觀的情況是我們直接在 components 數組的末尾插入,也就是説要插入的位置索引 cIndex 等於 componentCount。這裏分為兩種情況:
1. `cIndex = componentCount = 0` ,這種情況表示我們在向一個空的 CompositeByteBuf 插入 ByteBufs , 很簡單,直接插入即可。
2. `cIndex = componentCount > 0` , 這種情況表示我們再向一個非空的 CompositeByteBuf 插入 ByteBufs,正如上圖所示。同樣也很簡單,直接在 componentCount 的位置處插入即可。
稍微複雜一點的情況是我們在 components 數組的中間位置進行插入而不是在末尾,也就是 `cIndex < componentCount` 的情況。如下如圖所示,假設我們現在需要在 `cIndex = 3 ` 的位置處插入兩個 ByteBuf 進來,但現在 components[3] 以及 components[4] 的位置已經被佔用了。所以我們需要將這兩個位置上的原有 component 向後移動兩個位置,將 components[3] 和 components[4] 的位置騰出來。
// i = 3 , count = 2 , size = 5
System.arraycopy(components, i, components, i + count, size - i);
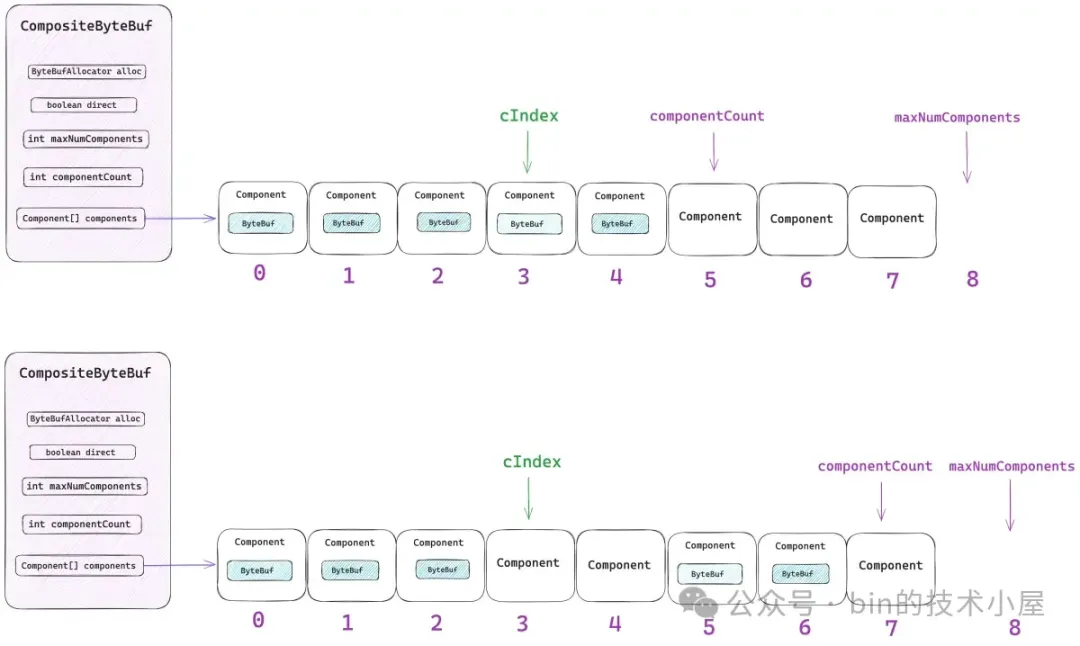
在複雜一點的情況就是 components 數組需要擴容,當一個 CompositeByteBuf 剛剛被初始化出來的時候,它的 components 數組長度等於 maxNumComponents。
如果當前 components 數組中包含的 component 個數 —— componentCount 加上本次需要添加的 ByteBuf 個數 —— count 已經超過了 maxNumComponents 的時候,就需要對 components 數組進行擴容。
    // 初始為 0,當前 CompositeByteBuf 中包含的 component 個數
    final int size = componentCount,
    // 本次 addComponents0 操作之後,新的 component 個數
    newSize = size + count;

    // newSize 超過了 maxNumComponents 則對 components 數組進行擴容
    if (newSize > components.length) {
        ....... 擴容 ....

        // 擴容後的新數組
        components = newArr;
    }
擴容之後的 components 數組長度是在 newSize 與原來長度的 `3 / 2 ` 之間取一個最大值。
int newArrSize = Math.max(size + (size >> 1), newSize);
如果我們原來恰好是希望在 components 數組的末尾插入,也就是 `cIndex = componentCount` 的情況,那麼就需要通過 `Arrays.copyOf` 首先申請一段長度為 newArrSize 的數組,然後將原來的 components 數組中的內容原樣拷貝過去。
newArr = Arrays.copyOf(components, newArrSize, Component[].class);
這樣新的 components 數組就有位置可以容納本次需要加入的 ByteBuf 了。
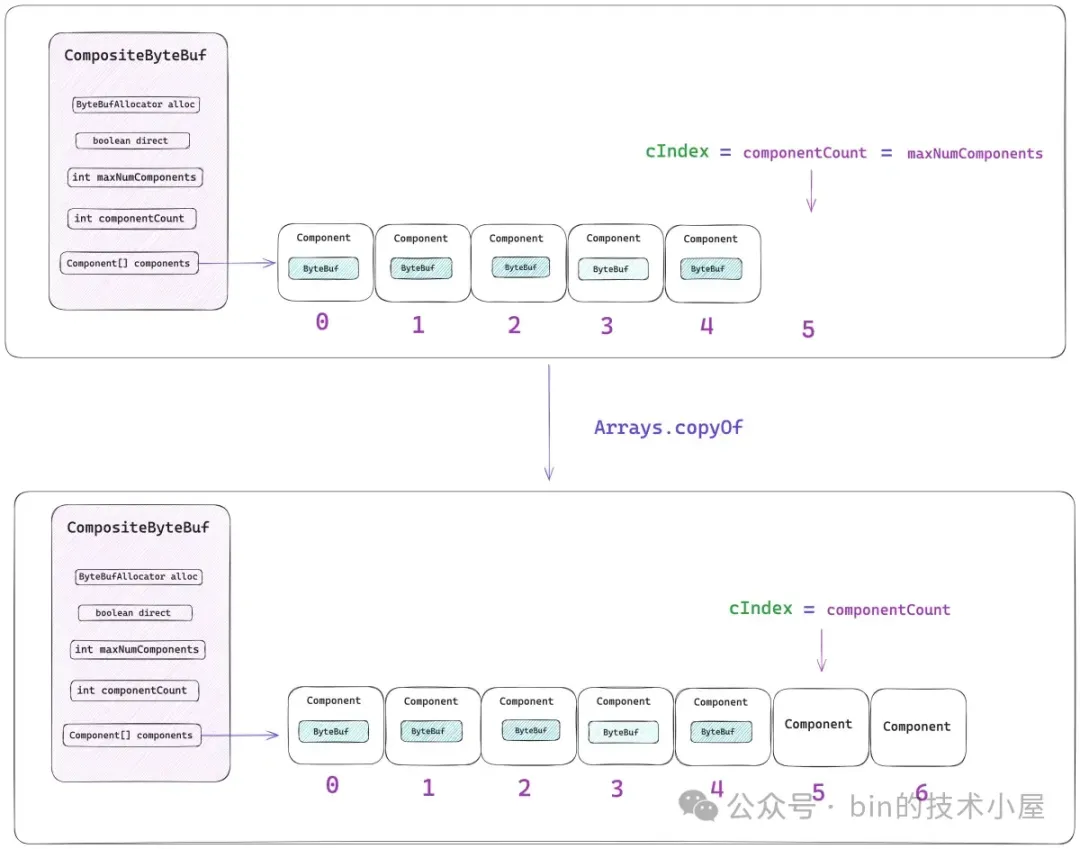
如果我們希望在原來 components 數組的中間插入,也就是 `cIndex < componentCount` 的情況,如下圖所示:

這種情況在擴容的時候就不能原樣拷貝原 components 數組了,而是首先通過 `System.arraycopy` 將 `[0 , cIndex)` 這段範圍的內容拷貝過去,在將 `[cIndex , componentCount) `這段範圍的內容拷貝到新數組的 `cIndex + count` 位置處。
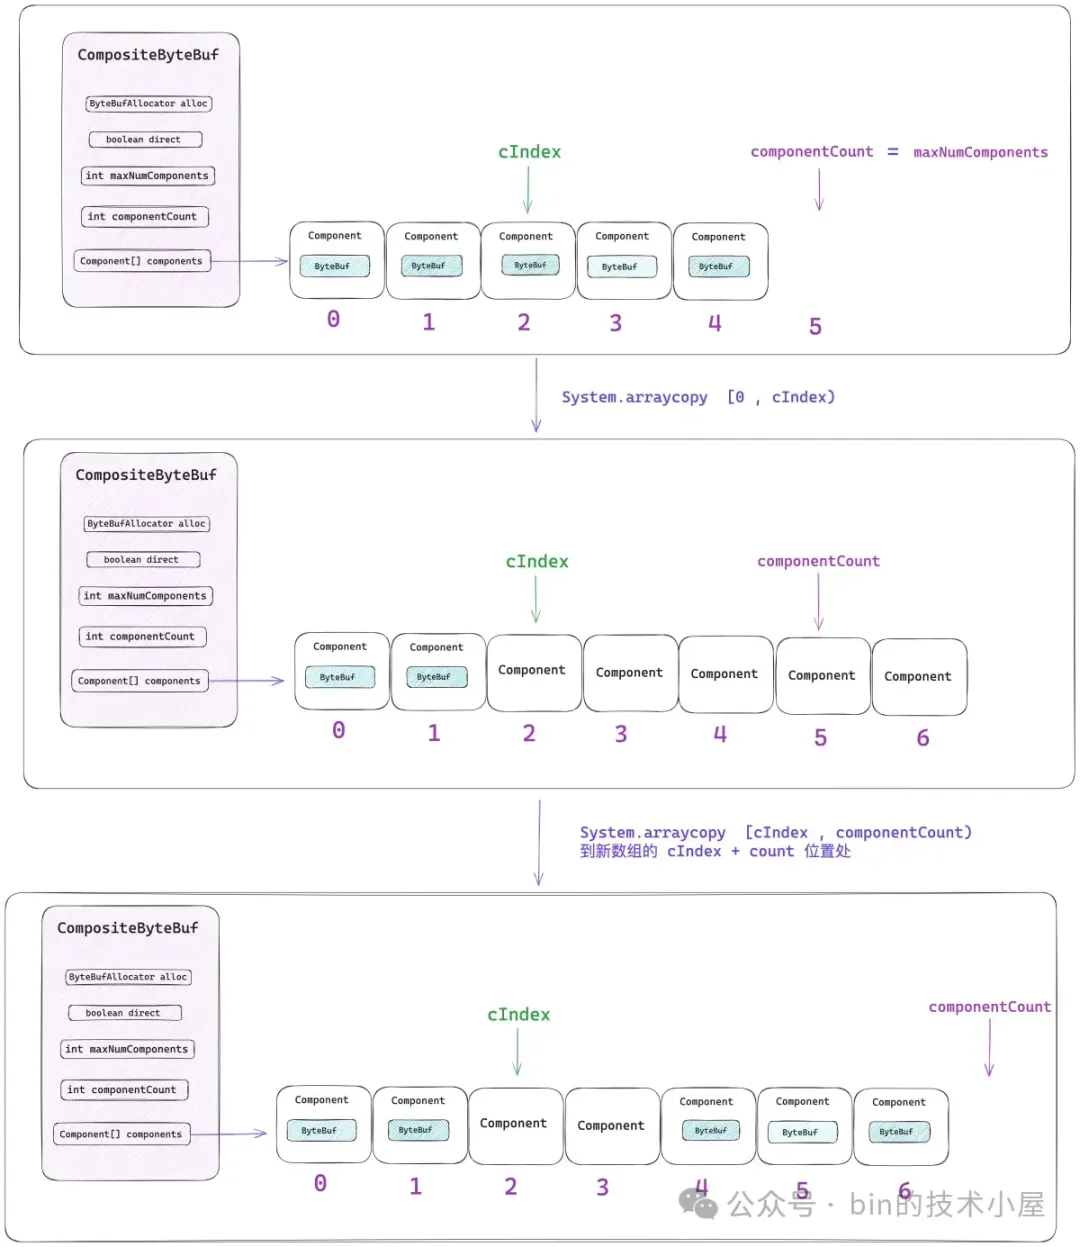
這樣一來,就在新 components 數組的 cIndex 索引處,空出了兩個位置出來用來添加本次這兩個 ByteBuf。最後更新 componentCount 的值。以上騰挪空間的邏輯封裝在 shiftComps 方法中:
private void shiftComps(int i, int count) {
    // 初始為 0,當前 CompositeByteBuf 中包含的 component 個數
    final int size = componentCount,
    // 本次 addComponents0 操作之後,新的 component 個數
    newSize = size + count;

    // newSize 超過了 max components(16) 則對 components 數組進行擴容
    if (newSize > components.length) {
        // grow the array,擴容到原來的 3 / 2
        int newArrSize = Math.max(size + (size >> 1), newSize);
        Component[] newArr;
        if (i == size) {
            // 在 Component[] 數組的末尾進行插入
            // 初始狀態 i = size = 0
            // size - 1 是 Component[] 數組的最後一個元素,指定的 i 恰好越界
            // 原來 Component[] 數組中的內容全部拷貝到 newArr 中
            newArr = Arrays.copyOf(components, newArrSize, Component[].class);
        } else {
            // 在 Component[] 數組的中間進行插入
            newArr = new Component[newArrSize];
            if (i > 0) {
                // [0 , i) 之間的內容拷貝到 newArr 中
                System.arraycopy(components, 0, newArr, 0, i);
            }
            if (i < size) {
                // 將剩下的 [i , size) 內容從 newArr 的 i + count 位置處開始拷貝。
                // 因為需要將原來的 [ i , i+count ) 這些位置讓出來,添加本次新的 components,
                System.arraycopy(components, i, newArr, i + count, size - i);
            }
        }
        // 擴容後的新數組
        components = newArr;
    } else if (i < size) {
        // i < size 本次操作要覆蓋原來的 [ i , i+count ) 之間的位置,所以這裏需要將原來位置上的 component 向後移動
        System.arraycopy(components, i, components, i + count, size - i);
    }
    // 更新 componentCount
    componentCount = newSize;
}
#### 2.8.4 Component 如何封裝 ByteBuf

經過上一小節 shiftComps 方法的輾轉騰挪之後,現在 CompositeByteBuf 中的 components 數組終於有位置可以容納本次需要添加的 ByteBuf 了。接下來就需要為每一個 ByteBuf 創建初始化一個 Component 實例,最後將這些 Component 實例放到 components 數組對應的位置上。
private static final class Component {
    // 原生 ByteBuf
    final ByteBuf srcBuf;
    // CompositeByteBuf 的 index 加上 srcAdjustment 就得到了srcBuf 的相關 index
    int srcAdjustment;
    // srcBuf 可能是一個被包裝過的 ByteBuf,比如 SlicedByteBuf , DuplicatedByteBuf
    // 被 srcBuf 包裝的最底層的 ByteBuf 就存放在 buf 字段中
    final ByteBuf buf;
    // CompositeByteBuf 的 index 加上 adjustment 就得到了 buf 的相關 index
    int adjustment;

    // 該 Component 在 CompositeByteBuf 視角中表示的數據範圍 [offset , endOffset)
    int offset;
    int endOffset;
}

我們首先需要初始化 Component 實例的 offset , endOffset 屬性,前面我們已經介紹了,一個 Component 在 CompositeByteBuf 的視角中所能表示的數據邏輯範圍是 `[offset , endOffset)`。在 components 數組中,一般前一個 Component 的 endOffset 往往是後一個 Component 的 offset。
如果我們期望從 components 數組的第一個位置處開始插入(cIndex = 0),那麼第一個 Component 的 offset 自然是 0 。
如果 cIndex > 0 , 那麼我們就需要找到它上一個 Component —— components[cIndex - 1] , 上一個 Component 的 endOffset 恰好就是當前 Component 的 offset。
然後通過 `newComponent` 方法利用 ByteBuf 相關屬性以及 offset 來初始化 Component 實例。隨後將創建出來的 Component 實例放置在對應的位置上 —— components[cIndex] 。
       // 獲取當前正在插入 Component 的 offset
       int nextOffset = cIndex > 0 ? components[cIndex - 1].endOffset : 0;
        for (ci = cIndex; arrOffset < len; arrOffset++, ci++) {
            // 待插入 ByteBuf
            ByteBuf b = buffers[arrOffset];
            if (b == null) {
                break;
            }
            // 將 ByteBuf 封裝在 Component 中
            Component c = newComponent(ensureAccessible(b), nextOffset);
            components[ci] = c;
            // 下一個 Component 的 Offset 是上一個 Component 的 endOffset
            nextOffset = c.endOffset;
        }
假設現在有一個空的 CompositeByteBuf,我們需要將一個數據範圍為 `[1 , 4]` , readerIndex = 1 的 srcBuf , 插入到 CompositeByteBuf 的 components 數組中。
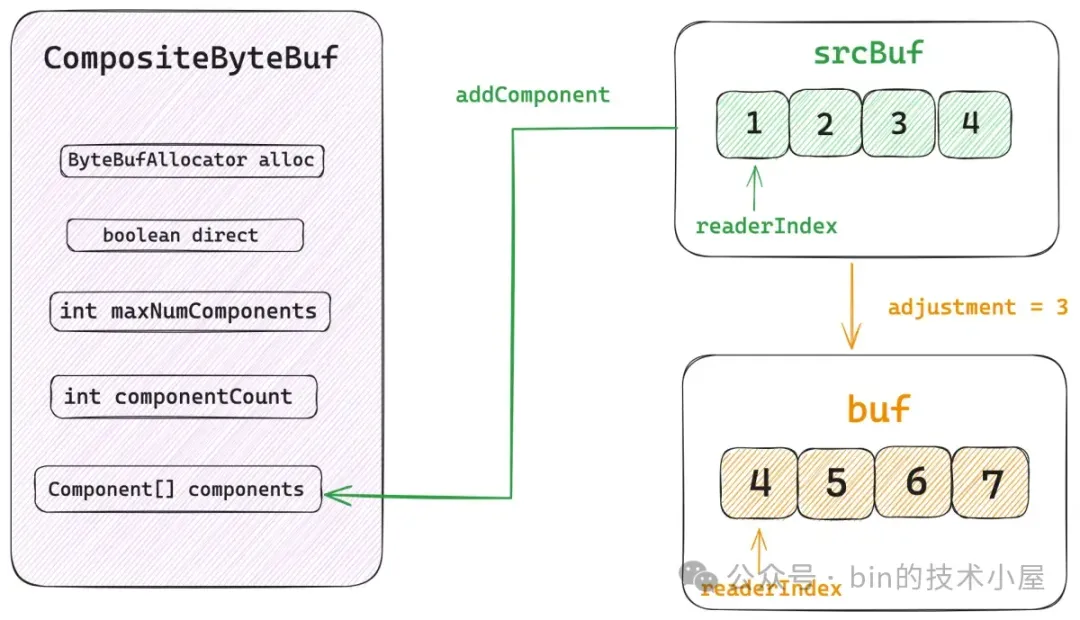
但是如果該 srcBuf 是一個視圖 ByteBuf 的話,比如:SlicedByteBuf , DuplicatedByteBuf。或者是一個被包裝過的 ByteBuf ,比如:WrappedByteBuf , SwappedByteBuf。
那麼我們就需要對 srcBuf 不斷的執行 `unwrap()`, 將其最底層的原生 ByteBuf 提取出來,如上圖所示,原生 buf 的數據範圍為 `[4 , 7]` , srcBuf 與 buf 之間相關 index 的偏移 adjustment 等於 3 , 原生 buf 的 readerIndex = 4 。
最後我們會根據 srcBuf , srcIndex(srcBuf 的 readerIndex),原生 buf ,unwrappedIndex(buf 的 readerIndex),offset , len (srcBuf 中的可讀字節數)來初始化 Component 實例。
private Component newComponent(final ByteBuf buf, final int offset) {
    // srcBuf 的 readerIndex = 1
    final int srcIndex = buf.readerIndex();
    // srcBuf 中的可讀字節數 = 4
    final int len = buf.readableBytes();

    // srcBuf 可能是一個被包裝過的 ByteBuf,比如 SlicedByteBuf,DuplicatedByteBuf
    // 獲取 srcBuf 底層的原生 ByteBuf
    ByteBuf unwrapped = buf;
    // 原生 ByteBuf 的 readerIndex
    int unwrappedIndex = srcIndex;
    while (unwrapped instanceof WrappedByteBuf || unwrapped instanceof SwappedByteBuf) {
        unwrapped = unwrapped.unwrap();
    }

    // unwrap if already sliced
    if (unwrapped instanceof AbstractUnpooledSlicedByteBuf) {
        // 獲取視圖 ByteBuf  相對於 原生 ByteBuf 的相關 index 偏移
        // adjustment = 3
        // unwrappedIndex = srcIndex + adjustment = 4
        unwrappedIndex += ((AbstractUnpooledSlicedByteBuf) unwrapped).idx(0);
        // 獲取原生 ByteBuf
        unwrapped = unwrapped.unwrap();
    } else if (unwrapped instanceof PooledSlicedByteBuf) {
        unwrappedIndex += ((PooledSlicedByteBuf) unwrapped).adjustment;
        unwrapped = unwrapped.unwrap();
    } else if (unwrapped instanceof DuplicatedByteBuf || unwrapped instanceof PooledDuplicatedByteBuf) {
        unwrapped = unwrapped.unwrap();
    }

    return new Component(buf.order(ByteOrder.BIG_ENDIAN), srcIndex,
            unwrapped.order(ByteOrder.BIG_ENDIAN), unwrappedIndex, offset, len, slice);
}
由於當前的 CompositeByteBuf 還是空的,裏面沒有包含任何邏輯數據,當長度為 4 的 srcBuf 加入之後,CompositeByteBuf 就產生了 `[0 , 3]` 這段邏輯數據範圍,所以 srcBuf 所屬 Component 的 offset = 0 , endOffset = 4 ,srcAdjustment = 1 ,adjustment = 4。
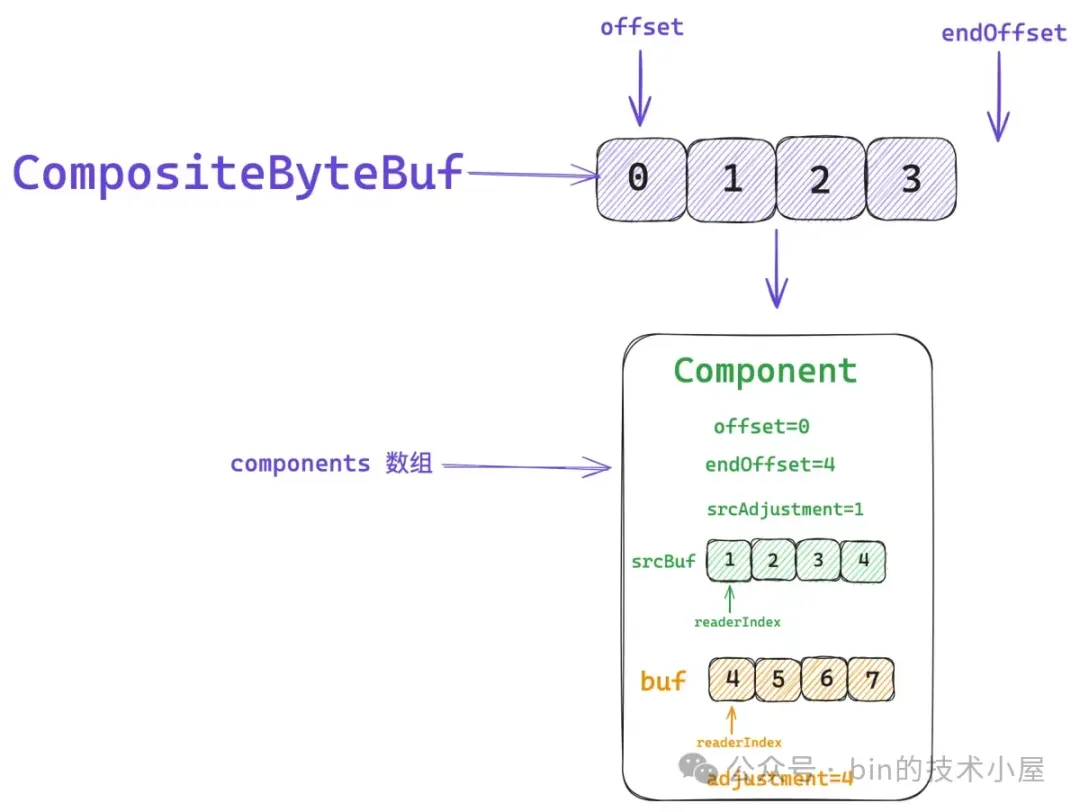
    Component(ByteBuf srcBuf, int srcOffset, ByteBuf buf, int bufOffset,
            int offset, int len, ByteBuf slice) {
        this.srcBuf = srcBuf;
        // 用於將 CompositeByteBuf 的 index 轉換為 srcBuf 的index
        // 1 - 0 = 1
        this.srcAdjustment = srcOffset - offset;
        this.buf = buf;
        // 用於將 CompositeByteBuf 的 index 轉換為 buf 的index
        // 4 - 0 = 4
        this.adjustment = bufOffset - offset;
        // CompositeByteBuf [offset , endOffset) 這段範圍的字節存儲在該 Component 中
        //  0
        this.offset = offset;
        // 下一個 Component 的 offset
        // 4
        this.endOffset = offset + len;
    }
當我們繼續初始化下一個 Component 的時候,它的 Offset 其實就是這個 Component 的 endOffset 。後面的流程都是一樣的了。

#### 2.8.5 addComponents0

在我們清楚了以上背景知識之後,在看 addComponents0 方法的邏輯就很清晰了:
private CompositeByteBuf addComponents0(boolean increaseWriterIndex,
        final int cIndex, ByteBuf[] buffers, int arrOffset) {
    // buffers 數組長度
    final int len = buffers.length,
    // 本次批量添加的 ByteBuf 個數
    count = len - arrOffset;
    // ci 表示從 components 數組的哪個索引位置處開始添加
    // 這裏先給一個初始值,後續 shiftComps 完成之後還會重新設置
    int ci = Integer.MAX_VALUE;
    try {
        // cIndex >= 0 && cIndex <= componentCount
        checkComponentIndex(cIndex);
        // 為新添加進來的 ByteBuf 騰挪位置,以及增加 componentCount 計數
        shiftComps(cIndex, count); // will increase componentCount
        // 獲取當前正在插入 Component 的 offset
        int nextOffset = cIndex > 0 ? components[cIndex - 1].endOffset : 0;
        for (ci = cIndex; arrOffset < len; arrOffset++, ci++) {
            ByteBuf b = buffers[arrOffset];
            if (b == null) {
                break;
            }
            // 將 ByteBuf 封裝在 Component 中
            Component c = newComponent(ensureAccessible(b), nextOffset);
            components[ci] = c;
            // 下一個 Component 的 Offset 是上一個 Component 的 endOffset
            nextOffset = c.endOffset;
        }
        return this;
    } finally {
        // ci is now the index following the last successfully added component
        // ci = componentCount 説明是一直按照順序向後追加 component
        // ci < componentCount 表示在 components 數組的中間插入新的 component
        if (ci < componentCount) {
            // 如果上面 for 循環完整的走完,ci = cIndex + count
            if (ci < cIndex + count) {
                // 上面 for 循環中有 break 的情況出現或者有異常發生
                // ci < componentCount ,在上面的 shiftComps 中將會涉及到 component 移動,因為要騰出位置
                // 如果發生異常,則將後面沒有加入 components 數組的 component 位置刪除掉
                // [ci, cIndex + count) 這段位置要刪除,因為在 ci-1 處已經發生異常,重新調整 components 數組
                removeCompRange(ci, cIndex + count);
                for (; arrOffset < len; ++arrOffset) {
                    ReferenceCountUtil.safeRelease(buffers[arrOffset]);
                }
            }
            // (在中間插入的情況下)需要調整 ci 到 size -1 之間的 component 的相關 Offset
            updateComponentOffsets(ci); // only need to do this here for components after the added ones
        }
        if (increaseWriterIndex && ci > cIndex && ci <= componentCount) {
            // 本次添加的最後一個 components[ci - 1]
            // 本次添加的第一個 components[cIndex]
            // 最後一個 endOffset 減去第一個的 offset 就是本次添加的字節個數
            writerIndex += components[ci - 1].endOffset - components[cIndex].offset;
        }
    }
}
這裏我們重點介紹下 `finally {}` 代碼塊中的邏輯。首先 addComponents0 方法中的核心邏輯是先通過 shiftComps 方法為接下來新創建出來的 Component 騰挪位置,因為我們有可能是在原有 components 數組的中間位置插入。
然後會在一個 `for ()` 循環中不停的將新創建的 Component 放置到 `components[ci]` 位置上。
當跳出 for 循環進入 finally 代碼塊的時候,ci 的值恰恰就是最後一個成功加入 components 數組的 Component 下一個位置,如下圖所示,假設 components[0] , components[1] ,components[2] 是我們剛剛在 for 循環中插入的新值,那麼 for 循環結束之後,ci 的值就是 3 。
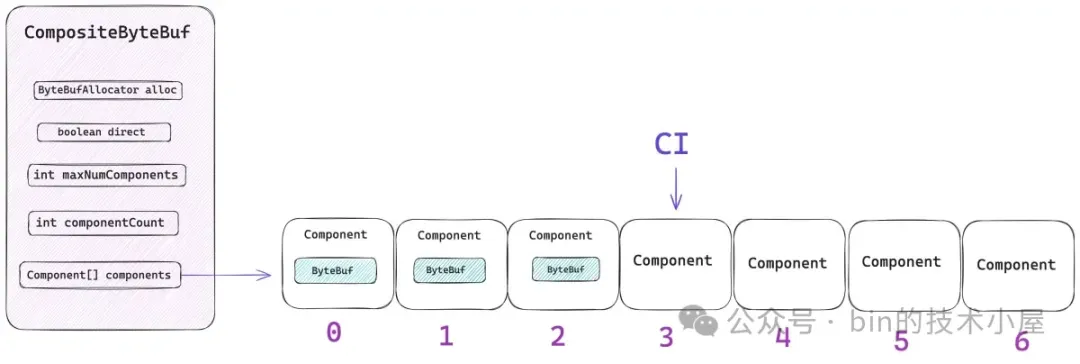
如果 `ci = componentCount` 這恰恰説明我們一直是在 components 數組的末尾進行插入,這種情況下各個 Component 實例中的 [offset , endOffset) 都是連續的不需要做任何調整。
但如果 `ci < componentCount` 這就説明了我們是在原來 components 數組的中間位置處開始插入,下圖中的 components[3] ,components[4] 是插入位置,當插入完成之後 ci 的值為 5。
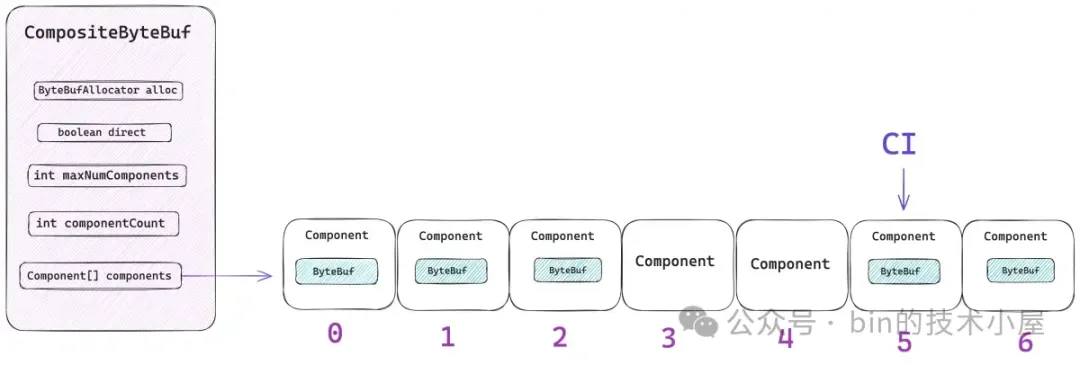
這時候就需要重新調整 components[5],components[6] 中的 `[offset , endOffset)` 範圍,因為 shiftComps 方法只負責幫你騰挪位置,不負責重新調整 `[offset , endOffset)` 範圍,當新的 Component 實例插入之後,原來彼此相鄰的 Component 實例之間的 `[offset , endOffset)` 就不連續了,所以這裏需要重新調整。
比如下圖中所展示的情況,原來的 components 數組包含五個 Component 實例,分別在 0 - 4 位置,它們之間原本的是連續的 `[offset , endOffset)`。

現在我們要在位置 3 ,4 處插入兩個新的 Component 實例,所以原來的 components[3] ,components[4] 需要移動到 components[5] ,components[6] 的位置上,但 shiftComps 只負責移動而不負責重新調整它們的 `[offset , endOffset)`。
當新的 Component 實例插入之後,components[4],components[5] ,components[6] 之間的 `[offset , endOffset)` 就不連續了。所以需要通過 `updateComponentOffsets` 方法重新調整。
private void updateComponentOffsets(int cIndex) {
    int size = componentCount;
    if (size <= cIndex) {
        return;
    }
    // 重新調整 components[5] ,components[6] 之間的 [offset , endOffset)
    int nextIndex = cIndex > 0 ? components[cIndex - 1].endOffset : 0;
    for (; cIndex < size; cIndex++) {
        Component c = components[cIndex];
        // 重新調整 Component 的 offset , endOffset
        c.reposition(nextIndex);
        nextIndex = c.endOffset;
    }
}

 void reposition(int newOffset) {
        int move = newOffset - offset;
        endOffset += move;
        srcAdjustment -= move;
        adjustment -= move;
        offset = newOffset;
  }
以上介紹的是正常情況下的邏輯,如果在執行 for 循環的過程中出現了 break 或者發生了異常,那麼 ci 的值一定是小於 `cIndex + count` 的。什麼意思呢 ?
比如我們要向一個 components 數組 `cIndex = 0` 的位置插入 `count = 5` 個 Component 實例,但是在插入第四個 Component 的時候,也就是在 components[3] 的位置處出現了 break 或者異常的情況,那麼就會退出 for 循環來到這裏的 finally 代碼塊。
此時的 ci 值為 3 ,cIndex + count 的值為 5,那麼就説明出現了異常情況。
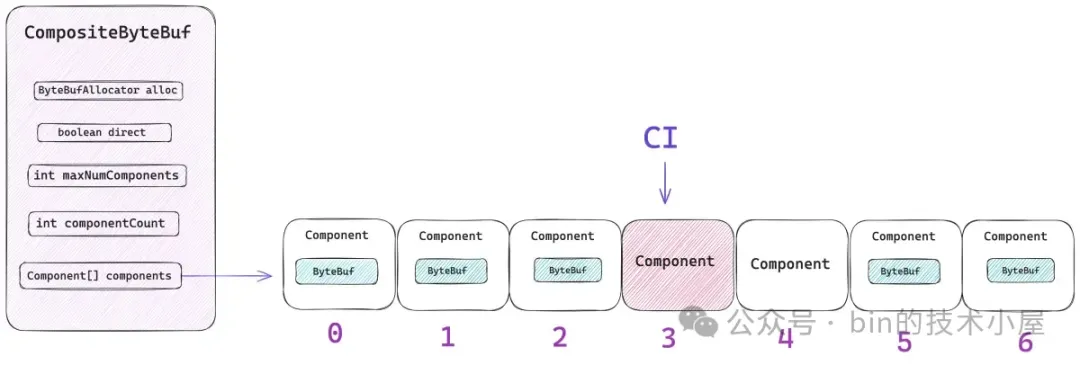
值得我們注意的是,components[3] 以及 components[4] 這兩個位置是之前通過 shiftComps 方法騰挪出來的,由於異常情況的發生,這兩個位置將不會放置任何 Component 實例。
這樣一來 components 數組就出現了空洞,所以接下來我們還需要將 components[5] , components[6] 位置上的 Component 實例重新移動回 components[3] 以及 components[4] 的位置上。
由於異常情況,那些 ByteBuf 數組中沒有被添加進 CompositeByteBuf 的 ByteBuf 需要執行 release 。
#### 2.8.6 consolidateIfNeeded
到現在為止一個空的 CompositeByteBuf 就算被填充好了,但是這裏有一個問題,就是 CompositeByteBuf 中所能包含的 Component 實例個數是受到 maxNumComponents 限制的。
我們回顧一下整個 addComponents 的過程,好像還沒有一個地方對 Component 的個數做出限制,甚至在 shiftComps 方法中還會對 components 數組進行擴容。
那麼這樣一來,Component 的個數有很大可能會超過 maxNumComponents 的限制,如果當前 CompositeByteBuf 中包含的 component 個數已經超過了 maxNumComponents ,那麼就需要在 `consolidate0` 方法中,將所有的 component 合併。
private void consolidateIfNeeded() {
    int size = componentCount;
    // 如果當前 component 的個數已經超過了 maxNumComponents,則將所有 component 合併成一個
    if (size > maxNumComponents) {
        consolidate0(0, size);
    }
}
在這裏,Netty 會將當前 CompositeByteBuf 中包含的所有 Component 合併成一個更大的 Component。合併之後 ,CompositeByteBuf 中就只包含一個 Component 了。合併的核心邏輯如下:
1. 根據當前 CompositeByteBuf 的 capacity 重新申請一個更大的 ByteBuf ,該 ByteBuf 需要容納下 CompositeByteBuf 所能表示的所有字節。
2. 將所有 Component 底層的 buf 中存儲的內容全部轉移到新的 ByteBuf 中,並釋放原有 buf 的內存。
3. 刪除 Component 數組中所有的 Component。
4. 根據新的 ByteBuf 創建一個新的 Component 實例,並放置在 components 數組的第一個位置上。
private void consolidate0(int cIndex, int numComponents) {
    if (numComponents <= 1) {
        return;
    }
    // 將 [cIndex , endCIndex) 之間的 Components 合併成一個
    final int endCIndex = cIndex + numComponents;
    final int startOffset = cIndex != 0 ? components[cIndex].offset : 0;
    // 計算合併範圍內 Components 的存儲的字節總數
    final int capacity = components[endCIndex - 1].endOffset - startOffset;
    // 重新申請一個新的 ByteBuf
    final ByteBuf consolidated = allocBuffer(capacity);
    // 將合併範圍內的 Components 中的數據全部轉移到新的 ByteBuf 中
    for (int i = cIndex; i < endCIndex; i ++) {
        components[i].transferTo(consolidated);
    }
    lastAccessed = null;
    // 數據轉移完成之後,將合併之前的這些 components 刪除
    removeCompRange(cIndex + 1, endCIndex);
    // 將合併之後的新 Component 存儲在 cIndex 位置處
    components[cIndex] = newComponent(consolidated, 0);
    if (cIndex != 0 || numComponents != componentCount) {
        // 如果 cIndex 不是從 0 開始的,那麼就更新 newComponent 的相關 offset
        updateComponentOffsets(cIndex);
    }
}
#### 2.8.7 CompositeByteBuf 的應用
當我們在傳輸層採用 TCP 協議進行數據傳輸的時候,經常會遇到半包或者粘包的問題,我們從 socket 中讀取出來的 ByteBuf 很大可能還構不成一個完整的包,這樣一來,我們就需要將每次從 socket 中讀取出來的 ByteBuf 在用户態緩存累加起來。
當累加起來的 ByteBuf 達到一個完整的數據包之後,我們在從這個被緩存的 ByteBuf 中讀取字節,然後進行解碼,最後將解碼出來的對象沿着 pipeline 向後傳遞。
public abstract class ByteToMessageDecoder extends ChannelInboundHandlerAdapter {
// 緩存累加起來的 ByteBuf
ByteBuf cumulation;
// ByteBuf 的累加聚合器
private Cumulator cumulator = MERGE_CUMULATOR;
// 是否是第一次收包
private boolean first;

@Override
public void channelRead(ChannelHandlerContext ctx, Object msg) throws Exception {
    if (msg instanceof ByteBuf) {
        // 用於存儲解碼之後的對象
        CodecOutputList out = CodecOutputList.newInstance();
        try {
            // 第一次收包
            first = cumulation == null;
            // 將新進來的 (ByteBuf) msg 與之前緩存的 cumulation 聚合累加起來
            cumulation = cumulator.cumulate(ctx.alloc(),
                    first ? Unpooled.EMPTY_BUFFER : cumulation, (ByteBuf) msg);
            // 解碼
            callDecode(ctx, cumulation, out);
        } catch (DecoderException e) {
            throw e;
        } catch (Exception e) {
            throw new DecoderException(e);
        } finally {
                ........ 省略 ........
                // 解碼成功之後,就將解碼出來的對象沿着 pipeline 向後傳播
                fireChannelRead(ctx, out, size);
        }
    } else {
        ctx.fireChannelRead(msg);
    }
}
}
Netty 為此專門定義了一個 Cumulator 接口,用於將每次從 socket 中讀取到的 ByteBuf 聚合累積起來。參數 alloc 是一個 ByteBuf 分配器,用於在聚合的過程中如果涉及到擴容,合併等操作可以用它來申請內存。

參數 cumulation 就是之前緩存起來的 ByteBuf,當第一次收包的時候,這裏的 cumulation 就是一個空的 ByteBuf —— Unpooled.EMPTY_BUFFER 。

參數 in 則是本次剛剛從 socket 中讀取出來的 ByteBuf,可能是一個半包,Cumulator 的作用就是將新讀取出來的 ByteBuf (in),累加合併到之前緩存的 ByteBuf (cumulation)中。
public interface Cumulator {
    ByteBuf cumulate(ByteBufAllocator alloc, ByteBuf cumulation, ByteBuf in);
}
Netty 提供了 Cumulator 接口的兩個實現,一個是 MERGE_CUMULATOR , 另一個是 COMPOSITE_CUMULATOR 。
public abstract class ByteToMessageDecoder extends ChannelInboundHandlerAdapter {
public static final Cumulator MERGE_CUMULATOR

public static final Cumulator COMPOSITE_CUMULATOR
}
MERGE_CUMULATOR 是 Netty 默認的 Cumulator ,也是傳統意義上最為普遍的一種聚合 ByteBuf 的實現,它的核心思想是在聚合多個 ByteBuf 的時候,首先會申請一塊更大的內存,然後將這些需要被聚合的 ByteBuf 中的內容全部拷貝到新的 ByteBuf 中。然後釋放掉原來的 ByteBuf 。

效果就是將多個 ByteBuf 重新聚合成一個更大的 ByteBuf ,但這種方式涉及到內存申請以及內存拷貝的開銷,優勢就是內存都是連續的,讀取速度快。

另外一種實現就是 COMPOSITE_CUMULATOR ,也是本小節的主題,它的核心思想是將多個 ByteBuf 聚合到一個 CompositeByteBuf 中,不需要額外申請內存,更不需要內存的拷貝。

但由於 CompositeByteBuf 只是邏輯上的一個視圖 ByteBuf,其底層依賴的內存還是原來的那些 ByteBuf,所以就導致了 CompositeByteBuf 中的內存不是連續的,在加上 CompositeByteBuf 的相關 index 設計的比較複雜,所以在讀取速度方面可能會比 MERGE_CUMULATOR 更慢一點,所以我們需要根據自己的場景來權衡考慮,靈活選擇。
public static final Cumulator COMPOSITE_CUMULATOR = new Cumulator() {
    @Override
    public ByteBuf cumulate(ByteBufAllocator alloc, ByteBuf cumulation, ByteBuf in) {
        if (!cumulation.isReadable()) {
            // 之前緩存的已經解碼完畢,這裏將它釋放,並從 in 開始重新累加。
            cumulation.release();
            return in;
        }
        CompositeByteBuf composite = null;
        try {
            // cumulation 是一個 CompositeByteBuf,説明 cumulation 之前是一個被聚合過的 ByteBuf
            if (cumulation instanceof CompositeByteBuf && cumulation.refCnt() == 1) {
                composite = (CompositeByteBuf) cumulation;
                // 這裏需要保證 CompositeByteBuf 的 writerIndex 與 capacity 相等
                // 因為我們需要每次在 CompositeByteBuf 的末尾聚合添加新的 ByteBuf
                if (composite.writerIndex() != composite.capacity()) {
                    composite.capacity(composite.writerIndex());
                }
            } else {
                // 如果 cumulation 不是 CompositeByteBuf,只是一個普通的 ByteBuf
                // 説明 cumulation 之前還沒有被聚合過,這裏是第一次聚合,所以需要先創建一個空的 CompositeByteBuf
                // 然後將 cumulation 添加到 CompositeByteBuf 中
                composite = alloc.compositeBuffer(Integer.MAX_VALUE).addFlattenedComponents(true, cumulation);
            }
            // 將本次新接收到的 ByteBuf(in)添加累積到 CompositeByteBuf 中
            composite.addFlattenedComponents(true, in);
            in = null;
            return composite;
        } finally {
             ........ 省略聚合失敗的處理 ..........
        }
    }
};
## 3. Heap or Direct
在前面的幾個小節中,我們討論了很多 ByteBuf 的設計細節,接下來讓我們跳出這些細節,重新站在全局的視角下來看一下 ByteBuf 的總體設計。

在 ByteBuf 的整個設計體系中,Netty 從 ByteBuf 內存佈局的角度上,將整個體系分為了 HeapByteBuf 和 DirectByteBuf 兩個大類。Netty 提供了 `PlatformDependent.directBufferPreferred() `方法來指定在默認情況下,是否偏向於分配 Direct Memory。
public final class PlatformDependent {
// 是否偏向於分配 Direct Memory
private static final boolean DIRECT_BUFFER_PREFERRED;

public static boolean directBufferPreferred() {
    return DIRECT_BUFFER_PREFERRED;
}
}
要想使得 DIRECT_BUFFER_PREFERRED 為 true ,必須同時滿足以下兩個條件:

1. `-Dio.netty.noPreferDirect` 參數必須指定為 false(默認)。

2. CLEANER 不為 NULL , 也就是需要 JDK 中包含有效的 CLEANER 機制。
static {
    DIRECT_BUFFER_PREFERRED = CLEANER != NOOP
                              && !SystemPropertyUtil.getBoolean("io.netty.noPreferDirect", false);
    if (logger.isDebugEnabled()) {
        logger.debug("-Dio.netty.noPreferDirect: {}", !DIRECT_BUFFER_PREFERRED);
    }
}
如果是安卓平台,那麼 CLEANER 直接就是 NOOP,不會做任何判斷,默認情況下直接走 Heap Memory , 除非特殊指定要走 Direct Memory。
    if (!isAndroid()) {
        if (javaVersion() >= 9) {
            // 檢查 sun.misc.Unsafe 類中是否包含有效的 invokeCleaner 方法
            CLEANER = CleanerJava9.isSupported() ? new CleanerJava9() : NOOP;
        } else {
            // 檢查 java.nio.ByteBuffer 中是否包含了 cleaner 字段
            CLEANER = CleanerJava6.isSupported() ? new CleanerJava6() : NOOP;
        }
    } else {
        CLEANER = NOOP;
    }
如果是 JDK 9 以上的版本,Netty 會檢查是否可以通過 `sun.misc.Unsafe` 的 `invokeCleaner` 方法正確執行 DirectBuffer 的 Cleaner,如果執行過程中發生異常,那麼 CLEANER 就為 NOOP,Netty 在默認情況下就會走 Heap Memory。
public final class Unsafe {
public void invokeCleaner(java.nio.ByteBuffer directBuffer) {
    if (!directBuffer.isDirect())
        throw new IllegalArgumentException("buffer is non-direct");

    theInternalUnsafe.invokeCleaner(directBuffer);
}
}
如果是 JDK 9 以下的版本,Netty 就會通過反射的方式先去獲取 DirectByteBuffer 的 cleaner 字段,如果 cleaner 為 null 或者在執行 clean 方法的過程中出現了異常,那麼 CLEANER 就為 NOOP,Netty 在默認情況下就會走 Heap Memory。
class DirectByteBuffer extends MappedByteBuffer implements DirectBuffer
{
private final Cleaner cleaner;

DirectByteBuffer(int cap) {                   // package-private

    ...... 省略 .....

    base = UNSAFE.allocateMemory(size);
    cleaner = Cleaner.create(this, new Deallocator(base, size, cap));
}
}
如果 `PlatformDependent.directBufferPreferred()` 方法返回 true ,那麼 ByteBufAllocator 接下來在分配內存的時候,默認情況下就會分配 directBuffer。
public final class UnpooledByteBufAllocator extends AbstractByteBufAllocator {
// ByteBuf 分配器
public static final UnpooledByteBufAllocator DEFAULT =
        new UnpooledByteBufAllocator(PlatformDependent.directBufferPreferred());
}
public abstract class AbstractByteBufAllocator implements ByteBufAllocator {
// 是否默認分配 directBuffer
private final boolean directByDefault;

protected AbstractByteBufAllocator(boolean preferDirect) {
    directByDefault = preferDirect && PlatformDependent.hasUnsafe();
}

@Override
public ByteBuf buffer() {
    if (directByDefault) {
        return directBuffer();
    }
    return heapBuffer();
}
}
一般情況下,JDK 都會包含有效的 CLEANER 機制,所以我們完全可以僅是通過 `-Dio.netty.noPreferDirect` (默認 false)來控制 Netty 默認情況下走  Direct Memory。

但如果是安卓平台,那麼無論  `-Dio.netty.noPreferDirect`  如何設置,Netty 默認情況下都會走  Heap Memory 。

## 4. Cleaner or NoCleaner

站在內存回收的角度,Netty 將 ByteBuf 分為了帶有 Cleaner 的 DirectByteBuf 和沒有 Cleaner 的 DirectByteBuf 兩個大類。在之前的文章[《以 ZGC 為例,談一談 JVM 是如何實現 Reference 語義的》](https://mp.weixin.qq.com/s/ukk_Pqk0_Kv0I7mxmG_yVA) 中的第三小節,筆者詳細的介紹過,JVM  如何利用 Cleaner 機制來回收 DirectByteBuffer 背後的 Native Memory 。

而 Cleaner 回收 DirectByteBuffer 的 Native Memory 需要依賴 GC 的發生,當一個 DirectByteBuffer 沒有任何強引用或者軟引用的時候,如果此時發生 GC , Cleaner 才會去回收 Native Memory。如果很久都沒發生 GC ,那麼這些 DirectByteBuffer 所引用的 Native Memory 將一直不會釋放。

所以僅僅是依賴 Cleaner 來釋放 Native Memory 是有一定延遲的,極端情況下,如果一直等不來 GC ,很有可能就會發生 OOM 。

而 Netty 的 ByteBuf 設計相當於是對 NIO ByteBuffer 的一種完善擴展,其底層其實都會依賴一個 JDK 的 ByteBuffer。比如,前面介紹的 UnpooledDirectByteBuf , UnpooledUnsafeDirectByteBuf 其底層依賴的就是 JDK  DirectByteBuffer , 而這個 DirectByteBuffer 就是帶有 Cleaner 的 ByteBuf 。
public class UnpooledDirectByteBuf extends AbstractReferenceCountedByteBuf {
// 底層依賴的 JDK DirectByteBuffer
ByteBuffer buffer;

public UnpooledDirectByteBuf(ByteBufAllocator alloc, int initialCapacity, int maxCapacity) {
    // 創建 DirectByteBuffer
    setByteBuffer(allocateDirect(initialCapacity), false);
}
protected ByteBuffer allocateDirect(int initialCapacity) {
    return ByteBuffer.allocateDirect(initialCapacity);
}
public class UnpooledUnsafeDirectByteBuf extends UnpooledDirectByteBuf {
// 底層依賴的 JDK DirectByteBuffer 的內存地址
long memoryAddress;


public UnpooledUnsafeDirectByteBuf(ByteBufAllocator alloc, int initialCapacity, int maxCapacity) {
     // 調用父類 UnpooledDirectByteBuf 構建函數創建底層依賴的 JDK DirectByteBuffer
    super(alloc, initialCapacity, maxCapacity);
}

@Override
final void setByteBuffer(ByteBuffer buffer, boolean tryFree) {
    super.setByteBuffer(buffer, tryFree);
    // 獲取 JDK DirectByteBuffer 的內存地址
    memoryAddress = PlatformDependent.directBufferAddress(buffer);
}
在 JDK NIO 中,凡是通過 `ByteBuffer.allocateDirect` 方法申請到 DirectByteBuffer 都是帶有 Cleaer 的。
public abstract class ByteBuffer {
public static ByteBuffer allocateDirect(int capacity) {
    return new DirectByteBuffer(capacity);
}
}
class DirectByteBuffer extends MappedByteBuffer implements DirectBuffer
{
private final Cleaner cleaner;

DirectByteBuffer(int cap) {                   // package-private

    ...... 省略 .....
    // 通過該構造函數申請到的 Direct Memory 會受到 -XX:MaxDirectMemorySize 參數的限制
    Bits.reserveMemory(size, cap);
    // 底層調用 malloc 申請內存
    base = UNSAFE.allocateMemory(size);

    ...... 省略 .....
    // 創建 Cleaner
    cleaner = Cleaner.create(this, new Deallocator(base, size, cap));
}
}
**而帶有 Cleaner 的 DirectByteBuffer 背後所能引用的 Direct Memory 是受到 `-XX:MaxDirectMemorySize` JVM 參數限制的**。由於 UnpooledDirectByteBuf 以及 UnpooledUnsafeDirectByteBuf 都帶有 Cleaner,所以當他們在系統中沒有任何強引用或者軟引用的時候,如果發生 GC , Cleaner 就會釋放他們的 Direct Memory 。

由於 Cleaner 執行會依賴 GC , 而 GC 的發生往往不那麼及時,會有一定的延時,所以 Netty 為了可以及時的釋放  Direct Memory ,往往選擇不依賴 JDK 的 Cleaner 機制,手動進行釋放。所以就有了 NoCleaner 類型的 DirectByteBuf —— UnpooledUnsafeNoCleanerDirectByteBuf 。
class UnpooledUnsafeNoCleanerDirectByteBuf extends UnpooledUnsafeDirectByteBuf {
@Override
protected ByteBuffer allocateDirect(int initialCapacity) {
    // 創建沒有 Cleaner 的 JDK DirectByteBuffer
    return PlatformDependent.allocateDirectNoCleaner(initialCapacity);
}

@Override
protected void freeDirect(ByteBuffer buffer) {
    // 既然沒有了 Cleaner , 所以 Netty 要手動進行釋放
    PlatformDependent.freeDirectNoCleaner(buffer);
}
}
UnpooledUnsafeNoCleanerDirectByteBuf 的底層同樣也會依賴一個 JDK  DirectByteBuffer , 但和之前不同的是,這裏的 DirectByteBuffer 是不帶有 cleaner 的。

我們通過 JNI 來調用 `DirectByteBuffer(long addr, int cap)` 構造函數創建出來的 JDK  DirectByteBuffer 都是沒有 cleaner 的。**但通過這種方式創建出來的 DirectByteBuffer 背後引用的 Native Memory 是不會受到 `-XX:MaxDirectMemorySize` JVM 參數限制的**。
class DirectByteBuffer {
// Invoked only by JNI: NewDirectByteBuffer(void*, long)
private DirectByteBuffer(long addr, int cap) {
    super(-1, 0, cap, cap, null);
    address = addr;
    // cleaner 為 null
    cleaner = null;
}
}
既然沒有了 cleaner , 所以 Netty 就無法依賴 GC 來釋放 Direct Memory 了,這就要求 Netty 必須手動調用 `freeDirect ` 方法及時地釋放 Direct Memory。

> 事實上,無論 Netty 中的 DirectByteBuf 有沒有 Cleaner, Netty 都會選擇手動的進行釋放,目的就是為了避免 GC 的延遲 , 從而及時的釋放 Direct Memory。

那麼 Netty 中的 DirectByteBuf 在什麼情況下帶有 Cleaner,又在什麼情況下不帶 Cleaner 呢 ?我們可以通過 `PlatformDependent.useDirectBufferNoCleaner` 方法的返回值進行判斷:
public final class PlatformDependent {
// Netty 的 DirectByteBuf 是否帶有 Cleaner
private static final boolean USE_DIRECT_BUFFER_NO_CLEANER;
public static boolean useDirectBufferNoCleaner() {
    return USE_DIRECT_BUFFER_NO_CLEANER;
}
}
- USE_DIRECT_BUFFER_NO_CLEANER = TRUE 表示 Netty 創建出來的 DirectByteBuf 不帶有 Cleaner 。  Direct Memory 的用量不會受到 JVM 參數 -`XX:MaxDirectMemorySize` 的限制。

- USE_DIRECT_BUFFER_NO_CLEANER = FALSE 表示 Netty 創建出來的 DirectByteBuf 帶有 Cleaner 。  Direct Memory 的用量會受到 JVM 參數 -`XX:MaxDirectMemorySize` 的限制。

我們可以通過 `-Dio.netty.maxDirectMemory` 來設置 USE_DIRECT_BUFFER_NO_CLEANER 的值,除此之外,該參數還可以指定在 Netty 層面上可以使用的最大 DirectMemory 用量。

`io.netty.maxDirectMemory = 0` 那麼 USE_DIRECT_BUFFER_NO_CLEANER 就為 FALSE , 表示在 Netty 層面創建出來的 DirectByteBuf 都是帶有 Cleaner 的,**這種情況下 Netty 並不會限制 maxDirectMemory 的用量,因為限制了也沒用,具體能用多少 maxDirectMemory,還是由 JVM 參數 `-XX:MaxDirectMemorySize` 決定的**。

`io.netty.maxDirectMemory < 0` ,默認為 -1,也就是在默認情況下 USE_DIRECT_BUFFER_NO_CLEANER 為 TRUE , 創建出來的 DirectByteBuf 都是不帶 Cleaner 的。由於在這種情況下 maxDirectMemory 的用量並不會受到 JVM 參數 `-XX:MaxDirectMemorySize` 的限制,所以在 Netty 層面上必須限制 maxDirectMemory 的用量,默認值就是  `-XX:MaxDirectMemorySize`  指定的值。

**這裏需要特別注意的是**,Netty 層面對於 maxDirectMemory 的容量限制和 JVM 層面對於 maxDirectMemory 的容量限制是單獨分別計算的,互不影響。因此站在 JVM 進程的角度來説,總體 maxDirectMemory 的用量是 `-XX:MaxDirectMemorySize` 的兩倍。

`io.netty.maxDirectMemory > 0` 的情況和小於 0 的情況一樣,唯一不同的是 Netty 層面的 maxDirectMemory 用量是專門由  `-Dio.netty.maxDirectMemory` 參數指定,仍然獨立於 JVM 層面的 maxDirectMemory 限制之外單獨計算。

**所以從這個層面來説,Netty 設計 NoCleaner 類型的 DirectByteBuf 的另外一個目的就是為了突破 JVM 對於 maxDirectMemory 用量的限制**。
public final class PlatformDependent {
// Netty 層面  Direct Memory 的用量統計
// 為 NULL 表示在 Netty 層面不進行特殊限制,完全由 JVM 進行限制 Direct Memory 的用量
private static final AtomicLong DIRECT_MEMORY_COUNTER;
// Netty 層面 Direct Memory 的最大用量
private static final long DIRECT_MEMORY_LIMIT;
// JVM 指定的 -XX:MaxDirectMemorySize 最大堆外內存
private static final long MAX_DIRECT_MEMORY = maxDirectMemory0();

static {
    long maxDirectMemory = SystemPropertyUtil.getLong("io.netty.maxDirectMemory", -1);

    if (maxDirectMemory == 0 || !hasUnsafe() || !PlatformDependent0.hasDirectBufferNoCleanerConstructor()) {
        // maxDirectMemory = 0 表示後續創建的 DirectBuffer 是帶有 Cleaner 的,Netty 自己不會強制限定 maxDirectMemory 的用量,完全交給 JDK 的 maxDirectMemory 來限制
        // 因為 Netty 限制了也沒用,其底層依然依賴的是 JDK  DirectBuffer(Cleaner),JDK 會限制 maxDirectMemory 的用量
        // 在沒有 Unsafe 的情況下,那麼就必須使用 Cleaner,因為如果不使用 Cleaner 的話,又沒有 Unsafe,我們就無法釋放 Native Memory 了
        // 如果 JDK 本身不包含創建 NoCleaner DirectBuffer 的構造函數 —— DirectByteBuffer(long, int),那麼自然只能使用 Cleaner
        USE_DIRECT_BUFFER_NO_CLEANER = false;
        // Netty 自身不會統計 Direct Memory 的用量,完全交給 JDK 來統計
        DIRECT_MEMORY_COUNTER = null;
    } else {
        USE_DIRECT_BUFFER_NO_CLEANER = true;
        if (maxDirectMemory < 0) {
            // maxDirectMemory < 0 (默認 -1) 後續創建 NoCleaner DirectBuffer
            // Netty 層面會單獨限制 maxDirectMemory 用量,maxDirectMemory 的值與 -XX:MaxDirectMemorySize 的值相同
            // 因為 JDK 不會統計和限制 NoCleaner DirectBuffer 的用量
            // 注意,這裏 Netty 的 maxDirectMemory 和 JDK 的 maxDirectMemory 是分別單獨統計的
            // 在 JVM 進程的角度來説,整體 maxDirectMemory 的用量是 -XX:MaxDirectMemorySize 的兩倍(Netty用的和 JDK 用的之和)
            maxDirectMemory = MAX_DIRECT_MEMORY;
            if (maxDirectMemory <= 0) {
                DIRECT_MEMORY_COUNTER = null;
            } else {
                // 統計 Netty DirectMemory 的用量
                DIRECT_MEMORY_COUNTER = new AtomicLong();
            }
        } else {
            // maxDirectMemory > 0 後續創建 NoCleaner DirectBuffer,Netty 層面的 maxDirectMemory 就是 io.netty.maxDirectMemory 指定的值
            DIRECT_MEMORY_COUNTER = new AtomicLong();
        }
    }
    logger.debug("-Dio.netty.maxDirectMemory: {} bytes", maxDirectMemory);
    DIRECT_MEMORY_LIMIT = maxDirectMemory >= 1 ? maxDirectMemory : MAX_DIRECT_MEMORY;
}
}
當 Netty 層面的 direct memory 用量超過了 `-Dio.netty.maxDirectMemory` 參數指定的值時,那麼就會拋出 `OutOfDirectMemoryError` ,分配 DirectByteBuf 將會失敗。
private static void incrementMemoryCounter(int capacity) {
    if (DIRECT_MEMORY_COUNTER != null) {
        long newUsedMemory = DIRECT_MEMORY_COUNTER.addAndGet(capacity);
        if (newUsedMemory > DIRECT_MEMORY_LIMIT) {
            DIRECT_MEMORY_COUNTER.addAndGet(-capacity);
            throw new OutOfDirectMemoryError("failed to allocate " + capacity
                    + " byte(s) of direct memory (used: " + (newUsedMemory - capacity)
                    + ", max: " + DIRECT_MEMORY_LIMIT + ')');
        }
    }
}
## 5. Unsafe or NoUnsafe
站在內存訪問方式的角度上來説 , Netty 又會將 ByteBuf 分為了 Unsafe 和 NoUnsafe 兩個大類,其中 NoUnsafe 的內存訪問方式是依賴底層的 JDK ByteBuffer,對於 Netty ByteBuf 的任何操作最終都是會代理給底層 JDK 的 ByteBuffer。
public class UnpooledDirectByteBuf extends AbstractReferenceCountedByteBuf {
// 底層依賴的 JDK DirectByteBuffer
ByteBuffer buffer;
@Override
protected byte _getByte(int index) {
    return buffer.get(index);
}

@Override
protected void _setByte(int index, int value) {
    buffer.put(index, (byte) value);
}
}
而 Unsafe 的內存訪問方式則是通過 `sun.misc.Unsafe` 類中提供的眾多 low-level direct buffer access API 來對內存地址直接進行訪問,由於是脱離 JVM 相關規範直接對內存地址進行訪問,所以我們在調用 Unsafe 相關方法的時候需要考慮 JVM 以及 OS 的各種細節,一不小心就會踩坑出錯,所以它是一種不安全的訪問方式,但是足夠靈活,高效。
public class UnpooledUnsafeDirectByteBuf extends UnpooledDirectByteBuf {
// 底層依賴的 JDK DirectByteBuffer 的內存地址
long memoryAddress;
@Override
protected byte _getByte(int index) {
return UnsafeByteBufUtil.getByte(addr(index));
}
final long addr(int index) {
// 直接通過內存地址進行訪問
return memoryAddress + index;
}
@Override
protected void _setByte(int index, int value) {
UnsafeByteBufUtil.setByte(addr(index), value);
}
}
Netty 提供了 `-Dio.netty.noUnsafe` 參數來讓我們決定是否採用 Unsafe 的內存訪問方式,默認值是 false , 表示 Netty 默認開啓 Unsafe 訪問方式。
final class PlatformDependent0 {
// 是否明確禁用 Unsafe,null 表示開啓 Unsafe
private static final Throwable EXPLICIT_NO_UNSAFE_CAUSE = explicitNoUnsafeCause0();
private static Throwable explicitNoUnsafeCause0() {
final boolean noUnsafe = SystemPropertyUtil.getBoolean("io.netty.noUnsafe", false);
logger.debug("-Dio.netty.noUnsafe: {}", noUnsafe);
if (noUnsafe) {
logger.debug("sun.misc.Unsafe: unavailable (io.netty.noUnsafe)");
return new UnsupportedOperationException("sun.misc.Unsafe: unavailable (io.netty.noUnsafe)");
}
return null;
}}
在確認開啓了 Unsafe 方式之後,我們就需要近一步確認在當前 JRE 的 classpath 下是否存在 `sun.misc.Unsafe` 類,是否能通過反射的方式獲取到 Unsafe 實例 —— theUnsafe 。
public final class Unsafe {
// Unsafe 實例
private static final Unsafe theUnsafe = new Unsafe();}
final class PlatformDependent0 {
// 驗證 Unsafe 是否可用,null 表示 Unsafe 是可用狀態
private static final Throwable UNSAFE_UNAVAILABILITY_CAUSE;
static {
// 嘗試通過反射的方式拿到 theUnsafe 實例
final Object maybeUnsafe = AccessController.doPrivileged(new PrivilegedAction<Object>() {
@Override
public Object run() {
try {
final Field unsafeField = Unsafe.class.getDeclaredField("theUnsafe");
Throwable cause = ReflectionUtil.trySetAccessible(unsafeField, false);
if (cause != null) {
return cause;
}
// the unsafe instance
return unsafeField.get(null);
} catch (NoSuchFieldException e) {
return e;
} catch (SecurityException e) {
return e;
} catch (IllegalAccessException e) {
return e;
} catch (NoClassDefFoundError e) {
// Also catch NoClassDefFoundError in case someone uses for example OSGI and it made
// Unsafe unloadable.
return e;
}
}
});
}}
在獲取到 Unsafe 實例之後,我們還需要檢查 Unsafe 中是否包含所有 Netty 用到的 low-level direct buffer access API ,確保這些 API 可以正常有效的運行。比如,是否包含 `copyMemory` 方法。
public final class Unsafe {
@ForceInline
public void copyMemory(Object srcBase, long srcOffset,
Object destBase, long destOffset,
long bytes) {
theInternalUnsafe.copyMemory(srcBase, srcOffset, destBase, destOffset, bytes);
}}
是否可以通過 Unsafe 訪問到 NIO Buffer 的 address 字段,因為後續我們需要直接操作內存地址。
public abstract class Buffer {
// 內存地址
long address;}
在整個過程中如果發生任何異常,則表示在當前 classpath 下,不存在 `sun.misc.Unsafe` 類或者是由於不同版本 JDK 的設計,Unsafe 中沒有 Netty 所需要的一些必要的訪存 API 。這樣一來我們就無法使用 Unsafe,內存的訪問方式就需要回退到 NoUnsafe。
if (maybeUnsafe instanceof Throwable) {
unsafe = null;
unsafeUnavailabilityCause = (Throwable) maybeUnsafe;
logger.debug("sun.misc.Unsafe.theUnsafe: unavailable", (Throwable) maybeUnsafe);
} else {
unsafe = (Unsafe) maybeUnsafe;
logger.debug("sun.misc.Unsafe.theUnsafe: available");
}
// 為 null 表示 Unsafe 可用
UNSAFE_UNAVAILABILITY_CAUSE = unsafeUnavailabilityCause;
UNSAFE = unsafe;如果在整個過程中沒有發生任何異常,我們獲取到了一個有效的 UNSAFE 實例,那麼後續將正式開啓 Unsafe 的內存訪問方式。
final class PlatformDependent0 {
static boolean hasUnsafe() {
return UNSAFE != null;
}}
完整的 `hasUnsafe()` 判斷邏輯如下:
1. 如果當前平台是安卓或者 .NET ,則不能開啓 Unsafe,因為這些平台並不包含 `sun.misc.Unsafe` 類。
2. `-Dio.netty.noUnsafe` 參數需要設置為 false (默認開啓)。
3.. 當前 classpath 下是否包含有效的 `sun.misc.Unsafe` 類。
4. Unsafe 實例需要包含必要的訪存 API 。
public final class PlatformDependent {
private static final Throwable UNSAFE_UNAVAILABILITY_CAUSE = unsafeUnavailabilityCause0();
public static boolean hasUnsafe() {
return UNSAFE_UNAVAILABILITY_CAUSE == null;
}
private static Throwable unsafeUnavailabilityCause0() {
if (isAndroid()) {
logger.debug("sun.misc.Unsafe: unavailable (Android)");
return new UnsupportedOperationException("sun.misc.Unsafe: unavailable (Android)");
}
if (isIkvmDotNet()) {
logger.debug("sun.misc.Unsafe: unavailable (IKVM.NET)");
return new UnsupportedOperationException("sun.misc.Unsafe: unavailable (IKVM.NET)");
}
Throwable cause = PlatformDependent0.getUnsafeUnavailabilityCause();
if (cause != null) {
return cause;
}
try {
boolean hasUnsafe = PlatformDependent0.hasUnsafe();
logger.debug("sun.misc.Unsafe: {}", hasUnsafe ? "available" : "unavailable");
return hasUnsafe ? null : PlatformDependent0.getUnsafeUnavailabilityCause();
} catch (Throwable t) {
logger.trace("Could not determine if Unsafe is available", t);
// Probably failed to initialize PlatformDependent0.
return new UnsupportedOperationException("Could not determine if Unsafe is available", t);
}
}}
如果 `PlatformDependent.hasUnsafe()` 方法返回 true , 那麼後續 Netty 都會創建 Unsafe 類型的 ByteBuf。
## 6. Pooled or Unpooled
站在內存管理的角度上來講,Netty 將 ByteBuf 分為了 池化(Pooled) 和 非池化(Unpooled)兩個大類,其中 Unpooled 類型的 ByteBuf 是用到的時候才去臨時創建,使用完的時候再去釋放。
而 Direct Memory 的申請和釋放開銷相較於 Heap Memory 會大很多,Netty 在面對高併發網絡通信的場景下,Direct Memory 的申請和釋放是一個非常頻繁的操作,這種大量頻繁地內存申請釋放操作對程序的性能影響是巨大的,因此 Netty 引入了內存池將這些 Direct Memory 統一池化管理起來。
Netty 提供了 `-Dio.netty.allocator.type` 參數來讓我們決定是否採用內存池來管理 ByteBuf , 默認值是 `pooled` , 也就是説 Netty 默認是採用池化的方式來管理 PooledByteBuf 。如果是安卓平台,那麼默認是使用非池化的 ByteBuf (unpooled)。
- 當參數 `io.netty.allocator.type` 的值為 pooled 時,Netty 的默認 ByteBufAllocator 是 `PooledByteBufAllocator.DEFAULT` 。
- 當參數 `io.netty.allocator.type` 的值為 unpooled 時,Netty 的默認 ByteBufAllocator 是 `UnpooledByteBufAllocator.DEFAULT` 。
public final class ByteBufUtil {
// 默認 PooledByteBufAllocator,池化管理 ByteBuf
static final ByteBufAllocator DEFAULT_ALLOCATOR;
static {
// 默認為 pooled
String allocType = SystemPropertyUtil.get(
"io.netty.allocator.type", PlatformDependent.isAndroid() ? "unpooled" : "pooled");
allocType = allocType.toLowerCase(Locale.US).trim();
ByteBufAllocator alloc;
if ("unpooled".equals(allocType)) {
alloc = UnpooledByteBufAllocator.DEFAULT;
logger.debug("-Dio.netty.allocator.type: {}", allocType);
} else if ("pooled".equals(allocType)) {
alloc = PooledByteBufAllocator.DEFAULT;
logger.debug("-Dio.netty.allocator.type: {}", allocType);
} else {
alloc = PooledByteBufAllocator.DEFAULT;
logger.debug("-Dio.netty.allocator.type: pooled (unknown: {})", allocType);
}
DEFAULT_ALLOCATOR = alloc;
}}
後續 Netty 在創建 SocketChannel 的時候,在 SocketChannelConfig 中指定的 ByteBufAllocator 就是這裏的 `ByteBufUtil.DEFAULT_ALLOCATOR`,默認情況下為 PooledByteBufAllocator。
public interface ByteBufAllocator {
ByteBufAllocator DEFAULT = ByteBufUtil.DEFAULT_ALLOCATOR;}
public class DefaultChannelConfig implements ChannelConfig {
// PooledByteBufAllocator
private volatile ByteBufAllocator allocator = ByteBufAllocator.DEFAULT;}
當 Netty 讀取 Socket 中的網絡數據時,首先會從 DefaultChannelConfig 中將 ByteBufAllocator 獲取到,然後利用 ByteBufAllocator 從內存池中獲取一個 DirectByteBuf ,最後將 Socket 中的數據讀取到 DirectByteBuf 中,隨後沿着 pipeline 向後傳播,進行 IO 處理。
protected class NioByteUnsafe extends AbstractNioUnsafe {
@Override
public final void read() {
// 獲取 SocketChannelConfig
final ChannelConfig config = config();
// 獲取 ByteBufAllocator , 默認為 PooledByteBufAllocator
final ByteBufAllocator allocator = config.getAllocator();
// 從內存池中獲取 byteBuf
byteBuf = allocHandle.allocate(allocator);
// 讀取 socket 中的數據到 byteBuf
allocHandle.lastBytesRead(doReadBytes(byteBuf));
// 將 byteBuf 沿着 pipeline 向後傳播
pipeline.fireChannelRead(byteBuf);
....... 省略 .......
}}
除此之外,Netty 還提供了 `ChannelOption.ALLOCATOR` 選項,讓我們可以在配置 ServerBootstrap 的時候為 SocketChannel 靈活指定自定義的 ByteBufAllocator 。
EventLoopGroup bossGroup = new NioEventLoopGroup(1);
EventLoopGroup workerGroup = new NioEventLoopGroup();
ServerBootstrap b = new ServerBootstrap();
b.group(bossGroup, workerGroup)
// 靈活配置 ByteBufAllocator
.childOption(ChannelOption.ALLOCATOR, UnpooledByteBufAllocator.DEFAULT;);這裏通過 ChannelOption 來配置 Socket 相關的屬性是最高優先級的,它會覆蓋掉一切默認配置。
## 7. Metric
在第四小節中,我們介紹了 Cleaner 和 NoCleaner 這兩種 DirectByteBuf,其中 CleanerDirectByteBuf 的整體 Direct Memory 的用量是受到 JVM 參數 `-XX:MaxDirectMemorySize` 限制的,而 NoCleanerDirectByteBuf 的整體 Direct Memory 可以突破該參數的限制,JVM 並不會統計這塊 Direct Memory 的用量。
Netty 為了及時地釋放這些 Direct Memory,通常默認選擇 NoCleanerDirectByteBuf,這就要求 Netty 需要對這部分 Direct Memory 的用量進行自行統計限制。NoCleanerDirectByteBuf 的最大可用 Direct Memory 我們可以通過 `-Dio.netty.maxDirectMemory` 來指定,默認情況下等於 `-XX:MaxDirectMemorySize` 設置的值。
PlatformDependent 類中的 `DIRECT_MEMORY_COUNTER` 字段用於統計在 Netty 層面上,所有 NoCleanerDirectByteBuf 佔用的 Direct Memory 大小。注意這裏並不會統計 CleanerDirectByteBuf 的 Direct Memory 佔用,這部分統計由 JVM 負責。
public final class PlatformDependent {
// 用於統計 NoCleaner 的 DirectByteBuf 所引用的 Native Memory 大小
private static final AtomicLong DIRECT_MEMORY_COUNTER;
public static ByteBuffer allocateDirectNoCleaner(int capacity) {
// 增加 Native Memory 用量統計
incrementMemoryCounter(capacity);
try {
// 分配 Native Memory
// 初始化 NoCleaner 的 DirectByteBuffer
return PlatformDependent0.allocateDirectNoCleaner(capacity);
} catch (Throwable e) {
decrementMemoryCounter(capacity);
throwException(e);
return null;
}
public static void freeDirectNoCleaner(ByteBuffer buffer) {
int capacity = buffer.capacity();
// 釋放 Native Memory
PlatformDependent0.freeMemory(PlatformDependent0.directBufferAddress(buffer));
// 減少 Native Memory 用量統計
decrementMemoryCounter(capacity);
} }
PlatformDependent 類是 Netty 最底層的一個類,所有內存的分配,釋放動作最終都是在該類中執行,因此 DIRECT_MEMORY_COUNTER 字段統計的是全局的 Direct Memory 大小(Netty 層面)。
每一次的內存申請 —— allocateDirectNoCleaner , 都會增加 DIRECT_MEMORY_COUNTER 計數,每一次的內存釋放 —— freeDirectNoCleaner,都會減少 DIRECT_MEMORY_COUNTER 計數。
我們可以通過 `PlatformDependent.usedDirectMemory() ` 方法來獲取 Netty 當前所佔用的 Direct Memory 大小。但如果我們特殊指定了需要使用 CleanerDirectByteBuf , 比如,將 `-Dio.netty.maxDirectMemory` 參數設置為 `0` , 那麼這裏將會返回 -1 。
private static void incrementMemoryCounter(int capacity) {
// 只統計 NoCleaner 的 DirectByteBuf 所引用的 Native Memory
if (DIRECT_MEMORY_COUNTER != null) {
long newUsedMemory = DIRECT_MEMORY_COUNTER.addAndGet(capacity);
if (newUsedMemory > DIRECT_MEMORY_LIMIT) {
DIRECT_MEMORY_COUNTER.addAndGet(-capacity);
throw new OutOfDirectMemoryError("failed to allocate " + capacity
+ " byte(s) of direct memory (used: " + (newUsedMemory - capacity)
+ ", max: " + DIRECT_MEMORY_LIMIT + ')');
}
}
}
private static void decrementMemoryCounter(int capacity) {
if (DIRECT_MEMORY_COUNTER != null) {
long usedMemory = DIRECT_MEMORY_COUNTER.addAndGet(-capacity);
assert usedMemory >= 0;
}
}
public static long usedDirectMemory() {
return DIRECT_MEMORY_COUNTER != null ? DIRECT_MEMORY_COUNTER.get() : -1;
}
除了 PlatformDependent 這裏的全局統計之外,Netty 還提供了以 ByteBufAllocator 為粒度的內存佔用統計,統計的維度包括 Heap Memory 的佔用和 Direct Memory 的佔用。
public final class UnpooledByteBufAllocator extends AbstractByteBufAllocator implements ByteBufAllocatorMetricProvider {
// 從該 ByteBufAllocator 分配出去的內存統計
private final UnpooledByteBufAllocatorMetric metric = new UnpooledByteBufAllocatorMetric();
@Override
public ByteBufAllocatorMetric metric() {
return metric;
}
// 統計 Direct Memory 的佔用
void incrementDirect(int amount) {
metric.directCounter.add(amount);
}
void decrementDirect(int amount) {
metric.directCounter.add(-amount);
}
// 統計 Heap Memory 的佔用
void incrementHeap(int amount) {
metric.heapCounter.add(amount);
}
void decrementHeap(int amount) {
metric.heapCounter.add(-amount);
}
}
Netty 定義的每一個 ByteBufAllocator 中,都會有一個 ByteBufAllocatorMetric 類型的字段,該類定義兩個計數字段:directCounter,heapCounter。 分別用於統計 Direct Memory 和 Heap Memory 的佔用。
private static final class UnpooledByteBufAllocatorMetric implements ByteBufAllocatorMetric {
final LongCounter directCounter = PlatformDependent.newLongCounter();
final LongCounter heapCounter = PlatformDependent.newLongCounter();
@Override
public long usedHeapMemory() {
return heapCounter.value();
}
@Override
public long usedDirectMemory() {
return directCounter.value();
}
@Override
public String toString() {
return StringUtil.simpleClassName(this) +
"(usedHeapMemory: " + usedHeapMemory() + "; usedDirectMemory: " + usedDirectMemory() + ')';
}
}因此從內存佔用統計的角度上來説,Netty 又會將整個 ByteBuf 體系分為 Instrumented 和 NoInstrumented 兩大類,帶有 Instrumented 前綴的 ByteBuf ,無論你是 Heap or Direct , Cleaner or NoCleaner,Unsafe or NoUnsafe 類型的 ByteBuf ,Netty 都會統計這部分內存佔用。
private static final class InstrumentedUnpooledUnsafeNoCleanerDirectByteBuf
extends UnpooledUnsafeNoCleanerDirectByteBuf {
InstrumentedUnpooledUnsafeNoCleanerDirectByteBuf(
UnpooledByteBufAllocator alloc, int initialCapacity, int maxCapacity) {
// 構造普通的 UnpooledUnsafeNoCleanerDirectByteBuf
super(alloc, initialCapacity, maxCapacity);
}
// 分配,釋放 的時候更新 Direct Memory
@Override
protected ByteBuffer allocateDirect(int initialCapacity) {
ByteBuffer buffer = super.allocateDirect(initialCapacity);
((UnpooledByteBufAllocator) alloc()).incrementDirect(buffer.capacity());
return buffer;
}
@Override
protected void freeDirect(ByteBuffer buffer) {
int capacity = buffer.capacity();
super.freeDirect(buffer);
((UnpooledByteBufAllocator) alloc()).decrementDirect(capacity);
}
}private static final class InstrumentedUnpooledUnsafeDirectByteBuf extends UnpooledUnsafeDirectByteBuf {
InstrumentedUnpooledUnsafeDirectByteBuf(
UnpooledByteBufAllocator alloc, int initialCapacity, int maxCapacity) {
// 構造普通的 UnpooledUnsafeDirectByteBuf
super(alloc, initialCapacity, maxCapacity);
}
// 分配,釋放 的時候更新 Direct Memory
@Override
protected ByteBuffer allocateDirect(int initialCapacity) {
ByteBuffer buffer = super.allocateDirect(initialCapacity);
((UnpooledByteBufAllocator) alloc()).incrementDirect(buffer.capacity());
return buffer;
}
@Override
protected void freeDirect(ByteBuffer buffer) {
int capacity = buffer.capacity();
super.freeDirect(buffer);
((UnpooledByteBufAllocator) alloc()).decrementDirect(capacity);
}
}
## 8. ByteBufAllocator
在 Netty 中,ByteBuf 的創建必須通過 ByteBufAllocator 進行,不能直接顯示地調用 ByteBuf 相關的構造函數自行創建。Netty 定義了兩種類型的 ByteBufAllocator :
1. PooledByteBufAllocator 負責池化 ByteBuf,這裏正是 Netty 內存管理的核心,在下一篇文章中,筆者會詳細的和大家介紹它。
2. UnpooledByteBufAllocator 負責分配非池化的 ByteBuf,創建 ByteBuf 的時候臨時向 OS 申請 Native Memory ,使用完之後,需要及時的手動調用 release 將 Native Memory 釋放給 OS 。
`-Dio.netty.allocator.type` 參數可以讓我們自行選擇 ByteBufAllocator 的類型,默認值為 `pooled ` , Netty 默認是採用池化的方式來管理 ByteBuf 。
public interface ByteBufAllocator {
// 默認為 PooledByteBufAllocator
ByteBufAllocator DEFAULT = ByteBufUtil.DEFAULT_ALLOCATOR;}
除了以上兩種官方定義的 ByteBufAllocator 之外,我們還可以根據自己實際業務場景來自行定製 ByteBufAllocator , 然後通過第六小節中介紹的 `ChannelOption.ALLOCATOR` 選項,將 ByteBufAllocator 靈活指定為我們自行定製的實現。
對於 UnpooledByteBuf 來説,Netty 還專門提供了一個工具類 `Unpooled`,這裏定義實現了很多針對 ByteBuf 的實用操作,比如,allocate,wrapped,copied 等。這裏筆者以 DirectByteBuf 的創建為例進行説明:
public final class Unpooled {
private static final ByteBufAllocator ALLOC = UnpooledByteBufAllocator.DEFAULT;
public static ByteBuf directBuffer() {
return ALLOC.directBuffer();
}}
Unpooled 底層依賴了 UnpooledByteBufAllocator , 所有對 ByteBuf 的創建動作最終都會代理給這個 Allocator 。在 DirectBuffer 的創建過程中,我們可以看到前面介紹的所有類型的 ByteBuf。
public final class UnpooledByteBufAllocator {
@Override
protected ByteBuf newDirectBuffer(int initialCapacity, int maxCapacity) {
final ByteBuf buf;
if (PlatformDependent.hasUnsafe()) {
buf = noCleaner ? new InstrumentedUnpooledUnsafeNoCleanerDirectByteBuf(this, initialCapacity, maxCapacity) :
new InstrumentedUnpooledUnsafeDirectByteBuf(this, initialCapacity, maxCapacity);
} else {
buf = new InstrumentedUnpooledDirectByteBuf(this, initialCapacity, maxCapacity);
}
// 是否啓動內存泄露探測,如果啓動則額外用 LeakAwareByteBuf 進行包裝返回
return disableLeakDetector ? buf : toLeakAwareBuffer(buf);
}}
- 首先 Netty 創建出來的所有 ByteBuf 都是帶有 Metric 統計的,具體的 ByteBuf 類型都會帶有 Instrumented 前綴。
- 如果當前 JRE 環境支持 Unsafe , 那麼後續就會通過 Unsafe 的方式來對 ByteBuf 進行相關操作(默認),具體的 ByteBuf 類型都會帶有 Unsafe 前綴。
- 如果我們明確指定了 NoCleaner 類型的 DirectByteBuf(默認),那麼創建出來的 ByteBuf 類型就會帶有 NoCleaner 前綴,由於沒有 Cleaner ,這就要求我們使用完 ByteBuf 的時候必須及時地手動進行釋放。
- 如果我們開啓了內存泄露探測,那麼創建流程的最後,Netty 會用一個 LeakAwareByteBuf 去包裝新創建出來的 ByteBuf,當這個 ByteBuf 被 GC 的時候,Netty 會通過相關引用計數來判斷是否存在忘記 release 的情況,從而確定出是否發生內存泄露。
## 總結
本文筆者從八個角度為大家詳細的剖析了 ByteBuf 的整體設計,這八個角度分別是:內存區域分佈的角度,內存管理的角度,內存訪問的角度,內存回收的角度,內存統計 Metric 的角度,零拷貝的角度,引用計數的角度,擴容的角度。


