Spring Boot 的異步功能(Async)允許我們將某些任務異步執行,而不會阻塞主線程。這對於處理耗時的操作非常有用,如發送電子郵件、生成報表、調用外部 API 等。通過異步處理,我們可以釋放主線程,讓它繼續處理其他請求,同時後台任務在後台線程中進行。這種方式可以顯著提高應用程序的響應速度和併發性。
Spring Boot Async 使用場景
以下是一些適合使用 Spring Boot 異步功能的常見場景:1.發送電子郵件: 當需要發送大量電子郵件或電子郵件發送需要較長時間時,異步處理可以確保用户不必等待郵件發送完成而導致延遲響應。2.數據處理: 在數據處理任務中,如文件上傳後的數據導入、圖像處理或數據轉換,異步可以提高系統的吞吐量。3.外部 API 調用: 如果應用程序需要與外部服務進行通信,異步調用可以避免長時間等待外部服務的響應。4.定時任務: 使用定時任務執行一些後台處理工作時,異步能夠確保任務不會影響到主線程的正常運行。
Spring Boot Async 配置
要在 Spring Boot 項目中使用異步功能,你需要執行以下步驟:
1. 添加依賴
首先,你需要在項目的 Maven 或 Gradle 構建文件中添加 Spring Boot 異步支持的依賴:Maven:
<dependency>
    <groupId>org.springframework.boot</groupId>
    <artifactId>spring-boot-starter</artifactId>
</dependency>
Gradle:
implementation 'org.springframework.boot:spring-boot-starter'2. 啓用異步
在 Spring Boot 應用程序的主類上添加 @EnableAsync 註解以啓用異步功能:
@SpringBootApplication
@EnableAsync
public class YourApplication {
    public static void main(String[] args) {
        SpringApplication.run(YourApplication.class, args);
    }
}
3. 創建異步方法
現在,你可以在服務類或任何需要異步執行的方法上使用 @Async 註解:
@Service
public class MyService {

    @Async
    public CompletableFuture<String> doSomethingAsync() {
        // 異步執行的任務
        // 返回一個 CompletableFuture 以便獲取異步任務的結果
    }
}
Spring Boot Async 實踐案例
當涉及到 Spring Boot 中的異步編程時,一個常見的實踐案例是使用異步方法來處理後台任務,以提高應用程序的性能和響應速度。以下是一個詳細的實踐案例,展示如何創建一個 Spring Boot 應用程序,使用異步方法來執行後台任務。
步驟 1:創建 Spring Boot 項目
首先,你需要創建一個新的 Spring Boot 項目。你可以使用 Spring Initializr(https://start.spring.io/)或在 IDE 中使用 Spring Boot 插件來快速創建項目。確保在項目配置中添加Spring Web和Spring Aspects依賴。關於具體的創建,你可以訪問這篇文章:【如何在線建一個 JAVA 的 Spring Boot 項目?Spring Boot 快速入門 Helloworld 示例】
步驟 2:添加異步支持
在項目的主類上添加@EnableAsync註解以啓用 Spring Boot 的異步功能:
import org.springframework.boot.SpringApplication;
import org.springframework.boot.autoconfigure.SpringBootApplication;
import org.springframework.scheduling.annotation.EnableAsync;

@SpringBootApplication
@EnableAsync
public class AsyncExampleApplication {
    public static void main(String[] args) {
        SpringApplication.run(AsyncExampleApplication.class, args);
    }
}
步驟 3:創建異步服務
創建一個服務類,其中包含一個異步方法。在這個示例中,我們將模擬一個發送電子郵件的異步任務:
import org.springframework.scheduling.annotation.Async;
import org.springframework.stereotype.Service;
@Service
public class EmailService {
@Async
public void sendEmail(String recipient, String message) {
// 模擬電子郵件發送過程,這裏可以包括連接到郵件服務器、發送郵件等操作
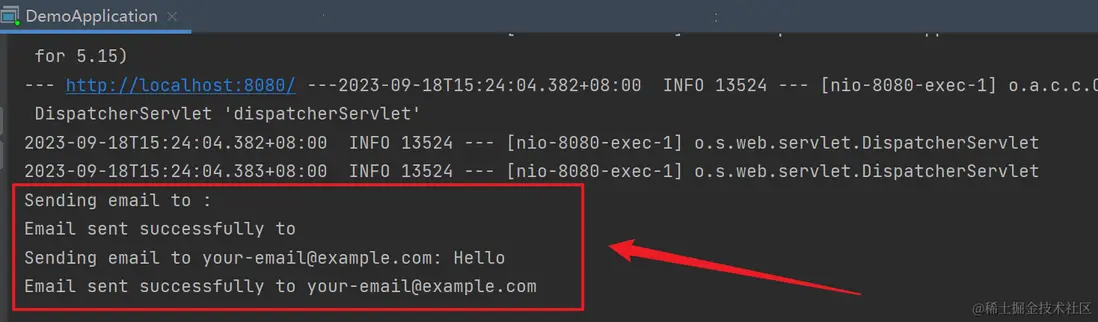
System.out.println("Sending email to " + recipient + ": " + message);
try {
Thread.sleep(5000); // 模擬郵件發送需要的時間
} catch (InterruptedException e) {
e.printStackTrace();
}
System.out.println("Email sent successfully to " + recipient);
}
}步驟 4:創建控制器
創建一個 REST 控制器,用於觸發異步電子郵件發送:
import org.springframework.beans.factory.annotation.Autowired;
import org.springframework.web.bind.annotation.GetMapping;
import org.springframework.web.bind.annotation.RequestParam;
import org.springframework.web.bind.annotation.RestController;
@RestController
public class EmailController {
@Autowired
private EmailService emailService;
@GetMapping("/sendEmail")
public String sendEmail(@RequestParam(required = false, defaultValue = "") String recipient, @RequestParam(required = false, defaultValue = "") String message) {
emailService.sendEmail(recipient, message);
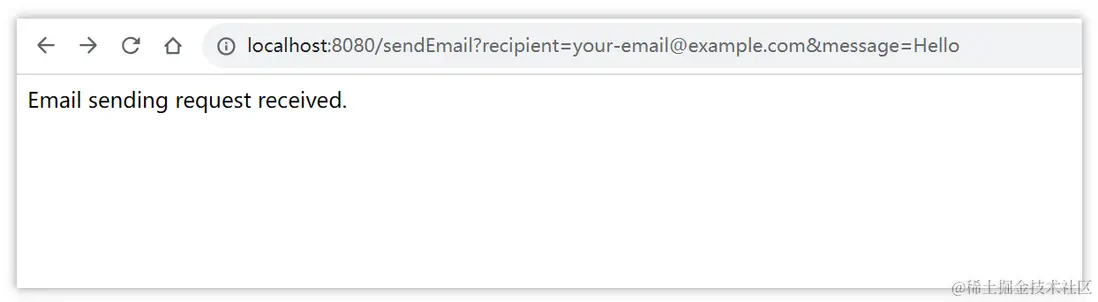
return "Email sending request received.";
}
}步驟 5:運行應用程序
現在,你可以運行 Spring Boot 應用程序。應用程序將啓動,並且可以通過訪問http://localhost:8080/sendEmail或者http://localhost:8080/sendEmail?recipient=your-email@example.com&message=Hello來觸發電子郵件發送請求。
步驟 6:觀察異步行為
當你發送電子郵件請求時,應用程序將立即返回響應,而不會等待電子郵件發送完成。後台線程將負責實際的電子郵件發送過程。
實踐案例注意事項
- 確保適當地配置線程池以控制異步方法的併發性。
- 異步方法中的異常處理非常重要。確保適當地處理異常以防止應用程序崩潰。
- 這個示例中的電子郵件發送是模擬的。在實際應用中,你需要連接到郵件服務器並執行實際的電子郵件發送操作。通過這個實踐案例,你可以瞭解如何在 Spring Boot 中使用異步方法來處理後台任務,從而提高應用程序的性能和響應速度。異步編程是處理併發性和性能問題的強大工具,可以用於各種不同的應用場景。
使用 Apifox 測試和管理接口
如果你是 JAVA 開發者,你經常需要與 API 打交道,確保你的應用程序能夠正常工作。這時,一個強大的接口測試工具就會派上用場。
Apifox 是一個比 Postman 更強大的接口測試工具,Apifox = Postman + Swagger + Mock + JMeter,Apifox 支持調試 http(s)、WebSocket、Socket、gRPC、Dubbo 等協議的接口,並且集成了 IDEA 插件。在開發完接口後,可以通過 Apifox 的 IDEA 插件一鍵自動生成接口文檔,多端同步,非常方便測試和維護。

Spring Boot Async 注意事項
在使用 Spring Boot 異步功能時,要注意以下幾點:
- 線程池配置: 默認情況下,Spring Boot 使用一個簡單的線程池來處理異步方法。你可以通過配置文件或屬性來自定義線程池的大小和其他屬性,以滿足你的需求。
- 異常處理: 異步方法中的異常處理需要特別小心。要確保你的異常能夠被捕獲並適當地處理,以避免應用程序崩潰。
- 性能監控: 異步任務的性能監控可能需要額外的配置,以便你可以跟蹤任務的執行情況和性能指標。
知識擴展:
- Spring Boot Actuator Endpoints 如何使用?Spring Boot 運行狀況端點的用法
- Spring Boot 配置文件 application.properties 的概念及用法,詳解 application.properties 配置文件
參考鏈接: 如果你希望深入學習和探索 Spring Boot 異步功能,以下是一些官方文檔鏈接:
- Spring Boot 異步處理:https://docs.spring.io/spring-framework/docs/current/referenc...
- Spring Boot @EnableAsync 註解:https://docs.spring.io/spring-framework/docs/current/referenc...