

簡介
雖然 java 的代碼生成工具有很多,可是很多時候不是自己喜歡的風格,改起來比較困難,所以我準備從零和大家一起搭建一套基於 springboot3.0 的框架,
這次就先搞定一套代碼生成功能,後續再不斷的完善其它
我們使用到的三方庫:
- beelt 模版引擎,用於生成代碼。官網:http://ibeetl.com
- mybatis-plug 官網:https://www.baomidou.com/
開始
第一步,創建一個 maven 項目,然後在 pom.xml 中引入相關依賴,用到數據庫驅動,阿里的數據庫連接池等
<?xml version="1.0" encoding="UTF-8"?>
<project xmlns="http://maven.apache.org/POM/4.0.0"
         xmlns:xsi="http://www.w3.org/2001/XMLSchema-instance"
         xsi:schemaLocation="http://maven.apache.org/POM/4.0.0 http://maven.apache.org/xsd/maven-4.0.0.xsd">
    <modelVersion>4.0.0</modelVersion>

    <groupId>org.example</groupId>
    <artifactId>springboot-generate</artifactId>
    <version>1.0-SNAPSHOT</version>

    <properties>
        <maven.compiler.source>20</maven.compiler.source>
        <maven.compiler.target>20</maven.compiler.target>
        <project.build.sourceEncoding>UTF-8</project.build.sourceEncoding>
    </properties>

    <parent>
        <groupId>org.springframework.boot</groupId>
        <artifactId>spring-boot-starter-parent</artifactId>
        <version>3.0.6</version>
    </parent>

    <!-- Add typical dependencies for a web application -->
    <dependencies>
        <dependency>
            <groupId>org.springframework.boot</groupId>
            <artifactId>spring-boot-starter-web</artifactId>
        </dependency>
        <!-- https://mvnrepository.com/artifact/com.alibaba/druid -->
        <dependency>
            <groupId>com.alibaba</groupId>
            <artifactId>druid</artifactId>
            <version>1.2.17</version>
        </dependency>
        <!-- https://mvnrepository.com/artifact/com.baomidou/mybatis-plus-boot-starter -->
        <dependency>
            <groupId>com.baomidou</groupId>
            <artifactId>mybatis-plus-boot-starter</artifactId>
            <version>3.5.3.1</version>
        </dependency>
        <!-- https://mvnrepository.com/artifact/com.baomidou/mybatis-plus -->
        <dependency>
            <groupId>com.baomidou</groupId>
            <artifactId>mybatis-plus</artifactId>
            <version>3.5.3.1</version>
        </dependency>
        <!-- https://mvnrepository.com/artifact/mysql/mysql-connector-java -->
        <dependency>
            <groupId>mysql</groupId>
            <artifactId>mysql-connector-java</artifactId>
            <version>8.0.33</version>
        </dependency>
        <!-- https://mvnrepository.com/artifact/com.ibeetl/beetl -->
        <dependency>
            <groupId>com.ibeetl</groupId>
            <artifactId>beetl-springboot-starter-jdk17</artifactId>
            <version>3.15.0.RELEASE</version>
        </dependency>
        <dependency>
            <groupId>org.projectlombok</groupId>
            <artifactId>lombok</artifactId>
            <version>1.18.12</version>
            <scope>provided</scope>
        </dependency>
    </dependencies>
    <!-- Package as an executable jar -->
    <build>
        <plugins>
            <plugin>
                <groupId>org.springframework.boot</groupId>
                <artifactId>spring-boot-maven-plugin</artifactId>
            </plugin>
        </plugins>
    </build>
</project>
第二步,在 java 文件夾下創建個包 com.light,並在下創建啓動入口 Application.java,注意不要直接在 java 下創建,代碼
@MapperScan("com.light.business.*.mapper")
@EnableBeetl //會攔截.btl文件使用Beetl語法解析
@RestController
@SpringBootApplication
public class Application {
    @RequestMapping("/")
    String home() {
        return "Hello World!";
    }

    public static void main(String[] args) throws Exception {
        SpringApplication.run(Application.class, args);
    }
}
第三步,去實現代碼生成,思路是通過一個頁面(這樣可視化,看起來更直觀)來展示可以生成的表,選擇後調用一個接口生成到項目中所以,我們先來個html用於展示表名以及操作
我們在 resouces 下創建 templates/generate/index.btl 文件,templates是缺省目錄,我們就直接用,而index.btl不用.html因為我們用模板引擎。
可以看到,很簡單展示一下表名稱,然後可以選擇提交
<head>
    <meta charset="UTF-8">
    <title>代碼自動生成器</title>
</head>
<style>
    body {
        display: flex;
        flex-direction: column;
        align-items: center;
        padding: 25px;
    }
</style>
<body>
    <h1> 歡迎使用 Light 代碼一鍵生成器 </h1>
    <div style="min-width: 450px">
        <div>
            <input type="button" style="margin-right:45px" onclick="selectReverse()" value="反選">
            <input type="button" value="提交併生成代碼" onclick="document.tableForm.submit()">
        </div>
        <div style="margin-top: 12px;margin-bottom: 2px">
            <b>請選擇要生成的數據表:</b>
        </div>
        <form name="tableForm" method="post" action="index">
            <%
                for(tableName in tableNames) {
                    println("<input type='checkbox' name='table' value='" + tableName + "'>" + tableName + "<br>");
                }
            %>
        </form>
    </div>
    <script>
        function selectReverse() {
            let tables = document.getElementsByName("table");
            for (let table of tables) {
                table.checked = !table.checked;
            }
        }
    </script>
</body>
第四步,因為上一步中需要展示表名,所以應該要一個查詢表名稱的方法,我們在 com.light 下創建 common.generate.service.GenerateService.java,然後添加查詢表名的方法
@Autowired
private JdbcTemplate jdbcTemplate;

public List<String> getTableNames(String tableSchema) {
    String sql = "SELECT table_name as tableName FROM INFORMATION_SCHEMA.TABLES\n" +
            "WHERE table_schema = '" + tableSchema + "'";
    return jdbcTemplate.query(sql, new RowMapper<String>() {
        @Override
        public String mapRow(ResultSet resultSet, int i) throws SQLException {
            return resultSet.getString(1);
        }
    });
}
第五步,我們在 com.light 下創建common.generate.controller.GenerateController,來用於訪問,如果有選擇了表,就會調用生成功能
@Value("${spring.datasource.url}")
private String databaseUrl;
@Autowired
private GenerateService generateService;
//引入包的前綴
private static String comPath = "com.light.business";
//文件生成的路徑
private static String[] filePath = new String[]{ System.getProperty("user.dir"), "src", "main", "java", "com", "light", "business" };

@RequestMapping(value = "/index")
public ModelAndView index(String[] table) throws IOException {
    String schema = databaseUrl.substring(databaseUrl.lastIndexOf("/") + 1, databaseUrl.indexOf("?"));

    if (table != null) {
        generateService.generation(Util.addFileSeparator(filePath), comPath, schema, Arrays.asList(table));
    }

    ModelAndView view = new ModelAndView();
    view.setViewName("/generate/index.btl");
    view.addObject("tableNames", generateService.getTableNames(schema));
    return view;
}
第六步,可以看到核心就是 service 的 generation 方法,所以在 GenerateService.java 中添加方法
public void generation(String filePath, String comPath, String schema, List<String> tableNames) throws IOException {
    //我們在 resouces下創建個 beetl-back-end 用於放模板
    ClasspathResourceLoader resourceLoader = new ClasspathResourceLoader("beetl-back-end");
    Configuration cfg = Configuration.defaultConfiguration();
    //加載模板組
    GroupTemplate gt = new GroupTemplate(resourceLoader, cfg);
    //獲取表以及其字段等信息
    List<TableInfo> tableInfoList = getTableInfoList(schema, tableNames);

    System.out.println("generate start");
    for (TableInfo tableInfo: tableInfoList) {
        //生成PO...
        doPo(gt, tableInfo, comPath, filePath);
        doVo(gt, tableInfo, comPath, filePath);

        doMapperJava(gt, tableInfo, comPath, filePath);
        doMapperXml(gt, tableInfo, comPath, filePath);

        doService(gt, tableInfo, comPath, filePath);
        doController(gt, tableInfo, comPath, filePath);
    }
    System.out.println("generate over");
}
其它代碼就不貼出來了,開源的,可以自己到 github 上。
當前可以生成 controller, service, mapjava, mapxml, PO, VO
思考
預留了根據註釋生成對應字段的枚舉功能,因為還在思考如何才合理。那麼是否還可以根據數據字段信息來生成校驗功能呢?或者你認為還有什麼是需要生成的呢?然後我們再來繼續擴展
使用
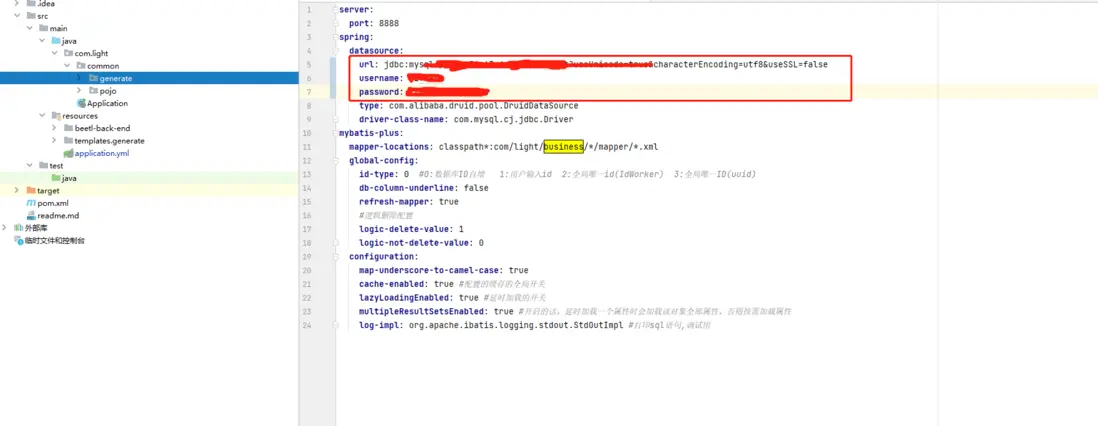
下載項目後,配置 application.yml 中的數據庫連接
啓動項目後在瀏覽器中輸入 http://localhost:8888/generate/index 即可訪問代碼生成入口,我們全選後點擊提交

然後就完成了,可以看到項目的 com.light 下創建了個 business 目錄,裏面就是生成的代碼了,所有的功能就已經完成了

如果添加表或修改了表,點擊需要的表重新生成即可,PO、VO等會覆蓋生成,具體在 com.light.common.generate.Config.java 中配置了
測試
由於我們從零開始創建的,所以還沒有 swagger 等等,postman 一個一個測試太慢了,所以我們這裏藉助前端自動生成功能來測試
由於前端是在線生成,所以訪問本地存在跨域問題,那們在本地我們先允許任何域訪問,在com.light.common下創建 config.CustomCorsConfiguration.java,簡單配置:
@Configuration
public class CustomCorsConfiguration implements WebMvcConfigurer {
    @Override
    public void addCorsMappings(CorsRegistry registry) {
        registry.addMapping("/**")
                // 放行哪些原始域
                .allowedOrigins("*")
                // 放行哪些請求方式
                .allowedMethods("*")
                // 放行哪些原始請求頭部信息
                .allowedHeaders("*");
    }
}
重啓項目
打開前端代碼生成器網站:https://light2f.com 到我的項目下,點擊 AI創建項目,輸入數據庫信息或者導入數據庫結構

如果沒有配置過端口與path應該輸入如下基本路徑信息。
後選擇或自動生成一套母版使用

由於我們springboot框架是從零搭建的,所以還沒有封裝 response,所以將模版修改紅框中數據為下面

直接確定生成

點擊剛剛生成的項目點擊眼睛進入預覽

我們還沒有token與登錄,所以直接點擊右邊跳過

ok, 接口字段等已經接入,可以測試了。
1.gif
總結
一個完成的從前到後功能已經完成了,但是實際使用中會有安全問題、權限問題等等,那麼我們那一期再完善一下 token 等,或者等小夥伴提需求
一起一步一步完善後繼搭建
地址
springboot-generate 開源地址:https://github.com/yangaijun/springboot-generate
前端在線生成網站:https://light2f.com