


Wireshark插件開發實戰-Lua解析自定義二進制協議
在調試自定義 TCP 協議時,我們常常需要構造原始的二進制數據包並通過 Wireshark 進行抓包分析。這篇文章記錄使用lua開發Wireshark插件解析私有二進制協議。
- 使用 Python 構造二進制協議數據包
- 使用
nc(netcat)發送數據 - 通過 tcpdump 抓包
- 通過 Wireshark + lua插件解析數據包
🧩 協議結構
協議格式如下:
[ uint16: msgType ][ uint16: bodyLen ][ bytes[bodyLen]: JSON字符串 ]例如:
- msgType =
1(0x0001) - bodyLen =
9(0x0009) - body =
{"a":123}
🛠️ 步驟 1:使用 Python 構造二進制數據
使用 Python 將結構化數據寫入一個二進制文件 msg.bin:
python3 -c 'with open("msg.bin", "wb") as f: f.write((1).to_bytes(2, "big") + len(b"{\"a\":123}").to_bytes(2, "big") + b"{\"a\":123}")'也可以使用xxd
echo '000100097b2261223a3132337d' | xxd -r -p > msg.bin
文件內容即為:
00 01: msgType = 100 09: bodyLen = 97b 22 61 22 3a 31 32 33 7d: JSON ={"a":123}
可以使用 xxd 驗證內容:
xxd msg.bin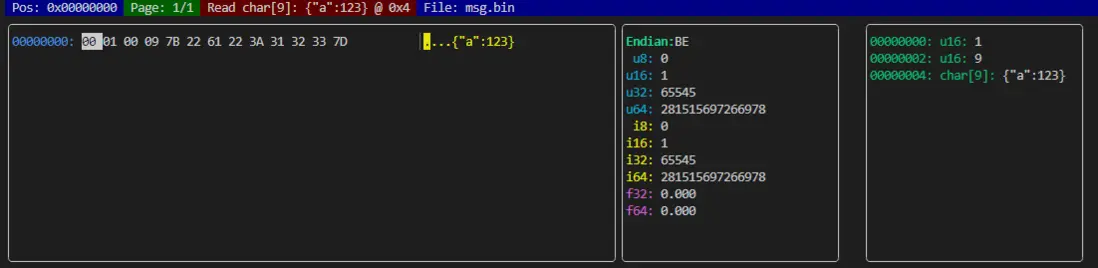
🚀 步驟 2:使用 nc 模擬客户端向服務器發送數據
通過nc模擬tcp服務器監聽端口,例如 12345:
nc -l -p 12345通過nc模擬tcp客户端,往服務端發送消息:
# 發送數據到監聽端口 12345
nc 127.0.0.1 12345 < msg.bin
# 也可以通過 xxd生成二進制數據直接發送
echo '0001 0009 7b2261223a3132337d' | xxd -r -p | nc 127.0.0.1 12345
📱 步驟 3:使用 tcpdump 抓包
sudo tcpdump -i lo port 12345 -w capture.pcap
- 啓動 Wireshark 打開
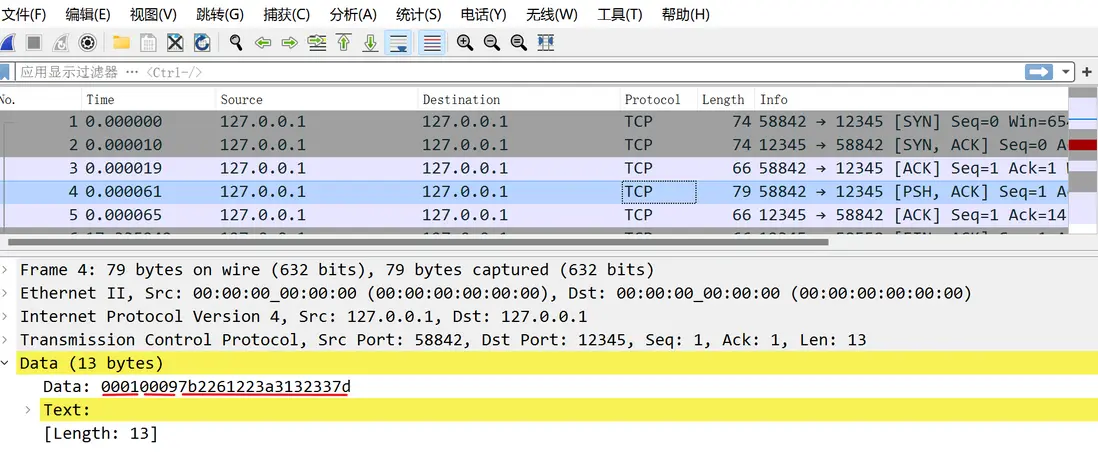
- 基於lua開發wireshark插件
--[[
sample.lua © 2025 xinchen@af83f787e8911dea9b3bf677746ebac9
A simple Wireshark Lua dissector for a custom protocol whose payload is:
[ uint16 msgType ][ uint16 bodyLen ][ bytes[bodyLen] containing a JSON string ]
To use:
1. Save this file as “sample.lua” (or any name ending in .lua).
2. Place it into your Wireshark plugins directory (e.g., on Windows:
C:\Program Files\Wireshark\plugins\<version>\ or under ~/.config/wireshark/plugins/ for Linux/Mac).
3. Restart Wireshark.
4. If your protocol runs over TCP on port 12345, it will now decode automatically.
(Adjust the port number in the last lines below to match your actual port.)
--]]
-- 1. Define the protocol
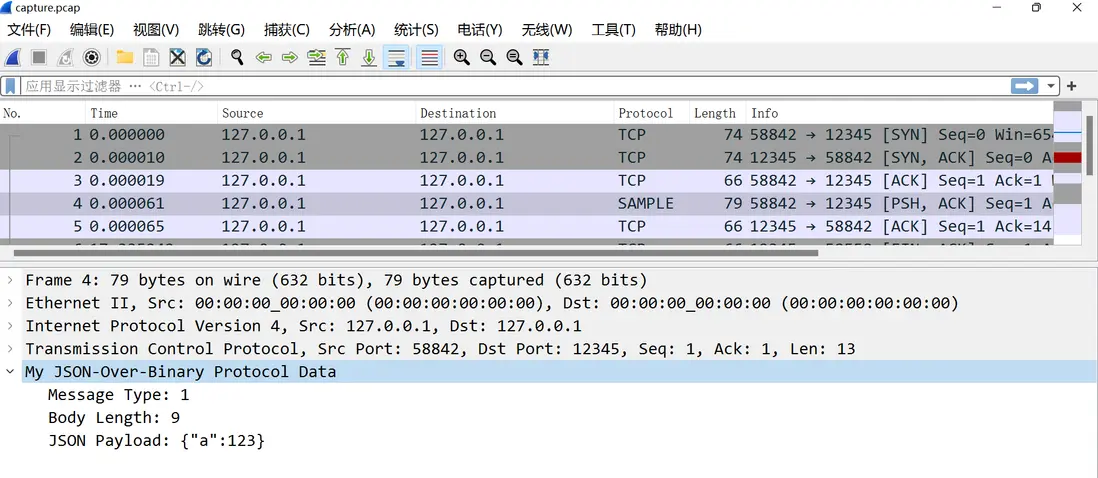
local sample = Proto("sample", "My JSON‐Over‐Binary Protocol")
-- 2. Define the fields we want to extract:
-- - msgType: uint16
-- - bodyLen: uint16
-- - jsonStr: the JSON text (bytes interpreted as string)
local f_msgType = ProtoField.uint16("sample.msgType", "Message Type", base.DEC)
local f_bodyLen = ProtoField.uint16("sample.bodyLen", "Body Length", base.DEC)
local f_jsonStr = ProtoField.string("sample.json", "JSON Payload", base.ASCII)
sample.fields = { f_msgType, f_bodyLen, f_jsonStr }
-- 3. The dissector function
function sample.dissector(buffer, pinfo, tree)
-- buffer: the entire packet’s raw bytes
-- pinfo: packet metadata (e.g. columns, protocol)
-- tree: the protocol tree to which we add our parsed fields
-- First, ensure we have at least 4 bytes for msgType + bodyLen
if buffer:len() < 4 then
return 0
end
-- Tell Wireshark which protocol column to display
pinfo.cols.protocol = sample.name
-- Add a subtree “My JSON‐Over‐Binary Protocol”
local subtree = tree:add(sample, buffer(), "My JSON‐Over‐Binary Protocol Data")
local offset = 0
-- 3.1 Parse msgType (2 bytes)
local msgType_field = buffer(offset, 2)
local msgType_val = msgType_field:uint()
subtree:add(f_msgType, msgType_field)
offset = offset + 2
-- 3.2 Parse bodyLen (2 bytes)
local bodyLen_field = buffer(offset, 2)
local bodyLen_val = bodyLen_field:uint()
subtree:add(f_bodyLen, bodyLen_field)
offset = offset + 2
-- 3.3 Check if full JSON payload is available
if buffer:len() < offset + bodyLen_val then
-- If not enough bytes, mark it as malformed/truncated
subtree:add_expert_info(PI_MALFORMED, PI_ERROR, "Packet too short for advertised bodyLen")
return
end
-- 3.4 Extract the JSON string bytes, interpret as ASCII/UTF-8
local json_field = buffer(offset, bodyLen_val)
-- We use :string() so that Wireshark will display it as text
subtree:add(f_jsonStr, json_field)
offset = offset + bodyLen_val
-- (Optional) If you want to pretty-print or validate JSON,
-- you could attempt to parse it here or use a heuristic.
-- But for most purposes, displaying the raw string is enough.
end
-- 4. Register the dissector on a specific TCP port (e.g. 12345).
-- Change “12345” to whatever port your protocol actually uses, or
-- alternatively hook into a heuristic/UDP/etc. as desired.
local tcp_port = DissectorTable.get("tcp.port")
tcp_port:add(12345, sample)
-- If your protocol is over UDP, swap the last two lines with:
-- local udp_port = DissectorTable.get("udp.port")
-- udp_port:add(12345, sample)
保存為 sample.lua 並放入 Wireshark 插件目錄中(如 ~/.config/wireshark/plugins/,或window中 C:\Program Files\Wireshark\plugins\<version>\),重新打開 Wireshark 即可。
🥪 步驟 4(可選):使用 tcpdump 抓包到 .pcap 文件
如果你希望在終端中進行抓包或生成 .pcap 文件用於後續分析,可以在 Windows 主機上安裝 WinDump(tcpdump 的 Windows 版本):
- 安裝 Npcap
- 安裝 WinDump
-
查看接口列表:
windump -D -
選擇正確接口編號,開始抓包:
windump -i 3 tcp port 12345 -w test.pcap - 使用 Wireshark 打開
test.pcap文件進行分析。
✅ 總結
通過以上方式,我們完成了以下目標:
- ✅ 構造自定義協議的二進制數據
- ✅ 使用
nc模擬客户端及服務端發送數據 - ✅ 使用 Wireshark 和 tcpdump 抓包
- ✅ 編寫 Lua 腳本進行協議解析
這種方法適合調試任何基於 TCP/UDP 的自定義協議,非常適合開發和測試場景。
如果你也在調試自己的私有協議,不妨用這個流程走一遍!希望對你有幫助 😎
