

1.簡介
koa框架是一個遵循洋葱模型的輕量級的nodejs框架,將大部分工作都拋給中間件來處理,框架只專注於compose各個中間件,並按照use註冊的順序逐個執行中間件。
2.安裝使用
安裝:npm install koa -s
使用:
const Koa = require('koa');
const app = new Koa;
app.listen(3000);
3.中間件的使用
const Koa  = require('koa');
const mount = require('koa-mount');

const app = new Koa();
app.use(mount('/api', function() {
      .....
}));
app.listen(80);
以上代碼使用了koa-mount來進行進行路由處理,使用koa實例上的use方法將mount函數返回的函數註冊為中間件。以下是koa中use函數。
  use(fn) {
    if (typeof fn !== 'function') throw new TypeError('middleware must be a function!');
    if (isGeneratorFunction(fn)) {
      deprecate('Support for generators will be removed in v3. ' +
                'See the documentation for examples of how to convert old middleware ' +
                'https://github.com/koajs/koa/blob/master/docs/migration.md');
      fn = convert(fn);
    }
    debug('use %s', fn._name || fn.name || '-');
    this.middleware.push(fn);
    return this;
  }
可以看到,一個函數中間件在use函數中先是判斷是否為generator函數,如果是,使用koa-convert轉換,最終都會放入koa實例的middleware數組中保存,供後續調用。
a.説一下isGeneratorFunction函數,這個函數的思路是通過Function動態創建一個generate函數,然後取其原型與傳入的函數的原型對比,如果相同説明傳入函數就是generate函數。
b.再説一下convert函數,這個函數在koa-convert包中,就是內部又引入了co庫,將傳入的generate函數包裹,達到自執行的效果。
回過頭説一下koa的listen函數,代碼如下:
  listen(...args) {
    debug('listen');
    const server = http.createServer(this.callback());
    return server.listen(...args);
  }

  callback() {
    const fn = compose(this.middleware);

    if (!this.listenerCount('error')) this.on('error', this.onerror);

    const handleRequest = (req, res) => {
      const ctx = this.createContext(req, res);
      return this.handleRequest(ctx, fn);
    };

    return handleRequest;
  }
可以看到,listen函數內部調用了node核心模塊http,創建了一個http服務,並將自身的callback函數作為http服務的響應函數。
而callback函數內部則是通過compose將之前註冊的中間件包裹,然後通過createContext將req和res封裝到一個ctx中,逐層傳入後面的中間件中。ctx內容如下:
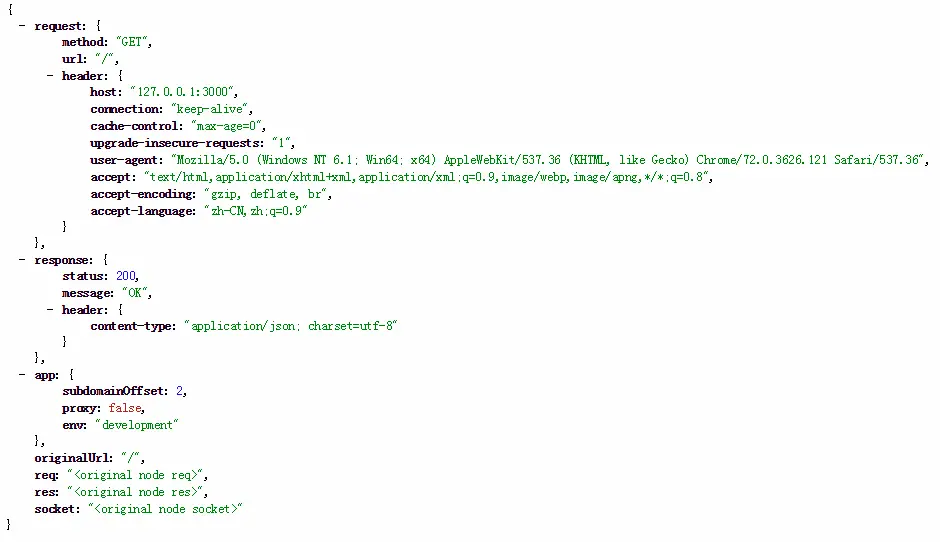
4.request和response處理
如上所示,req和res被封裝到了context中,在各個中間件都可以從參數中得到,中間件可以拿到兩個參數:一個是context,各中間件可以通過它來進行通信和同步狀態;第二個是next,調用它會執行後續中間件。使用示例如下:
const Koa = require('koa')
const app = new Koa()
//聲明一個main中間件,如果你急於瞭解中間件可以跳轉到(三)
const main = (ctx,next) =>{
if (ctx.request.accepts('json')) {
    ctx.response.type = 'json';
    ctx.response.body = { data: 'Hello World' };
  } else if (ctx.request.accepts('html')) {
    ctx.response.type = 'html';
    ctx.response.body = '<p>Hello World</p>';
  } else if (ctx.request.accepts('xml')) {
    ctx.response.type = 'xml';
    ctx.response.body = '<data>Hello World</data>';
  } else{
    ctx.response.type = 'text';
    ctx.response.body = 'Hello World';
  };
}; //直接運行頁面中會顯示json格式,因為我們沒有設置請求頭,所以每一種格式都是ok的。

app.use(main)//app.use()用來加載中間件。
app.listen(3000)
可以看到,我們給返回數據賦值可以直接使用’=‘賦值,在koa的response中body通過set屬性,將設置進來的body值按照其type進行處理,如下。
  set body(val) {
    const original = this._body;
    this._body = val;

    // no content
    if (null == val) {
      if (!statuses.empty[this.status]) this.status = 204;
      if (val === null) this._explicitNullBody = true;
      this.remove('Content-Type');
      this.remove('Content-Length');
      this.remove('Transfer-Encoding');
      return;
    }

    // set the status
    if (!this._explicitStatus) this.status = 200;

    // set the content-type only if not yet set
    const setType = !this.has('Content-Type');

    // string
    if ('string' === typeof val) {
      if (setType) this.type = /^\s*</.test(val) ? 'html' : 'text';
      this.length = Buffer.byteLength(val);
      return;
    }

    // buffer
    if (Buffer.isBuffer(val)) {
      if (setType) this.type = 'bin';
      this.length = val.length;
      return;
    }

    // stream
    if (val instanceof Stream) {
      onFinish(this.res, destroy.bind(null, val));
      if (original != val) {
        val.once('error', err => this.ctx.onerror(err));
        // overwriting
        if (null != original) this.remove('Content-Length');
      }

      if (setType) this.type = 'bin';
      return;
    }

    // json
    this.remove('Content-Length');
    this.type = 'json';
  },
5.靜態資源
使用koa-static中間件來處理靜態資源,實例如下:
安裝npm: npm install koa-static
使用:
const Koa = require('koa');
const app = new Koa();
const path = require('path');
const serve = require('koa-static');

const main = serve(path.join(__dirname));

app.use(main);
app.listen(3000);
6.post請求的body處理
可以使用koa-body中間件來處理,
安裝:npm install koa-body -s
使用:
const Koa = require('koa');
const {koaBody} = require('koa-body');

const app = new Koa();
app.use(koaBody({
    multipart: true
});
app.use(function(ctx, next) {
    console.log(ctx.request.body);
});
app.listen(3000);
如上,koa-body會將post請求的body解析後保存在ctx中,供後續中間件使用。
更對參數參考:https://blog.csdn.net/nullccc/article/details/113839289
參考資料:
https://zhuanlan.zhihu.com/p/67239164?utm_id=0