

導語
在分佈式消息隊列 RocketMQ 中,ConsumeQueue(消費隊列) 是消息消費的核心組件之一。它作為 CommitLog 的索引機制,幫助消費者快速定位並拉取消息。如果沒有 ConsumeQueue,消費者將無法高效地從海量消息中篩選出自己訂閲的數據。
本文將基於 RocketMQ 5.0 源碼,深入探討 ConsumeQueue 的設計原理與實現細節。
為什麼需要 ConsumeQueue?
在深入探討 ConsumeQueue 之前,我們有必要先了解 RocketMQ 的消息寫入和存儲方式。
CommitLog 是 RocketMQ 的消息存儲模塊,用户生產的所有消息都持久化存儲在該模塊中,它具備兩個特點:
- 使用的持久化存儲是一個文件隊列,文件保存於指定目錄下,每個文件的大小是固定的,通常是1GB。
- 只有一個文件可寫入,且僅支持追加寫,文件寫滿後自動切換至新的文件。
RocketMQ 設計者出於寫入優先的考慮,沒有為不同 Topic 隊列的消息分配不同的存儲文件,而是將消息直接寫入 CommitLog,不同 Topic 的消息混合分佈在 CommitLog 的文件中。
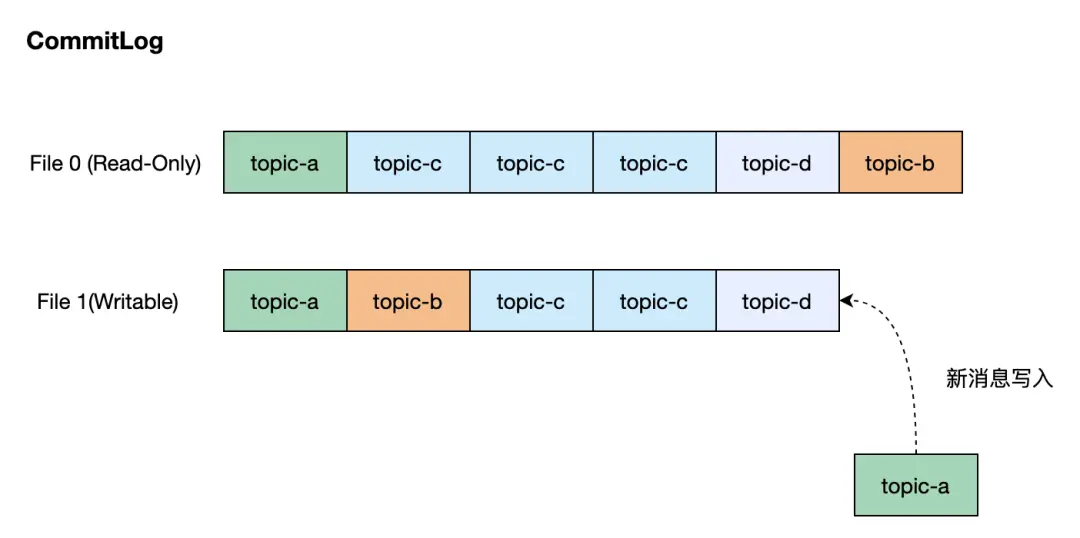
從上圖中可以看出,儘管消息的寫入非常高效,但是消費者需要按照其訂閲的 Topic 來從 CommitLog 中讀取該 Topic 的消息,顯而易見,RocketMQ 需要一種索引機制來快速讀取指定 Topic 隊列的消息,這正是 ConsumeQueue 要做的事情。
ConsumeQueue 的設計原理
ConsumeQueue 作為 RocketMQ 的消息索引樞紐,其設計核心在於高效映射邏輯隊列與物理存儲。我們通過下面的圖示來介紹 ConsumeQueue 的核心設計:
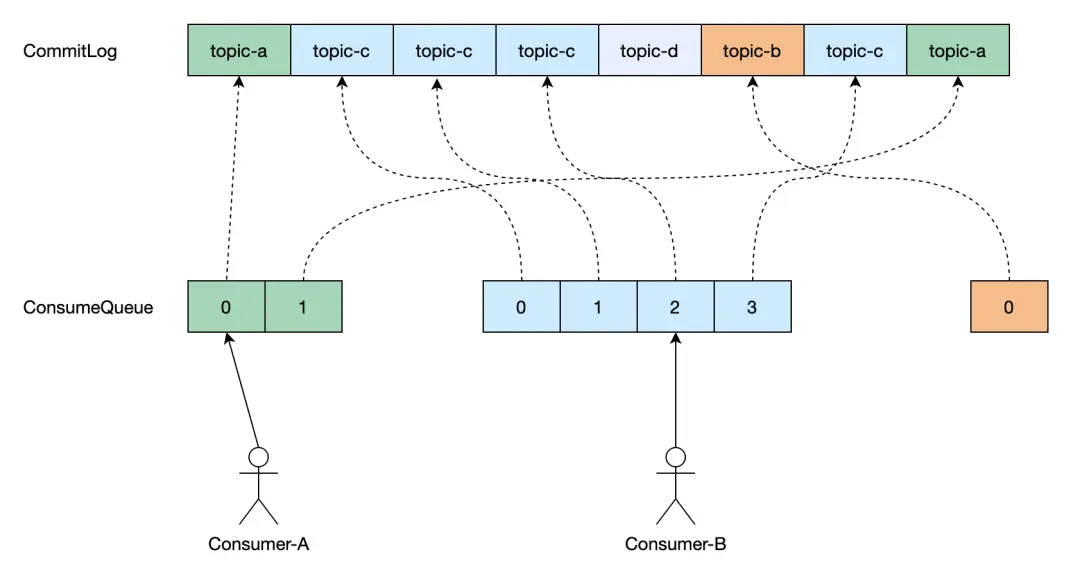
- 每個 Topic 隊列有其對應的唯一的 ConsumeQueue,當一條消息寫入到 CommitLog 後,RocketMQ 會構建該消息的索引,按異步方式將其寫入到對應 Topic 隊列的 ConsumeQueue 中。使用索引可以快速定位到消息在 CommitLog 文件的位置並讀取它。
- 消息索引對象在 ConsumeQueue 中的位置被稱為 Offset,是個從0開始的序號數,maxOffset 即 ConsumeQueue 索引的最大 Offset,會隨着新消息的寫入遞增。
- 基於這個設計,消費者通過與 ConsumeQueue 的 Offset 交互來實現消息的消費。最常見的場景就是,我們記錄消費組在 ConsumeQueue 上當前消費的 Offset,那麼消費者下線後再上線仍然可從上次消費的位置繼續消費。
基於文件的傳統實現方案
數據存儲與格式
與 CommitLog 類似,ConsumeQueue 使用文件隊列來持久化存儲消息索引。ConsumeQueue 使用的文件目錄所在路徑由其對應的 Topic 隊列確定,舉例説明,一個名為 ABC 的 Topic,其隊列0所在的文件目錄路徑是 /data/rocketmq_data/store/consumequeue/abc/0/。消息的索引對象是固定的20個字節大小,其內部格式定義見下圖。
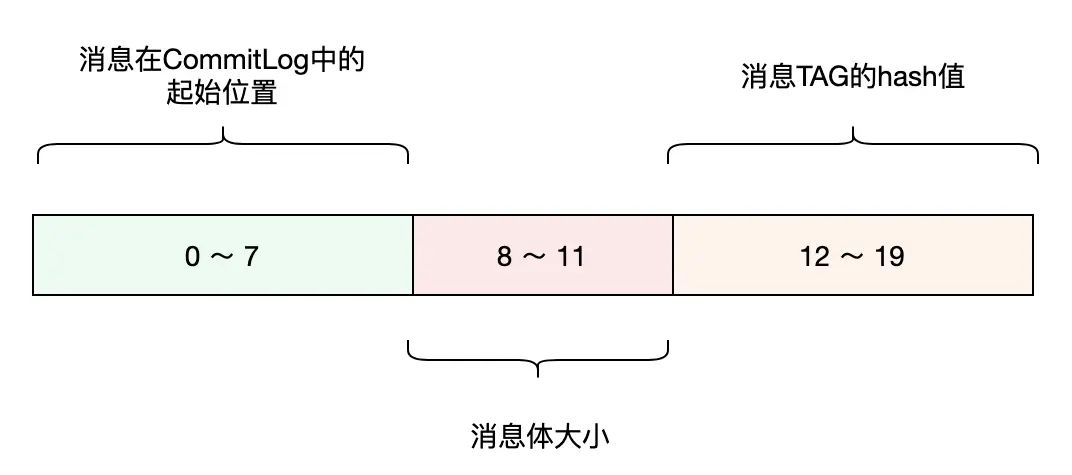
為了方便描述,從這裏開始我們將索引對象叫作 CqUnit。ConsumeQueue 的文件隊列中每個文件的大小是固定的,默認配置可存儲30萬個 CqUnit,當文件寫滿後,會切換到新文件進行寫入。文件名稱的命名方式是有講究的,它以文件存儲的第一個 CqUnit 的 Offset 作為名稱,這樣做的好處是,按 Offset 查詢 CqUnit時,可以根據文件名稱,快速定位到該 Offset 所在的文件,大幅減少對文件的讀取操作頻次。
構建過程
當消息寫入到 CommitLog 後,該消息對於消費者是不可見的,只有在 ConsumeQueue 中增加這條消息的 CqUnit 後,消費者才能消費到這條消息,因此寫入消息時須立刻往 ConsuemQueue 寫入消息的 CqUnit。我們需要給每一條消息指定其在 ConsumeQueue 中的 Offset,QueueOffsetOperator 類維護了一個 Topic 隊列與其當前 Offset 的表,當寫入一條新消息時,DefaultMessageStore 從 QueueOffsetOperator 中取出該 Topic 隊列的當前 Offset,將其寫入到消息體中,在消息成功寫入到 CommitLog 後,指示 QueueOffsetOperator 更新為當前 Offset + 1。為了防止其他寫入線程併發訪問 Topic 隊列的當前 Offset,在讀取和修改 Offset 期間,會使用一個 ReentrantLock 鎖定該 Topic 隊列。

ReputMessageService 作為異步任務,會不停的讀取 CommitLog,當有新的消息寫入,它會立即讀取到該消息,然後根據消息體構建一個 DispatchRequest 對象,CommitLogDispatcherBuildConsumeQueue 處理 DispatchRequest 對象,最終將 CqUnit 寫入到 ConsumeQueue 的存儲中。

按 Offset 查找消息
消費者通常是從某個 Offset 開始消費消息的,比如消費者下線後再次上線會從上次消費的 Offset 開始消費。DefaultMessageStore 的 GetMessage 方法實現從一個 Topic 隊列中拉取一批消息的功能,每次拉取要指定讀取的起始 Offset 以及該批次讀取的最大消息數量。下面截取了部分源碼展示實現的基本思路:
    @Override
    public GetMessageResult getMessage(final String group, final String topic, final int queueId, final long offset,
        final int maxMsgNums, final int maxTotalMsgSize, final MessageFilter messageFilter) {
        long beginTime = this.getSystemClock().now();
        GetMessageStatus status = GetMessageStatus.NO_MESSAGE_IN_QUEUE;
        long nextBeginOffset = offset;
        long minOffset = 0;
        long maxOffset = 0;
        GetMessageResult getResult = new GetMessageResult();
        final long maxOffsetPy = this.commitLog.getMaxOffset();
        ConsumeQueueInterface consumeQueue = findConsumeQueue(topic, queueId);
        if (consumeQueue != null) {
            minOffset = consumeQueue.getMinOffsetInQueue();
            maxOffset = consumeQueue.getMaxOffsetInQueue();
            if (maxOffset == 0) {
            //
            } else {
                long maxPullSize = Math.max(maxTotalMsgSize, 100);
                if (maxPullSize > MAX_PULL_MSG_SIZE) {
                    LOGGER.warn("The max pull size is too large maxPullSize={} topic={} queueId={}", maxPullSize, topic, queueId);
                    maxPullSize = MAX_PULL_MSG_SIZE;
                }
                status = GetMessageStatus.NO_MATCHED_MESSAGE;
                long maxPhyOffsetPulling = 0;
                int cqFileNum = 0;
                while (getResult.getBufferTotalSize() <= 0
                    && nextBeginOffset < maxOffset
                    && cqFileNum++ < this.messageStoreConfig.getTravelCqFileNumWhenGetMessage()) {
                    ReferredIterator<CqUnit> bufferConsumeQueue = null;
                    try {
                        bufferConsumeQueue = consumeQueue.iterateFrom(group, nextBeginOffset, maxMsgNums);
                        long nextPhyFileStartOffset = Long.MIN_VALUE;
                        long expiredTtlOffset = -1;
                        while (bufferConsumeQueue.hasNext() && nextBeginOffset < maxOffset) {
                            CqUnit cqUnit = bufferConsumeQueue.next();
                            long offsetPy = cqUnit.getPos();
                            int sizePy = cqUnit.getSize();
                            SelectMappedBufferResult selectResult = this.commitLog.getMessage(offsetPy, sizePy);
                            getResult.addMessage(selectResult, cqUnit.getQueueOffset(), cqUnit.getBatchNum());
                            status = GetMessageStatus.FOUND;
                            nextPhyFileStartOffset = Long.MIN_VALUE;
                        }
                    } catch (RocksDBException e) {
                        ERROR_LOG.error("getMessage Failed. cid: {}, topic: {}, queueId: {}, offset: {}, minOffset: {}, maxOffset: {}, {}",
                            group, topic, queueId, offset, minOffset, maxOffset, e.getMessage());
                    } finally {
                        if (bufferConsumeQueue != null) {
                            bufferConsumeQueue.release();
                        }
                    }
                }
                long diff = maxOffsetPy - maxPhyOffsetPulling;
                long memory = (long) (StoreUtil.TOTAL_PHYSICAL_MEMORY_SIZE
                    * (this.messageStoreConfig.getAccessMessageInMemoryMaxRatio() / 100.0));
                getResult.setSuggestPullingFromSlave(diff > memory);
            }
        } else {
            status = GetMessageStatus.NO_MATCHED_LOGIC_QUEUE;
            nextBeginOffset = nextOffsetCorrection(offset, 0);
        }
        getResult.setStatus(status);
        getResult.setNextBeginOffset(nextBeginOffset);
        getResult.setMaxOffset(maxOffset);
        getResult.setMinOffset(minOffset);
        return getResult;
    }
上述代碼片段的要點:
- Topic 隊列的 ConsumeQueue 的 IterateFrom 方法依據 Offset 生成一個 Iterator對象。
- 在 Iterator 有效的情況,不斷從 Iterator 拉取 CqUnit 對象,即按 Offset 順序讀取 CqUnit。
- 使用 CqUnit 對象中的 OffsetPy 和 SizePy 從 CommitLog 中讀取消息內容,返回給消費者。
接下來,我們介紹 ConsumeQueue 的 IterateFrom 方法是如何讀取 CqUnit 的。從下面的源碼中可以看到,GetIndexBuffer 方法先從 MappedFileQueue 中找到 Offset 所在的 MappedFile,然後找到 Offset 在 MappedFile 中的位置,從該位置讀取文件剩餘的內容。
public SelectMappedBufferResult getIndexBuffer(final long startIndex) {
        int mappedFileSize = this.mappedFileSize;
        long offset = startIndex * CQ_STORE_UNIT_SIZE;
        if (offset >= this.getMinLogicOffset()) {
            MappedFile mappedFile = this.mappedFileQueue.findMappedFileByOffset(offset);
            if (mappedFile != null) {
                return mappedFile.selectMappedBuffer((int) (offset % mappedFileSize));
            }
        }
        return null;
    }
    @Override
    public ReferredIterator<CqUnit> iterateFrom(long startOffset) {
        SelectMappedBufferResult sbr = getIndexBuffer(startOffset);
        if (sbr == null) {
            return null;
        }
        return new ConsumeQueueIterator(sbr);
    }
ConsumeQueueIterator 的 Next 方法和 hasNext 方法是對 getIndexBuffer 方法返回的 SelectMappedBufferResult 對象,即文件內容的 ByteBuffer,進行訪問。
private class ConsumeQueueIterator implements ReferredIterator<CqUnit> {
private SelectMappedBufferResult sbr;
private int relativePos = 0;
public ConsumeQueueIterator(SelectMappedBufferResult sbr) {
this.sbr = sbr;
if (sbr != null && sbr.getByteBuffer() != null) {
relativePos = sbr.getByteBuffer().position();
}
}
@Override
public boolean hasNext() {
if (sbr == null || sbr.getByteBuffer() == null) {
return false;
}
return sbr.getByteBuffer().hasRemaining();
}
@Override
public CqUnit next() {
if (!hasNext()) {
return null;
}
long queueOffset = (sbr.getStartOffset() + sbr.getByteBuffer().position() - relativePos) / CQ_STORE_UNIT_SIZE;
CqUnit cqUnit = new CqUnit(queueOffset,
sbr.getByteBuffer().getLong(),
sbr.getByteBuffer().getInt(),
sbr.getByteBuffer().getLong());
return cqUnit;
}
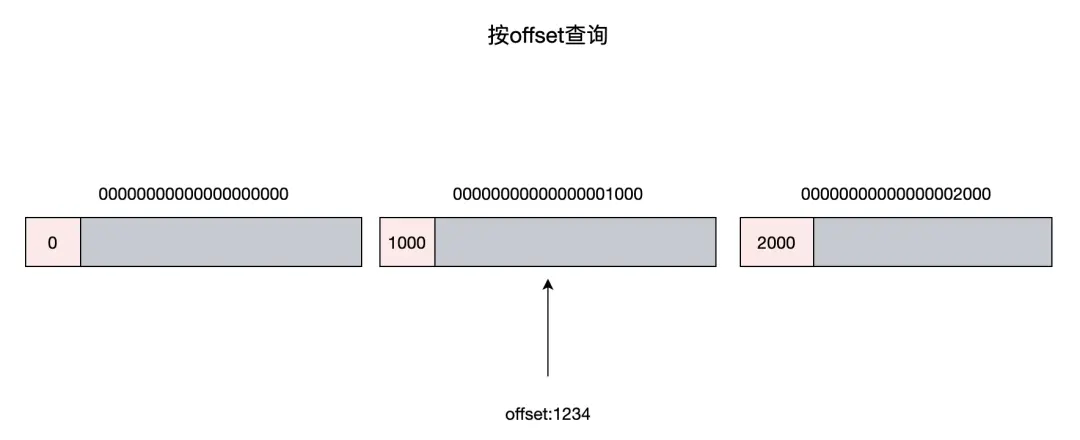
}我們再講下 MappedFileQueue 的 FindMappedFileByOffset 方法,該方法從其維護的文件隊列中查找到 Offset 所在的文件。前面我們介紹過,ConsumeQueue 的文件隊列中的文件是按 Offset 命名的,MappedFile 的 GetFileFromOffset 就是文件的名稱,那麼只需要按照 Offset 除以文件的大小便可得文件在隊列中的位置。這裏要注意的是,這個位置必須要先減去 FirstMappedFile 的位置後才是有效的,因為 ConsumeQueue 會定期清除過期的文件,所以 ConsumeQueue 管理的 MappedFileQueue 的第一個文件對應的 Offset 未必是0。
    public MappedFile findMappedFileByOffset(final long offset, final boolean returnFirstOnNotFound) {
        try {
            MappedFile firstMappedFile = this.getFirstMappedFile();
            MappedFile lastMappedFile = this.getLastMappedFile();
            if (firstMappedFile != null && lastMappedFile != null) {
                if (offset < firstMappedFile.getFileFromOffset() || offset >= lastMappedFile.getFileFromOffset() + this.mappedFileSize) {
                    LOG_ERROR.warn("Offset not matched. Request offset: {}, firstOffset: {}, lastOffset: {}, mappedFileSize: {}, mappedFiles count: {}",
                        offset,
                        firstMappedFile.getFileFromOffset(),
                        lastMappedFile.getFileFromOffset() + this.mappedFileSize,
                        this.mappedFileSize,
                        this.mappedFiles.size());
                } else {
                    int index = (int) ((offset / this.mappedFileSize) - (firstMappedFile.getFileFromOffset() / this.mappedFileSize));
                    MappedFile targetFile = null;
                    try {
                        targetFile = this.mappedFiles.get(index);
                    } catch (Exception ignored) {
                    }
                    if (targetFile != null && offset >= targetFile.getFileFromOffset()
                        && offset < targetFile.getFileFromOffset() + this.mappedFileSize) {
                        return targetFile;
                    }
                    for (MappedFile tmpMappedFile : this.mappedFiles) {
                        if (offset >= tmpMappedFile.getFileFromOffset()
                            && offset < tmpMappedFile.getFileFromOffset() + this.mappedFileSize) {
                            return tmpMappedFile;
                        }
                    }
                }
                if (returnFirstOnNotFound) {
                    return firstMappedFile;
                }
            }
        } catch (Exception e) {
            log.error("findMappedFileByOffset Exception", e);
        }
        return null;
    }
按時間戳查找消息
除了從指定 Offset 消費消息這種方式,消費者還有回溯到某個時間點開始消費的需求,這要求 RocketMQ 支持查詢指定的 Timestamp 所在的 Offset,然後從這個 Offset 開始消費消息。
我們可以從 ConsumeQueue 的 GetOffsetInQueueByTime 方法直接瞭解按時間戳查找消息的具體實現。
消息是按時間先後寫入的,ConsumeQueue 文件隊列中的 CqUnit 也是按時間先後排列的,那麼每個 MappedFile 都對應一段時間區間內的 CqUnit。從下面代碼可以看出,我們可以先根據 Timestamp 找到其落在時間區間的 MappedFile,然後在該 MappedFile 裏查找最接近該 Timestamp 的 CqUnit。
@Override
    public long getOffsetInQueueByTime(final long timestamp, final BoundaryType boundaryType) {
        MappedFile mappedFile = this.mappedFileQueue.getConsumeQueueMappedFileByTime(timestamp,
            messageStore.getCommitLog(), boundaryType);
        return binarySearchInQueueByTime(mappedFile, timestamp, boundaryType);
    }
GetConsumeQueueMappedFileByTime 的具體實現主要分為兩個部分:
- 找到每個 MappedFile 的 StartTimestamp 和 StopTimestamp,即 MappedFile 裏第一個 CqUnit 對應消息的時間戳和最後一個 CqUnit 對應消息的時間戳,需要訪問兩次 CommitLog 來得到消息內容。
- 使用 Timestamp 和每個 MappedFile 的 StartTimestamp 和 StopTimestamp 比較。當 Timestamp 落在某個 MappedFile 的 StartTimestamp 和 StopTimestamp 區間內時,那麼該 MappedFile 是下一步查找 CqUnit 的目標。
接下來,要按照二分查找法在該 MappedFile 中找到最接近 Timestamp 的 CqUnit。根據二分查找的法則,每次查找需要比較中間位置的 CqUnit 引用消息的存儲時間和目標 Timestamp 以確定下一個查找區間,直至 CqUnit 滿足最接近目標 Timestamp 的條件。要注意的是,獲取 CqUnit 引用消息的存儲時間需從 CommitLog 中讀取消息。
基於 RocksDB 的優化方案
儘管基於文件的實現比較直觀,但是當 Topic 隊列達到一定數量後,會出現明顯的性能和可用性問題。Topic 隊列數量越多,代表着 ConsumeQueue 文件越多,產生的隨機讀寫也就越多,這會影響系統整體的 IO 性能,導致出現生產消費 TPS 不斷下降,延遲不斷增高的趨勢。在我們內部的測試環境和客户的生產環境中,我們都發現使用的隊列數過多直接影響系統的可用性,而且我們無法通過不斷升級 Broker 節點配置來消除這種影響,因此我們騰訊雲 TDMQ RocketMQ 版在產品控制枱上會限制客户可創建的 Topic 數量以確保消息服務的穩定性。
那麼有沒有辦法能夠解決上面的問題讓服務能夠承載更多的 Topic 呢?我們可以把 ConsumeQueue 提供的功能理解為使用 Topic 隊列的 Offset 來找到 CqUnit,那麼 Topic 隊列和 Offset 構成了 Key,CqUnit 是 Value,是一個典型的 KV 使用場景。在單機 KV 存儲的軟件裏,最著名的莫過於 RocksDB了,它被廣泛使用於 Facebook,LinkedIn 等互聯網公司的業務中。從下面的設計圖看,RocksDB 基於 SSTable + MemTable 的實現能夠提供高效寫入和查找 KV 的能力,有興趣的讀者可以研究下RocksDB的具體實現(https://github.com/facebook/rocksdb/wiki/RocksDB-Overview),這裏不展開説明。
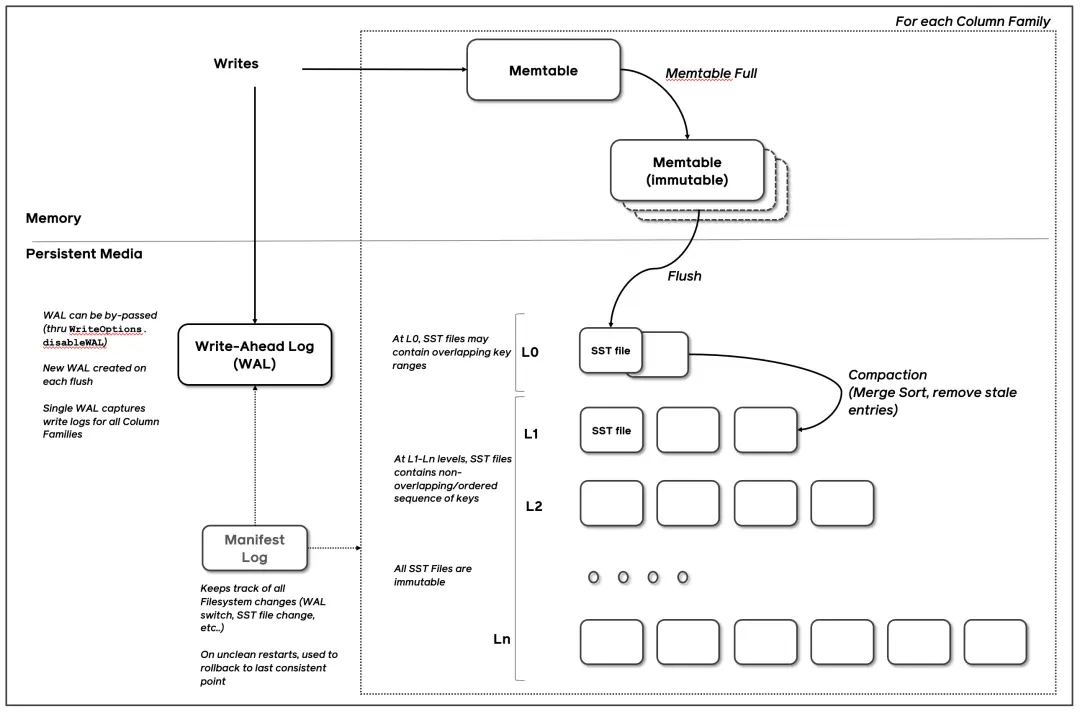
如果我們使用 RocksDB 讀寫 CqUnit,那麼 ConsumeQueue 文件數量不會隨着 Topic 隊列的數量線性增長,便不必擔心由此帶來的 IO 開銷。
下面我們來介紹如何使用 RocksDB 來實現 ConsumeQueue。
數據存儲與格式
在基於 RocksDB 的實現裏,RocketMQ 使用兩個 ColumnFamily 來管理不同類型的數據,這裏不熟悉 RocksDB 的讀者可以將 ColumnFamily 視作 MySQL 裏的 Table。
-
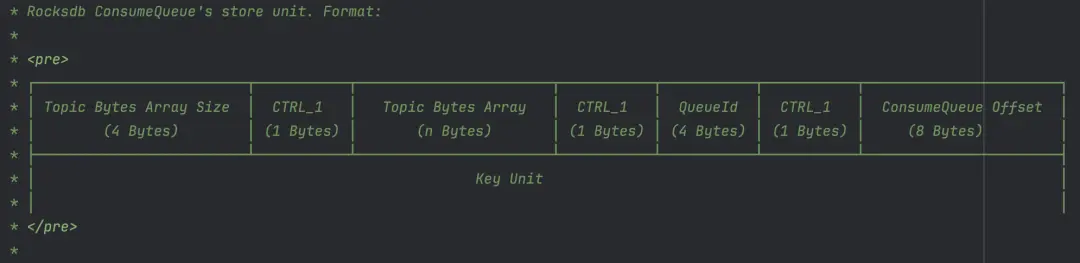
第一個 ColumnFamiliy,簡稱為 DefaultColumnFamily,用於管理 CqUnit 數據。
Key 的內容格式定義參考下圖,其包含 Topic 名稱、QueueId 和 ConsumeQueue 的 Offset。
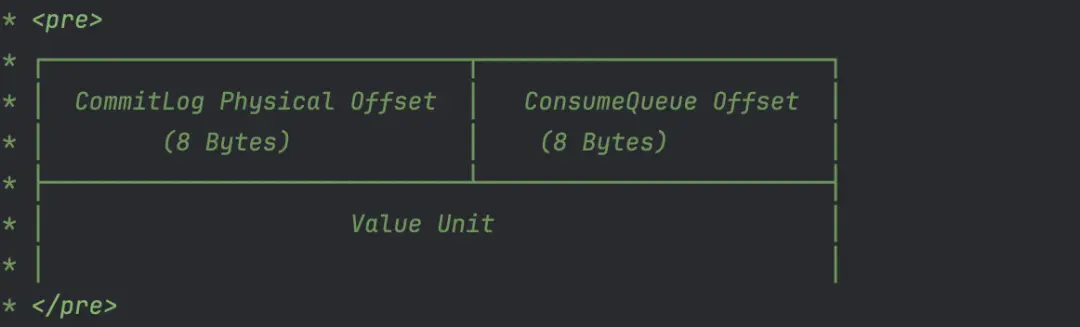
Value 的內容格式,與前文中文件實現裏的索引對象定義類似,但是多了一個消息存儲時間的字段。

-
第二個 ColumnFamily,簡稱為 OffsetColumnFamily,用於管理 Topic 隊列的 MaxOffset 和 MinOffset。
MaxOffset 是指 Topic 隊列最新一條消息在 ConsumeQueue 中的 Offset,隨着消息的新增而變化。MinOffset 是指 Topic 隊列最早一條消息在 ConsumeQueue 中的 Offset,當消息過期被刪除後發生變化。MaxOffset 和 MinOffset 確定消費者可讀取消息的範圍,在基於文件的實現裏,通過訪問 ConsumeQueue 文件隊列裏的隊尾和隊首文件得到這兩個數值。而在 RocksDB 的實現裏,我們單獨保存這兩個數值。
下圖是 Key 的格式定義,其包含 Topic 名稱、QueueId 以及用於標記是 MaxOffset 或 MinOffset 的字段。

Value 保存 ConsumeQueue的 Offset,以及該 Offset 對應消息在 CommitLog 的位置。
構建過程
ConsumeQueue 的 CqUnit 的構建過程與前文中基於文件的實現的過程一致,此處不再贅述,不同的是前文中 ReputMessageService 使用的 ConsumeQueueStore 被替換為 RocksDBConsumeQueueStore。在這個過程中,RocksDBConsumeQueueStore 主要完成兩件事:
- 往 DefaultColumnFamily 寫入消息對應的 CqUnit。
- 往 OffsetColumnFamily 更新消息對應 Topic 隊列的 maxOffset。
    private boolean putMessagePosition0(List<DispatchRequest> requests) {
        if (!this.rocksDBStorage.hold()) {
            return false;
        }
        try (WriteBatch writeBatch = new WriteBatch(); WriteBatch lmqTopicMappingWriteBatch = new WriteBatch()) {
            final int size = requests.size();
            if (size == 0) {
                return true;
            }
            long maxPhyOffset = 0;
            for (int i = size - 1; i >= 0; i--) {
                final DispatchRequest request = requests.get(i);
                DispatchEntry entry = DispatchEntry.from(request);
                dispatch(entry, writeBatch, lmqTopicMappingWriteBatch);
                dispatchLMQ(request, writeBatch, lmqTopicMappingWriteBatch);
                final int msgSize = request.getMsgSize();
                final long phyOffset = request.getCommitLogOffset();
                if (phyOffset + msgSize >= maxPhyOffset) {
                    maxPhyOffset = phyOffset + msgSize;
                }
            }
            // put lmq topic Mapping to DB if there has mapping exist
            if (lmqTopicMappingWriteBatch.count() > 0) {
                // write max topicId and all the topicMapping as atomic write
                ConfigHelperV2.stampMaxTopicSeqId(lmqTopicMappingWriteBatch, this.topicSeqIdCounter.get());
                this.configStorage.write(lmqTopicMappingWriteBatch);
                this.configStorage.flushWAL();
            }
            this.rocksDBConsumeQueueOffsetTable.putMaxPhyAndCqOffset(tempTopicQueueMaxOffsetMap, writeBatch, maxPhyOffset);
            this.rocksDBStorage.batchPut(writeBatch);
            this.rocksDBConsumeQueueOffsetTable.putHeapMaxCqOffset(tempTopicQueueMaxOffsetMap);
            long storeTimeStamp = requests.get(size - 1).getStoreTimestamp();
            if (this.messageStore.getMessageStoreConfig().getBrokerRole() == BrokerRole.SLAVE
                || this.messageStore.getMessageStoreConfig().isEnableDLegerCommitLog()) {
                this.messageStore.getStoreCheckpoint().setPhysicMsgTimestamp(storeTimeStamp);
            }
            this.messageStore.getStoreCheckpoint().setLogicsMsgTimestamp(storeTimeStamp);
            notifyMessageArriveAndClear(requests);
            return true;
        } catch (Exception e) {
            ERROR_LOG.error("putMessagePosition0 failed.", e);
            return false;
        } finally {
            tempTopicQueueMaxOffsetMap.clear();
            consumeQueueByteBufferCacheIndex = 0;
            offsetBufferCacheIndex = 0;
            this.rocksDBStorage.release();
        }
    }
按 offset 查找消息
在前文中我們已介紹過按 Offset 查找消息的流程,RocksDB 的實現裏,DefaultMessageStore 的 GetMessage 方法中使用的 ConsumeQueue 被替換成了 RocksDBConsumeQueue。這裏我們只關注其 IterateFrom 方法的實現,以下是該方法的代碼片段。
public ReferredIterator<CqUnit> iterateFrom(String group, long startIndex, int count) throws RocksDBException {
        long maxCqOffset = getMaxOffsetInQueue();
        if (startIndex < maxCqOffset) {
            int num = Math.min((int) (maxCqOffset - startIndex), count);
            if (MixAll.isLmq(topic) || PopAckConstants.isStartWithRevivePrefix(topic)) {
                return iterateUseMultiGet(startIndex, num);
            }
            if (num <= messageStore.getMessageStoreConfig().getUseScanThreshold()) {
                return iterateUseMultiGet(startIndex, num);
            }
            if (!messageStore.getMessageStoreConfig().isEnableScanIterator()) {
                return iterateUseMultiGet(startIndex, num);
            }
            final String scannerIterKey = group + "-" + Thread.currentThread().getId();
            ScanRocksDBConsumeQueueIterator scanRocksDBConsumeQueueIterator = scanIterators.get(scannerIterKey);
            if (scanRocksDBConsumeQueueIterator == null) {
                if (RocksDBConsumeQueue.this.messageStore.getMessageStoreConfig().isEnableRocksDBLog()) {
                    LOG.info("new ScanIterator Group-threadId{} Topic:{}, queueId:{},startIndex:{}, count:{}",
                        scannerIterKey, topic, queueId, startIndex, num);
                }
                ScanRocksDBConsumeQueueIterator newScanIterator = new ScanRocksDBConsumeQueueIterator(startIndex, num);
                scanRocksDBConsumeQueueIterator = scanIterators.putIfAbsent(scannerIterKey, newScanIterator);
                if (scanRocksDBConsumeQueueIterator == null) {
                    scanRocksDBConsumeQueueIterator = newScanIterator;
                } else {
                    newScanIterator.closeRocksIterator();
                }
                return scanRocksDBConsumeQueueIterator;
            }
            if (!scanRocksDBConsumeQueueIterator.isValid()) {
                scanRocksDBConsumeQueueIterator.closeRocksIterator();
                if (RocksDBConsumeQueue.this.messageStore.getMessageStoreConfig().isEnableRocksDBLog()) {
                    LOG.info("new ScanIterator not valid Group-threadId{} Topic:{}, queueId:{},startIndex:{}, count:{}",
                        scannerIterKey, topic, queueId, startIndex, count);
                }
                ScanRocksDBConsumeQueueIterator newScanIterator = new ScanRocksDBConsumeQueueIterator(startIndex, num);
                scanIterators.put(scannerIterKey, newScanIterator);
                return newScanIterator;
            } else {
                if (RocksDBConsumeQueue.this.messageStore.getMessageStoreConfig().isEnableRocksDBLog()) {
                    LOG.info("new ScanIterator valid then reuse Group-threadId{} Topic:{}, queueId:{},startIndex:{}, count:{}",
                        scannerIterKey, topic, queueId, startIndex, count);
                }
                scanRocksDBConsumeQueueIterator.reuse(startIndex, num);
                return scanRocksDBConsumeQueueIterator;
            }
        }
        return null;
    }
在上面的代碼中,首先通過 GetMaxOffsetInQueue 方法獲取該 Topic 隊列 ConsumeQueue 的 MaxOffset,MaxOffset 結合 Count 參數共同指定 Iterator 掃描的 Offset 區間。
然後,我們可以看到 IterateFrom 方法中根據不同的條件判斷分支返回不同類型的 Iterator 類對象,RocksDBConsumeQueueIterator 和 ScanRocksDBConsumeQueueIterator。下面是 IteratorUseMultiGet 方法中創建 RocksDBConsumeQueueIterator 對象的調用鏈中最核心的代碼, RangeQuery 方法根據 StartIndex 和 Num 構建了要查詢的 Key 列表,然後調用 RocksDB 的 MultiGet 方法查詢到 Key 列表對應的 Value 列表,RocksDBConsumeQueueIterator 使用該 Value 列表上提供迭代器的功能。
   public List<ByteBuffer> rangeQuery(final String topic, final int queueId, final long startIndex,
        final int num) throws RocksDBException {
        final byte[] topicBytes = topic.getBytes(StandardCharsets.UTF_8);
        final List<ColumnFamilyHandle> defaultCFHList = new ArrayList<>(num);
        final ByteBuffer[] resultList = new ByteBuffer[num];
        final List<Integer> kvIndexList = new ArrayList<>(num);
        final List<byte[]> kvKeyList = new ArrayList<>(num);
        for (int i = 0; i < num; i++) {
            ByteBuffer keyBB;
            // must have used topicMapping
            if (this.topicMappingTable != null) {
                Long topicId = topicMappingTable.get(topic);
                if (topicId == null) {
                    throw new RocksDBException("topic: " + topic + " topicMapping not existed error when rangeQuery");
                }
                keyBB = buildCQFixKeyByteBuffer(topicId, queueId, startIndex + i);
            } else {
                keyBB = buildCQKeyByteBuffer(topicBytes, queueId, startIndex + i);
            }
            kvIndexList.add(i);
            kvKeyList.add(keyBB.array());
            defaultCFHList.add(this.defaultCFH);
        }
        int keyNum = kvIndexList.size();
        if (keyNum > 0) {
            List<byte[]> kvValueList = this.rocksDBStorage.multiGet(defaultCFHList, kvKeyList);
            final int valueNum = kvValueList.size();
            if (keyNum != valueNum) {
                throw new RocksDBException("rocksdb bug, multiGet");
            }
            for (int i = 0; i < valueNum; i++) {
                byte[] value = kvValueList.get(i);
                if (value == null) {
                    continue;
                }
                ByteBuffer byteBuffer = ByteBuffer.wrap(value);
                resultList[kvIndexList.get(i)] = byteBuffer;
            }
        }
        final int resultSize = resultList.length;
        List<ByteBuffer> bbValueList = new ArrayList<>(resultSize);
        for (int i = 0; i < resultSize; i++) {
            ByteBuffer byteBuffer = resultList[i];
            if (byteBuffer == null) {
                break;
            }
            bbValueList.add(byteBuffer);
        }
        return bbValueList;
    }
ScanRocksDBConsumeQueueIterator 則是使用了 RocksDB 的 Iterator 特性(https://github.com/facebook/rocksdb/wiki/Iterator),相比 MultiGet,其擁有更好的性能。
下面是 ScanQuery 的實現,代碼比較簡潔,指定 Iterator 的 BeginKey 和 UpperKey,再調用 RocksDB 的 API 返回 Iterator 對象。
BeginKey 是通過 Topic 隊列信息和 StartIndex 參數構造的 Key。UpperKey 的構造比較精妙,還記得在 DefaultColumnFamily 介紹裏 Key 的格式吧,Key 的倒數第二個部分是 CTRL\_1,作為 CqUnit 的 Key 時是個常量,Unicode 值為1。構造 UpperKey 時,CTRL\_1 被替換為 CTRL_2, Uinicode 值為2,這樣能保證 Iterator 掃描區間的上限不超過 Topic 隊列 Offset 的理論最大值。
public RocksIterator scanQuery(final String topic, final int queueId, final long startIndex,
        ReadOptions scanReadOptions) throws RocksDBException {
        final ByteBuffer beginKeyBuf = getSeekKey(topic, queueId, startIndex);
        if (scanReadOptions.iterateUpperBound() == null) {
            ByteBuffer upperKeyForInitScanner = getUpperKeyForInitScanner(topic, queueId);
            byte[] buf = new byte[upperKeyForInitScanner.remaining()];
            upperKeyForInitScanner.slice().get(buf);
            scanReadOptions.setIterateUpperBound(new Slice(buf));
        }
        RocksIterator iterator = this.rocksDBStorage.scan(scanReadOptions);
        iterator.seek(beginKeyBuf.slice());
        return iterator;
    }
按時間戳查找消息
與基於文件的實現類似,使用 RocksDB 來按時間戳查找消息,首先也需要確定 Topic 隊列 ConsumeQueue 的 MinOffset 和 MaxOffset,然後使用二分查找法查找到最接近指定時間戳的 CqUnit。
    @Override
    public long getOffsetInQueueByTime(String topic, int queueId, long timestamp,
        BoundaryType boundaryType) throws RocksDBException {
        final long minPhysicOffset = this.messageStore.getMinPhyOffset();
        long low = this.rocksDBConsumeQueueOffsetTable.getMinCqOffset(topic, queueId);
        Long high = this.rocksDBConsumeQueueOffsetTable.getMaxCqOffset(topic, queueId);
        if (high == null || high == -1) {
            return 0;
        }
        return this.rocksDBConsumeQueueTable.binarySearchInCQByTime(topic, queueId, high, low, timestamp,
            minPhysicOffset, boundaryType);
    }
與基於文件的實現不同的是,由於 RocksDB 的 CqUnit 裏保存了消息存儲的時間,比較時間戳時不必再讀取 CommitLog 獲取消息的存儲時間,這樣提升了查找的時間效率。
總結及展望
本文和讀者分享了 ConsumeQueue 的設計與實現,着重介紹其在消息消費場景的應用。鑑於篇幅限制,仍有許多細節未涉及,比如 ConsumeQueue 的容錯恢復、過期清理機制等。近些年,RocketMQ 往 Serveless 化方向發展,在5.0的架構裏,已經將計算和存儲分離,Proxy 作為計算集羣,Broker 作為存儲集羣。從實際應用上來講,Broker 作為存儲角色,從計算的角色釋放出來之後,多出的性能和資源應該用於承載更多的 Topic,而基於文件的ConsumeQueue 實現限制了 Broker 的上限,因此我們需要 RocksDB 的實現方案來解決這個問題。
目前,騰訊雲的 TDMQ RabbitMQ Serveless、MQTT 產品均基於 RocketMQ 5.0 的架構部署運行,Broker 集羣已採用 RocksDB 的方案支持百萬級的 Topic 隊列,滿足 RabbitMQ 和 MQTT 協議需要大量 Topic 支持的場景。在騰訊雲 RocketMQ 5.0 的產品上,我們開始逐漸在新版本中灰度開啓該方案,為客户提供更好性能更穩定的消息隊列服務。