0. 前言
前兩年在 Github 網上衝浪的時候發現了一個 Realworld DEMO 項目,這是一個簡單但全面的全棧應用 DEMO 標準:一個類似於 Medium 的文章博客網站,有很多不同的語言和框架的實現,提供的功能包括
- 用户的註冊,登錄,獲取,更新信息,關注,取關
- 文章的創建,修改,喜歡,推薦,文章評論的創建和刪除
於是我按照 Realworld 項目的接口標準,用 UtilMeta 框架 實現了全部的功能,發現只用了 600 行左右的代碼,比大部分後端實現都要簡潔
UtilMeta 框架 是一個開源的 Python 後端框架,可以簡潔高效地開發 RESTful 接口,同時支持接入與適配 Django, Flask, FastAPI 等主流 Python 框架
這篇文章我就來帶着大家完整的走完這個 Realworld 博客項目的後端實現流程,從數據模型,JWT 鑑權,接口開發到接口的調試與管理,並會附上完整的 Python 項目源碼
1. 創建項目
安裝依賴
在創建項目之前,請先安裝 Realworld 項目所需的依賴庫
pip install utilmeta starlette django databases[aiosqlite]除了使用 UtilMeta 框架開發外,我們的項目將使用以下技術棧進行實現
- 使用 Starlette (FastAPI 的底層實現) 作為 HTTP backend,開發異步接口
- 使用 Django ORM 作為數據模型庫
- 使用 SQLite 作為數據庫
- 使用 JWT 進行用户鑑權
創建命令
使用如下命令創建一個新的 UtilMeta 項目
meta setup realworld --temp=full接着按照提示輸入或跳過,在提示選擇 backend 時輸入 starlette
Choose the http backend of your project
 - django (default)
 - flask
 - fastapi
 - starlette
 - sanic
 - tornado
>>> starlette
由於我們的項目包含多種接口和模型邏輯,為了方便更好地組織項目,我們在創建命令中使用了 --temp=full 參數創建完整的模板項目(默認創建的是單文件的簡單項目)
我們可以看到這個命令創建出的項目結構如下
/config
    conf.py
    env.py
    service.py
/domain
/service
    api.py
main.py
meta.ini
其中,我們建議的組織方式為
config:存放配置文件,環境變量,服務運行參數等domain:存放領域應用,模型與 RESTful 接口service:整合內部接口與外部服務main.py:運行入口文件,調試時使用python main.py即可直接運行服務meta.ini:元數據聲明文件,meta命令行工具通過識別這個文件的位置確定項目的根目錄
2. 編寫數據模型
對於博客這樣以數據的增刪改查為核心的 API 系統,我們往往從數據模型開始開發,通過對 API 文檔 的分析我們可以得出需要編寫用户,文章,評論等模型
創建領域應用
由於我們使用 Django 作為 ORM 底層實現,我們就依照 django 組織 app 的方式來組織我們的項目,我們可以簡單把博客項目分成【用户】【文章】兩個領域應用
首先使用如下命令為項目添加一個名為 user 的用户應用
meta add user命令運行後你可以看到在 domain 文件夾下創建了一個新的文件夾,結構如下
/domain
    /user
        /migrations
        api.py
        models.py
        schema.py
博客的用户模型以及用户和鑑權的相關接口將會放在這個文件夾中
即使你不熟悉 Django 的 app 用法也沒有關係,你可以簡單理解為一個分領域組織代碼的文件夾,領域的劃分標準由你來確定
我們再添加一個名為 article 的文章應用,將會用於存放文章與評論的模型和接口
meta add article用户模型
我們將按照 API 文檔:User 中對用户數據結構的説明編寫數據模型,我們打開 domain/user/models.py,編寫用户的模型
from django.db import models
from utilmeta.core.orm.backends.django.models import PasswordField, AwaitableModel

class User(AwaitableModel):
    username = models.CharField(max_length=40, unique=True)
    password = PasswordField(max_length=100)
    email = models.EmailField(max_length=60, unique=True)
    token = models.TextField(default='')
    bio = models.TextField(default='')
    image = models.URLField(default='')
AwaitableModel 是 UtilMeta 為 Django 查詢在異步環境執行所編寫的模型基類,它的底層使用 encode/databases 集成了各個數據庫的異步引擎,能夠使得 Django 真正發揮出異步查詢的性能
文章與評論模型
我們按照 API 文檔:Article 編寫 文章 與 評論 模型,打開 domain/article/models.py,編寫
from django.db import models
from utilmeta.core.orm.backends.django import models as amodels

class BaseContent(amodels.AwaitableModel):
    body = models.TextField()
    created_at = models.DateTimeField(auto_now_add=True)
    updated_at = models.DateTimeField(auto_now=True)
    author_id: int

    class Meta:
        abstract = True

class Tag(amodels.AwaitableModel):
    name = models.CharField(max_length=255)
    slug = models.SlugField(db_index=True, unique=True)
    created_at = models.DateTimeField(auto_now_add=True)

class Article(BaseContent):
    slug = models.SlugField(db_index=True, max_length=255, unique=True)
    title = models.CharField(db_index=True, max_length=255)
    description = models.TextField()
    author = models.ForeignKey(
        'user.User', on_delete=amodels.ACASCADE, related_name='articles')
    tags = models.ManyToManyField(Tag, related_name='articles')

class Comment(BaseContent):
    article = models.ForeignKey(
        Article, related_name='comments', on_delete=amodels.ACASCADE)
    author = models.ForeignKey(
        'user.User', on_delete=models.CASCADE, related_name='comments')
可以觀察到文章與評論的數據模型有着相似的結構,我們就可以利用 Django 模型類的繼承用法,定義一個 BaseContent 抽象模型來減少重複的字段聲明
添加關係模型
博客項目需要記錄用户之間的關注關係與用户與文章之間的喜歡關係,所以我們需要添加 Favorite 和 Follow 中間表模型來記錄用户,文章之間的關係
我們再次打開 domain/user/models.py,創建關係表併為 User 表添加多對多關係字段
from django.db import models
from utilmeta.core.orm.backends.django.models import PasswordField, AwaitableModel, ACASCADE

class User(AwaitableModel):
    # --- 定義好的字段

    # 新增字段 +++
    followers = models.ManyToManyField(
        'self', related_name='followed_bys', through='Follow',
        through_fields=('following', 'follower'),
        symmetrical=False
    )
    favorites = models.ManyToManyField(
        'article.Article', through='Favorite', related_name='favorited_bys')

# 新增模型 +++
class Favorite(AwaitableModel):
    user = models.ForeignKey(User, related_name='article_favorites', on_delete=ACASCADE)
    article = models.ForeignKey(
        'article.Article', related_name='user_favorites', on_delete=ACASCADE)
    created_at = models.DateTimeField(auto_now_add=True)

    class Meta:
        unique_together = ('user', 'article')

class Follow(AwaitableModel):
    following = models.ForeignKey(
        User, related_name='user_followers', on_delete=ACASCADE)
    follower = models.ForeignKey(
        User, related_name='user_followings', on_delete=ACASCADE)
    created_at = models.DateTimeField(auto_now_add=True)

    class Meta:
        unique_together = ('following', 'follower')
我們新增了兩個模型
Favorite:文章的喜歡關係模型Follow:用户之間的關注關係模型
同時也在 User 模型中添加了對應的多對多關係字段 followers 和 favorites,將會用於接下來的查詢接口的編寫
例子中的 ACASCADE 是 UtilMeta 為 Django 在異步環境下執行所開發的異步級聯刪除函數
接入數據庫
當我們編寫好數據模型後即可使用 Django 提供的遷移命令方便地創建對應的數據表了,由於我們使用的是 SQLite,所以無需提前安裝數據庫軟件,只需要在項目目錄中運行以下兩行命令即可完成數據庫的創建
meta makemigrations
meta migrate
當看到以下輸出時即表示你已完成了數據庫的創建
Operations to perform:
  Apply all migrations: article, contenttypes, user
Running migrations:
  Applying article.0001_initial... OK
  Applying user.0001_initial... OK
  Applying article.0002_initial... OK
  Applying contenttypes.0001_initial... OK
  Applying contenttypes.0002_remove_content_type_name... OK
以上的命令是 Django 的數據庫遷移命令,makemigrations會把數據模型的變更保存為遷移文件,而migrate命令則會把遷移文件轉化為創建或調整數據表的 SQL 語句執行
完成以上命令後你會在項目文件夾中看剛剛創建好名為 db 的 SQLite 數據庫,如果你想知道數據庫是如何配置的,請打開 config/conf.py 文件,你會在其中找到如下代碼
service.use(DatabaseConnections({
    'default': Database(
        name='db',
        engine='sqlite3',
    )
}))
這部分代碼就是用來聲明數據庫的連接配置的
3. 開發用户與鑑權接口
Realworld 博客項目需要使用 JWT 作為請求鑑權的方式,即處理用户登錄與識別當前請求的用户
實現 JWT 鑑權
UtilMeta 內置的鑑權組件中已經有了 JWT 鑑權的實現,我們只需聲明相應的參數即可獲得 JWT 鑑權能力,我們在 config 文件夾中創建一個名為 auth.py 的文件,編寫鑑權相關的配置
from .env import env
from utilmeta.core import api, auth
from utilmeta.core.auth import jwt
from utilmeta.core.request import var
from domain.user.models import User

class API(api.API):
    user_config = auth.User(
        User,
        authentication=jwt.JsonWebToken(
            secret_key=env.JWT_SECRET_KEY,
            user_token_field=User.token
        ),
        login_fields=User.email,
        password_field=User.password,
    )

    async def get_user(self) -> User:
        return await self.user_config.getter(self.request)

    async def get_user_id(self) -> int:
        return await var.user_id.get(self.request)
我們通過創建一個新的 API 基類來聲明鑑權相關的配置,這樣需要鑑權的 API 類都可以直接繼承這個新的 API 基類,在它們的接口函數中可以通過 await self.get_user() 獲取當前的請求用户
任何一個需要用户登錄才能訪問的接口,你都可以直接在接口參數中聲明 user: User = API.user_config,這樣你就可以通過 user 直接拿到當前請求用户的實例
關於 UtilMeta 框架在鑑權方面的詳細説明可以參考 UtilMeta 接口與用户鑑權 這篇文檔
環境變量管理
類似 JWT_SECRET_KEY 這樣重要的密鑰我們一般不會將它硬編碼到代碼中,而是使用環境變量的方式定義,UtilMeta 提供了一套環境變量聲明模板,我們可以打開 config/env.py 編寫
from utilmeta.conf import Env

class ServiceEnvironment(Env):
    PRODUCTION: bool = False
    JWT_SECRET_KEY: str = ''
    DJANGO_SECRET_KEY: str = ''

env = ServiceEnvironment(sys_env='CONDUIT_')
這樣我們可以將 JWT 的密鑰定義在運行環境的 CONDUIT_JWT_SECRET_KEY 變量中,並且使用 env.JWT_SECRET_KEY 訪問即可
用户鑑權 API
對於用户而言,我們需要實現用户的註冊,登錄,查詢與更新當前用户數據的接口:
- GET /api/user:獲取當前請求用户
- PUT /api/user:更新當前請求用户
- POST /api/users:用户註冊接口
- POST /api/users/login:用户登錄接口
在編寫接口前我們先來定義接口所需要的數據結構,主要是用户的登錄數據,註冊數據以及返回的用户數據,我們打開 domain/user/schema.py,編寫:
from utilmeta.core import orm
from .models import User, Follow
from utilmeta.core.orm.backends.django import expressions as exp
from utype.types import EmailStr

class UsernameMixin(orm.Schema[User]):
    username: str = orm.Field(regex='[A-Za-z0-9][A-Za-z0-9_]{2,18}[A-Za-z0-9]')

class UserBase(UsernameMixin):
    bio: str
    image: str

class UserLogin(orm.Schema[User]):
    email: str
    password: str

class UserRegister(UserLogin, UsernameMixin): pass

class UserSchema(UserBase):
    id: int = orm.Field(no_input=True)
    email: EmailStr
    password: str = orm.Field(mode='wa')
    token: str = orm.Field(mode='r')
接下來我們打開 domain/user/api.py 編寫用户相關的接口代碼:
from utilmeta.core import response, request, api, orm
from config.auth import API
from .schema import UserSchema

class UserResponse(response.Response):
    result_key = 'user'
    result: UserSchema

class UserAPI(API):
    response = UserResponse

    # GET /api/user:獲取當前請求用户
    async def get(self):
        user_id = await self.get_user_id()
        if not user_id:
            raise exceptions.Unauthorized('authentication required')
        return await UserSchema.ainit(user_id)

    # PUT /api/user:更新當前請求用户
    async def put(self, user: UserSchema[orm.WP] = request.BodyParam):
        user.id = await self.get_user_id()
        await user.asave()
        return await self.get()

class AuthenticationAPI(API):
    response = UserResponse

    # POST /api/users:用户註冊
    async def post(self, user: UserRegister = request.BodyParam):
        if await User.objects.filter(username=user.username).aexists():
            raise exceptions.BadRequest(f'duplicate username: {repr(user.username)}')
        if await User.objects.filter(email=user.email).aexists():
            raise exceptions.BadRequest(f'duplicate email: {repr(user.username)}')
        await user.asave()
        await self.user_config.login_user(
            request=self.request,
            user=user.get_instance(),
        )
        return await UserSchema.ainit(user.pk)

    # POST /api/users/login:用户登錄
    @api.post
    async def login(self, user: UserLogin = request.BodyParam):
        user_inst = await self.user_config.login(
            self.request, ident=user.email, password=user.password)
        if not user_inst:
            raise exceptions.PermissionDenied('email or password wrong')
        return await UserSchema.ainit(user_inst)
我們編寫的 AuthenticationAPI 繼承自之前在 config/auth.py 中定義的 API 類,在用户註冊的 post 接口中,當用户完成註冊後使用了 self.user_config.login_user 方法直接將用户登錄當前的請求(即生成對應的 JWT Token 然後更新用户的 token 字段)
另外由於 API 文檔 中對於請求與響應體結構的要求,我們聲明請求體參數使用的是 request.BodyParam,這樣參數名 user 會作為對應的模板鍵,而我們的響應也使用了響應模板中的 result_key 指定了 'user' 作為結果的模板鍵,於是用户接口的請求和響應的結構就與文檔一致了
{
  "user": {
    "email": "jake@jake.jake",
    "token": "jwt.token.here",
    "username": "jake",
    "bio": "I work at statefarm",
    "image": null
  }
}
Profile API
根據 API 文檔,Realworld 博客項目還需要開發一個獲取用户詳情,關注用户與取消關注的 Profile 接口
Profile 接口需要返回一個並非來着用户模型的動態字段 following,這個字段應該返回【當前請求的用户】是否關注了目標用户,我們打開 domain/user/schema.py 來實現符合這個需求的數據結構
# +++ 增加以下代碼
class ProfileSchema(UserBase):
    following: bool = False

    @classmethod
    def get_runtime(cls, user):
        if not user:
            return cls

        class ProfileRuntimeSchema(cls):
            following: bool = orm.Field(
                exp.Exists(
                    Follow.objects.filter(
                    following=exp.OuterRef('pk'), follower=user)
                )
            )

        return ProfileRuntimeSchema
然後我們打開 domain/user/api.py 編寫 Profile 接口
# +++ 增加以下代碼
from .schema import ProfileSchema
from .models import Follow

class ProfileResponse(response.Response):
    result_key = 'profile'
    result: ProfileSchema

@api.route('profiles/{username}')
class ProfileAPI(API):
    username: str = request.PathParam(regex='[A-Za-z0-9_]{1,60}')
    response = ProfileResponse

    def __init__(self, *args, **kwargs):
        super().__init__(*args, **kwargs)
        self.profile: Optional[User] = None

    @api.get
    async def get(self, user: Optional[User] = API.user_config):
        return await ProfileSchema.get_runtime(user).ainit(self.profile)

    @api.post
    async def follow(self, user: User = API.user_config):
        await Follow.objects.aget_or_create(following=self.profile, follower=user)
        return await self.get(user)

    @api.delete(follow)
    async def unfollow(self, user: User = API.user_config):
        await Follow.objects.filter(following=self.profile, follower=user).adelete()
        return await self.get(user)

    @api.before('*')
    async def handle_profile(self):
        profile = await User.objects.filter(username=self.username).afirst()
        if not profile:
            raise exceptions.NotFound(f'profile({repr(self.username)}) not found')
        self.profile = profile
ProfileAPI 使用 API 類公共參數複用了路徑參數 username ,並在 handle_profile 預處理鈎子中將其查詢得到目標用户實例賦值給 self.profile,在 API 接口函數 get, follow, unfollow 中只需要使用 self.profile 訪問目標用户實例即可完成對應的邏輯,另外 follow 與 unfollow 接口還在返回時複用了 get 接口的序列化邏輯
鈎子函數是 UtilMeta API 類中的特殊函數,可以在給定的 API 接口執行前/後/出錯時調用,從而更好的複用邏輯,具體用法可以參考 UtilMeta API 類與路由文檔 中的【鈎子機制】
我們為 ProfileSchema 定義的動態查詢函數 get_runtime 可以傳入當前請求的用户,根據請求用户生成對應的查詢表達式,從而可以完成 【當前請求的用户】是否關注了目標用户的 following 字段的實現
在 ProfileAPI 的 get 接口中,你可看到這個查詢函數的調用方式
class ProfileAPI(API):
    @api.get
    async def get(self, user: Optional[User] = API.user_config):
        return await ProfileSchema.get_runtime(user).ainit(self.profile)
4. 開發文章與評論接口
接下來我們來開發文章和評論相關的接口,來實現文章的推薦,查詢,創建,更新,評論,喜歡等一系列功能
文章接口結構
根據 API 文檔 | 文章接口 部分的定義,我們可以先開發接口的基本結構,打開 domain/article/api.py,編寫
from utilmeta.core import api, request, orm, response
from config.auth import API
from typing import List, Optional

class ArticleSchema(orm.Schema[Article]):
    pass

class MultiArticlesResponse(response.Response):
    result_key = 'articles'
    count_key = 'articlesCount'
    result: List[ArticleSchema]

class SingleArticleResponse(response.Response):
    result_key = 'article'
    result: ArticleSchema

class ArticleAPI(API):
    class BaseArticleQuery(orm.Query[Article]):
        offset: int
        limit: int

    class ListArticleQuery(BaseArticleQuery):
        tag: str
        author: str
        favorited: str

    async def get(self, query: ListArticleQuery) -> MultiArticlesResponse: pass

    @api.get
    async def feed(self, query: BaseArticleQuery) -> MultiArticlesResponse: pass

    @api.get('/{slug}')
    async def get_article(self) -> SingleArticleResponse: pass

    @api.post('/{slug}/favorite')
    async def favorite(
        self, user: User = API.user_config) -> SingleArticleResponse: pass

    @api.delete('/{slug}/favorite')
    async def unfavorite(
        self, user: User = API.user_config) -> SingleArticleResponse: pass

    @api.put('/{slug}')
    async def update_article(self,
        article: ArticleSchema[orm.WP] = request.BodyParam,
        user: User = API.user_config) -> SingleArticleResponse: pass

    @api.delete('/{slug}')
    async def delete_article(self, user: User = API.user_config): pass

    async def post(self,
        article: ArticleSchema[orm.A] = request.BodyParam,
        user: User = API.user_config) -> SingleArticleResponse: pass
對於較為複雜的 API 文檔進行開發,可以先按照文檔定義接口的名稱,路徑,輸入輸出,然後再補充相關的邏輯
編寫文章 Schema
我們編寫的文章接口需要圍繞文章數據進行增刪改查,這時我們可以使用 UtilMeta 的 Schema 查詢輕鬆完成,你只需要編寫一個簡單的類,即可將你需要的增改查模板聲明出來並直接使用,我們以文章為例,我們打開 domain/article/schema.py,編寫
from utype.types import *
from utilmeta.core import orm
from .models import Article
from domain.user.schema import ProfileSchema
from django.db import models

class ArticleSchema(orm.Schema[Article]):
    id: int = orm.Field(no_input=True)
    body: str
    created_at: datetime
    updated_at: datetime
    author: ProfileSchema
    author_id: int = orm.Field(mode='a', no_input=True)

    slug: str = orm.Field(no_input='aw', default=None, defer_default=True)
    title: str = orm.Field(default='', defer_default=True)
    description: str = orm.Field(default='', defer_default=True)
    tag_list: List[str] = orm.Field(
        'tags.name', alias='tagList',
        mode='rwa', no_output='aw', default_factory=list
    )
    favorites_count: int = orm.Field(
        models.Count('favorited_bys'),
        alias='favoritesCount'
    )
在我們編寫的這個 Schema 類中,有很多種類的字段,我們一一説明
author: 關係 Schema 字段,它是一個外鍵字段,並且使用類型聲明指定了另一個 Schema 類,在查詢時,author將會把文章作者用户的信息按照ProfileSchema的聲明查詢出來
外鍵,多對多,一對多等關係字段都支持 Schema 關係查詢,比如例子中author外鍵字段的反向關係是用户的文章字段articles,在用户的 Schema 中聲明articles: List[ArticleSchema]即可查詢用户的所有文章
tag_list: 多級關係查詢字段,有時你只需要將關係表中的一個字段查詢出來,就可以用這樣的用法,這個字段聲明瞭orm.Field('tags.name')會沿着tags-name的路徑進行查詢,最終查詢的是文章對應的標籤的名稱列表favorites_count: 表達式字段:還記得你在 User 模型中聲明的favorites = models.ManyToManyField('article.Article', related_name='favorited_bys')字段嗎?你可以靈活地使用這些關係名稱或反向關係來創建表達式字段,favorites_count字段就使用models.Count('favorited_bys')查詢【喜歡這個文章的用户的數量】
另外對於 tag_list 和 favorites_count 字段,我們使用 alias 參數為它們指定了用於輸入輸出的真實名稱(符合 API 文檔中要求的駝峯命名)
字段模式
你可以看到在上面的例子中,很多字段都指定了 mode 這一參數,mode 參數可以用來聲明一個字段適用的模式(場景),從而可以在不同的場景中表現出不同的行為,在數據的增刪改查中常用的場景有
'r':查詢:作為數據庫查詢的結果返回'w':更新:作為請求的數據,需要更新數據庫的現有記錄'a':創建:作為請求的數據,需要在數據庫中新建記錄
你可以組合模式字母來表示字段支持多種模式,默認 UtilMeta 會根據模型字段的性質自動賦予模式
即使你沒有聲明模式,UtilMeta 也會根據模型字段的特性自動為字段賦予模式,比如類似created_at這樣被自動創建的字段就無法被修改,也無需在創建中提供,其模式會自動被賦予為'r'(只讀),你可以通過顯式聲明mode參數來覆蓋默認的模式賦予
舉例來説,字段
author_id: int = orm.Field(mode='a', no_input=True)其中的含義為
- 這個字段只適用於模式
'a'(創建數據) - 這個字段無需輸入
從實際開發角度來理解,一個文章的作者字段應該指定為當前請求的用户,而忽略客户端可能提供的其他值,並且也不應該允許被修改,所以我們會在數據保存前對該字段進行賦值,如
class ArticleAPI(API):
    @api.post
    async def post(self, article: ArticleSchema, user: User = API.user_config):
        article.author_id = user.pk
        await article.asave()
no_input=True 參數會忽略該字段在 Schema 初始化中提供的數據,即客户端傳遞的數據,但是仍然允許開發者在函數邏輯中自行賦值
模式生成
你可以直接使用 YourSchema['<mode>'] 來快速生成對應模式的 Schema 類,UtilMeta 的 orm 模塊提供了幾個常用的模式
orm.A:即'a'模式,常用於 POST 方法創建新的對象orm.W:即'w'模式,常用於 PUT 方法更新對象orm.WP:忽略必傳(required)屬性的'w'模式,常用於 PATCH 方法部分更新對象
所以你可以直接使用 ArticleSchema[orm.A] 來生成創建模式下的 ArticleSchema 類,作為創建文章接口的數據輸入
當然,如果你認為使用模式的方式複雜度較高,你也可以把不同接口的輸入輸出拆分成獨立的 Schema 類
動態查詢字段
在博客項目中,我們需要對每個文章返回 【當前用户是否喜歡】 這一信息,我們依然可以利用運行時 Schema 函數的方法來處理這樣的動態查詢,我們為編寫好的 ArticleSchema 增加以下代碼
class ArticleSchema(orm.Schema[Article]):
    # ... 編寫好的字段

    # +++ 增加
    favorited: bool = False

    @classmethod
    def get_runtime(cls, user_id):
        if not user_id:
            return cls

        class ArticleRuntimeSchema(cls):
            favorited: bool = exp.Exists(
                Favorite.objects.filter(article=exp.OuterRef('pk'), user=user_id)
            )

        return ArticleRuntimeSchema
我們編寫的 get_runtime 類函數,以用户的 ID 作為輸入生成相應的查詢字段,這樣我們在 API 函數中就可以使用 ArticleSchema.get_runtime(user_id)這樣的方式來動態獲得 Schema 類了
文章查詢接口
我們先來編寫文章的查詢接口:在 domain/article/api.py 中,對以下部分進行填充:
class MultiArticlesResponse(response.Response):
    result_key = 'articles'
    count_key = 'articlesCount'
    result: List[ArticleSchema]

class ArticleAPI(API):
    # +++ 新增代碼
    class ListArticleQuery(orm.Query[Article]):
        tag: str = orm.Filter('tags.name')
        author: str = orm.Filter('author.username')
        favorited: str = orm.Filter('favorited_bys.username')
        offset: int = orm.Offset(default=0)
        limit: int = orm.Limit(default=20, le=100)

    async def get(self, query: ListArticleQuery) -> MultiArticlesResponse:
        schema = ArticleSchema.get_runtime(
            await self.get_user_id()
        )
        return MultiArticlesResponse(
            result=await schema.aserialize(query),
            count=await query.acount()
        )
我們的查詢接口需要支持通過 tag, author, favorited 等參數過濾數據,也需要支持使用 offset, limit 來控制返回數量,可以看到我們只需要編寫一個 Query 模板即可完成,其中
tag:使用orm.Filter('tags.name')指定查詢的目標字段,當請求的查詢參數中包含tag參數時,就會增加相應的過濾查詢,與author,favorited等字段原理一致offset:使用orm.Offset定義了一個標準的起始量字段,默認為 0limit:使用orm.Limit定義了結果的返回數量限制,默認為 20,最高為 100
offset和limit是 API 開發中常用的結果分片控制參數,當請求同時提供offset和limit時,最後生成的查詢集用 Python 切片的方式可以表示為queryset[offset: offset + limit],這樣客户端可以一次只查詢結果中的一小部分,並且根據結果的數量調整下一次查詢的offset
orm.Query 模板類作為 API 函數參數的類型聲明默認將自動解析請求的查詢參數,它有幾個常用方法
get_queryset():根據查詢參數生成對應的查詢集,如果你使用 Django 作為 ORM 庫,那麼得到的就是 Django QuerySet,這個查詢集將會應用所有的過濾與分頁參數,你可以直接把它作為序列化方法的輸入得到對應的數據count():忽略分頁參數獲取查詢的總數,這個方法在分頁查詢時很有用,因為客户端不僅需要得到當前請求的數據,還需要得到查詢對應的結果總數,這樣客户端才可以正確顯示分頁的頁數,或者知道有沒有查詢完畢,這個方法的異步實現為acount
由於接口需要返回查詢的文章總數,所以在 get 方法中,我們不僅調用 schema.aserialize 將生成的目標查詢集進行序列化,還調用了 query.acount() 返回文章的總數,再結合 MultiArticlesResponse 中定義的響應體結構,我們就可以得到文檔要求的如下響應
{
    "articles": [],
    "articlesCount": 0
}
使用鈎子複用接口邏輯
我們閲讀文章部分的 API 接口文檔可以發現,有很多接口都有着重複的邏輯,例如
- 在 創建文章 / 更新文章 接口,都需要根據請求數據中的標題為文章生成新的
slug字段 - 查詢 / 更新 / 喜歡 / 取消喜歡 / 刪除 接口,都需要根據
slug路徑參數查詢對應的文章是否存在 - 查詢 / 更新 / 喜歡 / 取消喜歡 / 創建 接口,都需返回目標文章對象或者新創建出的文章對象
對於這些重複的邏輯,我們都可以使用 鈎子函數 來完成複用,示例如下
class SingleArticleResponse(response.Response):
    result_key = 'article'
    result: ArticleSchema

class ArticleAPI(API):
    @api.get('/{slug}')
    async def get_article(self): pass

    @api.post('/{slug}/favorite')
    async def favorite(self): pass

    @api.delete('/{slug}/favorite')
    async def unfavorite(self): pass

    @api.put('/{slug}')
    async def update_article(self): pass

    @api.delete('/{slug}')
    async def delete_article(self): pass

    async def post(self): pass

    # new ++++
    def __init__(self, *args, **kwargs):
        super().__init__(*args, **kwargs)
        self.tags = []
        self.article: Optional[Article] = None

    @api.before(get_article, favorite, unfavorite, update_article, delete_article)
    async def handle_slug(self, slug: str = request.SlugPathParam):
        article = await Article.objects.filter(slug=slug).afirst()
        if not article:
            raise exceptions.NotFound('article not found')
        self.article = article

    @api.before(post, update_article)
    async def gen_tags(self, article: ArticleSchema[orm.A] = request.BodyParam):
        for name in article.tag_list:
            slug = '-'.join([''.join(filter(str.isalnum, v))
                for v in name.split()]).lower()
            tag, created = await Tag.objects.aupdate_or_create(
                slug=slug, defaults=dict(name=name))
            self.tags.append(tag)

    @api.after(get_article, favorite, unfavorite, update_article, post)
    async def handle_response(self) -> SingleArticleResponse:
        if self.tags:
            # create or set tags relation in creation / update
            await self.article.tags.aset(self.tags)
        schema = ArticleSchema.get_runtime(
            await self.get_user_id()
        )
        return SingleArticleResponse(
            await schema.ainit(self.article)
        )
我們在例子中定義了幾個鈎子函數
handle_slug:使用@api.before裝飾器定義的預處理鈎子,在使用了slug路徑參數的接口執行前調用,查詢出對應的文章並賦值給self.article,對應的接口函數可以使用這個實例屬性對目標文章直接進行訪問gen_tags:在創建或更新文章接口前執行的預處理鈎子,通過解析 ArticleSchema 的tag_list字段生成一系列的 tag 實例並存儲在self.tags屬性中handle_response:使用@api.after裝飾器定義的響應處理鈎子,在獲取/更新/創建了單個文章對象的接口後執行,其中如果檢測到gen_tags鈎子生成的tags實例,則會對文章對象進行關係賦值,並且會將self.article實例使用 ArticleSchema 的動態子類進行序列化並返回
評論接口
接下來我們開發評論接口,我們依然先編寫評論的數據結構,打開 domain/article/schema.py,增加以下代碼:
# +++ 增加代碼
class CommentSchema(orm.Schema[Comment]):
    id: int = orm.Field(mode='r')
    article_id: int = orm.Field(mode='a', no_input=True)
    body: str
    created_at: datetime
    updated_at: datetime
    author: ProfileSchema
    author_id: int = orm.Field(mode='a', no_input=True)
從 評論接口的 API 文檔 可以發現,評論接口都是以 /api/articles/:slug/comments 作為路徑開端的,並且路徑位於文章接口的子目錄,也就是説評論接口的 API 類需要掛載到文章接口的 API 類上,我們在 domain/article/api.py 中添加評論接口的代碼
from utilmeta.core import api, request, orm, response
from config.auth import API
from .models import Article, Comment
from .schema import CommentSchema

# +++ 增加代碼
@api.route('{slug}/comments')
class CommentAPI(API):
    slug: str = request.SlugPathParam

    class ListResponse(response.Response):
        result_key = 'comments'
        name = 'list'
        result: List[CommentSchema]

    class ObjectResponse(response.Response):
        result_key = 'comment'
        name = 'object'
        result: CommentSchema

    def __init__(self, *args, **kwargs):
        super().__init__(*args, **kwargs)
        self.article: Optional[Article] = None

    async def get(self) -> ListResponse:
        return self.ListResponse(
            await CommentSchema.aserialize(
                Comment.objects.filter(article=self.article)
            )
        )

    async def post(self, comment: CommentSchema[orm.A] = request.BodyParam,
                   user: User = API.user_config) -> ObjectResponse:
        comment.article_id = self.article.pk
        comment.author_id = user.pk
        await comment.asave()
        return self.ObjectResponse(
            await CommentSchema.ainit(comment.pk)
        )

    @api.delete('/{id}')
    async def delete_comment(self, id: int, user: User = API.user_config):
        comment = await Comment.objects.filter(
            id=id,
        ).afirst()
        if not comment:
            raise exceptions.NotFound('comment not found')
        if comment.author_id != user.pk:
            raise exceptions.PermissionDenied('permission denied')
        await comment.adelete()

    @api.before('*')
    async def handle_article_slug(self):
        article = await Article.objects.filter(slug=self.slug).afirst()
        if not article:
            raise exceptions.NotFound('article not found')
        self.article = article

class ArticleAPI(API):
    # +++ 增加代碼
    comments: CommentAPI
我們需要將評論 API 的路徑配置到 articles/{slug}/comments,所以我們直接使用裝飾器 @api.route('{slug}/comments') 來裝飾 CommentAPI,這樣當我們把 CommentAPI 掛載到 ArticleAPI 上時,就會直接將 ArticleAPI 的路徑延申 {slug}/comments 作為 CommentAPI 的路徑
評論接口路徑中的 {slug} 是標識文章的路徑參數,我們在 CommentAPI 中實現了名為 handle_article_slug 的預處理鈎子,在接口函數執行前統一將對應的文章查詢出來
由於在評論 API 中,所有的接口都需要接收{slug}路徑參數,我們就可以將這個參數直接聲明到 API 類中,在函數中直接使用self.slug獲取,這樣的參數稱為 API 公共參數,它們同樣會被整合到生成的 API 文檔中
由於文章和評論相關的接口代碼較長,你可以在 Github 中完整瀏覽
5. 接口整合與錯誤處理
我們已經編寫好了所有的接口,接下來只需要按照文檔把它們整合在一起即可,我們使用 API 類掛載的方式為編寫好的 API 接口賦予路徑,打開 service/api.py 編寫根 API 代碼
import utype
from utilmeta.utils import exceptions, Error
from domain.user.api import UserAPI, ProfileAPI, AuthenticationAPI
from domain.article.api import ArticleAPI
from domain.article.models import Tag
from utilmeta.core import api, response
from typing import List

class TagsSchema(utype.Schema):
    tags: List[str]

class ErrorResponse(response.Response):
    message_key = 'msg'
    result_key = 'errors'

@api.CORS(allow_origin='*')
class RootAPI(api.API):
    user: UserAPI
    users: AuthenticationAPI
    profiles: ProfileAPI
    articles: ArticleAPI

    @api.get
    async def tags(self) -> TagsSchema:
        return TagsSchema(
            tags=[name async for name in Tag.objects.values_list('name', flat=True)]
        )

    @api.handle('*', Exception)
    def handle_errors(self, e: Error) -> ErrorResponse:
        detail = None
        exception = e.exception
        if isinstance(exception, exceptions.BadRequest):
            status = 422
            detail = exception.detail
        else:
            status = e.status
        return ErrorResponse(detail, error=e, status=status)
我們聲明瞭 handle_errors 錯誤處理鈎子,使用 @api.handle('*', Exception) 表示會處理所有接口的所有錯誤,根據 API 文檔 | 錯誤處理 的要求我們將校驗失敗的錯誤類型 exceptions.BadRequest 的響應狀態碼調整為 422 (默認為 400),並且通過錯誤實例的 detail 屬性獲取詳細的報錯信息
比如當我們試圖訪問 GET /api/articles?limit=x 時,響應結果就會清晰的反映出出錯的參數和原因
{
  "errors": {
    "name": "query",
    "field": "Query",
    "origin": {
      "name": "limit",
      "value": "x",
      "field": "Limit",
      "schema": {
        "type": "integer",
        "minimum": 0,
        "maximum": 100
      },
      "msg": "invalid number: 'x'"
    }
  },
  "msg": "BadRequest: parse item: ['query'] failed: parse item: ['limit'] failed: invalid number: 'x'"
}
另外在我們編寫的根 API 上使用了 @api.CORS 裝飾器為所有的 API 接口指定了跨源策略,我們使用 allow_origin='*' 允許所有的前端源地址進行訪問
跨域請求(或跨源請求)指的是前端瀏覽器的源地址(協議+域名+端口)與後端 API 的源地址不同的請求,此時瀏覽器使用一套 CORS 機制來進行資源訪問控制。UtilMeta 的 CORS 插件會自動對跨域請求做出處理,包括響應 OPTIONS 方法,根據聲明和配置返回正確的Access-Control-Allow-Origin與Access-Control-Allow-Headers響應頭
6. 配置與運行
配置時間與連接選項
由於 API 文檔給出的輸出時間是類似 "2016-02-18T03:22:56.637Z" 的格式,我們打開 config/conf.py,添加時間配置的代碼
from utilmeta import UtilMeta
from config.env import env

def configure(service: UtilMeta):
    from utilmeta.ops.config import Operations
    from utilmeta.core.server.backends.django import DjangoSettings
    from utilmeta.core.orm import DatabaseConnections, Database
    from utilmeta.conf.time import Time

    service.use(DjangoSettings(
        apps_package='domain',
        secret_key=env.DJANGO_SECRET_KEY
    ))
    service.use(DatabaseConnections({
        'default': Database(
            name='conduit',
            engine='sqlite3',
        )
    }))
    service.use(Time(
        time_zone='UTC',
        use_tz=True,
        datetime_format="%Y-%m-%dT%H:%M:%S.%fZ"
    ))
    service.use(Operations(
        route='ops',
        database=Database(
            name='realworld_utilmeta_ops',
            engine='sqlite3',
        ),
    ))
Time 配置類可以配置 API 使用的時區,UTC,以及輸出的時間格式
環境變量
還記得我們在 JWT 鑑權部分引入一個名為 JWT_SECRET_KEY 的環境變量嗎?我們需要設置它,否則項目無法正常運行,我們打開 config/env.py 可以看到我們聲明的環境變量
from utilmeta.conf import Env

class ServiceEnvironment(Env):
    PRODUCTION: bool = False
    JWT_SECRET_KEY: str = ''
    DJANGO_SECRET_KEY: str = ''

env = ServiceEnvironment(sys_env='CONDUIT_')
在運行前,你需要先設置這一密鑰,比如在 Linux 系統中運行:
export CONDUIT_JWT_SECRET_KEY=<YOUR_KEY>運行項目
接下來我們就可以運行項目了,我們可以看到在項目的根目錄有一個 main.py 文件,其中的代碼如下
from config.service import service

service.mount('service.api.RootAPI', route='/api')
app = service.application()

if __name__ == '__main__':
    service.run()
所以我們只需要執行
python main.py即可運行項目,由於我們使用的是 starlette 作為運行時實現提供異步接口,UtilMeta 會使用 uvicorn 來運行項目,當你看到如下輸出即可表示項目運行成功
INFO:     Started server process [26428]
INFO:     Waiting for application startup.
INFO:     Application startup complete.
INFO:     Uvicorn running on http://127.0.0.1:8000 (Press CTRL+C to quit)
我們的服務運行在本機的 8000 端口,這個設置可以在 config/service.py 中找到與調整
from utilmeta import UtilMeta
from config.conf import configure
from config.env import env
import starlette

service = UtilMeta(
    __name__,
    name='conduit',
    description='Realworld DEMO - conduit',
    backend=starlette,
    production=env.PRODUCTION,
    version=(1, 0, 0),
    port=8080,
    asynchronous=True,
    api='service.api.RootAPI',
    route='/api'
)
configure(service)
如果你正在本地運行多個項目都使用了同一端口,你可能會看到端口衝突的報錯信息
[Errno 10048] error while attempting to bind on address
('127.0.0.1', 8000): 通常每個套接字地址(協議/網絡地址/端口)只允許使用一次。
此時你只需要調整一下你的服務端口再重啓項目即可
7. 連接與管理 API
UtilMeta 框架包含一個內置的運維管理模塊可以方便地連接和管理你開發好的 API 服務,包括:
- 數據管理 CRUD
- 可調試的 API 接口文檔
- 編寫與執行 API 單元測試
- 服務端請求實時日誌查詢
- 服務端資源性能與佔用實時監控
當你的博客服務開發好後並本地運行服務時,你可以可以看到這樣的輸出
connect your APIs at https://ops.utilmeta.com/localhost?local_node=http://127.0.0.1:8000/api/ops直接點擊輸出中的鏈接就可以進入到 UtilMeta 平台連接並調試你運行在本地的 Realworld 後端服務
UtilMeta 平台為 Realworld 案例項目也提供了一個公開的樣例管理地址,你可以點擊 https://beta.utilmeta.com/realworld 訪問
下面可以帶大家來看一下 UtilMeta 平台提供的後端服務管理功能:
API 接口文檔
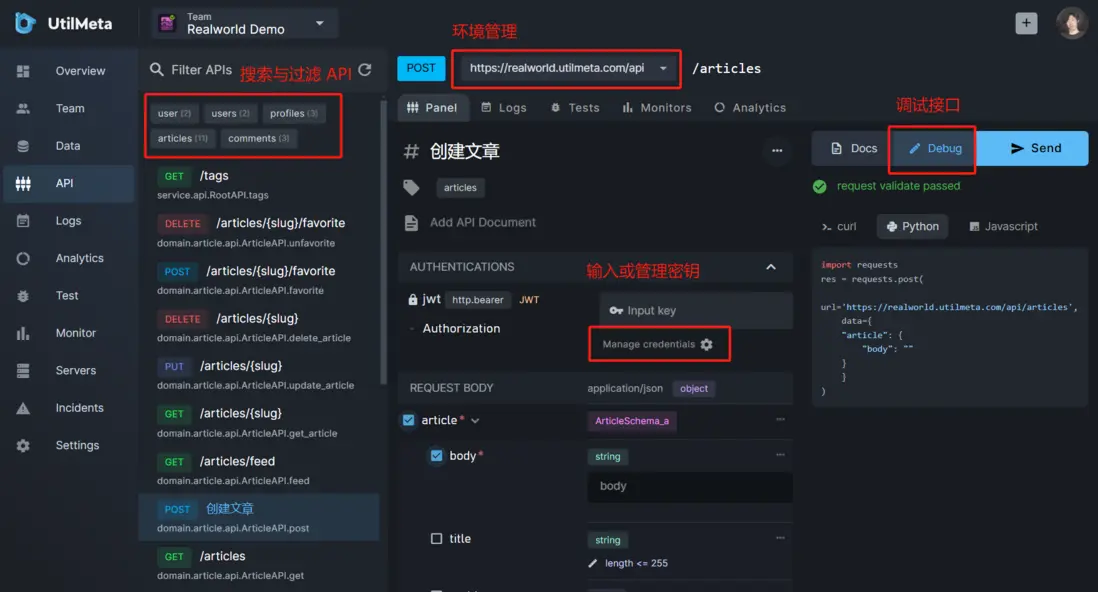
點擊左欄 API 可以進入平台的接口管理板塊,查看後端服務自動生成的 API 文檔
左側的 API 列表可以搜索或者使用標籤過濾接口,點擊接口即可進入對應的接口文檔,點擊右側的【Debug】按鈕可以進入調試模式,你可以輸入參數併發起請求,右側會自動同步參數對應的 curl, python 和 js 請求代碼
Data 數據管理
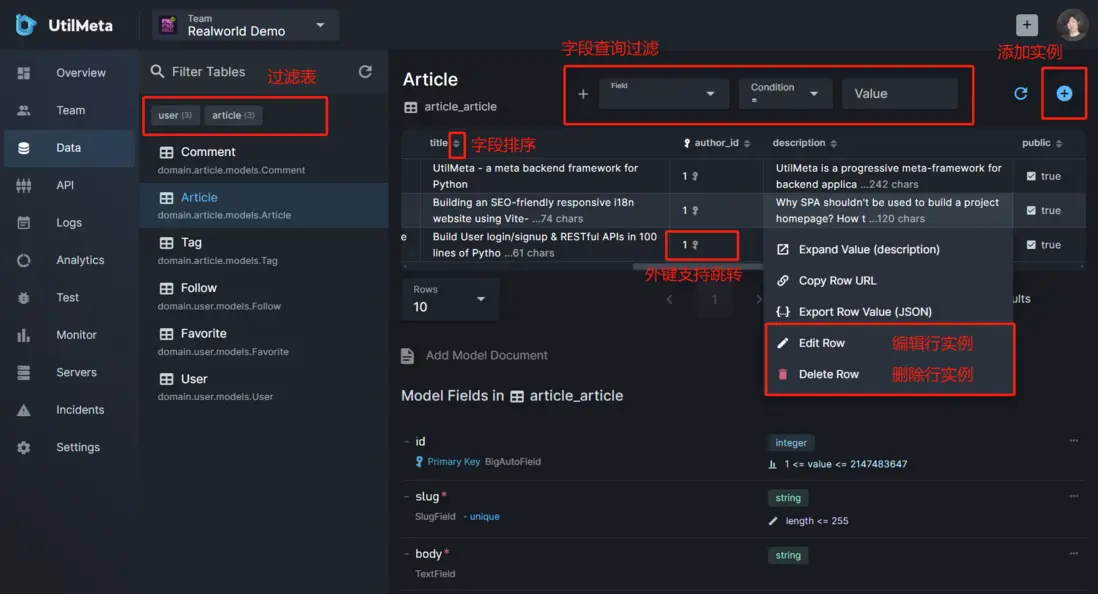
點擊左欄 Data 可以進入平台的數據管理板塊,管理開發好的數據模型對應的數據庫數據
左側的模型(數據表)列表可以搜索或者使用標籤過濾,點擊模型後右側將顯示錶結構與查詢表數據,你可以在上方的字段查詢欄添加多個字段查詢,表中的每個字段也支持正反排序
表中的每個數據單元都是可以點擊的,左擊或右擊都會展開選項卡,對於數據過大無法顯示完整的數據可以展開,有權限的用户也可以對選中的數據行進行編輯或刪除。點擊右上角的【+】按鈕可以創建新的數據實例
表的下方是模型的表結構文檔,會詳細展示模型字段的名稱,類型,屬性(主鍵,外鍵,唯一等)和校驗規則
Logs 日誌查詢
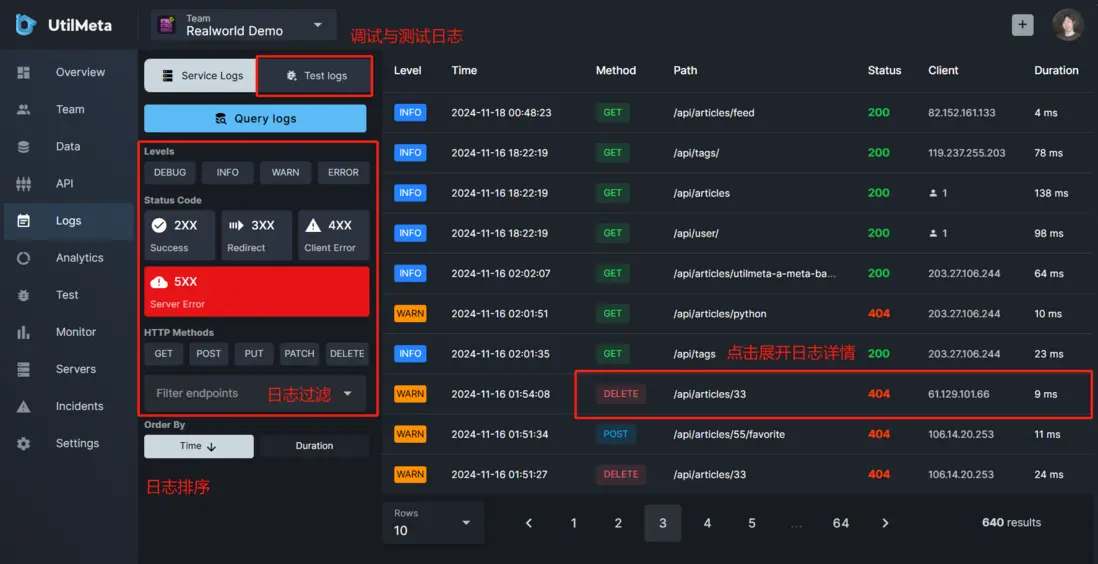
點擊左欄 Logs 可以進入平台的日誌查詢板塊,查詢 API 服務的實時請求日誌
左側下方的過濾選項包括日誌等級,響應狀態碼,HTTP 方法和 API 接口路徑等,還可以根據請求時間或處理時間進行排序
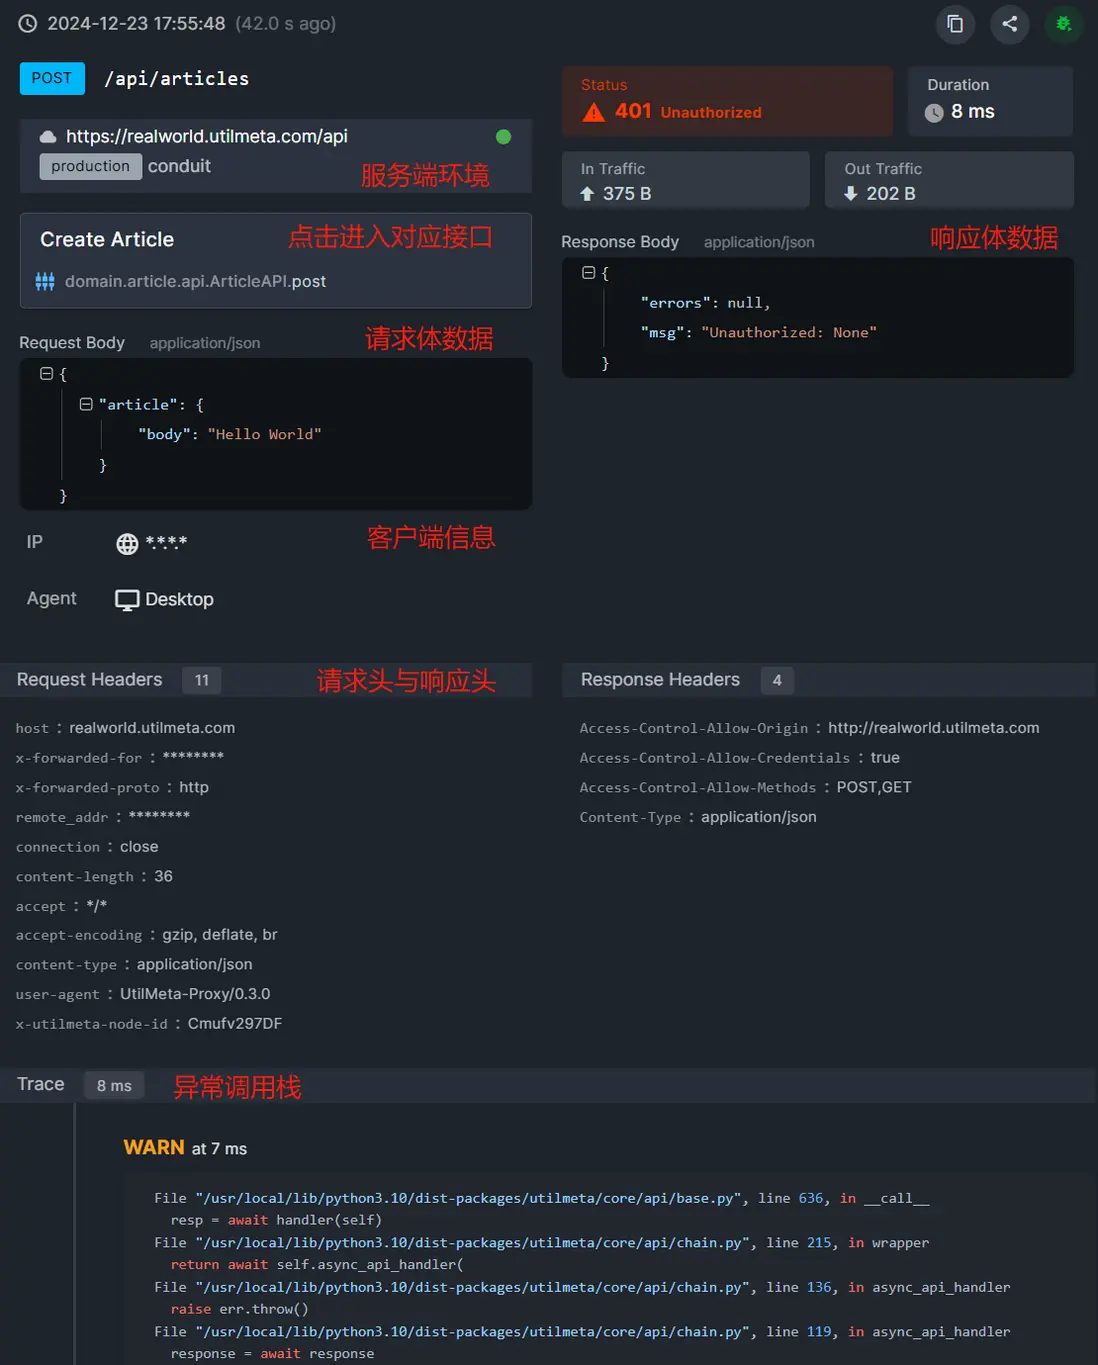
點擊單條日誌即可展開日誌詳情,日誌會詳細記錄請求和響應的信息,異常調用棧等數據
相關鏈接
- 本文實現出的 Realworld 源碼地址:https://github.com/utilmeta/utilmeta-py-realworld-example-app
- 本文實現出的 Realworld 項目地址:https://realworld.utilmeta.com/
- UtilMeta 框架文檔中的 Realworld 案例教程:https://docs.utilmeta.com/py/zh/tutorials/realworld-blog
- UtilMeta 框架首頁:https://utilmeta.com/zh/py
我同時也是 UtilMeta 框架的作者,如果你有什麼問題或者想加入 UtilMeta 開發者羣也歡迎聯繫我,我的全網 ID 和微信號都是 voidZXL


