
第十一篇:加載外部模型:GLTF/OBJ格式解析
引言
在現代3D開發中,90%的複雜模型來自專業建模工具。Three.js提供了強大的模型加載能力,支持20+種3D格式。本文將深入解析GLTF和OBJ格式,並通過Vue3實現模型預覽編輯器,讓你掌握專業3D資產的導入、優化和控制技術。

1. 模型格式對比
1.1 主流格式特性
|
格式
|
類型
|
優勢
|
侷限性
|
適用場景
|
|
GLTF |
開放標準
|
全特性支持、體積小
|
需要轉換工具
|
通用3D內容
|
|
OBJ+MTL |
傳統格式
|
廣泛支持、簡單
|
無動畫、大文件
|
靜態模型
|
|
FBX |
私有格式
|
完整動畫支持
|
需授權、體積大
|
角色動畫
|
|
STL |
工業標準
|
簡單幾何
|
無材質、顏色
|
3D打印
|
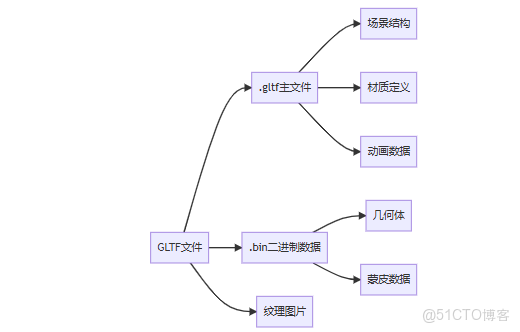
1.2 GLTF結構解析
2. GLTF加載全流程
2.1 基礎加載
<script setup>
import { GLTFLoader } from 'three/addons/loaders/GLTFLoader.js';
import { DRACOLoader } from 'three/addons/loaders/DRACOLoader.js';

const modelRef = ref(null);
const loadingProgress = ref(0);

// 初始化加載器
const loader = new GLTFLoader();
const dracoLoader = new DRACOLoader();
dracoLoader.setDecoderPath('libs/draco/');
loader.setDRACOLoader(dracoLoader);

// 加載模型
function loadModel(url) {
  loadingProgress.value = 0;

  loader.load(
    url,
    (gltf) => {
      const model = gltf.scene;
      modelRef.value = model;

      // 自動縮放和居中
      normalizeModel(model);

      scene.add(model);
    },
    (xhr) => {
      loadingProgress.value = (xhr.loaded / xhr.total) * 100;
    },
    (error) => {
      console.error('模型加載失敗:', error);
      showFallbackModel();
    }
  );
}

// 初始加載
onMounted(() => loadModel('models/robot.glb'));
</script>

<template>
  <div class="loading" v-if="loadingProgress < 100">
    加載中: {{ Math.floor(loadingProgress) }}%
  </div>
</template>
2.2 模型標準化
function normalizeModel(model) {
  const box = new THREE.Box3().setFromObject(model);
  const size = box.getSize(new THREE.Vector3());
  const center = box.getCenter(new THREE.Vector3());

  // 計算縮放比例(適配高度為2單位)
  const scale = 2 / size.y;

  // 應用變換
  model.position.sub(center);
  model.scale.set(scale, scale, scale);
  model.position.set(0, -1, 0); // 置於地面
}
2.3 動畫處理
const mixer = ref(null);

// 播放所有動畫
function playAnimations(gltf) {
  if (gltf.animations.length > 0) {
    mixer.value = new THREE.AnimationMixer(gltf.scene);

    gltf.animations.forEach((clip) => {
      const action = mixer.value.clipAction(clip);
      action.play();
    });

    // 添加到動畫循環
    sceneMixers.push(mixer.value);
  }
}

// 動畫循環
const sceneMixers = [];
function animate() {
  const delta = clock.getDelta();
  sceneMixers.forEach(mixer => mixer.update(delta));
  requestAnimationFrame(animate);
}
3. OBJ/MTL格式處理
3.1 傳統格式加載
<script setup>
import { OBJLoader } from 'three/addons/loaders/OBJLoader.js';
import { MTLLoader } from 'three/addons/loaders/MTLLoader.js';

// 先加載材質
function loadOBJModel(objUrl, mtlUrl) {
  const mtlLoader = new MTLLoader();
  mtlLoader.load(mtlUrl, (materials) => {
    materials.preload();

    const objLoader = new OBJLoader();
    objLoader.setMaterials(materials);
    objLoader.load(objUrl, (object) => {
      scene.add(object);
    });
  });
}
</script>
3.2 材質轉換
// 轉換MTL材質為Three.js材質
function convertMaterials(materials) {
  Object.values(materials.materials).forEach(mtlMat => {
    const threeMat = new THREE.MeshPhongMaterial({
      color: new THREE.Color(mtlMat.diffuse[0], mtlMat.diffuse[1], mtlMat.diffuse[2]),
      map: mtlMat.map_diffuse ? loadTexture(mtlMat.map_diffuse) : null,
      specular: new THREE.Color(mtlMat.specular[0], mtlMat.specular[1], mtlMat.specular[2]),
      shininess: mtlMat.specular_exponent,
      transparent: mtlMat.opacity < 1.0,
      opacity: mtlMat.opacity
    });

    mtlMat.userData.threeMat = threeMat;
  });
}
3.3 格式轉換建議
graph LR
    A[原始格式] --> B{需要動畫?}
    B -->|是| C[轉換為GLB]
    B -->|否| D{需要高質量材質?}
    D -->|是| E[轉換為GLTF]
    D -->|否| F[轉換為壓縮GLB]
4. 模型優化技術
4.1 幾何體壓縮
// 使用Draco壓縮
import { GLTFExporter } from 'three/addons/exporters/GLTFExporter.js';

function exportCompressed(model) {
  const exporter = new GLTFExporter();

  exporter.parse(model, (gltf) => {
    const options = {
      binary: true,
      dracoOptions: {
        compressionLevel: 10
      }
    };

    // 生成壓縮後的GLB
    const glb = exporter.packGLB(gltf, options);
    downloadFile(glb, 'model.glb');
  });
}
4.2 紋理優化
// 紋理轉Basis Universal
import { KTX2Exporter } from 'three/addons/exporters/KTX2Exporter.js';

async function convertTexturesToKTX2(materials) {
  const exporter = new KTX2Exporter();

  for (const material of Object.values(materials)) {
    if (material.map) {
      const ktx2Data = await exporter.export(material.map);
      material.map = new THREE.CompressedTexture(
        [ktx2Data],
        material.map.image.width,
        material.map.image.height,
        THREE.RGBAFormat,
        THREE.UnsignedByteType
      );
    }
  }
}
4.3 模型簡化
// 使用SIMPLIFY修改器
import { SimplifyModifier } from 'three/addons/modifiers/SimplifyModifier.js';

function simplifyModel(mesh, ratio) {
  const modifier = new SimplifyModifier();
  const simplifiedGeometry = modifier.modify(
    mesh.geometry,
    Math.floor(mesh.geometry.attributes.position.count * ratio)
  );

  mesh.geometry.dispose();
  mesh.geometry = simplifiedGeometry;
}
5. Vue3模型預覽編輯器
5.1 項目結構
src/
  ├── components/
  │    ├── ModelViewer.vue      // 模型查看器
  │    ├── ModelLibrary.vue     // 模型庫
  │    ├── AnimationControl.vue // 動畫控制
  │    └── MaterialEditor.vue   // 材質編輯
  └── App.vue
5.2 模型查看器
<!-- ModelViewer.vue -->
<template>
  <div class="model-viewer">
    <canvas ref="canvasRef"></canvas>

    <div class="controls">
      <button @click="toggleAutoRotate">
        {{ autoRotate ? '停止旋轉' : '自動旋轉' }}
      </button>
      <button @click="resetCamera">重置視圖</button>
      <button @click="toggleWireframe">線框模式</button>
    </div>

    <div class="loading" v-if="loading">
      加載中: {{ progress }}%
    </div>
  </div>
</template>

<script setup>
import { ref, onMounted } from 'vue';
import * as THREE from 'three';
import { OrbitControls } from 'three/addons/controls/OrbitControls.js';
import { GLTFLoader } from 'three/addons/loaders/GLTFLoader.js';

// 狀態管理
const canvasRef = ref(null);
const autoRotate = ref(true);
const loading = ref(false);
const progress = ref(0);

// 場景初始化
const scene = new THREE.Scene();
scene.background = new THREE.Color(0xeeeeee);
const camera = new THREE.PerspectiveCamera(75, 1, 0.1, 1000);
camera.position.set(0, 1, 3);
const renderer = ref(null);
const controls = ref(null);

onMounted(() => {
  renderer.value = new THREE.WebGLRenderer({
    canvas: canvasRef.value,
    antialias: true
  });
  renderer.value.setSize(800, 600);

  // 添加軌道控制
  controls.value = new OrbitControls(camera, renderer.value.domElement);
  controls.value.autoRotate = autoRotate.value;

  // 添加基礎燈光
  const ambientLight = new THREE.AmbientLight(0xffffff, 0.5);
  scene.add(ambientLight);

  const directionalLight = new THREE.DirectionalLight(0xffffff, 0.8);
  directionalLight.position.set(5, 10, 7);
  scene.add(directionalLight);

  // 啓動渲染循環
  animate();
});

// 加載模型方法
function loadModel(url) {
  loading.value = true;

  const loader = new GLTFLoader();
  loader.load(
    url,
    (gltf) => {
      // 清除舊模型
      clearScene();

      const model = gltf.scene;
      scene.add(model);

      // 標準化模型
      normalizeModel(model);

      // 處理動畫
      if (gltf.animations.length > 0) {
        emit('animations-loaded', gltf.animations);
      }

      loading.value = false;
    },
    (xhr) => {
      progress.value = Math.round((xhr.loaded / xhr.total) * 100);
    },
    (error) => {
      console.error('加載失敗:', error);
      loading.value = false;
      emit('load-error', error);
    }
  );
}

// 暴露方法
defineExpose({ loadModel });
</script>
5.3 模型庫組件
<!-- ModelLibrary.vue -->
<template>
  <div class="model-library">
    <h3>模型庫</h3>

    <div class="categories">
      <button
        v-for="category in categories"
        :key="category"
        :class="{ active: currentCategory === category }"
        @click="currentCategory = category"
      >
        {{ category }}
      </button>
    </div>

    <div class="model-list">
      <div
        v-for="model in filteredModels"
        :key="model.id"
        class="model-card"
        @click="selectModel(model)"
      >
        <img :src="model.thumbnail" :alt="model.name">
        <div class="info">
          <h4>{{ model.name }}</h4>
          <p>{{ formatSize(model.size) }}</p>
        </div>
      </div>
    </div>
  </div>
</template>

<script setup>
import { ref, computed } from 'vue';

// 模型數據
const models = ref([
  {
    id: 1,
    name: '科幻機器人',
    category: '角色',
    path: 'models/robot.glb',
    thumbnail: 'thumbnails/robot.jpg',
    size: 1024 * 1024 * 2.5 // 2.5MB
  },
  // 更多模型...
]);

const currentCategory = ref('所有');
const categories = computed(() => [
  '所有',
  ...new Set(models.value.map(m => m.category))
]);

const filteredModels = computed(() => {
  if (currentCategory.value === '所有') return models.value;
  return models.value.filter(m => m.category === currentCategory.value);
});

function selectModel(model) {
  emit('select', model);
}

function formatSize(bytes) {
  if (bytes < 1024) return bytes + ' B';
  if (bytes < 1024 * 1024) return (bytes / 1024).toFixed(1) + ' KB';
  return (bytes / 1024 / 1024).toFixed(1) + ' MB';
}
</script>
5.4 動畫控制器
<!-- AnimationControl.vue -->
<template>
  <div class="animation-control" v-if="animations.length > 0">
    <h3>動畫控制</h3>

    <select v-model="currentAnimation">
      <option v-for="(anim, index) in animations" :key="index" :value="index">
        {{ anim.name || `動畫 ${index+1}` }}
      </option>
    </select>

    <div class="timeline">
      <input type="range" v-model="animationProgress" min="0" max="1" step="0.01">
      <span>{{ formatTime(currentTime) }} / {{ formatTime(duration) }}</span>
    </div>

    <div class="controls">
      <button @click="playAnimation">播放</button>
      <button @click="pauseAnimation">暫停</button>
      <button @click="stopAnimation">停止</button>
    </div>
  </div>
</template>

<script setup>
import { ref, watch } from 'vue';

const props = defineProps(['animations', 'mixer']);
const emit = defineEmits(['update']);

const currentAnimation = ref(0);
const animationProgress = ref(0);
const isPlaying = ref(false);
const currentTime = ref(0);
const duration = ref(0);

let currentAction = null;

// 當動畫改變時更新
watch(() => props.animations, (anims) => {
  if (anims.length > 0) {
    setupAnimation(currentAnimation.value);
  }
});

// 設置動畫
function setupAnimation(index) {
  if (currentAction) {
    currentAction.stop();
  }

  const clip = props.animations[index];
  currentAction = props.mixer.clipAction(clip);
  duration.value = clip.duration;
  currentTime.value = 0;

  // 播放動畫
  playAnimation();
}

function playAnimation() {
  if (!currentAction) return;

  currentAction.play();
  isPlaying.value = true;
}

function pauseAnimation() {
  if (!currentAction) return;

  currentAction.paused = !currentAction.paused;
  isPlaying.value = !currentAction.paused;
}

function stopAnimation() {
  if (!currentAction) return;

  currentAction.stop();
  isPlaying.value = false;
  currentTime.value = 0;
  animationProgress.value = 0;
}

// 更新動畫進度
watch(animationProgress, (value) => {
  if (currentAction) {
    currentAction.time = value * duration.value;
    currentAction.play();
    currentAction.paused = true;
  }
});

// 監聽mixer更新
props.mixer.addEventListener('loop', (e) => {
  currentTime.value = e.time % duration.value;
  animationProgress.value = currentTime.value / duration.value;
});

function formatTime(seconds) {
  const mins = Math.floor(seconds / 60);
  const secs = Math.floor(seconds % 60);
  return `${mins}:${secs.toString().padStart(2, '0')}`;
}
</script>
5.5 材質編輯器
<!-- MaterialEditor.vue -->
<template>
  <div class="material-editor" v-if="materials.length > 0">
    <h3>材質編輯</h3>

    <select v-model="currentMaterial">
      <option v-for="(mat, index) in materials" :key="index" :value="mat">
        {{ mat.name || `材質 ${index+1}` }}
      </option>
    </select>

    <div v-if="currentMaterial" class="material-properties">
      <ColorPicker label="基礎色" v-model="currentMaterial.color" />

      <div class="slider-group">
        <label>金屬度</label>
        <input type="range" v-model.number="currentMaterial.metalness" min="0" max="1" step="0.01">
        <span>{{ currentMaterial.metalness.toFixed(2) }}</span>
      </div>

      <div class="slider-group">
        <label>粗糙度</label>
        <input type="range" v-model.number="currentMaterial.roughness" min="0" max="1" step="0.01">
        <span>{{ currentMaterial.roughness.toFixed(2) }}</span>
      </div>

      <button @click="applyChanges">應用更改</button>
    </div>
  </div>
</template>

<script setup>
import { ref, watch } from 'vue';

const props = defineProps(['model']);
const emit = defineEmits(['update']);

const materials = ref([]);
const currentMaterial = ref(null);

// 收集模型中的所有材質
watch(() => props.model, (model) => {
  if (!model) return;

  materials.value = [];

  model.traverse((obj) => {
    if (obj.isMesh && obj.material) {
      // 處理材質數組
      const mats = Array.isArray(obj.material) ? obj.material : [obj.material];

      mats.forEach(mat => {
        if (!materials.value.includes(mat)) {
          materials.value.push(mat);
        }
      });
    }
  });

  if (materials.value.length > 0) {
    currentMaterial.value = materials.value[0];
  }
});

function applyChanges() {
  materials.value.forEach(mat => {
    mat.needsUpdate = true;
  });
  emit('update');
}
</script>
6. 錯誤處理與回退
6.1 錯誤處理策略
function handleModelError(error, modelPath) {
  console.error('模型加載失敗:', modelPath, error);

  // 1. 嘗試加載低質量版本
  if (!modelPath.includes('-lowpoly')) {
    const fallbackPath = modelPath.replace('.glb', '-lowpoly.glb');
    loadModel(fallbackPath);
    return;
  }

  // 2. 顯示佔位模型
  showPlaceholderModel();

  // 3. 報告錯誤到服務器
  reportErrorToServer({
    error: error.message,
    model: modelPath,
    browser: navigator.userAgent
  });
}

function showPlaceholderModel() {
  const geometry = new THREE.BoxGeometry(1, 1, 1);
  const material = new THREE.MeshBasicMaterial({
    color: 0xff0000,
    wireframe: true
  });
  const cube = new THREE.Mesh(geometry, material);
  scene.add(cube);
}
6.2 模型驗證
function validateModel(model) {
  const issues = [];

  // 檢查幾何體
  model.traverse(obj => {
    if (obj.isMesh) {
      // 驗證UV座標
      if (!obj.geometry.attributes.uv) {
        issues.push(`模型 ${obj.name} 缺少UV座標`);
      }

      // 驗證法線
      if (!obj.geometry.attributes.normal) {
        issues.push(`模型 ${obj.name} 缺少法線`);
      }

      // 檢查材質設置
      if (obj.material.roughness === 0 && obj.material.metalness === 1) {
        issues.push(`材質 ${obj.material.name} 可能設置錯誤 (全反射金屬)`);
      }
    }
  });

  return issues;
}
7. 高級技巧
7.1 模型分塊加載
// 使用GLTF tiles擴展
import { GLTFTiles } from 'three/addons/loaders/GLTFTiles.js';

const tilesLoader = new GLTFTiles();
tilesLoader.loadBoundingVolume('models/tileset.json', (tileset) => {
  // 只加載視野內的區塊
  const visibleTiles = tileset.getVisibleTiles(camera);

  visibleTiles.forEach(tile => {
    tilesLoader.loadTile(tile.url, (gltf) => {
      scene.add(gltf.scene);
    });
  });
});

// 相機移動時更新
cameraControls.addEventListener('change', () => {
  const newVisibleTiles = tileset.getVisibleTiles(camera);
  // 加載新塊,卸載不可見塊...
});
7.2 模型差異更新
// 使用JSON差異更新模型
function updateModel(oldModel, newModel) {
  const diff = calculateModelDiff(oldModel, newModel);

  diff.changedMaterials.forEach(matDiff => {
    const material = findMaterialById(matDiff.id);
    Object.assign(material, matDiff.properties);
    material.needsUpdate = true;
  });

  diff.addedObjects.forEach(objData => {
    const obj = createObjectFromData(objData);
    scene.add(obj);
  });

  diff.removedObjects.forEach(id => {
    const obj = scene.getObjectByProperty('uuid', id);
    if (obj) scene.remove(obj);
  });
}
7.3 模型版本控制
// 模型版本管理
const modelVersions = {
  'robot': {
    v1: 'models/robot_v1.glb',
    v2: 'models/robot_v2.glb',
    latest: 'v2'
  }
};

function loadModelVersion(modelName, version = 'latest') {
  const versionInfo = modelVersions[modelName];
  if (!versionInfo) throw new Error(`Unknown model: ${modelName}`);

  const actualVersion = version === 'latest' ?
    versionInfo.latest : version;

  const path = versionInfo[actualVersion];
  if (!path) throw new Error(`Invalid version: ${version}`);

  loadModel(path);
}
8. 最佳實踐
- 模型預處理:
- 使用Blender進行三角化處理
- 刪除無用頂點組和形狀鍵
- 合併相同材質網格
- 資源管理:
graph TD
    A[模型加載] --> B{是否常用?}
    B -->|是| C[加入預加載隊列]
    B -->|否| D[按需加載]
    C --> E[資源池緩存]
D --> F[使用後釋放]- 移動端優化:
- 最大模型尺寸<5MB
- 最大紋理尺寸1024x1024
- 使用Draco壓縮幾何體
- 禁用非必要動畫
9. 常見問題解答
Q1:GLB和GLTF有什麼區別?
- GLTF:JSON格式文本文件 + 外部二進制/紋理
- GLB:單文件格式,包含所有數據
- 建議:使用GLB簡化部署,GLTF便於調試
Q2:模型顯示為黑色怎麼辦?
- 檢查光源是否添加
- 確認材質是否需要光照(MeshBasicMaterial不受光)
- 驗證法線方向是否正確
- 檢查紋理是否加載失敗
Q3:如何減小模型體積?
- 使用Draco幾何壓縮(減少50-70%)
- 轉換紋理為Basis Universal(減少80%)
- 簡化幾何體(減少面數)
- 量化頂點數據(減少精度)
10. 總結
通過本文,你已掌握:
- GLTF/OBJ格式結構與加載技術
- 模型標準化與動畫處理方法
- 模型壓縮與優化策略
- Vue3模型預覽編輯器實現
- 錯誤處理與驗證技術
- 高級技巧:分塊加載、差異更新
- 模型管理最佳實踐
核心價值:Three.js的模型加載系統將專業3D內容無縫集成到Web環境,結合Vue3的響應式管理,實現影視級3D資產的實時交互體驗。
下一篇預告
第十二篇:粒子系統:海量點渲染
你將學習:
- Points與PointsMaterial核心API
- GPU加速粒子計算
- 動態粒子效果(火焰/煙霧/魔法)
- 粒子碰撞與物理模擬
- 百萬級粒子優化策略
- Vue3實現粒子編輯器
準備好創造令人驚歎的粒子效果了嗎?讓我們進入微觀世界的視覺盛宴!