
一、檢查網絡狀況
1.1、關閉防火牆
systemctl status firewalld #檢查防火牆狀態
systemctl stop firewalld #停用防火牆
systemctl disable firewalld #永久停用防火牆
systemctl is-enabled firewalld #檢查防火牆關閉狀態
systemctl status firewalld #檢查防火牆狀態

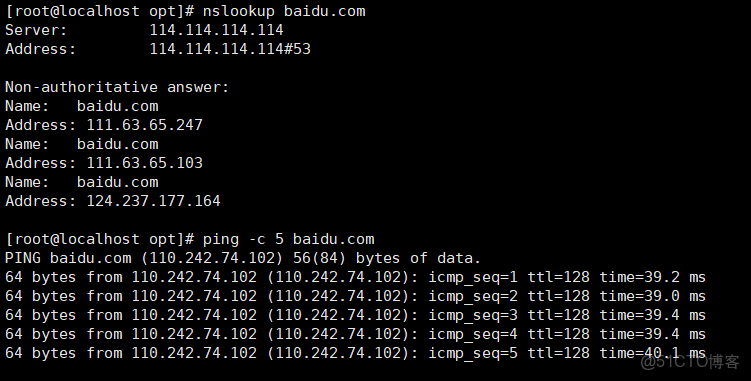
1.2、檢查網絡狀態是否可以連接外網
nslookup baidu.com #驗證DNS域名解析
ping -c 5 baidu.com #ping 5次
curl -I https://mirrors.aliyun.com #國內阿里雲鏡像源驗證連接

二、新設備需要更換基礎源文件(若未執行本步驟無法下載·依賴環境)
#切換到基礎源文件的目錄
cd /etc/yum.repos.d/# 備份原基礎源文件(重命名為 .repo.bak,保留備份)
mv CentOS-Base.repo CentOS-Base.repo.bak
# (可選)如果有其他多餘的 .repo 文件,可臨時移到備份目錄(避免衝突)
mkdir -p backup && mv *.repo backup/ # 僅保留 .repo.bak 和 backup 目錄
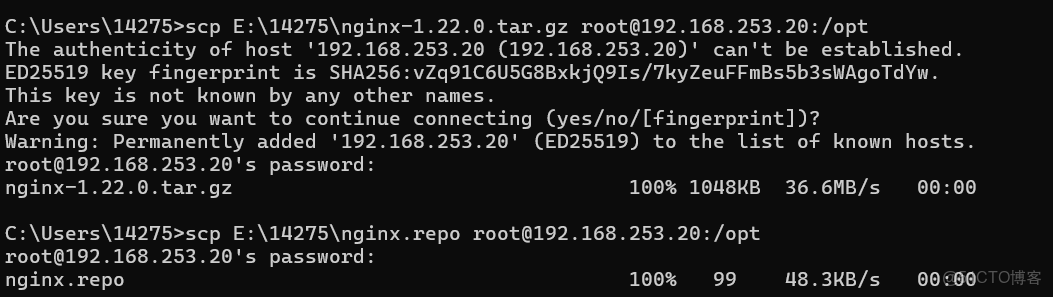
#下載阿里雲源文件(若本地有下載好的阿里基礎源文件,無需下載直接備份好後進行替換即可具體步驟可使用直接拖拽或者使用windows終端輸入“scp(文件目錄)(root@IP地址):/ ” 指令進行更換 )
curl -o /etc/yum.repos.d/CentOS-Base.repo https://mirrors.aliyun.com/repo/Centos-7.repo
#執行 curl -o 命令會直接覆蓋 /etc/yum.repos.d/CentOS-Base.repo(若未備份),若需保留原有配置,務必先執行步驟 1 的備份操作。
三、下載依賴環境
yum install -y gcc gcc-c++ make pcre pcre-devel zlib zlib-devel openssl openssl-devel
或者
# 安裝編譯器、依賴庫、開發工具
sudo yum install -y gcc gcc-c++ make automake autoconf libtool
# 安裝核心依賴(正則、壓縮、SSL)
sudo yum install -y pcre pcre-devel zlib zlib-devel openssl openssl-devel
四、.創建運行用户、組
#(Nginx 服務程序默認以 nobody 身份運行,建議為其創建專門的用户賬號,以便更準確地控制其訪問權限)
useradd -M -s /sbin/nologin nginx
五、編譯安裝Nginxcd
5.1、下載 Nginx 源碼包
(1)cd opt #切換到“/目錄”下的opt目錄
#下載Nginx 1.24.0 穩定版(可以自己選擇版本號,下文中用的是1.20.0版本)
wget https://nginx.org/download/nginx-1.24.0.tar.gz(2)本地有下載好的文件可以直接拖拽進opt目錄中或者使用windows終端scp指令來傳輸文件
#解壓文件包
tar zxvf nginx-1.20.2.tar.gz -C /opt/
#切換到nginx-1.20.2目錄內
cd nginx-1.20.2/
#編寫./configure \
./configure \
--prefix=/usr/local/nginx \ #指定nginx的安裝路徑
--user=nginx \ #指定用户名
--group=nginx \ #指定組名
--with-http_stub_status_module
--with-http_ssl_module #啓用 http_stub_status_module 模塊以支持狀態統計
運行
./configure \
--prefix=/usr/local/nginx \          # Nginx 安裝目錄(核心參數,建議默認)
--user=nginx \                       # 運行 Nginx 的用户(避免 root 權限風險)
--group=nginx \                      # 運行 Nginx 的用户組
--with-http_ssl_module \             # 啓用 HTTPS 模塊(必備)
--with-http_gzip_static_module \     # 啓用 gzip 靜態壓縮模塊
--with-http_stub_status_module \     # 啓用狀態監控模塊(查看連接數、負載等)
--with-pcre \                        # 啓用 PCRE 正則支持(rewrite 模塊依賴)
--with-zlib \                        # 啓用 zlib 壓縮支持
--without-http_autoindex_module \    # 禁用自動索引模塊(避免目錄遍歷風險)
--without-http_ssi_module            # 禁用 SSI 模塊(非必需,減少資源佔用)
———————————————————————————————————————————
#make && make install 是 Linux 系統中源碼編譯安裝軟件的核心兩步組合命令,承接前文配置 YUM 源的操作(通常用於解決編譯依賴)
make && make install
#若 make 報錯,需清理已編譯的中間文件,再重新編譯:
make clean #清理編譯生成的二進制文件與中間文件
make distclean #徹底清理
# 給源碼安裝的 Nginx 創建 “全局軟鏈接”,
讓你無需輸入完整路徑(/usr/local/nginx/sbin/nginx),直接在終端輸入 nginx 命令就能操作 Nginx 服務(啓動、停止、重載等)。
ln -s /usr/local/nginx/sbin/nginx /usr/local/sbin/ #讓系統識別nginx的操作命令
#驗證軟連接的正確性
ls -l /usr/local/sbin/nginx若輸出類似以下內容,説明創建成功(-> 左側是軟鏈接,右側是原文件路徑):
lrwxrwxrwx 1 root root 31 11月 22 10:00 /usr/local/sbin/nginx -> /usr/loc———————————————————————————————————————————
==========================企業=======================================
./configure \
--prefix=/usr/local/nginx \ # 安裝目錄
--user=nginx \ # 運行用户(後續會創建)
--group=nginx \ # 運行用户組
--with-http_ssl_module \ # 啓用 HTTPS 模塊
--with-http_v2_module \ # 啓用 HTTP/2 協議(提升性能)
--with-http_gzip_static_module \ # 啓用靜態 gzip 壓縮
--with-http_stub_status_module \ # 啓用狀態監控模塊
--with-pcre \ # 啓用 PCRE 正則支持(rewrite 依賴)
--with-stream \ # 啓用 TCP 代理模塊(如反向代理數據庫)
--with-stream_ssl_module \ # 啓用 TCP 代理的 SSL 支持
--http-log-path=/var/log/nginx/access.log \ # 訪問日誌路徑
--error-log-path=/var/log/nginx/error.log \ # 錯誤日誌路徑
--pid-path=/var/run/nginx/nginx.pid \ # PID 文件路徑
--lock-path=/var/lock/nginx.lock # 鎖文件路徑
注意:
可根據需求增減模塊(如 --without-xxx 禁用不需要的模塊)
企業若需特殊模塊(如第三方緩存模塊),可通過 --add-module 引入
———————————————————————————————————————————
六、檢查、啓動、重啓、停止 nginx服務
#檢查配置文件是否配置正確
nginx -t

#啓動
nginx
#停止
cat /usr/local/nginx/logs/nginx.pid #先查看nginx的PID號
kill -3 <PID號>
kill -s QUIT <PID號>
killall -3 nginx
killall -s QUIT nginx
#重載
kill -1 <PID號>
kill -s HUP <PID號>
killall -1 nginx
killall -s HUP nginx
#日誌分割,重新打開日誌文件
kill -USR1 <PID號>
#平滑升級
kill -USR2 <PID號>
| 信號編號 | 信號名 | 含義 |
| -------- | ------ | ------------------------------------------------------------ |
| 0 | EXIT | 程序退出時收到該信息。 |
| 1 | HUP | 掛掉電話線或終端連接的掛起信號,這個信號也會造成某些進程在沒有終止的情況下重新初始化。 |
| 2 | INT | 表示結束進程,但並不是強制性的,常用的 "Ctrl+C" 組合鍵發出就是一個 kill -2 的信號。 |
| 3 | QUIT | 退出。 |
| 9 | KILL | 殺死進程,即強制結束進程。 |
| 11 | SEGV | 段錯誤。 |
| 15 | TERM | 正常結束進程,是 kill 命令的默認信號 |
停止的辦法:
#查找所有關於nginx正在運行的進程
ps aux | grep nginx
# 2. 殺死所有 Nginx 進程(徹底清理)
pkill -f nginx
————在進行下一步是必須先關閉Nginx進程不然會導致端口被佔用
七、添加 Nginx 系統服務
#創建並編寫nginx系統配置文件
sudo(權限不夠添加) vim /usr/lib/systemd/system/nginx.service
####ExecStart 路徑與 --prefix 一致
如果複製的話後方#號以及之後的註釋不可複製,語法錯誤。
[Unit]
Description=Nginx HTTP Server
After=network.target remote-fs.target nss-lookup.target
[Service]
Type=forking
PIDFile=/usr/local/nginx/logs/nginx.pid  # PID 文件路徑(安裝目錄下的 logs 目錄)
ExecStart=/usr/local/nginx/sbin/nginx    # 啓動命令路徑
ExecReload=/usr/local/nginx/sbin/nginx -s reload  # 平滑重啓
ExecStop=/usr/local/nginx/sbin/nginx -s stop        # 停止命令
PrivateTmp=true
[Install]
WantedBy=multi-user.target
#保存退出後,刷新 systemd 配置:
sudo systemctl daemon-reload#賦權
chmod 754 /usr/lib/systemd/system/nginx.service
# 啓動Nginx
systemctl start nginx
#查看狀態(確保running)
systemctl status nginx
#設置開機自啓
systemctl enable nginx
- 狀態正常標誌:終端顯示
active (running),無報錯。
八、驗證安裝是否成功
/usr/local/nginx/sbin/nginx -t成功輸出:nginx: the configuration file /usr/local/nginx/conf/nginx.conf syntax is ok
# nginx: configuration file /usr/local/nginx/conf/nginx.conf test is successful九、新版本升級:
9.1、升級前準備(關鍵!避免數據丟失)
1. 備份核心文件(重中之重)
升級前必須備份配置、日誌和舊版本程序,防止升級失敗無法回滾:
bash
運行
# 1. 備份配置文件目錄(所有 nginx.conf、虛擬主機配置等)
cp -r /usr/local/nginx/conf /usr/local/nginx/conf_bak_$(date +%Y%m%d)
# 2. 備份 Nginx 安裝目錄(含二進制程序、日誌,可選但推薦)
cp -r /usr/local/nginx /usr/local/nginx_bak_$(date +%Y%m%d)
# 3. 備份系統服務文件(若配置了 systemd 服務)
cp /usr/lib/systemd/system/nginx.service /usr/lib/systemd/system/nginx.service_bak
2. 查看當前 Nginx 信息(確保升級參數一致)
升級時需保持編譯參數與舊版本一致,否則會丟失已啓用的模塊(如 HTTPS、gzip 等):
bash
運行
# 查看當前版本和編譯參數(關鍵!記錄 --prefix 和 --with-xxx 模塊)
/usr/local/nginx/sbin/nginx -V
示例輸出(需重點記錄 configure arguments 後的所有參數):
plaintext
nginx version: nginx/1.24.0
built by gcc 4.8.5 20150623 (Red Hat 4.8.5-44) (GCC)
built with OpenSSL 1.0.2k-fips  26 Jan 2017
TLS SNI support enabled
configure arguments: --prefix=/usr/local/nginx --user=nginx --group=nginx --with-http_ssl_module --with-http_gzip_static_module --with-http_stub_status_module
3. 確認系統依賴已安裝
編譯新版本仍需依賴舊版本的編譯環境,若之前已安裝,可跳過;若未安裝或不確定:
bash
運行
# CentOS 7 安裝依賴
yum install -y gcc gcc-c++ make pcre pcre-devel zlib zlib-devel openssl openssl-devel
4. 下載新版本 Nginx 源碼
從 Nginx 官方下載頁 選擇 穩定版(Stable version),推薦 1.26.2(2024 年最新穩定版):
bash
運行
# 進入臨時目錄,避免污染系統目錄
cd /tmp
# 下載新版本源碼(替換為最新穩定版地址)
wget https://nginx.org/download/nginx-1.26.2.tar.gz
9.2、編譯安裝升級(推薦!適合手動編譯的場景)
核心邏輯:用新版本源碼編譯,僅替換舊的二進制程序(nginx),保留配置和數據。
1. 解壓新版本源碼
bash
運行
# 解壓源碼包
tar -zxvf nginx-1.26.2.tar.gz
# 進入源碼目錄
cd nginx-1.26.2
2. 配置編譯參數(必須與舊版本一致)
將第一步記錄的 configure arguments 完整複製,直接執行(確保模塊不丟失):
bash
運行
# 粘貼舊版本的編譯參數,示例如下(替換為你自己的參數!)
./configure \
--prefix=/usr/local/nginx \          # 與舊版本一致,否則安裝路徑改變
--user=nginx \                       # 與舊版本一致
--group=nginx \                      # 與舊版本一致
--with-http_ssl_module \             # 保留已啓用的模塊
--with-http_gzip_static_module \
--with-http_stub_status_module- 若需要新增模塊,可在原有參數後添加
--with-xxx(如--with-http_flv_module); - 配置成功標誌:無報錯,最後輸出
objs/Makefile生成成功。
3. 編譯(僅編譯,不安裝!)
bash
運行
# 編譯(多核加速:make -j $(nproc),根據CPU核心數自動分配)
make -j $(nproc)- 編譯成功標誌:無
error信息,最後顯示make[1]: Leaving directory '/tmp/nginx-1.26.2'; - 編譯後的二進制文件在
objs/nginx路徑下。
4. 停止舊版本 Nginx 服務
替換二進制文件前必須停止服務,避免進程佔用:
bash
運行
# 停止 Nginx(用 systemd 或直接執行二進制文件)
systemctl stop nginx
# 或
/usr/local/nginx/sbin/nginx -s stop
# 驗證是否完全停止(無 nginx 進程則成功)
ps -ef | grep nginx
5. 替換舊版本二進制程序
用新版本編譯後的 objs/nginx 替換舊的 /usr/local/nginx/sbin/nginx:
bash
運行
# 先備份舊的二進制文件(雙重保險)
mv /usr/local/nginx/sbin/nginx /usr/local/nginx/sbin/nginx_old
# 複製新版本二進制文件到安裝目錄
cp /tmp/nginx-1.26.2/objs/nginx /usr/local/nginx/sbin/
# 賦予執行權限(確保可運行)
chmod +x /usr/local/nginx/sbin/nginx
6. 啓動新版本並驗證
bash
運行
# 1. 檢查配置文件兼容性(新版本可能不兼容舊配置,必須測試!)
/usr/local/nginx/sbin/nginx -t
# 成功輸出:syntax is ok + test is successful
# 2. 啓動 Nginx
systemctl start nginx
# 3. 驗證版本是否升級成功
/usr/local/nginx/sbin/nginx -v
# 預期輸出:nginx version: nginx/1.26.2
# 4. 驗證服務狀態和模塊(可選)
systemctl status nginx  # 確保 active (running)
/usr/local/nginx/sbin/nginx -V  # 確認編譯參數與舊版本一致(模塊未丟失)
9.3、包管理器升級(yum/apt,適合通過軟件源安裝的場景)
若你的 Nginx 是通過 yum install nginx 或 apt install nginx 安裝的,直接用包管理器升級(更簡單):
1. CentOS系統(yum)
bash
運行
# 1. 備份配置文件(同上,避免被覆蓋)
cp -r /etc/nginx /etc/nginx_bak_$(date +%Y%m%d)
# 2. 升級 Nginx(自動下載最新穩定版)
yum update -y nginx
# 3. 驗證版本和狀態
nginx -v
systemctl restart nginx
systemctl status nginx
9.4、回滾方案(升級失敗時使用)
若升級後出現報錯(如配置不兼容、模塊缺失),立即回滾到舊版本:
bash
運行
# 1. 停止新版本 Nginx
systemctl stop nginx
# 2. 恢復舊版本二進制文件(編譯安裝場景)
mv /usr/local/nginx/sbin/nginx_old /usr/local/nginx/sbin/nginx
# 3. 恢復備份的配置文件(若修改過配置)
rm -rf /usr/local/nginx/conf
mv /usr/local/nginx/conf_bak_2025xxxx /usr/local/nginx/conf
# 4. 啓動舊版本
systemctl start nginx
# 5. 驗證回滾成功
/usr/local/nginx/sbin/nginx -v  # 應顯示舊版本號
9.5、常見問題排查
1. 編譯時提示 “SSL modules require the OpenSSL library”
原因:缺少 OpenSSL 依賴,執行:
bash
運行
yum install -y openssl openssl-devel  # CentOS
apt install -y libssl-dev             # Ubuntu
2. 啓動時提示 “nginx: [emerg] unknown directive xxx”
原因:新版本不兼容舊配置中的某些指令,或編譯時未啓用對應模塊:
- 解決方案 1:查看
nginx -t報錯信息,刪除 / 修改不兼容的指令; - 解決方案 2:重新編譯,確保添加了對應的模塊(參考舊版本的
nginx -V參數)。
3. 替換二進制文件後提示 “Permission denied”
原因:權限不足,執行:
bash
運行
chmod +x /usr/local/nginx/sbin/nginx
chown -R nginx:nginx /usr/local/nginx/  # 確保運行用户有權限
4. 升級後端口被佔用
原因:舊 Nginx 進程未完全停止,執行:
bash
運行
pkill -f nginx  # 強制殺死所有 Nginx 進程
systemctl start nginx