
説明:
- 沒有使用obshell進行運維管理
- 所需安裝包

1. 硬件準備
1.1. 配置:
系統:Alibaba Cloud Linux release 3 (OpenAnolis Edition)
內核版本:5.10.134-19.1.al8.x86_64
CPU:4C
內存:32G
掛載盤:500G
1.2. 規劃配置:
/data 200G --根據實際數據量
/home/admin/oceanbase 200G ---安裝需求至少 200 G 空間以保存 7 天及以上的日誌。
/redo 80G ----事務日誌文件大小 = 增量數據內存上限的 3~4 倍。
2. 安裝前準備:
2.1. 檢查硬件:
- 查看操作系統:cat /etc/redhat-release。需滿足
- 查看內核:uname -r 。OceanBase 數據庫要求操作系統為 3.10.0 及以上。
- 查看內存:free -g。確保可用內存小於配置文件中的 memory_limit 值。
清理內存:sudo sysctl -w vm.drop_caches=3或sudo echo 3 > /proc/sys/vm/drop_caches
2.2. 創建用户:
創建用户:useradd -U admin -d /home/admin -s /bin/bash
設置密碼:passwd admin
授權:chown -R admin:admin /redo
chown -R admin:admin /data/
chown -R admin:admin /home/admin
添加sudo權限:vim /etc/sudoers
## Same thing without a password
# %wheel ALL=(ALL) NOPASSWD: ALL
admin ALL=(ALL) NOPASSWD: ALL
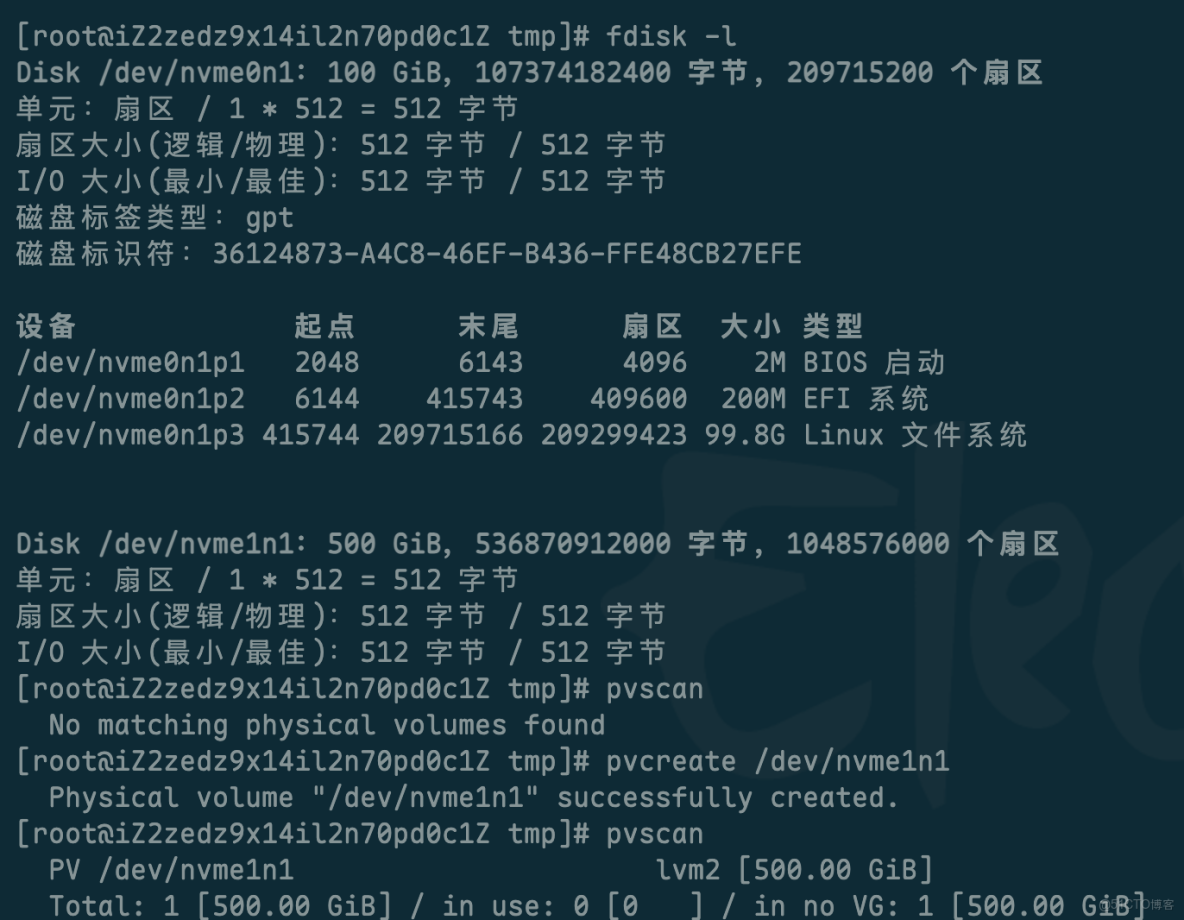
2.3. 磁盤做LVM:
pvcreate /dev/nvme1n1
pvscan
vgcreate、vgscan

lvcreate、lvscan


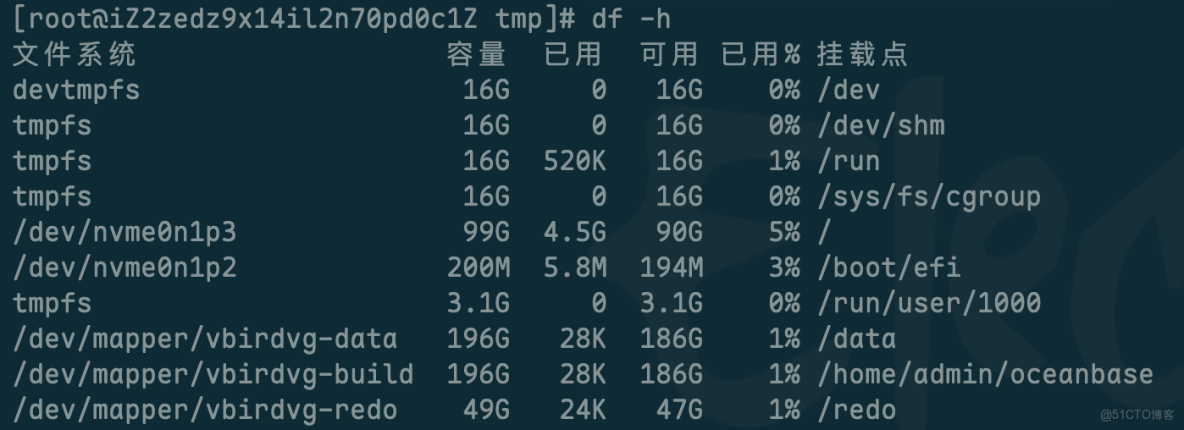
格式化、掛載
mkfs -t ext4 /dev/vbirdvg/data
mkfs -t ext4 /dev/vbirdvg/build
mkfs -t ext4 /dev/vbirdvg/redo
mkdir /data
mkdir /redo
mkdir -p /home/admin/oceanbase
mount /dev/vbirdvg/data /data
mount /dev/vbirdvg/build /home/admin/oceanbase
mount /dev/vbirdvg/redo /redo/
修改配置文件:
limits.conf
在 /etc/security/limits.conf 配置文件中添加以下內容:
root soft nofile 655350
root hard nofile 655350
* soft nofile 655350
* hard nofile 655350
* soft stack unlimited
* hard stack unlimited
* soft nproc 655360
* hard nproc 655360
* soft core unlimited
* hard core unlimited
退出重新登錄後ulimit -a生效
sysctl.conf
#for oceanbase
#修改內核異步 I/O 限制
fs.aio-max-nr = 1048576
#網絡優化
net.core.somaxconn = 2048
net.core.netdev_max_backlog = 10000
net.core.rmem_default = 16777216
net.core.wmem_default = 16777216
net.core.rmem_max = 16777216
net.core.wmem_max = 16777216
net.ipv4.ip_forward = 0
net.ipv4.conf.default.rp_filter = 1
net.ipv4.conf.default.accept_source_route = 0
net.ipv4.tcp_syncookies = 1
net.ipv4.tcp_rmem = 4096 87380 16777216
net.ipv4.tcp_wmem = 4096 65536 16777216
net.ipv4.tcp_max_syn_backlog = 16384
net.ipv4.tcp_fin_timeout = 15
net.ipv4.tcp_slow_start_after_idle=0
vm.swappiness = 0
vm.min_free_kbytes = 2097152
vm.overcommit_memory = 0
fs.file-max = 6573688
fs.pipe-user-pages-soft = 0
#修改進程可以擁有的虛擬內存區域數量
vm.max_map_count = 655360
#此處為 OceanBase 數據庫的 data 目錄
kernel.core_pattern = /data/core-%e-%p-%t
2.4. 關閉防火牆
systemctl stop firewalld
systemctl status firewalld
2.5. 關閉selinux
vi /etc/selinux/config
修改:SELINUX=disabled
2.6. 配置時鐘同步
單節點部署不需要
2.7. 互信
admin用户可登錄自己
#ssh-keygen -t rsa
#ssh-copy-id -i id_rsa.pub admin@172.16.79.89
驗證:admin用户執行ssh 'admin@172.16.79.89' --不需要輸入密碼錶示成功
注意
1、不要更改/etc/hosts文件。
2、其中172.16.79.89為本主機的內網IP。
3. 安裝
3.1. 安裝OBD:
rpm -ivh ob-deploy-3.5.0-5.el8.x86_64.rpm
source /etc/profile.d/obd.sh
3.2. 配置OBD:
- 禁用遠程倉庫:obd mirror disable remote
- 將安裝包添加至本地鏡像庫:obd mirror clone *.rpm
- 查看本地鏡像庫:obd mirror list local
- 修改參數文件
oceanbase-ce:
  user:
    username: admin
    key_file: /home/admin/.ssh/authorized_keys
  servers:
    # Please don't use hostname, only IP can be supported
    - 172.16.79.89
  global:
    #  The working directory for OceanBase Database. OceanBase Database is started under this directory. This is a required field.
    home_path: /home/admin/oceanbase/observer
    # The directory for data storage. The default value is $home_path/store.
    data_dir: /data
    # The directory for clog, ilog, and slog. The default value is the same as the data_dir value.
    redo_dir: /redo
    # Starting from observer version 4.2, the network selection for the observer is based on the 'local_ip' parameter, and the 'devname' parameter is no longer mandatory.
    # If the 'local_ip' parameter is set, the observer will first use this parameter for the configuration, regardless of the 'devname' parameter.
    # If only the 'devname' parameter is set, the observer will use the 'devname' parameter for the configuration.
    # If neither the 'devname' nor the 'local_ip' parameters are set, the 'local_ip' parameter will be automatically assigned the IP address configured above.
    # devname: eth0
    mysql_port: 2881 # External port for OceanBase Database. The default value is 2881. DO NOT change this value after the cluster is started.
    rpc_port: 2882 # Internal port for OceanBase Database. The default value is 2882. DO NOT change this value after the cluster is started.
    obshell_port: 2886 # Operation and maintenance port for Oceanbase Database. The default value is 2886. This parameter is valid only when the version of oceanbase-ce is 4.2.2.0 or later.
    zone: zone1
    # if current hardware's memory capacity is smaller than 50G, please use the setting of "mini-single-example.yaml" and do a small adjustment.
    memory_limit: 0 # The maximum running memory for an observer
    memory_limit_percentage: 70
    # The reserved system memory. system_memory is reserved for general tenants. The default value is 30G.
    system_memory: 0MB
    datafile_size: 140GB # Size of the data file.
    #cpu_count: 16
    log_disk_size: 55GB # The size of disk space used by the clog files.
    ob_sql_work_area_percentage: 10
    #enable_syslog_wf: false # Print system logs whose levels are higher than WARNING to a separate log file. The default value is true.
    max_syslog_file_count: 0 # The maximum number of reserved log files before enabling auto recycling. The default value is 0.
    enable_syslog_recycle: true
    # root_password: # root user password, can be empty
    connect_timeout: 10000
    ob_query_timeout: 300000000
ob_trx_timeout: 300000000- 部署集羣: obd cluster deploy obtest -c test-local.yaml
- 啓動集羣: obd cluster start obtest
- 查看集羣列表:obd cluster list
- 查看集羣及root初始密碼:obd cluster display obtest
3.3. 連接集羣:
命令行連接:(使用obclient或mysql命令都可以)
obclient -h127.1 -uroot@sys -p -A -C
查看數據庫可用資源
select a.zone, a.SVR_IP,a.SVR_PORT, b.status,
cpu_capacity,cpu_assigned_max,cpu_capacity-cpu_assigned_max as cpu_free,
round(memory_limit/1024/1024/1024,2) as memory_total_gb,
round((memory_limit-mem_capacity)/1024/1024/1024,2) as system_memory_gb,
round(mem_assigned/1024/1024/1024,2) as mem_assigned_gb,
round((mem_capacity-mem_assigned)/1024/1024/1024,2) as memory_free_gb,
round(log_disk_capacity/1024/1024/1024,2) as log_disk_capacity_gb,
round(log_disk_assigned/1024/1024/1024,2) as log_disk_assigned_gb,
round((log_disk_capacity-log_disk_assigned)/1024/1024/1024,2) as log_disk_free_gb,
round((data_disk_capacity/1024/1024/1024),2) as data_disk_gb,
round((data_disk_in_use/1024/1024/1024),2) as data_disk_used_gb,
round((data_disk_capacity-data_disk_in_use)/1024/1024/1024,2) as data_disk_free_gb
from gv$ob_servers a join oceanbase.DBA_OB_SERVERS b on a.zone=b.zone\G;
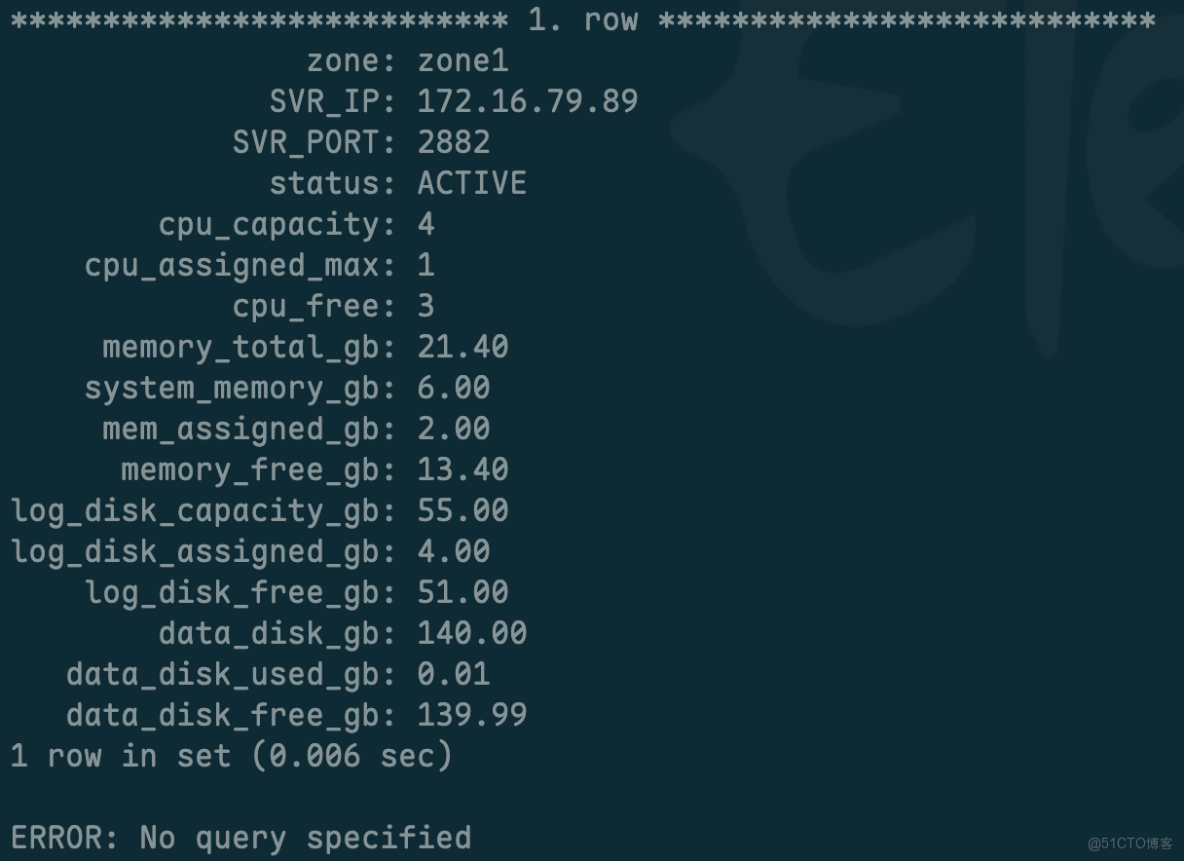
租户可用資源:
CPU:3 C,內存:13GB,日誌磁盤空間51GB, 數據磁盤空間139.99GB。
4. 數據庫管理
4.1. 建議:
OceanBase 創建資源池默認只允許大於 5G(包括 5G)內存規格,如果創建小規格的unit需要手動修改下參數__min_full_resource_pool_memory為1G:
alter system set __min_full_resource_pool_memory=1073741824;
驗證:
select * from __all_virtual_sys_parameter_stat where name='__min_full_resource_pool_memory';
4.2. 創建租户:
1、創建unit規格:
create resource unit if not exists sp_trans_test MAX_CPU=1, MEMORY_SIZE='2G';
---可修改unit規格:
alter RESOURCE UNIT sp_trans_test MAX_CPU=1, MEMORY_SIZE='2G' MAX_IOPS=128000000, MIN_IOPS=128000000, LOG_DISK_SIZE='5G';
---查看unit
select * from __all_unit;
2、創建資源池:
create resource pool if not exists sp_trans_test unit='sp_trans_test', unit_num=1;
--查看資源池
select * from __all_resource_pool\G;
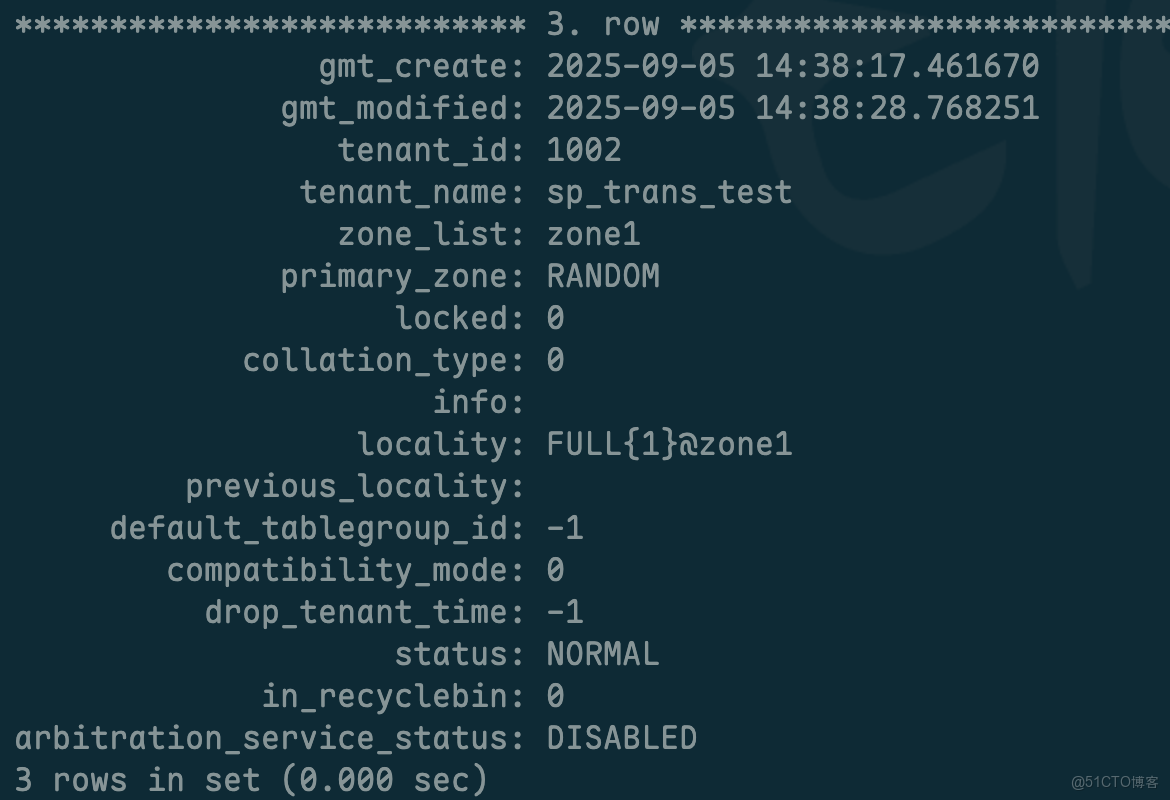
3、創建租户:
create tenant if not exists sp_trans_test RESOURCE_POOL_LIST=('sp_trans_test') set ob_tcp_invited_nodes='%';
--查看租户:select * from __all_tenant\G;
5. 主機重啓後:
需要admin用户手動啓動,命令:
/home/admin/oceanbase/bin/obshell admin start --takeover 0 --ob
或
obd cluster start obtest
網頁訪問:http://39.97.32.230:2886/ 可以白屏管理租户。