

系統權限管理
1、前言
在實際開發中,開發任何一套系統,基本都少不了權限管理這一塊。這些足以説明權限管理的重要性。其實SpringSecurity去年就學了,一直沒有時間整理,用了一年多時間了,給我的印象一直都挺好,實用,安全性高(Security可以對密碼進行加密)。而且這一塊在實際開發中也的確很重要,所以這裏整理了一套基於SpringSecurity的權限管理。
案例代碼下面有下載鏈接。
2、案例技術棧
如果對於SpringSecurity還不瞭解的話可以先了解一下SpringSecurity安全控件的學習,頁面採用的是Bootstrap寫的(頁面就簡單的寫了一下,可以根據自己的需求更改),其實後端理解了,前台就是顯示作用,大家可以自行更換前台頁面顯示框架,持久層使用的是Spring-Data-Jpa。
並且對後端持久層和控制器進行了一下小封裝,Java持久層和控制器的封裝。頁面使用的Thymeleaf模板,SpringBoot整合Thymeleaf模板。
數據庫設計
1、表關係
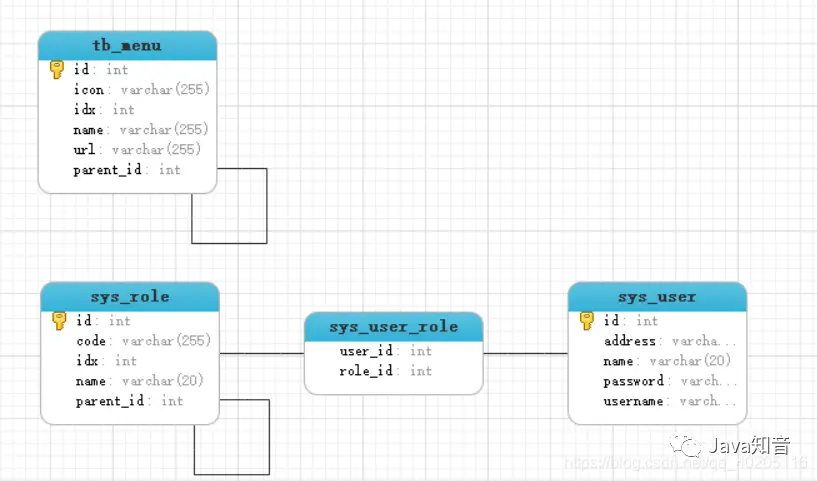
- 菜單(TbMenu)=====> 頁面上需要顯示的所有菜單
- 角色(SysRole)=====> 角色及角色對應的菜單
- 用户(SysUser)=====> 用户及用户對應的角色
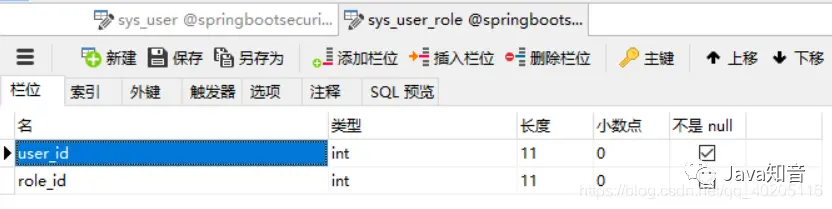
- 用户和角色中間表(sys_user_role)====> 用户和角色中間表
2、數據庫表結構
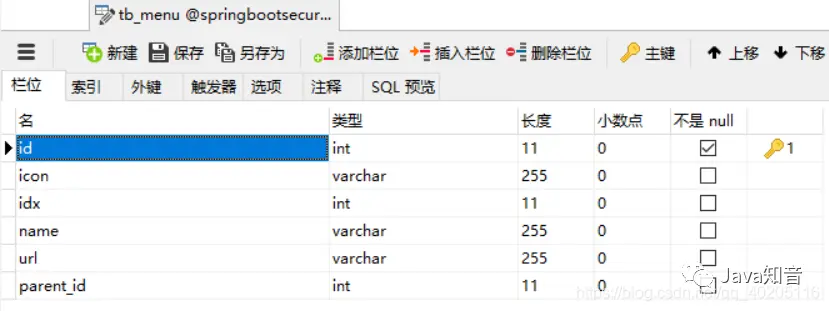
菜單表tb_menu
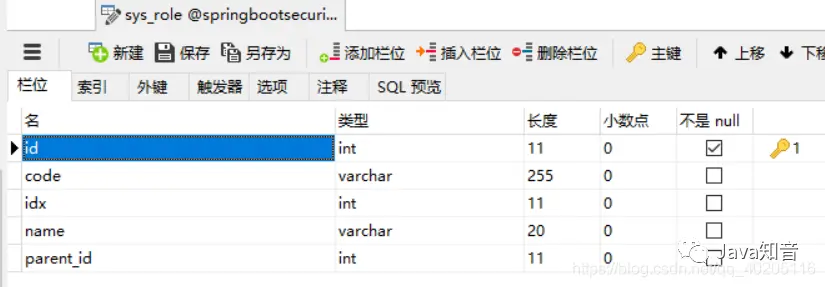
角色及菜單權限表sys_role,其中父節點parent 為null時為角色,不為null時為對應角色的菜單權限。
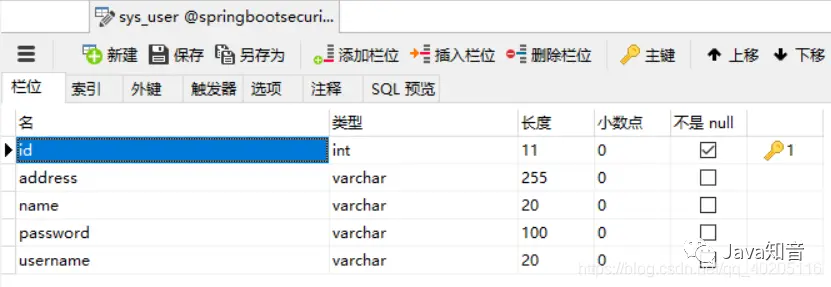
用户表sys_user
用户和角色多對多關係,用户和角色中間表sys_user_role(有Spring-Data-Jpa自動生成)。
新建項目
1、新建springboot項目
新建springboot項目,在項目中添加SpringSecurity相關Maven依賴,pom.map文件
<?xml version="1.0" encoding="UTF-8"?>
<project xmlns="http://maven.apache.org/POM/4.0.0" xmlns:xsi="http://www.w3.org/2001/XMLSchema-instance"
xsi:schemaLocation="http://maven.apache.org/POM/4.0.0 https://maven.apache.org/xsd/maven-4.0.0.xsd">
<modelVersion>4.0.0</modelVersion>
<parent>
<groupId>org.springframework.boot</groupId>
<artifactId>spring-boot-starter-parent</artifactId>
<version>2.2.2.RELEASE</version>
<relativePath/> <!-- lookup parent from repository -->
</parent>
<groupId>com.mcy</groupId>
<artifactId>springboot-security</artifactId>
<version>0.0.1-SNAPSHOT</version>
<name>springboot-security</name>
<description>Demo project for Spring Boot</description>
<properties>
<java.version>1.8</java.version>
</properties>
<dependencies>
<dependency>
<groupId>org.springframework.boot</groupId>
<artifactId>spring-boot-starter-data-jpa</artifactId>
</dependency>
<dependency>
<groupId>org.springframework.boot</groupId>
<artifactId>spring-boot-starter-security</artifactId>
</dependency>
<dependency>
<groupId>org.springframework.boot</groupId>
<artifactId>spring-boot-starter-thymeleaf</artifactId>
</dependency>
<dependency>
<groupId>org.springframework.boot</groupId>
<artifactId>spring-boot-starter-web</artifactId>
</dependency>
<dependency>
<groupId>mysql</groupId>
<artifactId>mysql-connector-java</artifactId>
<scope>runtime</scope>
</dependency>
<dependency>
<groupId>org.springframework.boot</groupId>
<artifactId>spring-boot-starter-test</artifactId>
<scope>test</scope>
<exclusions>
<exclusion>
<groupId>org.junit.vintage</groupId>
<artifactId>junit-vintage-engine</artifactId>
</exclusion>
</exclusions>
</dependency>
<dependency>
<groupId>org.springframework.security</groupId>
<artifactId>spring-security-test</artifactId>
<scope>test</scope>
</dependency>
<dependency>
<groupId>org.thymeleaf.extras</groupId>
<artifactId>thymeleaf-extras-springsecurity5</artifactId>
</dependency>
<dependency>
<groupId>org.springframework.boot</groupId>
<artifactId>spring-boot-devtools</artifactId>
<scope>runtime</scope>
<optional>true</optional>
</dependency>
<dependency>
<groupId>org.webjars.bower</groupId>
<artifactId>bootstrap-select</artifactId>
<version>2.0.0-beta1</version>
</dependency>
<dependency>
<groupId>org.webjars</groupId>
<artifactId>bootbox</artifactId>
<version>4.4.0</version>
</dependency>
</dependencies>
<build>
<plugins>
<plugin>
<groupId>org.springframework.boot</groupId>
<artifactId>spring-boot-maven-plugin</artifactId>
</plugin>
</plugins>
</build>
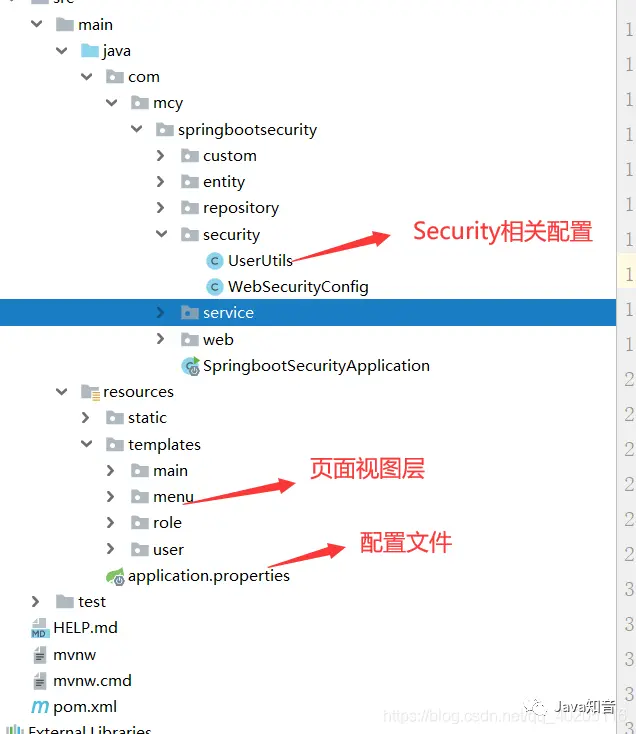
</project>2、項目結構
編寫代碼
1、編寫實體類
菜單表實體類TbMenu,Spring-Data-Jpa可以根據實體類去數據庫新建或更新對應的表結構,詳情可以訪問Spring-Data-Jpa入門:
https://blog.csdn.net/qq_4020...
import com.fasterxml.jackson.annotation.JsonIgnore;
import com.mcy.springbootsecurity.custom.BaseEntity;
import org.springframework.data.annotation.CreatedBy;
import javax.persistence.*;
import java.util.ArrayList;
import java.util.List;
/**
* 菜單表
* @author
*
*/
@Entity
public class TbMenu extends BaseEntity<Integer> {
private String name;
private String url;
private Integer idx;
@JsonIgnore
private TbMenu parent;
@JsonIgnore
private List<TbMenu> children=new ArrayList<>();
@Column(unique=true)
public String getName() {
return name;
}
public void setName(String name) {
this.name = name;
}
public String getUrl() {
return url;
}
public void setUrl(String url) {
this.url = url;
}
public Integer getIdx() {
return idx;
}
public void setIdx(Integer idx) {
this.idx = idx;
}
@ManyToOne
@CreatedBy
public TbMenu getParent() {
return parent;
}
public void setParent(TbMenu parent) {
this.parent = parent;
}
@OneToMany(cascade=CascadeType.ALL,mappedBy="parent")
@OrderBy(value="idx")
public List<TbMenu> getChildren() {
return children;
}
public void setChildren(List<TbMenu> children) {
this.children = children;
}
public TbMenu(Integer id) {
super(id);
}
public TbMenu(){
super();
}
public TbMenu(String name, String url, Integer idx, TbMenu parent, List<TbMenu> children) {
this.name = name;
this.url = url;
this.idx = idx;
this.parent = parent;
this.children = children;
}
public TbMenu(Integer integer, String name, String url, Integer idx, TbMenu parent, List<TbMenu> children) {
super(integer);
this.name = name;
this.url = url;
this.idx = idx;
this.parent = parent;
this.children = children;
}
@Transient
public Integer getParentId() {
return parent==null?null:parent.getId();
}
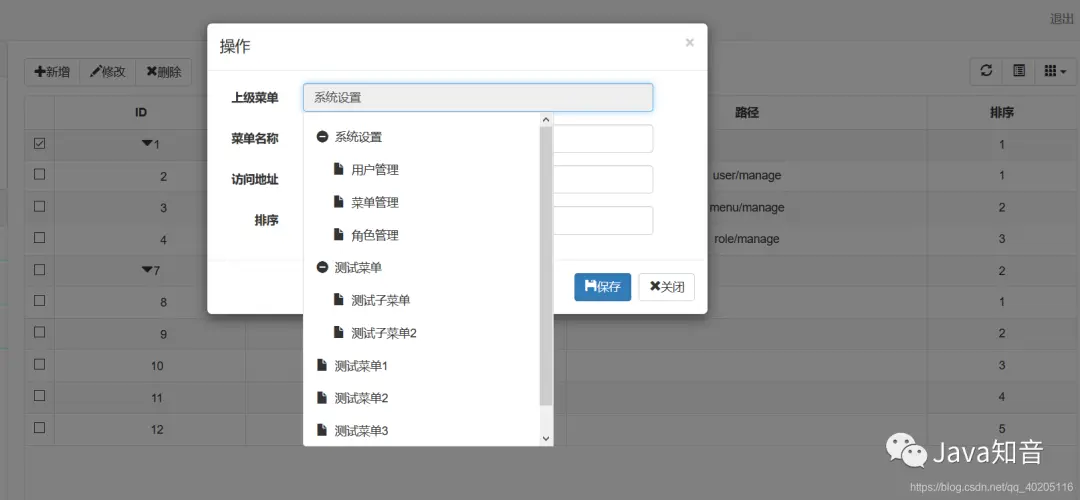
}表新建好了,下面就是實現增刪改查就可以了,實現效果如下。
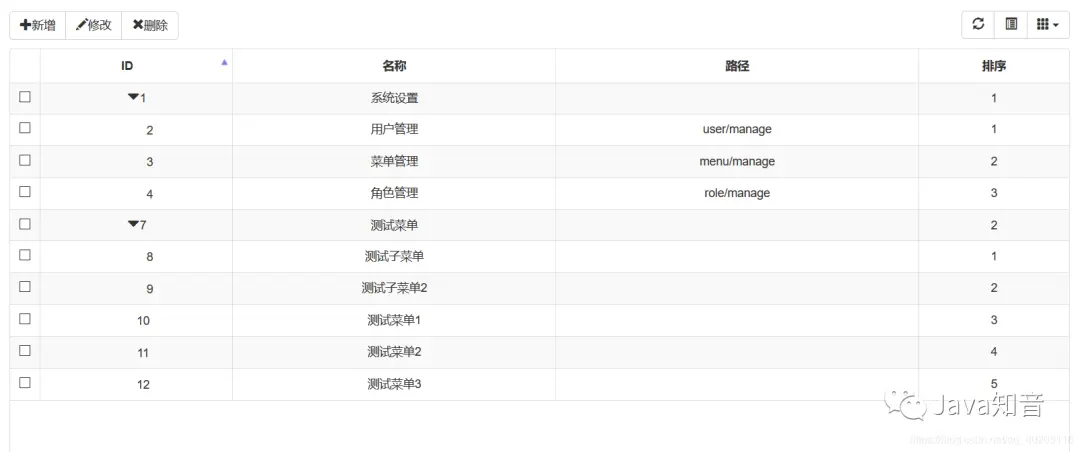
新增和修改菜單。
對於Bootstrap的樹形表格,可以移步到:BootStrap-bable-treegrid樹形表格的使用。
https://blog.csdn.net/qq_4020...
菜單管理實現了,下一步就是實現角色及角色對應的權限管理了。
角色及權限表SysRole,parent 為null時為角色,不為null時為權限。
package com.mcy.springbootsecurity.entity;
import com.fasterxml.jackson.annotation.JsonIgnore;
import com.mcy.springbootsecurity.custom.BaseEntity;
import org.springframework.data.annotation.CreatedBy;
import javax.persistence.*;
import java.util.ArrayList;
import java.util.List;
@Entity
/***
* 角色及角色對應的菜單權限
* @author
*parent 為null時為角色,不為null時為權限
*/
public class SysRole extends BaseEntity<Integer> {
private String name; //名稱
private String code; //代碼
@JsonIgnore
private SysRole parent;
private Integer idx; //排序
@JsonIgnore
private List<SysRole> children = new ArrayList<>();
@Column(length=20)
public String getName() {
return name;
}
public void setName(String name) {
this.name = name;
}
public String getCode() {
return code;
}
public void setCode(String code) {
this.code = code;
}
@ManyToOne
@CreatedBy
public SysRole getParent() {
return parent;
}
public void setParent(SysRole parent) {
this.parent = parent;
}
@OneToMany(cascade=CascadeType.ALL,mappedBy="parent")
public List<SysRole> getChildren() {
return children;
}
public void setChildren(List<SysRole> children) {
this.children = children;
}
//獲取父節點id
@Transient
public Integer getParentId() {
return parent==null?null:parent.getId();
}
public Integer getIdx() {
return idx;
}
public void setIdx(Integer idx) {
this.idx = idx;
}
public SysRole(String name, String code, SysRole parent, Integer idx, List<SysRole> children) {
this.name = name;
this.code = code;
this.parent = parent;
this.idx = idx;
this.children = children;
}
public SysRole(Integer id, String name, String code, SysRole parent, Integer idx, List<SysRole> children) {
super(id);
this.name = name;
this.code = code;
this.parent = parent;
this.idx = idx;
this.children = children;
}
public SysRole(Integer id) {
super(id);
}
public SysRole(){}
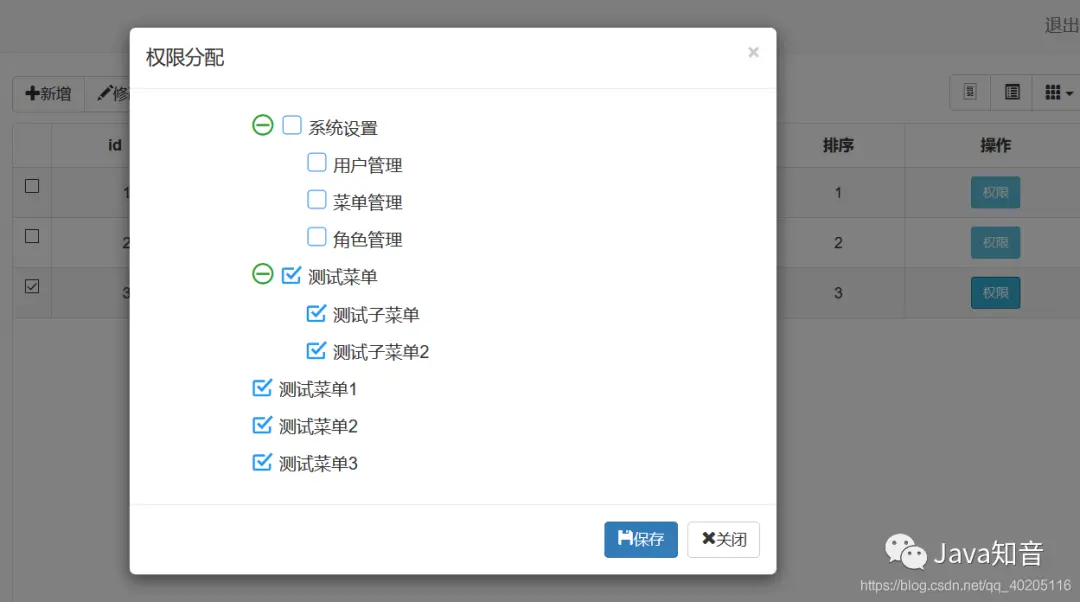
}首先需要實現角色管理,之後在角色中添加對應的菜單權限。
實現效果(也可以和菜單管理一樣,用樹形表格展示,根據個人需求。這裏用的是樹形菜單展示的)。
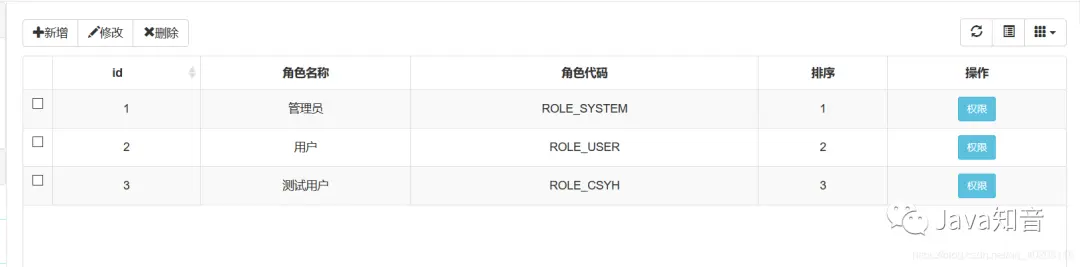
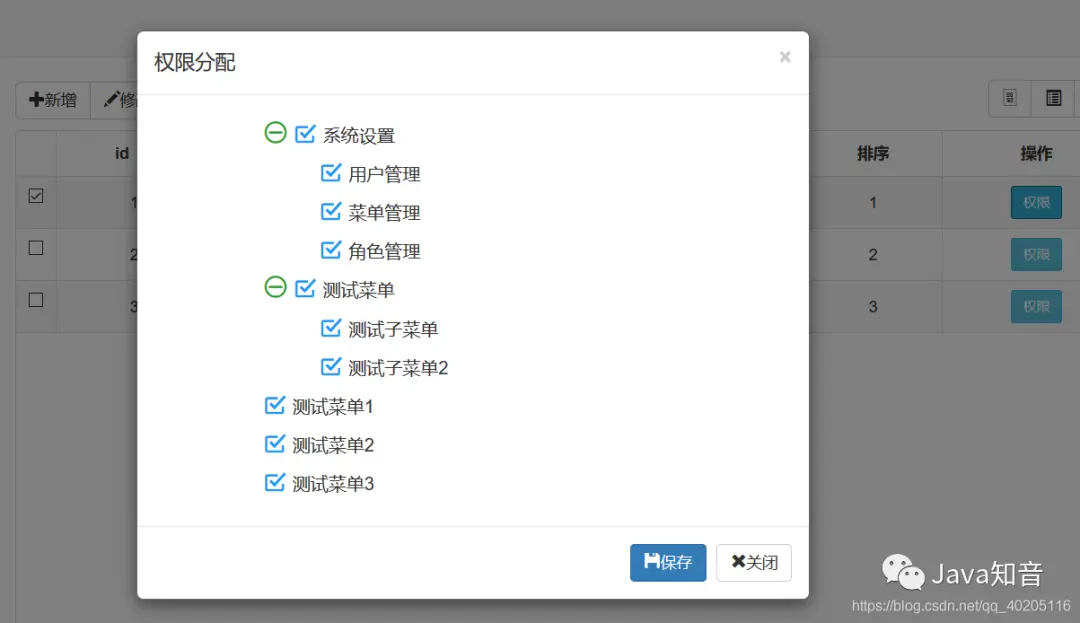
給角色分配權限。

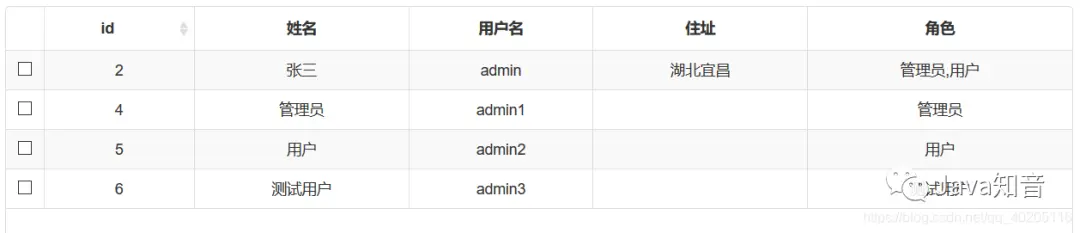
最後實現的就是用户管理了,只需要對添加的用户分配對應的角色就可以了,用户登錄時,顯示角色對應的權限。
用户表SysUser,繼承的BaseEntity類中就一個ID字段。
import com.fasterxml.jackson.annotation.JsonIgnore;
import com.mcy.springbootsecurity.custom.BaseEntity;

import javax.persistence.*;
import java.util.ArrayList;
import java.util.List;

/**
 * 用户表
 */
@Entity
public class SysUser extends BaseEntity<Integer> {
 private String username; //賬號
 private String password; //密碼
 private String name;  //姓名
 private String address;  //地址

 @JsonIgnore
 private List<SysRole> roles=new ArrayList<>(); //角色

 @Column(length=20,unique=true)
 public String getUsername() {
  return username;
 }
 public void setUsername(String username) {
  this.username = username;
 }

 @Column(length=100)
 public String getPassword() {
  return password;
 }
 public void setPassword(String password) {
  this.password = password;
 }

 @Column(length=20)
 public String getName() {
  return name;
 }
 public void setName(String name) {
  this.name = name;
 }

 @ManyToMany(cascade=CascadeType.REFRESH,fetch=FetchType.EAGER)
 @JoinTable(name="sys_user_role",joinColumns=@JoinColumn(name="user_id"),inverseJoinColumns=@JoinColumn(name="role_id"))
 public List<SysRole> getRoles() {
  return roles;
 }
 public void setRoles(List<SysRole> roles) {
  this.roles = roles;
 }

 public String getAddress() {
  return address;
 }

 public void setAddress(String address) {
  this.address = address;
 }

 //角色名稱
 @Transient
 public String getRoleNames() {
  String str="";
  for (SysRole role : getRoles()) {
   str+=role.getName()+",";
  }
  if(str.length()>0) {
   str=str.substring(0, str.length()-1);
  }
  return str;
 }

 //角色代碼
 @Transient
 public String getRoleCodes() {
  String str="";
  for (SysRole role : getRoles()) {
   str+=role.getCode()+",";
  }
  if(str.indexOf(",")>0) {
   str=str.substring(0,str.length()-1);
  }
  return str;
 }

}
用户管理就是基本的數據表格,效果如圖。

2、Security配置文件
Security相關配置文件,下面兩個文件如果看不懂,可以訪問SpringSecurity安全控件的學習中有詳細講解。
https://blog.csdn.net/qq_4020...
package com.mcy.springbootsecurity.security;

import com.mcy.springbootsecurity.service.SysUserService;
import org.springframework.beans.factory.annotation.Autowired;
import org.springframework.context.annotation.Configuration;
import org.springframework.security.config.annotation.authentication.builders.AuthenticationManagerBuilder;
import org.springframework.security.config.annotation.web.builders.HttpSecurity;
import org.springframework.security.config.annotation.web.configuration.WebSecurityConfigurerAdapter;
import org.springframework.security.crypto.bcrypt.BCryptPasswordEncoder;

@Configuration
public class WebSecurityConfig extends WebSecurityConfigurerAdapter {

    @Autowired
    private SysUserService userService;

    /**
     * 用户認證操作
     * @param auth
     * @throws Exception
     */
    @Override
    protected void configure(AuthenticationManagerBuilder auth) throws Exception {
        //添加用户,並給予權限
        auth.inMemoryAuthentication().withUser("aaa").password("{noop}1234").roles("DIY");
        //設置認證方式
        auth.userDetailsService(userService).passwordEncoder(new BCryptPasswordEncoder());
    }

    /**
     * 用户授權操作
     * @param http
     * @throws Exception
     */
    @Override
    protected void configure(HttpSecurity http) throws Exception {
        http.csrf().disable();    //安全器令牌
        http.formLogin()
                //登錄請求被攔截
                .loginPage("/login").permitAll()
                //設置默認登錄成功跳轉頁面
                .successForwardUrl("/main")
                .failureUrl("/login?error");   //登錄失敗的頁面
        http.authorizeRequests().antMatchers("/static/**", "/assets/**").permitAll();    //文件下的所有都能訪問
        http.authorizeRequests().antMatchers("/webjars/**").permitAll();
        http.logout().logoutUrl("/logout").permitAll();     //退出
        http.authorizeRequests().anyRequest().authenticated();    //除此之外的都必須通過請求驗證才能訪問
    }
}
獲取登錄者相關信息,工具類。
import com.mcy.springbootsecurity.entity.SysUser;
import com.mcy.springbootsecurity.service.SysUserService;
import org.springframework.beans.factory.annotation.Autowired;
import org.springframework.security.core.GrantedAuthority;
import org.springframework.security.core.context.SecurityContextHolder;
import org.springframework.security.core.userdetails.UserDetails;
import org.springframework.stereotype.Component;

import java.util.ArrayList;
import java.util.List;

//創建會話,獲取當前登錄對象
@Component
public class UserUtils {
 @Autowired
 private SysUserService userService;

 /**
  * 獲取當前登錄者的信息
  * @return 當前者信息
  */
 public SysUser getUser() {
  //獲取當前用户的用户名
  String username = SecurityContextHolder.getContext().getAuthentication().getName();
  SysUser user = userService.findByUsername(username);
  return user;
 }

 /**
  * 判斷此用户中是否包含roleName菜單權限
  * @param roleName
  * @return
  */
 public Boolean hasRole(String roleName) {
  //獲取UserDetails類,
  UserDetails userDetails = (UserDetails) SecurityContextHolder.getContext().getAuthentication().getPrincipal();
  List<String> roleCodes=new ArrayList<>();
  for (GrantedAuthority authority : userDetails.getAuthorities()) {
   //getAuthority()返回用户對應的菜單權限
   roleCodes.add(authority.getAuthority());
  }
  return roleCodes.contains(roleName);
 }
}
3、動態權限菜單加載相關方法
用户表的SysUserService需要實現UserDetailsService接口,因為在SpringSecurity中配置的相關參數需要是UserDetailsService類的數據。
重寫UserDetailsService接口中的loadUserByUsername方法,通過該方法查詢對應的用户,返回對象UserDetails是SpringSecurity的一個核心接口。其中定義了一些可以獲取用户名,密碼,權限等與認證相關信息的方法。
重寫的loadUserByUsername方法。
@Override
public UserDetails loadUserByUsername(String username) throws UsernameNotFoundException {
    //調用持久層接口findByUsername方法查詢用户。
    SysUser user = userRepository.findByUsername(username);
    if(user == null){
        throw new UsernameNotFoundException("用户名不存在");
    }
    //創建List集合,用來保存用户菜單權限,GrantedAuthority對象代表賦予當前用户的權限
    List<GrantedAuthority> authorities = new ArrayList<>();
    //獲得當前用户角色集合
    List<SysRole> roles = user.getRoles();
    List<SysRole> haveRoles=new ArrayList<>();
    for (SysRole role : roles) {
        haveRoles.add(role);
        List<SysRole> children = roleService.findByParent(role);
        children.removeAll(haveRoles);
        haveRoles.addAll(children);
    }
    for(SysRole role: haveRoles){
        //將關聯對象role的name屬性保存為用户的認證權限
        authorities.add(new SimpleGrantedAuthority(role.getName()));
    }
    //此處返回的是org.springframework.security.core.userdetails.User類,該類是SpringSecurity內部的實現
    //org.springframework.security.core.userdetails.User類實現了UserDetails接口
    return new User(user.getUsername(), user.getPassword(), authorities);
}
所有功能實現了,最後就是根據角色去顯示對應的菜單了。
在TbMenuService類中的findAuditMenu方法,查詢當前用户所擁有的權限菜單。
/**
 * 獲取用户所擁有的權限對應的菜單項
 * @return
 */
public List<TbMenu> findAuditMenu() {
    List<TbMenu> menus;
    //判斷是否是後門用户
    if(userUtils.hasRole("ROLE_DIY")){
        //查詢所有菜單,子菜單可以通過父級菜單的映射得到
        menus = menuRepository.findByParentIsNullOrderByIdx();
    }else{
        //獲取此用户對應的菜單權限
        menus = auditMenu(menuRepository.findByParentIsNullOrderByIdx());
    }
    return menus;
}

//根據用户的菜單權限對菜單進行過濾
private List<TbMenu> auditMenu(List<TbMenu> menus) {
    List<TbMenu> list = new ArrayList<>();
    for(TbMenu menu: menus){
        String name = menu.getName();
        //判斷此用户是否有此菜單權限
        if(userUtils.hasRole(name)){
            list.add(menu);
            //遞歸判斷子菜單
            if(menu.getChildren() != null && !menu.getChildren().isEmpty()) {
                menu.setChildren(auditMenu(menu.getChildren()));
            }
        }
    }
    return list;
}
在UserUtils工具類中的hasRole方法,判斷此用户中是否包含roleName菜單權限。
public Boolean hasRole(String roleName) {
 //獲取UserDetails類,
 UserDetails userDetails = (UserDetails) SecurityContextHolder.getContext().getAuthentication().getPrincipal();
 List<String> roleCodes=new ArrayList<>();
 for (GrantedAuthority authority : userDetails.getAuthorities()) {
  //getAuthority()返回用户對應的菜單權限
  roleCodes.add(authority.getAuthority());
 }
 return roleCodes.contains(roleName);
}
之後在控制器中返回用户對應的菜單權限,之後在前台頁面遍歷就可以了。
@RequestMapping(value = "/main")
public String main(ModelMap map){
    //加載菜單
    List<TbMenu> menus = menuService.findAuditMenu();
    map.put("menus", menus);
    if (menus.isEmpty()) {
        return "main/main";
    }
    return "main/main1";
}
4、首頁菜單遍歷
首頁菜單遍歷,這裏使用的是LayUI菜單,如果其他框架可以自行根據頁面標籤規律遍歷,因為頁面使用的是Thymeleaf模板,不是JSP,使用遍歷菜單時不是採用的EL表達式,而是使用的Thymeleaf自帶的標籤表達式。
<div id="main">
    <div id="main_nav">
        <div class="panel-group" id="accordion" style="margin-bottom: 0;">
            <div th:each="menu, menuStat: ${menus}" th:if="${menu.children.size() != 0 && menu.children != null}" class="panel panel-default">
                <div class="panel-heading">
                    <h4 class="panel-title">
                        <p data-toggle="collapse" data-parent="#accordion" th:href="|#collapseOne${menuStat.index}|">
                            <span th:text="${menu.name}">系統設置</span><span class="caret"></span>
                        </p>
                    </h4>
                </div>
                <div th:if="${menuStat.first}" th:id="|collapseOne${menuStat.index}|" class="panel-collapse collapse collapse in">
                    <div class="panel-body">
                        <p th:each="subMenu:${menu.children}" th:src="${subMenu.url}" th:text="${subMenu.name}">菜單管理</p>
                    </div>
                </div>
                <div th:if="${!menuStat.first}" th:id="|collapseOne${menuStat.index}|" class="panel-collapse collapse collapse">
                    <div class="panel-body">
                        <p th:each="subMenu:${menu.children}" th:src="${subMenu.url}" th:text="${subMenu.name}">菜單管理</p>
                    </div>
                </div>
            </div>
        </div>
        <div id="nav_p">
            <p th:each="menu:${menus}" th:if="${menu.children.size() == 0}" th:src="${menu.url}" th:text="${menu.name}">成績管理</p>
        </div>
    </div>
    <div id="main_home">
        首頁內容
    </div>
</div>
測試應用
1、對應效果展示
用户數據及對應的角色
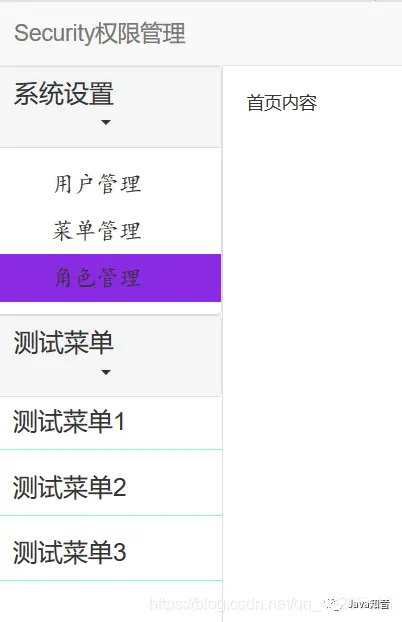
管理員對應的菜單權限。
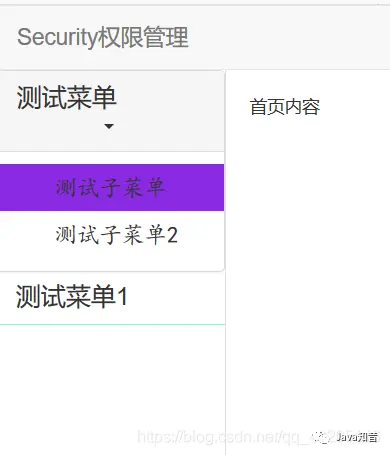
用户角色對應的菜單權限。
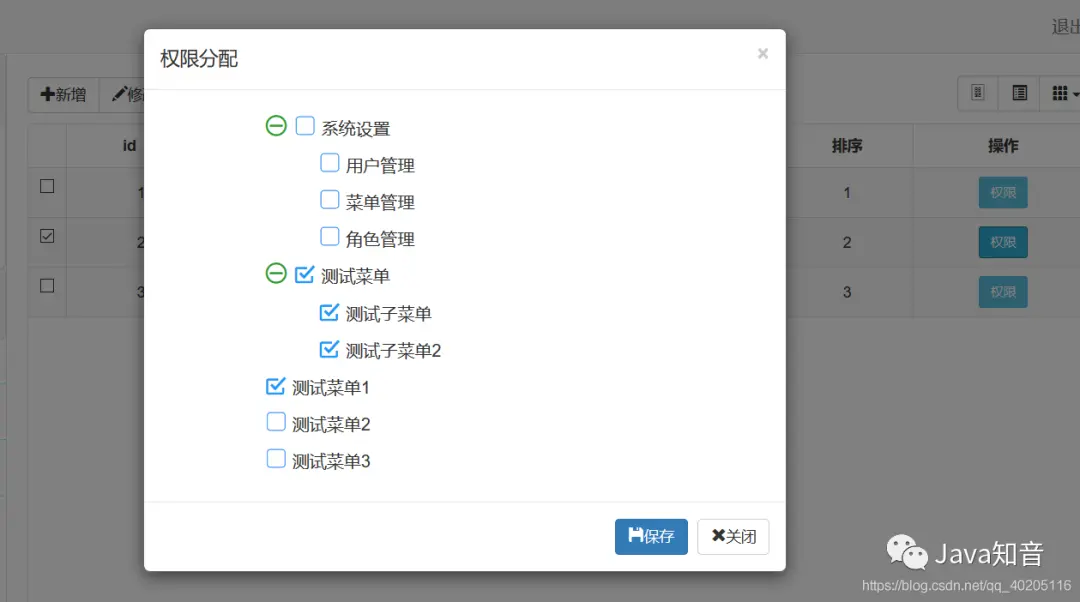
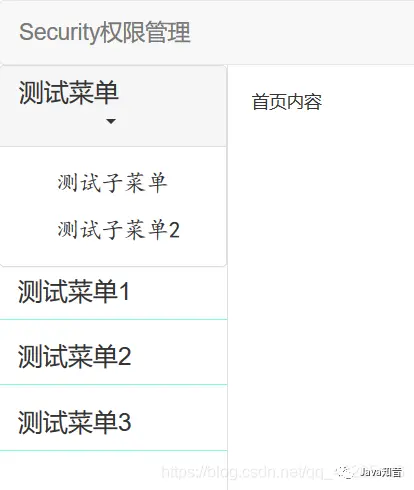
測試用户角色對應的菜單權限。
2、測試應用
用户名為admin1有管理員角色的用户登錄,菜單顯示。
用户名為admin2有用户角色的用户登錄,菜單顯示。
用户名為admin3有測試用户角色的用户登錄,菜單顯示。
3、案例代碼下載
下載地址:https://github.com/machaoyin/...