

🧑💻 寫在開頭
點贊 + 收藏 === 學會🤣🤣🤣
有些時候我們的項目只使用原生一些內容是無法實現一些功能的,所以今天我帶來了一個大家都熟悉的,也是生活中常見的一個功能,也就是大家在網購的時候,下單成功後就可以看到自己的訂單,當然也可以查看物流信息,那麼物流信息中有一個部分就是地圖部分,這部分可以讓用户看到自己購買的商品到了哪裏。那這個功能我們使用原生大概率是無法完成的,這就需要我們使用高德地圖、百度地圖或者騰訊之類的開放地圖類 API 的功能,那麼今天我就來和大家分享一下如何去使用高德地圖實現這一功能。
1. 準備工作
1.1. 官方文檔
lbs.amap.com/api/javascr…
1.2. 需要安裝的依賴
npm i @amap/amap-jsapi-loader --save
2. 開始
首先我們需要給地圖設置一個容器,命名為container
<template>
  <div id="container"></div>
</template>
設置樣式
<style  scoped>
  #container{
      padding:0px;
      margin: 0px;
      width: 100%;
      height: 800px;
  }
</style>
2.1. 創建地圖組件
首先我們需要去擴展 window 接口類型的定義,如果不配置就會出現錯誤:
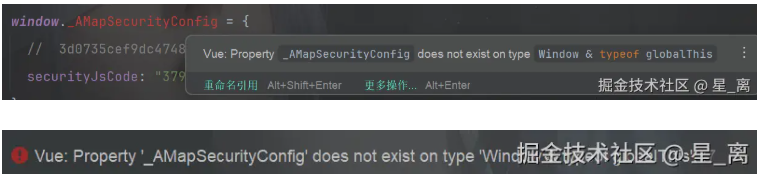
核心原因:
TypeScript 對 window 的類型有嚴格定義,默認的 Window 接口裏沒有 _AMapSecurityConfig,所以會提示 “該屬性不存在”。但是高德地圖又需要這個屬性來配置安全密鑰,所以我們就需要來擴展一下 window 類型。
那麼我們就需要先來配置一下:按照以下路徑創建 global.d.ts 文件
src-->types-->global.d.ts
進入文件配置以下內容:
interface Window {
  _AMapSecurityConfig: {
      securityJsCode: string
  }
}
2.2. 初始化地圖組件
<script setup lang="ts">
import  {onMounted,onUnmounted} from "vue";
import AMapLoader from '@amap/amap-jsapi-loader';

let map = null;
onMounted(()=>{
  window._AMapSecurityConfig = {
    securityJsCode: "379c75538f6ae27ee95c983a6feaf358",
  };
  AMapLoader.load({
    key:"3d0735cef9dc47489452066b7dbe2510",
    version:"2.0",
    plugins:["AMap.scale"]
  })
    .then((AMap)=>{
      map = new AMap.Map("container",{
        //設置地圖容器的Id
        viewMode:"3D",//是否為3D地圖模式
        zoom:11,//初始化地圖級別
        center:[116.397428, 39.90923]
      })
    })
    .catch((e)=>{
      console.error(e)
    })
})
onUnmounted(()=>{
  map?.destroy();
})
</script>
3. 路線規劃
lbs.amap.com/demo/javasc…
通過數據處理出起始點和途徑點的座標:
const logisticsInfo = [
  {
    "latitude": "23.129152403638752",
    "longitude": "113.42775362698366"
  },
  {
    "latitude": "30.454012",
    "longitude": "114.42659"
  },
  {
    "latitude": "31.93182",
    "longitude": "118.633415"
  },
  {
    "latitude": "31.035032",
    "longitude": "121.611504"
  }
]
// 物流軌跡的起始點
  const start = logisticsInfo.shift()//起點
  const end = logisticsInfo.pop()//終點
  const ways = logisticsInfo.map(item => [item.longitude, item.latitude])//途徑點數組
AMap.plugin('AMap.Driving', () => {
  //構造路線導航類
  var driving = new AMap.Driving({
    map: map, // 指定繪製的路線軌跡顯示到map地圖
    showTraffic: false, // 關閉實時交通路況
    hideMarkers: false // 隱藏默認的圖標
  });
  // 根據起終點經緯度規劃駕車導航路線
  driving.search(new AMap.LngLat(start.longitude, start.latitude), new AMap.LngLat(end.longitude, end.latitude), {
    waypoints:ways, // 途經點這裏是一個二維數組的格式[[經度, 維度], [經度, 維度]]
  },function (status: string, result: object) {

    if (status === 'complete') {
      console.log('繪製駕車路線完成')
      // 調整視野達到最佳顯示區域
      map.setFitView([ startMarker, endMarker, currentMarker ])
    } else {
      console.log('獲取駕車數據失敗:' + result)
    }
  })
})
4. 自定義圖標


import startImg from '../public/start.png'
import endImg from '../public/end.png'
import carImg from '../public/car.png'
自定義圖標需要使用到 marker 類
// 自定義開始座標圖片
const startMarker = new AMap.Marker({
  position: [start.longitude, start.latitude], // 自定義圖標位置
  icon:startImg,
  map: map // 指定圖標顯示在哪個地圖實例
})
// 自定義終點座標圖片
const endMarker = new AMap.Marker({
  position: [end.longitude, end.latitude],
  icon:endImg,
  map: map
})
// 自定義當前座標圖片
const currentMarker = new AMap.Marker({
  position: [currentLocationInfo.longitude, currentLocationInfo.latitude],
  icon:carImg,
  map: map
})
5. 完整代碼實現
<template>
  <h1>地圖組件</h1>
  <div id="container" style="width:100%; height: 500px;"></div>
</template>
<script setup lang="ts">
import { onMounted } from 'vue'
import AMapLoader from '@amap/amap-jsapi-loader'
import startImg from '../public/start.png'
import endImg from '../public/end.png'
import carImg from '../public/car.png'
// 接口返回的數據
const logisticsInfo = [
  {
    "latitude": "23.129152403638752",
    "longitude": "113.42775362698366"
  },
  {
    "latitude": "30.454012",
    "longitude": "114.42659"
  },
  {
    "latitude": "31.93182",
    "longitude": "118.633415"
  },
  {
    "latitude": "31.035032",
    "longitude": "121.611504"
  }
]
// 當前座標
const currentLocationInfo = {
  latitude: "31.93182",
  longitude: "118.633415"
}
window._AMapSecurityConfig = {
  securityJsCode: '2af1e64a8f6b16d6d79bfa8162c46755'
}
onMounted(async () => {
  const AMap = await AMapLoader.load({
    key: '9ac7a2671565e21bc21aca6df07eb5cb',
    version: '2.0'
  })
  // 地圖的創建
  var map = new AMap.Map('container', {
    viewMode: '2D', // 默認使用 2D 模式,如果希望使用帶有俯仰角的 3D 模式,請設置 viewMode: '3D'
    zoom:16, // 初始化地圖層級
    center: [116.209804,40.149393], // 初始化地圖中心點
    plugins:["AMap.Driving"]
  });


  // 物流軌跡的起始點
  const start = logisticsInfo.shift()
  const end = logisticsInfo.pop()
  const ways = logisticsInfo.map(item => [item.longitude, item.latitude])
  // 自定義開始座標圖片
  const startMarker = new AMap.Marker({
    position: [start.longitude, start.latitude], // 自定義圖標位置
    icon:startImg,
    map: map // 指定圖標顯示在哪個地圖實例
  })
  // 自定義終點座標圖片
  const endMarker = new AMap.Marker({
    position: [end.longitude, end.latitude],
    icon:endImg,
    map: map
  })
// 自定義當前座標圖片
  const currentMarker = new AMap.Marker({
    position: [currentLocationInfo.longitude, currentLocationInfo.latitude],
    icon:carImg,
    map: map
  })

  // 繪製物流軌跡
  AMap.plugin('AMap.Driving', () => {
    //構造路線導航類
    var driving = new AMap.Driving({
      map: map, // 指定繪製的路線軌跡顯示到map地圖
      showTraffic: false, // 關閉實時交通路況
      hideMarkers: true // 隱藏默認的圖標
    });
    // 根據起終點經緯度規劃駕車導航路線
    driving.search(new AMap.LngLat(start.longitude, start.latitude), new AMap.LngLat(end.longitude, end.latitude), {
      waypoints:ways, // 途經點這裏是一個二維數組的格式[[經度, 維度], [經度, 維度]]
    },function (status: string, result: object) {

      if (status === 'complete') {
        console.log('繪製駕車路線完成')
        // 調整視野達到最佳顯示區域
        map.setFitView([ startMarker, endMarker, currentMarker ])
      } else {
        console.log('獲取駕車數據失敗:' + result)
      }
    })
  })

})
</script>