

1.概述
Spring AOP是Spring框架中極為重要的核心功能,和Spring IOC並稱為Spring的兩大核心模塊。顧名思義,AOP 即 Aspect Oriented Programming,翻譯為面向切面編程。OOP面向對象編程是縱向地對一個事物的抽象,一個對象包括靜態的屬性信息、動態的方法信息等。而AOP是橫向地對不同事物的抽象,屬性與屬性、方法與方法、對象與對象都可以組成一個切面,而用這種思維去設計編程的方式叫做面向切面編程。
Spring AOP 是利用 CGLIB 和 JDK 動態代理等方式來實現運行期動態方法增強,其目的是將與業務無關的代碼單獨抽離出來,使其邏輯不再與業務代碼耦合,從而降低系統的耦合性,提高程序的可重用性和開發效率。因而 AOP 便成為了日誌記錄、監控管理、性能統計、異常處理、權限管理、統一認證等各個方面被廣泛使用的技術。我們之所以能無感知地在Spring容器bean對象方法前後隨意添加代碼片段進行邏輯增強,是由於Spring 在運行期幫我們把切面中的代碼邏輯動態“織入”到了bean對象方法內,所以説AOP本質上就是一個代理模式。
對於代理模式和動態代理技術相關知識點不熟悉的,請先看看之前我總結的:淺析動態代理實現與原理,學習一下動態代理知識點,瞭解CGlib 和 JDK 兩種不同動態代理實現方式原理與區別,並且上面説了Spring AOP就是動態代理技術實現的,只有瞭解動態代理技術,才能快速掌握今天主題AOP。
2.AOP切面編程示例
既然AOP切面編程的特點就是可以做到對某一個功能進行統一切面處理,對業務代碼無侵入,降低耦合度。那麼下面我們就根據日誌記錄這一功能進行實例講解,對於AOP的編程實現可以基於XML配置,也可以基於註解開發,當下註解開發是主流,所以下面我們基於註解進行示例展示。
切面類
定義一個切面類,來進行日誌記錄的統一打印。
@Component  // bean組件
@Aspect // 切面類
public class LogAspect {

    // 切入點
    @Pointcut("execution(* com.shepherd.aop.service.*.*(..))")
    private void pt(){}

    /**
     * 前置通知
     */
    @Before("pt()")
    public  void beforePrintLog(){
        System.out.println("前置通知beforePrintLog方法開始記錄日誌了。。。");
    }

    /**
     * 後置通知
     */
    @AfterReturning("pt()")
    public  void afterReturningPrintLog(){
        System.out.println("後置通知afterReturningPrintLog方法開始記錄日誌了。。。");
    }
    /**
     * 異常通知
     */
    @AfterThrowing("pt()")
    public  void afterThrowingPrintLog(){
        System.out.println("異常通知afterThrowingPrintLog方法開始記錄日誌了。。。");
    }

    /**
     * 最終通知
     */
    @After("pt()")
    public  void afterPrintLog(){
        System.out.println("最終通知afterPrintLog方法開始記錄日誌了。。。");
    }

    /**
     * 環繞通知
     */
    @Around("pt()")
    public Object aroundPrintLog(ProceedingJoinPoint pjp){
        Object rtValue = null;
        try{
            Object[] args = pjp.getArgs();//得到方法執行所需的參數

            System.out.println("環繞通知aroundPrintLog方法開始記錄日誌了。。。前置");

            rtValue = pjp.proceed(args);//明確調用業務層方法(切入點方法)
      System.out.println(rtValue);

            System.out.println("環繞通知aroundPrintLog方法開始記錄日誌了。。。後置");
            return rtValue;
        }catch (Throwable t){
            System.out.println("環繞通知aroundPrintLog方法開始記錄日誌了。。。異常");
            throw new RuntimeException(t);
        }finally {
            System.out.println("環繞通知aroundPrintLog方法開始記錄日誌了。。。最終");
        }
    }
}首先@Aspect表示該類是一個切面類,只要滿足@Pointcut標註的切點表達式,就可以執行相應通知方法增強邏輯打印日誌。同時我這裏寫了aop的所有通知:前置、後置、異常、最終、環繞,其實環繞通知就能實現其他四種通知效果了,但是我為了演示所有通知方式和通知方法執行順序,就全寫了,你可以觀察一下執行結果。
業務方法
隨便寫一個業務方法:
public interface MyService {
    String doSomething();
}
@Service
public class MyServiceImpl implements MyService{
@Override
public String doSomething() {
return "========>>> 業務方法執行成功啦!!! ========>>> ";
}
}配置類
聲明一個配置類開啓aop代理功能和bean組件掃描
@Configuration //配置類
@ComponentScan(basePackages = {"com.shepherd.aop"})   //掃描bean組件
@EnableAspectJAutoProxy   //開啓aop切面功能
public class AopConfig {

    public static void main(String[] args) {
        AnnotationConfigApplicationContext ac = new AnnotationConfigApplicationContext(AopConfig.class);
        MyService myService = ac.getBean(MyService.class);
        myService.doSomething();

    }
}
通過以上步驟執行main方法結果如下:
環繞通知aroundPrintLog方法開始記錄日誌了。。。前置
前置通知beforePrintLog方法開始記錄日誌了。。。
後置通知afterReturningPrintLog方法開始記錄日誌了。。。
最終通知afterPrintLog方法開始記錄日誌了。。。
========>>> 業務方法執行成功啦!!! ========>>>
環繞通知aroundPrintLog方法開始記錄日誌了。。。後置
環繞通知aroundPrintLog方法開始記錄日誌了。。。最終Spring是需要手動添加@EnableAspectJAutoProxy註解進行aop功能集成的,而Spring Boot中使用自動裝配的技術,可以不手動加這個註解就實現集成,因為在自動配置類AopAutoConfiguration中已經集成了@EnableAspectJAutoProxy
項目推薦:基於SpringBoot2.x、SpringCloud和SpringCloudAlibaba企業級系統架構底層框架封裝,解決業務開發時常見的非功能性需求,防止重複造輪子,方便業務快速開發和企業技術棧框架統一管理。引入組件化的思想實現高內聚低耦合並且高度可配置化,做到可插拔。嚴格控制包依賴和統一版本管理,做到最少化依賴。注重代碼規範和註釋,非常適合個人學習和企業使用
Github地址:https://github.com/plasticene/plasticene-boot-starter-parent
Gitee地址:https://gitee.com/plasticene3/plasticene-boot-starter-parent
微信公眾號:Shepherd進階筆記
交流探討qun:Shepherd_126
3.AOP實現原理
首先來看看Spring是如何集成AspectJ AOP的,這時候目光應該定格在在註解@EnableAspectJAutoProxy上
@Target(ElementType.TYPE)
@Retention(RetentionPolicy.RUNTIME)
@Documented
@Import(AspectJAutoProxyRegistrar.class)
public @interface EnableAspectJAutoProxy {

    /**
     * Indicate whether subclass-based (CGLIB) proxies are to be created as opposed
     * to standard Java interface-based proxies. The default is {@code false}.
     * 該屬性指定是否通過CGLIB進行動態代理,spring默認是根據是否實現了接口來判斷使用JDK還是CGLIB,
     * 這也是兩種代理主要區別,如果為ture,spring則不做判斷直接使用CGLIB代理
     */
    boolean proxyTargetClass() default false;

    /**
     * Indicate that the proxy should be exposed by the AOP framework as a {@code ThreadLocal}
     * for retrieval via the {@link org.springframework.aop.framework.AopContext} class.
     * Off by default, i.e. no guarantees that {@code AopContext} access will work.
     * @since 4.3.1
     * 暴露aop代理,這樣就可以藉助ThreadLocal特性在AopContext在上下文中獲取到,可用於解決內部方法調用 a()
     * 調用this.b()時this不是增強代理對象問題,通過AopContext獲取即可
     */
    boolean exposeProxy() default false;

}該註解核心代碼:@Import(AspectJAutoProxyRegistrar.class),這也是Spring集成其他功能通用方式了,對於註解@Import不太熟悉的,可以看看我之前總結的:@Import使用及原理詳解。來到AspectJAutoProxyRegistrar類:
class AspectJAutoProxyRegistrar implements ImportBeanDefinitionRegistrar {

    /**
     * Register, escalate, and configure the AspectJ auto proxy creator based on the value
     * of the @{@link EnableAspectJAutoProxy#proxyTargetClass()} attribute on the importing
     * {@code @Configuration} class.
     */
    @Override
    public void registerBeanDefinitions(
            AnnotationMetadata importingClassMetadata, BeanDefinitionRegistry registry) {

    // 重點 重點 重點   注入AspectJAnnotationAutoProxyCreator
        AopConfigUtils.registerAspectJAnnotationAutoProxyCreatorIfNecessary(registry);

    // 根據@EnableAspectJAutoProxy註解屬性進行代理方式和是否暴露aop代理等設置
        AnnotationAttributes enableAspectJAutoProxy =
                AnnotationConfigUtils.attributesFor(importingClassMetadata, EnableAspectJAutoProxy.class);
        if (enableAspectJAutoProxy != null) {
            if (enableAspectJAutoProxy.getBoolean("proxyTargetClass")) {
                AopConfigUtils.forceAutoProxyCreatorToUseClassProxying(registry);
            }
            if (enableAspectJAutoProxy.getBoolean("exposeProxy")) {
                AopConfigUtils.forceAutoProxyCreatorToExposeProxy(registry);
            }
        }
    }

}可以看到這裏@import就是作用就是將AnnotationAwareAspectJAutoProxyCreator註冊到容器當中,這個類是Spring AOP的關鍵
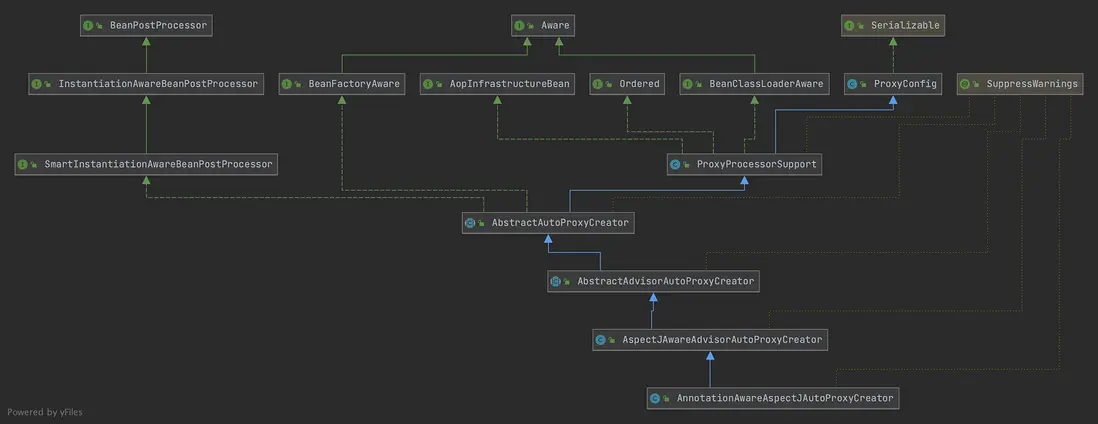
創建代理對象的時機就在創建一個Bean的時候,而創建代理對象的關鍵工作其實是由AnnotationAwareAspectJAutoProxyCreator 完成的。從上面類圖可以看出它本質上是一種BeanPostProcessor。對BeanPostProcessor後置處理器不瞭解的,可以查看之前總結的:後置處理器PostProcessor,這是Spring核心擴展點。 所以它的執行是在完成原始 Bean 構建後的初始化Bean(initializeBean)過程中進行代理對象生成的,最終放到Spring容器中,我們可以看下它的postProcessAfterInitialization 方法,該方法在其上級父類中AbstractAutoProxyCreator實現的:
/**
     * Create a proxy with the configured interceptors if the bean is
     * identified as one to proxy by the subclass.
     * @see #getAdvicesAndAdvisorsForBean
     */
    @Override
    public Object postProcessAfterInitialization(@Nullable Object bean, String beanName) {
        if (bean != null) {
            Object cacheKey = getCacheKey(bean.getClass(), beanName);
            if (this.earlyProxyReferences.remove(cacheKey) != bean) {
                return wrapIfNecessary(bean, beanName, cacheKey);
            }
        }
        return bean;
}可以看到只有當earlyProxyReferences集合中不存在cacheKey的時候,才會執行wrapIfNecessary方法。Spring AOP對象生成的時機有兩個:一個是提前AOP,提前AOP的對象會被放入到earlyProxyReferences集合當中,Spring循環依賴解決方案中如果某個bean有循環依賴,同時需要代理增強,那麼就會提前生成aop代理對象放入earlyProxyReferences中,關於循環依賴解決方案詳解,請看之前總結的:Spring循環依賴解決方案 若沒有提前,AOP會在Bean的生命週期的最後執行postProcessAfterInitialization的時候進行AOP動態代理。
進入#wrapIfNecessary()方法,核心邏輯:
    protected Object wrapIfNecessary(Object bean, String beanName, Object cacheKey) {

        .......

        // Create proxy if we have advice.
        Object[] specificInterceptors = getAdvicesAndAdvisorsForBean(bean.getClass(), beanName, null);
        if (specificInterceptors != DO_NOT_PROXY) {
            this.advisedBeans.put(cacheKey, Boolean.TRUE);
            Object proxy = createProxy(
                    bean.getClass(), beanName, specificInterceptors, new SingletonTargetSource(bean));
            this.proxyTypes.put(cacheKey, proxy.getClass());
            return proxy;
        }

        this.advisedBeans.put(cacheKey, Boolean.FALSE);
        return bean;
}#getAdvicesAndAdvisorsForBean()遍歷Spring容器中所有的bean,判斷bean上是否加了@Aspect註解,對加了該註解的類再判斷其擁有的所有方法,對於加了通知註解的方法構建出Advisor通知對象放入候選通知鏈當中。接着基於當前加載的Bean通過切點表達式篩選通知,添加ExposeInvocationInterceptor攔截器,最後對通知鏈進行排序,得到最終的通知鏈。得到完整的advice通知鏈信息後,緊接着通過#createProxy()生成代理對象
    protected Object createProxy(Class<?> beanClass, @Nullable String beanName,
            @Nullable Object[] specificInterceptors, TargetSource targetSource) {

        if (this.beanFactory instanceof ConfigurableListableBeanFactory) {
            AutoProxyUtils.exposeTargetClass((ConfigurableListableBeanFactory) this.beanFactory, beanName, beanClass);
        }

    // new 一個代理工廠對象
        ProxyFactory proxyFactory = new ProxyFactory();
        proxyFactory.copyFrom(this);

    // 判斷使用JDK代理還是CGLIB代理
        if (proxyFactory.isProxyTargetClass()) {
            // Explicit handling of JDK proxy targets (for introduction advice scenarios)
            if (Proxy.isProxyClass(beanClass)) {
                // Must allow for introductions; can't just set interfaces to the proxy's interfaces only.
                for (Class<?> ifc : beanClass.getInterfaces()) {
                    proxyFactory.addInterface(ifc);
                }
            }
        }
        else {
            // No proxyTargetClass flag enforced, let's apply our default checks...
            if (shouldProxyTargetClass(beanClass, beanName)) {
                proxyFactory.setProxyTargetClass(true);
            }
            else {
                evaluateProxyInterfaces(beanClass, proxyFactory);
            }
        }

    // 構建advisor通知鏈
        Advisor[] advisors = buildAdvisors(beanName, specificInterceptors);
      // 將通知鏈放入代理工廠
    proxyFactory.addAdvisors(advisors);
    // 將被代理的目標類放入到代理工程中
        proxyFactory.setTargetSource(targetSource);
        customizeProxyFactory(proxyFactory);

        proxyFactory.setFrozen(this.freezeProxy);
        if (advisorsPreFiltered()) {
            proxyFactory.setPreFiltered(true);
        }
    // 基於代理工廠獲取代理對象返回
        return proxyFactory.getProxy(getProxyClassLoader());
    }
#proxyFactory.getProxy(getProxyClassLoader())
public Object getProxy(@Nullable ClassLoader classLoader) {
        return createAopProxy().getProxy(classLoader);
    }
#createAopProxy()
    @Override
    public AopProxy createAopProxy(AdvisedSupport config) throws AopConfigException {
        if (config.isOptimize() || config.isProxyTargetClass() || hasNoUserSuppliedProxyInterfaces(config)) {
            Class<?> targetClass = config.getTargetClass();
            if (targetClass == null) {
                throw new AopConfigException("TargetSource cannot determine target class: " +
                        "Either an interface or a target is required for proxy creation.");
            }
            if (targetClass.isInterface() || Proxy.isProxyClass(targetClass)) {
                return new JdkDynamicAopProxy(config);
            }
            return new ObjenesisCglibAopProxy(config);
        }
        else {
            return new JdkDynamicAopProxy(config);
        }
}AOP的代理方式有兩種,一種是CGLIB代理,使用ObjenesisCglibAopProxy來創建代理對象,另一種是JDK動態代理,使用JdkDynamicAopProxy來創建代理對象,最終通過對應的AopProxy的#getProxy()生成代理對象,來看看JdkDynamicAopProxy的:
    @Override
    public Object getProxy() {
        return getProxy(ClassUtils.getDefaultClassLoader());
    }

    @Override
    public Object getProxy(@Nullable ClassLoader classLoader) {
        if (logger.isTraceEnabled()) {
            logger.trace("Creating JDK dynamic proxy: " + this.advised.getTargetSource());
        }
        Class<?>[] proxiedInterfaces = AopProxyUtils.completeProxiedInterfaces(this.advised, true);
        findDefinedEqualsAndHashCodeMethods(proxiedInterfaces);
        return Proxy.newProxyInstance(classLoader, proxiedInterfaces, this);
    }
Proxy.newProxyInstance(classLoader, proxiedInterfaces, this)這不就是JDK動態代理技術實現模板代碼嘛。到這裏aop代理對象就已經生成放到Spring容器中。
接下來我們就來看看AOP是怎麼執行增強方法的,也就是如何執行aspect切面的通知方法的?還是以JDK實現的動態代理JdkDynamicAopProxy為例,其實現了InvocationHandler來實現動態代理,意味着調用代理對象的方法會調用JdkDynamicAopProxy中的invoke()方法,核心邏輯如下:
    @Override
    @Nullable
    public Object invoke(Object proxy, Method method, Object[] args) throws Throwable {
        Object oldProxy = null;
        boolean setProxyContext = false;

        TargetSource targetSource = this.advised.targetSource;
        Object target = null;

        try {

            .......

            Object retVal;

            if (this.advised.exposeProxy) {
                // Make invocation available if necessary.
        // 暴露aop代理對象
                oldProxy = AopContext.setCurrentProxy(proxy);
                setProxyContext = true;
            }

            // Get as late as possible to minimize the time we "own" the target,
            // in case it comes from a pool.
            target = targetSource.getTarget();
            Class<?> targetClass = (target != null ? target.getClass() : null);

            // Get the interception chain for this method.
      // 根據切面通知,獲取方法的攔截鏈
            List<Object> chain = this.advised.getInterceptorsAndDynamicInterceptionAdvice(method, targetClass);

            // Check whether we have any advice. If we don't, we can fallback on direct
            // reflective invocation of the target, and avoid creating a MethodInvocation.
            // 攔截鏈為空,直接反射調用目標方法
      if (chain.isEmpty()) {
                // We can skip creating a MethodInvocation: just invoke the target directly
                // Note that the final invoker must be an InvokerInterceptor so we know it does
                // nothing but a reflective operation on the target, and no hot swapping or fancy proxying.
                Object[] argsToUse = AopProxyUtils.adaptArgumentsIfNecessary(method, args);
                retVal = AopUtils.invokeJoinpointUsingReflection(target, method, argsToUse);
            }
            else {
        // 如果不為空,那麼會構建一個MethodInvocation對象,調用該對象的proceed()方法執行攔截器鏈以及目標方法
                // We need to create a method invocation...
                MethodInvocation invocation =
                        new ReflectiveMethodInvocation(proxy, target, method, args, targetClass, chain);
                // Proceed to the joinpoint through the interceptor chain.
                retVal = invocation.proceed();
            }

            // Massage return value if necessary.
            Class<?> returnType = method.getReturnType();
            if (retVal != null && retVal == target &&
                    returnType != Object.class && returnType.isInstance(proxy) &&
                    !RawTargetAccess.class.isAssignableFrom(method.getDeclaringClass())) {
                // Special case: it returned "this" and the return type of the method
                // is type-compatible. Note that we can't help if the target sets
                // a reference to itself in another returned object.
                retVal = proxy;
            }
            else if (retVal == null && returnType != Void.TYPE && returnType.isPrimitive()) {
                throw new AopInvocationException(
                        "Null return value from advice does not match primitive return type for: " + method);
            }
            return retVal;
        }
        finally {
            if (target != null && !targetSource.isStatic()) {
                // Must have come from TargetSource.
                targetSource.releaseTarget(target);
            }
            if (setProxyContext) {
                // Restore old proxy.
                AopContext.setCurrentProxy(oldProxy);
            }
        }
    }
4.總結
基於以上全部就是今天要講解的Spring AOP相關知識點啦,AOP作為Spring框架的核心模塊,在很多場景都有應用到,如Spring的事務控制就是通過aop實現的。採用橫向抽取機制,取代了傳統縱向繼承體系重複性代碼,將日誌記錄,性能統計,安全控制,事務處理,異常處理等代碼從業務邏輯代碼中劃分出來,通過對這些行為的分離,我們希望可以將它們獨立到非指導業務邏輯的方法中,進而改變這些行為的時候不影響業務邏輯的代碼,從而做到保證開發者在不修改源代碼的前提下,為系統中不同的業務組件添加某些通用功能,同時AOP切面編程便於減少系統的重複代碼,降低模塊間的耦合度,有利於系統未來的可拓展性和可維護性。