

本文分享 RustFS 對象存儲前段直傳的完整實現方式,改變了傳統的瀏覽器-> 後端服務器 -> 對象存儲的上傳方式,提高了效率和安全性。文章包括 5 個部分:
- 前言
- 核心概念
- 兩種方案詳解
- 技術實現
- 完整示例
- 最佳實踐
什麼是前端直傳?
傳統的文件上傳流程:瀏覽器 → 後端服務器 → 對象存儲這種方式存在以下問題:
- 佔用後端服務器帶寬和資源
- 上傳速度受限於後端服務器
- 需要處理大文件的內存管理
- 服務器成本增加
前端直傳則是:瀏覽器 → 對象存儲
優勢:
- ✅ 減輕後端服務器壓力
- ✅ 上傳速度更快(直連對象存儲)
- ✅ 降低服務器成本
- ✅ 支持大文件上傳
安全性問題
直傳面臨的核心問題:如何在不暴露永久密鑰的情況下,讓前端安全地上傳文件?本教程介紹兩種解決方案:
- 預簽名 URL 方案(推薦)
- STS 臨時憑證方案
對象存儲基礎
對象存儲使用類似 AWS S3 的模型:
存儲桶 (Bucket)
└── 對象 (Object)
    ├── Key: "uploads/photo.jpg"  # 對象路徑
    ├── Value: [文件內容]
    └── Metadata: {ContentType, Size, etc.}
訪問控制
對象存儲通過 Access Key 和 Secret Key 進行身份驗證:
永久密鑰(長期有效,不應暴露給前端)
├── Access Key ID: "user-2"
└── Secret Access Key: "rustfsadmin"

臨時憑證(短期有效,可以給前端使用)
├── Access Key ID
├── Secret Access Key
└── Session Token
兩種方案詳解
方案一:預簽名 URL 方案(推薦)
適用場景
- 單文件上傳
- 表單提交時附帶文件
- 簡單安全的上傳需求交
互流程
瀏覽器                    後端服務                   RustFS
  │                          │                          │
  │ ①請求預簽名URL            │                          │
  ├──────────────────────────>│                          │
  │                          │                          │
  │                          │ ②使用boto3生成簽名URL     │
  │                          │                          │
  │ ③返回預簽名URL            │                          │
  │<──────────────────────────┤                          │
  │                          │                          │
  │ ④使用預簽名URL直傳文件                               │
  ├─────────────────────────────────────────────────────>│
  │                          │                          │
  │ ⑤返回成功                                            │
  │<──────────────────────────────────────────────────────┤
優勢:
- 前端實現極簡,無需處理簽名
- 後端完全控制權限
- 無需額外依賴
- 每個文件獨立權限控制
方案二:STS 臨時憑證方案
推薦場景:
- 批量文件上傳(如相冊上傳)
- 長時間上傳操作
- 需要多次上傳的場景
交互流程
瀏覽器                    後端服務                   RustFS
  │                          │                          │
  │ ①請求臨時憑證              │                          │
  ├──────────────────────────>│                          │
  │                          │                          │
  │ ②返回臨時憑證              │                          │
  │<──────────────────────────┤                          │
  │                          │                          │
  │ ③前端使用SDK上傳(憑證可複用)                        │
  ├─────────────────────────────────────────────────────>│
  │                          │                          │
  │ ④繼續上傳其他文件                                     │
  ├─────────────────────────────────────────────────────>│
優勢
- 憑證可複用,減少網絡請求
- 適合批量上傳
- 靈活控制權限
技術實現
後端實現(使用 boto3)
- 安裝依賴
pip install boto3 flask flask-cors- 核心代碼
import boto3
from botocore.client import Config
from flask import Flask, request, jsonify
from flask_cors import CORS

app = Flask(__name__)
CORS(app)

# 配置
RUSTFS_CONFIG = {
    'access_key_id': 'user-2',
    'secret_access_key': 'rustfsadmin',
    'endpoint_url': 'http://127.0.0.1:9000',
    'bucket_name': 'test-bucket',
    'region_name': 'us-east-1'
}

def create_s3_client():
    """創建 S3 客户端"""
    return boto3.client(
        's3',
        aws_access_key_id=RUSTFS_CONFIG['access_key_id'],
        aws_secret_access_key=RUSTFS_CONFIG['secret_access_key'],
        endpoint_url=RUSTFS_CONFIG['endpoint_url'],
        region_name=RUSTFS_CONFIG['region_name'],
        config=Config(
            signature_version='s3v4',
            s3={'addressing_style': 'path'}
        )
    )

# 方案一:預簽名 URL
@app.route('/api/presigned-url', methods=['POST'])
def get_presigned_url():
    """生成預簽名 URL"""
    data = request.get_json()
    object_key = data['object_key']
    content_type = data.get('content_type', 'application/octet-stream')
    expires = data.get('expires', 3600)

    s3_client = create_s3_client()

    # boto3 自動處理簽名
    presigned_url = s3_client.generate_presigned_url(
        ClientMethod='put_object',
        Params={
            'Bucket': RUSTFS_CONFIG['bucket_name'],
            'Key': object_key,
            'ContentType': content_type
        },
        ExpiresIn=expires
    )

    return jsonify({
        'code': 0,
        'data': {
            'url': presigned_url,
            'method': 'PUT',
            'headers': {'Content-Type': content_type}
        }
    })

# 方案二:STS 臨時憑證
@app.route('/api/sts/credentials', methods=['POST'])
def get_sts_credentials():
    """獲取 S3 臨時憑證"""
    # 生產環境應該使用真實的 STS AssumeRole
    # sts_client = boto3.client('sts')
    # response = sts_client.assume_role(...)

    return jsonify({
        'code': 0,
        'data': {
            'access_key_id': RUSTFS_CONFIG['access_key_id'],
            'secret_access_key': RUSTFS_CONFIG['secret_access_key'],
            'endpoint_url': RUSTFS_CONFIG['endpoint_url'],
            'bucket_name': RUSTFS_CONFIG['bucket_name'],
            'region_name': RUSTFS_CONFIG['region_name']
        }
    })

if __name__ == '__main__':
    app.run(host='0.0.0.0', port=5000, debug=True)
前端實現(使用 @aws-sdk/client-s3)
-
安裝依賴
npm install @aws-sdk/client-s3 @aws-sdk/s3-request-presigner vue - 方案一:預簽名 URL
上傳// utils/upload-presigned.ts

/**
 * 使用預簽名 URL 上傳文件
 */
exportasyncfunction uploadWithPresignedUrl(
  file: File,
  objectKey: string,
  onProgress?: (progress: number) => void
): Promise<string> {
// 1. 獲取預簽名 URL
const response = await fetch('http://127.0.0.1:9000/api/presigned-url', {
    method: 'POST',
    headers: { 'Content-Type': 'application/json' },
    body: JSON.stringify({
      object_key: objectKey,
      content_type: file.type
    })
  })
const { data } = await response.json()

// 2. 使用預簽名 URL 上傳
returnnewPromise((resolve, reject) => {
    const xhr = new XMLHttpRequest()

    xhr.upload.addEventListener('progress', (e) => {
      if (e.lengthComputable && onProgress) {
        onProgress(Math.round((e.loaded / e.total) * 100))
      }
    })

    xhr.addEventListener('load', () => {
      if (xhr.status >= 200 && xhr.status < 300) {
        resolve(data.url.split('?')[0])
      } else {
        reject(newError(`上傳失敗: ${xhr.status}`))
      }
    })

    xhr.addEventListener('error', () => reject(newError('網絡錯誤')))

    xhr.open(data.method, data.url, true)
    Object.entries(data.headers).forEach(([key, value]) => {
      xhr.setRequestHeader(key, value asstring)
    })
    xhr.send(file)
  })
}-
方案二:STS 憑證
上傳/ utils/upload-sdk.ts

import { S3Client, PutObjectCommand } from'@aws-sdk/client-s3'
import { getSignedUrl } from'@aws-sdk/s3-request-presigner'

interface S3Credentials {
access_key_id: string
secret_access_key: string
endpoint_url: string
bucket_name: string
region_name: string
}

/**
 * 使用 AWS SDK 上傳文件(帶進度)
 */
exportasyncfunction uploadWithSDK(
file: File,
objectKey: string,
credentials: S3Credentials,
onProgress?: (progress: number) => void
): Promise<string> {
// 1. 創建 S3 客户端
const s3Client = new S3Client({
  credentials: {
    accessKeyId: credentials.access_key_id,
    secretAccessKey: credentials.secret_access_key
  },
  endpoint: credentials.endpoint_url,
  region: credentials.region_name,
  forcePathStyle: true
})

// 2. 如果需要進度,使用預簽名 URL + XHR
if (onProgress) {
  const command = new PutObjectCommand({
    Bucket: credentials.bucket_name,
    Key: objectKey,
    ContentType: file.type
  })

  const presignedUrl = await getSignedUrl(s3Client, command, { expiresIn: 3600 })

  returnnewPromise((resolve, reject) => {
    const xhr = new XMLHttpRequest()

    xhr.upload.addEventListener('progress', (e) => {
      if (e.lengthComputable) {
        onProgress(Math.round((e.loaded / e.total) * 100))
      }
    })

    xhr.addEventListener('load', () => {
      if (xhr.status >= 200 && xhr.status < 300) {
        resolve(`${credentials.endpoint_url}/${credentials.bucket_name}/${objectKey}`)
      } else {
        reject(newError(`上傳失敗: ${xhr.status}`))
      }
    })

    xhr.addEventListener('error', () => reject(newError('網絡錯誤')))

    xhr.open('PUT', presignedUrl, true)
    xhr.setRequestHeader('Content-Type', file.type)
    xhr.send(file)
  })
}

// 3. 簡單上傳(無進度)
const command = new PutObjectCommand({
  Bucket: credentials.bucket_name,
  Key: objectKey,
  Body: file,
  ContentType: file.type
})

await s3Client.send(command)
return`${credentials.endpoint_url}/${credentials.bucket_name}/${objectKey}`
}

/**
 * 獲取 S3 憑證
 */
exportasyncfunction getS3Credentials(): Promise<S3Credentials> {
const response = await fetch('http://127.0.0.1:9000/api/sts/credentials', {
  method: 'POST',
  headers: { 'Content-Type': 'application/json' }
})
const { data } = await response.json()
return data
}

/**
 * 生成唯一的對象路徑
 */
exportfunction generateObjectKey(file: File, prefix = 'uploads'): string {
const timestamp = Date.now()
const random = Math.random().toString(36).substring(2, 8)
const ext = file.name.split('.').pop() || ''
return`${prefix}/${timestamp}_${random}.${ext}`
}
Vue 組件示例
<template>
  <div class="upload-container">
    <h2>文件上傳</h2>

    <div class="upload-area" @click="$refs.fileInput.click()">
      <input
        ref="fileInput"
        type="file"
        multiple
        style="display: none"
        @change="handleFileSelect"
      />
      <p>點擊選擇文件上傳</p>
    </div>

    <div v-for="file in files" :key="file.id" class="file-item">
      <span>{{ file.name }}</span>
      <div v-if="file.status === 'uploading'">
        <progress :value="file.progress" max="100"></progress>
        <span>{{ file.progress }}%</span>
      </div>
      <span v-else-if="file.status === 'success'">✅ 成功</span>
      <span v-else-if="file.status === 'error'">❌ {{ file.error }}</span>
    </div>
  </div>
</template>

<script setup lang="ts">
import { ref } from 'vue'
import { uploadWithPresignedUrl, generateObjectKey } from '../utils/upload-presigned'
// 或者使用: import { uploadWithSDK, getS3Credentials } from '../utils/upload-sdk'

interface UploadFile {
  id: string
  name: string
  status: 'pending' | 'uploading' | 'success' | 'error'
  progress: number
  error?: string
}

const files = ref<UploadFile[]>([])

const handleFileSelect = (event: Event) => {
  const target = event.target as HTMLInputElement
  if (!target.files) return

  Array.from(target.files).forEach((file) => {
    const uploadFile: UploadFile = {
      id: `${Date.now()}_${Math.random()}`,
      name: file.name,
      status: 'pending',
      progress: 0
    }
    files.value.push(uploadFile)
    startUpload(uploadFile, file)
  })

  target.value = ''
}

const startUpload = async (uploadFile: UploadFile, file: File) => {
  uploadFile.status = 'uploading'

  try {
    const objectKey = generateObjectKey(file)

    // 方案一:預簽名 URL
    await uploadWithPresignedUrl(file, objectKey, (progress) => {
      uploadFile.progress = progress
    })

    // 方案二:STS 憑證(需要先獲取憑證)
    // const credentials = await getS3Credentials()
    // await uploadWithSDK(file, objectKey, credentials, (progress) => {
    //   uploadFile.progress = progress
    // })

    uploadFile.status = 'success'
  } catch (error) {
    uploadFile.status = 'error'
    uploadFile.error = error instanceof Error ? error.message : '上傳失敗'
  }
}
</script>

<style scoped>
.upload-area {
  border: 2px dashed #ccc;
  padding: 40px;
  text-align: center;
  cursor: pointer;
}

.upload-area:hover {
  border-color: #666;
}

.file-item {
  padding: 10px;
  border-bottom: 1px solid #eee;
  display: flex;
  justify-content: space-between;
  align-items: center;
}

progress {
  width: 200px;
  margin: 0 10px;
}
</style>
完整示例
場景一:單文件上傳(預簽名 URL)
// 簡單上傳一個文件
const file = document.querySelector('input[type="file"]').files[0]
const objectKey = `uploads/${Date.now()}_${file.name}`

await uploadWithPresignedUrl(file, objectKey, (progress) => {
  console.log(`進度: ${progress}%`)
})

console.log('上傳成功!')
場景二:批量上傳(STS 憑證)
// 批量上傳多個文件
const files = [...document.querySelector('input[type="file"]').files]

// 1. 獲取一次憑證
const credentials = await getS3Credentials()

// 2. 使用同一憑證上傳所有文件
awaitPromise.all(
  files.map((file) => {
    const objectKey = generateObjectKey(file)
    return uploadWithSDK(file, objectKey, credentials, (progress) => {
      console.log(`${file.name}: ${progress}%`)
    })
  })
)

console.log('全部上傳成功!')
最佳實踐
1. 方案選擇
單文件或少量文件  →  預簽名 URL(簡單直接)
批量文件上傳 → STS 憑證(減少請求)- 文件驗證
function validateFile(file: File): boolean {
// 大小限制(100MB)
if (file.size > 100 * 1024 * 1024) {
    alert('文件過大')
    returnfalse
  }

// 類型限制
const allowedTypes = ['image/jpeg', 'image/png', 'image/gif']
if (!allowedTypes.includes(file.type)) {
    alert('不支持的文件類型')
    returnfalse
  }

returntrue
}
- 錯誤處理和重試
async function uploadWithRetry(file: File, maxRetries = 3) {
for (let i = 0; i < maxRetries; i++) {
    try {
      const objectKey = generateObjectKey(file)
      returnawait uploadWithPresignedUrl(file, objectKey)
    } catch (error) {
      if (i === maxRetries - 1) throw error
      awaitnewPromise(resolve => setTimeout(resolve, 1000 * (i + 1)))
    }
  }
}- 安全建議
# 後端驗證
@app.route('/api/presigned-url', methods=['POST'])
def get_presigned_url():
    # ✅ 驗證文件類型
    allowed_types = ['image/jpeg', 'image/png']
    if data['content_type'] notin allowed_types:
        return jsonify({'code': 400, 'message': '不支持的文件類型'}), 400

    # ✅ 驗證用户權限
    # if not current_user.can_upload():
    #     return jsonify({'code': 403, 'message': '無權限'}), 403

    # ✅ 限制文件路徑
    # 確保用户只能上傳到自己的目錄
    # object_key = f"users/{current_user.id}/{filename}"

    # 生成預簽名 URL
# ...- 性能優化
// 併發控制:最多同時上傳 3 個文件
asyncfunction uploadFilesWithLimit(files: File[], limit = 3) {
const queue = [...files]
const results = []
const executing = new Set()

while (queue.length > 0 || executing.size > 0) {
    while (queue.length > 0 && executing.size < limit) {
      const file = queue.shift()!
      const promise = uploadWithPresignedUrl(file, generateObjectKey(file))
        .then((url) => {
          executing.delete(promise)
          return { success: true, url }
        })
        .catch((error) => {
          executing.delete(promise)
          return { success: false, error }
        })

      executing.add(promise)
      results.push(promise)
    }

    if (executing.size > 0) {
      awaitPromise.race(executing)
    }
  }

returnPromise.all(results)
}
總結
核心要點
- ✅ 使用 AWS SDK - boto3(後端)和 @aws-sdk/client-s3(前端)
- ✅ 預簽名 URL - 簡單場景首選,後端完全控制
- ✅ STS 憑證 - 批量上傳,減少網絡請求
- ✅ 永久密鑰不暴露 - 只在後端使用
- ✅ 添加驗證 - 文件類型、大小、用户權限
- ✅ 錯誤處理 - 重試機制,友好提示兩種方案對比
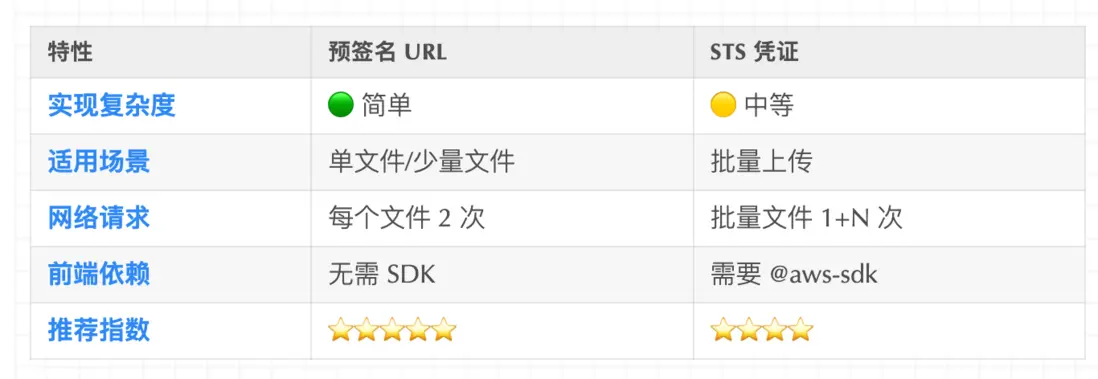
方案對比教程完成!開始構建你的文件上傳功能吧! 🎉