

react 模擬實現代碼傳送門Tiny React
1. JSX 到底是什麼
使用 React 就一定會寫 JSX,JSX 到底是什麼呢?它是一種 JavaScript 語法的擴展,React 使用它來描述用户界面長成什麼樣子。雖然它看起來非常像 HTML,但它確實是 JavaScript 。在 React 代碼執行之前,Babel 會對將 JSX 編譯為 React API.
<div className="container">
  <h3>Hello React</h3>
  <p>React is great </p>
</div>
// 1 jsx 代碼執行前會被轉換為 React.createElement 的調用
React.createElement(
"div",
{
className: "container"
},
React.createElement("h3", null, "Hello React"),
React.createElement("p", null, "React is great")
);
// 2. createElement 返回 Virtual DOM 對象
// 3. 根據 Virtual DOM 生成真實的 DOM從兩種語法對比來看,JSX 語法的出現是為了讓 React 開發人員編寫用户界面代碼更加輕鬆。
Babel REPL
2. DOM 操作問題
在現代 web 應用程序中使用 JavaScript 操作 DOM 是必不可少的,但遺憾的是它比其他大多數 JavaScript 操作要慢的多。
大多數 JavaScript 框架對於 DOM 的更新遠遠超過其必須進行的更新,從而使得這種緩慢操作變得更糟。
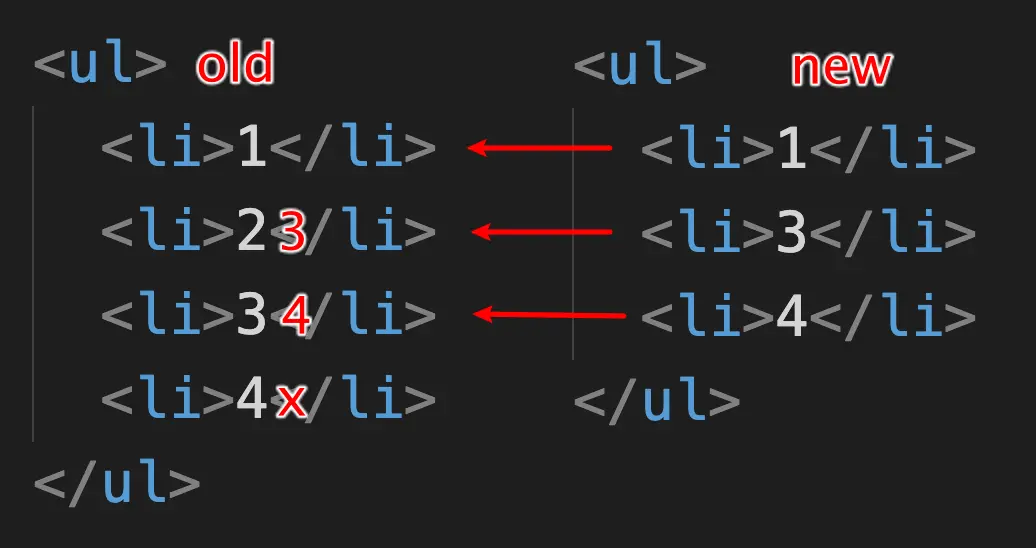
例如假設你有包含十個項目的列表,你僅僅更改了列表中的第一項,大多數 JavaScript 框架會重建整個列表,這比必要的工作要多十倍。
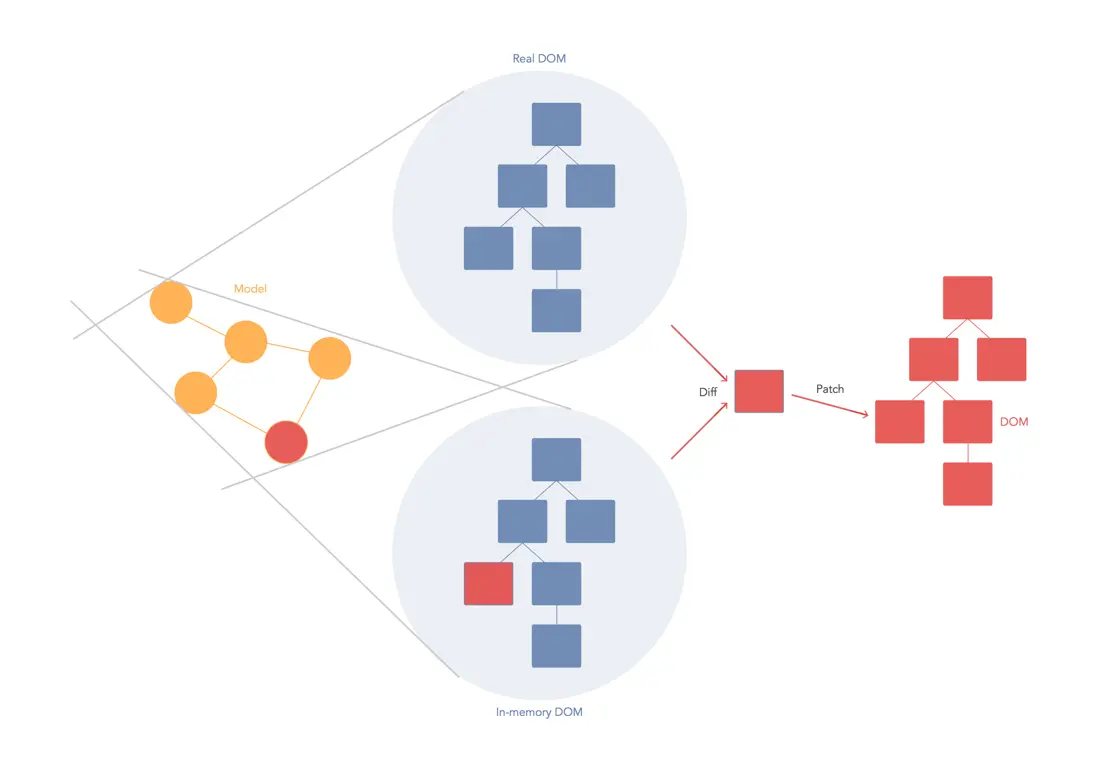
更新效率低下已經成為嚴重問題,為了解決這個問題,React 普及了一種叫做 Virtual DOM 的東西,Virtual DOM 出現的目的就是為了提高 JavaScript 操作 DOM 對象的效率。
3. 什麼是 Virtual DOM
在 React 中,每個 DOM 對象都有一個對應的 Virtual DOM 對象,它是 DOM 對象的 JavaScript 對象表現形式,其實就是使用 JavaScript 對象來描述 DOM 對象信息,比如 DOM 對象的類型是什麼,它身上有哪些屬性,它擁有哪些子元素。
可以把 Virtual DOM 對象理解為 DOM 對象的副本,但是它不能直接顯示在屏幕上。
<div className="container">
  <h3>Hello React</h3>
  <p>React is great </p>
</div>
{
type: "div",
props: { className: "container" },
children: [
{
type: "h3",
props: null,
children: [
{
type: "text",
props: {
textContent: "Hello React"
}
}
]
},
{
type: "p",
props: null,
children: [
{
type: "text",
props: {
textContent: "React is great"
}
}
]
}
]
}4. Virtual DOM 如何提升效率
精準找出發生變化的 DOM 對象,只更新發生變化的部分。
在 React 第一次創建 DOM 對象後,會為每個 DOM 對象創建其對應的 Virtual DOM 對象,在 DOM 對象發生更新之前,React 會先更新所有的 Virtual DOM 對象,然後 React 會將更新後的 Virtual DOM 和 更新前的 Virtual DOM 進行比較,從而找出發生變化的部分,React 會將發生變化的部分更新到真實的 DOM 對象中,React 僅更新必要更新的部分。
Virtual DOM 對象的更新和比較僅發生在內存中,不會在視圖中渲染任何內容,所以這一部分的性能損耗成本是微不足道的。
<div id="container">
    <p>Hello React</p>
</div>
<div id="container">
<p>Hello Angular</p>
</div>const before = {
type: "div",
props: { id: "container" },
children: [
{
type: "p",
props: null,
children: [
{ type: "text", props: { textContent: "Hello React" } }
]
}
]
}const after = {
type: "div",
props: { id: "container" },
children: [
{
type: "p",
props: null,
children: [
{ type: "text", props: { textContent: "Hello Angular" } }
]
}
]
}5. 創建 Virtual DOM
在 React 代碼執行前,JSX 會被 Babel 轉換為 React.createElement 方法的調用,在調用 createElement 方法時會傳入元素的類型,元素的屬性,以及元素的子元素,createElement 方法的返回值為構建好的 Virtual DOM 對象。
{
  type: "div",
  props: null,
  children: [{type: "text", props: {textContent: "Hello"}}]
}
/**
* 創建 Virtual DOM
* @param {string} type 類型
* @param {object | null} props 屬性
* @param {createElement[]} children 子元素
* @return {object} Virtual DOM
*/
function createElement (type, props, ...children) {
return {
type,
props,
children
}
}從 createElement 方法的第三個參數開始就都是子元素了,在定義 createElement 方法時,通過 ...children 將所有的子元素放置到 children 數組中。
const virtualDOM = (
  <div className="container">
    <h1>你好 Tiny React</h1>
    <h2>(編碼必殺技)</h2>
    <div>
      嵌套1 <div>嵌套 1.1</div>
    </div>
    <h3>(觀察: 這個將會被改變)</h3>
    {2 == 1 && <div>如果2和1相等渲染當前內容</div>}
    {2 == 2 && <div>2</div>}
    <span>這是一段內容</span>
    <button onClick={() => alert("你好")}>點擊我</button>
    <h3>這個將會被刪除</h3>
    2, 3
  </div>
)
console.log(virtualDOM)
通過以上代碼測試,發現返回的 Virtual DOM 存在一些問題,第一個問題是文本節點被直接放入到了數組中
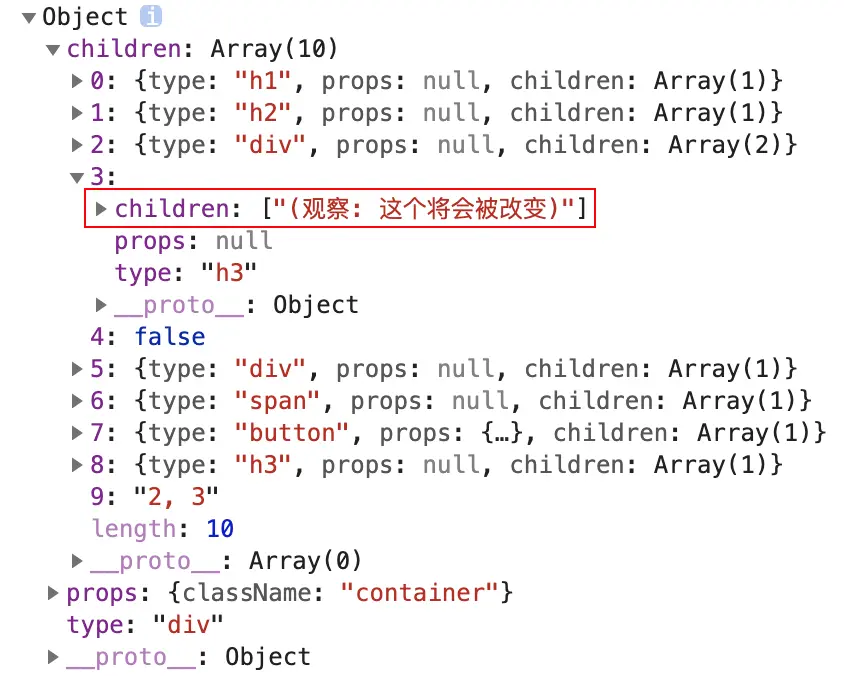
而我們期望是文本節點應該是這樣的
children: [
  {
    type: "text",
    props: {
      textContent: "React is great"
    }
  }
]
通過以下代碼對 Virtual DOM 進行改造,重新構建 Virtual DOM。
// 將原有 children 拷貝一份 不要在原有數組上進行操作
const childElements = [].concat(...children).map(child => {
  // 判斷 child 是否是對象類型
  if (child instanceof Object) {
    // 如果是 什麼都不需要做 直接返回即可
    return child
  } else {
    // 如果不是對象就是文本 手動調用 createElement 方法將文本轉換為 Virtual DOM
    return createElement("text", { textContent: child })
  }
})
return {
  type,
  props,
  children: childElements
}
通過觀察返回的 Virtual DOM,文本節點已經被轉化成了對象類型的 Virtual DOM,但是布爾值也被當做文本節點被轉化了,在 JSX 中,如果 Virtual DOM 被轉化為了布爾值或者null,是不應該被更新到真實 DOM 中的,所以接下來要做的事情就是清除 Virtual DOM 中的布爾值和null。
// 由於 map 方法無法從數據中刨除元素, 所以此處將 map 方法更改為 reduce 方法
const childElements = [].concat(...children).reduce((result, child) => {
  // 判斷子元素類型 刨除 null true false
  if (child != null && child != false && child != true) {
    if (child instanceof Object) {
      result.push(child)
    } else {
      result.push(createElement("text", { textContent: child }))
    }
  }
  // 將需要保留的 Virtual DOM 放入 result 數組
  return result
}, [])
在 React 組件中,可以通過 props.children 獲取子元素,所以還需要將子元素存儲在 props 對象中。
return {
  type,
  props: Object.assign({ children: childElements }, props),
  children: childElements
}
6. 渲染 Virtual DOM 對象為 DOM 對象
通過調用 render 方法可以將 Virtual DOM 對象更新為真實 DOM 對象。
在更新之前需要確定是否存在舊的 Virtual DOM,如果存在需要比對差異,如果不存在可以直接將 Virtual DOM 轉換為 DOM 對象。
目前先只考慮不存在舊的 Virtual DOM 的情況,就是説先直接將 Virtual DOM 對象更新為真實 DOM 對象。
// render.js
export default function render(virtualDOM, container, oldDOM = container.firstChild) {
  // 在 diff 方法內部判斷是否需要對比 對比也好 不對比也好 都在 diff 方法中進行操作
  diff(virtualDOM, container, oldDOM)
}
// diff.js
import mountElement from "./mountElement"
export default function diff(virtualDOM, container, oldDOM) {
// 判斷 oldDOM 是否存在
if (!oldDOM) {
// 如果不存在 不需要對比 直接將 Virtual DOM 轉換為真實 DOM
mountElement(virtualDOM, container)
}
}在進行 virtual DOM 轉換之前還需要確定 Virtual DOM 的類 Component VS Native Element。
類型不同需要做不同的處理 如果是 Native Element 直接轉換。
如果是組件 還需要得到組件實例對象 通過組件實例對象獲取組件返回的 virtual DOM 然後再進行轉換。
目前先只考慮 Native Element 的情況。
// mountElement.js
import mountNativeElement from "./mountNativeElement"

export default function mountElement(virtualDOM, container) {
  // 通過調用 mountNativeElement 方法轉換 Native Element
  mountNativeElement(virtualDOM, container)
}
// mountNativeElement.js
import createDOMElement from "./createDOMElement"
export default function mountNativeElement(virtualDOM, container) {
const newElement = createDOMElement(virtualDOM)
container.appendChild(newElement)
}// createDOMElement.js
import mountElement from "./mountElement"
import updateElementNode from "./updateElementNode"
export default function createDOMElement(virtualDOM) {
let newElement = null
if (virtualDOM.type === "text") {
// 創建文本節點
newElement = document.createTextNode(virtualDOM.props.textContent)
} else {
// 創建元素節點
newElement = document.createElement(virtualDOM.type)
// 更新元素屬性
updateElementNode(newElement, virtualDOM)
}
// 遞歸渲染子節點
virtualDOM.children.forEach(child => {
// 因為不確定子元素是 NativeElement 還是 Component 所以調用 mountElement 方法進行確定
mountElement(child, newElement)
})
return newElement
}
7. 為元素節點添加屬性
// createDOMElement.js
// 看看節點類型是文本類型還是元素類型
if (virtualDOM.type === "text") {
  // 創建文本節點 設置節點內容
  newElement = document.createTextNode(virtualDOM.props.textContent)
} else {
  // 根據 Virtual DOM type 屬性值創建 DOM 元素
  newElement = document.createElement(virtualDOM.type)
  // 為元素設置屬性
  updateElementNode(newElement, virtualDOM)
}
export default function updateElementNode(element, virtualDOM) {
// 獲取要解析的 VirtualDOM 對象中的屬性對象
const newProps = virtualDOM.props
// 將屬性對象中的屬性名稱放到一個數組中並循環數組
Object.keys(newProps).forEach(propName => {
const newPropsValue = newProps[propName]
// 考慮屬性名稱是否以 on 開頭 如果是就表示是個事件屬性 onClick -> click
if (propName.slice(0, 2) === "on") {
const eventName = propName.toLowerCase().slice(2)
element.addEventListener(eventName, newPropsValue)
// 如果屬性名稱是 value 或者 checked 需要通過 [] 的形式添加
} else if (propName === "value" || propName === "checked") {
element[propName] = newPropsValue
// 刨除 children 因為它是子元素 不是屬性
} else if (propName !== "children") {
// className 屬性單獨處理 不直接在元素上添加 class 屬性是因為 class 是 JavaScript 中的關鍵字
if (propName === "className") {
element.setAttribute("class", newPropsValue)
} else {
// 普通屬性
element.setAttribute(propName, newPropsValue)
}
}
})
}8. 渲染組件
8.1 函數組件
在渲染組件之前首先要明確的是,組件的 Virtual DOM 類型值為函數,函數組件和類組件都是這樣的。
// 原始組件
const Heart = () => <span>♥</span><Heart />// 組件的 Virtual DOM
{
type: f function() {},
props: {}
children: []
}在渲染組件時,要先將 Component 與 Native Element 區分開,如果是 Native Element 可以直接開始渲染,如果是組件,特別處理。
// mountElement.js
export default function mountElement(virtualDOM, container) {
  // 無論是類組件還是函數組件 其實本質上都是函數
  // 如果 Virtual DOM 的 type 屬性值為函數 就説明當前這個 Virtual DOM 為組件
  if (isFunction(virtualDOM)) {
    // 如果是組件 調用 mountComponent 方法進行組件渲染
    mountComponent(virtualDOM, container)
  } else {
    mountNativeElement(virtualDOM, container)
  }
}

// Virtual DOM 是否為函數類型
export function isFunction(virtualDOM) {
  return virtualDOM && typeof virtualDOM.type === "function"
}
在 mountComponent 方法中再進行函數組件和類型的區分,然後再分別進行處理。
// mountComponent.js
import mountNativeElement from "./mountNativeElement"

export default function mountComponent(virtualDOM, container) {
  // 存放組件調用後返回的 Virtual DOM 的容器
  let nextVirtualDOM = null
  // 區分函數型組件和類組件
  if (isFunctionalComponent(virtualDOM)) {
    // 函數組件 調用 buildFunctionalComponent 方法處理函數組件
    nextVirtualDOM = buildFunctionalComponent(virtualDOM)
  } else {
    // 類組件
  }
  // 判斷得到的 Virtual Dom 是否是組件
  if (isFunction(nextVirtualDOM)) {
    // 如果是組件 繼續調用 mountComponent 解剖組件
    mountComponent(nextVirtualDOM, container)
  } else {
    // 如果是 Navtive Element 就去渲染
    mountNativeElement(nextVirtualDOM, container)
  }
}

// Virtual DOM 是否為函數型組件
// 條件有兩個: 1. Virtual DOM 的 type 屬性值為函數 2. 函數的原型對象中不能有render方法
// 只有類組件的原型對象中有render方法
export function isFunctionalComponent(virtualDOM) {
  const type = virtualDOM && virtualDOM.type
  return (
    type && isFunction(virtualDOM) && !(type.prototype && type.prototype.render)
  )
}

// 函數組件處理
function buildFunctionalComponent(virtualDOM) {
  // 通過 Virtual DOM 中的 type 屬性獲取到組件函數並調用
  // 調用組件函數時將 Virtual DOM 對象中的 props 屬性傳遞給組件函數 這樣在組件中就可以通過 props 屬性獲取數據了
  // 組件返回要渲染的 Virtual DOM
  return virtualDOM && virtualDOM.type(virtualDOM.props || {})
}
8.2 類組件
類組件本身也是 Virtual DOM,可以通過 Virtual DOM 中的 type 屬性值確定當前要渲染的組件是類組件還是函數組件。
在確定當前要渲染的組件為類組件以後,需要實例化類組件得到類組件實例對象,通過類組件實例對象調用類組件中的 render 方法,獲取組件要渲染的 Virtual DOM。
類組件需要繼承 Component 父類,子類需要通過 super 方法將自身的 props 屬性傳遞給 Component 父類,父類會將 props 屬性掛載為父類屬性,子類繼承了父類,自己本身也就自然擁有props屬性了。這樣做的好處是當 props 發生更新後,父類可以根據更新後的 props 幫助子類更新視圖。
假設以下代碼就是我們要渲染的類組件:
class Alert extends TinyReact.Component {
  constructor(props) {
    // 將 props 傳遞給父類 子類繼承父類的 props 子類自然就有 props 數據了
    // 否則 props 僅僅是 constructor 函數的參數而已
    // 將 props 傳遞給父類的好處是 當 props 發生更改時 父類可以幫助更新 props 更新組件視圖
    super(props)
    this.state = {
      title: "default title"
    }
  }
  render() {
    return (
      <div>
        <h2>{this.state.title}</h2>
        <p>{this.props.message}</p>
      </div>
    )
  }
}

TinyReact.render(<Alert message="Hello React" />, root)
// Component.js 父類 Component 實現
export default class Component {
constructor(props) {
this.props = props
}
}在 mountComponent 方法中通過調用 buildStatefulComponent 方法得到類組件要渲染的 Virtual DOM
// mountComponent.js
export default function mountComponent(virtualDOM, container) {
  let nextVirtualDOM = null
  // 區分函數型組件和類組件
  if (isFunctionalComponent(virtualDOM)) {
    // 函數組件
    nextVirtualDOM = buildFunctionalComponent(virtualDOM)
  } else {
    // 類組件
    nextVirtualDOM = buildStatefulComponent(virtualDOM)
  }
  // 判斷得到的 Virtual Dom 是否是組件
  if (isFunction(nextVirtualDOM)) {
    mountComponent(nextVirtualDOM, container)
  } else {
    mountNativeElement(nextVirtualDOM, container)
  }
}

// 處理類組件
function buildStatefulComponent(virtualDOM) {
  // 實例化類組件 得到類組件實例對象 並將 props 屬性傳遞進類組件
  const component = new virtualDOM.type(virtualDOM.props)
  // 調用類組件中的render方法得到要渲染的 Virtual DOM
  const nextVirtualDOM = component.render()
  // 返回要渲染的 Virtual DOM
  return nextVirtualDOM
}
9. Virtual DOM 比對
在進行 Virtual DOM 比對時,需要用到更新後的 Virtual DOM 和更新前的 Virtual DOM,更新後的 Virtual DOM 目前我們可以通過 render 方法進行傳遞,現在的問題是更新前的 Virtual DOM 要如何獲取呢?
對於更新前的 Virtual DOM,對應的其實就是已經在頁面中顯示的真實 DOM 對象。既然是這樣,那麼我們在創建真實DOM對象時,就可以將 Virtual DOM 添加到真實 DOM 對象的屬性中。在進行 Virtual DOM 對比之前,就可以通過真實 DOM 對象獲取其對應的 Virtual DOM 對象了,其實就是通過render方法的第三個參數獲取的,container.firstChild。
在創建真實 DOM 對象時為其添加對應的 Virtual DOM 對象
// mountElement.js
import mountElement from "./mountElement"

export default function mountNativeElement(virtualDOM, container) {
 // 將 Virtual DOM 掛載到真實 DOM 對象的屬性中 方便在對比時獲取其 Virtual DOM
 newElement._virtualDOM = virtualDOM
}
9.1 Virtual DOM 類型相同
Virtual DOM 類型相同,如果是元素節點,就對比元素節點屬性是否發生變化,如果是文本節點就對比文本節點內容是否發生變化
要實現對比,需要先從已存在 DOM 對象中獲取其對應的 Virtual DOM 對象。
// diff.js
// 獲取未更新前的 Virtual DOM
const oldVirtualDOM = oldDOM && oldDOM._virtualDOM
判斷 oldVirtualDOM 是否存在, 如果存在則繼續判斷要對比的 Virtual DOM 類型是否相同,如果類型相同判斷節點類型是否是文本,如果是文本節點對比,就調用 updateTextNode 方法,如果是元素節點對比就調用 setAttributeForElement 方法
// diff.js
else if (oldVirtualDOM && virtualDOM.type === oldVirtualDOM.type) {
  if (virtualDOM.type === "text") {
    // 文本節點 對比文本內容是否發生變化
    updateTextNode(virtualDOM, oldVirtualDOM, oldDOM)
  } else {
    // 元素節點 對比元素屬性是否發生變化
    setAttributeForElement(oldDOM, virtualDOM, oldVirtualDOM)
  }
updateTextNode 方法用於對比文本節點內容是否發生變化,如果發生變化則更新真實 DOM 對象中的內容,既然真實 DOM 對象發生了變化,還要將最新的 Virtual DOM 同步給真實 DOM 對象。
function updateTextNode(virtualDOM, oldVirtualDOM, oldDOM) {
  // 如果文本節點內容不同
  if (virtualDOM.props.textContent !== oldVirtualDOM.props.textContent) {
    // 更新真實 DOM 對象中的內容
    oldDOM.textContent = virtualDOM.props.textContent
  }
  // 同步真實 DOM 對應的 Virtual DOM
  oldDOM._virtualDOM = virtualDOM
}
setAttributeForElement 方法用於設置/更新元素節點屬性
思路是先分別獲取更新後的和更新前的 Virtual DOM 中的 props 屬性,循環新 Virtual DOM 中的 props 屬性,通過對比看一下新 Virtual DOM 中的屬性值是否發生了變化,如果發生變化 需要將變化的值更新到真實 DOM 對象中
再循環未更新前的 Virtual DOM 對象,通過對比看看新的 Virtual DOM 中是否有被刪除的屬性,如果存在刪除的屬性 需要將 DOM 對象中對應的屬性也刪除掉
// updateNodeElement.js
export default function updateNodeElement(
  newElement,
  virtualDOM,
  oldVirtualDOM = {}
) {
  // 獲取節點對應的屬性對象
  const newProps = virtualDOM.props || {}
  const oldProps = oldVirtualDOM.props || {}
  Object.keys(newProps).forEach(propName => {
    // 獲取屬性值
    const newPropsValue = newProps[propName]
    const oldPropsValue = oldProps[propName]
    if (newPropsValue !== oldPropsValue) {
      // 判斷屬性是否是否事件屬性 onClick -> click
      if (propName.slice(0, 2) === "on") {
        // 事件名稱
        const eventName = propName.toLowerCase().slice(2)
        // 為元素添加事件
        newElement.addEventListener(eventName, newPropsValue)
        // 刪除原有的事件的事件處理函數
        if (oldPropsValue) {
          newElement.removeEventListener(eventName, oldPropsValue)
        }
      } else if (propName === "value" || propName === "checked") {
        newElement[propName] = newPropsValue
      } else if (propName !== "children") {
        if (propName === "className") {
          newElement.setAttribute("class", newPropsValue)
        } else {
          newElement.setAttribute(propName, newPropsValue)
        }
      }
    }
  })
  // 判斷屬性被刪除的情況
  Object.keys(oldProps).forEach(propName => {
    const newPropsValue = newProps[propName]
    const oldPropsValue = oldProps[propName]
    if (!newPropsValue) {
      // 屬性被刪除了
      if (propName.slice(0, 2) === "on") {
        const eventName = propName.toLowerCase().slice(2)
        newElement.removeEventListener(eventName, oldPropsValue)
      } else if (propName !== "children") {
        newElement.removeAttribute(propName)
      }
    }
  })
}
以上對比的僅僅是最上層元素,上層元素對比完成以後還需要遞歸對比子元素
else if (oldVirtualDOM && virtualDOM.type === oldVirtualDOM.type) {
    // 遞歸對比 Virtual DOM 的子元素
    virtualDOM.children.forEach((child, i) => {
      diff(child, oldDOM, oldDOM.childNodes[i])
    })
  }
9.2 Virtual DOM 類型不同
當對比的元素節點類型不同時,就不需要繼續對比了,直接使用新的 Virtual DOM 創建 DOM 對象,用新的 DOM 對象直接替換舊的 DOM 對象。當前這種情況要將組件刨除,組件要被單獨處理。
// diff.js
else if (
  // 如果 Virtual DOM 類型不一樣
  virtualDOM.type !== oldVirtualDOM.type &&
  // 並且 Virtual DOM 不是組件 因為組件要單獨進行處理
  typeof virtualDOM.type !== "function"
) {
  // 根據 Virtual DOM 創建真實 DOM 元素
  const newDOMElement = createDOMElement(virtualDOM)
  // 用創建出來的真實 DOM 元素 替換舊的 DOM 元素
  oldDOM.parentNode.replaceChild(newDOMElement, oldDOM)
}
9.3 刪除節點
刪除節點發生在節點更新以後並且發生在同一個父節點下的所有子節點身上。
在節點更新完成以後,如果舊節點對象的數量多於新 VirtualDOM 節點的數量,就説明有節點需要被刪除。
// 獲取就節點的數量
let oldChildNodes = oldDOM.childNodes
// 如果舊節點的數量多於要渲染的新節點的長度
if (oldChildNodes.length > virtualDOM.children.length) {
  for (
    let i = oldChildNodes.length - 1;
    i > virtualDOM.children.length - 1;
    i--
  ) {
    oldDOM.removeChild(oldChildNodes[i])
  }
}
9.4 類組件狀態更新
以下代碼是要更新狀態的類組件,在類組件的 state 對象中有默認的 title 狀態,點擊 change title 按鈕調用 handleChange 方法,在 handleChange 方法中調用 this.setState 方法更改 title 的狀態值。
class Alert extends TinyReact.Component {
  constructor(props) {
    super(props)
    this.state = {
      title: "default title"
    }
    // 更改 handleChange 方法中的 this 指向 讓 this 指向類實例對象
    this.handleChange = this.handleChange.bind(this)
  }
  handleChange() {
    // 調用父類中的 setState 方法更改狀態
    this.setState({
      title: "changed title"
    })
  }
  render() {
    return (
      <div>
        <h2>{this.state.title}</h2>
        <p>{this.props.message}</p>
        <button onClick={this.handleChange}>change title</button>
      </div>
    )
  }
}
setState 方法是定義在父類 Component 中的,該方法的作用是更改子類的 state,產生一個全新的 state 對象。
// Component.js
export default class Component {
  constructor(props) {
    this.props = props
  }
  setState (state) {
    // setState 方法被子類調用 此處this指向子類實例對象
    // 所以改變的是子類的 state 對象
    this.state = Object.assign({}, this.state, state)
  }
}
現在子類已經可以調用父類的 setState 方法更改狀態值了,當組件的 state 對象發生更改時,要調用 render 方法更新組件視圖。
在更新組件之前,要使用更新的 Virtual DOM 對象和未更新的 Virtual DOM 進行對比找出更新的部分,達到 DOM 最小化操作的目的。
在 setState 方法中可以通過調用 this.render 方法獲取更新後的 Virtual DOM,由於 setState 方法被子類調用,this 指向子類,所以此處調用的是子類的 render 方法。
// Component.js
setState(state) {
  // setState 方法被子類調用 此處this指向子類
  // 所以改變的是子類的 state
  this.state = Object.assign({}, this.state, state)
  // 通過調用 render 方法獲取最新的 Virtual DOM
  let virtualDOM = this.render()
}
要實現對比,還需要獲取未更新前的 Virtual DOM,按照之前的經驗,我們可以從 DOM 對象中獲取其對應的 Virtual DOM 對象,未更新前的 DOM 對象實際上就是現在在頁面中顯示的 DOM 對象,我們只要能獲取到這個 DOM 對象就可以獲取到其對應的 Virtual DOM 對象了。
頁面中的 DOM 對象要怎樣獲取呢?頁面中的 DOM 對象是通過 mountNativeElement 方法掛載到頁面中的,所以我們只需要在這個方法中調用 Component 類中的方法就可以將 DOM 對象保存在 Component 類中了。在子類調用 setState 方法的時候,在 setState 方法中再調用另一個獲取 DOM 對象的方法就可以獲取到之前保存的 DOM 對象了。
// Component.js
// 保存 DOM 對象的方法
setDOM(dom) {
  this._dom = dom
}
// 獲取 DOM 對象的方法
getDOM() {
  return this._dom
}
接下來我們要研究一下在 mountNativeElement 方法中如何才能調用到 setDOM 方法,要調用 setDOM 方法,必須要得到類的實例對象,所以目前的問題就是如何在 mountNativeElement 方法中得到類的實例對象,這個類指的不是Component類,因為我們在代碼中並不是直接實例化的Component類,而是實例化的它的子類,由於子類繼承了父類,所以在子類的實例對象中也是可以調用到 setDOM 方法的。
mountNativeElement 方法接收最新的 Virtual DOM 對象,如果這個 Virtual DOM 對象是類組件產生的,在產生這個 Virtual DOM 對象時一定會先得到這個類的實例對象,然後再調用實例對象下面的 render 方法進行獲取。我們可以在那個時候將類組件實例對象添加到 Virtual DOM 對象的屬性中,而這個 Virtual DOM 對象最終會傳遞給 mountNativeElement 方法,這樣我們就可以在 mountNativeElement 方法中獲取到組件的實例對象了,既然類組件的實例對象獲取到了,我們就可以調用 setDOM 方法了。
在 buildClassComponent 方法中為 Virtual DOM 對象添加 component 屬性, 值為類組件的實例對象。
function buildClassComponent(virtualDOM) {
  const component = new virtualDOM.type(virtualDOM.props)
  const nextVirtualDOM = component.render()
  nextVirtualDOM.component = component
  return nextVirtualDOM
}
在 mountNativeElement 方法中獲取組件實例對象,通過實例調用調用 setDOM 方法保存 DOM 對象,方便在對比時通過它獲取它的 Virtual DOM 對象
export default function mountNativeElement(virtualDOM, container) {
  // 獲取組件實例對象
  const component = virtualDOM.component
  // 如果組件實例對象存在
  if (component) {
    // 保存 DOM 對象
    component.setDOM(newElement)
  }
}
接下來在 setState 方法中就可以調用 getDOM 方法獲取 DOM 對象了
setState(state) {
  this.state = Object.assign({}, this.state, state)
  let virtualDOM = this.render()
  // 獲取頁面中正在顯示的 DOM 對象 通過它可以獲取其對象的 Virtual DOM 對象
  let oldDOM = this.getDOM()
}
現在更新前的 Virtual DOM 對象和更新後的 Virtual DOM 對象就都已經獲取到了,接下來還要獲取到真實 DOM 對象父級容器對象,因為在調用 diff 方法進行對比的時候需要用到
setState(state) {
  this.state = Object.assign({}, this.state, state)
  let virtualDOM = this.render()
  let oldDOM = this.getDOM()
  // 獲取真實 DOM 對象父級容器對象
  let container = oldDOM.parentNode
}
接下來就可以調用 diff 方法進行比對了,比對後會按照我們之前寫好的邏輯進行 DOM 對象更新,我們就可以在頁面中看到效果了
setState(state) {
    this.state = Object.assign({}, this.state, state)
    let virtualDOM = this.render()
    let oldDOM = this.getDOM()
    let container = oldDOM.parentNode
    // 比對
    diff(virtualDOM, container, oldDOM)
  }
9.5 組件更新
在 diff 方法中判斷要更新的 Virtual DOM 是否是組件。
如果是組件再判斷要更新的組件和未更新前的組件是否是同一個組件,如果不是同一個組件就不需要做組件更新操作,直接調用 mountElement 方法將組件返回的 Virtual DOM 添加到頁面中。
如果是同一個組件,就執行更新組件操作,其實就是將最新的 props 傳遞到組件中,再調用組件的render方法獲取組件返回的最新的 Virtual DOM 對象,再將 Virtual DOM 對象傳遞給 diff 方法,讓 diff 方法找出差異,從而將差異更新到真實 DOM 對象中。
在更新組件的過程中還要在不同階段調用其不同的組件生命週期函數。
在 diff 方法中判斷要更新的 Virtual DOM 是否是組件,如果是組件又分為多種情況,新增 diffComponent 方法進行處理
else if (typeof virtualDOM.type === "function") {
  // 要更新的是組件
  // 1) 組件本身的 virtualDOM 對象 通過它可以獲取到組件最新的 props
  // 2) 要更新的組件的實例對象 通過它可以調用組件的生命週期函數 可以更新組件的 props 屬性 可以獲取到組件返回的最新的 Virtual DOM
  // 3) 要更新的 DOM 象 在更新組件時 需要在已有DOM對象的身上進行修改 實現DOM最小化操作 獲取舊的 Virtual DOM 對象
  // 4) 如果要更新的組件和舊組件不是同一個組件 要直接將組件返回的 Virtual DOM 顯示在頁面中 此時需要 container 做為父級容器
  diffComponent(virtualDOM, oldComponent, oldDOM, container)
}
在 diffComponent 方法中判斷要更新的組件是未更新前的組件是否是同一個組件
// diffComponent.js
export default function diffComponent(virtualDOM, oldComponent, oldDOM, container) {
  // 判斷要更新的組件和未更新的組件是否是同一個組件 只需要確定兩者使用的是否是同一個構造函數就可以了
  if (isSameComponent(virtualDOM, oldComponent)) {
    // 屬同一個組件 做組件更新
  } else {
    // 不是同一個組件 直接將組件內容顯示在頁面中
  }
}
// virtualDOM.type 更新後的組件構造函數
// oldComponent.constructor 未更新前的組件構造函數
// 兩者等價就表示是同一組件
function isSameComponent(virtualDOM, oldComponent) {
  return oldComponent && virtualDOM.type === oldComponent.constructor
}
如果不是同一個組件的話,就不需要執行更新組件的操作,直接將組件內容顯示在頁面中,替換原有內容
// diffComponent.js
else {
  // 不是同一個組件 直接將組件內容顯示在頁面中
  // 這裏為 mountElement 方法新增了一個參數 oldDOM
  // 作用是在將 DOM 對象插入到頁面前 將頁面中已存在的 DOM 對象刪除 否則無論是舊DOM對象還是新DOM對象都會顯示在頁面中
  mountElement(virtualDOM, container, oldDOM)
}
在 mountNativeElement 方法中刪除原有的舊 DOM 對象
// mountNavtiveElement.js
export default function mountNativeElement(virtualDOM, container, oldDOM) {
 // 如果舊的DOM對象存在 刪除
  if (oldDOM) {
    unmount(oldDOM)
  }
}
// unmount.js
export default function unmount(node) {
node.remove()
}如果是同一個組件的話,需要執行組件更新操作,需要調用組件生命週期函數
先在 Component 類中添加生命週期函數,子類要使用的話直接覆蓋就可以
// Component.js
export default class Component {
  // 生命週期函數
  componentWillMount() {}
  componentDidMount() {}
  componentWillReceiveProps(nextProps) {}
  shouldComponentUpdate(nextProps, nextState) {
    return nextProps != this.props || nextState != this.state
  }
  componentWillUpdate(nextProps, nextState) {}
  componentDidUpdate(prevProps, preState) {}
  componentWillUnmount() {}
}
新建 updateComponent 方法用於更新組件操作,並在 if 成立後調用
// diffComponent.js
if (isSameComponent(virtualDOM, oldComponent)) {
  // 屬同一個組件 做組件更新
  updateComponent(virtualDOM, oldComponent, oldDOM, container)
}
在 updateComponent 方法中調用組件的生命週期函數,更新組件獲取最新 Virtual DOM,最終調用 diff 方法進行更新
import diff from "./diff"

export default function updateComponent(
  virtualDOM,
  oldComponent,
  oldDOM,
  container
) {
  // 生命週期函數
  oldComponent.componentWillReceiveProps(virtualDOM.props)
  if (
    // 調用 shouldComponentUpdate 生命週期函數判斷是否要執行更新操作
    oldComponent.shouldComponentUpdate(virtualDOM.props)
  ) {
    // 將未更新的 props 保存一份
    let prevProps = oldComponent.props
    // 生命週期函數
    oldComponent.componentWillUpdate(virtualDOM.props)
    // 更新組件的 props 屬性 updateProps 方法定義在 Component 類型
    oldComponent.updateProps(virtualDOM.props)
    // 因為組件的 props 已經更新 所以調用 render 方法獲取最新的 Virtual DOM
    const nextVirtualDOM = oldComponent.render()
    // 將組件實例對象掛載到 Virtual DOM 身上
    nextVirtualDOM.component = oldComponent
    // 調用diff方法更新視圖
    diff(nextVirtualDOM, container, oldDOM)
    // 生命週期函數
    oldComponent.componentDidUpdate(prevProps)
  }
}
// Component.js
export default class Component {
updateProps(props) {
this.props = props
}
}10. ref 屬性
為節點添加 ref 屬性可以獲取到這個節點的 DOM 對象,比如在 DemoRef 類中,為 input 元素添加了 ref 屬性,目的是獲取 input DOM 元素對象,在點擊按鈕時獲取用户在文本框中輸入的內容
class DemoRef extends TinyReact.Component {
  handle() {
    let value = this.input.value
    console.log(value)
  }
  render() {
    return (
      <div>
        <input type="text" ref={input => (this.input = input)} />
        <button onClick={this.handle.bind(this)}>按鈕</button>
      </div>
    )
  }
}
實現思路是在創建節點時判斷其 Virtual DOM 對象中是否有 ref 屬性,如果有就調用 ref 屬性中所存儲的方法並且將創建出來的DOM對象作為參數傳遞給 ref 方法,這樣在渲染組件節點的時候就可以拿到元素對象並將元素對象存儲為組件屬性了。
// createDOMElement.js
if (virtualDOM.props && virtualDOM.props.ref) {
  virtualDOM.props.ref(newElement)
}
在類組件的身上也可以添加 ref 屬性,目的是獲取組件的實例對象,比如下列代碼中,在 DemoRef 組件中渲染了 Alert 組件,在 Alert 組件中添加了 ref 屬性,目的是在 DemoRef 組件中獲取 Alert 組件實例對象。
class DemoRef extends TinyReact.Component {
  handle() {
    let value = this.input.value
    console.log(value)
    console.log(this.alert)
  }
  componentDidMount() {
    console.log("componentDidMount")
  }
  render() {
    return (
      <div>
        <input type="text" ref={input => (this.input = input)} />
        <button onClick={this.handle.bind(this)}>按鈕</button>
        <Alert ref={alert => (this.alert = alert)} />
      </div>
    )
  }
}
實現思路是在 mountComponent 方法中,如果判斷了當前處理的是類組件,就通過類組件返回的 Virtual DOM 對象中獲取組件實例對象,判斷組件實例對象中的 props 屬性中是否存在 ref 屬性,如果存在就調用 ref 方法並且將組件實例對象傳遞給 ref 方法。
// mountComponent.js
let component = null
  if (isFunctionalComponent(virtualDOM)) {}
    else {
    // 類組件
    nextVirtualDOM = buildStatefulComponent(virtualDOM)
    // 獲取組件實例對象
    component = nextVirtualDOM.component
  }
    // 如果組件實例對象存在的話
    if (component) {
       // 判斷組件實例對象身上是否有 props 屬性 props 屬性中是否有 ref 屬性
    if (component.props && component.props.ref) {
      // 調用 ref 方法並傳遞組件實例對象
      component.props.ref(component)
    }
  }
代碼走到這,順便處理一下組件掛載完成的生命週期函數
// 如果組件實例對象存在的話
if (component) {
  component.componentDidMount()
}
11. key 屬性
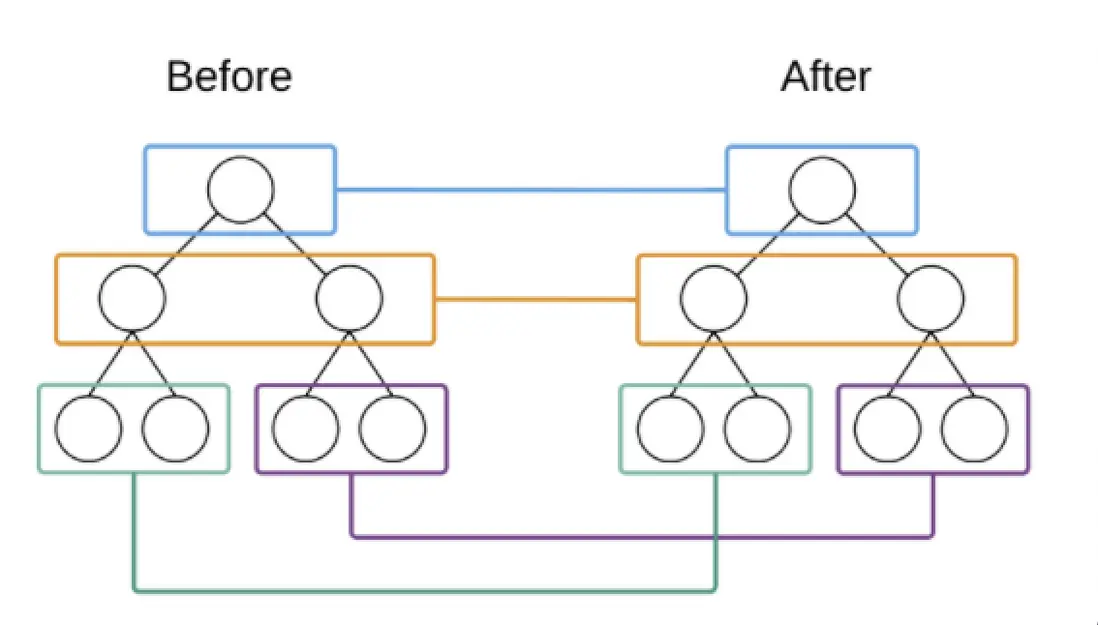
在 React 中,渲染列表數據時通常會在被渲染的列表元素上添加 key 屬性,key 屬性就是數據的唯一標識,幫助 React 識別哪些數據被修改或者刪除了,從而達到 DOM 最小化操作的目的。
key 屬性不需要全局唯一,但是在同一個父節點下的兄弟節點之間必須是唯一的。
也就是説,在比對同一個父節點下類型相同的子節點時需要用到 key 屬性。
11.1 節點對比
實現思路是在兩個元素進行比對時,如果類型相同,就循環舊的 DOM 對象的子元素,查看其身上是否有key 屬性,如果有就將這個子元素的 DOM 對象存儲在一個 JavaScript 對象中,接着循環要渲染的 Virtual DOM 對象的子元素,在循環過程中獲取到這個子元素的 key 屬性,然後使用這個 key 屬性到 JavaScript 對象中查找 DOM 對象,如果能夠找到就説明這個元素是已經存在的,是不需要重新渲染的。如果通過key屬性找不到這個元素,就説明這個元素是新增的是需要渲染的。
// diff.js
else if (oldVirtualDOM && virtualDOM.type === oldVirtualDOM.type) {
  // 將擁有key屬性的元素放入 keyedElements 對象中
  let keyedElements = {}
  for (let i = 0, len = oldDOM.childNodes.length; i < len; i++) {
    let domElement = oldDOM.childNodes[i]
    if (domElement.nodeType === 1) {
      let key = domElement.getAttribute("key")
      if (key) {
        keyedElements[key] = domElement
      }
    }
  }
}
// diff.js
// 看一看是否有找到了擁有 key 屬性的元素
let hasNoKey = Object.keys(keyedElements).length === 0
// 如果沒有找到擁有 key 屬性的元素 就按照索引進行比較
if (hasNoKey) {
// 遞歸對比 Virtual DOM 的子元素
virtualDOM.children.forEach((child, i) => {
diff(child, oldDOM, oldDOM.childNodes[i])
})
} else {
// 使用key屬性進行元素比較
virtualDOM.children.forEach((child, i) => {
// 獲取要進行比對的元素的 key 屬性
let key = child.props.key
// 如果 key 屬性存在
if (key) {
// 到已存在的 DOM 元素對象中查找對應的 DOM 元素
let domElement = keyedElements[key]
// 如果找到元素就説明該元素已經存在 不需要重新渲染
if (domElement) {
// 雖然 DOM 元素不需要重新渲染 但是不能確定元素的位置就一定沒有發生變化
// 所以還要查看一下元素的位置
// 看一下 oldDOM 對應的(i)子元素和 domElement 是否是同一個元素 如果不是就説明元素位置發生了變化
if (oldDOM.childNodes[i] && oldDOM.childNodes[i] !== domElement) {
// 元素位置發生了變化
// 將 domElement 插入到當前元素位置的前面 oldDOM.childNodes[i] 就是當前位置
// domElement 就被放入了當前位置
oldDOM.insertBefore(domElement, oldDOM.childNodes[i])
}
} else {
mountElement(child, oldDOM, oldDOM.childNodes[i])
}
}
})
}// mountNativeElement.js
if (oldDOM) {
container.insertBefore(newElement, oldDOM)
} else {
// 將轉換之後的DOM對象放置在頁面中
container.appendChild(newElement)
}11.2 節點卸載
在比對節點的過程中,如果舊節點的數量多於要渲染的新節點的數量就説明有節點被刪除了,繼續判斷 keyedElements 對象中是否有元素,如果沒有就使用索引方式刪除,如果有就要使用 key 屬性比對的方式進行刪除。
實現思路是循環舊節點,在循環舊節點的過程中獲取舊節點對應的 key 屬性,然後根據 key 屬性在新節點中查找這個舊節點,如果找到就説明這個節點沒有被刪除,如果沒有找到,就説明節點被刪除了,調用卸載節點的方法卸載節點即可。
// 獲取就節點的數量
let oldChildNodes = oldDOM.childNodes
// 如果舊節點的數量多於要渲染的新節點的長度
if (oldChildNodes.length > virtualDOM.children.length) {
  if (hasNoKey) {
    for (
      let i = oldChildNodes.length - 1;
      i >= virtualDOM.children.length;
      i--
    ) {
      oldDOM.removeChild(oldChildNodes[i])
    }
  } else {
    for (let i = 0; i < oldChildNodes.length; i++) {
      let oldChild = oldChildNodes[i]
      let oldChildKey = oldChild._virtualDOM.props.key
      let found = false
      for (let n = 0; n < virtualDOM.children.length; n++) {
        if (oldChildKey === virtualDOM.children[n].props.key) {
          found = true
          break
        }
      }
      if (!found) {
        unmount(oldChild)
        i--
      }
    }
  }
}
卸載節點並不是説將節點直接刪除就可以了,還需要考慮以下幾種情況
- 如果要刪除的節點是文本節點的話可以直接刪除
- 如果要刪除的節點由組件生成,需要調用組件卸載生命週期函數
- 如果要刪除的節點中包含了其他組件生成的節點,需要調用其他組件的卸載生命週期函數
- 如果要刪除的節點身上有 ref 屬性,還需要刪除通過 ref 屬性傳遞給組件的 DOM 節點對象
- 如果要刪除的節點身上有事件,需要刪除事件對應的事件處理函數
export default function unmount(dom) {
  // 獲取節點對應的 virtualDOM 對象
  const virtualDOM = dom._virtualDOM
  // 如果要刪除的節點時文本
  if (virtualDOM.type === "text") {
    // 直接刪除節點
    dom.remove()
    // 阻止程序向下運行
    return
  }
  // 查看節點是否由組件生成
  let component = virtualDOM.component
  // 如果由組件生成
  if (component) {
    // 調用組件卸載生命週期函數
    component.componentWillUnmount()
  }

  // 如果節點具有 ref 屬性 通過再次調用 ref 方法 將傳遞給組件的DOM對象刪除
  if (virtualDOM.props && virtualDOM.props.ref) {
    virtualDOM.props.ref(null)
  }

  // 事件處理
  Object.keys(virtualDOM.props).forEach(propName => {
    if (propName.slice(0, 2) === "on") {
      const eventName = propName.toLowerCase().slice(2)
      const eventHandler = virtualDOM.props[propName]
      dom.removeEventListener(eventName, eventHandler)
    }
  })

  // 遞歸刪除子節點
  if (dom.childNodes.length > 0) {
    for (let i = 0; i < dom.childNodes.length; i++) {
      unmount(dom.childNodes[i])
      i--
    }
  }

  dom.remove()
}