

背景
學習React,並實現ToDoList功能(分為2個部分,依靠父組件傳值實現,dva實現):

目標分析
- 功能確定
- 組件劃分
- 代碼實現
我們可以確定大概的功能有發佈事件,刪除事件,顯示事件內容和截止日期,統計事件等。
依照以上功能可以做出大概的組件劃分圖
其中ToDoListInput為發佈事件功能,List完成對事件的顯示,listItem是事件,其中包括對事件的刪除,勾選,內容顯示等功能,Statistics完成對事件的統計等。
代碼部分採用React+antd完成

代碼實現
容易從組件劃分圖可以得出,ToDoList,List,Statistics之間的聯繫應該通過ToDoListApp,即它們的父組件來完成,因此我們可以在ToDoListApp的state中設置list數組,用於儲存事件,以及創建修改list的方法等,並且通過父組件傳值的方式將list傳入Statistics等子組件中。
為了簡化代碼,我並沒有完全按照概念圖來寫組件內容,而因為功能比較簡單所以我將ToDOListInPut,Statistics承擔的功能均放在ToDoListAPP中,而List中就之間完成了渲染每個子組件。
分析代碼需要完成的功能。
父組件ToDoList:
使用的庫
import React, { Component } from 'react';
import TodoListItem from './TodoListItem';
import {nanoid} from 'nanoid'
import {DatePicker, Input,Button}from 'antd'
import moment from 'moment'
import './index.css';
其中nanoid是生成唯一標識的庫,通過nanoid()調用
State設置
class TodoList extends Component {
  constructor(props) {
    super(props);
    this.state = {
      list: [],
      finished: 0,
      inputValue: '',
      date:null
    };
  }
...
}
list用於存儲發佈事件,finished用於記錄完成的事件數,inputValue和date則是為了獲取發佈事件的內容和截止日期。
添加事件。
handleAddTask = () => {
    const { inputValue,date} = this.state;
    if (!inputValue) {
      alert("輸入為空,請重新輸入待辦事項");
      return
    }
    if(!date)
    {
      alert("截止時間為空,請重新選擇截止日期")
      return
    }
    var obj = {
      content: inputValue,
      status: false,
      deadline: moment(date).format('YYYY-MM-DD HH:mm:ss'),
      nanoid:nanoid()
    };
    const { list } = this.state;
    list.push(obj);
    this.setState({
      list,
      inputValue: '',
      date:null
    });
  }
先判斷髮布的事件中的內容或者日期是否為空。再從state中獲取inputValue,date數據,再設置事件的默認勾選狀態status為false不勾選。設置好添加的事件以後,push進state中的list中,最後使用setState修改list中的值。
修改inputValue中的值
handleChangeValue = (event) => {
    const { value } = event.target;
    this.setState({
      inputValue: value
    });
  }
修改date的值
handleDateChange=(e)=>{
    this.setState({date:e})
  }
傳遞給子組件用於刪除事件
handleClickDelete = (indexID) => {
    const { list } = this.state;
    const List = list.filter(item =>
      item.nanoid !== indexID);
    this.setState({
      list: List
    });
  }
傳入事件中的nanoid,以確定事件在list中的下標,使用filter函數過濾傳入的id值,最後使用setState修改list的值。
傳遞給子組件用於統計完成的事件
updateFinished = (indexID) => {
    const { list } = this.state;
    list.forEach((item) => {
        if (item.nanoid === indexID) {
            item.status=!item.status
        }
    })
    this.setState({list:list})
    let finishedTask = 0;
    list.forEach((item) => {
      if (item.status === true) {
        ++finishedTask;
      }
    });
    this.setState({
      finished: finishedTask
    });
  }
從state中獲取list,遍歷數組,並且統計其中status為true的個數,即被勾選的個數,最後使用setState修改finished的值,用於顯示完成的任務數。
render函數
 render() {
    const { list,finished,inputValue,date} = this.state;
    return (
      <div className="container">
        <h1>TO DO LIST</h1>
        <hr></hr>
        <div>
          <TodoListItem
            list={list}
            handleClickDelete={this.handleClickDelete}
            updateFinished={this.updateFinished}
          />
          <div className="item-count">
            {finished}
            已完成任務/
            {list.length}
            任務總數
          </div>
          <div className="addItem">
            <Input
              placeholder="Add your item……"
              onKeyPress={this.enterPress}
              value={inputValue}
              onChange={this.handleChangeValue}
            />
            <DatePicker onChange={this.handleDateChange} showTime value={date ? moment(date, 'YYYY-MM-DD HH:mm:ss') : null}/>
            <Button className="addButton"
              onClick={this.handleAddTask}
              shape='round'
            >
              添加
          </Button>
          </div>

        </div>
      </div>
    );
  }
通過父組件傳值的方式將handleClickDelete,updateFinished方法傳遞給子組件,並且將list對象數組傳遞給子組件。
子組件ToDoListItem
使用的庫
import { Radio, Button, Input } from 'antd';
import React, { Component } from 'react';
父組件傳入的函數
handleClickDelete(indexID) {
        this.props.handleClickDelete(indexID);
}
handleClickFinished = (indexID) => {
        this.props.updateFinished(indexID);
}
渲染每個子組件
listMap = () => {
        const { list } = this.props;
        return (
            list.map(item => {
                return (this.listMapItem(item))
            })
        )
    }
將list中的每個組件都使用listMapItem函數分別渲染,最後用render函數渲染。
渲染父組件傳遞進list中的每個對象
listMapItem = (item) => {
        return (
            <div className='wrapper-item'
                key={item.nanoid}
            >
                <div className="item">
                    <div className='item-select'>
                        <Radio
                            checked={item.status}
                            onClick={this.handleClickFinished.bind(this, item.nanoid)}
                        />
                        <Input
                            style={{ textDecoration: item.status ===false ? 'none' : 'line-through',flexBasis:500} }
                            value={item.content}
                        >
                        </Input>
                    </div>
                    <span>{item.deadline}</span>
                    <Button
                        style={{margin:'0px 0px 0px 20px'}}
                        onClick={this.handleClickDelete.bind(this, item.nanoid)}
                    >
                        刪除
                    </Button>
                </div>
            </div>
        );
    }
最後render渲染
 render() {
        return (
            <div>
                {this.listMap()}
            </div>
        );
    }
代碼遺留問題以及值得注意的地方
遺留問題:發佈事件,即handleAddTask方法中,既然已經使用了react中的組件,這裏可以用message組件進行替代。
值得注意的地方:在開始的代碼編寫,使用map函數對list中每個對象進行渲染時的key值採用的默認id值,這是不可取的,因為如果其他地方也使用了map函數,就會出現重複的id值。這裏可以使用nanoid生成唯一標識符來設置key值。
因為此次的代碼較為簡單,組件劃分的層數也不多,依靠父組件傳值就沒有什麼問題,但是在實際的工程項目中,往往一個項目往往有幾十層,這時候一層一層的傳遞數據是低效的,且每增添一個函數,程序員就需要在每一層的代碼中進行改動,難以維護、我們意識到僅僅靠父組件傳值的方式,我們很難在大型的工程項目中應用。因此,我經過實驗室老師指導,通過dva.js重新構建了此次的代碼,並且修復了遺留的問題。
dva部分
背景
同上,安裝dva的具體方法參考dva官網
目標分析
同上
與父組件傳值方式差異性分析
有差別的是,此次通過dva來構建代碼。dva中通過model層來管理需要共用的state部分,省去了一層一層傳值的時間。並且dva是基於redux、redux-saga 和 react-router的基礎上建立的,可以方便的進行頁面跳轉,異步處理等。而與父組件傳值方式相同的是,當model中的state值修改後,關聯了該model的組件也會重新渲染
dva程序運行圖解
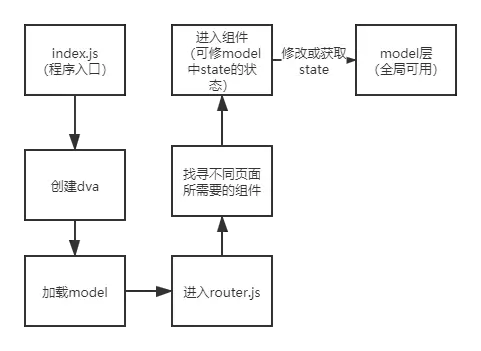
model層分析
dva 通過 model 的概念把一個領域的模型管理起來,包含同步更新 state 的 reducers,處理異步邏輯的 effects,訂閲數據源的 subscriptions。(由於本次實現的功能較為簡單不用subscriptions)
我們可以將原來ToDoListApp中State中的數據全部放入ToDoList.js這個model中
export default {
    namespace: 'list',
    state: {list:[],finished:0,inputValue:'',date:null},
    reducers:{}
    effect:{}
    }
namespace 表示在全局 state 上的 key
state 是初始值,在這裏是一個對象。
reducers 等同於 redux 裏的 reducer,接收 action,同步更新 state
index.js
import dva from 'dva';
const app=dva();
app.model(require('./models/todoList').default);
app.router(require('./router').default);
app.start('#root');
router.js
import React from 'react';
import Products from './routes/Products';
import { Router, Route, Switch } from 'dva/router';
import IndexPage from './routes/IndexPage';
import TodoList from './routes/TodoList';
function RouterConfig({ history }) {
  return (
    <Router history={history}>
      <Switch>
        <Route path="/products" exact component={Products}  />
        <Route path="/index" exact component={IndexPage}/>
        <Route path="/todoList" exact component={TodoList}/>
      </Switch>
    </Router>
  );
}

export default RouterConfig;
此處每個Route都是不同的頁面,path中為瀏覽器訪問的路徑,exact,component={}是要顯示的組件。
Routes/ToDoList.js
使用的庫
import React, { Component } from 'react';
import TodoListItem from './TodoListItem';
import {nanoid} from 'nanoid'
import {DatePicker, Input,Button,message}from 'antd'
import moment from 'moment'
import {connect} from 'dva'
import styles from './index.css';
connect可以理解為是組件與model層的橋樑
connect修改和獲取model中的信息
//用於獲取model中的list信息
const mapStateToProps=({list})=>{
    return {list:list}
}
//用於修改model中的list信息
const mapDispatchToProps=(dispatch)=>{
  return{
      handleClickAdd:({status,deadline,content,nanoid})=>{
        dispatch({type:'list/addListItem',obj:{status,deadline,content,nanoid}})
      },
      handleChangeInputValue:(value)=>{
         dispatch({type:'list/handleChangeValue',value:value})
      },
      handleChangeDate:(date)=>{
         dispatch({type:'list/handleChangeDate',date})
      },
      handleChangeInputValueAndDate:(inputValue,date)=>{
        dispatch({type:'list/handleChangeDateAndInputValue',value:inputValue,date})
      },
    }
}
export default connect(mapStateToProps,mapDispatchToProps)(TodoList)
與redux的使用基本無差異,mapStateToProps是獲取model中的state,其參數為model中的namespace,mapDisPatchToProps則是用於修改model的state。兩者都通過高階組件將對象傳遞給自身,所以可以用this.props來使用。dispatch中type匹配model中effect的關鍵字來實現修改model中的state參數,除了type外的其他元素均可以當做傳遞給了model相匹配的一個函數一個action對象。
添加任務
handleAddTask = () => {
    const { inputValue,date} = this.props.list;
    if (!inputValue) {
      message.info("輸入為空,請重新輸入待辦事項");
      return
    }
    if(!date)
    {
     message.info("截止時間為空,請重新選擇截止日期");
      return
    }
    var obj = {
      content: inputValue,
      status: false,
      deadline: moment(date).format('YYYY-MM-DD HH:mm:ss'),
      nanoid:nanoid()
    };
   this.props.handleClickAdd(obj)
   const nullInputValue=''
   const nullDate=null
   this.props.handleChangeInputValueAndDate(nullInputValue,nullDate)
  }
其主要邏輯與父組件傳值的邏輯基本一致,不同的是,此處是修改model中的state數據。
修改日期
 handleDateChange=(e)=>{
    this.props.handleChangeDate(e)
  }
修改inputValue
 handleChangeValue = (event) => {
    const { value } = event.target;
    this.props.handleChangeInputValue(value)
  }
render函數
  render() {
    const { finished,inputValue,date,list} = this.props.list;
    return (
      <div className={styles.container}>
        <h1>TO DO LIST</h1>
        <hr></hr>
        <div>
          <TodoListItem/>
          <div className={styles.itemCount}>
            {finished}
            已完成任務/
            {list.length}
            任務總數
          </div>
          <div className={styles.addItem}>
            <Input
              placeholder="Add your item……"
              onKeyPress={this.enterPress}
              value={inputValue}
              onChange={this.handleChangeValue}
            />
            <DatePicker onChange={this.handleDateChange} showTime value={date ? moment(date, 'YYYY-MM-DD HH:mm:ss') : null}/>
            <Button className={styles.addButton}
              onClick={this.handleAddTask}
              shape='round'
            >
              添加
          </Button>
          </div>

        </div>
      </div>
    );
  }
與父組件傳值不同的是,由於state已經在model層中,其是共用的,所以不再需要通過父組件來傳遞修改方法,而是在子組件中寫即可。
Route/ToDoListItem.js
connect
const mapStateToProps=({list})=>{
    return {list:list}
}
const mapDispatchToProps=(dispatch)=>{
    return{
        handleClickDelete:(id)=>{
            dispatch({type:'list/deleteListItem',id:id})
        },
        handleUpdate:(list)=>{
            dispatch({type:'list/updateList',list:list})
         },
        handleChangeFinished:(finishedTask)=>{
            dispatch({type:'list/handleChangeFinished',finishedTask})
          }
      }
}
其餘的方法格式與ToDoList一致,不再贅述
Model/ToDoList.js
reducers
update(state,action){
        return action.newState
      }
reduce是純函數,所以只負責刷新狀態即可
effect
effects:{
      *deleteListItem(action,{put,select}){
        const {list}=yield select(_=>_.list)
        const newList=[...list.filter(item=>item.nanoid!==action.id)]
        const newState={...yield select(_=>_.list),list:newList}
        console.log(newState)
        yield put({type:'update',newState})
      },
      *updateList(action,{put,select}){
        const newList=[...action.list]
        const newState={...yield select(_=>_.list),list:newList}
        yield put({type:'unpdate',newState})
      },
      *addListItem(action,{put,select}){
        const {list}=yield select(_=>_.list)
        const newList=[...list,action.obj]
        const newState={...yield select(_=>_.list),list:newList}
        yield put({type:'update',newState})
      },
      *handleChangeValue(action,{put,select}){
        let newState={...yield select(_=>_.list)}
        newState['inputValue']=action.value
        yield put({type:'update',newState})
      },
      *handleChangeDate(action,{put,select}){
        let newState={...yield select(_=>_.list)}
        newState['date']=action.date
        yield put({type:'update',newState})
      },
      *handleChangeDateAndInputValue(action,{put,select}){
       let newState={...yield select(_=>_.list)}
       newState['inputValue']=action.value
       newState['date']=action.date
       yield put({type:'update',newState})
      },
      *handleChangeFinished(action,{put,select}){
        let newState={...yield select(_=>_.list)}
        newState['finished']=action.finishedTask
        yield put({type:'update',newState})
       },
    }
effect負責業務邏輯的處理,因此在組件中dispatch應該匹配effct中相應的名稱進行操作,其中action為dispatch中除了type以外的對象。而後面的對象為yield需要的操作,通常有call,select,put。此處用到select選取state中的數據,最後操作完後,通過type匹配reducer中相應的名稱,完成對state的更新。
值得注意的地方
- model中的reducers是純函數,不能在其內部處理業務邏輯,相關的操作應該在effects中處理
- 組件刷新與否取決於model層的state是否刷新,而state刷新則需要判斷state是否改變,而僅僅改變state中的值是不會刷新的,因為state對象的地址並沒有改變,所以在effect中我們採用{...對象名}來深拷貝state,使得組件可以正常刷新
- dva官方文檔中state只是一個數組,其實其可以是一個對象,存儲多個需要的對象,使得程序員從多次的父組件傳值解脱出來。