

初步嘗試
在實現之初的想法很簡單,先實現一個二分欄功能的組件,頁面主要元素有三個:左分欄,右分欄,分割線,全部使用 absolute 定位。
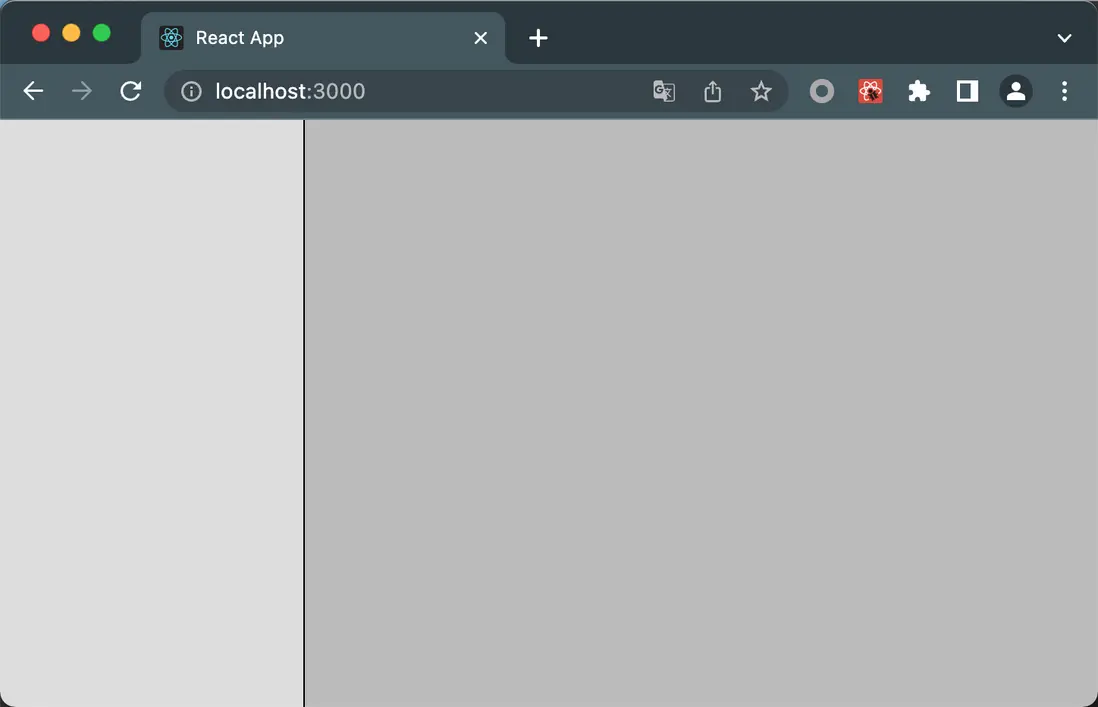
實現樣式預覽
import { FC, useState } from 'react';
import styles from './index.module.scss';
import cn from 'classnames';

const ResizableCol: FC = () => {
  const [width, setWidth] = useState(100);

  return (
    <div className={styles.container}>
      { /** 左分欄 */ }
      <div className={cn(styles.leftside, styles.block)} style={{ width: `${width}px` }}></div>
      { /** 右分欄 */ }
      <div className={cn(styles.rightside, styles.block)} style={{ left: `${width}px` }}></div>
      { /** 分割線 */ }
      <div
        className={styles.divider}
        style={{ left: `${width}px` }}
      />
    </div>
  );
};

export default ResizableCol;
.container {
position: relative;
height: 100%;
}
.divider {
position: absolute;
top: 0;
bottom: 0;
width: 1px;
height: 100%;
background-color: #000;
cursor: col-resize;
z-index: 1;
}
.block {
position: absolute;
top: 0;
bottom: 0;
}
.leftside {
left: 0;
background-color: #ddd;
}
.rightside {
right: 0;
background-color: #bbb;
}添加交互、優化樣式
在實現樣式後,為組件補充相關交互代碼,主要是為 onMouseDown / onMouseMove / onMouseUp 添加相應的事件處理函數。
其中:
- onMouseDown: 記錄用户的點擊位置,同時,如果發現有
onMouseUp未正常觸發的情況下,調用相關處理函數handleMouseUp。 - onMouseMove: 根據用户當前鼠標位置計算左右分欄的寬度,以及分割線的位置。
- onMouseUp: 清理數據。
另外 onMouseMove 和 onMouseUp 事件由外層的容器元素進行處理,主要是由於當用户鼠標滑動較快時,如果鼠標脱離了分割線元素,那麼這兩個事件就不會再繼續觸發了,由於分割線很窄,只有幾個像素寬,所以這種情況是極有可能發生的,因此需要將這兩個事件提升到父級容器來處理。
// 記錄點擊開始位置
const startXRef = useRef<number | null>(null)
// 記錄左分欄的寬度
const [width, setWidth] = useState(100);
// 當分割線開始移動時,記錄此時的左分欄寬度
const oldWidthRef = useRef(100);

// onMouseDown處理函數
const handleMouseDown = useCallback((e: React.MouseEvent) => {
  if (e.button === 0) {
    if (startXRef.current !== null) {
      handleMouseUp(e);
    }
    startXRef.current = e.clientX;
  }
}, []);

// onMouseMove處理函數
const handleMouseMove = useCallback((e: React.MouseEvent) => {
  if (startXRef.current === null) {
    return;
  }
  setWidth(e.clientX - startXRef.current + oldWidthRef.current);
}, [])

// onMouseUp處理函數
const handleMouseUp = useCallback((e: React.MouseEvent) => {
  if (e.button === 0) {
    startXRef.current = null;
    oldWidthRef.current = width;
  }
}, [width])

return (
  <div className={styles.container} onMouseMove={handleMouseMove} onMouseUp={handleMouseUp} style={{ 'cursor': startXRef.current !== null ? 'col-resize' : 'default' }}>
    <div className={cn(styles.leftside, styles.block)} style={{ width: `${width}px` }}></div>
    <div className={cn(styles.rightside, styles.block)} style={{ left: `${width}px` }}></div>
    <div
      className={styles.divider}
      style={{ left: `${width - 3}px` }}
      onMouseDown={handleMouseDown}
      draggable={false} />
  </div>
);
同時,如果分割線元素太窄(例如1個像素),用户很難選中分割線,因此將其寬度修改為7像素大小。
.divider {
  position: absolute;
  top: 0;
  bottom: 0;
  width: 1px;
  padding: 0 3px;
  height: 100%;
  cursor: col-resize;
  z-index: 1;

  &:after {
    display: inline-block;
    content: '';
    position: absolute;
    left: 3px;
    top: 0;
    bottom: 0;
    width: 1px;
    background-color: #000;
    z-index: -1;
  }
}
實現多分欄
將組件從二分欄拓展到三分欄、四分欄,在實現思路上和二分欄沒有什麼區別,同樣是響應用户的交互後,去更新多個分欄的寬度。
同時這次,將不同分欄的內容改為由父組件傳遞的形式,因此 ResizableCol 現在可以接受以下的 props
export interface Props {
  /** 不同分欄的內容 */
  content: JSX.Element[];
  /** 不同分欄的默認寬度 */
  defaultWidth?: number[];
}
由於邏輯上並沒有大的不同,所以就直接貼 ResizableCol 的代碼了
import React, { FC, useState, useCallback, useRef } from 'react';
import styles from './index.module.scss';
import { Props } from './type';

const DefaultWidth = 100;

function isValidWidth(width: number) {
  return width > 0;
}

function cumsum(arr: number[], start: number, end?: number) {
  let result = 0;
  for (let i = start, j = end == null ? arr.length : end; i < j; i++) {
    result += arr[i];
  }
  return result;

}

function isUndef(val: any): val is (null | undefined) {
  return val === null || val === undefined;
}

/**
 * 可多分欄
 */
const ResizableCol: FC<Props> = props => {
  const { content, defaultWidth } = props;
  const colCount = content.length;

  const validDefaultWidth = (defaultWidth || []).map(width => isValidWidth(width) ? width : DefaultWidth);
  for (let i = validDefaultWidth.length; i < colCount - 1; i++) {
    validDefaultWidth.push(DefaultWidth)
  }

  const indexRef = useRef<number | null>(null);
  const [widthList, setWidthList] = useState(validDefaultWidth);
  const oldWidthRef = useRef(validDefaultWidth);
  const startClientXRef = useRef<number | null>(null)

  const handleMouseDown = useCallback((e: React.MouseEvent) => {
    if (e.button === 0) {
      if (startClientXRef.current !== null) {
        handleMouseUp(e);
      }

      startClientXRef.current = e.clientX;

      // 記錄index
      const dividerEl = e.target as HTMLDivElement;
      const indexStr = dividerEl.dataset.index;
      if (!indexStr) {
        return;
      }

      const indexNum = Number(indexStr);
      if (isNaN(indexNum)) {
        return;
      }
      indexRef.current = indexNum;
    }
  }, []);

  const handleMouseMove = useCallback((e: React.MouseEvent) => {
    if (startClientXRef.current === null) {
      return;
    }
    const indexNum = indexRef.current;
    if (isUndef(indexNum)) {
      return;
    }

    setWidthList(widthList => {
      let newWidth = e.clientX - startClientXRef.current! + oldWidthRef.current[indexNum];
      newWidth = Math.max(Math.min(newWidth, 200), 100);

      if (newWidth === widthList[indexNum]) {
        return widthList;
      }

      const newList = [...widthList];
      newList[indexNum] = newWidth;
      return newList;
    });
  }, []);

  const handleMouseUp = useCallback((e: React.MouseEvent) => {
    if (e.button === 0) {
      startClientXRef.current = null;
      oldWidthRef.current = widthList;
    }
  }, [widthList])

  return (
    <div className={styles.container} onMouseMove={handleMouseMove} onMouseUp={handleMouseUp} style={{ 'cursor': startClientXRef.current !== null ? 'col-resize' : 'default' }}>
      {
        content.map((col, index) => {
          const left = cumsum(widthList, 0, index);
          const width = widthList[index];

          return (
            <>
              <div
                className={styles.block}
                style={{
                  left: `${left}px`,
                  width: index === colCount - 1 ? 'auto' : `${width}px`,
                  right: index === colCount - 1 ? '0px' : 'auto'
                }}
              >
                {col}
              </div>

              {
                index !== colCount - 1 ? (
                  <div
                    data-index={index}
                    className={styles.divider}
                    style={{ left: `${left + width - 3}px` }}
                    onMouseDown={handleMouseDown}
                    draggable={false} />
                ) : null
              }
            </>
          );
        })
      }
    </div>
  );
};

export default ResizableCol;
後續
在多分的基礎上,仍舊需要補充一些組件交互上的限制,例如對於不同分欄的寬度限制(上面代碼中將分欄的寬度限制在 100px 到 200px 之間),這些限制以及不同分欄之間寬度可能存在的聯動關係可以按照自己的需求去實現。
以及需要考慮在性能上,目前這樣的實現是否滿足要求。