

大家好,我是長林啊!一個愛好 JavaScript、Go、Rust 的全棧開發者和 AI 探索者;致力於終生學習和技術分享。
本文首發在我的微信公眾號【長林啊】,歡迎大家關注、分享、點贊!
前面的文章介紹了 Script 組件和 Link 組件,今天我們來看看 Font 組件。在 Web 開發中,字體是一個常常被忽視但至關重要的元素。它不僅影響網站的可讀性和用户體驗,還體現了品牌的個性和風格。選擇合適的字體,可以提高文本的可讀性,幫助用户更好地理解內容,並傳達品牌的獨特氣質。良好的字體選擇不僅可以改善網站的美觀度,還可以吸引用户在網站上停留更長時間。另外,選擇可縮放且適應不同屏幕的字體,也是確保網站在各種設備上保持良好可讀性的關鍵。同時,使用輕量級 Web 字體還可以加快頁面加載速度,提高網站的性能。
傳統字體
在Web設計中,字體是實現視覺表達和用户體驗的關鍵,但與印刷設計不同,Web設計不受物理尺寸或顏色數量的限制,但帶寬成本是一個不容忽視的因素。在 Web 上實現豐富的排版體驗時,字體的使用尤為突出。傳統的 Web 字體要求每個樣式(如常規、粗體、斜體)都需要單獨的字體文件,這可能導致頁面加載時間增加和用户體驗下降。例如,僅包含常規和粗體樣式以及它們對應的斜體,字體數據可能達到好幾百 kb 或更多的字體數據。
傳統字體的使用很方便,通過 @font-face 指定一個自定義的字體,字體文件可以本地文件或者遠程文件,如果提供了 local() 函數,從用户本地查找指定的字體名稱,並且找到了一個匹配項,本地字體就會被使用。否則,字體就會使用 url() 函數下載的資源。然後使用 font-family 來標識“系列”,比如:
@font-face {
    font-family: "Open Sans";
    src:
        url("/fonts/OpenSans-Regular-webfont.woff2") format("woff2"),
        url("/fonts/OpenSans-Regular-webfont.woff") format("woff");
}
具體的使用方法如下:
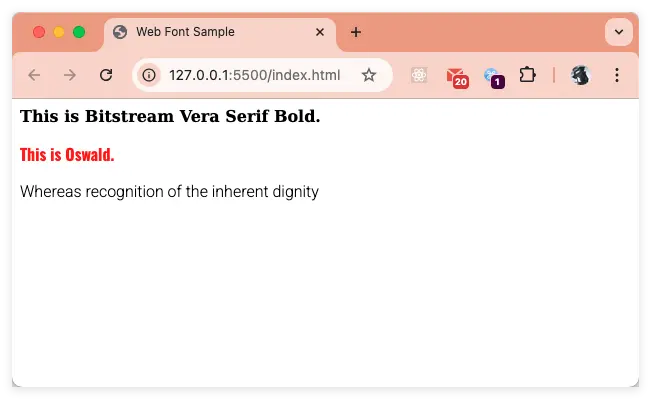
<html lang="en">
<head>
<title>Web Font Sample</title>
<style type="text/css" media="screen, print">
@font-face {
font-family: "Bitstream Vera Serif Bold";
src: url("https://mdn.github.io/css-examples/web-fonts/VeraSeBd.ttf");
}
body {
font-family: "Bitstream Vera Serif Bold", serif;
}
</style>
</head>
<body>
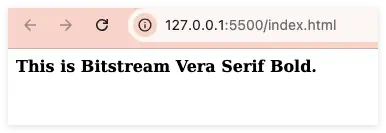
This is Bitstream Vera Serif Bold.
</body>
</html>效果如下:
可變字體

在可變字體出現之前,每個不同的字體風格都需要單獨的文件,這限制了設計師在 Web 上使用豐富字體的能力。可變字體允許在一個單一的文件中包含多個字體風格(如上圖),從而減少了文件大小和請求數量,提升了頁面加載速度和性能。想了解更多的可變字體相關的內容,可以閲讀《Introducing OpenType Variable Fonts》;當然也可以看 大漠_w3cpluscom 大佬在掘進上的專欄《現代 CSS》的 Web 上的可變字體。
在 Web 上使用可變字體可以分以下幾個步驟。
- 步驟一:獲取可用的可變字體。
- 步驟二:在 CSS 中集成可變字體。
- 步驟三:找出可變字體的軸和範圍值。
- 步驟四:設置可變字體樣式。
- 步驟五:降級處理。
在 Google Fonts 可以查看到很多可變字體,篩選條件也很簡單(選中左側的 Variable),如下圖:
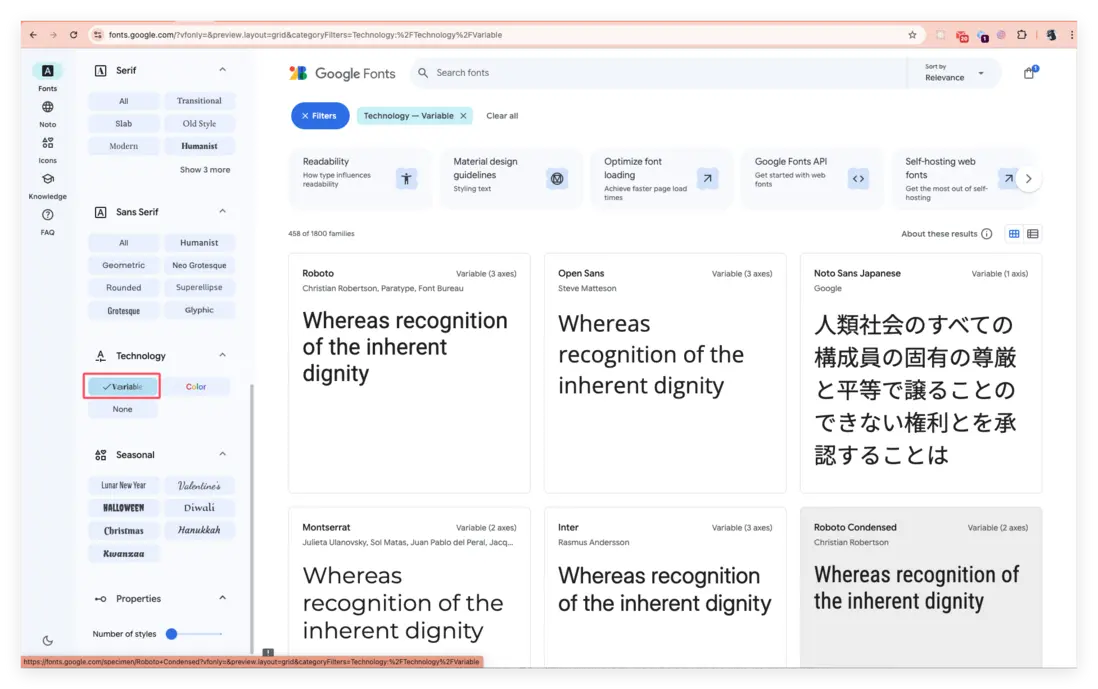
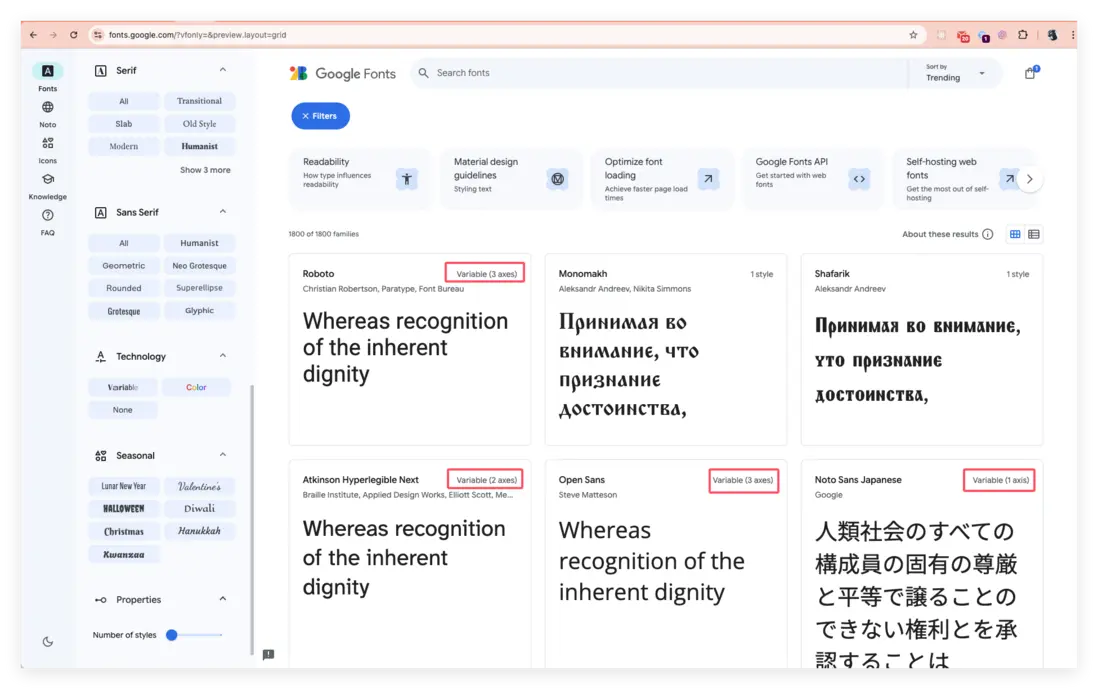
每個字體的右上角也可以區分哪些字體是可變字體:
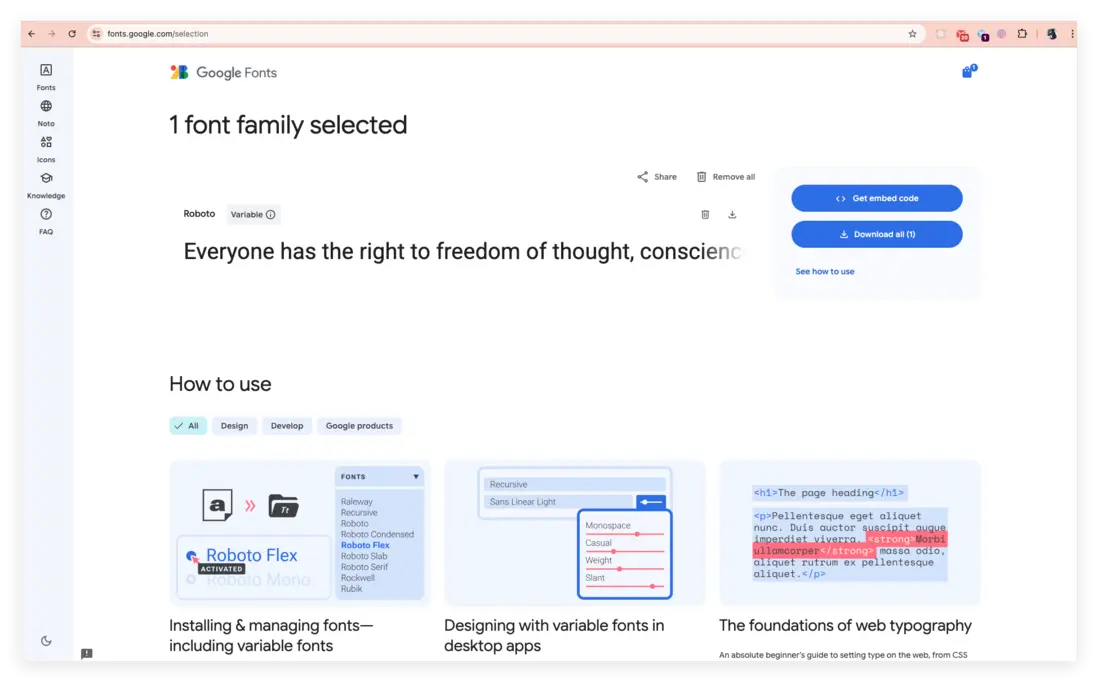
選中一個可變字體之後,進去後可以調整可變字體的版本,然後點擊右上角的 “Get font”按鈕。如下圖:

可以直接獲取代碼或者下載字體文件:
如果選擇以遠程字體文件引入的方式,則點擊 “Get Embed code”後,就可以選擇對應的平台的引入代碼,如下圖:

整體示例如下:
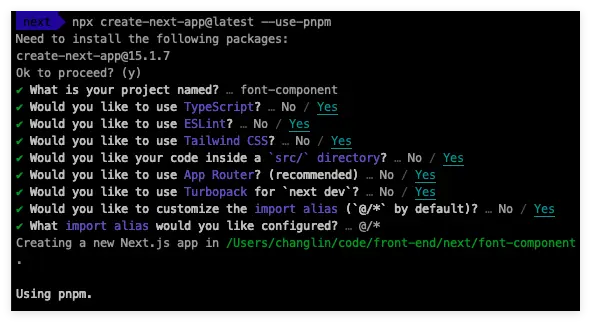
<html lang="en">

<head>
    <title>Web Font Sample</title>
    <link href="https://fonts.googleapis.com/css2?family=Oswald:wght@200;300;400;469;500;600;681;700&display=swap"
        rel="stylesheet">
    <link rel="preconnect" href="https://fonts.googleapis.com">
    <link rel="preconnect" href="https://fonts.gstatic.com" crossorigin>
    <link href="https://fonts.googleapis.com/css2?family=Roboto:ital,wdth,wght@0,94,280;1,94,280&display=swap"
        rel="stylesheet">
    <style type="text/css" media="screen, print">
        @font-face {
            font-family: "Bitstream Vera Serif Bold";
            src: url("https://mdn.github.io/css-examples/web-fonts/VeraSeBd.ttf");
        }

        body {
            font-family: "Bitstream Vera Serif Bold", serif;
        }

        .custom-font {
            font-family: 'Oswald';
            font-weight: 681;
            color: red;
        }

        .roboto-font {
            font-family: "Roboto", serif;
            font-optical-sizing: auto;
            font-weight: 400;
            font-style: normal;
            font-variation-settings:
                "wdth" 494;
        }
    </style>
</head>

<body>
    This is Bitstream Vera Serif Bold.
    <p class="custom-font">
        This is Oswald.
    </p>
    <p class="roboto-font">Whereas recognition of the inherent dignity
    </p>
</body>

</html>
效果如下圖:
有了上面的理論基礎後,按照前面的慣例,在進入正題之前,我們先來準備一下相關的環境,創建一個項目便於演示後面的內容。
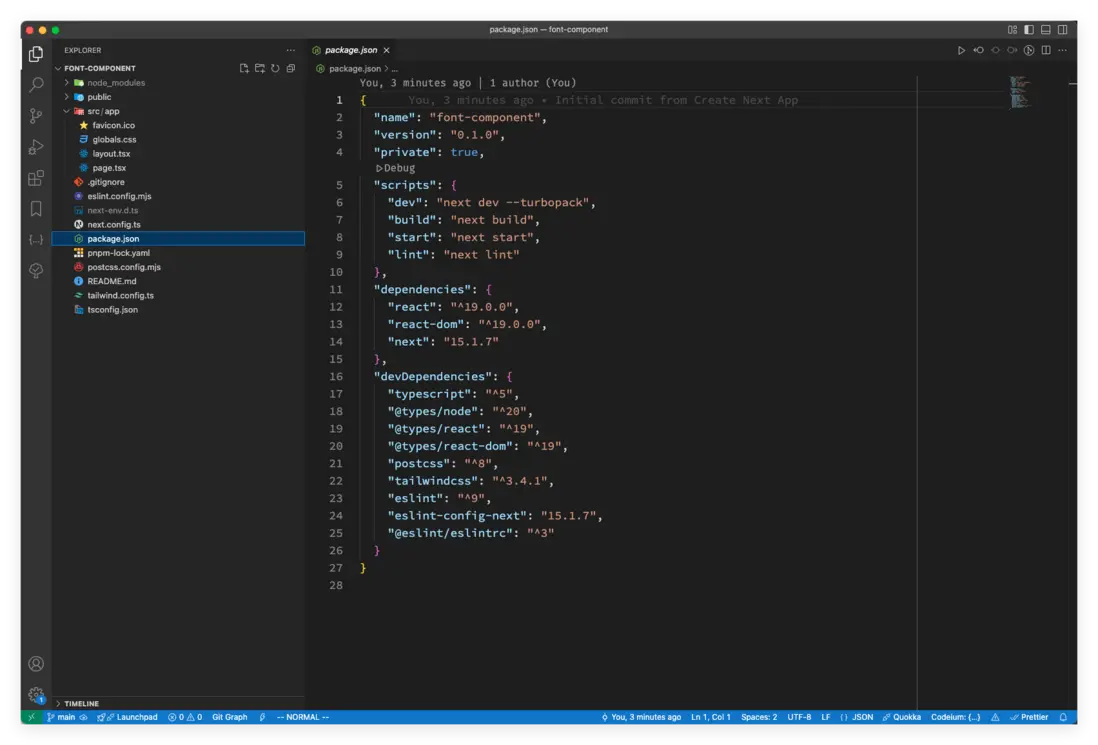
使用命令 npx create-next-app@latest --use-pnpm 創建一個新的項目;具體的項目配置選項如下:
在 VS Code 打開以後,項目的依賴如下圖:
我們下面就來看看 Next.js 做了哪些優化?在 Next.js 中怎麼用可變字體?
Font 組件
如果將上面的傳統字體的示例代碼遷移到 Next.js 項目中,在 Next.js 中的引入方式有:
- 通過
<link href="https://fonts.googleapis.com/css2?family=Roboto:ital,wdth,wght@0,88,280;1,88,280&display=swap" rel="stylesheet">。 - 通過 css 文件的方式引入,比如:
import "./global.css";,在global.css文件中使用@import url()引入。 - 通過內置組件
next/font包的localFont加載或者 Google Font 系列字體來加載。
可變字體在 Next.js 中也比較方便,Next.js 內置了 next/font 組件,幫助我們更好的管理和使用字體,而且 Next.js 官方還做了不少優化,其中就包括佈局偏移的問題。next/font 具體又分為 next/font/google 和 next/font/local,分別對應使用 Google 字體和使用本地字體。
Google 字體
// 加載 Google Font 系列的字體
import { Inter, Roboto_Mono } from 'next/font/google'

export const inter = Inter({
    subsets: ['latin'],
    display: 'swap',
})

export const roboto_mono = Roboto_Mono({
    subsets: ['latin'],
    display: 'swap',
})上面這段字體加載的代碼中,需要注意的是:如果字體是多單詞,使用下劃線_連接,比如Roboto Mono,導入的時候寫成Roboto_Mono。
最終渲染後的效果如下:

Next.js 推薦使用可變字體來獲得最佳的性能和靈活性。如果不能使用可變字體,你需要聲明 weight(字重,是指字體的粗細程度):
import { Roboto } from 'next/font/google'

const roboto = Roboto({
    weight: '400',
    subsets: ['latin'],
    display: 'swap',
})

export default function RootLayout({
    children,
}: {
    children: React.ReactNode
}) {
    return (
        <html lang="en" className={roboto.className} >
            <body>{children} </body>
        </html>
    )
}
上面這段代碼中,需要注意 subsets 這個屬性,谷歌的字體是可以指定子集(subset)的,目前 Next.js 官方網站上也沒有具體指出哪些字體支持那些子集,可以通過 next.js 源碼搜字體查看,在 packages/font/src/google/index.ts 中;還可以隨便寫一個,然後通過 TS 的類型推導校正,如下圖:
本地字體
-
多字體的加載方式
import localFont from 'next/font/local'; const roboto = localFont({ src: [ { path: './Roboto-Regular.woff2', weight: '400', style: 'normal', }, { path: './Roboto-Italic.woff2', weight: '400', style: 'italic', }, { path: './Roboto-Bold.woff2', weight: '700', style: 'normal', }, { path: './Roboto-BoldItalic.woff2', weight: '700', style: 'italic', }, ], }) export default function RootLayout({ children }: Readonly<{ children: React.ReactNode }>) { return ( <html lang="en" className={roboto.className}> <body>{children}</body> </html> ) } -
單字體加載方式
import localFont from 'next/font/local'

const manrope = localFont({
    src: './fonts/Manrope.woff2',
    display: 'swap',
})

export default function RootLayout({ children }: Readonly<{ children: React.ReactNode }>) {
    return (
        <html lang="en" className={manrope.className}>
            <body>{children}</body>
        </html>
    )
}
字體函數的相關參數
上面介紹了 Google 字體和本地字體的相關用法和注意點,接下來看看字體函數的相關參數。
| 屬性 | font/google | font/local | 類型 | 必傳 |
|---|---|---|---|---|
| src | ❌ | ✅ | 字符串或對象數組 | 是 |
| weight | ✅ | ✅ | 字符串或數組 | 可選 |
| style | ✅ | ✅ | 字符串或數組 | - |
| subsets | ✅ | ❌ | 字符串數組 | - |
| axes | ✅ | ❌ | 字符串數組 | - |
| display | ✅ | ✅ | 字符串 | - |
| preload | ✅ | ✅ | 布爾 | - |
| fallback | ✅ | ✅ | 字符串數組 | - |
| adjustFontFallback | ✅ | ✅ | 布爾或者字符串 | - |
| variable | ✅ | ✅ | 字符串 | - |
| declarations | ❌ | ✅ | 對象數組 | - |
-
src
這個屬性只有在
next/font/local中必傳,它可以是一個字符串,也可以是對象數組,其類型為:Array<{path: string, weight?: string, style?: string}>。如果是字符串的話,路徑地址相當於字體加載函數調用的位置;比如:比如上面帶代碼
app/page.tsx中使用src:'./fonts/Manrope.woff2'調用字體加載函數,Manrope.woff2就要放置在app/fonts/下。 -
weight
字體字重,類似於
font-weight。如果是可變字體,則非必傳,如果不是可變字體,則必傳。它的值可以是字符串或字符串數組:- 單個字符串:
weight: '400'、weight: '100 900'(表示可變字體取值範圍為 100 ~ 900)。 - 字符串數組:
weight: ['100', '400', '900'](表示不可變字體的三個字重值)。
- 單個字符串:
-
style
字體風格,類似於
font-style。一共有三個可選值:italic、oblique、normal;默認值是:normal。如果使用
next/font/google的非可變字體,也可以傳入一組樣式值,如style: ['italic','normal']。它的值同樣可以是字符串或字符串數組:
- 單個字符串:
style: 'italic'或者style: 'oblique'或者style: 'normal'。 - 字符串數組:
style: ['italic', 'normal']。
- 單個字符串:
-
subsets
這個屬性在上面也有使用過,字體子集(font subsets)可以通過一個字符串數組來定義,數組中包含每個子集的名稱。通過子集指定的字體將在
preload選項為true時(默認值)在 HTML 頭部注入一個預加載屬性的link標籤。如果preload為true,但不指定子集會有警告。有些字體只有一個默認子集,比如latin,也需要手動制定。preload選項默認為true,如果你不想預加載字體,可以將其設置為false。使用方式也比較簡單:
import { Roboto } from 'next/font/google' const roboto = Roboto({ weight: '400', subsets: ['latin'], display: 'swap', }) -
axes
可變字體(Variable Fonts)通過內置的多種變形軸(axis 的複數形式 axes),允許用户動態調整字體的視覺特性。以字寬(Width)、字重(Weight)、傾斜(Slant)等為代表的變形軸,本質上是對字體形態的數字化控制參數,用户可通過調節這些軸值,使單一字體文件呈現出傳統多款獨立字體的效果。
比如,Inter 字體,不僅支持基礎的「字重軸」(調節筆畫粗細)和「字寬軸」(調節字符橫向比例),還包含「傾斜軸」(Slant,模擬斜體效果)或「光學尺寸軸」(Optical Size,適配不同顯示環境)等參數,從而通過多維度調整實現更靈活的排版表現。這種技術將傳統靜態字體的離散樣式轉化為連續可變的動態系統,顯著提升了設計效率與視覺一致性。
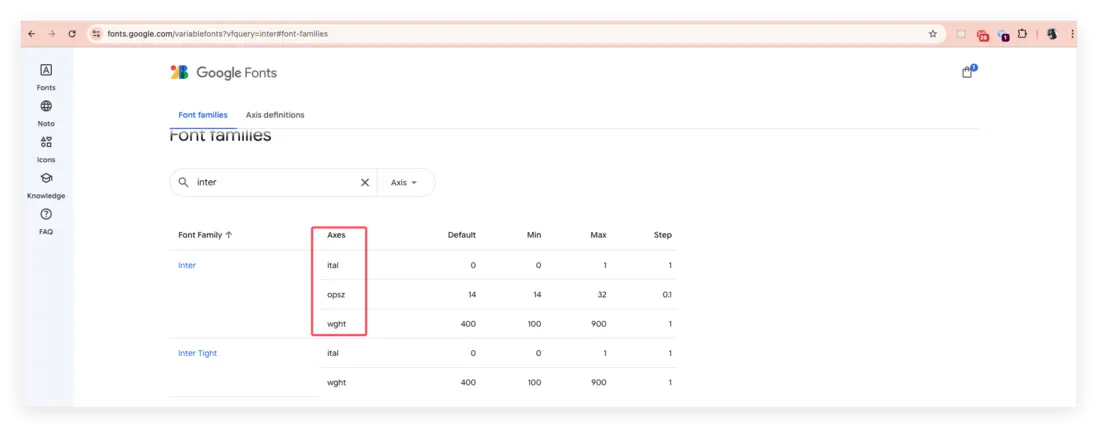
上圖的 ital 是斜體(italic)、opsz 是光學尺寸軸(Optical Size)、wght 是字重(wight)。
axes 的值是一個字符串數組形式,比如 axes: ['slnt', 'wght'],你可以在 Google 可變字體頁面查詢字體的 Axes 有哪些(如上圖)。默認情況下,只有 weight 軸會被留下(只留一個的目的是減少字體文件大小),如果需要其他的軸就需要單獨聲明。
-
display
字體顯示策略,類似於(font-display);用於控制頁面加載時 Web Fonts 引起的佈局抖動和偏移的優化策略。它的可選值有
'auto'、'block'、'swap'、'fallback'或'optional', 在 Next.js 的next/font組件中的默認值是swap,在 Web CSS 中font-display的默認值是auto。font-display: auto:使用瀏覽器的預設值,一般是block。font-display: block會使文本在網頁字體加載期間隱藏(最長3秒),超時後自動用備用字體顯示,待網頁字體加載完成後再切換回原字體。font-display: swap會立即用備用字體顯示文本(無加載等待),待網頁字體加載完成後自動切換。優勢是內容即時可見,但需確保備用字體與目標字體形態相近,以減少切換時的佈局抖動或偏移的風險。font-display: fallback:先顯示空白(大約 100ms),然後切換為備用字體,時間大概是 3s,3s 內能加載完字體,就使用字體,3s 內加載不完,後續接着使用備用字體。font-display: optional:先顯示空白(大約 100ms),100ms 內能加載完就用,加載不完就直接使用備用字體。
在 Next.js 的
next/font組件中的默認值是swap。 -
preload
用於指定是否預加載該字體,默認值為
true(啓用預加載)。 -
fallback
當字體加載失敗時使用的備用字體列表;該值為一個字符串數組:
fallback: ['system-ui', 'arial'],沒有默認值。 -
adjustFontFallback
對於
next/font/google一個布爾值,用於設置是否啓用自動備用字體以減少累積佈局偏移(Cumulative Layout Shift),默認值為true(啓用)。對於
next/font/local一個字符串或布爾值false,用於設置是否啓用自動備用字體以減少累積佈局偏移。可選值為'Arial'、'Times New Roman'或false,默認值為'Arial'。示例:
adjustFontFallback: false:適用於next/font/google(禁用自動備用字體優化)adjustFontFallback: 'Times New Roman':適用於 next/font/local(手動指定備用字體為 Times New Roman)
-
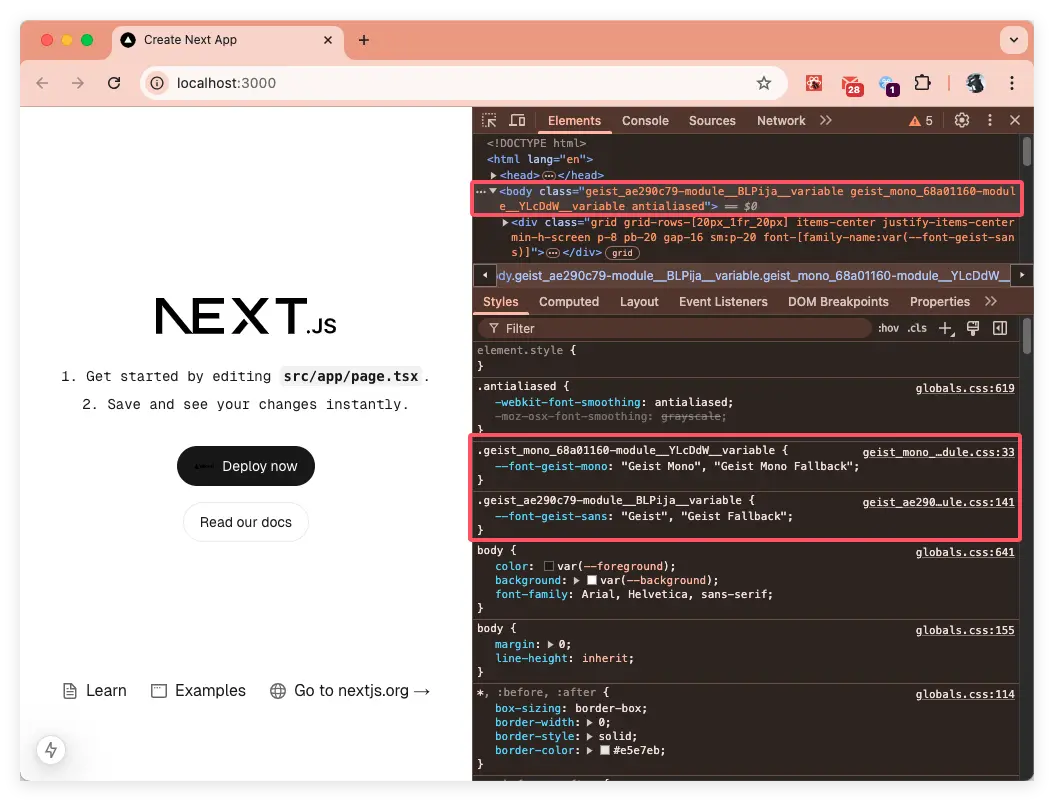
variable
一個字符串值,用於定義當通過 CSS 變量方式應用樣式時所使用的 CSS 變量名稱。在 Web CSS 中開發者自定義屬性標記設定值,然後使用 CSS 的
var()函數來獲取值,比如:.p {--primary-color: #f4500; background-color: var(--primary-color);},這裏就不詳細介紹這塊的內容,如果不熟悉可以閲讀 MDN 的《使用 CSS 自定義屬性(變量)》。在 Next.js 中要怎麼聲明和使用一個 CSS 變量呢?就要藉助
variable屬性。使用方式如下:
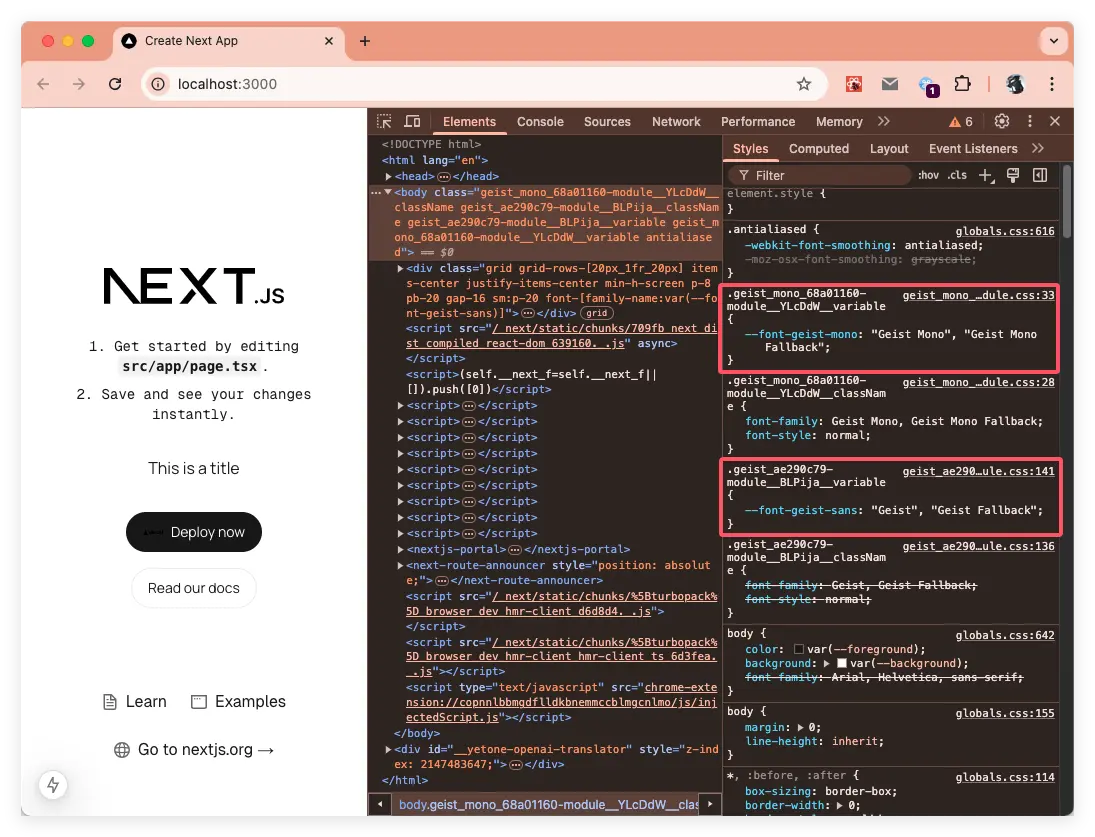
在瀏覽器中解析後的效果如下圖:
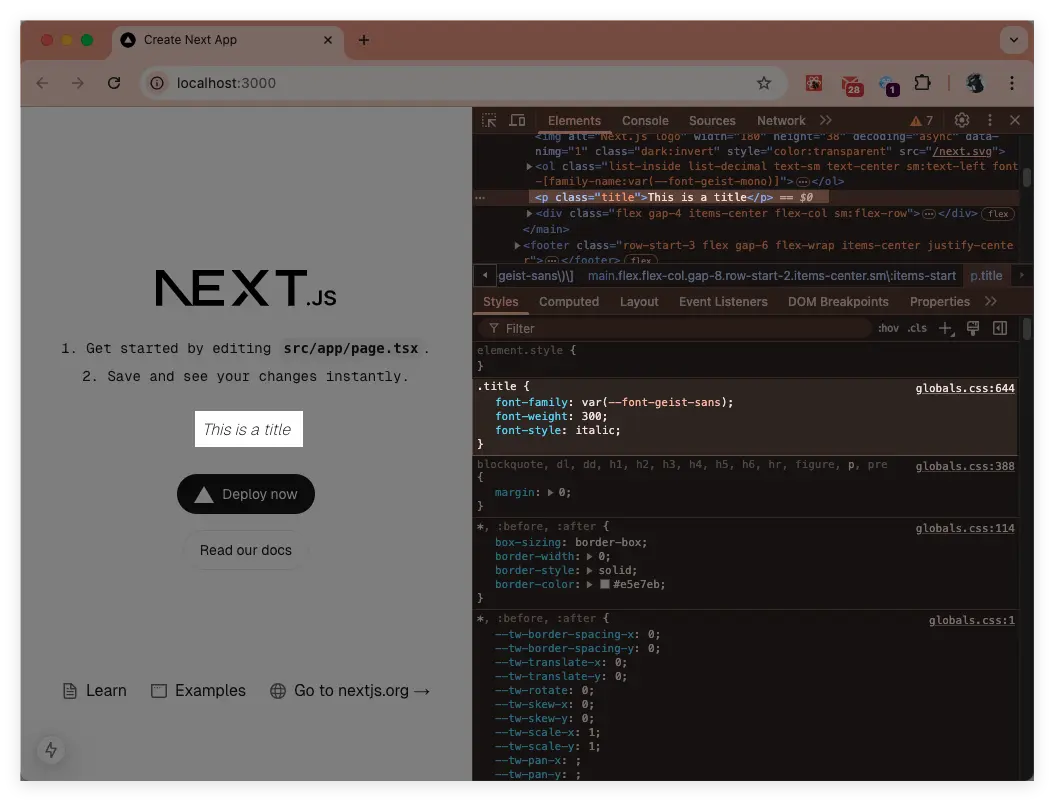
上面只是聲明瞭,如果我們要在 CSS 中使用還需要藉助
var()函數:.title { font-family: var(--font-geist-sans); font-weight: 300; font-style: italic; }效果如下:
-
declarations
進一步自定義
@font-face內容的生成。除了這些常用的屬性外,還有不少我們開發中不是很常見的屬性,比如
font-variant-ligatures、font-variant-caps、font-variant-east-asian、font-variant-alternates、font-variant-numeric和font-variant-position等等;而declarations就是給你用來在next/font/local時自定義@font-face的生成,使用示例如下:import localFont from 'next/font/local'; const manrope = localFont({ src: "./fonts/Manrope-VariableFont_wght.ttf", display: 'swap', variable: '--manrope', fallback: ['ui-sans-serif', 'system-ui'], adjustFontFallback: false, declarations: [ { prop: 'font-optical-sizing', value: 'auto' }, { prop: 'ascent-override', value: '90%' }, { prop: '-webkit-font-smoothing', value: 'antialiased' }, { prop: '-moz-osx-font-smoothing', value: 'grayscale' } ] });使用樣式
在 Next.js 中,可以通過
className、style、CSS 變量三種方式應用字體的樣式。

CSS 變量在前面已經有過演示了,下面就演示下 className 和 style 的使用。直接在 className 上使用已加載字體的類名和樣式,如下:
import type { Metadata } from "next";
import { Geist, Geist_Mono } from "next/font/google";
import "./globals.css";
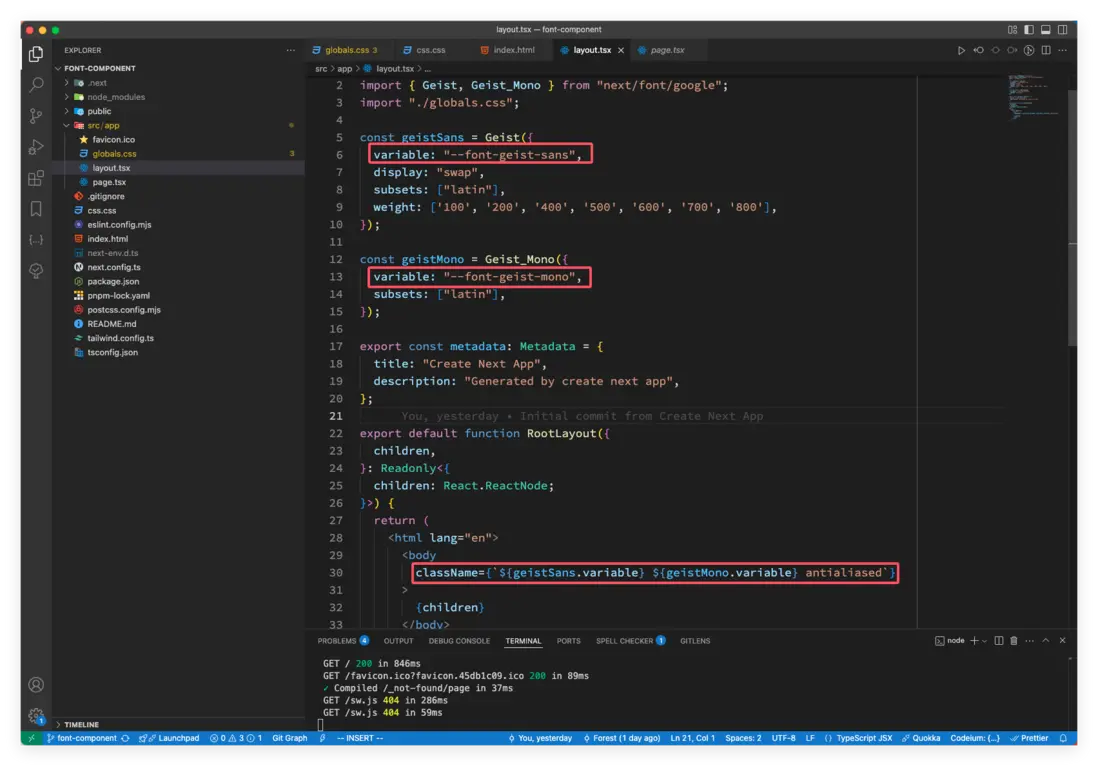
const geistSans = Geist({
variable: "--font-geist-sans",
display: "swap",
subsets: ["latin"],
weight: ['100', '200', '400', '500', '600', '700', '800'],
});
const geistMono = Geist_Mono({
variable: "--font-geist-mono",
subsets: ["latin"],
});
// ...
export default function RootLayout({
children,
}: Readonly<{
children: React.ReactNode;
}>) {
return (
<html lang="en">
<body
className={`${geistMono.className} ${geistSans.className} ${geistSans.variable} ${geistMono.variable} antialiased`}
>
{children}
</body>
</html>
);
}最佳實踐
多種字體的使用
使用多種字體有兩種方法,一種是導出字體,通過 className 來使用;一種是通過 CSS 變量的形式。
-
導出字體
在
next/font/google中導出字體,然後添加配置:import { Geist, Geist_Mono } from "next/font/google"; const geistSans = Geist({ variable: "--font-geist-sans", display: "swap", subsets: ["latin"], weight: ['100', '200', '400', '500', '600', '700', '800'], }); const geistMono = Geist_Mono({ variable: "--font-geist-mono", subsets: ["latin"], });在需要的時候導入並使用:
export default function RootLayout({ children, }: Readonly<{ children: React.ReactNode; }>) { return ( <html lang="en"> <body className={`${geistMono.className} ${geistSans.className} antialiased`} > {children} </body> </html> ); } -
通過 CSS 變量使用
前面已經使用過這種方式,這裏也簡單看一下:
import { Geist, Geist_Mono } from 'next/font/google'

const geistSans = Geist({
  variable: "--font-geist-sans",
  display: "swap",
  subsets: ["latin"],
  weight: ['100', '200', '400', '500', '600', '700', '800'],
});

const geistMono = Geist_Mono({
  variable: "--font-geist-mono",
  subsets: ["latin"],
});

export default function RootLayout({ children }: Readonly<{ children: React.ReactNode }) {
  return (
    <html lang="en" className={`${geistSans.variable} ${geistMono.variable}`}>
      <body>
        <h1>My App</h1>
        <div>{children}</div>
      </body>
    </html>
  )
}
在瀏覽器渲染後的效果如下:
從圖中可以看到,聲明瞭
--font-geist-mono和--font-geist-sans兩個 CSS 變量,當需要使用的地方時就可以通過var()的形式引用:html { font-family: var(--font-geist-sans); } .title{ font-family: var(--font-geist-mono); }
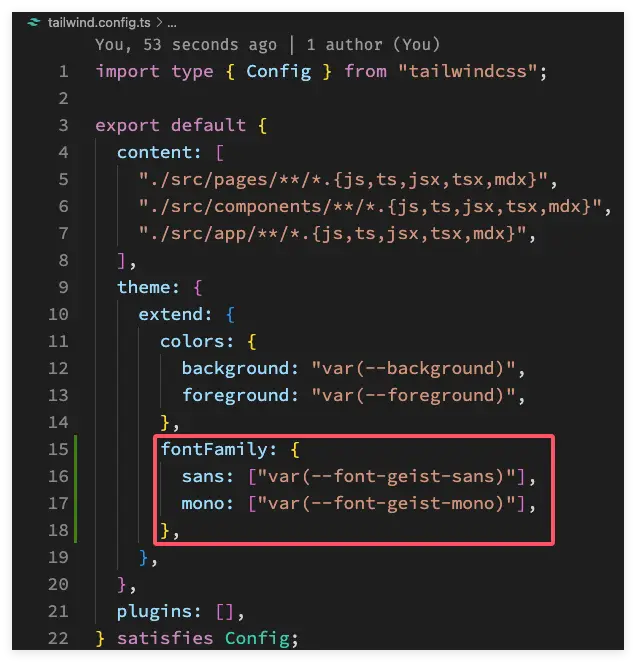
跟 tailwindcss 搭配一起使用
其實這塊本質跟 CSS 變量的引用是一樣的,只不過結合 tailwindcss 時,需要在 tailwind.config.ts 中添加配置!具體的配置如下:
-
通過
variable聲明 CSS 變量import { Geist, Geist_Mono } from 'next/font/google' import './globals.css' // 引入 css const geistSans = Geist({ variable: "--font-geist-sans", display: "swap", subsets: ["latin"], weight: ['100', '200', '400', '500', '600', '700', '800'], }); const geistMono = Geist_Mono({ variable: "--font-geist-mono", subsets: ["latin"], }); export default function RootLayout({ children }: Readonly<{ children: React.ReactNode }) { return ( <html lang="en" className={`${geistSans.variable} ${geistMono.variable}`}> <body> <h1>My App</h1> <div>{children}</div> </body> </html> ) } -
globals CSS 文件
@tailwind base; @tailwind components; @tailwind utilities; -
將 CSS 變量添加到
tailwind.config.ts配置中fontFamily: { sans: ["var(--font-geist-sans)"], mono: ["var(--font-geist-mono)"], },具體配置如下圖:
-
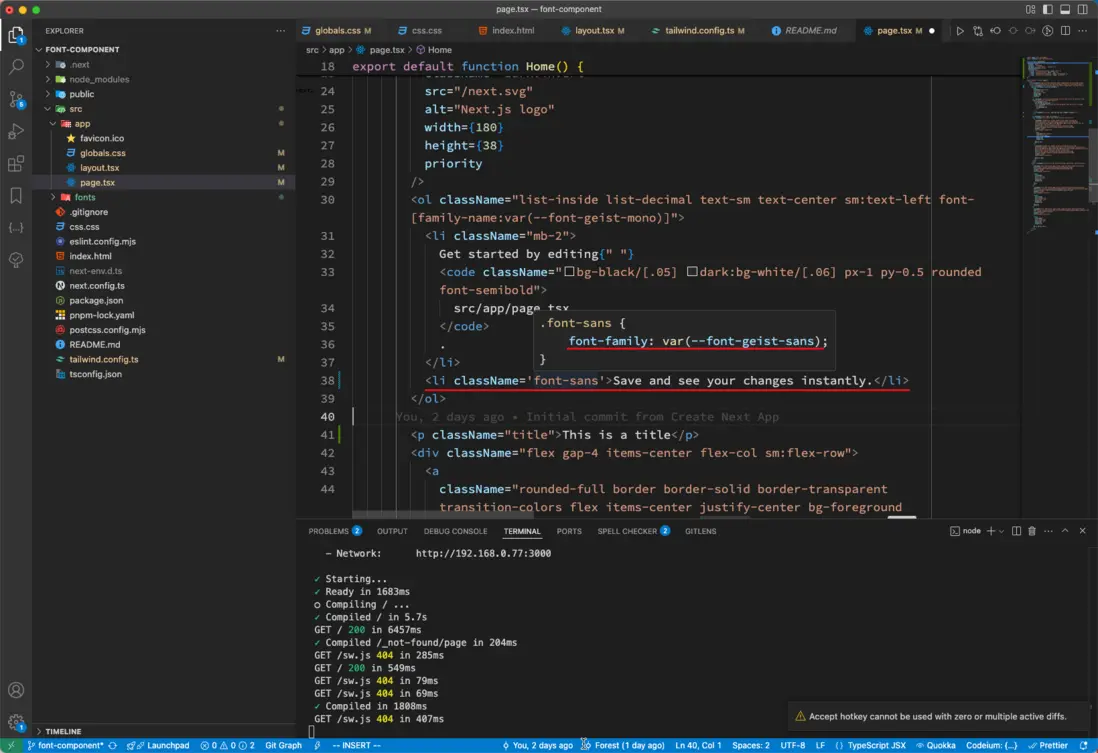
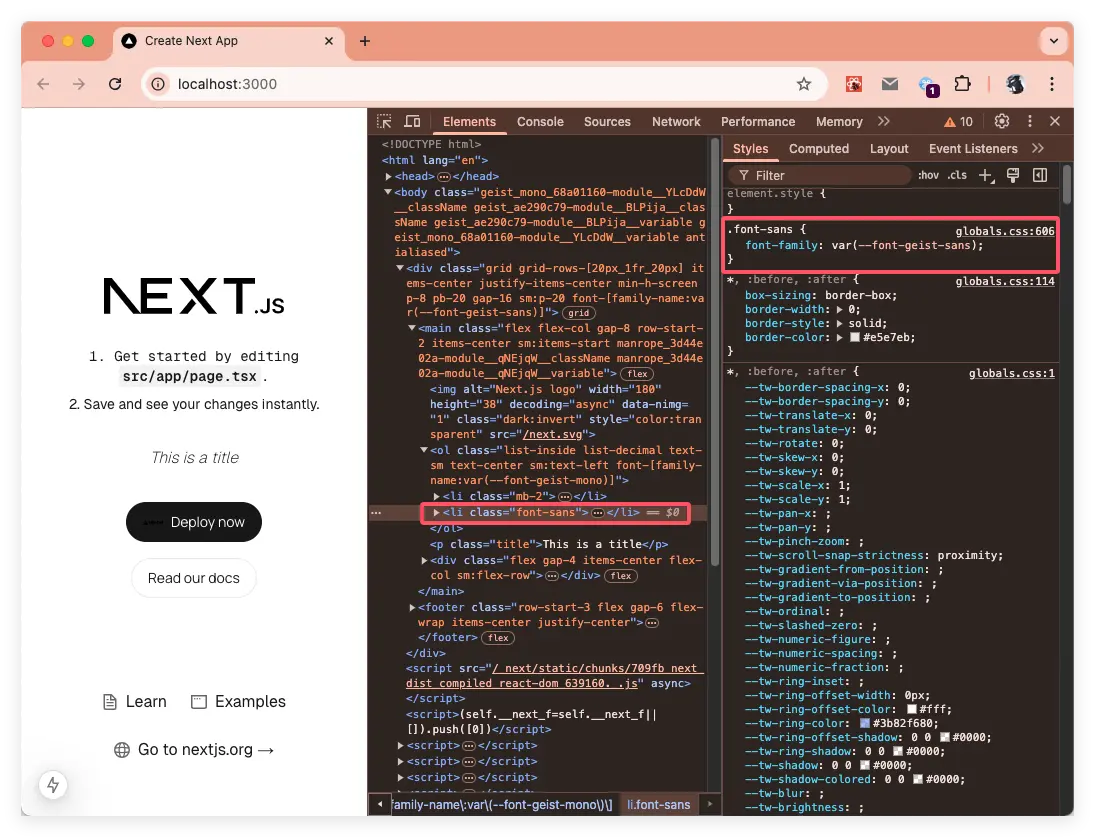
在頁面中使用
在 tailwindcss 中自定義字體,需要通過
font-為前綴來使用!<li className='font-sans'>Save and see your changes instantly.</li>瀏覽器的效果:
iconfont 字體使用
這裏就引用阿里媽媽方圓體字體,如下圖:
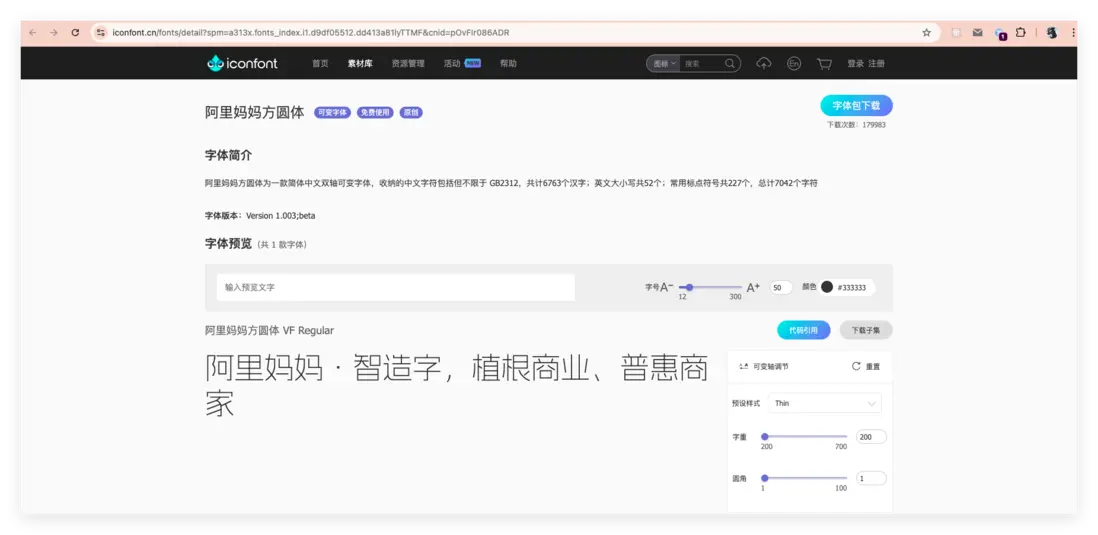
因為篇幅的問題,就不一步步演示字體的下載,下載字體需要登錄!
下載字體後,將字體放入項目中並在 globals.css 中引入,然後創建 alimama/page.tsx 文件。 如下圖:
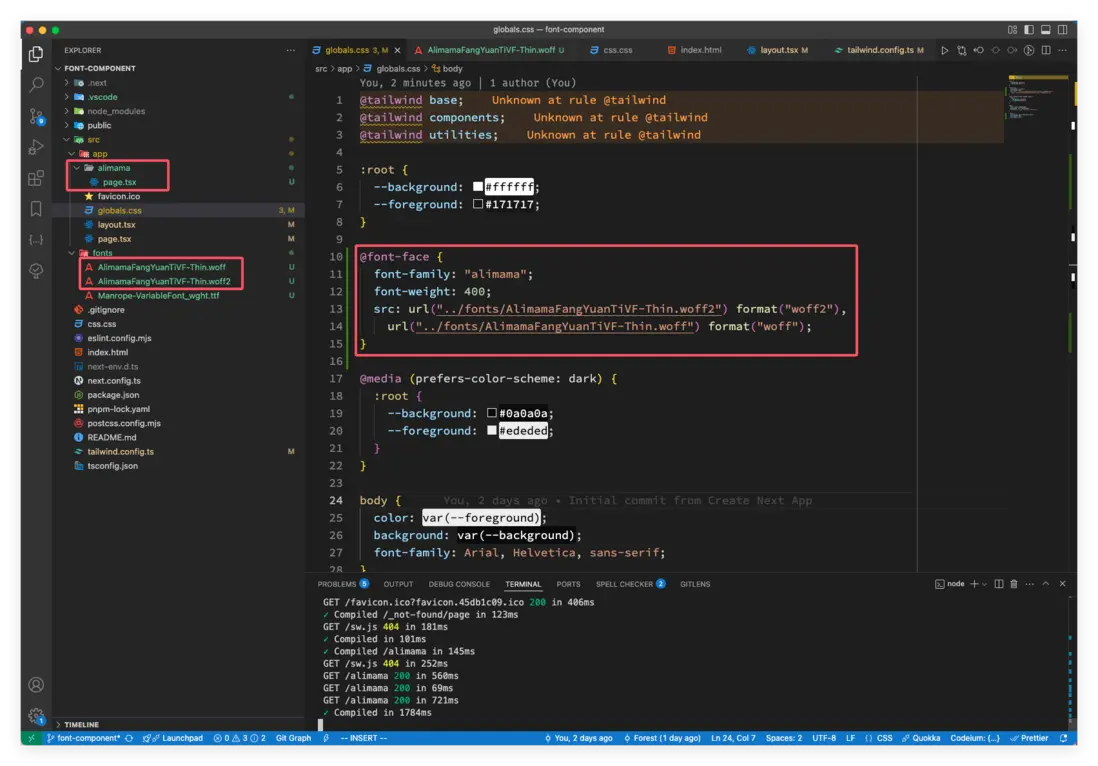
引入字體的 CSS 代碼:
@font-face {
    font-family: "alimama";
    font-weight: 400;
    src: url("../fonts/AlimamaFangYuanTiVF-Thin.woff2") format("woff2"),
        url("../fonts/AlimamaFangYuanTiVF-Thin.woff") format("woff");
}
接着就在在 tailwind.config.ts 文件中配置阿里媽媽字體:
alimama: ['alimama'],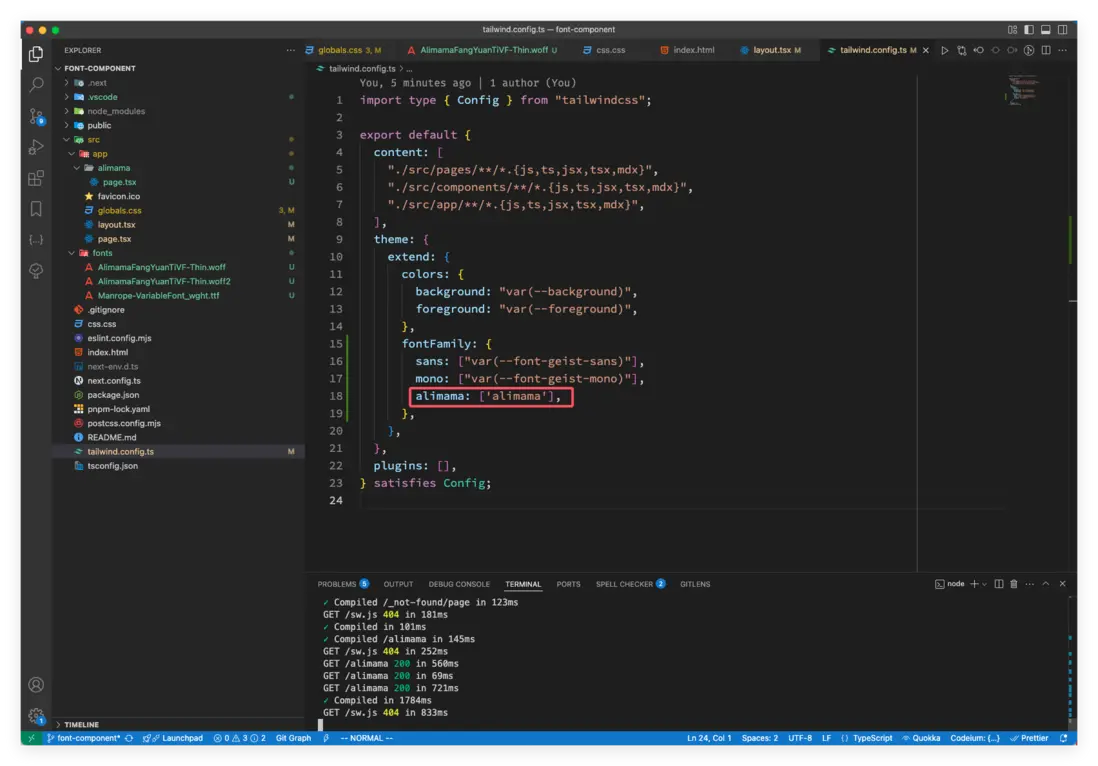
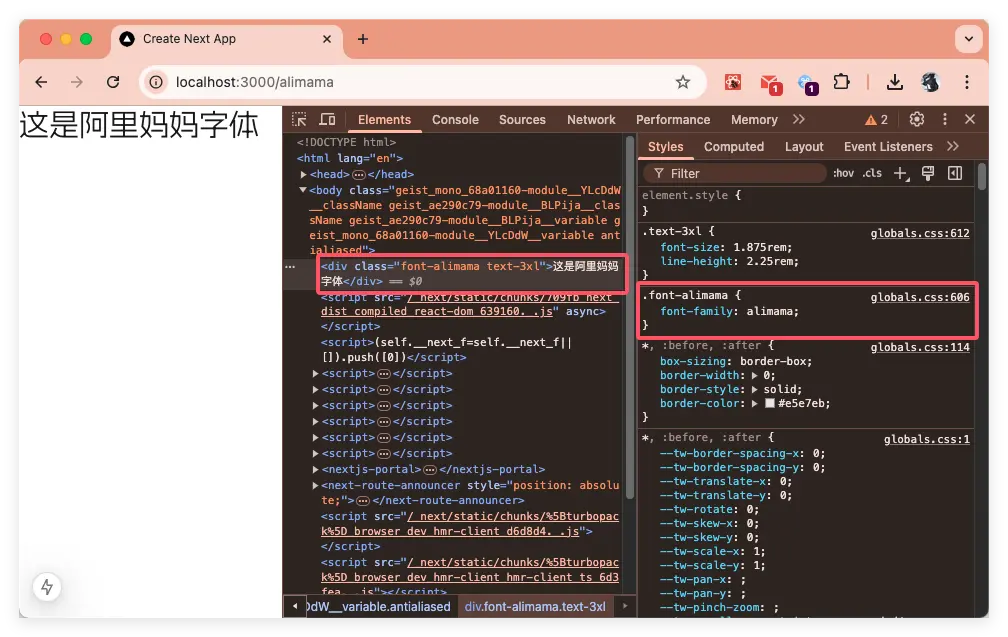
下面是在 app/alimama/page.tsx 中的使用:
const page = () => {
return (
<div className="font-alimama text-3xl">這是阿里媽媽字體</div>
)
}
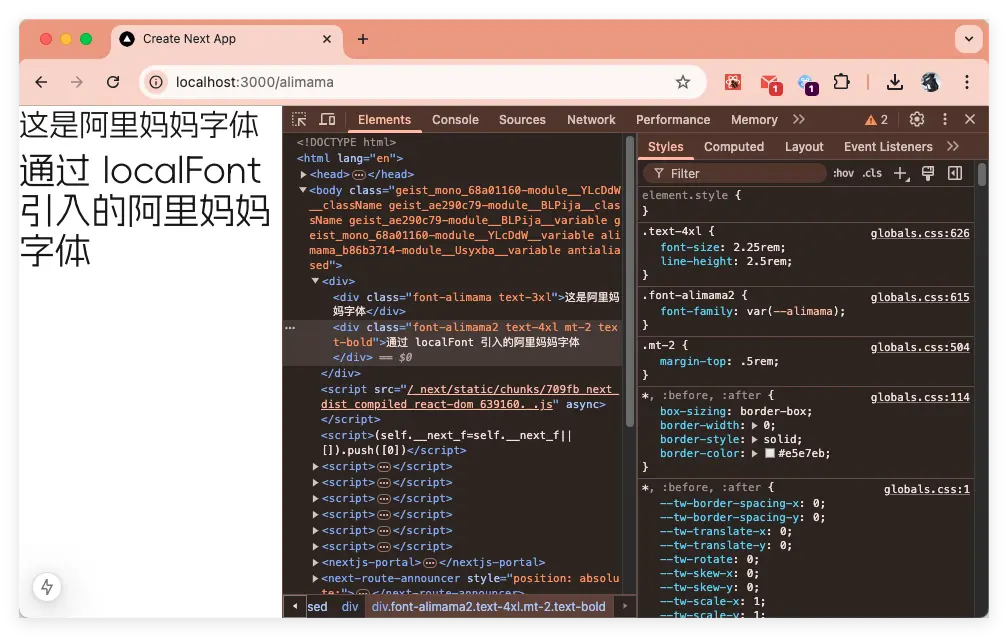
export default page效果如下:
關於 iconfont 圖標的使用,這裏推薦一篇掘金社區的文章 nextjs封裝svgIcon,使用iconfont!
上面引入阿里媽媽字體也可以通過localFont函數加載,因為篇幅太長,這裏就不詳細説明了,我在演示項目中完善了這一塊的內容,可以通過 https://github.com/clin211/next-awesome/commit/813b6c809ccd203051d0f6577f856acbb2c92218 查看!
總結
本文對比介紹了傳統字體和可變字體的區別,接着引出 Next.js 中 Font 組件;Next.js 的 Font 組件通過自動預加載、消除佈局偏移和可變字體支持,顯著提升網頁性能與開發效率,同時賦予設計更大靈活性。其提供 Google 字體與本地託管雙模式加載方案,結合 subsets 子集、axes 可變軸等配置等,構建出高效字體加載體系。實踐中推薦採用 CSS 變量全局管理,優先使用可變字體減少文件體積,配合子集化加載進一步優化性能。通過變量綁定無縫集成 Tailwind 等主流框架,並支持混合字體方案靈活應對多樣化設計場景。開發中需注意本地字體路徑、非可變字體的必填參數(如 weight/style),以及生產環境下預加載等等細節。
「文章推薦」
- What is My Font?:https://medium.com/@paowens59/what-is-my-font-f775c72fe67a
- Introducing OpenType Variable Fonts:https://medium.com/variable-fonts/https-medium-com-tiro-intro...
- 如何在前端項目中使用出色的開源字體:https://juejin.cn/post/7381784676720050215?searchId=202502171...
- 字體文件 OTF 壓縮:https://juejin.cn/post/7397592619809308691?searchId=202502171...
- nextjs封裝svgIcon,使用iconfont:https://juejin.cn/post/7326414660487512116
「參考資料」
- @font-face:https://developer.mozilla.org/zh-CN/docs/Web/CSS/@font-face
- subset:https://fonts.google.com/knowledge/glossary/subsetting
- MDN font-weight:https://developer.mozilla.org/zh-CN/docs/Web/CSS/font-weight
- MDN font-style:https://developer.mozilla.org/zh-CN/docs/Web/CSS/font-style
- tailwindcss 中自定義字體:https://tailwindcss.com/docs/font-family
- 字字珠璣:https://github.com/fan2/FontType/blob/master/README.md


