1. 概述
如今,前端和後端組件經常分離構成一個 Web 應用程序。通常,我們以後端組件的形式暴露 API,供前端組件或第三方應用集成使用。
在這種情況下,對後端 API 的規範至關重要。同時,API 文檔應該具有信息量大、易讀且易於遵循的特點。
此外,參考文檔應同時描述 API 中的所有變更。手動完成此任務既費時又費力,因此自動化流程勢在必行。
在本教程中,我們將探討 Swagger 2 用於 Spring REST Web 服務,並使用 Springfox 實現 Swagger 2 規範。如果您不熟悉 Swagger,請訪問 其網站 以瞭解更多信息,然後再繼續本教程。
需要注意的是,最新的 Swagger 規範,現在稱為 OpenAPI 3.0,得到了 Springdoc 項目的更好支持,並且應該用於記錄 Spring REST API。 此外,Spring Boot 3 不支持該庫。
2. 目標項目
我們使用的 REST 服務創建不屬於本文檔的範圍。如果您已經有合適的項目,請使用它。如果沒有,以下鏈接是一個不錯的起點:
- 使用 Spring 和 Java Config 構建 REST API 文章
- 構建 RESTful Web 服務
3. 添加 Maven 依賴
如上所述,我們將使用 Swagger 規範的 Springfox 實現。最新版本可以在 Maven Central 上找到。
要在我們的 Maven 項目中添加它,需要在 pom.xml 文件中添加一個依賴:
<dependency>
    <groupId>io.springfox</groupId>
    <artifactId>springfox-swagger2</artifactId>
    <version>3.0.0</version>
</dependency>
3.1. Spring Boot 依賴
對於基於 Spring Boot 的項目,只需要添加一個 springfox-boot-starter 依賴即可。
<dependency>
    <groupId>io.springfox</groupId>
    <artifactId>springfox-boot-starter</artifactId>
    <version>3.0.0</version>
</dependency>
我們可以在 Spring Boot 父項目管理下添加任何所需的啓動器。
<dependency>
    <groupId>org.springframework.boot</groupId>
    <artifactId>spring-boot-starter-parent</artifactId>
    <version>3.3.2</version>
</dependency>
4. 將 Swagger 2 集成到項目
This section describes how to integrate Swagger 2 into your project. Swagger 2 is a popular open-source framework for designing, building, and documenting RESTful APIs. Integrating Swagger 2 allows you to automatically generate API documentation, test your API endpoints, and facilitate collaboration among developers.
Here's a breakdown of the steps involved:
-
Install the Swagger CLI: The Swagger CLI (Command Line Interface) is a command-line tool that you'll use to interact with Swagger 2. You can download and install it from the official Swagger website: https://swagger.io/install/
-
Create a Swagger Definition: A Swagger definition is a YAML or JSON file that describes your API. This file defines the endpoints, request/response formats, and other relevant information. You can create a new definition from scratch or import an existing one.
Example YAML Swagger Definition:
--- definitions: User: type: object properties: id: type: integer description: The user's ID. name: type: string description: The user's name. -
Generate API Documentation: Once you have a Swagger definition, you can use the Swagger CLI to generate API documentation in various formats, such as HTML, PDF, or JSON.
swagger serve --enable-pretty-errors --api-docs -
Test Your API Endpoints: The Swagger UI provides a user-friendly interface for testing your API endpoints. You can send requests to your API endpoints and view the responses directly in the browser.
The Swagger UI automatically detects and displays the API definition, allowing you to interact with your API seamlessly.
4.1. Java 配置文件
Swagger 的配置主要圍繞着 Docket Bean 進行:
@Configuration
public class SpringFoxConfig {
    @Bean
    public Docket api() {
        return new Docket(DocumentationType.SWAGGER_2)
          .select()
          .apis(RequestHandlerSelectors.any())
          .paths(PathSelectors.any())
          .build();
    }
}
在定義了 Docket Bean 後,其 select() 方法返回一個 ApiSelectorBuilder 實例,該實例提供了一種控制 Swagger 暴露的端點的途徑。
我們可以使用 RequestHandlerSelectors 和 PathSelectors 配置謂詞,以選擇具有特定條件的 RequestHandler。 使用 any() 對兩者都進行配置,將我們 API 的所有端點通過 Swagger 提供文檔。
4.2. 不使用 Spring Boot 的配置
在純粹的 Spring 項目中,我們需要顯式地啓用 Swagger 2。為此,我們需要在配置類上使用 @EnableSwagger2 :
@Configuration
@EnableSwagger2
public class SpringFoxConfig {
}
此外,如果沒有 Spring Boot,我們無法享受資源處理器的自動配置的便利。
Swagger UI 添加了一組資源,這些資源必須作為擴展 WebMvcConfigurerAdapter 類並使用 @EnableWebMvc 註解的類進行配置。
@Override
public void addResourceHandlers(ResourceHandlerRegistry registry) {
    registry.addResourceHandler("swagger-ui.html")
      .addResourceLocations("classpath:/META-INF/resources/");

    registry.addResourceHandler("/webjars/**")
      .addResourceLocations("classpath:/META-INF/resources/webjars/");
}
4.3. 驗證
要驗證 Springfox 是否正常工作,可以訪問以下 URL 在瀏覽器中:
http://localhost:8080/v2/api-docs
結果是一個包含大量鍵值對的 JSON 響應,不太易於閲讀。 幸運的是,Swagger 提供了 Swagger UI 用於此目的。
5. Swagger UI
Swagger UI 是一個內置解決方案,它使得用户與 Swagger 生成的 API 文檔進行交互更加容易。
5.1. 啓用 Springfox 的 Swagger UI
為了使用 Swagger UI,我們需要添加額外的 Maven 依賴:
<dependency>
    <groupId>io.springfox</groupId>
    <artifactId>springfox-swagger-ui</artifactId>
    <version>3.0.0</version>
</dependency>
現在我們可以通過訪問以下地址在我們的瀏覽器中進行測試:
http://localhost:8080/swagger-ui/
結果應大致如下所示:
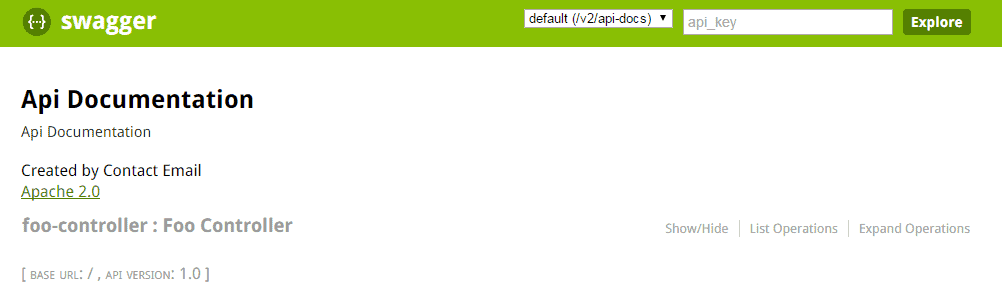
5.2. 探索 Swagger 文檔
Swagger 的響應中包含應用程序中定義的 所有控制器列表。 點擊其中的任何一個,將列出有效的 HTTP 方法(DELETE、GET、HEAD、OPTIONS、PATCH、POST、PUT)。
展開每個方法將提供額外的有用數據,例如響應狀態、內容類型和參數列表。 還可以通過 UI 嘗試每個方法。
Swagger 與我們的代碼庫同步的能力至關重要。 為了演示這一點,我們可以向我們的應用程序添加一個新的控制器:
@RestController
public class CustomController {

    @RequestMapping(value = "/custom", method = RequestMethod.POST)
    public String custom() {
        return "custom";
    }
}
現在刷新 Swagger 文檔,我們看到 custom-controller 已出現在控制器列表中。正如我們所知,Swagger 的響應中只顯示一個方法 (POST)。
6. Spring Data REST
Springfox 通過其 springfox-data-rest 庫,提供對 Spring Data REST 的支持。
Spring Boot 會在 classpath 中發現 spring-boot-starter-data-rest 時自動配置。
現在,讓我們創建一個名為 User 的實體:
@Entity
public class User {
    @Id
    private Long id;
    private String firstName;
    private int age;
    private String email;

    // getters and setters
}
然後我們將創建一個 UserRepository,用於為 User實體添加CRUD操作:
@Repository
public interface UserRepository extends CrudRepository<User, Long> {
}
最後,我們將導入 SpringDataRestConfiguration 類到 SpringFoxConfig 類中:
@EnableSwagger2
@Import(SpringDataRestConfiguration.class)
public class SpringFoxConfig {
    //...
}
注意:我們將使用 @EnableSwagger2 註解來啓用 Swagger,因為 @EnableSwagger2WebMvc 在 版本 3 的庫中已被棄用。
讓我們重啓應用程序以生成 Spring Data REST API 的規範:

我們可以看到 Springfox 已為 User 實體生成了規範,包括 HTTP 方法,如 GET、POST、PUT、PATCH 和 DELETE。
7. Bean 驗證
Springfox 也通過其 springfox-bean-validators 庫支持 Bean 驗證註解。
首先,我們將 Maven 依賴添加到我們的 pom.xml 中:
<dependency>
    <groupId>io.springfox</groupId>
    <artifactId>springfox-bean-validators</artifactId>
    <version>3.0.0</version>
</dependency>再次強調,如果使用 Spring Boot,我們就不需要顯式地提供上述依賴項。
接下來,讓我們為 User 實體添加一些驗證註解,例如 @NotNull 和 @Min。
@Entity
public class User {
    //...

    @NotNull(message = "First Name cannot be null")
    private String firstName;

    @Min(value = 15, message = "Age should not be less than 15")
    @Max(value = 65, message = "Age should not be greater than 65")
    private int age;
}
最後,我們將導入 <a href="http://springfox.github.io/springfox/javadoc/current/springfox/bean/validators/configuration/BeanValidatorPluginsConfiguration.html"><em >BeanValidatorPluginsConfiguration</em></em ></a > 類到SpringFoxConfig 類中:
@EnableSwagger2
@Import(BeanValidatorPluginsConfiguration.class)
public class SpringFoxConfig {
    //...
}
讓我們來查看一下 API 規範的變更:
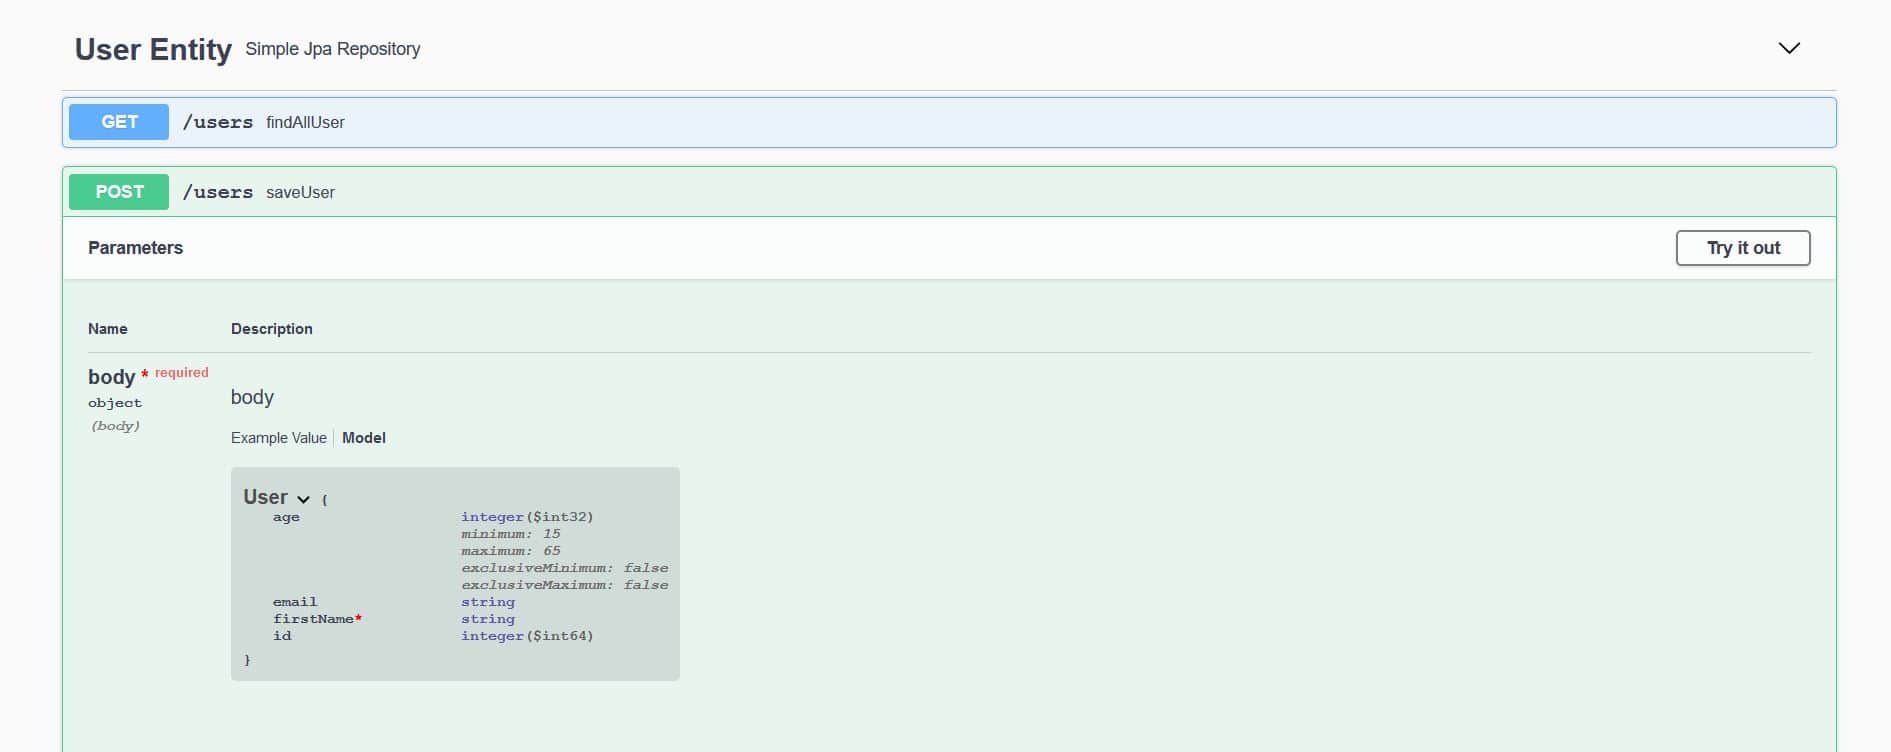
在此,我們可以觀察到 User 模型上 firstName 字段是 必需的。 此外,age 字段也定義了最小和最大值。
8. 插件
為了向 API 規範添加特定功能,我們可以創建一個 Springfox 插件。插件可以提供各種功能,從豐富模型和屬性到自定義 API 列表和默認值。
Springfox 通過其 spi 模塊支持插件創建。spi 模塊提供了一些接口,例如 ModelBuilderPlugin、ModelPropertyBuilderPlugin 和 ApiListingBuilderPlugin,這些接口作為擴展鈎子,用於實現自定義插件。
為了演示其功能,讓我們創建一個插件來豐富 email 屬性,該屬性位於 User 模型中。我們將使用 ModelPropertyBuilderPlugin 接口並設置 pattern 和 example 的值。
首先,讓我們創建一個名為 EmailAnnotationPlugin 的類,並覆蓋 supports 方法,以允許任何 文檔類型,例如 Swagger 1.2 和 Swagger 2:
@Component
@Order(Validators.BEAN_VALIDATOR_PLUGIN_ORDER)
public class EmailAnnotationPlugin implements ModelPropertyBuilderPlugin {
    @Override
    public boolean supports(DocumentationType delimiter) {
        return true;
    }
}
然後,我們將覆蓋 ModelPropertyBuilderPlugin 的 apply 方法,以設置構建器屬性的值:
@Override
public void apply(ModelPropertyContext context) {
    Optional<Email> email = annotationFromBean(context, Email.class);
     if (email.isPresent()) {
        context.getSpecificationBuilder().facetBuilder(StringElementFacetBuilder.class)
          .pattern(email.get().regexp());
        context.getSpecificationBuilder().example("[email protected]");
    }
}因此,API規範將顯示使用pattern和example值的@Email註解標註的屬性。
接下來,我們將@Email註解添加到User實體中:
@Entity
public class User {
    //...

    @Email(regexp=".*@.*\\..*", message = "Email should be valid")
    private String email;
}
最後,我們將啓用 EmailAnnotationPlugin 在 SpringFoxConfig 類中,通過將其註冊為 Bean 來完成:
@Import({BeanValidatorPluginsConfiguration.class})
public class SpringFoxConfig {
    //...

    @Bean
    public EmailAnnotationPlugin emailPlugin() {
        return new EmailAnnotationPlugin();
    }
}
讓我們來看看 EmailAnnotationPlugin 的實際應用:
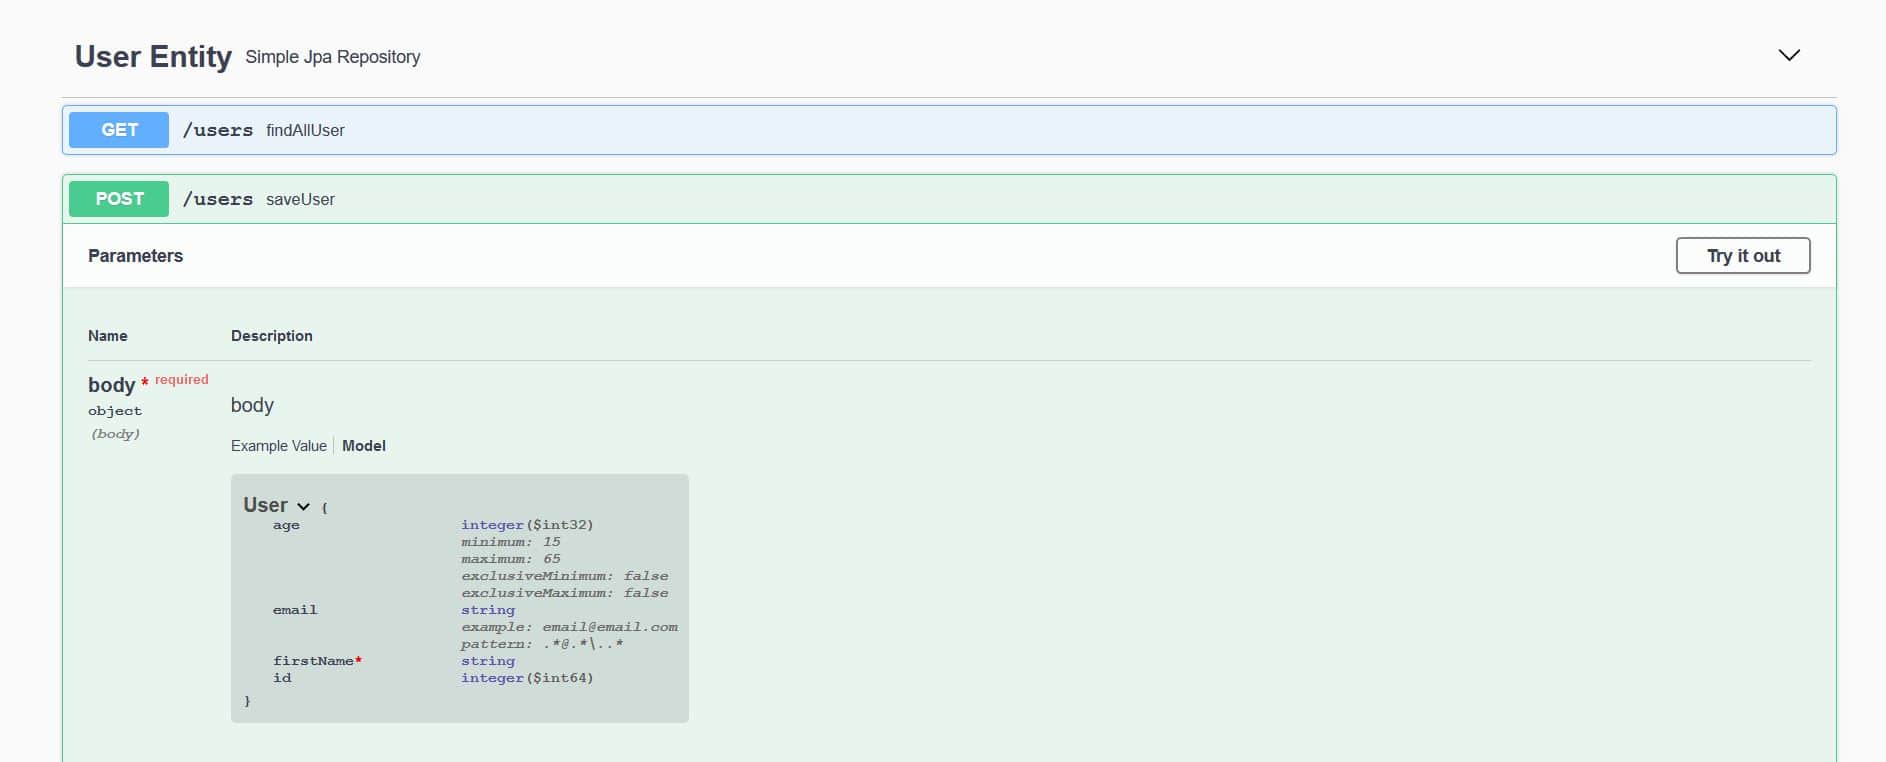
我們可以看到 pattern 的值與 email 屬性的 User 實體中的正則表達式 (.@.\..*) 相同。
同樣,example ([email protected]) 的值也相同,正如在 EmailAnnotationPlugin 的 apply 方法中定義的。
9. 高級配置
我們的應用程序中的 Docket Bean 可以配置,從而使我們能夠更好地控制 API 文檔生成過程。
9.1. 使用 Swagger 響應過濾 API
並非總是希望暴露整個 API 的文檔。可以通過向 apis() 和 paths() 方法傳遞參數來限制 Swagger 的響應,這些方法是 Docket 類的。
如上所示,RequestHandlerSelectors 允許使用 any 或 none 謂詞,但也可用於根據基礎包、類註解和方法註解來過濾 API。
PathSelectors 通過謂詞提供額外的過濾功能,掃描應用程序的請求路徑。可以使用 any()、none()、regex() 或 ant()。
在下面的示例中,我們將指示 Swagger 只包含特定包中的控制器,並使用 ant() 謂詞指定特定路徑:
@Bean
public Docket api() {
    return new Docket(DocumentationType.SWAGGER_2)
      .select()
      .apis(RequestHandlerSelectors.basePackage("com.baeldung.web.controller"))
      .paths(PathSelectors.ant("/foos/*"))
      .build();
}
9.2. 自定義信息
Swagger 還提供了一些默認值在響應中,我們可以自定義,例如“Api 文檔”、“創建人聯繫郵箱”和“Apache 2.0”。
要更改這些值,我們可以使用 apiInfo(ApiInfo apiInfo) 方法——ApiInfo 類包含有關 API 的自定義信息:
@Bean
public Docket api() {
    return new Docket(DocumentationType.SWAGGER_2)
      .select()
      .apis(RequestHandlerSelectors.basePackage("com.example.controller"))
      .paths(PathSelectors.ant("/foos/*"))
      .build()
      .apiInfo(apiInfo());
}

private ApiInfo apiInfo() {
    return new ApiInfo(
      "My REST API",
      "Some custom description of API.",
      "API TOS",
      "Terms of service",
      new Contact("John Doe", "www.example.com", "[email protected]"),
      "License of API", "API license URL", Collections.emptyList());
}
9.3. 自定義方法響應消息
Swagger 允許通過 Docket 的 globalResponses() 方法全局覆蓋 HTTP 方法的響應消息。
首先,我們需要指示 Swagger 不使用默認響應消息。 假設我們想要覆蓋所有 GET 方法的 500 和 403 響應消息。
為了實現這一點,必須在 Docket 的初始化塊中添加一些代碼(為了清晰起見,原始代碼已省略):
.useDefaultResponseMessages(false)
.globalResponses(HttpMethod.GET, newArrayList(
    new ResponseBuilder().code("500")
        .description("500 message").build(),
    new ResponseBuilder().code("403")
        .description("Forbidden!!!!!").build()
));
由於您提供的文本只包含一個圖片鏈接,而我無法訪問外部鏈接,因此無法進行翻譯。請提供圖片內容或圖片所包含的文本,我才能按照您的要求進行翻譯。
10. 使用 OAuth 保護的 API 和 Swagger UI
Swagger UI 提供了一些非常實用的功能,我們之前已經詳細地介紹了它們。但是,如果我們無法訪問經過 OAuth 保護且未授權的 API,就無法充分利用這些功能。
讓我們看看如何使用授權碼流程,讓 Swagger 訪問經過 OAuth 保護的 API。在下面的示例中,我們將配置 Swagger 以訪問我們的安全 API。
我們將配置 Swagger 使用 SecurityScheme 和 SecurityContext 支持,以訪問我們的安全 API。
@Bean
public Docket api() {
    return new Docket(DocumentationType.SWAGGER_2).select()
        .apis(RequestHandlerSelectors.any())
        .paths(PathSelectors.any())
        .build()
        .securitySchemes(Arrays.asList(securityScheme()))
        .securityContexts(Arrays.asList(securityContext()));
}
10.1. 安全配置
我們將定義一個 <em >SecurityConfiguration</em> Bean 在我們的 Swagger 配置中,並設置一些默認值:
@Bean
public SecurityConfiguration security() {
    return SecurityConfigurationBuilder.builder()
        .clientId(CLIENT_ID)
        .clientSecret(CLIENT_SECRET)
        .scopeSeparator(" ")
        .useBasicAuthenticationWithAccessCodeGrant(true)
        .build();
}
10.2. SecurityScheme
接下來,我們將定義我們的 SecurityScheme;它用於描述我們 API 的安全方式(基本身份驗證、OAuth2 等)。
在我們的案例中,我們將定義一個 OAuth 方案,用於安全我們的資源服務器:
private SecurityScheme securityScheme() {
    GrantType grantType = new AuthorizationCodeGrantBuilder()
        .tokenEndpoint(new TokenEndpoint(AUTH_SERVER + "/token", "oauthtoken"))
        .tokenRequestEndpoint(
          new TokenRequestEndpoint(AUTH_SERVER + "/authorize", CLIENT_ID, CLIENT_SECRET))
        .build();

    SecurityScheme oauth = new OAuthBuilder().name("spring_oauth")
        .grantTypes(Arrays.asList(grantType))
        .scopes(Arrays.asList(scopes()))
        .build();
    return oauth;
}
請注意,我們使用了 Authorization Code 授權模式,因此需要提供 OAuth2 授權服務器的 token 端點和授權 URL。
以下是我們需要定義的權限範圍:
private AuthorizationScope[] scopes() {
    AuthorizationScope[] scopes = {
      new AuthorizationScope("read", "for read operations"),
      new AuthorizationScope("write", "for write operations"),
      new AuthorizationScope("foo", "Access foo API") };
    return scopes;
}
它們與我們應用程序中實際定義的範圍同步,用於 /foos API。
10.3. SecurityContext
最後,我們需要為我們的示例 API 定義一個 SecurityContext:
private SecurityContext securityContext() {
    return SecurityContext.builder()
      .securityReferences(
        Arrays.asList(new SecurityReference("spring_oauth", scopes())))
      .forPaths(PathSelectors.regex("/foos.*"))
      .build();
}
請注意,此處使用的引用名稱 spring_oauth 與我們之前在 SecurityScheme 中使用的名稱保持一致。
10.4. 測試
現在我們已經完成了所有設置並準備好運行,讓我們來查看我們的 Swagger UI 並嘗試訪問 Foo API。
我們可以本地訪問 Swagger UI:
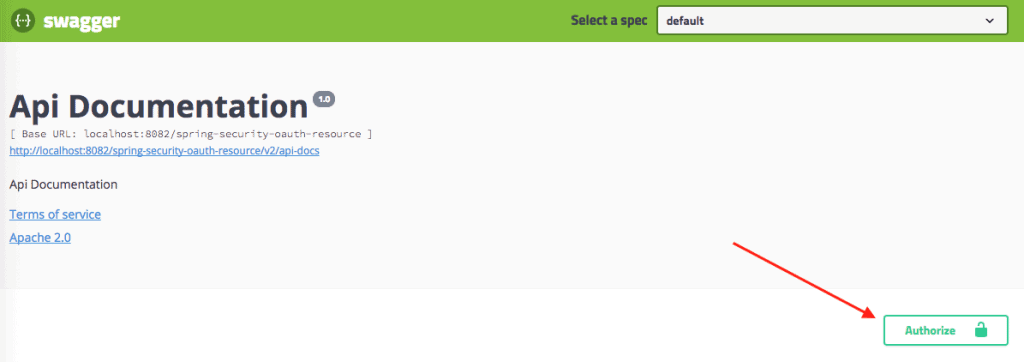
http://localhost:8082/spring-security-oauth-resource/swagger-ui.html如我們所見,由於我們的安全配置,現在存在一個新的授權按鈕。
當我們點擊授權按鈕時,我們可以看到以下彈窗,以授權我們的 Swagger UI 訪問受保護的 API。
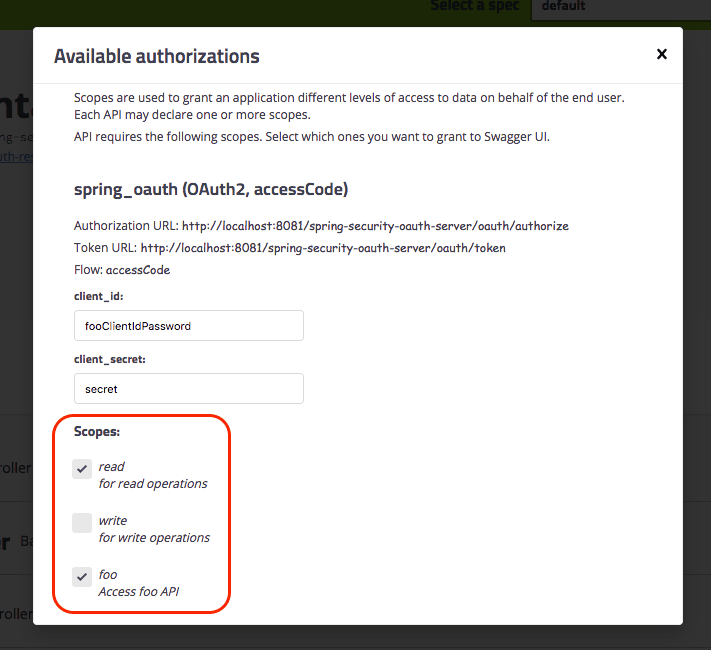
請注意:
- 我們現在可以看到 CLIENT_ID 和 CLIENT_SECRET,因為我們之前已經預先配置好了它們(但我們仍然可以更改它們)。
- 現在我們可以選擇所需的權限範圍。
以下是受保護 API 的標記方式:
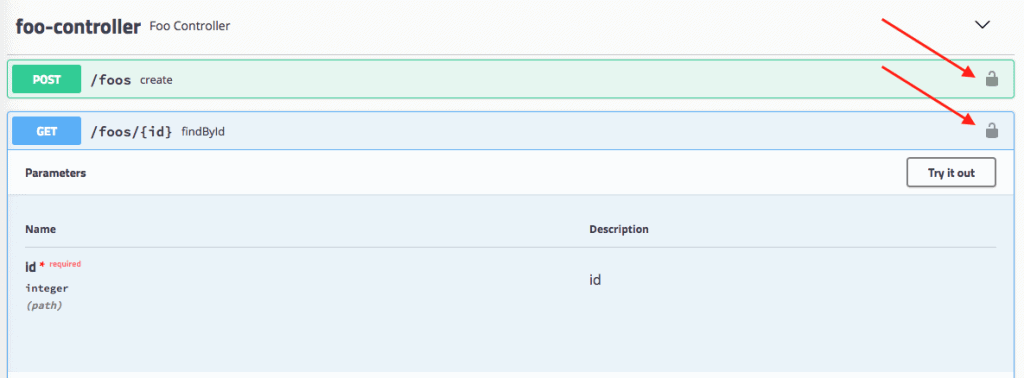
最後,我們可以調用我們的 API!
當然,現在這個安全配置已啓用,我們必須小心地對外暴露 Swagger UI,這幾乎是顯而易見的。
11. 結論
在本文中,我們設置了 Swagger 2 以生成 Spring REST API 的文檔。我們還探討了如何可視化和自定義 Swagger 的輸出。最後,我們研究了簡單的 OAuth 配置方案,用於 Swagger。
如果您是《REST With Spring》的學習者,請參閲模塊 7 的第 1 課,深入瞭解 Swagger 與 Spring 和 Spring Boot 的設置。
