1. 概述
該依賴項已停止維護。我們有一篇新的關於 SAML 與 Spring Security 的文章。
在本教程中,我們將探索 Spring Security SAML 與 Okta 作為身份提供者 (IdP)。
2. 什麼是 SAML?
安全斷言標記語言 (SAML) 是一種開放標準,允許身份提供者 (IdP) 安全地將用户的身份驗證和授權詳細信息發送到服務提供者 (SP)。
它使用基於 XML 的消息進行 IdP 和 SP 之間的通信。
換句話説,當用户嘗試訪問服務時,他需要通過 IdP 進行身份驗證。一旦身份驗證完成,IdP 將以 XML 格式將 SAML 屬性(包含授權和身份驗證詳細信息)發送到 SP。
除了提供安全的身份驗證傳輸機制外,SAML 還促進了單點登錄 (SSO),允許用户只需登錄一次,即可使用相同的憑據登錄到其他服務提供者。
3. Okta SAML 配置
首先,作為前提條件,您需要設置一個 Okta 開發者賬户。
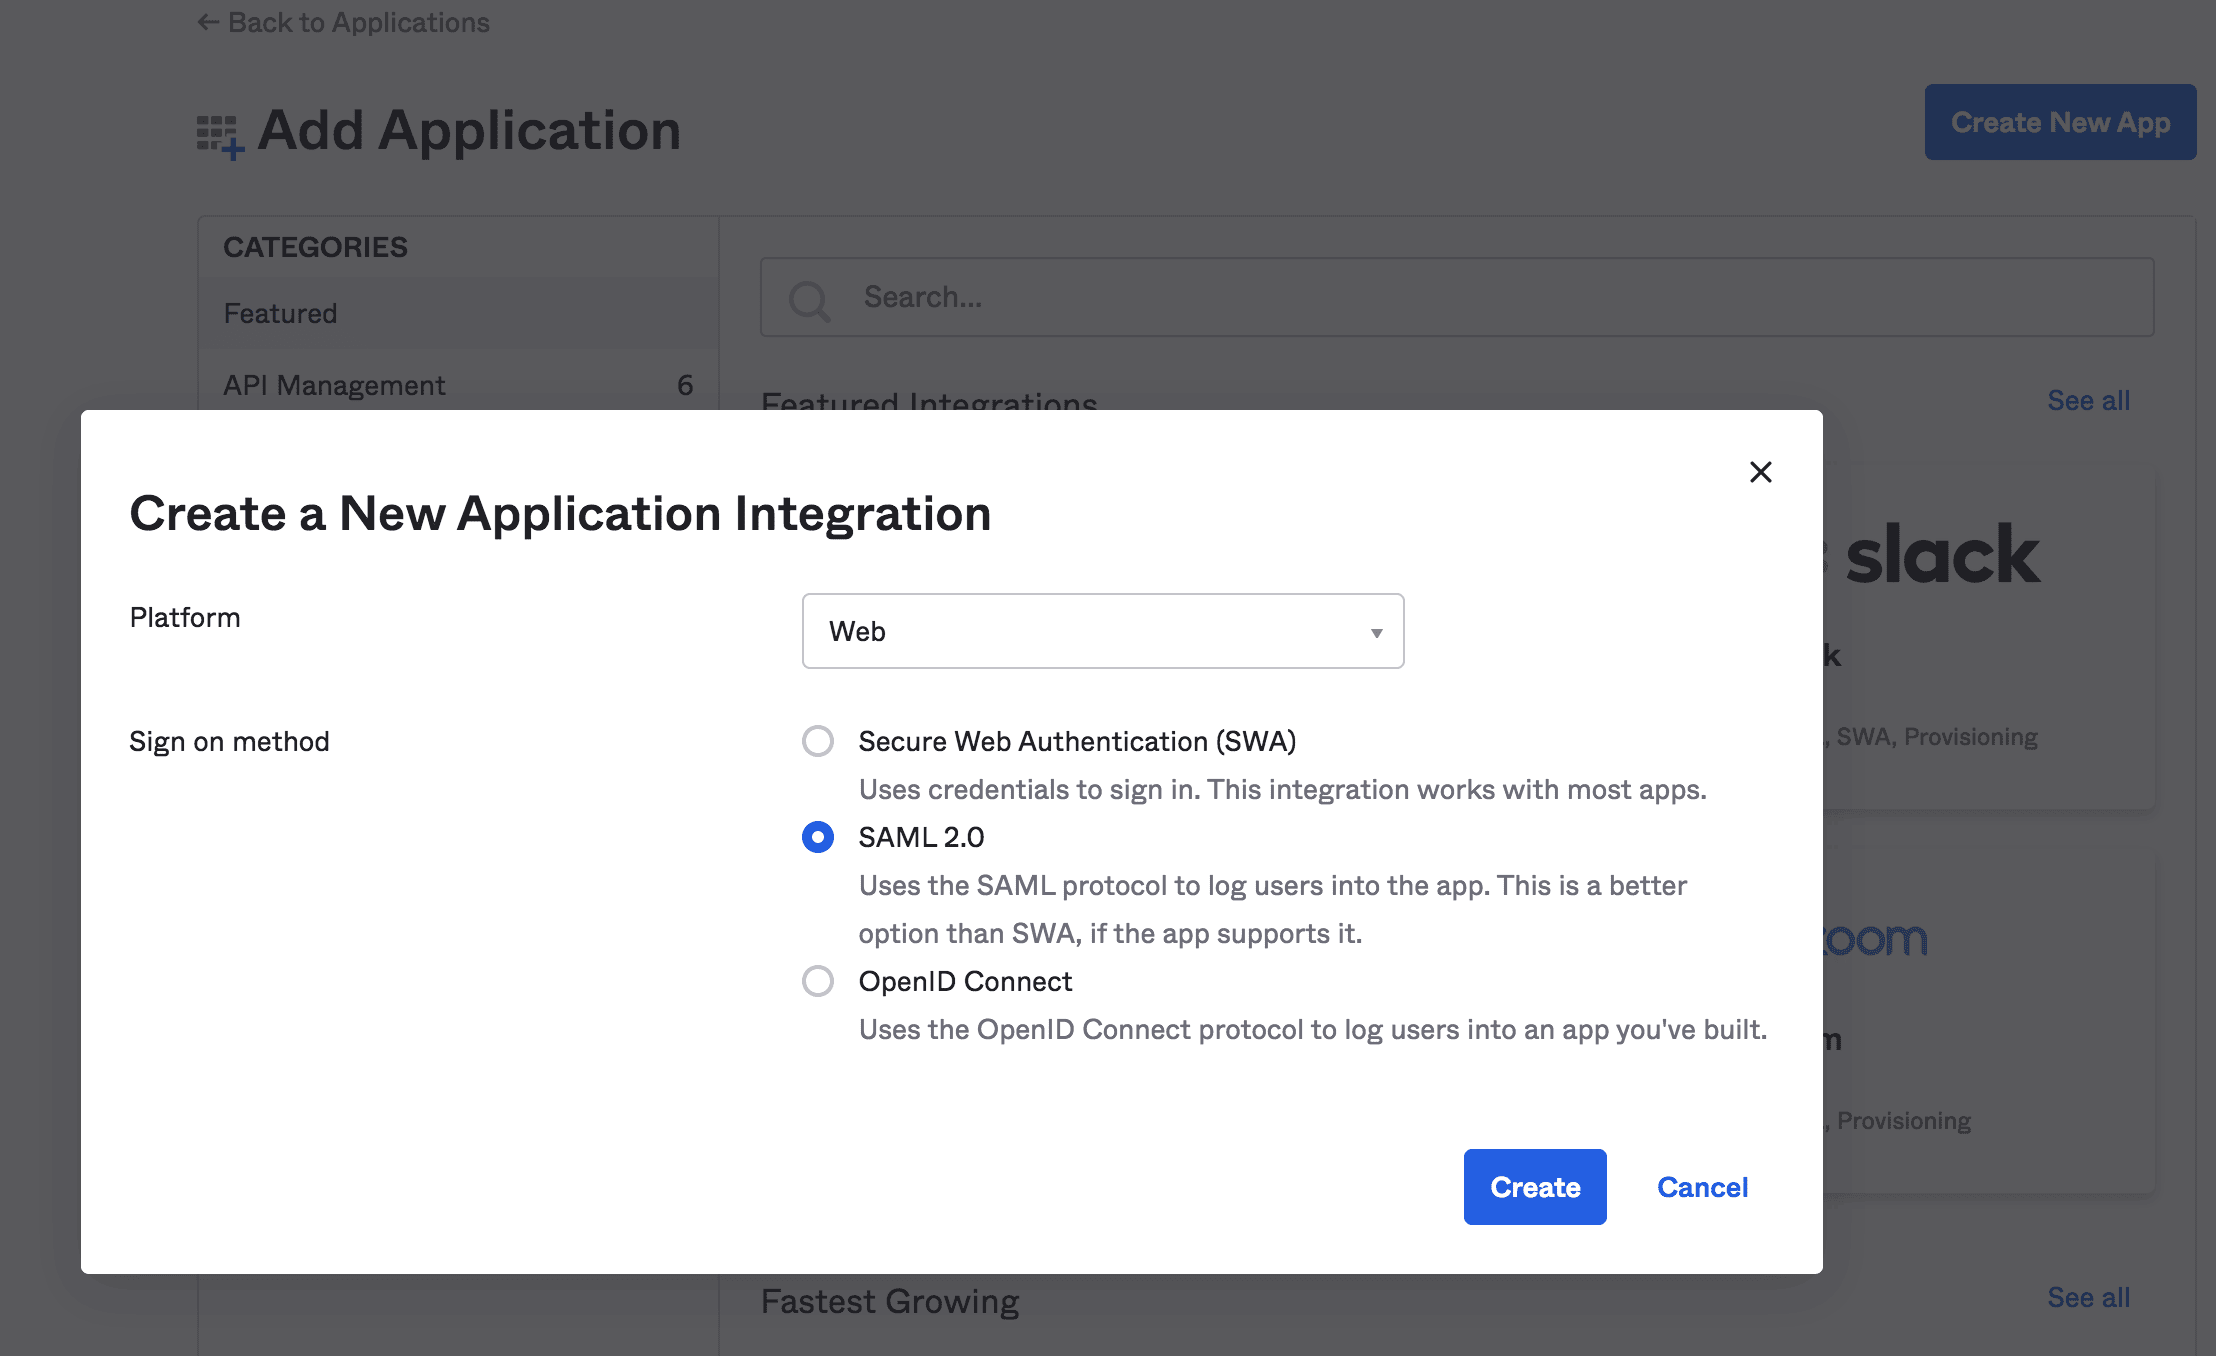
3.1. 創建新應用程序
然後,我們將創建一個與 SAML 2.0 支持集成的 Web 應用程序:
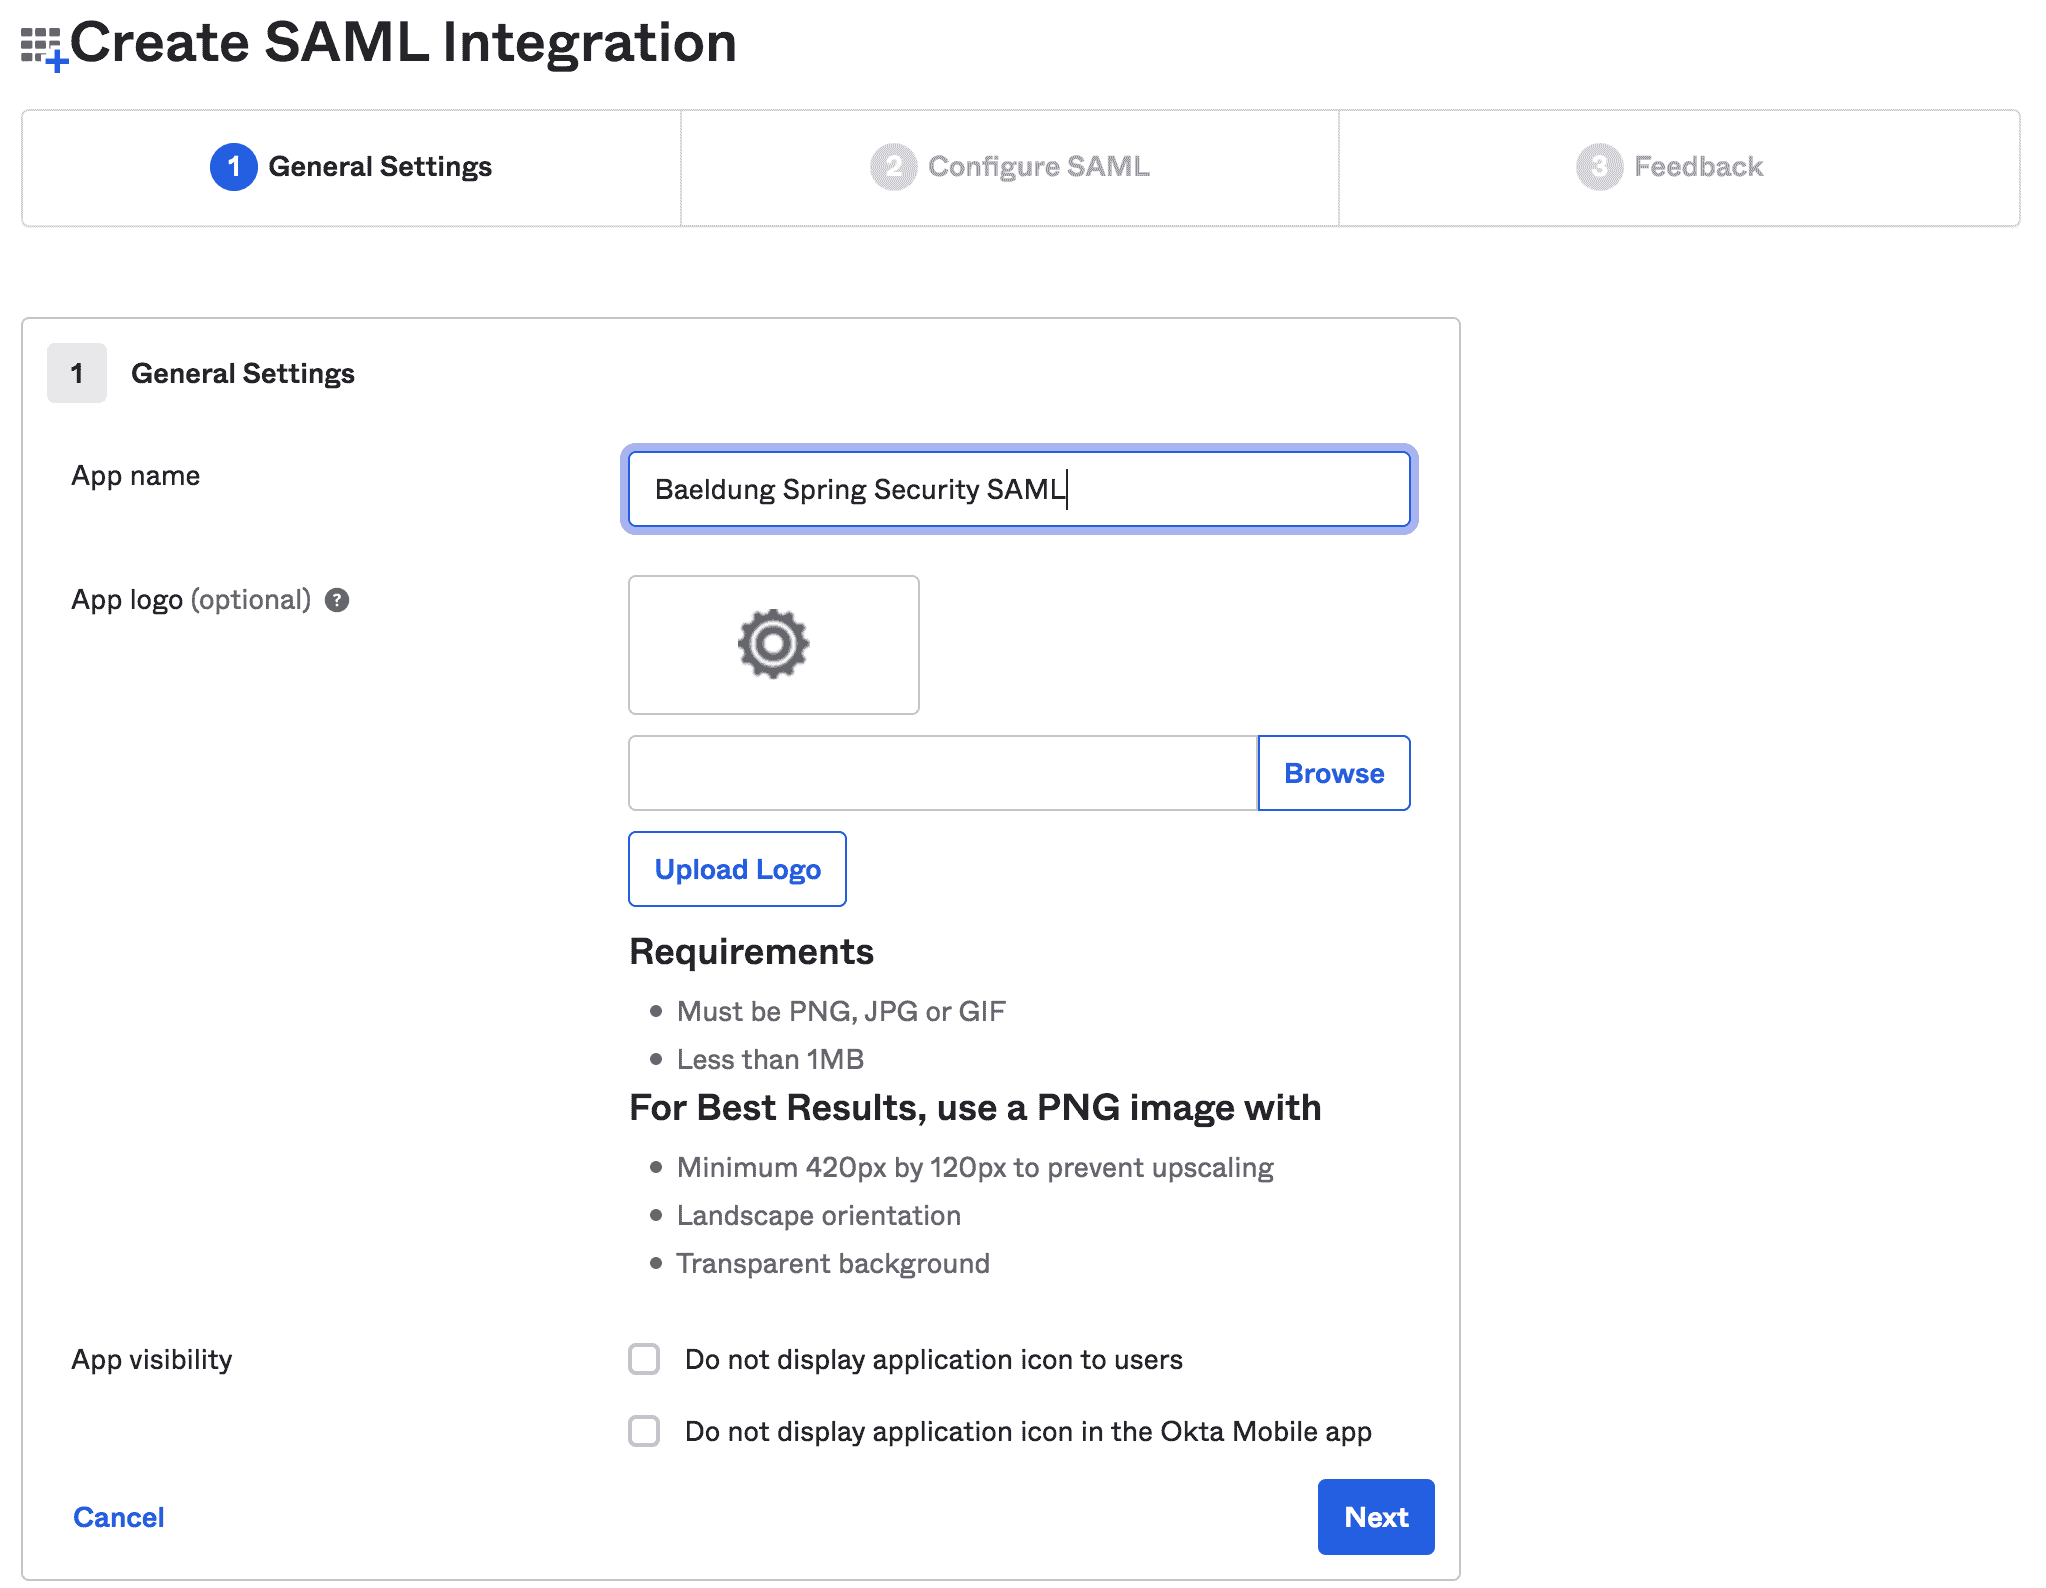
接下來,我們將填寫一般信息,例如應用程序名稱和應用程序徽標:
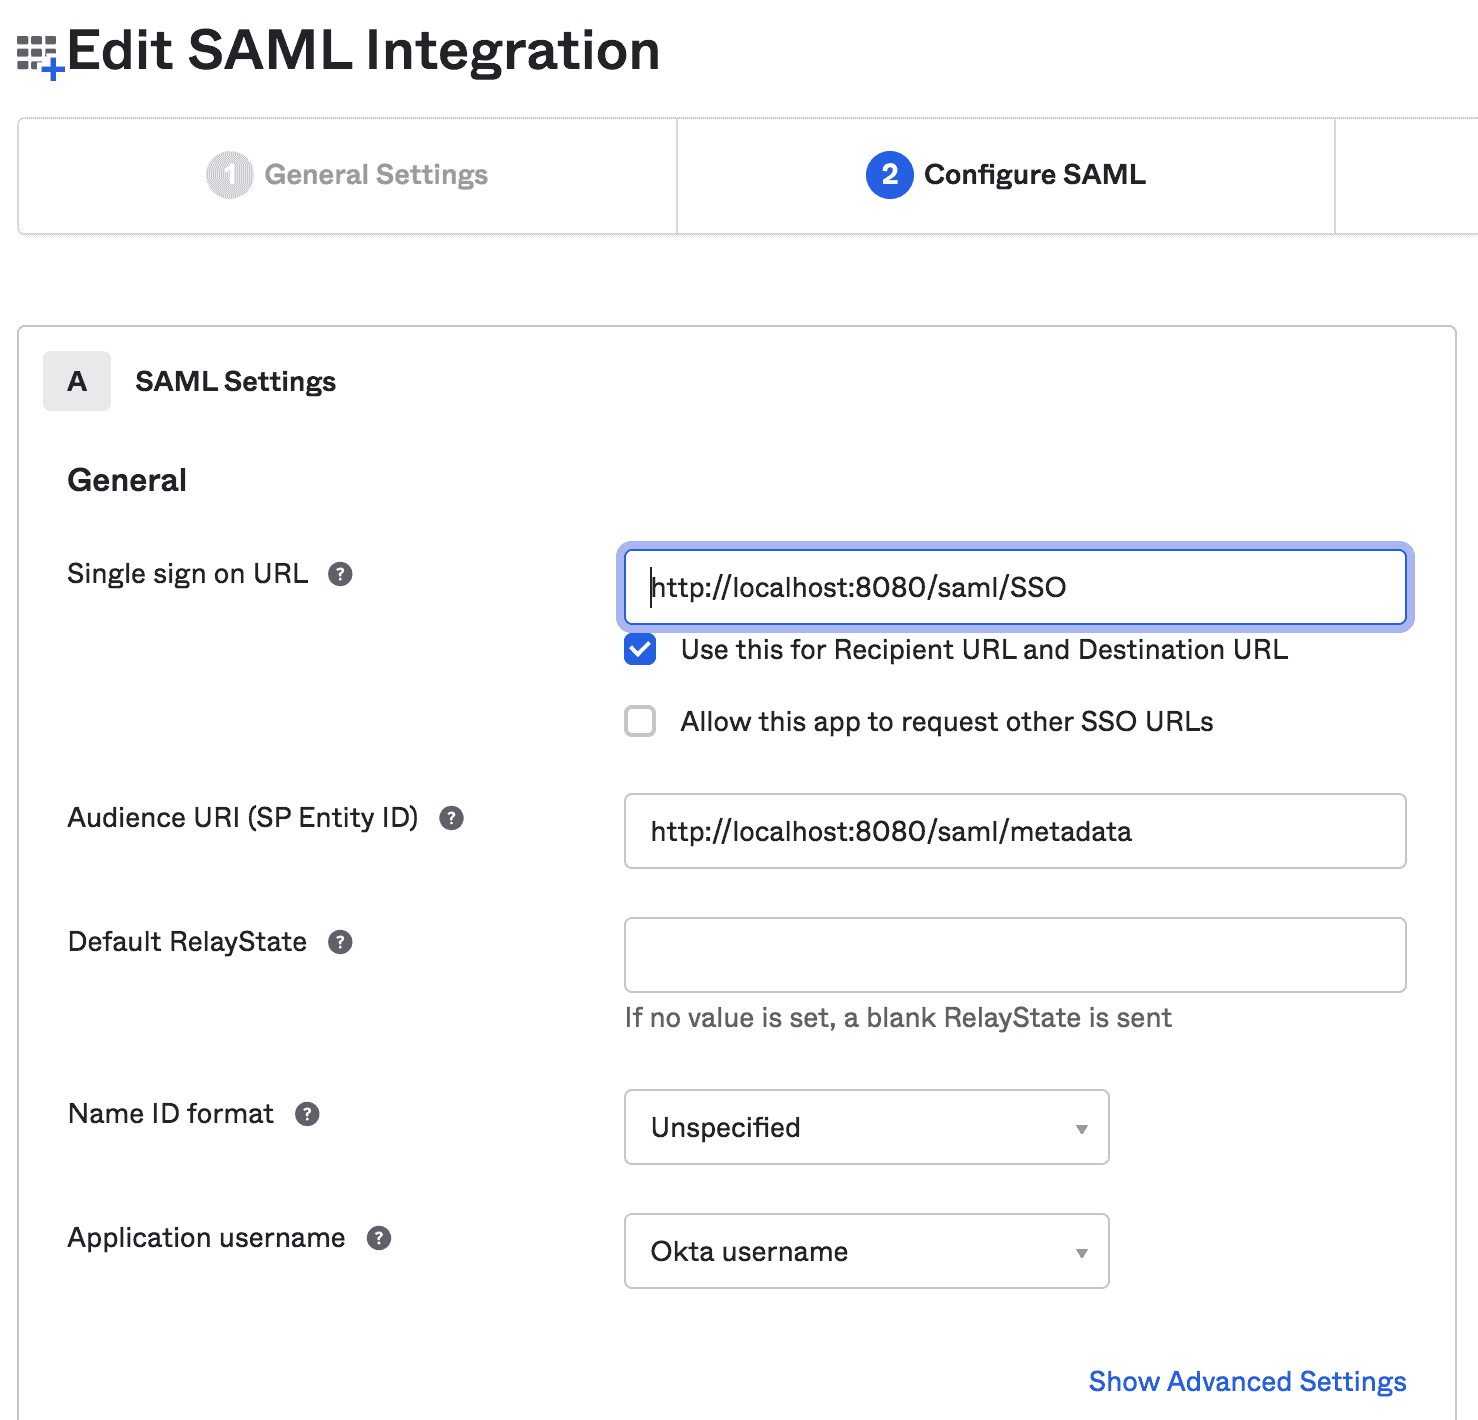
3.2. 編輯 SAML 集成
在本步驟中,我們將提供 SAML 設置,例如 SSO URL 和 Audience URI:
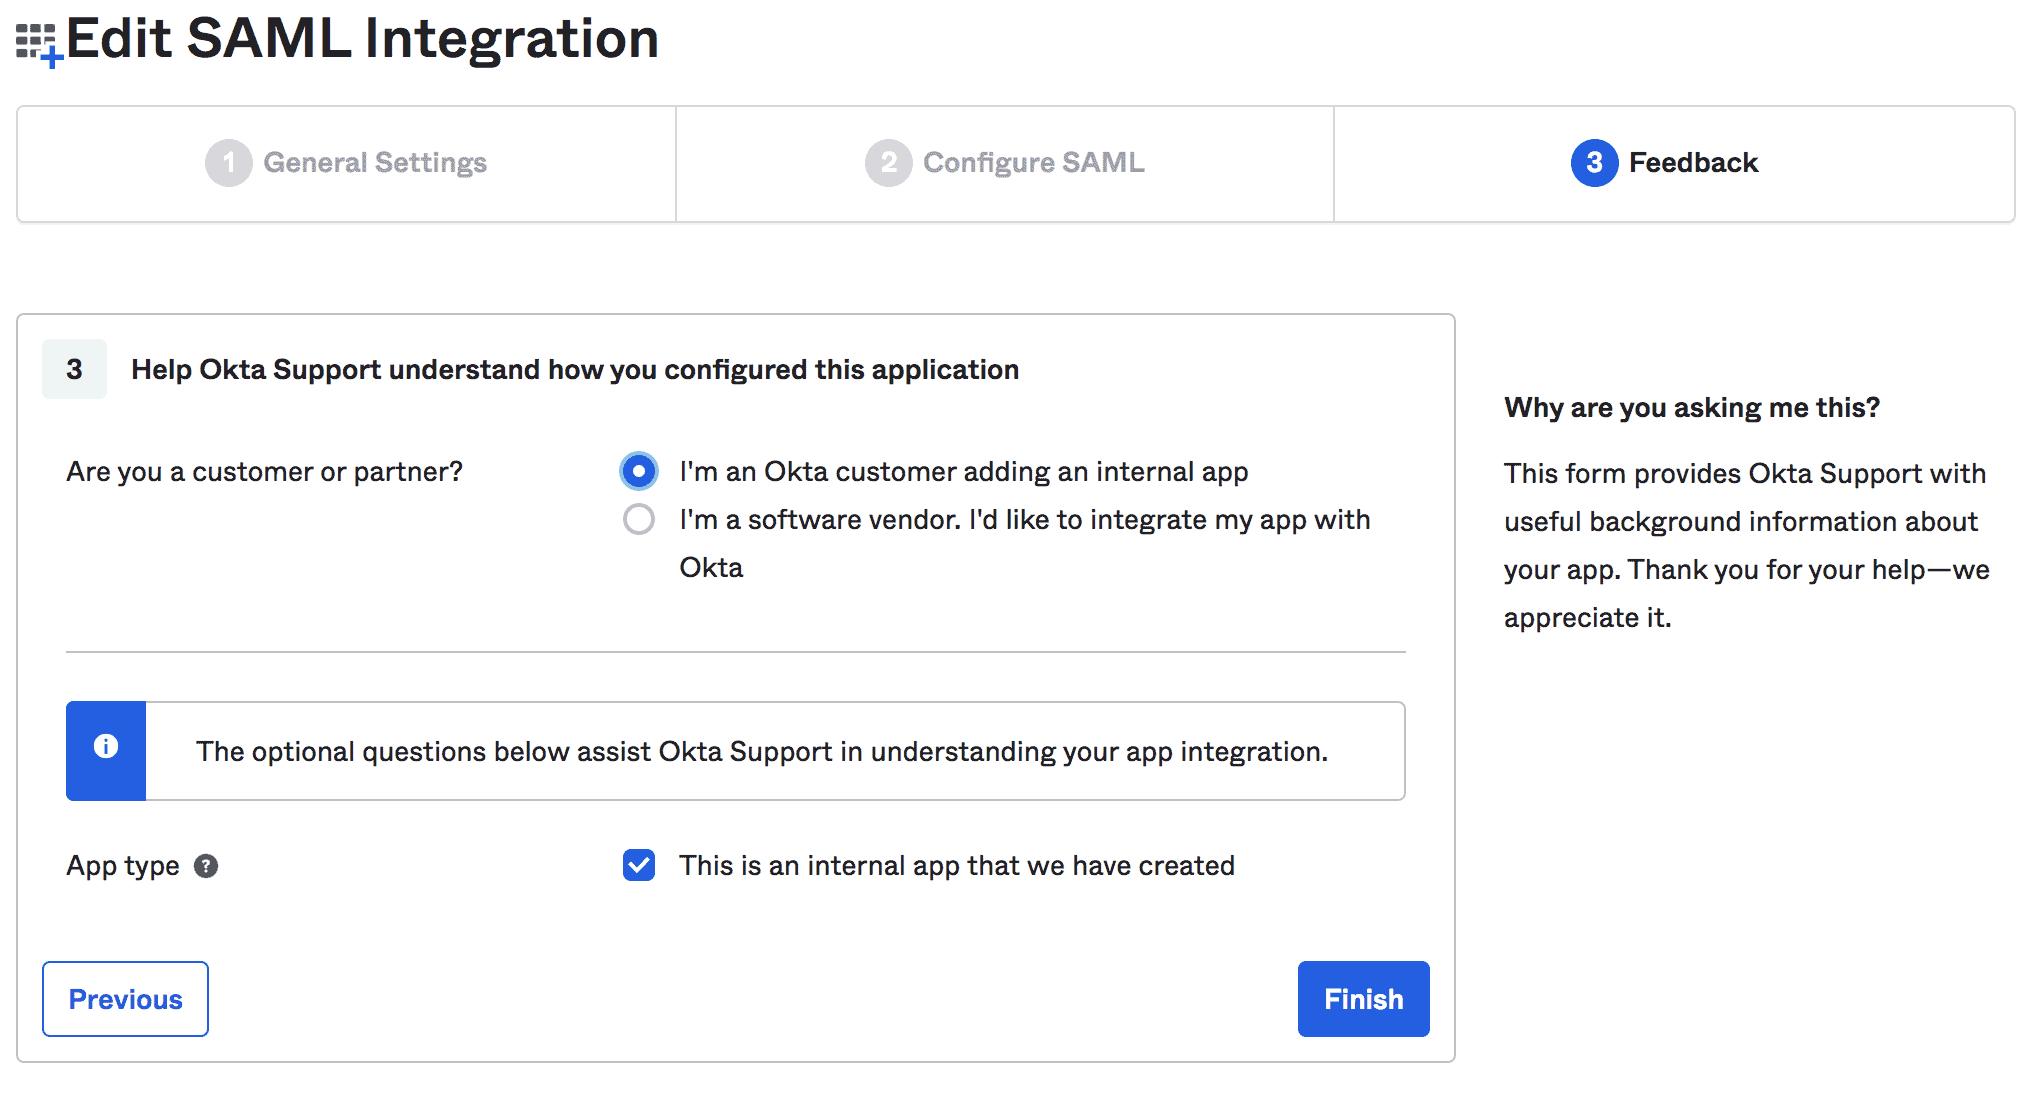
最後,我們可以提供有關我們集成的反饋:
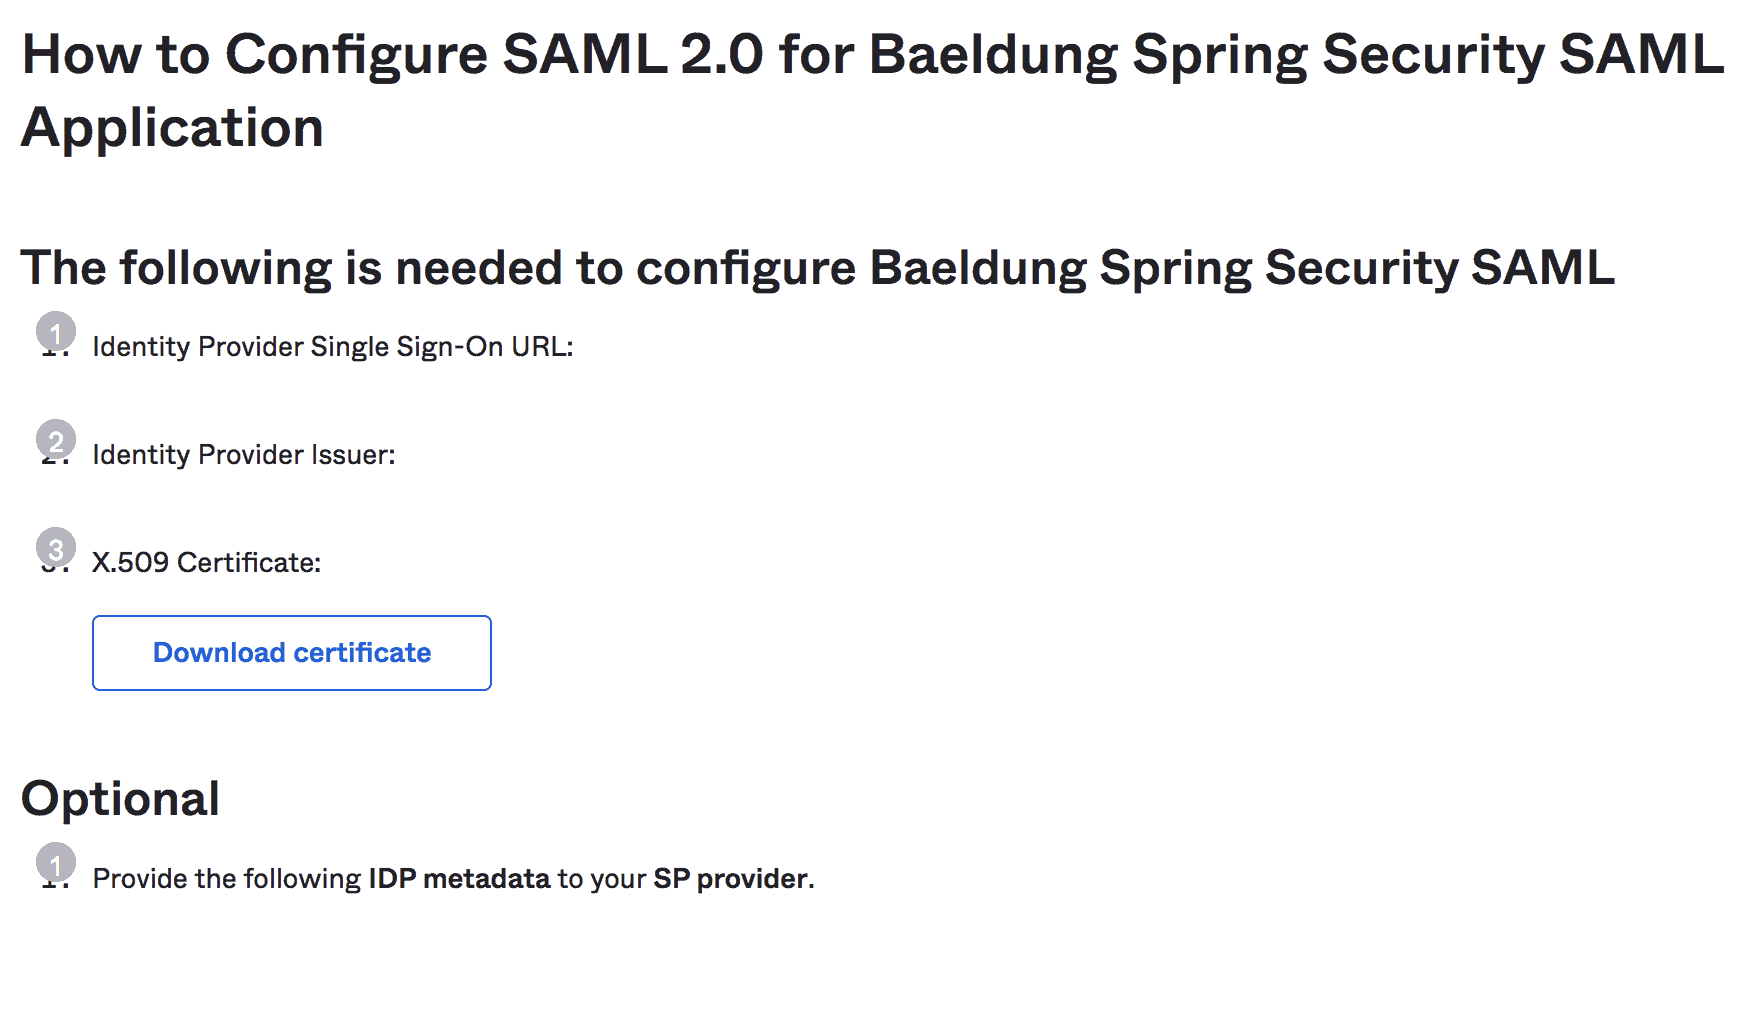
3.3. 查看配置説明
完成設置後,我們可以查看我們的 Spring Boot 應用的配置説明:
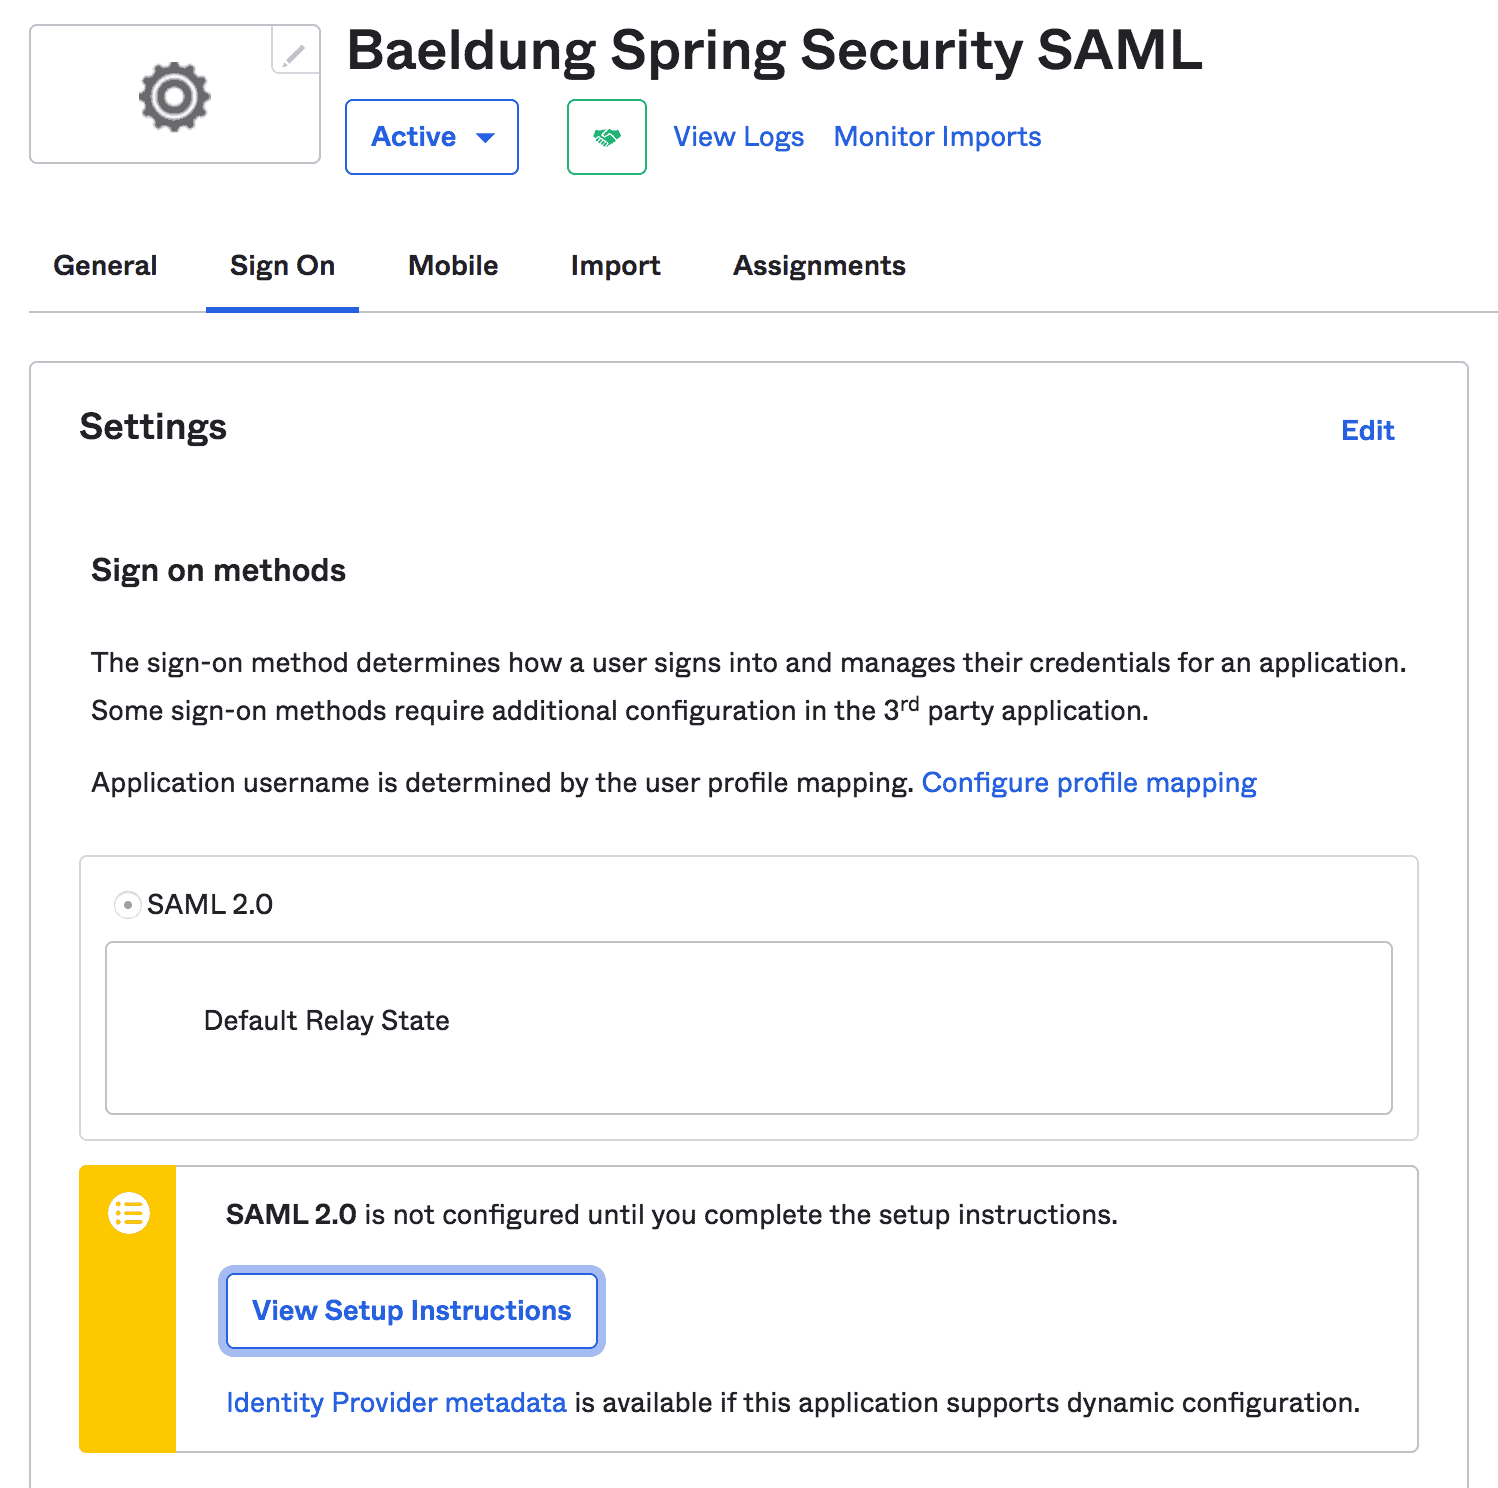
注意:我們應該複製 IdP 發行者 URL 和 IdP 元數據 XML,這些信息將在 Spring Security 配置中進一步使用:
4. Spring Boot 部署
除了常見的 Maven 依賴項,如 spring-boot-starter-web 和 spring-boot-starter-security,我們還需要 spring-security-saml2-core 依賴項:
<dependency>
    <groupId>org.springframework.boot</groupId>
    <artifactId>spring-boot-starter-web</artifactId>
    <version>2.7.2</version>
</dependency>
<dependency>
    <groupId>org.springframework.boot</groupId>
    <artifactId>spring-boot-starter-security</artifactId>
    <version>2.7.2</version>
</dependency>
<dependency>
    <groupId>org.springframework.security.extensions</groupId>
    <artifactId>spring-security-saml2-core</artifactId>
    <version>1.0.10.RELEASE</version>
</dependency>此外,請務必添加 Shibboleth 倉庫,以便下載 opensaml 所需的最新 jar 文件,該 jar 文件是 spring-security-saml2-core 依賴項所必需的:
<repository>
    <id>Shibboleth</id>
    <name>Shibboleth</name>
    <url>https://build.shibboleth.net/nexus/content/repositories/releases/</url>
</repository>
或者,我們也可以在 Gradle 項目中設置依賴項:
compile group: 'org.springframework.boot', name: 'spring-boot-starter-web', version: "2.7.2"
compile group: 'org.springframework.boot', name: 'spring-boot-starter-security', version: "2.7.2"
compile group: 'org.springframework.security.extensions', name: 'spring-security-saml2-core', version: "1.0.10.RELEASE"
5. Spring Security 配置
現在我們已經完成了 Okta SAML 設置和 Spring Boot 項目的準備工作,接下來我們將開始配置 Spring Security,以便與 Okta 進行 SAML 2.0 集成。
5.1. SAML 身份驗證入口點
首先,我們將創建一個 SAMLEntryPoint 類型的 Bean,它將作為 SAML 身份驗證的入口點:
@Bean
public WebSSOProfileOptions defaultWebSSOProfileOptions() {
    WebSSOProfileOptions webSSOProfileOptions = new WebSSOProfileOptions();
    webSSOProfileOptions.setIncludeScoping(false);
    return webSSOProfileOptions;
}

@Bean
public SAMLEntryPoint samlEntryPoint() {
    SAMLEntryPoint samlEntryPoint = new SAMLEntryPoint();
    samlEntryPoint.setDefaultProfileOptions(defaultWebSSOProfileOptions());
    return samlEntryPoint;
}在此,WebSSOProfileOptions Bean 允許我們設置從 SP 向 IdP 發送的請求中的參數,用於請求用户身份驗證。
5.2. 登錄與登出
接下來,讓我們為我們的 SAML URI 創建幾個過濾器,例如 discovery、login 和 logout。
@Bean
public FilterChainProxy samlFilter(SAMLProcessingFilter samlProcessingFilter) throws Exception {
    List<SecurityFilterChain> chains = new ArrayList<>();
    chains.add(new DefaultSecurityFilterChain(new AntPathRequestMatcher("/saml/SSO/**"),
        samlProcessingFilter));
    chains.add(new DefaultSecurityFilterChain(new AntPathRequestMatcher("/saml/discovery/**"),
        samlDiscovery()));
    chains.add(new DefaultSecurityFilterChain(new AntPathRequestMatcher("/saml/login/**"),
        samlEntryPoint));
    chains.add(new DefaultSecurityFilterChain(new AntPathRequestMatcher("/saml/logout/**"),
        samlLogoutFilter));
    chains.add(new DefaultSecurityFilterChain(new AntPathRequestMatcher("/saml/SingleLogout/**"),
        samlLogoutProcessingFilter));
    return new FilterChainProxy(chains);
}
然後,我們將添加一些相應的過濾器和處理程序:
@Bean
public SAMLProcessingFilter samlWebSSOProcessingFilter(AuthenticationManager authenticationManager) {
    SAMLProcessingFilter samlWebSSOProcessingFilter = new SAMLProcessingFilter();
    samlWebSSOProcessingFilter.setAuthenticationManager(authenticationManager);
    samlWebSSOProcessingFilter.setAuthenticationSuccessHandler(samlAuthSuccessHandler);
    samlWebSSOProcessingFilter.setAuthenticationFailureHandler(samlAuthFailureHandler);
    return samlWebSSOProcessingFilter;
}

@Bean
public SAMLDiscovery samlDiscovery() {
    return new SAMLDiscovery();
}

@Bean
public SavedRequestAwareAuthenticationSuccessHandler successRedirectHandler() {
    SavedRequestAwareAuthenticationSuccessHandler successRedirectHandler = new SavedRequestAwareAuthenticationSuccessHandler();
    successRedirectHandler.setDefaultTargetUrl("/home");
    return successRedirectHandler;
}

@Bean
public SimpleUrlAuthenticationFailureHandler authenticationFailureHandler() {
    SimpleUrlAuthenticationFailureHandler failureHandler = new SimpleUrlAuthenticationFailureHandler();
    failureHandler.setUseForward(true);
    failureHandler.setDefaultFailureUrl("/error");
    return failureHandler;
}目前,我們已配置了身份驗證的入口點(samlEntryPoint)和幾個過濾器鏈。現在,讓我們深入瞭解它們的詳細信息。
當用户首次嘗試登錄時,samlEntryPoint 將處理入口請求。然後,如果啓用,samlDiscovery Bean 將發現用於身份驗證的 IdP。
接下來,當用户登錄時,IdP 將 SAML 響應重定向到 /saml/sso URI 進行處理,相應的 samlWebSSOProcessingFilter 將對關聯的身份驗證令牌進行認證。
成功後,successRedirectHandler 將重定向用户到默認目標 URL (/home)。否則,authenticationFailureHandler 將重定向用户到 /error URL。
最後,讓我們添加單次註銷和全局註銷處理程序:
@Bean
public SimpleUrlLogoutSuccessHandler successLogoutHandler() {
    SimpleUrlLogoutSuccessHandler successLogoutHandler = new SimpleUrlLogoutSuccessHandler();
    successLogoutHandler.setDefaultTargetUrl("/");
    return successLogoutHandler;
}

@Bean
public SecurityContextLogoutHandler logoutHandler() {
    SecurityContextLogoutHandler logoutHandler = new SecurityContextLogoutHandler();
    logoutHandler.setInvalidateHttpSession(true);
    logoutHandler.setClearAuthentication(true);
    return logoutHandler;
}

@Bean
public SAMLLogoutProcessingFilter samlLogoutProcessingFilter() {
    return new SAMLLogoutProcessingFilter(successLogoutHandler(), logoutHandler());
}

@Bean
public SAMLLogoutFilter samlLogoutFilter() {
    return new SAMLLogoutFilter(successLogoutHandler(),
        new LogoutHandler[] { logoutHandler() },
        new LogoutHandler[] { logoutHandler() });
}
5.3. 元數據處理
現在,我們將向 SP 提供 IdP 元數據 XML。這將幫助我們的 IdP 知道在用户登錄後應重定向到哪個 SP 端點。
因此,我們將配置 MetadataGenerator bean 以啓用 Spring SAML 處理元數據:
public MetadataGenerator metadataGenerator() {
    MetadataGenerator metadataGenerator = new MetadataGenerator();
    metadataGenerator.setEntityId(samlAudience);
    metadataGenerator.setExtendedMetadata(extendedMetadata());
    metadataGenerator.setIncludeDiscoveryExtension(false);
    metadataGenerator.setKeyManager(keyManager());
    return metadataGenerator;
}

@Bean
public MetadataGeneratorFilter metadataGeneratorFilter() {
    return new MetadataGeneratorFilter(metadataGenerator());
}

@Bean
public ExtendedMetadata extendedMetadata() {
    ExtendedMetadata extendedMetadata = new ExtendedMetadata();
    extendedMetadata.setIdpDiscoveryEnabled(false);
    return extendedMetadata;
}
<em>MetadataGenerator</em> Bean 需要一個 <a href="https://docs.spring.io/spring-security-saml/docs/current/api/org/springframework/security/saml/key/KeyManager.html"><em>KeyManager</em></a> 實例來加密 SP 和 IdP 之間的交換:
@Bean
public KeyManager keyManager() {
    DefaultResourceLoader loader = new DefaultResourceLoader();
    Resource storeFile = loader.getResource(samlKeystoreLocation);
    Map<String, String> passwords = new HashMap<>();
    passwords.put(samlKeystoreAlias, samlKeystorePassword);
    return new JKSKeyManager(storeFile, samlKeystorePassword, passwords, samlKeystoreAlias);
}
在這裏,我們需要為 KeyManager 豆創建一個 Keystore 並提供給它。我們可以使用 JRE 命令創建一個自簽名密鑰和 Keystore:
keytool -genkeypair -alias baeldungspringsaml -keypass baeldungsamlokta -keystore saml-keystore.jks -keyalg RSA5.4. MetadataManager
然後,我們將使用 ExtendedMetadataDelegate 實例配置 IdP 元數據到我們的 Spring Boot 應用程序中:
@Bean
@Qualifier("okta")
public ExtendedMetadataDelegate oktaExtendedMetadataProvider() throws MetadataProviderException {
    org.opensaml.util.resource.Resource resource = null
    try {
        resource = new ClasspathResource("/saml/metadata/sso.xml");
    } catch (ResourceException e) {
        e.printStackTrace();
    }
    Timer timer = new Timer("saml-metadata")
    ResourceBackedMetadataProvider provider = new ResourceBackedMetadataProvider(timer,resource);
    provider.setParserPool(parserPool());
    return new ExtendedMetadataDelegate(provider, extendedMetadata());
}

@Bean
@Qualifier("metadata")
public CachingMetadataManager metadata() throws MetadataProviderException, ResourceException {
    List<MetadataProvider> providers = new ArrayList<>();
    providers.add(oktaExtendedMetadataProvider());
    CachingMetadataManager metadataManager = new CachingMetadataManager(providers);
    metadataManager.setDefaultIDP(defaultIdp);
    return metadataManager;
}
在這裏,我們解析了來自 sso.xml文件的元數據,該文件包含來自Okta開發者賬户中複製的IdP元數據XML,這些XML是在查看設置説明時複製的。
同樣,defaultIdp變量包含IdP Issuer URL,該URL也來自Okta開發者賬户。
5.5. XML 解析
對於 XML 解析,可以使用 `StaticBasicParserPool 類的一個實例:
@Bean(initMethod = "initialize")
public StaticBasicParserPool parserPool() {
    return new StaticBasicParserPool();
}

@Bean(name = "parserPoolHolder")
public ParserPoolHolder parserPoolHolder() {
    return new ParserPoolHolder();
}
5.6. SAML 處理器
然後,我們需要一個處理器來解析 HTTP 請求中的 SAML 消息:
@Bean
public HTTPPostBinding httpPostBinding() {
    return new HTTPPostBinding(parserPool(), VelocityFactory.getEngine());
}

@Bean
public HTTPRedirectDeflateBinding httpRedirectDeflateBinding() {
    return new HTTPRedirectDeflateBinding(parserPool());
}

@Bean
public SAMLProcessorImpl processor() {
    ArrayList<SAMLBinding> bindings = new ArrayList<>();
    bindings.add(httpRedirectDeflateBinding());
    bindings.add(httpPostBinding());
    return new SAMLProcessorImpl(bindings);
}
在這裏,我們使用了 POST 和 Redirect 綁定,與我們的 Okta 開發者賬户配置相關。
5.7. <em >SAMLAuthenticationProvider</em> 實現
最後,我們需要自定義 <em >SAMLAuthenticationProvider</em> 類來檢查 <em >ExpiringUsernameAuthenticationToken</em> 類的實例,並設置獲取到的權限:
public class CustomSAMLAuthenticationProvider extends SAMLAuthenticationProvider {
    @Override
    public Collection<? extends GrantedAuthority> getEntitlements(SAMLCredential credential, Object userDetail) {
        if (userDetail instanceof ExpiringUsernameAuthenticationToken) {
            List<GrantedAuthority> authorities = new ArrayList<GrantedAuthority>();
            authorities.addAll(((ExpiringUsernameAuthenticationToken) userDetail).getAuthorities());
            return authorities;
        } else {
            return Collections.emptyList();
        }
    }
}
此外,我們應該將 CustomSAMLAuthenticationProvider 配置為 SecurityConfig 類中的一個 Bean:
@Bean
public SAMLAuthenticationProvider samlAuthenticationProvider() {
    return new CustomSAMLAuthenticationProvider();
}
5.8. SecurityConfig
最後,我們將使用前面討論過的 samlEntryPoint 和 samlProcessingFilter 配置基本的 HTTP 安全性。
Bean
public SecurityFilterChain filterChain(HttpSecurity http, SAMLProcessingFilter samlProcessingFilter) throws Exception {
    http.csrf().disable();

    http.httpBasic().authenticationEntryPoint(samlEntryPoint);

    http
      .addFilterBefore(metadataGeneratorFilter(), ChannelProcessingFilter.class)
      .addFilterAfter(samlProcessingFilter, BasicAuthenticationFilter.class)
      .addFilterBefore(samlProcessingFilter, CsrfFilter.class);

    http
      .authorizeRequests()
      .antMatchers("/").permitAll()
      .anyRequest().authenticated();

    http
      .logout()
      .addLogoutHandler((request, response, authentication) -> {
          response.sendRedirect("/saml/logout");
      });

   http.authenticationProvider(samlAuthenticationProvider);
   return http.build();
}
好了!我們完成了 Spring Security SAML 配置,允許用户登錄到 IdP,然後從 IdP 以 XML 格式接收用户的身份驗證詳情。最後,它還對用户令牌進行身份驗證,以允許訪問我們的 Web 應用程序。
6. HomeController
現在,我們的 Spring Security SAML 配置以及 Okta 開發者帳户設置已就緒,我們可以設置一個簡單的控制器,提供一個登陸頁面和主頁。
6.1. 索引和認證映射
首先,添加映射到默認目標 URI (/) 和 /auth URI:
@RequestMapping("/")
public String index() {
    return "index";
}

@GetMapping(value = "/auth")
public String handleSamlAuth() {
    Authentication auth = SecurityContextHolder.getContext().getAuthentication();
    if (auth != null) {
        return "redirect:/home";
    } else {
        return "/";
    }
}
然後,我們將添加一個簡單的 index.html 文件,允許用户使用 login 鏈接通過 Okta SAML 認證。
<!doctype html>
<html>
<head>
<title>Baeldung Spring Security SAML</title>
</head>
<body>
    <h3><Strong>Welcome to Baeldung Spring Security SAML</strong></h3>
    <a th:href="@{/auth}">Login</a>
</body>
</html>
現在,我們準備運行我們的 Spring Boot 應用,並通過 http://localhost:8080/ 訪問它:
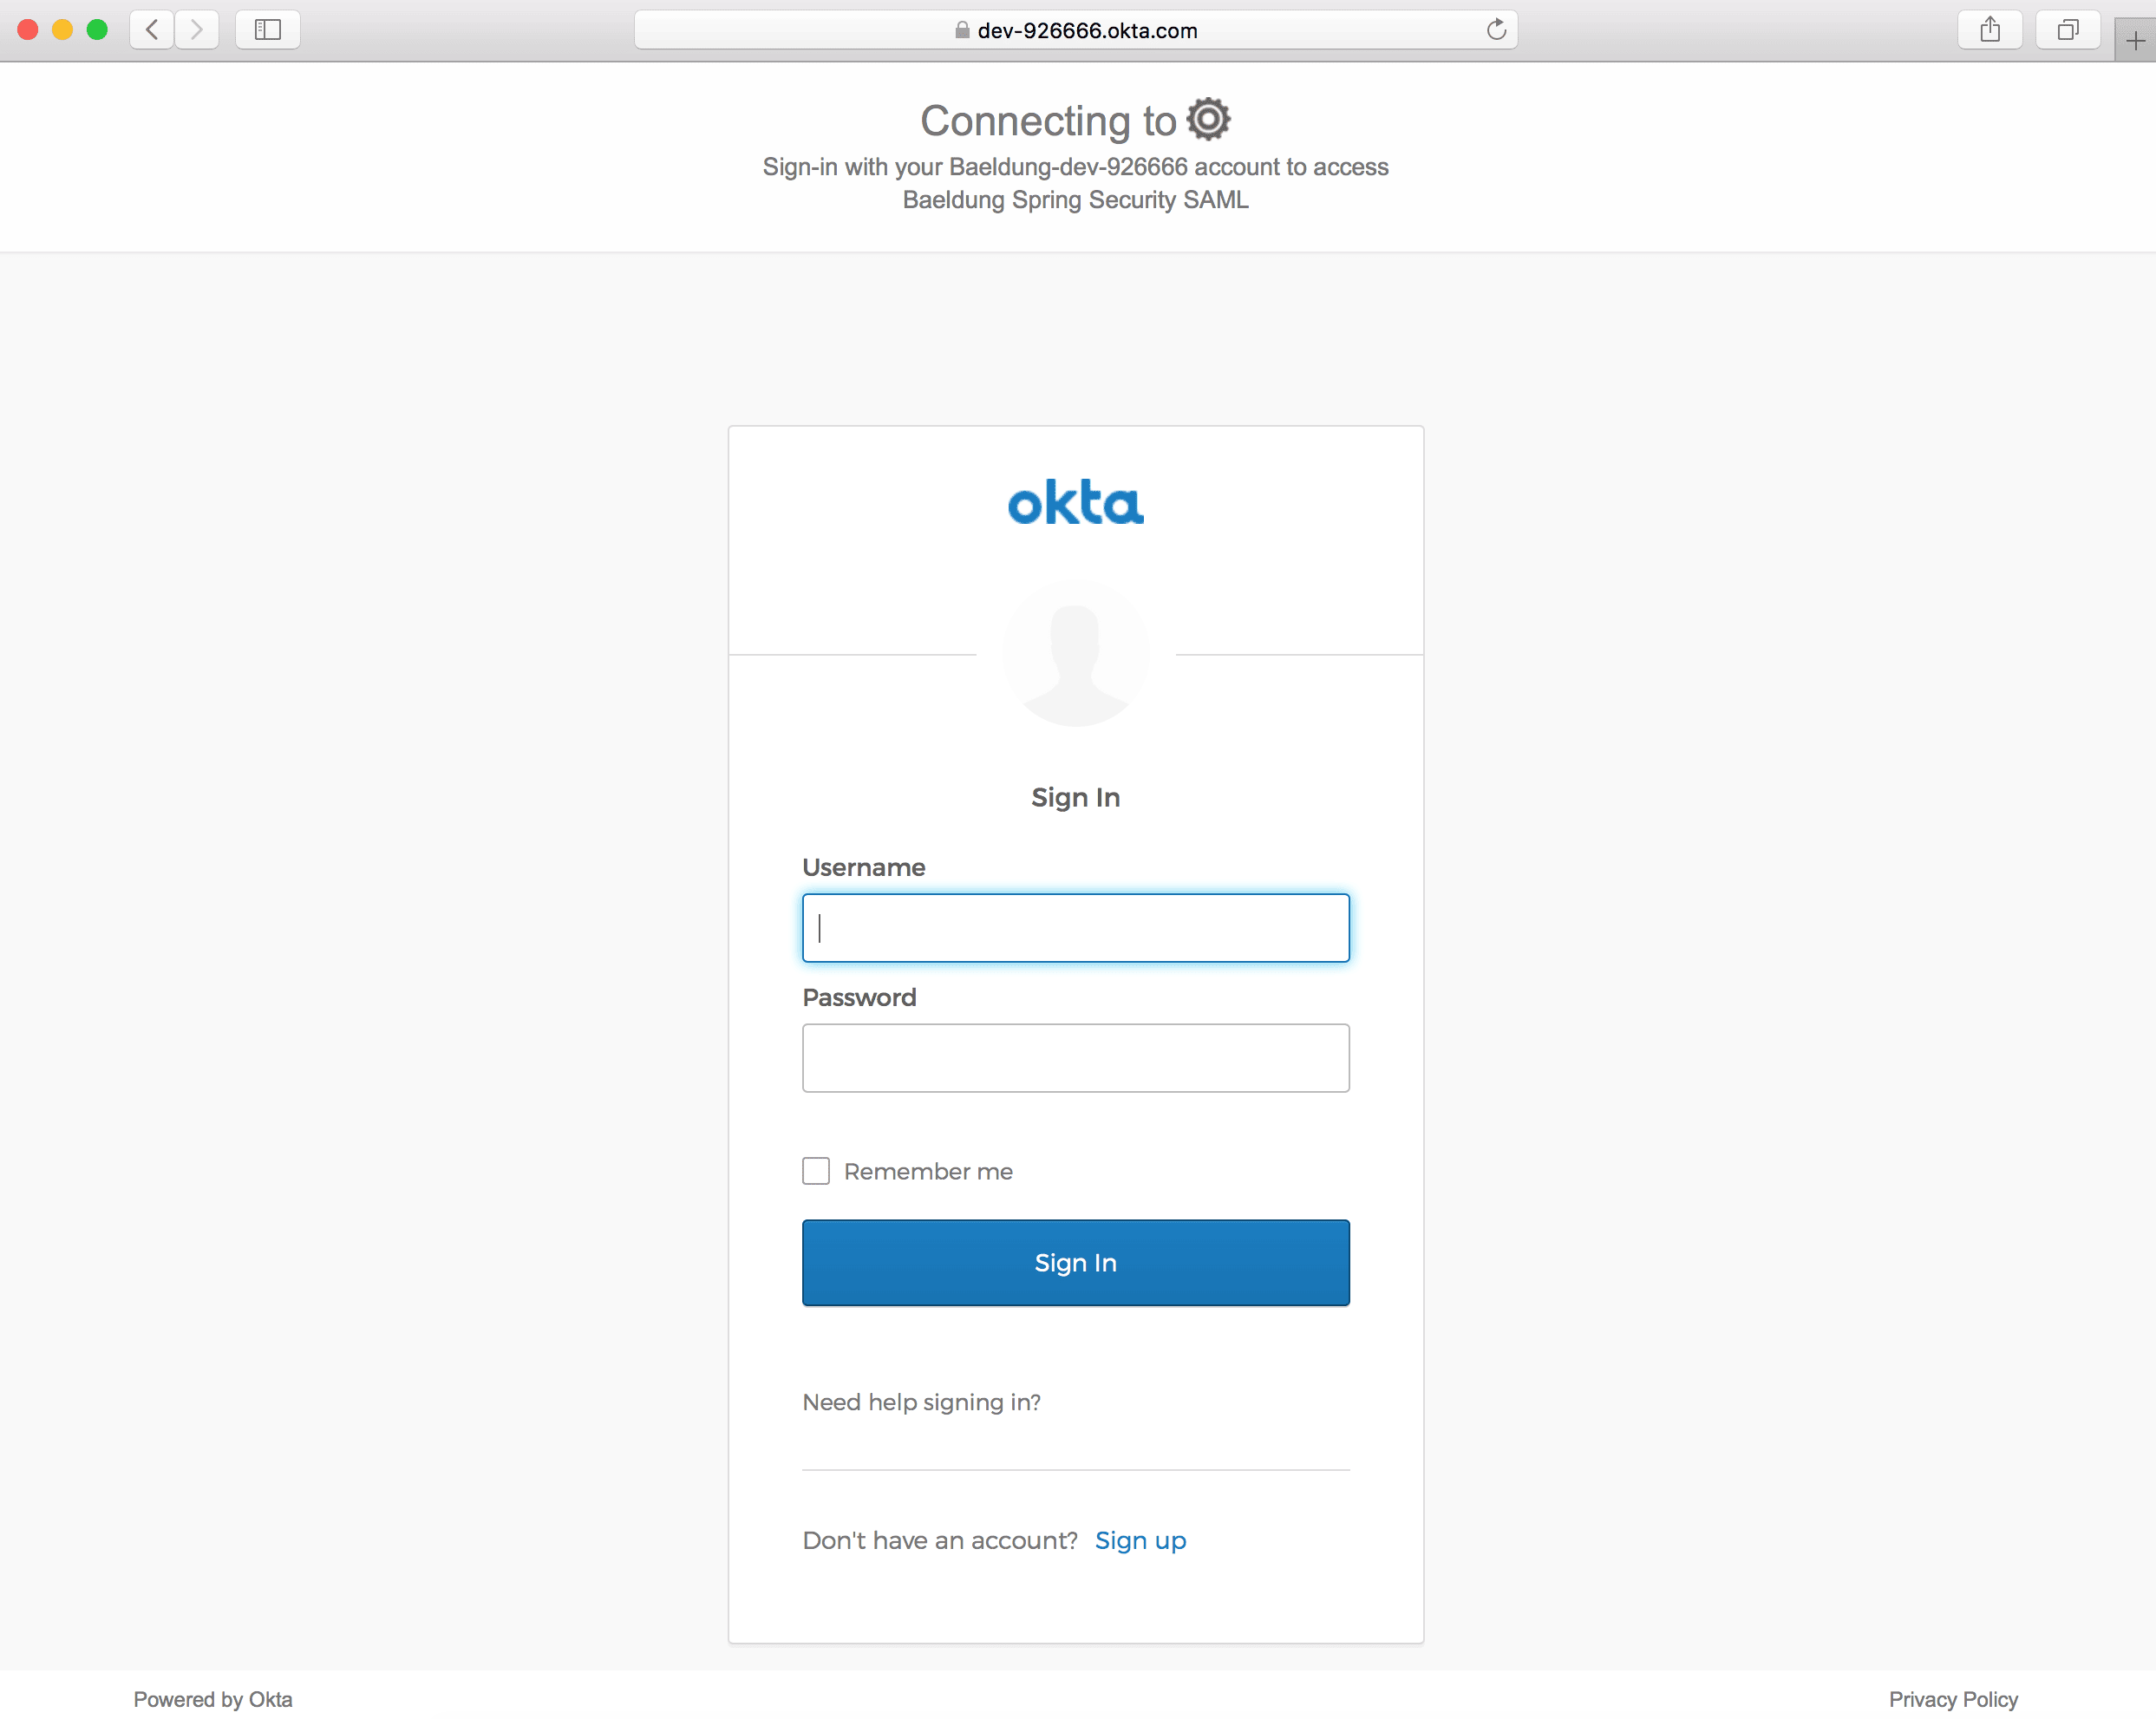
點擊 登錄 鏈接時,應該會打開 Okta 登錄頁面:
6.2. 主頁
接下來,我們將添加對 home</em/> URI 的映射,以便在成功認證後重定向用户:
@RequestMapping("/home")
public String home(Model model) {
    Authentication authentication = SecurityContextHolder.getContext().getAuthentication();
    model.addAttribute("username", authentication.getPrincipal());
    return "home";
}
我們還將添加 home.html 以顯示已登錄的用户和退出鏈接:
<!doctype html>
<html>
<head>
<title>Baeldung Spring Security SAML: Home</title>
</head>
<body>
    <h3><Strong>Welcome!</strong><br/>You are successfully logged in!</h3>
    <p>You are logged as <span th:text="${username}">null</span>.</p>
    <small>
        <a th:href="@{/logout}">Logout</a>
    </small>
</body>
</html>
成功登錄後,我們應該看到主頁。

7. 結論
在本教程中,我們討論了 Spring Security 與 Okta 的 SAML 集成。
首先,我們設置了一個 Okta 開發者帳户,並啓用了 SAML 2.0 Web 集成。然後,我們創建了一個包含所需 Maven 依賴項的 Spring Boot 項目。
接下來,我們完成了 Spring Security SAML 的所有 所需配置,包括 samlEntryPoint, samlFilter, 元數據處理和 SAML 處理器。
最後,我們創建了一個控制器和一些頁面,例如 index 和 home,以測試我們與 Okta 的 SAML 集成。
