1. 簡介
在本文中,我們將探討如何使用 MaxMind GeoIP2 Java API 和免費的 GeoLite2 數據庫,從 IP 地址獲取地理位置數據。
我們還將通過一個簡單的 Spring MVC Web 演示應用程序來驗證這一點。
2. 快速入門
要開始使用,您需要從 MaxMind 下載 GeoIP2 API 和 GeoLite2 數據庫。
2.1. Maven 依賴
要將 MaxMind GeoIP2 API 集成到您的 Maven 項目中,請在 <em/>pom.xml</em/> 文件中添加以下內容:
<dependency>
    <groupId>com.maxmind.geoip2</groupId>
    <artifactId>geoip2</artifactId>
    <version>2.8.0</version>
</dependency>
要獲取最新的 API 版本,您可以在 Maven 中央倉庫 中找到它。
2.2. 下載數據庫
接下來,您需要下載 GeoLite2 數據庫。 本教程中使用的是 GeoLite2 City 數據庫的二進制壓縮版本。
解壓縮後,您將獲得一個名為 GeoLite2-City.mmdb 的文件。 這是一份 IP 到位置映射數據庫,採用 MaxMind 專有的二進制格式。
3. 使用 GeoIP2 Java API
讓我們使用 GeoIP2 Java API 從數據庫中檢索給定 IP 地址的地理位置數據。首先,讓我們創建一個 DatabaseReader 來查詢數據庫:
File database = new File(dbLocation);
DatabaseReader dbReader = new DatabaseReader.Builder(database).build();
接下來,我們使用 city() 方法來獲取 IP 地址的城市數據:
CityResponse response = dbReader.city(ipAddress);CityResponse對象包含除了城市名稱之外的多個信息片段。以下是一個示例 JUnit 測試,展示瞭如何打開數據庫、根據 IP 地址檢索城市信息,以及從CityResponse對象中提取這些信息:
@Test
public void givenIP_whenFetchingCity_thenReturnsCityData()
  throws IOException, GeoIp2Exception {
    String ip = "your-ip-address";
    String dbLocation = "your-path-to-mmdb";

    File database = new File(dbLocation);
    DatabaseReader dbReader = new DatabaseReader.Builder(database)
      .build();

    InetAddress ipAddress = InetAddress.getByName(ip);
    CityResponse response = dbReader.city(ipAddress);

    String countryName = response.getCountry().getName();
    String cityName = response.getCity().getName();
    String postal = response.getPostal().getCode();
    String state = response.getLeastSpecificSubdivision().getName();
}
4. 在 Web 應用程序中使用 GeoIP
讓我們來看一個從用户公共 IP 地址獲取地理位置數據並將其在地圖上顯示的示例 Web 應用程序。
我們將從一個基本的 Spring Web MVC 應用程序開始。然後,我們將編寫一個 控制器,該控制器接受一個 IP 地址,並通過 POST 請求返回包含城市、緯度和經度(從 GeoIP2 API 推斷)的 JSON 響應。
最後,我們將編寫一些 HTML 和 JavaScript,將用户的公共 IP 地址加載到表單中,向我們的 控制器 發送一個 Ajax POST 請求,並在 Google 地圖上顯示結果。
4.1. 響應實體類
讓我們首先定義用於存儲地理位置響應的類:
public class GeoIP {
    private String ipAddress;
    private String city;
    private String latitude;
    private String longitude;
    // constructors, getters and setters...
}
4.2. 服務類
現在,讓我們編寫服務類,該類使用 GeoIP2 Java API 和 GeoLite2 數據庫來獲取地理位置數據:
public class RawDBDemoGeoIPLocationService {
    private DatabaseReader dbReader;

    public RawDBDemoGeoIPLocationService() throws IOException {
        File database = new File("your-mmdb-location");
        dbReader = new DatabaseReader.Builder(database).build();
    }

    public GeoIP getLocation(String ip)
      throws IOException, GeoIp2Exception {
        InetAddress ipAddress = InetAddress.getByName(ip);
        CityResponse response = dbReader.city(ipAddress);

        String cityName = response.getCity().getName();
        String latitude =
          response.getLocation().getLatitude().toString();
        String longitude =
          response.getLocation().getLongitude().toString();
        return new GeoIP(ip, cityName, latitude, longitude);
    }
}
4.3. Spring 控制器
讓我們來看一下 Spring MVC 中的 Controller,它將“ipAddress”請求參數發送到我們的服務類以獲取地理位置響應數據:
@RestController
public class GeoIPTestController {
    private RawDBDemoGeoIPLocationService locationService;

    public GeoIPTestController() throws IOException {
        locationService = new RawDBDemoGeoIPLocationService();
    }

    @PostMapping("/GeoIPTest")
    public GeoIP getLocation(
      @RequestParam(value="ipAddress", required=true) String ipAddress
    ) throws Exception {

        GeoIPLocationService<String, GeoIP> locationService
          = new RawDBDemoGeoIPLocationService();
        return locationService.getLocation(ipAddress);
    }
}
4.4. HTML 表單
讓我們添加前端代碼來調用我們的 Spring 控制器,從包含 IP 地址的 HTML 表單開始:
<body>
    <form id="ipForm" action="GeoIPTest" method="POST">
        <input type="text" name = "ipAddress" id = "ip"/>
        <input type="submit" name="submit" value="submit" />
    </form>
    ...
</body>
4.5. 在客户端加載公網 IP 地址
現在,我們使用 jQuery 和 ipify.org JavaScript API,預先填充“ipAddress”文本字段,使其包含用户的公網 IP 地址:
<script src
   ="https://ajax.googleapis.com/ajax/libs/jquery/3.1.1/jquery.min.js">
</script>

<script type="text/javascript">
    $(document).ready (function () {
        $.get( "https://api.ipify.org?format=json",
          function( data ) {
             $("#ip").val(data.ip) ;
        });
...
</script>
4.6. 提交 Ajax POST 請求
當表單提交時,我們將向 Spring 框架中的 Controller 發送一個 Ajax POST 請求,以獲取包含地理位置數據的 JSON 響應:
$( "#ipForm" ).submit(function( event ) {
    event.preventDefault();
    $.ajax({
        url: "GeoIPTest",
        type: "POST",
        contentType:
         "application/x-www-form-urlencoded; charset=UTF-8",
        data: $.param( {ipAddress : $("#ip").val()} ),
        complete: function(data) {},
        success: function(data) {
            $("#status").html(JSON.stringify(data));
            if (data.ipAddress !=null) {
                showLocationOnMap(data);
            }
        },
        error: function(err) {
            $("#status").html("Error:"+JSON.stringify(data));
            },
        });
});
4.7. 示例 JSON 響應
來自我們 Spring 框架的 Controller 的 JSON 響應將具有以下格式:
{
    "ipAddress":"your-ip-address",
    "city":"your-city",
    "latitude":"your-latitude",
    "longitude":"your-longitude"
}
4.8. 在 Google 地圖上顯示位置
要顯示位置在 Google 地圖上,您需要在 HTML 代碼中包含 Google Maps API:
<script src="https://maps.googleapis.com/maps/api/js?key=YOUR-API-KEY"
async defer></script>
您可以使用 Google 開發者控制枱獲取 Google 地圖 API 密鑰。
您還需要定義一個 HTML <div> 標籤來包含地圖圖像:
<div id="map" style="height: 500px; width:100%; position:absolute"></div>你可以使用以下 JavaScript 函數在 Google 地圖上顯示座標:
function showLocationOnMap (location) {
    var map;
    map = new google.maps.Map(document.getElementById('map'), {
      center: {
        lat: Number(location.latitude),
        lng: Number(location.longitude)},
        zoom: 15
    });
    var marker = new google.maps.Marker({
      position: {
        lat: Number(location.latitude),
        lng: Number(location.longitude)},
        map: map,
        title:
          "Public IP:"+location.ipAddress
            +" @ "+location.city
    });
}
在啓動 Web 應用程序後,請打開地圖頁面的 URL:
http://localhost:8080/spring-mvc-xml/GeoIpTest.jsp您將看到您連接的當前公共 IP 地址加載到文本框中:
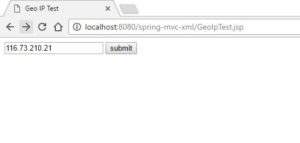
請注意,GeoIP2 和 ipify 都支持 IPv4 地址和 IPv6 地址。
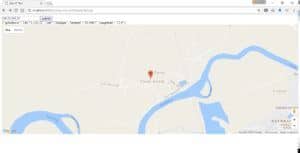
提交表單後,您將看到包含城市、緯度和經度等信息 JSON 響應文本(對應於您的公共 IP 地址),以及下方指向您位置的 Google 地圖:
5. 結論
在本教程中,我們回顧了使用 MaxMind GeoIP2 Java API 和免費 MaxMind GeoLite2 City 數據庫進行測試(使用 JUnit 測試)。
然後,我們構建了一個 Spring MVC Controller 和服務,用於從 IP 地址獲取地理位置數據(城市、緯度、經度)。
最後,我們構建了一個 HTML/JavaScript 前端,以演示該功能如何用於在 Google 地圖上顯示用户的地理位置。
該產品包含由 MaxMind 創建的 GeoLite2 數據,可通過 http://www.maxmind.com 獲取。
