1. 概述
Spring Security 5 提供對 Spring Webflux 中非阻塞的 WebClient 類的 OAuth2 支持。
在本教程中,我們將分析使用該類訪問受保護資源的各種方法。我們還將深入瞭解 Spring 如何處理 OAuth2 授權過程。
2. 場景搭建
遵循 OAuth2規範,除了我們重點關注的客户端之外,我們自然需要一個授權服務器和一個資源服務器。
我們可以使用知名授權提供商,如 Google 或 Github。為了更好地理解 OAuth2 客户端的作用,我們也可以使用自己的服務器,並提供實現參考。我們不會詳細介紹配置,因為它不是本教程的主題,僅需知道以下內容:
- 授權服務器將:
- 運行在端口 8081
- 暴露 /oauth/authorize、/oauth/token 和 oauth/check_token 端點以執行所需的功能
- 配置了樣用户信息(例如:john/123)和一個 OAuth 客户端 (fooClientIdPassword/secret)
- 資源服務器將與身份驗證服務器分離,並且:
- 運行在端口 8082
- 提供一個簡單的 Foo 對象資源,可通過 /foos/{id} 端點訪問
注意:需要理解的是,許多 Spring 項目提供不同的 OAuth 相關功能和實現。我們可以查看 此 Spring 項目矩陣 以瞭解每個庫提供的內容。
WebClient 以及所有相關的 reactive Webflux 功能都屬於 Spring Security 5 項目。因此,我們將在本教程中主要使用此框架。
3. Spring Security 5 Under the Hood
為了充分理解示例,瞭解 Spring Security 如何內部管理 OAuth2 功能至關重要。
該框架提供以下功能:
- 利用 OAuth2 提供方賬户登錄用户到應用程序
- 配置服務為 OAuth2 客户端
- 管理授權程序
- 自動刷新令牌
- 存儲憑據(如果需要)
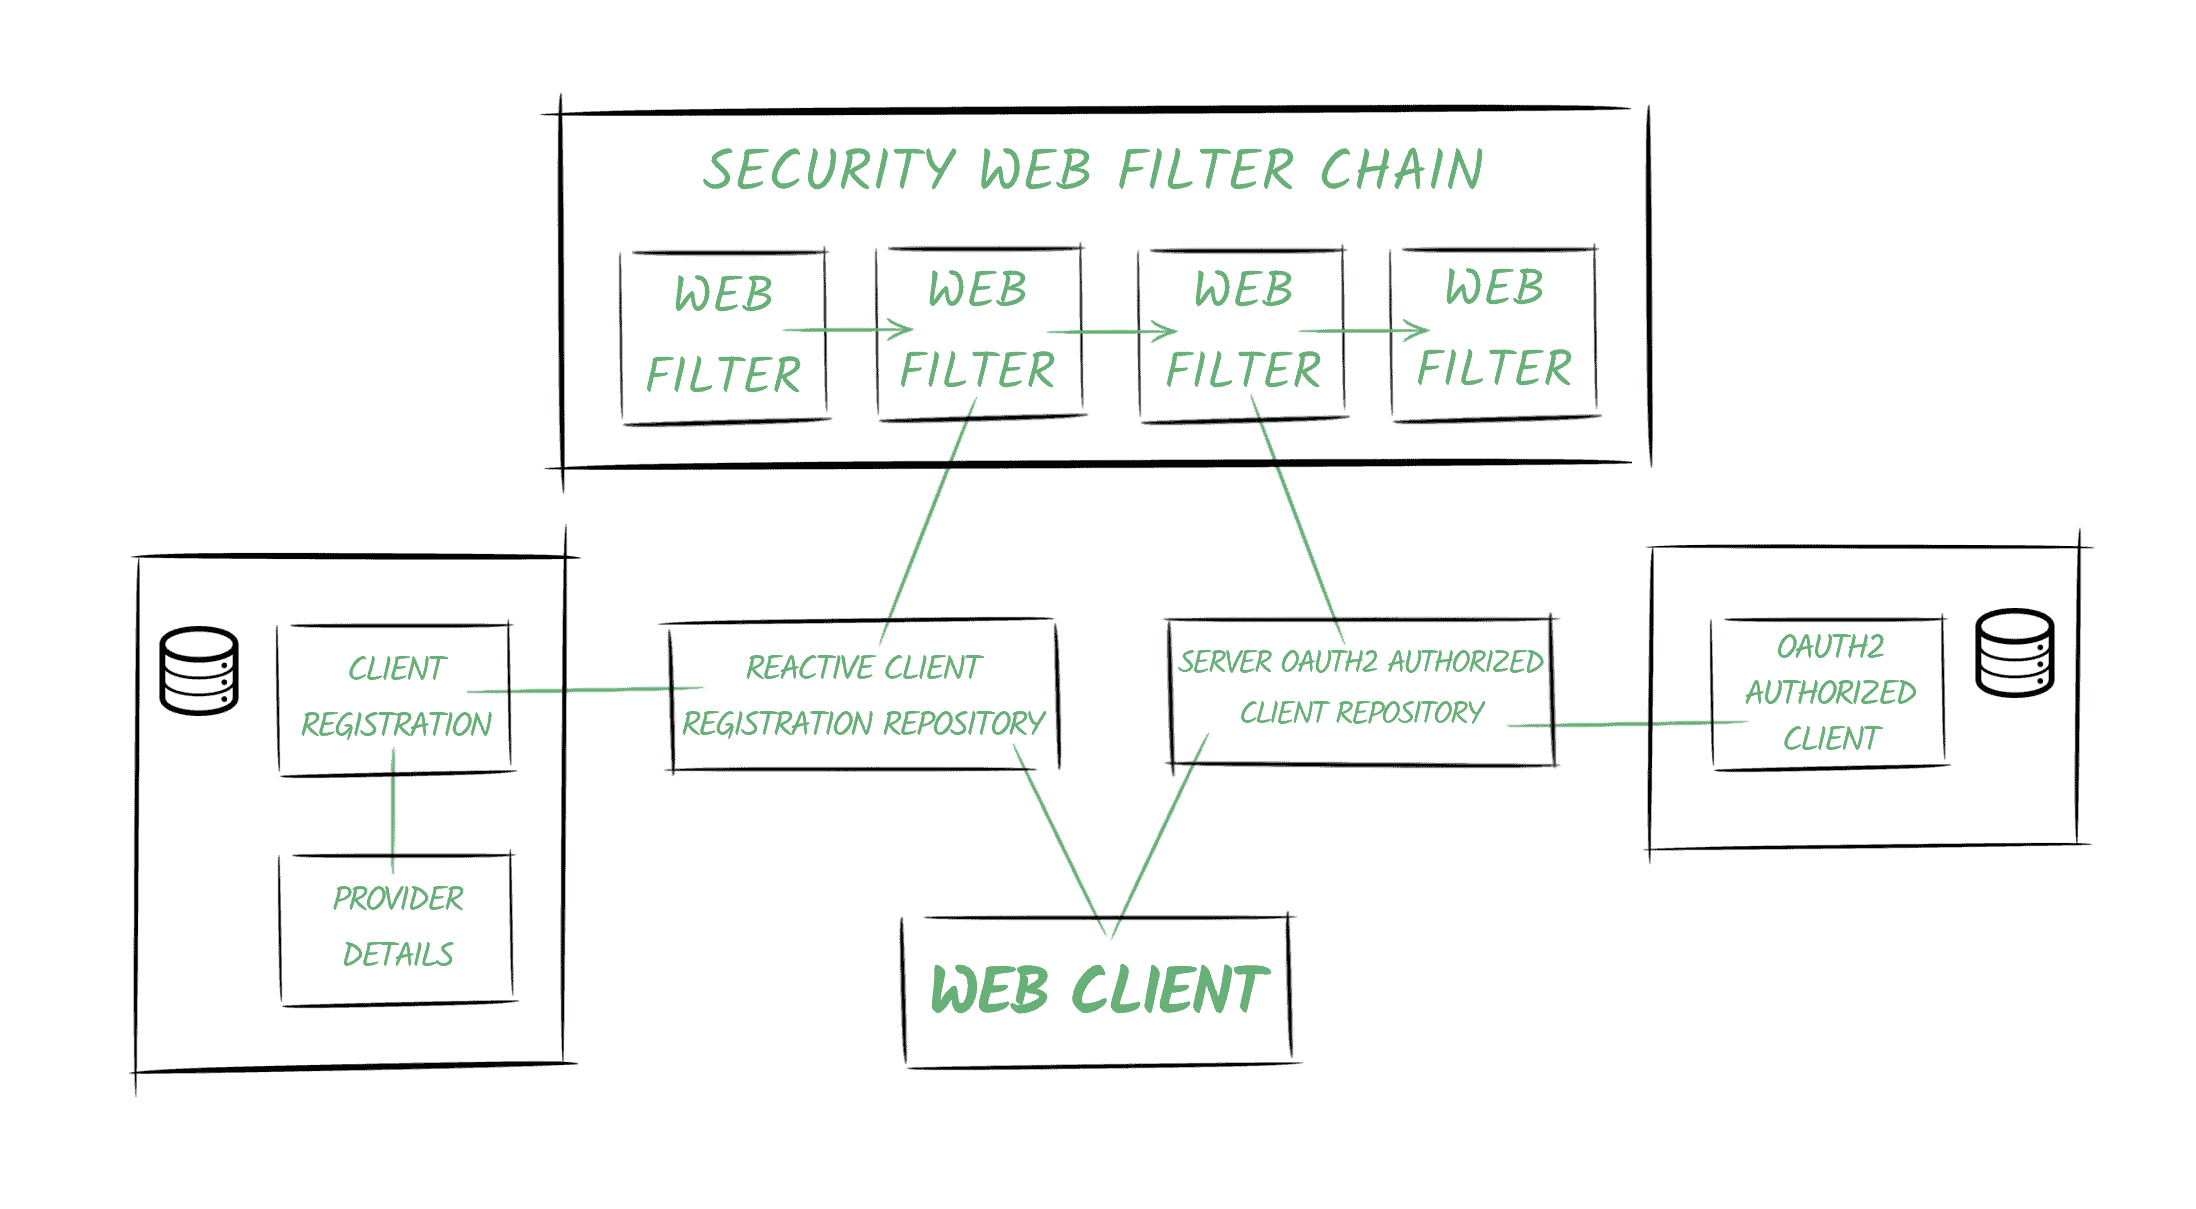
以下圖表描述了 Spring Security 的 OAuth2 世界中的一些基本概念:
3.1. Providers
Spring 定義了 OAuth2 提供方角色,負責公開 OAuth 2.0 保護的資源。
在我們的示例中,我們的 Authentication Service 將提供提供方功能。
3.2. Client Registrations
一個<em>
在我們的場景中,它將是註冊在 Authentication Server 中的客户端,通過
當最終用户(即資源所有者)授予客户端訪問其資源的權限時,創建一個<em>
它將負責將訪問令牌與客户端註冊和資源所有者(表示為
Spring Security 還提供用於訪問上述實體的倉庫類。 特別是,
Spring Boot 2.x 創建了這些倉庫類的 Bean,並且會自動將其添加到上下文中。</strong> Spring Security 5 中的關鍵概念之一是反應式的
正如其名稱所示,它代表了
當我們啓用應用程序中的 OAuth2 功能時,Spring Security 會將兩個過濾器添加到鏈中: Web Client 將配置為包含指向倉庫的
它將使用它們來獲取訪問令牌並將其自動添加到請求中。 Spring Security 允許我們配置應用程序為 OAuth2 客户端。 在本文中,我們將使用一個 WebClient 實例來使用 ‘客户端憑據’ grant type 檢索資源,然後使用 ‘授權碼’ flow。 首先,我們需要配置客户端註冊和我們將使用的提供者。 正如我們在 OAuth2 Login 文章中所看到的,我們可以通過編程方式配置它,也可以通過使用屬性來定義我們的註冊,從而依賴 Spring Boot 的自動配置。 這些是我們用來檢索資源所需的全部配置,使用 client_credentials flow。 我們使用這種 grant type 在機器對機器的通信中,其中沒有終端用户與我們的應用程序交互。 例如,讓我們假設我們有一個 cron 任務嘗試使用我們的應用程序中的 WebClient 檢索受保護的資源: 接下來,我們將設置我們在計劃任務中自動注入的 webClient 實例: 正如我們之前提到的,客户端註冊表會自動創建並添加到上下文中的 Spring Boot 所添加。 需要注意的是,我們正在使用一個 UnAuthenticatedServerOAuth2AuthorizedClientRepository 實例。因為沒有終端用户參與該過程,因為它是一個機器對機器的通信。 此外,正如我們之前所説,我們將默認使用 bael 客户端註冊表。 否則,我們必須在 cron 任務中定義請求時指定它: 如果我們運行應用程序,並啓用 DEBUG 調試日誌級別,我們就能看到 Spring Security 為我們執行的調用: 我們還會注意到,任務運行第二次時,應用程序不會首先請求令牌,因為令牌尚未過期。 This grant type is usually used in cases where less-trusted third-party applications need to access resources. In order to execute the OAuth2 process using the Authorization Code flow, we’ll need to define several more properties for our client registration and the provider: Apart from the properties we used in the previous section, this time we also need to include: Of course, for well-known providers, the first two points don’t need to be specified. The redirect endpoint is created automatically by Spring Security. By default, the URL configured for it is [action]/oauth2/code/[registrationId], with only authorize and login actions permitted (in order to avoid an infinite loop). This endpoint is in charge of: Next, we’ll need to configure the SecurityWebFilterChain. The most common scenario is using Spring Security’s OAuth2 Login capabilities to authenticate users and give them access to our endpoints and resources. If that’s our case, then just including the oauth2Logindirective in the ServerHttpSecuritydefinition will be enough for our application to work as an OAuth2 Client too: Now it’s time to put our WebClientinstance in place: This time we’re injecting both the client registration repository and the authorized client repository from the context. We’re also enabling the setDefaultOAuth2AuthorizedClientoption. With this, the framework will try to obtain the client information from the current Authenticationobject managed in Spring Security. We have to take into account that with it, all HTTP requests will include the access token, which might not be the desired behavior. Later we’ll analyze alternatives that will indicate the client that a specific WebClienttransaction will use. The Authorization Code requires a user-agent that can work out redirections (e.g., a browser) to execute the procedure. Therefore, we can make use of this grant type when the user is interacting with our application, usually calling an HTTP endpoint: Finally, we’ll call the endpoint and analyze what’s going on by checking the log entries. After we call the endpoint, the application verifies that we’re not yet authenticated in the application: The application redirects to the Authorization Service’s endpoint to authenticate using the credentials existing in the Provider’s registries (in our case, we’ll use the bael-user/bael-password After authenticating, the user-agent is sent back to the Redirect URI, along with the code as a query param, and the state value that was first sent (to avoid CSRF attacks): It obtains users information: And it redirects the user-agent to the original endpoint: Finally, our WebClientinstance can request the secured resource successfully: 此前,我們瞭解到使用 如果我們從配置中刪除此命令,我們就需要在定義請求時明確指定客户端註冊。 一種方法,當然是使用 正如我們所見,最常見的場景是依賴 OAuth2 授權提供者在我們的應用程序中登錄用户。 但是,如果我們要避免這樣做,同時仍然能夠使用 OAuth2 協議訪問受保護的資源呢?那麼我們需要在我們的配置中進行一些更改。 首先,為了在整體上保持一致性,我們可以使用 authorize 操作而不是 login 操作來定義重定向 URI 屬性: 我們還可以刪除與用户相關的屬性,因為我們不會使用它們來創建應用程序中的 Principal。 現在,我們將配置 SecurityWebFilterChain,而無需包含 oauth2Login 命令,而是包含 oauth2Client 命令。 即使我們不想依賴 OAuth2 登錄,我們仍然希望在訪問端點之前對用户進行身份驗證。因此,我們在這裏也包含 formLogin 指令: 現在,讓我們運行應用程序,並查看當我們使用 /auth-code-annotated 端點時會發生什麼。 我們首先需要使用表單登錄向我們的應用程序登錄。 然後應用程序會將我們重定向到授權服務登錄以授予我們資源訪問權限。 注意:完成此操作後,我們應該被重定向回我們最初調用的端點。但是,Spring Security 似乎會將我們重定向回根路徑“/”而不是它,這似乎是一個 bug。觸發 OAuth2 舞蹈的請求之後的所有請求都將成功運行。 我們可以看到在端點響應中,授權客户端這次與一個名為 bael-client-id 的 principal 相關聯,而不是名為 bael-user 的 principal。 默認情況下,Spring 5 僅提供一個與 OAuth2 相關的服務方法,用於輕鬆地將 Bearer 令牌頭添加到請求中。它是 HttpHeaders#setBearerAuth 方法。 現在我們將查看一個示例,以演示手動執行 OAuth2 舞蹈以獲取受保護資源的步驟。 簡單來説,我們需要鏈接兩個 HTTP 請求,一個用於從授權服務器獲取身份驗證令牌,另一個使用該令牌獲取資源: 此示例應幫助我們理解使用符合 OAuth2 規範的請求可能多麼繁瑣,並展示 setBearerAuth 方法的使用。 在實際場景中,我們將讓 Spring Security 為我們處理所有繁瑣的工作,以透明的方式,就像我們在之前的部分中所做的那樣。 在本文中,我們學習瞭如何將我們的應用程序設置為 OAuth2 客户端,更具體地説,我們如何配置和使用 WebClient 以在完全反應式堆棧中檢索受保護的資源。 然後,我們分析了 Spring Security 5 OAuth2 機制在底層如何運作,以符合 OAuth2 規範。3.3. Authorized Clients
3.4. Repositories
3.5. Web Client Filter Chain
3.6. Web Client
4. Spring Security 5 Support – the Client Credentials Flow
4.1. Client and Provider Configurations
spring.security.oauth2.client.registration.bael.authorization-grant-type=client_credentials
spring.security.oauth2.client.registration.bael.client-id=bael-client-id
spring.security.oauth2.client.registration.bael.client-secret=bael-secret

spring.security.oauth2.client.provider.bael.token-uri=http://localhost:8085/oauth/token4.2. Using the WebClient
@Autowired
private WebClient webClient;

@Scheduled(fixedRate = 5000)
public void logResourceServiceResponse() {

    webClient.get()
      .uri("http://localhost:8084/retrieve-resource")
      .retrieve()
      .bodyToMono(String.class)
      .map(string
        -> "Retrieved using Client Credentials Grant Type: " + string)
      .subscribe(logger::info);
}
4.3. Configuring the WebClient
@Bean
WebClient webClient(ReactiveClientRegistrationRepository clientRegistrations) {
    ServerOAuth2AuthorizedClientExchangeFilterFunction oauth =
      new ServerOAuth2AuthorizedClientExchangeFilterFunction(
        clientRegistrations,
        new UnAuthenticatedServerOAuth2AuthorizedClientRepository());
    oauth.setDefaultClientRegistrationId("bael");
    return WebClient.builder()
      .filter(oauth)
      .build();
}webClient.get()
.uri("http://localhost:8084/retrieve-resource")
.attributes(
ServerOAuth2AuthorizedClientExchangeFilterFunction
.clientRegistrationId("bael"))
.retrieve()
// ...4.4. Testing
o.s.w.r.f.client.ExchangeFunctions:
  HTTP POST http://localhost:8085/oauth/token
o.s.http.codec.json.Jackson2JsonDecoder:
  Decoded [{access_token=89cf72cd-183e-48a8-9d08-661584db4310,
    token_type=bearer,
    expires_in=41196,
    scope=read
    (truncated)...]
o.s.w.r.f.client.ExchangeFunctions:
  HTTP GET http://localhost:8084/retrieve-resource
o.s.core.codec.StringDecoder:
  Decoded "This is the resource!"
c.b.w.c.service.WebClientChonJob:
We retrieved the following resource using Client Credentials Grant Type: This is the resource!5. Spring Security 5 Support – Implementation Using the Authorization Code Flow
5.1. Client and Provider Configurations
spring.security.oauth2.client.registration.bael.client-name=bael
spring.security.oauth2.client.registration.bael.client-id=bael-client-id
spring.security.oauth2.client.registration.bael.client-secret=bael-secret
spring.security.oauth2.client.registration.bael
  .authorization-grant-type=authorization_code
spring.security.oauth2.client.registration.bael
  .redirect-uri=http://localhost:8080/login/oauth2/code/bael

spring.security.oauth2.client.provider.bael.token-uri=http://localhost:8085/oauth/token
spring.security.oauth2.client.provider.bael
  .authorization-uri=http://localhost:8085/oauth/authorize
spring.security.oauth2.client.provider.bael.user-info-uri=http://localhost:8084/user
spring.security.oauth2.client.provider.bael.user-name-attribute=name
5.2. HTTP Security Configurations
@Bean
public SecurityWebFilterChain springSecurityFilterChain(ServerHttpSecurity http) {
    http.authorizeExchange()
      .anyExchange()
      .authenticated()
      .and()
      .oauth2Login();
    return http.build();
}
5.3. Configuring the WebClient
@Bean
WebClient webClient(
  ReactiveClientRegistrationRepository clientRegistrations,
  ServerOAuth2AuthorizedClientRepository authorizedClients) {
    ServerOAuth2AuthorizedClientExchangeFilterFunction oauth =
      new ServerOAuth2AuthorizedClientExchangeFilterFunction(
        clientRegistrations,
        authorizedClients);
    oauth.setDefaultOAuth2AuthorizedClient(true);
    return WebClient.builder()
      .filter(oauth)
      .build();
}
5.4. Using the WebClient
@RestController
public class ClientRestController {

    @Autowired
    WebClient webClient;

    @GetMapping("/auth-code")
    Mono<String> useOauthWithAuthCode() {
        Mono<String> retrievedResource = webClient.get()
          .uri("http://localhost:8084/retrieve-resource")
          .retrieve()
          .bodyToMono(String.class);
        return retrievedResource.map(string ->
          "We retrieved the following resource using Oauth: " + string);
    }
}
5.5. Testing
o.s.w.s.adapter.HttpWebHandlerAdapter: HTTP GET "/auth-code"
...
HTTP/1.1 302 Found
Location: /oauth2/authorization/bael
  ?response_type=code
  &client_id=bael-client-id
  &state=...
&redirect_uri=http%3A%2F%2Flocalhost%3A8080%2Flogin%2Foauth2%2Fcode%2FbaelHTTP/1.1 302 Found
Location: http://localhost:8085/oauth/authorize
?response_type=code
&client_id=bael-client-id
&state=...
&redirect_uri=http%3A%2F%2Flocalhost%3A8080%2Flogin%2Foauth2%2Fcode%2Fbaelo.s.w.r.f.client.ExchangeFunctions:HTTP POST http://localhost:8085/oauth/token
o.s.w.r.f.client.ExchangeFunctions:HTTP GET http://localhost:8084/user
HTTP/1.1 302 Found
Location: /auth-code
o.s.w.r.f.client.ExchangeFunctions:HTTP GET http://localhost:8084/retrieve-resource
o.s.w.r.f.client.ExchangeFunctions:Response 200 OK
o.s.core.codec.StringDecoder :Decoded "This is the resource!"
6. 替代方案 – 在呼叫中進行客户端註冊
@GetMapping("/auth-code-annotated")
Mono<String> useOauthWithAuthCodeAndAnnotation(
  @RegisteredOAuth2AuthorizedClient("bael") OAuth2AuthorizedClient authorizedClient) {
    Mono<String> retrievedResource = webClient.get()
      .uri("http://localhost:8084/retrieve-resource")
      .attributes(
        ServerOAuth2AuthorizedClientExchangeFilterFunction.oauth2AuthorizedClient(authorizedClient))
      .retrieve()
      .bodyToMono(String.class);
    return retrievedResource.map(string ->
      "Resource: " + string
        + " - Principal associated: " + authorizedClient.getPrincipalName()
        + " - Token will expire at: " + authorizedClient.getAccessToken()
          .getExpiresAt());
}
7. 避免 OAuth2 登錄功能
spring.security.oauth2.client.registration.bael
.redirect-uri=http://localhost:8080/login/oauth2/code/bael@Bean
public SecurityWebFilterChain springSecurityFilterChain(ServerHttpSecurity http) {
http.authorizeExchange()
.anyExchange()
.authenticated()
.and()
.oauth2Client()
.and()
.formLogin();
return http.build();
}8. Spring Framework 支持 – 手動方法
@Autowired
WebClient client;

public Mono<String> obtainSecuredResource() {
    String encodedClientData =
      Base64.getEncoder().encodeToString("bael-client-id:bael-secret".getBytes());
    Mono<String> resource = client.post()
      .uri("localhost:8085/oauth/token")
      .header("Authorization", "Basic " + encodedClientData)
      .body(BodyInserters.fromFormData("grant_type", "client_credentials"))
      .retrieve()
      .bodyToMono(JsonNode.class)
      .flatMap(tokenResponse -> {
          String accessTokenValue = tokenResponse.get("access_token")
            .textValue();
          return client.get()
            .uri("localhost:8084/retrieve-resource")
            .headers(h -> h.setBearerAuth(accessTokenValue))
            .retrieve()
            .bodyToMono(String.class);
        });
    return resource.map(res ->
      "使用手動方法檢索資源: " + res);
}9. 結論
