1. 概述
在本教程中,我們將學習 JSON Web 簽名 (JWS) 以及如何使用 JSON Web 密鑰 (JWK) 規範在配置為 Spring Security OAuth2 的應用程序中實現它。
我們應該牢記,儘管 Spring 正在努力將所有 Spring Security OAuth 功能遷移到 Spring Security 框架,但本指南仍然是理解這些規範基本概念的良好起點,並在實施它們在任何框架中時會派上用場。
首先,我們將嘗試理解基本概念,例如 JWS 和 JWK,它們的用途以及如何輕鬆配置 Resource Server 以使用此 OAuth 解決方案。
然後,我們將深入研究,通過分析 OAuth2 Boot 在幕後所做的事情以及設置 Authorization Server 以使用 JWK 的詳細規範。
2. 瞭解 JWS 和 JWK 的全局概念
在開始之前,我們需要正確理解一些基本概念。 建議您首先回顧我們的 OAuth 和 JWT 文章,因為這些主題不屬於本教程的範圍。
JWS 是一種由 IETF 創建的規範,描述了用於驗證數據完整性的各種密碼學機制,即 JWT 中的數據,具體來説是 JSON Web Token (JWT)。 它定義了一種包含執行此操作所需信息的 JSON 結構。
它是 JWT 規範中廣泛使用的關鍵方面,因為聲明必須經過簽名或加密才能被認為是安全可靠的。
在第一種情況下,JWT 表示為 JWS。 如果它被加密,則 JWT 將編碼為 JSON Web Encryption (JWE) 結構。
在 OAuth 工作流程中,最常見的情況是僅使用已簽名 JWT。 這是因為我們通常不需要“隱藏”信息,而是要驗證數據的完整性。
當然,無論我們處理的是已簽名還是加密的 JWT,我們都需要正式的指南,以便有效地傳輸公共密鑰。
JWK 是一種由 IETF 定義的 JSON 結構,代表一個加密密鑰。
許多身份驗證提供商提供“JWK 集合”端點,該端點也定義在規範中。 通過它,其他應用程序可以找到有關公共密鑰的信息,以便處理 JWT。
例如,資源服務器使用 JWT 中的 kid (密鑰 ID) 字段來查找 JWK 集中正確的密鑰。
2.1. 使用 JWK 實現解決方案
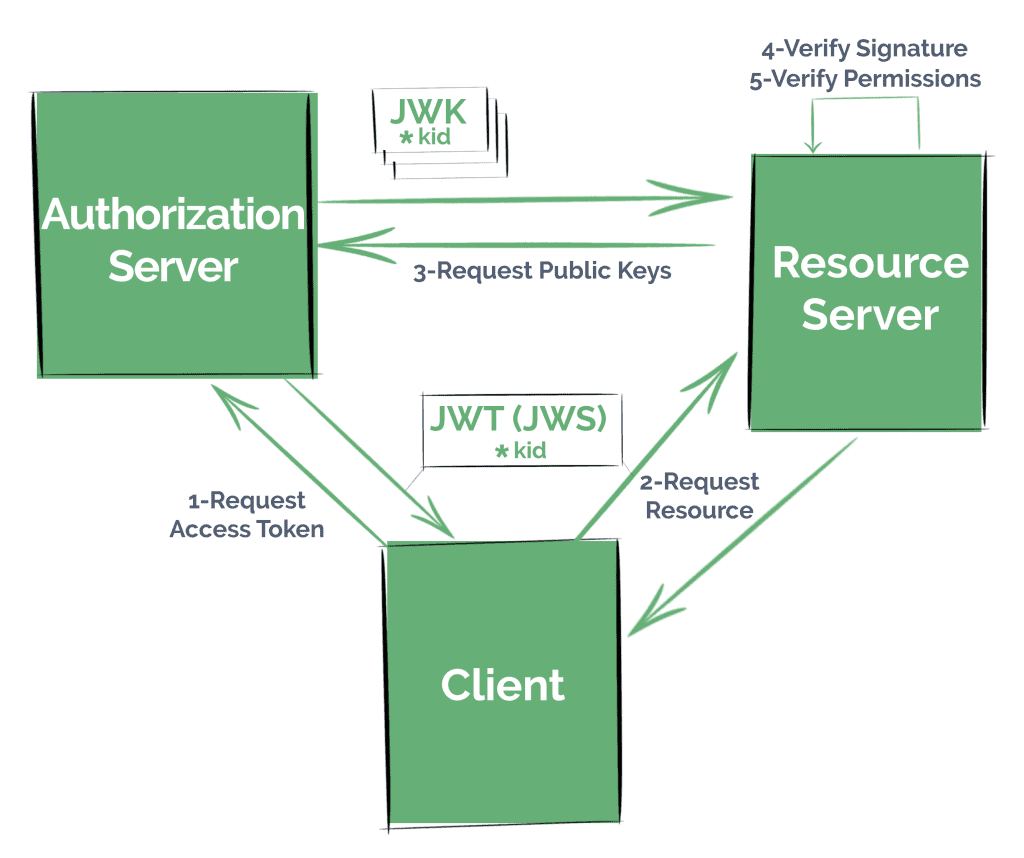
常見情況下,如果我們想使我們的應用程序以安全的方式提供資源,比如通過使用標準安全協議,如 OAuth 2.0,我們則需要遵循以下步驟:
- 在授權服務器上註冊客户端——要麼是在我們自己的服務中,要麼是在一個著名的提供商(如 Okta、Facebook 或 Github)中
- 這些客户端將從授權服務器請求訪問令牌,遵循我們可能配置的任何 OAuth 策略
- 它們將嘗試向資源服務器呈現令牌(在本例中,作為 JWT)以訪問資源
- 資源服務器必須驗證令牌是否被篡改,通過檢查其簽名,以及驗證其聲明
- 並且,我們的資源服務器最終檢索到資源,現在確信客户端擁有正確的權限
3. JWK 和資源服務器配置
稍後,我們將學習如何設置自己的授權服務器,該服務器提供 JWT 及其“JWK 集合”端點。
在此之前,我們將專注於最簡單——也是最常見的場景,即指向現有授權服務器的情況。
我們只需要指示服務如何驗證它接收的訪問令牌,例如它應該使用哪個公鑰來驗證 JWT 的簽名。
我們將使用 Spring Security OAuth 的 Autoconfig 功能以簡單而乾淨的方式來實現這一點,僅使用應用程序屬性。
3.1. Maven 依賴
我們需要將 OAuth2 自配置依賴添加到 Spring 應用程序的 pom 文件中:
<dependency>
    <groupId>org.springframework.security.oauth.boot</groupId>
    <artifactId>spring-security-oauth2-autoconfigure</artifactId>
    <version>2.1.6.RELEASE</version>
</dependency>
如往常一樣,我們可以從 Maven Central 檢查最新版本的 Artifact。
請注意,此依賴項不由 Spring Boot 管理,因此我們必須指定其版本。
它應該與我們使用的 Spring Boot 版本匹配。
3.2. 配置資源服務器
接下來,我們需要使用 @EnableResourceServer 註解在我們的應用程序中啓用資源服務器功能:
@SpringBootApplication
@EnableResourceServer
public class ResourceServerApplication {

    public static void main(String[] args) {
        SpringApplication.run(ResourceServerApplication.class, args);
    }
}
現在我們需要指示我們的應用程序如何獲取用於驗證接收到的 JWT 簽名的公鑰。
OAuth2 Boot 提供了不同的策略來驗證令牌。
正如我們之前所説,大多數授權服務器會暴露一個帶有集合的 URI,供其他服務使用,以驗證簽名。
我們將配置我們稍後進一步處理的本地授權服務器的 JWK 集合端點。
讓我們在 application.properties 中添加以下內容:
security.oauth2.resource.jwk.key-set-uri=
  http://localhost:8081/sso-auth-server/.well-known/jwks.json
我們將研究其他策略,當我們對這個主題進行詳細分析時。
注意: 新的 Spring Security 5.1 資源服務器僅支持 JWK 簽名 JWT 作為授權,Spring Boot 也提供非常相似的屬性來配置 JWK 集合端點:
spring.security.oauth2.resourceserver.jwk-set-uri=
  http://localhost:8081/sso-auth-server/.well-known/jwks.json
3.3. Spring 配置在幕後
我們之前添加的屬性在創建了幾個 Spring Bean 中得到了體現。
更準確地説,OAuth2 Boot 將創建:
- 一個 JwkTokenStore,具有解碼 JWT 和驗證其簽名的唯一能力
- 一個 DefaultTokenServices 實例,用於使用前述 TokenStore
4. The JWK Set Endpoint in the Authorization Server
Now we’ll go deeper on this subject, analyzing some key aspects of JWK and JWS as we configure an Authorization Server that issues JWTs and serves its JWK Set endpoint.
Note that since Spring Security doesn’t yet offer features to set up an Authorization Server, creating one using Spring Security OAuth capabilities is the only option at this stage. It will be compatible with Spring Security Resource Server, though.
4.1. Enabling Authorization Server Features
The first step is configuring our Authorization server to issue access tokens when required.
We’ll also add the spring-security-oauth2-autoconfigure dependency as we did with Resource Server.
First, we’ll use the @EnableAuthorizationServer annotation to configure the OAuth2 Authorization Server mechanisms:
@Configuration
@EnableAuthorizationServer
public class JwkAuthorizationServerConfiguration {

    // ...

}
And we’ll register an OAuth 2.0 Client using properties:
security.oauth2.client.client-id=bael-client
security.oauth2.client.client-secret=bael-secret
With this, our application will retrieve random tokens when requested with the corresponding credentials:
curl -d grant_type=client_credentials -d scope=any bael-client:bael-secret @localhost:8081/sso-auth-server/oauth/tokenAs we can see, Spring Security OAuth retrieves a random string value by default, not JWT-encoded:
"access_token": "af611028-643f-4477-9319-b5aa8dc9408f"4.2. Issuing JWTs
We can easily change this by creating a JwtAccessTokenConverter bean in the context:
@Bean
public JwtAccessTokenConverter accessTokenConverter() {
    return new JwtAccessTokenConverter();
}
and using it in a JwtTokenStore instance:
@Bean
public TokenStore tokenStore() {
    return new JwtTokenStore(accessTokenConverter());
}
So with these changes, let’s request a new access token, and this time we’ll obtain a JWT, encoded as a JWS, to be accurate.
We can easily identify JWSs; their structure consists of three fields (header, payload, and signature) separated by a dot:
"access_token":"eyJhbGciOiJIUzI1NiIsInR5cCI6IkpXVCJ9
  .
  eyJzY29wZSI6WyJhbnkiXSwiZXhwIjoxNTYxOTcy...
  .
  XKH70VUHeafHLaUPVXZI9E9pbFxrJ35PqBvrymxtvGI"
By default, Spring signs the header and payload using a Message Authentication Code (MAC) approach.
We can verify this by analyzing the JWT in one of the many JWT decoder/verifier online tools we can find out there.
If we decode the JWT we obtained, we’ll see that the value of the alg attribute is HS256, which indicates an HMAC-SHA256 algorithm was used to sign the token.
In order to understand why we don’t need JWKs with this approach, we have to understand how MAC hashing function works.
4.3. The Default Symmetric Signature
MAC hashing uses the same key to sign the message and to verify its integrity; it’s a symmetric hashing function.
Therefore, for security purposes, the application can’t publicly share its signing key.
Only for academic reasons, we’ll make public the Spring Security OAuth /oauth/token_key endpoint:
security.oauth2.authorization.token-key-access=permitAll()And we’ll customize the signing key value when we configure the JwtAccessTokenConverter bean:
converter.setSigningKey("bael")To know exactly which symmetric key is being used.
4.4. Alternatives for the Resource Server Configuration
Depending on our security needs, we might consider that securing one of the recently mentioned endpoints properly – whilst making them accessible to the Resource Servers – is enough.
If that’s the case, then we can leave the Authorization Server as-is, and choose another approach for the Resource Server.
The Resource Server will expect the Authorization Server to have secured endpoints, so for starters, we’ll need to provide the client credentials, with the same properties we used in the Authorization Server:
security.oauth2.client.client-id=bael-client
security.oauth2.client.client-secret=bael-secret
Then we can choose to use the /oauth/check_token endpoint (a.k.a. the introspection endpoint) or obtain a single key from /oauth/token_key:
security.oauth2.resource.jwt.key-uri=
  http://localhost:8081/sso-auth-server/oauth/token_key
security.oauth2.resource.token-info-uri=
  http://localhost:8081/sso-auth-server/oauth/check_token
Alternatively, we can just configure the key that will be used to verify the token in the Resource Service:
security.oauth2.resource.jwt.key-value=baelWith this approach, there will be no interaction with the Authorization Server, but of course, this means less flexibility on changes with the Token signing configuration.
As with the key URI strategy, this last approach might be recommended only for asymmetric signing algorithms.
4.5. Creating a Keystore File
Let’s not forget our final objective. We want to provide a JWK Set endpoint as the most well-known providers do.
If we’re going to share keys, it’ll be better if we use asymmetric cryptography (particularly, digital signature algorithms) to sign the tokens.
The first step towards this is creating a KeyStore file.
One easy way to achieve this is:
- open the command line in the
/bindirectory of any JDK or JRE you have in handy:
cd $JAVA_HOME/bin- run the
keytoolcommand, with the corresponding parameters:
./keytool -genkeypair \
  -alias bael-oauth-jwt \
  -keyalg RSA \
  -keypass bael-pass \
  -keystore bael-jwt.jks \
  -storepass bael-pass
Notice we used an RSA algorithm here, which is asymmetric.
- answer the interactive questions and generate the keystore file
We can request and decode a Access Token, check it’s kid value, and use it to request a resource.
Once the public key is retrieved, the Resource Server stores it internally, mapping it to the Key Id for future requests.
5. 結論
我們在這份全面的指南中學習了很多關於 JWT、JWS 和 JWK 的知識。 不僅包括 Spring 相關的配置,還涵蓋了通用的 Security 概念,並通過一個實際示例來觀察它們的應用。
我們看到了 Resource Server 的基本配置,該配置使用 JWK Set 端點處理 JWT。
最後,我們通過設置一個高效的 Authorization Server,該 Server 暴露了 JWK Set 端點,擴展了 Spring Security OAuth 的基本功能。
