1. 概述
在本快速教程中,我們將演示如何使用 Thymeleaf 將 List 對象綁定。
要學習如何將 Thymeleaf 與 Spring 集成,請查看我們的主要 Spring 文章,其中您還可以學習如何顯示字段、接受輸入、顯示驗證錯誤或轉換數據以供顯示。
2. Thymeleaf 中列表示例
我們將首先演示如何在 Thymeleaf 頁面中顯示 列表 的元素,以及如何將對象列表作為用户輸入綁定到 Thymeleaf 表單中。
為此,我們將使用以下代碼所示的簡單模型:
// 代碼塊註釋翻譯
// 此代碼塊註釋將不被翻譯
public class Book {
    private long id;

    private String title;

    private String author;

    // getters and setters
}
除了顯示示例中的現有書籍,我們還將使用户能夠向收藏中添加多本書籍,並同時編輯所有現有書籍。
3. 顯示列表元素
下面是返回 allBooks 頁面的 Controller 方法:
@GetMapping("/all")
public String showAll(Model model) {
    model.addAttribute("books", bookService.findAll());
    return "books/allBooks";
}
在這裏,我們添加了 Book 對象列表作為模型屬性,並將其發送到視圖,視圖將使用 HTML 表格進行顯示:
<table>
    <thead>
        <tr>
            <th> Title </th>
            <th> Author </th>
        </tr>
    </thead>
    <tbody>
	<tr th:if="${books.empty}">
            <td colspan="2"> No Books Available </td>
        </tr>
        <tr th:each="book : ${books}">
            <td><span th:text="${book.title}"> Title </span></td>
            <td><span th:text="${book.author}"> Author </span></td>
        </tr>
    </tbody>
</table>在這裏,我們使用th:each屬性來遍歷列表並顯示其中每個對象的屬性。
4. 使用選擇表達式綁定列表
為了通過表單提交將列表中的對象發送到控制器,我們不能直接使用List對象。
相反,我們必須添加一個包裝對象來持有提交的列表:
public class BooksCreationDto {
    private List<Book> books;

    // default and parameterized constructor

    public void addBook(Book book) {
        this.books.add(book);
    }

    // getter and setter
}
現在,我們允許用户通過一次提交表單添加三本書。
首先,我們將準備表單頁面,並將我們的命令對象作為 Model 屬性傳遞:
@GetMapping("/create")
public String showCreateForm(Model model) {
    BooksCreationDto booksForm = new BooksCreationDto();

    for (int i = 1; i <= 3; i++) {
        booksForm.addBook(new Book());
    }

    model.addAttribute("form", booksForm);
    return "books/createBooksForm";
}
如我們所見,我們通過包裝類將 3 個空 Book 對象傳遞到了視圖中。
接下來,我們需要將表單添加到 Thymeleaf 頁面中:
<form action="#" th:action="@{/books/save}" th:object="${form}"
  method="post">
    <fieldset>
        <input type="submit" id="submitButton" th:value="Save">
        <input type="reset" id="resetButton" name="reset" th:value="Reset"/>
        <table>
            <thead>
                <tr>
                    <th> Title</th>
                    <th> Author</th>
                </tr>
            </thead>
            <tbody>
                <tr th:each="book, itemStat : *{books}">
                    <td><input th:field="*{books[__${itemStat.index}__].title}" /></td>
                    <td><input th:field="*{books[__${itemStat.index}__].author}" /></td>
                </tr>
            </tbody>
        </table>
    </fieldset>
</form>
這是上方頁面的效果:
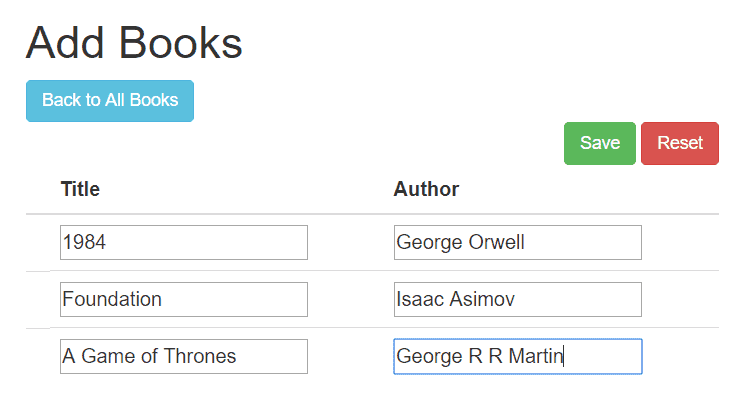
讓我們更詳細地瞭解我們在這裏所做的事情。首先,我們使用了 th:object=”${form}” 來指定命令對象(即我們作為 Model 屬性傳遞的那個對象)。
接下來值得注意的是,我們使用選擇表達式通過以下方式訪問列表:
<tr th:each="book, itemStat : *{books}">最後,我們使用 th:field 將輸入映射為列表元素的屬性。
但是,我們還需要使用 itemStat 變量來定義我們所引用的是哪個列表元素,如以下示例所示:
th:field="*{books[__${itemStat.index}__].title}"最後一步實際上是處理提交的數據,在後端。我們將使用命令對象作為控制器中 @ModelAttribute 在我們的 @PostMapping 方法中,保存檢索到的圖書列表並返回所有現有圖書給用户:
@PostMapping("/save")
public String saveBooks(@ModelAttribute BooksCreationDto form, Model model) {
bookService.saveAll(form.getBooks());
model.addAttribute("books", bookService.findAll());
return "redirect:/books/all";
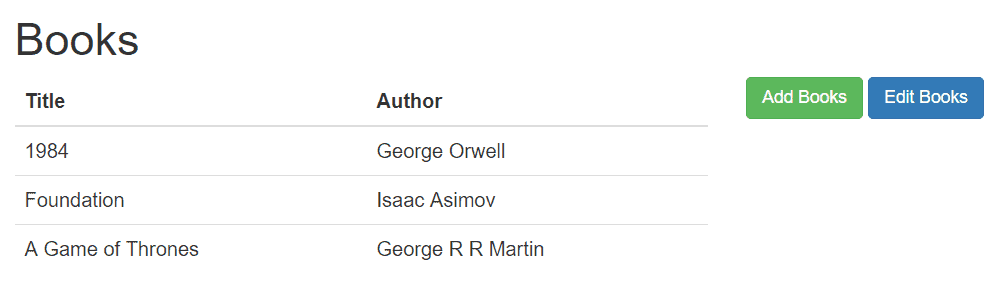
}提交表單到 /save 端點後,我們將獲得包含所有新增書籍的頁面:
5. 使用變量表達式綁定列表
對於此示例,我們首先將所有現有書籍加載到命令對象中:
@GetMapping("/edit")
public String showEditForm(Model model) {
    List<Book> books = new ArrayList<>();
    bookService.findAll().iterator().forEachRemaining(books::add);

    model.addAttribute("form", new BooksCreationDto(books));
    return "books/editBooksForm";
}
該 HTML 頁面與其它頁面相似,最值得注意的差異在於 塊中:
<tr th:each="book, itemStat : ${form.books}">
    <td>
        <input hidden th:name="|books[${itemStat.index}].id|" th:value="${book.getId()}"/>
    </td>
    <td>
        <input th:name="|books[${itemStat.index}].title|" th:value="${book.getTitle()}"/>
    </td>
    <td>
        <input th:name="|books[${itemStat.index}].author|" th:value="${book.getAuthor()}"/>
    </td>
</tr>
如
我們還需要添加隱藏輸入,將當前圖書的 ID 綁定起來,因為我們不想創建新的圖書,而是要編輯現有圖書。
6. 結論
在本文中,我們演示瞭如何在 Thymeleaf 和 Spring MVC 中使用 List 對象的方法。我們展示瞭如何將發送到視圖的對象列表進行顯示,但重點在於如何在 Thymeleaf 表單中將用户輸入綁定為列表的兩種方式。
