1. 概述
本教程將討論 HAL 是什麼以及它為什麼有用,然後再介紹 HAL 瀏覽器。
隨後,我們將使用 Spring 構建一個簡單的 REST API,其中包括一些有趣的端點,並使用一些測試數據填充我們的數據庫。
最後,使用 HAL 瀏覽器,我們將探索我們的 REST API,並瞭解如何遍歷其中包含的數據。
2. HAL 和 HAL 瀏覽器
JSON Hypertext Application Language,或 HAL,是一種簡潔的格式,它提供了一種一致且易於鏈接的方式,可以在我們的 API 之間鏈接資源。 將 HAL 包含在我們的 REST API 中,可以極大地提高 API 的可探索性,同時它本質上是自文檔化的。
它通過返回 JSON 格式的數據來工作,該數據概述了有關 API 的相關信息。
HAL 模型圍繞着兩個基本概念:
資源,其中包含:
- 指向相關 URI 的鏈接
- 嵌入式資源
- 狀態
鏈接:
- 目標 URI
- 鏈接的 rel(關係)
- 一些可選屬性,用於處理版本過時、內容協商等
HAL 瀏覽器是由開發 HAL 的同一人創建的,它提供了一個瀏覽器內 GUI,用於遍歷您的 REST API。
現在我們將構建一個簡單的 REST API,插入 HAL 瀏覽器,並探索其功能。
3. 依賴項
以下是用於將 HAL 瀏覽器集成到我們的 REST API 所需的單個依賴項。
首先,對於 Maven 項目,請使用以下依賴項:該依賴項。
<dependency>
    <groupId>org.springframework.data</groupId>
    <artifactId>spring-data-rest-hal-explorer</artifactId>
    <version>3.4.1.RELEASE</version>
</dependency>
如果你正在使用 Gradle 構建項目,你可以將以下行添加到你的 build.gradle 文件中:
compile group: 'org.springframework.data', name: 'spring-data-rest-hal-explorer', version: '3.4.1.RELEASE'4. 構建一個簡單的 REST API
This section will guide you through the process of building a basic REST API using [Your Chosen Technology - e.g., Node.js with Express]. We'll cover the fundamental concepts and steps involved in creating a simple API that can handle requests and responses.
4.1 Understanding RESTful Principles
REST (Representational State Transfer) is an architectural style for designing networked applications. Key principles of REST include:
- Client-Server: A clear separation of concerns between the client and the server.
- Stateless: Each request from a client to the server must contain all the information needed to understand the request. The server does not store any client context between requests.
- Cacheable: Responses can be cached to improve performance.
- Uniform Interface: A consistent set of methods (GET, POST, PUT, DELETE) for interacting with resources.
4.2 Setting up Your Environment
Before you begin, you'll need to have the following installed:
- [Your Chosen Technology - e.g., Node.js]
- [Your Chosen Package Manager - e.g., npm or yarn]
- A code editor (e.g., VS Code, Sublime Text)
4.3 Creating a Basic API Route
Let's create a simple route that returns a "Hello, World!" message.
// app.js
const express = require('express');
const app = express();
const port = 3000;

app.get('/', (req, res) => {
  res.send('Hello, World!');
});

app.listen(port, () => {
  console.log(`Example app listening at http://localhost:${port}`);
});
Explanation:
express(): Creates an Express application.app.get('/', ...): Defines a route that listens for GET requests to the root path ('/').res.send('Hello, World!'): Sends the "Hello, World!" message as the response.app.listen(port, ...): Starts the server and listens for incoming requests on the specified port (3000 in this example).
4.1. 簡單數據模型
在我們的示例中,我們將設置一個簡單的 REST API,用於瀏覽我們圖書館中的不同書籍。
這裏,我們定義了一個簡單的書實體,其中包含適當的註解,以便我們使用 Hibernate 存儲數據:
@Entity
public class Book {

  @Id
  @GeneratedValue(strategy = GenerationType.IDENTITY)
  private long id;

  @NotNull
  @Column(columnDefinition = "VARCHAR", length = 100)
  private String title;

  @NotNull
  @Column(columnDefinition = "VARCHAR", length = 100)
  private String author;

  @Column(columnDefinition = "VARCHAR", length = 1000)
  private String blurb;

  private int pages;

  // usual getters, setters and constructors

}
4.2. 介紹 CRUD 倉庫
接下來,我們需要一些端點。為此,我們可以利用 PagingAndSortingRepository,並指定我們想要從我們的 Book 實體中獲取數據。
該類提供 簡單 CRUD 命令,以及分頁和排序功能,無需額外配置。
@Repository
public interface BookRepository extends PagingAndSortingRepository<Book, Long> {

    @RestResource(rel = "title-contains", path="title-contains")
    Page<Book> findByTitleContaining(@Param("query") String query, Pageable page);

    @RestResource(rel = "author-contains", path="author-contains", exported = false)
    Page<Book> findByAuthorContaining(@Param("query") String query, Pageable page);
}
如果看起來有些奇怪,或者您想了解更多關於 Spring 倉庫的信息,請在此處閲讀更多內容。
我們通過添加兩個新的端點擴展了倉庫:
- findByTitleContaining – 返回標題包含查詢的圖書
- findByAuthorContaining – 返回數據庫中作者包含查詢的圖書
請注意,我們的第二個端點包含export = false屬性。此屬性阻止該端點生成 HAL 鏈接,並且將不可通過 HAL 瀏覽器訪問。
最後,在 Spring 啓動時,我們將加載我們的數據,通過定義實現 ApplicationRunner 接口的類來完成。您可以在 GitHub 項目中找到完整的 DBLoader 類。
5. 安裝 HAL 瀏覽器
安裝 HAL 瀏覽器非常簡單,尤其是在使用 Spring 構建 REST API 時。只要我們包含了依賴項,Spring 就會自動配置瀏覽器,並使其通過默認端點可用。
現在,我們只需要點擊“運行”並切換到瀏覽器。HAL 瀏覽器將可用在 http://localhost:8080/。
6. 使用 HAL 瀏覽器探索我們的 REST API
HAL 瀏覽器由兩個部分組成——探索器和檢查器。我們將分別分解和探索每個部分。
6.1. HAL 探索器
正如其名稱所示,探索器致力於探索當前端點相關的 API 新部分。它包含一個搜索欄,以及用於顯示自定義請求頭和屬性的文本框。
下方是鏈接部分和嵌入式資源的點擊式列表。
6.2. 使用鏈接
如果導航到我們的 /books 終點,我們可以查看現有的鏈接:
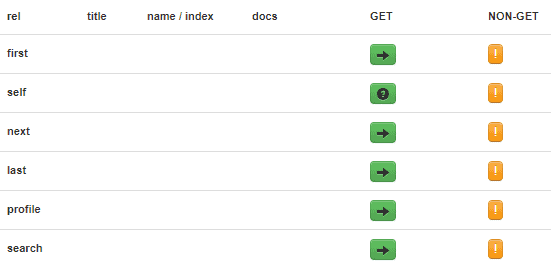
這些 鏈接是從 毗鄰的 HAL 中生成的:
"_links": {
    "first": {
      "href": "http://localhost:8080/books?page=0&size=20"
    },
    "self": {
      "href": "http://localhost:8080/books{?page,size,sort}",
      "templated": true
    },
    "next": {
      "href": "http://localhost:8080/books?page=1&size=20"
    },
    "last": {
      "href": "http://localhost:8080/books?page=4&size=20"
    },
    "profile": {
      "href": "http://localhost:8080/profile/books"
    },
    "search": {
      "href": "http://localhost:8080/books/search"
    }
},如果我們將搜索端點移動到這裏,我們還可以查看使用PagingAndSortingRepository 創建的自定義端點。
{
  "_links": {
    "title-contains": {
      "href": "http://localhost:8080/books/search/title-contains{?query,page,size,sort}",
      "templated": true
    },
    "self": {
      "href": "http://localhost:8080/books/search"
    }
  }
}
上述 HAL 顯示了我們的 標題包含 端點,它顯示了合適的搜索條件。請注意,作者包含 端點缺失,因為我們已定義不應將其導出。
6.3. 查看嵌入式資源
嵌入式資源顯示我們端點 /books 上單個圖書記錄的詳細信息。每個資源還包含其自身的屬性和鏈接 部分:

6.4. 使用表單
GET 列中標記為問號的按鈕表示可以使用表單模態框輸入自定義搜索條件。
以下是用於我們的 title-contains 端點的表單:
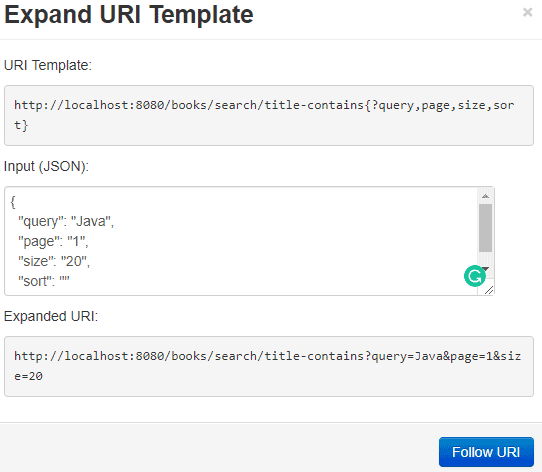
我們的自定義 URI 返回包含單詞“Java”的 20 本書的前一頁。
6.5. 匯檢器 (Hal Inspector)
匯檢器位於瀏覽器的右側,包含響應頭和響應體。該HAL 數據用於渲染教程中之前看到的鏈接和嵌入式資源。
7. 結論
在本文中,我們總結了 HAL 的內容、其用途以及它如何幫助我們創建更優秀的自文檔化 REST API。
我們使用 Spring 構建了一個簡單的 REST API,該 API 實現了 PagingAndSortingRepository,並定義了我們自己的端點。我們還看到了如何從 HAL 瀏覽器中排除某些端點。
在定義 API 之後,我們使用測試數據對其進行了填充,並藉助 HAL 瀏覽器對其進行了詳細探索。我們看到了 HAL 瀏覽器的結構,以及 UI 控制元素,這些控制元素允許我們逐步瀏覽 API 並探索其數據。
