1. 概述
本文將探討 Spring Security 框架中用於安全響應式應用程序的新功能。此版本與 Spring 6 和 Spring Boot 3 保持一致。
本文檔不會深入介紹響應式應用程序本身,這本身是 Spring 5 框架中的一項新特性。請務必查看“Reactor 核心介紹”文章以獲取更多詳細信息。
2. Maven 設置我們將使用 Spring Boot Starter 引導我們的項目,幷包含所有必需的依賴項。
基本設置需要聲明父項目、Web Starter 和 Security Starter 依賴項。 我們還需要 Spring Security 測試框架:
<parent>
    <groupId>org.springframework.boot</groupId>
    <artifactId>spring-boot-starter-parent</artifactId>
    <version>3.3.2</version>
    <relativePath/>
</parent>

<dependencies>
    <dependency>
        <groupId>org.springframework.boot</groupId>
        <artifactId>spring-boot-starter-webflux</artifactId>
    </dependency>
    <dependency>
        <groupId>org.springframework.boot</groupId>
        <artifactId>spring-boot-starter-security</artifactId>
    </dependency>
    <dependency>
        <groupId>org.springframework.security</groupId>
        <artifactId>spring-security-test</artifactId>
        <scope>test</scope>
    </dependency>
</dependencies>
我們可以在 Maven Central 上查看當前版本的 Spring Boot security starter:https://mvnrepository.com/artifact/org.springframework.boot/spring-boot-starter-security。
3. 項目設置
讓我們看看如何設置我們的項目。
3.1. 啓動反應式應用程序
我們不會使用標準的 @SpringBootApplication 配置,而是配置基於 Netty 的 Web 服務器。 Netty 是一個基於 NIO 的異步框架,是反應式應用程序的良好基礎。
@EnableWebFlux 註解使應用程序能夠啓用標準的 Spring Web Reactive 配置:
@ComponentScan(basePackages = {"com.baeldung.security"})
@EnableWebFlux
public class SpringSecurity6Application {

    public static void main(String[] args) {
        try (AnnotationConfigApplicationContext context
          = new AnnotationConfigApplicationContext(SpringSecurity6Application.class)) {
            context.getBean(NettyContext.class).onClose().block();
        }
    }
}
在這裏,我們創建了一個新的應用程序上下文,並通過調用 Netty 上下文的 .onClose().block() 鏈來等待 Netty 關閉。
Netty 關閉後,上下文將自動使用 try-with-resources 塊進行關閉。
我們還需要創建一個基於 Netty 的 HTTP 服務器,一個用於處理 HTTP 請求的處理程序,以及服務器和處理程序之間的適配器:
@Bean
public NettyContext nettyContext(ApplicationContext context) {
    HttpHandler handler = WebHttpHandlerBuilder
      .applicationContext(context).build();
    ReactorHttpHandlerAdapter adapter
      = new ReactorHttpHandlerAdapter(handler);
    HttpServer httpServer = HttpServer.create("localhost", 8080);
    return httpServer.newHandler(adapter).block();
}
3.2. Spring Security 配置類
對於我們的基本 Spring Security 配置,我們將創建一個配置類 – SecurityConfig。
為了啓用 Spring Security 6 中的 WebFlux 支持,我們只需要指定 @EnableWebFluxSecurity 和 @Configuration 註解即可。
@EnableWebFluxSecurity
@Configuration
public class SecurityConfig {
    // ...
}
在 Spring Security 6 中,@Configuration 已從 @EnableWebFluxSecurity 和 @EnableReactiveMethodSecurity 註解中移除。因此,在使用這些註解的任何地方,都需要添加 @Configuration 註解。
現在我們可以利用 ServerHttpSecurity 類來構建我們的安全配置。
此類自 Spring 5 引入,是一個新特性。它類似於 HttpSecurity 構建器,但僅適用於 WebFlux 應用程序。
ServerHttpSecurity 已經預配置了一些合理的默認值,因此我們可以完全跳過此配置。但作為入門,我們將提供以下最小配置:
@Bean
public SecurityWebFilterChain securityWebFilterChain(
  ServerHttpSecurity http) {
    return http.authorizeExchange(exchanges -> exchanges
      .anyExchange().authenticated())
      .build();
}
同時,我們需要一個用户詳情服務。Spring Security 提供了方便的模擬用户構建器和內存中用户詳情服務的實現:
@Bean
public MapReactiveUserDetailsService userDetailsService() {
    UserDetails user = User
      .withUsername("user")
      .password(passwordEncoder().encode("password"))
      .roles("USER")
      .build();
    return new MapReactiveUserDetailsService(user);
}
由於我們正處於響應式編程領域,用户詳情服務也應採用響應式方式。如果查看 ReactiveUserDetailsService 接口,你會發現它的 findByUsername 方法實際上返回一個 Mono 發佈的:
public interface ReactiveUserDetailsService {

    Mono<UserDetails> findByUsername(String username);
}
現在我們可以運行我們的應用程序,並觀察到標準的 HTTP 基本身份驗證表單。
4. 樣式登錄表單
自 Spring Security 5 以來,一個新穎的樣式登錄表單是一個小但顯著的改進,它使用了 Bootstrap 4 CSS 框架。登錄表單中的樣式錶鏈接到 CDN,因此我們只有在連接到互聯網時才會看到這個改進。
要使用新的登錄表單,讓我們向 ServerHttpSecurity 建造器中添加相應的 formLogin() 建造器方法:
public SecurityWebFilterChain securityWebFilterChain(
  ServerHttpSecurity http) {
    return http.authorizeExchange(exchanges -> exchanges
      .anyExchange().authenticated())
      .formLogin(formLogin -> formLogin
        .loginPage("/login"))
      .build();
}
現在打開應用程序的主頁,我們會發現它比我們之前使用的默認表單看起來要好得多,這要歸功於 Spring Security 的先前版本:
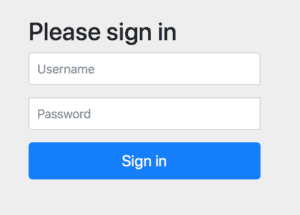
請注意,這並不是一個可以直接用於生產的環境的表單,但它是我們應用程序的一個良好開端。
現在,如果登錄後,再訪問 http://localhost:8080/logout 網址,我們會看到登出確認表單,該表單也進行了樣式化處理。
5. 反應式控制器安全
為了觀察身份驗證表單背後的內容,我們來實現一個簡單的反應式控制器,向用户問候:
@RestController
public class GreetingController {

    @GetMapping("/")
    public Mono<String> greet(Mono<Principal> principal) {
        return principal
          .map(Principal::getName)
          .map(name -> String.format("Hello, %s", name));
    }

}
登錄後,我們會看到歡迎消息。接下來,我們添加一個僅限管理員訪問的反應式處理程序:
@GetMapping("/admin")
public Mono<String> greetAdmin(Mono<Principal> principal) {
    return principal
      .map(Principal::getName)
      .map(name -> String.format("Admin access: %s", name));
}
現在讓我們為我們的用户詳情服務創建一個第二個用户,角色為 ADMIN:
UserDetails admin = User.withDefaultPasswordEncoder()
  .username("admin")
  .password("password")
  .roles("ADMIN")
  .build();
現在我們可以為管理 URL 添加一個匹配規則,要求用户擁有 ROLE_ADMIN 權限。
請注意,匹配器必須在 .anyExchange() 鏈調用之前添加。此調用適用於尚未由其他匹配器覆蓋的所有其他 URL:
return http.authorizeExchange(exchanges -> exchanges
  .pathMatchers("/admin").hasAuthority("ROLE_ADMIN")
  .anyExchange().authenticated())
  .formLogin(formLogin -> formLogin
    .loginPage("/login"))
  .csrf(csrf -> csrf.disable())
  .build();
如果現在我們使用 用户 或 管理員 登錄,我們將會看到他們都會觀察到初始問候語,因為我們已經將其開放給所有已認證的用户。
但只有 管理員 用户才能訪問 http://localhost:8080/admin 網址並查看她的問候語。
6. 反應式方法安全
我們已經瞭解瞭如何安全地保護URL,那麼如何安全地保護方法呢?
為了啓用反應式方法中的方法級安全,我們只需在我們的 SecurityConfig 類中添加 @EnableReactiveMethodSecurity 和 @Configuration 註解即可:
@EnableWebFluxSecurity
@Configuration
@EnableReactiveMethodSecurity
public class SecurityConfig {
    // ...
}
現在讓我們創建一個反應式問候服務,內容如下:
@Service
public class GreetingService {

    public Mono<String> greet() {
        return Mono.just("Hello from service!");
    }
}
我們可以將其注入到控制器中,訪問 http://localhost:8080/greetingService,並確認其正常運行:
@RestController
public class GreetingController {

    private GreetingService greetingService

    // constructor...

    @GetMapping("/greetingService")
    public Mono<String> greetingService() {
        return greetingService.greet();
    }

}
如果現在我們在服務方法上添加 @PreAuthorize 註解,並指定 ADMIN 角色,那麼 greet 服務 URL 將不再對普通用户可用:
@Service
public class GreetingService {

    @PreAuthorize("hasRole('ADMIN')")
    public Mono<String> greet() {
        // ...
    }
}
7. 在測試中模擬用户
讓我們看看如何輕鬆測試我們的反應式 Spring 應用程序。
首先,我們將創建一個帶有注入的應用程序上下文的測試:
@ContextConfiguration(classes = SpringSecurity6Application.class)
public class SecurityTest {

    @Autowired
    ApplicationContext context;

    // ...
}
現在我們將設置一個簡單的反應式 Web 測試客户端,它是 Spring 5 測試框架的一個特性:
@Before
public void setup() {
    this.webTestClient = WebTestClient
      .bindToApplicationContext(this.context)
      .configureClient()
      .build();
}
這使得我們能夠快速檢查未經授權的用户是否從我們應用程序的主頁重定向到登錄頁面:
@Test
void whenNoCredentials_thenRedirectToLogin() {
    webTestClient.get()
      .uri("/")
      .exchange()
      .expectStatus().is3xxRedirection();
}如果我們現在將@WithMockUser註解添加到測試方法中,就可以為該方法提供一個經過身份驗證的用户。
該用户的用户名和密碼分別為user和password,角色為USER。當然,所有這些都可以使用@WithMockUser註解參數進行配置。
現在我們可以檢查授權用户是否看到問候語:
@Test
@WithMockUser
void whenHasCredentials_thenSeesGreeting() {
    webTestClient.get()
      .uri("/")
      .exchange()
      .expectStatus().isOk()
      .expectBody(String.class).isEqualTo("Hello, user");
}
@WithMockUser 註解自 Spring Security 4 版本開始可用。但在 Spring Security 5 版本中,該註解也已更新,以覆蓋反應式端點和方法。
8. 結論
在本教程中,我們發現了 Spring Security 的新功能,尤其是在響應式編程領域。
