1. 簡介
在本教程中,我們將集成 BIRT(業務智能和報告工具)與 Spring Boot MVC,以生成 HTML 和 PDF 格式的靜態和動態報告。
2. 什麼是 BIRT?
BIRT 是一個開源引擎,用於創建數據可視化,可以集成到 Java Web 應用程序中。
它是在 Eclipse 基金會內的一個頂級軟件項目,並獲得了 IBM 和 Innovent Solutions 的貢獻。 Actuate 於 2004 年末啓動並贊助了這個項目。
該框架允許創建與各種數據源集成的報告。
3. Maven 依賴
BIRT 主要包含兩個組件:一個可視化報表設計器,用於創建報表設計文件,以及一個運行時組件,用於解釋和渲染這些設計。
在我們的示例 Web 應用程序中,我們將使用它們作為 Spring Boot 的一部分。
3.1. BIRT 框架依賴項
正如我們習慣於使用依賴管理思維一樣,首選方法是查找 BIRT 在 Maven Central 上。
然而,可用的核心庫的最新官方版本是 2016 年的 4.6 版本,而通過 Eclipse 下載頁面,我們可以找到至少兩個較新的版本 (當前版本為 4.8)。
如果選擇使用官方構建,最簡單的方法是下載 BIRT 報告引擎 包,這是一個完整的 Web 應用程序,也對學習很有用。然後我們需要將其中的 lib 文件夾複製到我們的項目(大小約為 68MB)並告訴 IDE 將其所有 jar 文件包含進去。
毋庸置疑的是,使用這種方法,我們只能通過 IDE 進行編譯,因為 Maven 不會找到這些 jar 文件,除非我們在本地倉庫中手動配置和安裝它們(超過 100 個文件!)。
幸運的是,Innovent Solutions 決定親自出手,並在 Maven Central 上發佈了其自己的 BIRT 依賴項構建,這很棒,因為它為我們管理了所有需要的依賴項。
閲讀了在線論壇上的評論,不清楚這些 Artifact 是否適合生產環境使用,但 Innovent Solutions 自 Eclipse 團隊的開始就參與了該項目,因此我們的項目依賴於他們。
包含 BIRT 現在非常容易:
<dependency>
    <groupId>com.innoventsolutions.birt.runtime</groupId>
    <artifactId>org.eclipse.birt.runtime_4.8.0-20180626</artifactId>
    <version>4.8.0</version>
</dependency>
3.2. Spring Boot 依賴項
現在 BIRT 已導入到我們的項目中,我們只需要在 pom 文件中添加標準的 Spring Boot 依賴項。
有一個潛在問題,即 BIRT jar 包包含了自己的Slf4J 實現,這與 Logback 存在衝突,並在啓動時拋出異常。
由於我們無法從 jar 包中移除它,為了解決這個問題,我們需要排除 Logback:
<dependency>
    <groupId>org.springframework.boot</groupId>
    <artifactId>spring-boot-starter-logging</artifactId>
    <exclusions>
        <exclusion>
            <groupId>ch.qos.logback</groupId>
            <artifactId>logback-classic</artifactId>
        </exclusion>
    </exclusions>
</dependency>
現在,我們終於可以開始了!
4. BIRT 報告
在 BIRT 框架中,報告是一個長 XML 配置文件,通過 rptdesign 擴展名進行標識。
它告訴引擎應該繪製什麼以及在哪裏繪製,從標題的樣式到連接數據源所需的屬性。
對於一個基本的動態報告,我們需要配置三件事:
- 數據源(在我們的示例中,我們使用本地 CSV 文件,但它可以輕鬆地成為數據庫表)
- 我們想要顯示的元素(圖表、表格等)
- 頁面設計
報告的結構類似於 HTML 頁面,具有標題、正文、頁腳、腳本和樣式。
該框架提供了大量的組件供您選擇,包括與主流數據源、佈局、圖表和表格的集成。 此外,我們還可以將其擴展以添加我們自己的組件!
生成報告文件的有兩類方法:可視化或編程。
5. Eclipse 報告設計師
為了簡化報告創建過程,Eclipse 團隊構建了一個報告設計工具插件,用於其流行的 IDE。
該工具具有易於拖放的界面,來自左側的 調色板,它會自動打開新組件添加到頁面時的設置窗口。 此外,通過在頁面上單擊該組件並然後單擊 屬性編輯器按鈕(在下圖中突出顯示),我們可以查看每個組件可用的所有自定義選項。
要以樹形視圖可視化整個頁面結構,只需單擊 概述 按鈕。
數據探索器 選項卡還包含我們報告中定義的的數據源:
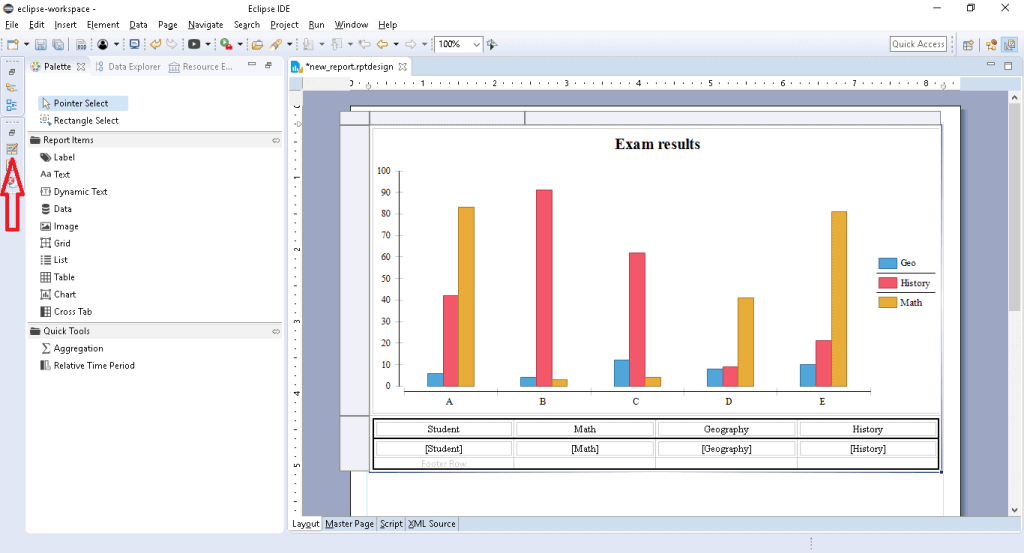
圖像中顯示的示例報告可以在路徑 <項目根目錄>/reports/csv_data_report.rptdesign 找到。
選擇視覺設計師的主要優勢是其在線文檔,它更側重於該工具,而不是編程方法。
如果我們在 Eclipse 中已經使用,則只需安裝 BIRT 報告設計插件,其中包含預定義的視角和視覺編輯器。
對於當前未使用 Eclipse 的開發人員,並且不想切換的人來説,有 Eclipse 報告設計師 包,該包包含一個預安裝了 BIRT 插件的可移植 Eclipse 安裝。
報告文件最終確定後,我們可以將其保存到我們的項目並返回到我們首選環境中的編碼。
6. 程序化方法
我們也可以僅使用代碼設計報告,但由於文檔資料較少,這種方法會更加困難,因此請做好深入研究源代碼和在線論壇的準備。
另外,值得考慮的是,諸如尺寸、長度和網格位置等繁瑣的設計細節,使用設計器處理起來會更加容易。
為了證明這一點,這是一個定義一個包含圖像和文本的簡單靜態頁面的示例:
DesignElementHandle element = factory.newSimpleMasterPage("Page Master");
design.getMasterPages().add(element);

GridHandle grid = factory.newGridItem(null, 2, 1);
design.getBody().add(grid);

grid.setWidth("100%");

RowHandle row0 = (RowHandle) grid.getRows().get(0);

ImageHandle image = factory.newImage(null);
CellHandle cell = (CellHandle) row0.getCells().get(0);
cell.getContent().add(image);
image.setURL("\"https://www.baeldung.com/wp-content/themes/baeldung/favicon/favicon-96x96.png\"");

LabelHandle label = factory.newLabel(null);
cell = (CellHandle) row0.getCells().get(1);
cell.getContent().add(label);
label.setText("Hello, Baeldung world!");
這段代碼將生成一份簡單的(且醜陋的)報告:

上述報告示例可以找到在以下路徑:<em>項目根目錄</em>/reports/static_report.rptdesign。
在我們編寫報告的顯示方式和要顯示的數據之後,我們可以通過運行我們的 <em>ReportDesignApplication</em> 類來生成 XML 文件。
7. 連接數據源
我們之前提到過,BIRT 支持多種不同的數據源。
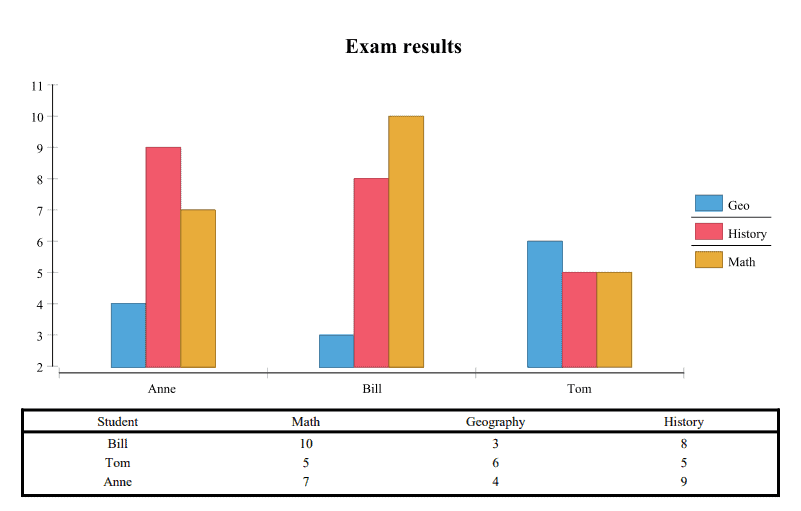
對於我們的示例項目,我們使用了包含三個條目的簡單 CSV 文件。該文件位於 reports 文件夾中,包含三行簡單的帶標題的數據,以及標題:
Student, Math, Geography, History
Bill, 10,3,8
Tom, 5,6,5
Anne, 7, 4,9
<h3>7.1. 配置數據源</h3>
<p>為了讓 BIRT 使用我們的文件(或任何其他類型的源),<strong >我們需要配置一個 <em >數據源</em> <em ></strong>。</p>
<p>對於我們的文件,我們使用報告設計師創建了一個 <em >平面文件數據源</em>,只需幾個步驟即可:</p>
<ol>
<li>打開設計師視角,查看右側的 <em >概覽</em>。</li>
<li>右鍵單擊 <em >數據源</em> 圖標。</li>
<li>選擇所需的源類型(在本例中為平面文件源)。</li>
<li>我們可以選擇加載整個文件夾或僅加載一個文件。如果我們的數據文件是 CSV 格式,我們應該選擇前者,並確保第一行作為列名指示器。</li>
<li>測試連接以確保路徑正確。</li>
</ol>
<p>我們附上了一些圖片來展示每個步驟:</p>
<style type="text/css">
#gallery-1 {
margin: auto;
}
#gallery-1 .gallery-item {
float: left;
margin-top: 10px;
text-align: center;
width: 50%;
}
#gallery-1 img {
border: 2px solid #cfcfcf;
}
#gallery-1 .gallery-caption {
margin-left: 0;
}
/* see gallery_shortcode() in wp-includes/media.php */
</style>
<div>
<dl class="gallery-item">
<dt class="gallery-icon landscape">
<a class="thumbnail" href="https://www.baeldung.com/wp-content/uploads/2019/04/birt_gallery_1.png"><img src="/file/story/attachments/image/l/f66e2fff-71f2-45ac-8b5d-07c92a0e0ace"></a>
</dt>
</dl>
<dl class="gallery-item">
<dt class="gallery-icon landscape">
<a class="thumbnail" href="https://www.baeldung.com/wp-content/uploads/2019/04/birt_gallery_2.png"><img src="/file/story/attachments/image/l/0ce24d2b-8e03-44f1-89f6-deb0cfe9345c"></a>
</dt>
</dl>
<br style="clear: both">
<dl class="gallery-item">
<dt class="gallery-icon landscape">
<a class="thumbnail" href="https://www.baeldung.com/wp-content/uploads/2019/04/birt_gallery_3.png"><img src="/file/story/attachments/image/l/d0889ba2-b2f2-4510-bf79-2c79bda76558"></a>
</dt>
</dl>
<dl class="gallery-item">
<dt class="gallery-icon landscape">
<a class="thumbnail" href="https://www.baeldung.com/wp-content/uploads/2019/04/birt_gallery_4.png"><img src="/file/story/attachments/image/l/a0b9d6c9-b6c1-4d1e-ab4a-8f874d26df22"></a>
</dt>
</dl>
<br style="clear: both">
</div>
<h3>7.2. 數據集</h3>
<p>數據源已準備好,但我們需要定義我們的<em>數據集</em>,即在報告中實際顯示的數據:</p>
<ol>
 <li>打開設計師視圖,查看右側的<em>概述</em>。</li>
 <li>右鍵單擊<em>數據集</em>圖標。</li>
 <li>選擇所需的<em>數據源</em>和類型(在本例中只有一個類型)。</li>
 <li>下一個屏幕取決於數據源和數據集的選擇:在本例中,我們看到一個可以選擇要包含的列的頁面。</li>
 <li>完成設置後,可以通過雙擊我們的數據集隨時打開配置。</li>
 <li>在<em>輸出列</em>中,我們可以設置顯示的數據類型。</li>
 <li>然後,可以通過點擊<em>預覽結果</em>查看預覽。</li>
</ol>
<p>再次,一些圖片來闡明這些步驟:</p>
<style type="text/css">
			#gallery-2 {
				margin: auto;
			}
			#gallery-2 .gallery-item {
				float: left;
				margin-top: 10px;
				text-align: center;
				width: 50%;
			}
			#gallery-2 img {
				border: 2px solid #cfcfcf;
			}
			#gallery-2 .gallery-caption {
				margin-left: 0;
			}
			/* see gallery_shortcode() in wp-includes/media.php */
		</style>
<div>
 <dl class="gallery-item">
  <dt class="gallery-icon landscape">
   <a class="thumbnail" href="https://www.baeldung.com/wp-content/uploads/2019/04/birt_gallery_5.png"><img src="/file/story/attachments/image/l/749b2692-04ab-4359-85d6-5edc9a7f1dcc"></a>
  </dt>
 </dl>
 <dl class="gallery-item">
  <dt class="gallery-icon landscape">
   <a class="thumbnail" href="https://www.baeldung.com/wp-content/uploads/2019/04/birt_gallery_6.png"><img src="/file/story/attachments/image/l/ba6e4ca9-12be-4ffd-bf1d-d676ff01130b"></a>
  </dt>
 </dl>
 <br style="clear: both">
 <dl class="gallery-item">
  <dt class="gallery-icon landscape">
   <a class="thumbnail" href="https://www.baeldung.com/wp-content/uploads/2019/04/birt_gallery_7.png"><img src="/file/story/attachments/image/l/c295dee8-d237-466a-851b-b9b323d85212"></a>
  </dt>
 </dl>
 <dl class="gallery-item">
  <dt class="gallery-icon landscape">
   <a class="thumbnail" href="https://www.baeldung.com/wp-content/uploads/2019/04/birt_gallery_8.png"><img src="/file/story/attachments/image/l/de3f53b4-612a-438f-87d8-427c392bc058"></a>
  </dt>
 </dl>
 <br style="clear: both">
</div>
7.3. 其他數據源類型
如第 4 步的 數據集 配置中所述,可用的選項可能會根據所引用的 數據源 而變化。
對於我們的 CSV 文件,BIRT 提供了與要顯示的列、數據類型以及是否要加載整個文件相關的選項。另一方面,如果我們有一個 JDBC 數據源,我們可能需要編寫一個 SQL 查詢或存儲過程。
從 數據集 菜單中,我們可以將兩個或多個數據集連接到一個新的數據集。
8. 生成報告
一旦報告文件準備就緒,我們需要將其傳遞給引擎進行渲染。為此,需要實現一些事項。
8.1. 引擎初始化
<em>ReportEngine</em> 類,負責解析設計文件並生成最終結果,是 BIRT 運行時庫的一部分。
它使用一系列輔助工具和任務來完成工作,因此資源消耗較大:

圖片來源: Eclipse BIRT 文檔
創建引擎實例存在顯著成本,主要原因是加載擴展所消耗的資源。因此,我們應該只創建單個 `ReportEngine` 實例,並將其用於運行多個報告。
報告引擎通過平台提供的工廠創建。在創建引擎之前,必須先啓動平台,平台會加載相應的插件:
@PostConstruct
protected void initialize() throws BirtException {
    EngineConfig config = new EngineConfig();
    config.getAppContext().put("spring", this.context);
    Platform.startup(config);
    IReportEngineFactory factory = (IReportEngineFactory) Platform
      .createFactoryObject(IReportEngineFactory.EXTENSION_REPORT_ENGINE_FACTORY);
    birtEngine = factory.createReportEngine(config);
    imageFolder = System.getProperty("user.dir") + File.separatorChar + reportsPath + imagesPath;
    loadReports();
}
當我們不再需要它時,我們可以將其銷燬:
@Override
public void destroy() {
    birtEngine.destroy();
    Platform.shutdown();
}
8.2. 實現輸出格式
BIRT 已經支持多種輸出格式:HTML、PDF、PPT 和 ODT,僅列出部分。
對於示例項目,我們使用 generatePDFReport 和 generateHTMLReport 方法實現了其中的兩個。
它們在具體屬性需求方面略有不同,例如輸出格式和圖像處理程序。
實際上,PDF 將圖像與文本嵌入在一起,而 HTML 報告則需要生成它們並/或鏈接它們。
因此,PDF 渲染函數相當簡單:
private void generatePDFReport(IReportRunnable report, HttpServletResponse response,
  HttpServletRequest request) {
    IRunAndRenderTask runAndRenderTask = birtEngine.createRunAndRenderTask(report);
    response.setContentType(birtEngine.getMIMEType("pdf"));
    IRenderOption options = new RenderOption();
    PDFRenderOption pdfRenderOption = new PDFRenderOption(options);
    pdfRenderOption.setOutputFormat("pdf");
    runAndRenderTask.setRenderOption(pdfRenderOption);
    runAndRenderTask.getAppContext().put(EngineConstants.APPCONTEXT_PDF_RENDER_CONTEXT, request);

    try {
        pdfRenderOption.setOutputStream(response.getOutputStream());
        runAndRenderTask.run();
    } catch (Exception e) {
        throw new RuntimeException(e.getMessage(), e);
    } finally {
        runAndRenderTask.close();
    }
}
雖然 HTML 渲染函數需要更多設置:
private void generateHTMLReport(IReportRunnable report, HttpServletResponse response,
  HttpServletRequest request) {
    IRunAndRenderTask runAndRenderTask = birtEngine.createRunAndRenderTask(report);
    response.setContentType(birtEngine.getMIMEType("html"));
    IRenderOption options = new RenderOption();
    HTMLRenderOption htmlOptions = new HTMLRenderOption(options);
    htmlOptions.setOutputFormat("html");
    htmlOptions.setBaseImageURL("/" + reportsPath + imagesPath);
    htmlOptions.setImageDirectory(imageFolder);
    htmlOptions.setImageHandler(htmlImageHandler);
    runAndRenderTask.setRenderOption(htmlOptions);
    runAndRenderTask.getAppContext().put(
      EngineConstants.APPCONTEXT_BIRT_VIEWER_HTTPSERVET_REQUEST, request);

    try {
        htmlOptions.setOutputStream(response.getOutputStream());
        runAndRenderTask.run();
    } catch (Exception e) {
        throw new RuntimeException(e.getMessage(), e);
    } finally {
        runAndRenderTask.close();
    }
}
最重要的是,我們設置了 HTMLServerImageHandler,而不是使用默認的處理程序。 這種微小的差異對生成的 img 標籤產生了重大影響:
- 默認的處理程序將 img 標籤鏈接到文件系統路徑,這被許多瀏覽器出於安全原因阻止
- HTMLServerImageHandler 將 img 標籤鏈接到服務器 URL
通過使用 setImageDirectory 方法,我們指定引擎將保存生成的圖像文件的位置。
默認情況下,處理程序會在每次請求中生成一個新的文件,因此 我們可以添加緩存層或刪除策略。
8.3. 圖像發佈
在 HTML 報告案例中,圖像文件是外部文件,因此需要通過服務器路徑進行訪問。
如代碼所示,通過使用 setBaseImageURL 方法,我們告訴引擎在 img 標籤的鏈接中使用哪個相對路徑,因此我們需要確保路徑確實可訪問!
因此,在我們的 ReportEngineApplication 中,我們配置 Spring 以發佈 images 文件夾:
@SpringBootApplication
@EnableWebMvc
public class ReportEngineApplication implements WebMvcConfigurer {
    @Value("${reports.relative.path}")
    private String reportsPath;
    @Value("${images.relative.path}")
    private String imagesPath;

    ...

    @Override
    public void addResourceHandlers(ResourceHandlerRegistry registry) {
        registry
          .addResourceHandler(reportsPath + imagesPath + "/**")
          .addResourceLocations("file:///" + System.getProperty("user.dir") + "/"
            + reportsPath + imagesPath);
    }
}
無論我們選擇哪條路徑,都必須確保此處和前一個片段的 htmlOptions 使用的路徑相同,否則報告將無法顯示圖像。
9. 顯示報告
所需的最後一部分是用於返回渲染結果的 控制器:
@RequestMapping(method = RequestMethod.GET, value = "/report/{name}")
@ResponseBody
public void generateFullReport(HttpServletResponse response, HttpServletRequest request,
  @PathVariable("name") String name, @RequestParam("output") String output)
  throws EngineException, IOException {
    OutputType format = OutputType.from(output);
    reportService.generateMainReport(name, format, response, request);
}通過使用output參數,我們可以讓用户選擇所需的格式——HTML或PDF。
10. 測試報告
我們可以通過運行 <em >ReportEngineApplication</em> 類來啓動應用程序。
在啓動過程中,<em >BirtReportService</em> 類將加載 <em ><project_root>/reports</em> 文件夾中所有找到的報告。
要查看我們的報告在行動中的效果,只需將瀏覽器指向:
- /report/csv_data_report?output=pdf
- /report/csv_data_report?output=html
- /report/static_report?output=pdf
- /report/static_report?output=html
以下是 <em >csv_data_report</em> 報告的外觀:
要在更改設計文件後重新加載報告,只需將瀏覽器指向 <em >/report/reload</em>。
11. 結論
在本文中,我們整合了 BIRT 與 Spring Boot,探討了其中的陷阱和挑戰,同時也展現了其強大的功能和靈活性。
