1. 概述
動態管理應用程序配置在許多實際場景中都可能是一個關鍵需求。在微服務架構中,由於擴展操作或不同的負載條件,不同的服務可能需要運行時配置更改。在其他情況下,應用程序可能需要根據用户偏好、來自外部 API 的數據或動態變化的要求來調整其行為。
application.properties 文件是靜態的,無法在不重啓應用程序的情況下進行更改。但是,Spring Boot 提供了多種強大的方法,可以在不中斷服務的情況下在運行時調整配置。無論是在線應用程序中切換功能、為負載均衡更新數據庫連接,還是在不重新部署應用程序的情況下更改第三方集成中的 API 密鑰,Spring Boot 的動態配置功能為這些複雜的環境提供了所需的靈活性。
在本教程中,我們將探索在 Spring Boot 應用程序中動態更新屬性的多種策略,而無需直接修改 application.properties 文件。
這些方法解決了不同的需求,從非持久的內存更新到使用外部文件進行持久更新。
我們的示例參考了 Spring Boot 3.2.4 和 JDK17。不同版本的 Spring Boot 可能會需要對代碼進行輕微調整。
2. 使用原型範圍內的 Bean
當我們需要在不影響已創建的 Bean 實例或修改全局應用程序狀態的前提下,動態調整特定 Bean 的屬性時,一個簡單的帶有 <em @Service</em> 註解和直接注入的 <em @Value</em> 類並不能滿足要求,因為這些屬性將會在應用程序上下文的生命週期內保持靜態。
相反,<strong>我們可以使用在<em @Bean` 方法中定義的配置類來創建具有可修改屬性的 Bean。 這種方法允許在應用程序執行期間動態更改屬性:
@Configuration
public class CustomConfig {

    @Bean
    @Scope("prototype")
    public MyService myService(@Value("${custom.property:default}") String property) {
        return new MyService(property);
    }
}
通過使用 @Scope(“prototype”),我們確保每次調用 myService(…) 時,都會創建一個新的 MyService 實例,從而允許在運行時配置不同的設置。 在本示例中,MyService 是一個最小的 POJO:
public class MyService {
    private final String property;

    public MyService(String property) {
        this.property = property;
    }

    public String getProperty() {
        return property;
    }
}
為了驗證動態行為,我們可以使用以下測試:
@Autowired
private ApplicationContext context;

@Test
void whenPropertyInjected_thenServiceUsesCustomProperty() {
    MyService service = context.getBean(MyService.class);
    assertEquals("default", service.getProperty());
}

@Test
void whenPropertyChanged_thenServiceUsesUpdatedProperty() {
    System.setProperty("custom.property", "updated");
    MyService service = context.getBean(MyService.class);
    assertEquals("updated", service.getProperty());
}
這種方法使我們能夠在運行時更改配置,而無需重啓應用程序。這些更改是臨時的,僅影響由 CustomConfig 實例化形成的 Bean。
3. 使用 Environment、MutablePropertySources 和 @RefreshScope
與前一個案例不同,我們想要更新已經實例化 bean 的屬性。為此,我們將使用 Spring Cloud 的 @RefreshScope 註解以及 /actuator/refresh 端點。 此 actuator 會刷新所有 @RefreshScope bean,用最新的配置反映的全新實例替換舊實例,從而允許在不重啓應用程序的情況下實時更新屬性。 再次聲明,這些更改並非持久化。
3.1. 基本配置
首先,我們將這些依賴項添加到 pom.xml 中:
<dependency>
    <groupId>org.springframework.cloud</groupId>
    <artifactId>spring-cloud-starter</artifactId>
    <version>4.1.3</version>
</dependency>
<dependency>
    <groupId>org.springframework.cloud</groupId>
    <artifactId>spring-cloud-starter-config</artifactId>
    <version>4.1.3</version>
</dependency>
<dependency>
    <groupId>org.springframework.boot</groupId>
    <artifactId>spring-boot-starter-actuator</artifactId>
    <version>3.2.4</version>
</dependency>
<dependency>
    <groupId>org.awaitility</groupId>
    <artifactId>awaitility</artifactId>
    <scope>test</scope>
    <version>4.2.0</version>
</dependency>
spring-cloud-starter 和 spring-cloud-starter-config 依賴項是 Spring Cloud 框架的一部分,而 spring-boot-starter-actuator 依賴項則用於暴露 /actuator/refresh 端點。 此外, awaitility 依賴項是一個測試實用工具,用於處理異步操作,正如我們在 JUnit5 測試中所看到的。
現在讓我們來查看 application.properties。 由於在這個示例中,我們沒有使用 Spring Cloud Config Server 來在多個服務之間集中管理配置,而是隻需要在單個 Spring Boot 應用程序中更新屬性,因此我們應該禁用默認行為,即嘗試連接到外部配置服務器:
spring.cloud.config.enabled=false我們仍然在使用 Spring Cloud 的功能,但與分佈式客户端-服務器架構不同。如果忘記設置 spring.cloud.config.enabled=false,應用程序將無法啓動,並拋出 java.lang.IllegalStateException。
然後我們需要啓用 Spring Boot Actuator 端點以暴露 /actuator/refresh:
management.endpoint.refresh.enabled=true
management.endpoints.web.exposure.include=refresh
此外,如果希望記錄每次執行器被調用時的情況,我們應該設置以下日誌級別:
logging.level.org.springframework.boot.actuate=DEBUG最後,讓我們為我們的測試添加一個樣板屬性:
my.custom.property=defaultValue基本配置已完成。
3.2. 示例 Bean
當我們在 Bean 上應用 @RefreshScope/em/> 註解時,Spring Boot 不會直接實例化該 Bean,就像它通常會那樣。相反,它會創建一個代理對象,作為實際 Bean 的佔位符或委託對象。
@Value/em/> 註解會將 my.custom.property/em/> 的值從 application.properties/em/> 文件注入到 customProperty/em/> 字段中:
@RefreshScope
@Component
public class ExampleBean {
    @Value("${my.custom.property}")
    private String customProperty;

    public String getCustomProperty() {
        return customProperty;
    }
}
代理對象攔截到該 Bean 的方法調用。當通過 /actuator/refresh 端點觸發刷新事件時,代理對象會使用更新後的配置屬性重新初始化該 Bean。
3.3. PropertyUpdaterService</em translate>
為了在運行的 Spring Boot 應用程序中動態更新屬性,我們可以創建 PropertyUpdaterService 類,該類通過編程方式添加或更新屬性。 基本上,它允許我們通過管理自定義屬性源來在運行時注入或修改應用程序屬性。
在深入代碼之前,讓我們澄清一些關鍵概念:
- Environment → 提供對屬性源、配置文件和系統環境變量的訪問接口
- ConfigurableEnvironment → Environment 的子接口,允許應用程序的屬性在運行時動態更新 MutablePropertySources → PropertySource 對象集合,由 ConfigurableEnvironment 保持,該集合提供添加、刪除或重新排序源的方法,例如系統屬性、環境變量或自定義屬性源
一個 UML 圖,可以幫助我們理解動態屬性更新如何在應用程序中傳播:
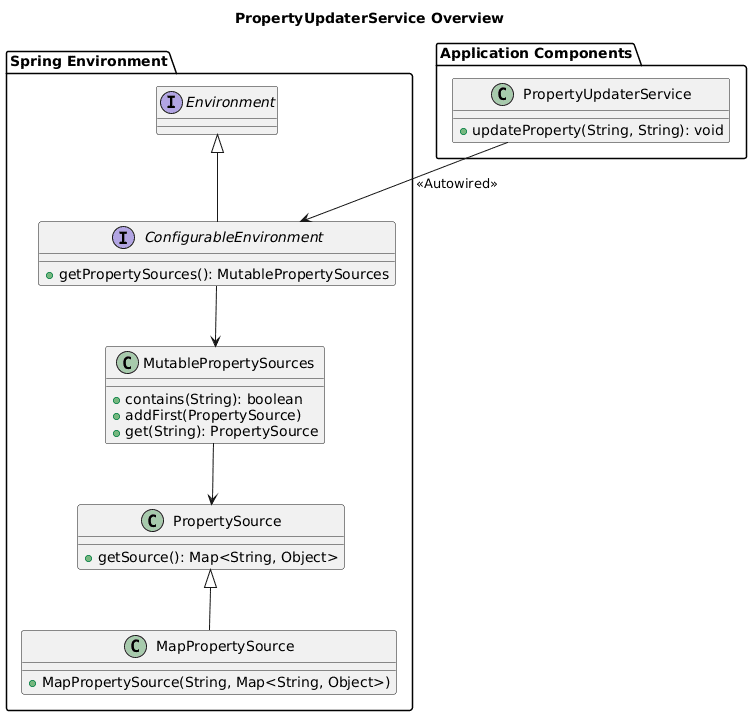
下面是我們的 PropertyUpdaterService,它使用這些組件動態更新屬性:
@Service
public class PropertyUpdaterService {
    private static final String DYNAMIC_PROPERTIES_SOURCE_NAME = "dynamicProperties";

    @Autowired
    private ConfigurableEnvironment environment;

    public void updateProperty(String key, String value) {
        MutablePropertySources propertySources = environment.getPropertySources();
        if (!propertySources.contains(DYNAMIC_PROPERTIES_SOURCE_NAME)) {
            Map<String, Object> dynamicProperties = new HashMap<>();
            dynamicProperties.put(key, value);
            propertySources.addFirst(new MapPropertySource(DYNAMIC_PROPERTIES_SOURCE_NAME, dynamicProperties));
        } else {
            MapPropertySource propertySource = (MapPropertySource) propertySources.get(DYNAMIC_PROPERTIES_SOURCE_NAME);
            propertySource.getSource().put(key, value);
        }
    }
}
我們來分解一下:
updateProperty(…) 方法會檢查 MutablePropertySources 集合中是否存在名為 dynamicProperties 的自定義屬性源- 如果不存在,它會創建一個新的 MapPropertySource 對象,並將該屬性作為第一個屬性源添加
propertySources.addFirst(…) 確保我們的動態屬性優先於環境中的其他屬性- 如果 dynamicProperties 源已經存在,則該方法會更新現有屬性或如果鍵不存在則添加它
通過使用此服務,我們可以在運行時以編程方式更新應用程序中的任何屬性。
3.4. 使用 <em>PropertyUpdaterService</em> 的替代策略
雖然通過控制器直接暴露屬性更新功能在測試目的上很方便,但在生產環境中通常不安全。 當使用控制器進行測試時,我們應該確保它得到充分的保護,防止未經授權的訪問。
在生產環境中,有幾種安全有效使用 <em>PropertyUpdaterService</em> 的替代策略:
- 定時任務 → 屬性可能會根據時間敏感條件或外部數據源的變化而改變
- 基於條件邏輯 → 對特定應用程序事件或觸發器做出響應,例如負載變化、用户活動或外部 API 響應
- 受限訪問工具 → 僅供授權人員訪問的安全管理工具
- 自定義 actuator 端點 → 自定義 actuator 提供了對暴露功能的更多控制,並可以包含額外的安全措施
- 應用程序事件監聽器 → 在雲環境中非常有用,其中實例可能需要根據基礎設施的變化或其他應用程序中的重大事件來調整設置
關於內置的 /actuator/refresh 端點,雖然它刷新了帶有 @RefreshScope 註解的 Bean,但它不會直接更新屬性。我們可以使用 <em>PropertyUpdaterService</em> 編程方式添加或修改屬性,然後觸發 /actuator/refresh 來在整個應用程序中應用這些更改。 但是,如果沒有 <em>PropertyUpdaterService</em>,這個 actuator 無法更新或添加新的屬性。
總而言之,我們選擇的方法應該與應用程序的特定要求、配置數據的敏感性和整體安全態勢相一致。
3.5. 使用控制器手動測試
這裏演示瞭如何使用一個簡單的控制器來測試 <em >PropertyUpdaterService</em> 的功能。
@RestController
@RequestMapping("/properties")
public class PropertyController {
    @Autowired
    private PropertyUpdaterService propertyUpdaterService;

    @Autowired
    private ExampleBean exampleBean;

    @PostMapping("/update")
    public String updateProperty(@RequestParam String key, @RequestParam String value) {
        propertyUpdaterService.updateProperty(key, value);
        return "Property updated. Remember to call the actuator /actuator/refresh";
    }

    @GetMapping("/customProperty")
    public String getCustomProperty() {
        return exampleBean.getCustomProperty();
    }
}
使用 curl 進行手動測試將允許我們驗證我們的實現是否正確:
$ curl "http://localhost:8080/properties/customProperty"
defaultValue

$ curl -X POST "http://localhost:8080/properties/update?key=my.custom.property&value=baeldungValue"
Property updated. Remember to call the actuator /actuator/refresh

$ curl -X POST http://localhost:8080/actuator/refresh -H "Content-Type: application/json"
[]

$ curl "http://localhost:8080/properties/customProperty"
baeldungValue
它按預期工作。但是,如果第一次嘗試失敗了,而且我們的應用程序非常複雜,我們應該再次嘗試最後一個命令,以便 Spring Cloud 有時間更新 Bean。
3.6. JUnit5 測試
自動化測試無疑很有幫助,但並非易事。由於 屬性更新操作是異步的,並且沒有 API 可以知道何時完成,因此我們需要使用超時機制,以避免阻塞 JUnit5。之所以是異步,是因為調用 /actuator/refresh 立即返回,而不會等待所有 Bean 真正被重新創建。
await 語句 能夠幫助我們避免使用複雜的邏輯來測試我們感興趣的 Bean 刷新。它允許我們避免不太優雅的設計,例如輪詢。
最後,為了使用 RestTemplate,我們需要按照 @SpringBootTest(…) 註解中指定的,請求啓動 Web 環境:
@SpringBootTest(webEnvironment = SpringBootTest.WebEnvironment.RANDOM_PORT)
public class PropertyUpdaterServiceUnitTest {
    @Autowired
    private PropertyUpdaterService propertyUpdaterService;

    @Autowired
    private ExampleBean exampleBean;

    @LocalServerPort
    private int port;

    @Test
    @Timeout(5)
    public void whenUpdatingProperty_thenPropertyIsUpdatedAndRefreshed() throws InterruptedException {
        // Injects a new property into the test context
        propertyUpdaterService.updateProperty("my.custom.property", "newValue");

        // Trigger the refresh by calling the actuator endpoint
        HttpHeaders headers = new HttpHeaders();
        headers.setContentType(MediaType.APPLICATION_JSON);
        HttpEntity<String> entity = new HttpEntity<>(null, headers);
        RestTemplate restTemplate = new RestTemplate();
        restTemplate.postForEntity("http://localhost:" + port + "/actuator/refresh", entity, String.class);

        // Awaitility to wait until the property is updated
        await().atMost(5, TimeUnit.SECONDS).until(() -> "newValue".equals(exampleBean.getCustomProperty()));
    }
}
當然,我們需要自定義測試,包括所有我們感興趣的屬性和 Bean。
4. 使用外部配置文件
在某些場景下,為了管理應用程序部署包之外的配置更新,以確保屬性的持久性更改,需要使用外部配置。 這樣做也允許我們將更改分發到多個應用程序。
在這種情況下,我們將使用相同的先前 Spring Cloud 設置來啓用 <em @RefreshScope</em> 和 <em /actuator/refresh</em> 支持,以及相同的示例控制器和 Bean。
我們的目標是使用外部文件 <em external-config.properties> 測試 <em ExampleBean 的動態更改。 請將其保存如下內容:
my.custom.property=externalValue我們可以通過使用 –spring.config.additional-location</em/> 參數來告知 Spring Boot external-config.properties</em/> 的位置,如以下 Eclipse 截圖所示。請務必將示例 /path/to/</em/> 替換為實際路徑。
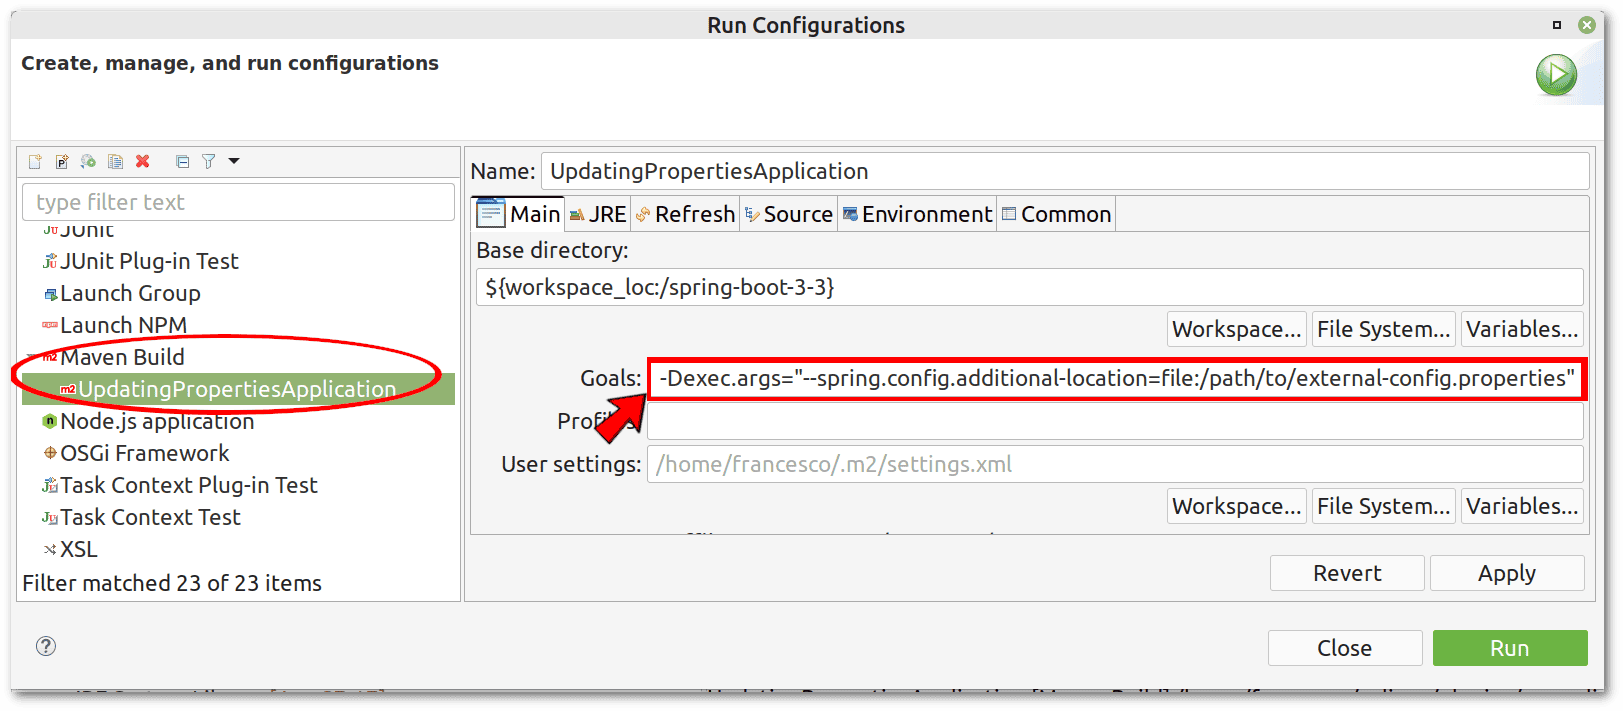
讓我們驗證 Spring Boot 是否正確加載了該外部文件,以及其屬性是否覆蓋了 application.properties</em/> 中的屬性。
$ curl "http://localhost:8080/properties/customProperty"
externalValue
由於計劃,它正常運行,因為 <em >externalValue</em > 在 <em >external-config.properties</em > 中被替換成了 <em >defaultValue</em >> 在application.properties中的值。現在,讓我們通過編輯我們的external-config.properties` 文件來更改此屬性的值:
my.custom.property=external-Baeldung-Value如往常一樣,我們需要調用執行器:
$ curl -X POST http://localhost:8080/actuator/refresh -H "Content-Type: application/json"
["my.custom.property"]
終於,結果符合預期,而且這次是持久的:
$ curl "http://localhost:8080/properties/customProperty"
external-Baeldung-Value這種方法的一個優勢在於,我們可以在每次修改 external-config.properties文件時輕鬆自動化 actuator 的調用。 要做到這一點,我們可以使用跨平台的 fswatch工具在 Linux 和 macOS 上,只需記住將 /path/to/替換為實際路徑:
$ fswatch -o /path/to/external-config.properties | while read f; do
    curl -X POST http://localhost:8080/actuator/refresh -H "Content-Type: application/json";
done
Windows 用户可能會發現基於 PowerShell 的替代方案更方便,但我們不會深入討論它。
5. 結論
在本文中,我們探討了在 Spring Boot 應用程序中,無需直接修改 application.properties 文件,動態更新屬性的各種方法。
我們首先討論了使用自定義配置在 Bean 內部的方法,利用 @Configuration、@Bean 和 @Scope(“prototype”) 標註,允許在不重啓應用程序的情況下動態更改 Bean 屬性。 這種方法確保了靈活性,並隔離了特定 Bean 實例的更改。
然後,我們研究了 Spring Cloud 的 @RefreshScope 和 /actuator/refresh 端點,用於對已實例化 Bean 進行實時更新,並討論了使用外部配置文件的持久性屬性管理。 這些方法提供了強大的動態和集中式配置管理選項,從而提高了 Spring Boot 應用程序的可維護性和適應性。
