1. 概述
OpenFeign 是一個聲明式的 REST 客户端,可用於 Spring Boot 應用程序。假設我們有一個使用 OAuth2 保護的 REST API,並且希望使用 OpenFeign 調用它。在這種情況下,我們需要使用 OpenFeign 提供訪問令牌。
在本教程中,我們將描述 如何為 OpenFeign 客户端添加 OAuth2 支持。
2. 服務間身份驗證
服務間身份驗證是 REST API 安全領域一個熱門話題。我們可以使用 mTLS 或 JWT 為 REST API 提供身份驗證機制。然而,OAuth2 協議是保護 API 的既定方案。 假設我們想要使用另一個服務(客户端角色)調用一個安全的服務(服務器角色)。 在這種情況下,我們使用 客户端憑據 grant 類型。 我們通常使用 客户端憑據進行兩個 API 之間或沒有最終用户之間的身份驗證。 下圖顯示了這種 grant 類型中的主要參與者:

在客户端憑據中,客户端服務使用令牌端點從授權服務器獲取訪問令牌。 然後它使用訪問令牌來訪問由資源服務器保護的資源。 資源服務器驗證訪問令牌,如果有效,則服務請求。
2.1. 授權服務器
為了頒發訪問令牌,我們設置一個授權服務器。為了簡化當前設置,我們將使用嵌入在 Spring Boot 應用程序中的 Keycloak。假設我們使用來自 GitHub 的 授權服務器項目:
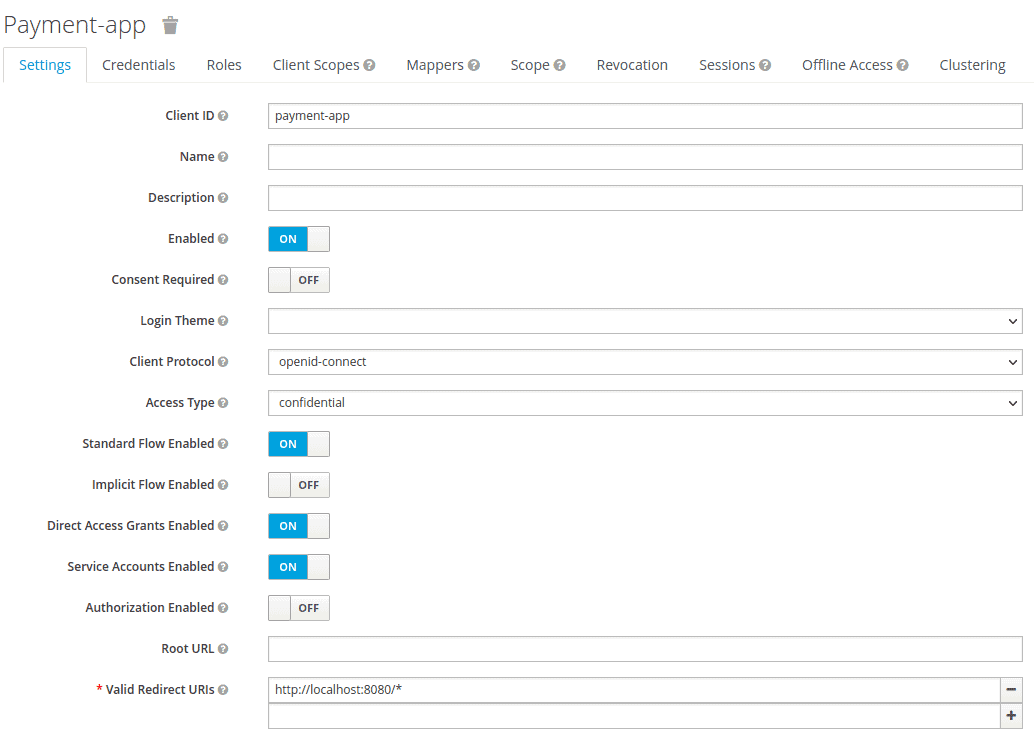
我們將 Access Type 設置為 credential,並啓用 Service Accounts Enabled 選項。然後,我們將 Realm 詳細信息導出為 feign-realm.json,並將 Realm 文件設置在 application-feign.yml 中:
keycloak:
  server:
    contextPath: /auth
    adminUser:
      username: bael-admin
      password: pass
    realmImportFile: feign-realm.json
現在,授權服務器已準備就緒。 我們可以使用 –spring.profiles.active=feign 選項運行應用程序。 由於本教程的重點是 OpenFeign 的 OAuth2 支持,因此我們無需深入研究它。
2.2 資源服務器
現在我們已經配置了授權服務器,接下來我們設置資源服務器。為此,我們將使用 GitHub 上的資源服務器項目。首先,我們將 Payment 類作為資源添加:
public class Payment {

    private String id;
    private double amount;

   // standard getters and setters
}
然後,我們在 PaymentController</em/> 類中聲明一個 API:
@RestController
public class PaymentController {

    @GetMapping("/payments")
    public List<Payment> getPayments() {
        List<Payment> payments = new ArrayList<>();
        for(int i = 1; i < 6; i++){
            Payment payment = new Payment();
            payment.setId(String.valueOf(i));
            payment.setAmount(2);
            payments.add(payment);
        }
        return payments;
    }

}
getPayments() API 返回支付列表。 此外,我們還配置了資源服務器在 application-feign.yml 文件中:
spring:
  security:
    oauth2:
      resourceserver:
        jwt:
issuer-uri: http://localhost:8083/auth/realms/master現在,getPayments() API 使用 OAuth2 授權服務器進行安全保護,調用此 API 時,必須提供有效的訪問令牌:
curl --location --request POST 'http://localhost:8083/auth/realms/master/protocol/openid-connect/token' \
  --header 'Content-Type: application/x-www-form-urlencoded' \
  --data-urlencode 'client_id=payment-app' \
  --data-urlencode 'client_secret=863e9de4-33d4-4471-b35e-f8d2434385bb' \
  --data-urlencode 'grant_type=client_credentials'
在獲取訪問令牌後,我們將其設置在請求的 Authorization 標頭中:
curl --location --request GET 'http://localhost:8081/resource-server-jwt/payments' \
  --header 'Authorization: Bearer Access_Token'
現在,我們希望使用 OpenFeign 代替 cURL 或 Postman 來調用安全 API。
3. OpenFeign 客户端
OpenFeign 客户端是與遠程服務交互的核心組件。它允許您使用聲明式的方式(即通過註解)來調用 RESTful 服務。 OpenFeign 負責處理 HTTP 請求的細節,例如序列化/反序列化請求和響應體,以及處理 HTTP 狀態碼。
以下是一些 OpenFeign 客户端的關鍵特性:
- 聲明式配置: 通過註解(如
@FeignClient)來定義服務接口。 - 動態代理: OpenFeign 會自動生成 HTTP 客户端,無需手動創建。
- 請求方法映射: 可以映射服務接口的方法到具體的 HTTP 方法(如 GET、POST、PUT、DELETE)。
- 請求參數處理: OpenFeign 能夠自動處理請求參數的序列化和反序列化。
- 錯誤處理: 可以配置 OpenFeign 來處理 HTTP 錯誤狀態碼。
以下是一個使用 OpenFeign 客户端調用 RESTful 服務的示例:
@FeignClient(name = "my-service")
public interface MyServiceClient {

    @GetMapping("/users/{id}")
    User getUserById(@PathVariable("id") Long id);
}
在這個例子中,@FeignClient 註解指定了服務接口的名稱為 "my-service"。@GetMapping 註解映射了 getUserById 方法到 HTTP GET 方法,並使用 @PathVariable 註解來獲取請求參數 id。
3.1. 依賴項
為了使用 Spring Cloud OpenFeign 調用安全 API,我們需要在我們的 spring-cloud-starter-openfeign 中添加 pom.xml 文件:
<dependency>
    <groupId>org.springframework.cloud</groupId>
    <artifactId>spring-cloud-starter-openfeign</artifactId>
    <version>3.1.0</version>
</dependency>
此外,我們需要將 spring-cloud-dependencies 添加到 pom.xml 中:
<dependency>
    <groupId>org.springframework.cloud</groupId>
    <artifactId>spring-cloud-dependencies</artifactId>
    <version>2021.0.0</version>
    <type>pom</type>
</dependency>
3.2. 配置
首先,我們需要將 <em/>@EnableFeignClients</em> 添加到我們的主類中:
@SpringBootApplication
@EnableFeignClients
public class ExampleApplication {
    public static void main(String[] args) {
        SpringApplication.run(ExampleApplication.class, args);
    }
}
然後,我們定義 PaymentClient 接口,用於調用 getPayments() API。 此外,我們需要在 PaymentClient 接口中添加 @FeignClient 註解:
@FeignClient(
  name = "payment-client",
  url = "http://localhost:8081/resource-server-jwt",
  configuration = OAuthFeignConfig.class)
public interface PaymentClient {

    @RequestMapping(value = "/payments", method = RequestMethod.GET)
    List<Payment> getPayments();
}
我們根據資源服務器的地址設置了 url。在這種情況下,@FeignClient 的主要參數是 configuration 屬性,它支持 OpenFeign 的 OAuth2。之後,我們定義一個 PaymentController 類並將 PaymentClient 注入其中:
@RestController
public class PaymentController {

    private final PaymentClient paymentClient;

    public PaymentController(PaymentClient paymentClient) {
        this.paymentClient = paymentClient;
    }

    @GetMapping("/payments")
    public List<Payment> getPayments() {
        List<Payment> payments = paymentClient.getPayments();
        return payments;
    }
}
4. OAuth2 支持
OAuth2 是一種授權框架,允許第三方應用程序代表用户訪問其資源,而無需共享用户的憑據。它通過使用訪問令牌(Access Token)和刷新令牌(Refresh Token)來實現。
訪問令牌 (Access Token): 訪問令牌是第三方應用程序用於訪問用户資源的憑證。 它的有效期通常有限,過期後需要使用刷新令牌獲取新的訪問令牌。
刷新令牌 (Refresh Token): 刷新令牌用於獲取新的訪問令牌。 它的有效期通常比訪問令牌更長。
OAuth2 流程
OAuth2 授權流程通常包括以下步驟:
- 用户授權: 用户授權第三方應用程序訪問其資源。
- 授權碼交換 (Authorization Code Grant): 應用程序使用授權碼請求訪問令牌。
- 訪問令牌獲取: 應用程序使用授權碼獲取訪問令牌。
- 資源訪問: 應用程序使用訪問令牌訪問用户資源。
關鍵概念
- 客户端 (Client): 發起授權請求的應用程序。
- 資源所有者 (Resource Owner): 擁有資源的賬户。
- 客户端註冊應用 (Client Credentials): 客户端用於標識自身的憑證。
- 授權服務器 (Authorization Server): 頒發訪問令牌和刷新令牌的服務器。
4.1. 依賴關係
為了在 Spring Cloud OpenFeign 中添加 OAuth2 支持,我們需要在 <em>pom.xml</em> 文件中添加 <a href="https://mvnrepository.com/artifact/org.springframework.security/spring-security-oauth2-client">spring-security-oauth2-client</a> 和 <a href="https://mvnrepository.com/artifact/org.springframework.boot/spring-boot-starter-security">spring-boot-starter-security</a>。
<dependency>
    <groupId>org.springframework.boot</groupId>
    <artifactId>spring-boot-starter-security</artifactId>
    <version>2.6.1</version>
</dependency>
<dependency>
    <groupId>org.springframework.security</groupId>
    <artifactId>spring-security-oauth2-client</artifactId>
    <version>5.6.0</version>
</dependency>
4.2. 配置
現在,我們想要創建一個配置。其核心思想是獲取並添加訪問令牌到 OpenFeign 請求中。攔截器可以為每個 HTTP 請求/響應執行此任務。添加攔截器是 Feign 提供的有用的功能。我們將使用 RequestInterceptor,它將 OAuth2 訪問令牌注入到 OpenFeign 客户端的請求中,通過添加 Authorization Bearer 頭部來實現。 讓我們定義 OAuthFeignConfig 配置類並定義 requestInterceptor() Bean:
@Configuration
public class OAuthFeignConfig {

    public static final String CLIENT_REGISTRATION_ID = "keycloak";

    private final OAuth2AuthorizedClientService oAuth2AuthorizedClientService;
    private final ClientRegistrationRepository clientRegistrationRepository;

    public OAuthFeignConfig(OAuth2AuthorizedClientService oAuth2AuthorizedClientService,
      ClientRegistrationRepository clientRegistrationRepository) {
        this.oAuth2AuthorizedClientService = oAuth2AuthorizedClientService;
        this.clientRegistrationRepository = clientRegistrationRepository;
    }

    @Bean
    public RequestInterceptor requestInterceptor() {
        ClientRegistration clientRegistration = clientRegistrationRepository.findByRegistrationId(CLIENT_REGISTRATION_ID);
        OAuthClientCredentialsFeignManager clientCredentialsFeignManager =
          new OAuthClientCredentialsFeignManager(authorizedClientManager(), clientRegistration);
        return requestTemplate -> {
            requestTemplate.header("Authorization", "Bearer " + clientCredentialsFeignManager.getAccessToken());
        };
    }
}
在 <em>requestInterceptor()</em> Bean 中,我們使用 <em>ClientRegistration</em> 和 <em>OAuthClientCredentialsFeignManager</em> 類來註冊 oauth2 客户端並從授權服務器獲取訪問令牌。為此,我們需要在我們的 <em>application.properties</em> 文件中定義 <em>oauth2</em> 客户端的屬性:
spring.security.oauth2.client.registration.keycloak.authorization-grant-type=client_credentials
spring.security.oauth2.client.registration.keycloak.client-id=payment-app
spring.security.oauth2.client.registration.keycloak.client-secret=863e9de4-33d4-4471-b35e-f8d2434385bb
spring.security.oauth2.client.provider.keycloak.token-uri=http://localhost:8083/auth/realms/master/protocol/openid-connect/token
讓我們創建 OAuthClientCredentialsFeignManager 類並定義 getAccessToken() 方法:
public String getAccessToken() {
    try {
        OAuth2AuthorizeRequest oAuth2AuthorizeRequest = OAuth2AuthorizeRequest
          .withClientRegistrationId(clientRegistration.getRegistrationId())
          .principal(principal)
          .build();
        OAuth2AuthorizedClient client = manager.authorize(oAuth2AuthorizeRequest);
        if (isNull(client)) {
            throw new IllegalStateException("client credentials flow on " + clientRegistration.getRegistrationId() + " failed, client is null");
        }
        return client.getAccessToken().getTokenValue();
    } catch (Exception exp) {
        logger.error("client credentials error " + exp.getMessage());
    }
    return null;
}
我們使用 OAuth2AuthorizeRequest 和 OAuth2AuthorizedClient 類來從授權服務器獲取訪問令牌。 現在,對於每個請求,OpenFeign攔截器管理 oauth2 客户端並將訪問令牌添加到請求中。
5. 測試
要測試 OpenFeign 客户端,讓我們創建一個名為 PaymentClientUnitTest 的類:
@RunWith(SpringRunner.class)
@SpringBootTest
public class PaymentClientUnitTest {

    @Autowired
    private PaymentClient paymentClient;

    @Test
    public void whenGetPayment_thenListPayments() {
        List<Payment> payments = paymentClient.getPayments();
        assertFalse(payments.isEmpty());
    }
}
在本次測試中,我們調用了 getPayments() API。背地裏,PaymentClient 通過攔截器連接到 OAuth2 客户端並獲取訪問令牌。
6. 結論
本文介紹了調用安全API所需的環境搭建。隨後,我們配置OpenFeign,通過一個實際示例調用該安全API。為此,我們向OpenFeign添加並配置了攔截器,該攔截器管理OAuth2客户端並將訪問令牌添加到請求中。
