1. 概述
Spring REST Docs 和 OpenAPI 3.0 都是為 REST API 創建 API 文檔的兩種方式。
在本教程中,我們將探討它們各自的優缺點。
2. 簡要起源概述
Spring REST Docs 是由 Spring 社區開發的一個框架,用於創建 RESTful API 的準確文檔。 它採用測試驅動的方法,其中文檔是通過 Spring MVC 測試、Spring Webflux 的 WebTestClient 或 REST-Assured 編寫的。
運行測試的輸出被創建為 AsciiDoc 文件,這些文件可以使用 AsciiDoc 工具進行組合,以生成描述我們 API 的 HTML 頁面。 由於它遵循 TDD 方法,Spring REST Docs 可以自動帶來所有優勢,例如減少錯誤率、減少返工以及更快的反饋週期等。
另一方面,OpenAPI 是源於 Swagger 2.0 規範。 截至編寫本文時,其最新版本是 3.0,並且有許多已知的 實現。
類似於任何規範,OpenAPI 規定了其實現必須遵循的規則。 簡單來説,所有 OpenAPI 實現都應該以 JSON 對象的形式生成文檔,格式可以是 JSON 或 YAML。
還存在許多 工具,這些工具可以接受 JSON/YAML 並生成用户界面,以便可視化和導航 API。 這在驗收測試中非常有用,例如。 在我們這裏的代碼示例中,我們將使用 springdoc – Spring Boot 中 OpenAPI 3 的庫。
在詳細瞭解這兩種方法之前,讓我們快速設置一個需要文檔化的 API。
3. REST API
讓我們使用 Spring Boot 構建一個基本的 CRUD API。
3.1. 倉庫
這裏我們將使用一個簡易的 PagingAndSortingRepository 接口,以及 Foo 模型。
@Repository
public interface FooRepository extends PagingAndSortingRepository<Foo, Long>{}

@Entity
public class Foo {
    @Id
    @GeneratedValue(strategy = GenerationType.IDENTITY)
    private long id;

    @Column(nullable = false)
    private String title;

    @Column()
    private String body;

    // constructor, getters and setters
}
我們還會使用 schema.sql 和 data.sql 加載倉庫。
3.2. 控制器
接下來,我們簡要地看一下控制器,為了簡潔,省略了其具體實現細節:
@RestController
@RequestMapping("/foo")
public class FooController {

    @Autowired
    FooRepository repository;

    @GetMapping
    public ResponseEntity<List<Foo>> getAllFoos() {
        // implementation
    }

    @GetMapping(value = "{id}")
    public ResponseEntity<Foo> getFooById(@PathVariable("id") Long id) {
        // implementation
    }

    @PostMapping
    public ResponseEntity<Foo> addFoo(@RequestBody @Valid Foo foo) {
        // implementation
    }

    @DeleteMapping("/{id}")
    public ResponseEntity<Void> deleteFoo(@PathVariable("id") long id) {
        // implementation
    }

    @PutMapping("/{id}")
    public ResponseEntity<Foo> updateFoo(@PathVariable("id") long id, @RequestBody Foo foo) {
        // implementation
    }
}
3.3. 應用 (The Application)
最後,Boot 應用:
@SpringBootApplication()
public class Application {
    public static void main(String[] args) {
        SpringApplication.run(Application.class, args);
    }
}
4. OpenAPI / Springdoc
現在讓我們看看 springdoc 如何為我們的 Foo REST API 添加文檔。
請回想一下,它會根據該對象生成 JSON 對象和 API 的 UI 視覺效果。
4.1. 基本 UI
首先,我們將添加幾個 Maven 依賴項:<a href="https://mvnrepository.com/artifact/org.springdoc/springdoc-openapi-data-rest">springdoc-openapi-data-rest</a> 用於生成 JSON,以及 <a href="https://mvnrepository.com/artifact/org.springdoc/springdoc-openapi-ui">springdoc-openapi-ui</a> 用於渲染 UI。
該工具將對我們的 API 進行內省,並讀取控制器方法的註解。 從而生成 API JSON,該 JSON 將位於 http://localhost:8080/api-docs/。 它還將提供一個基本 UI,位於 http://localhost:8080/swagger-ui-custom.html。
如你所見,我們無需添加任何代碼,就獲得了我們 API 的美觀可視化,包括 <em>Foo</em> 模式。 通過使用“Try it out” 按鈕,我們甚至可以執行操作並查看結果。
現在,如果我們想為 API 添加一些實際文檔,該怎麼辦? 比如 API 的內容、所有操作的含義、預期輸入和預期響應是什麼?
我們將在這部分內容中討論。
4.2. 詳細 UI
首先,讓我們看看如何為 API 添加通用描述。
為此,我們將向 Boot App 添加一個 OpenAPI 豆:
@Bean
public OpenAPI customOpenAPI(@Value("${springdoc.version}") String appVersion) {
    return new OpenAPI().info(new Info()
      .title("Foobar API")
      .version(appVersion)
      .description("This is a sample Foobar server created using springdocs - " +
        "a library for OpenAPI 3 with spring boot.")
      .termsOfService("http://swagger.io/terms/")
      .license(new License().name("Apache 2.0")
      .url("http://springdoc.org")));
}
接下來,為了向我們的API操作添加信息,我們將使用一些OpenAPI特定的註解來裝飾我們的映射。
讓我們看看如何描述 getFooById。 我們將在另一個控制器 FooBarController 中完成這項工作,該控制器類似於我們的 FooController:
@RestController
@RequestMapping("/foobar")
@Tag(name = "foobar", description = "the foobar API with documentation annotations")
public class FooBarController {
    @Autowired
    FooRepository repository;

    @Operation(summary = "Get a foo by foo id")
    @ApiResponses(value = {
      @ApiResponse(responseCode = "200", description = "found the foo", content = {
        @Content(mediaType = "application/json", schema = @Schema(implementation = Foo.class))}),
      @ApiResponse(responseCode = "400", description = "Invalid id supplied", content = @Content),
      @ApiResponse(responseCode = "404", description = "Foo not found", content = @Content) })
    @GetMapping(value = "{id}")
    public ResponseEntity getFooById(@Parameter(description = "id of foo to be searched")
      @PathVariable("id") String id) {
        // implementation omitted for brevity
    }
    // other mappings, similarly annotated with @Operation and @ApiResponses
}
現在讓我們看看對UI的影響:
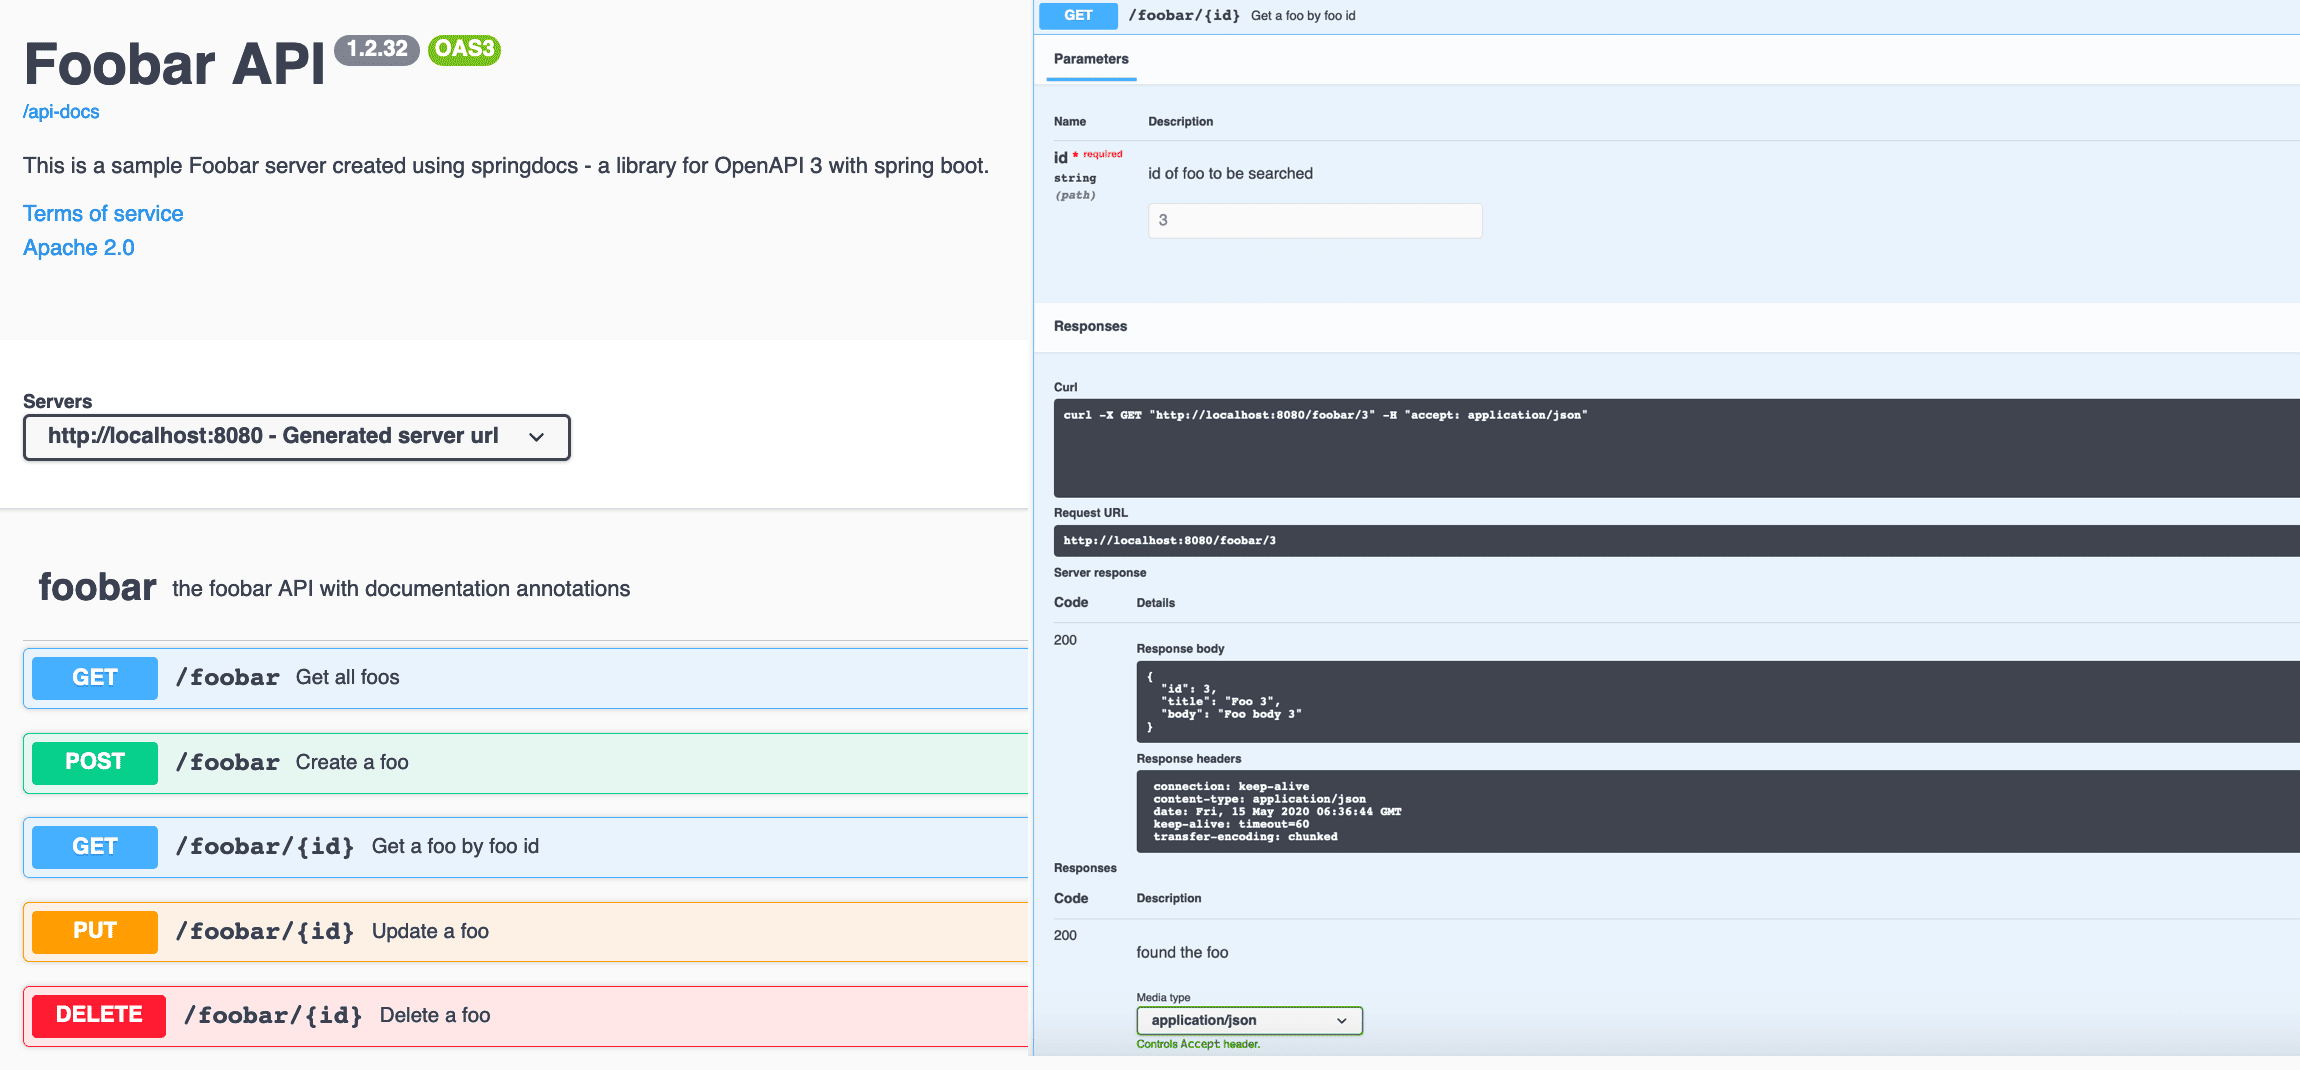
因此,通過這些最小的配置,我們的API用户現在可以瞭解它的功能、使用方法以及預期結果。我們只需要編譯代碼並運行Boot App。
5. Spring REST Docs
REST docs 是一種與 API 文檔截然不同的方法。 如前所述,該過程是基於測試的,輸出結果為靜態 HTML 頁面。
在我們的示例中,我們將使用 Spring MVC Tests 創建文檔片段。
在開始之前,我們需要在我們的 pom 中添加 spring-restdocs-mockmvc 依賴項以及 asciidoc Maven 插件。
5.1. JUnit5 測試
現在讓我們來查看包含我們文檔的 JUnit5 測試:
@ExtendWith({ RestDocumentationExtension.class, SpringExtension.class })
@SpringBootTest(classes = Application.class)
public class SpringRestDocsIntegrationTest {
    private MockMvc mockMvc;

    @Autowired
    private ObjectMapper objectMapper;

    @BeforeEach
    public void setup(WebApplicationContext webApplicationContext,
      RestDocumentationContextProvider restDocumentation) {
        this.mockMvc = MockMvcBuilders.webAppContextSetup(webApplicationContext)
          .apply(documentationConfiguration(restDocumentation))
          .build();
    }

    @Test
    public void whenGetFooById_thenSuccessful() throws Exception {
        ConstraintDescriptions desc = new ConstraintDescriptions(Foo.class);
        this.mockMvc.perform(get("/foo/{id}", 1))
          .andExpect(status().isOk())
          .andDo(document("getAFoo", preprocessRequest(prettyPrint()),
            preprocessResponse(prettyPrint()),
            pathParameters(parameterWithName("id").description("id of foo to be searched")),
            responseFields(fieldWithPath("id")
              .description("The id of the foo" +
                collectionToDelimitedString(desc.descriptionsForProperty("id"), ". ")),
              fieldWithPath("title").description("The title of the foo"),
              fieldWithPath("body").description("The body of the foo"))));
    }

    // more test methods to cover other mappings
運行此測試後,我們會在 targets/generated-snippets 目錄下獲得多個文件,這些文件包含有關所提供的 API 操作的信息。特別是,whenGetFooById_thenSuccessful 將會為我們提供八個 adoc 文件,這些文件位於 getAFoo 文件夾中,該文件夾位於該目錄下。
以下是一個示例 http-response.adoc 文件,當然它包含響應體:
[source,http,options="nowrap"]
----
HTTP/1.1 200 OK
Content-Type: application/json
Content-Length: 60

{
  "id" : 1,
  "title" : "Foo 1",
  "body" : "Foo body 1"
}
----
5.2. fooapi.adoc
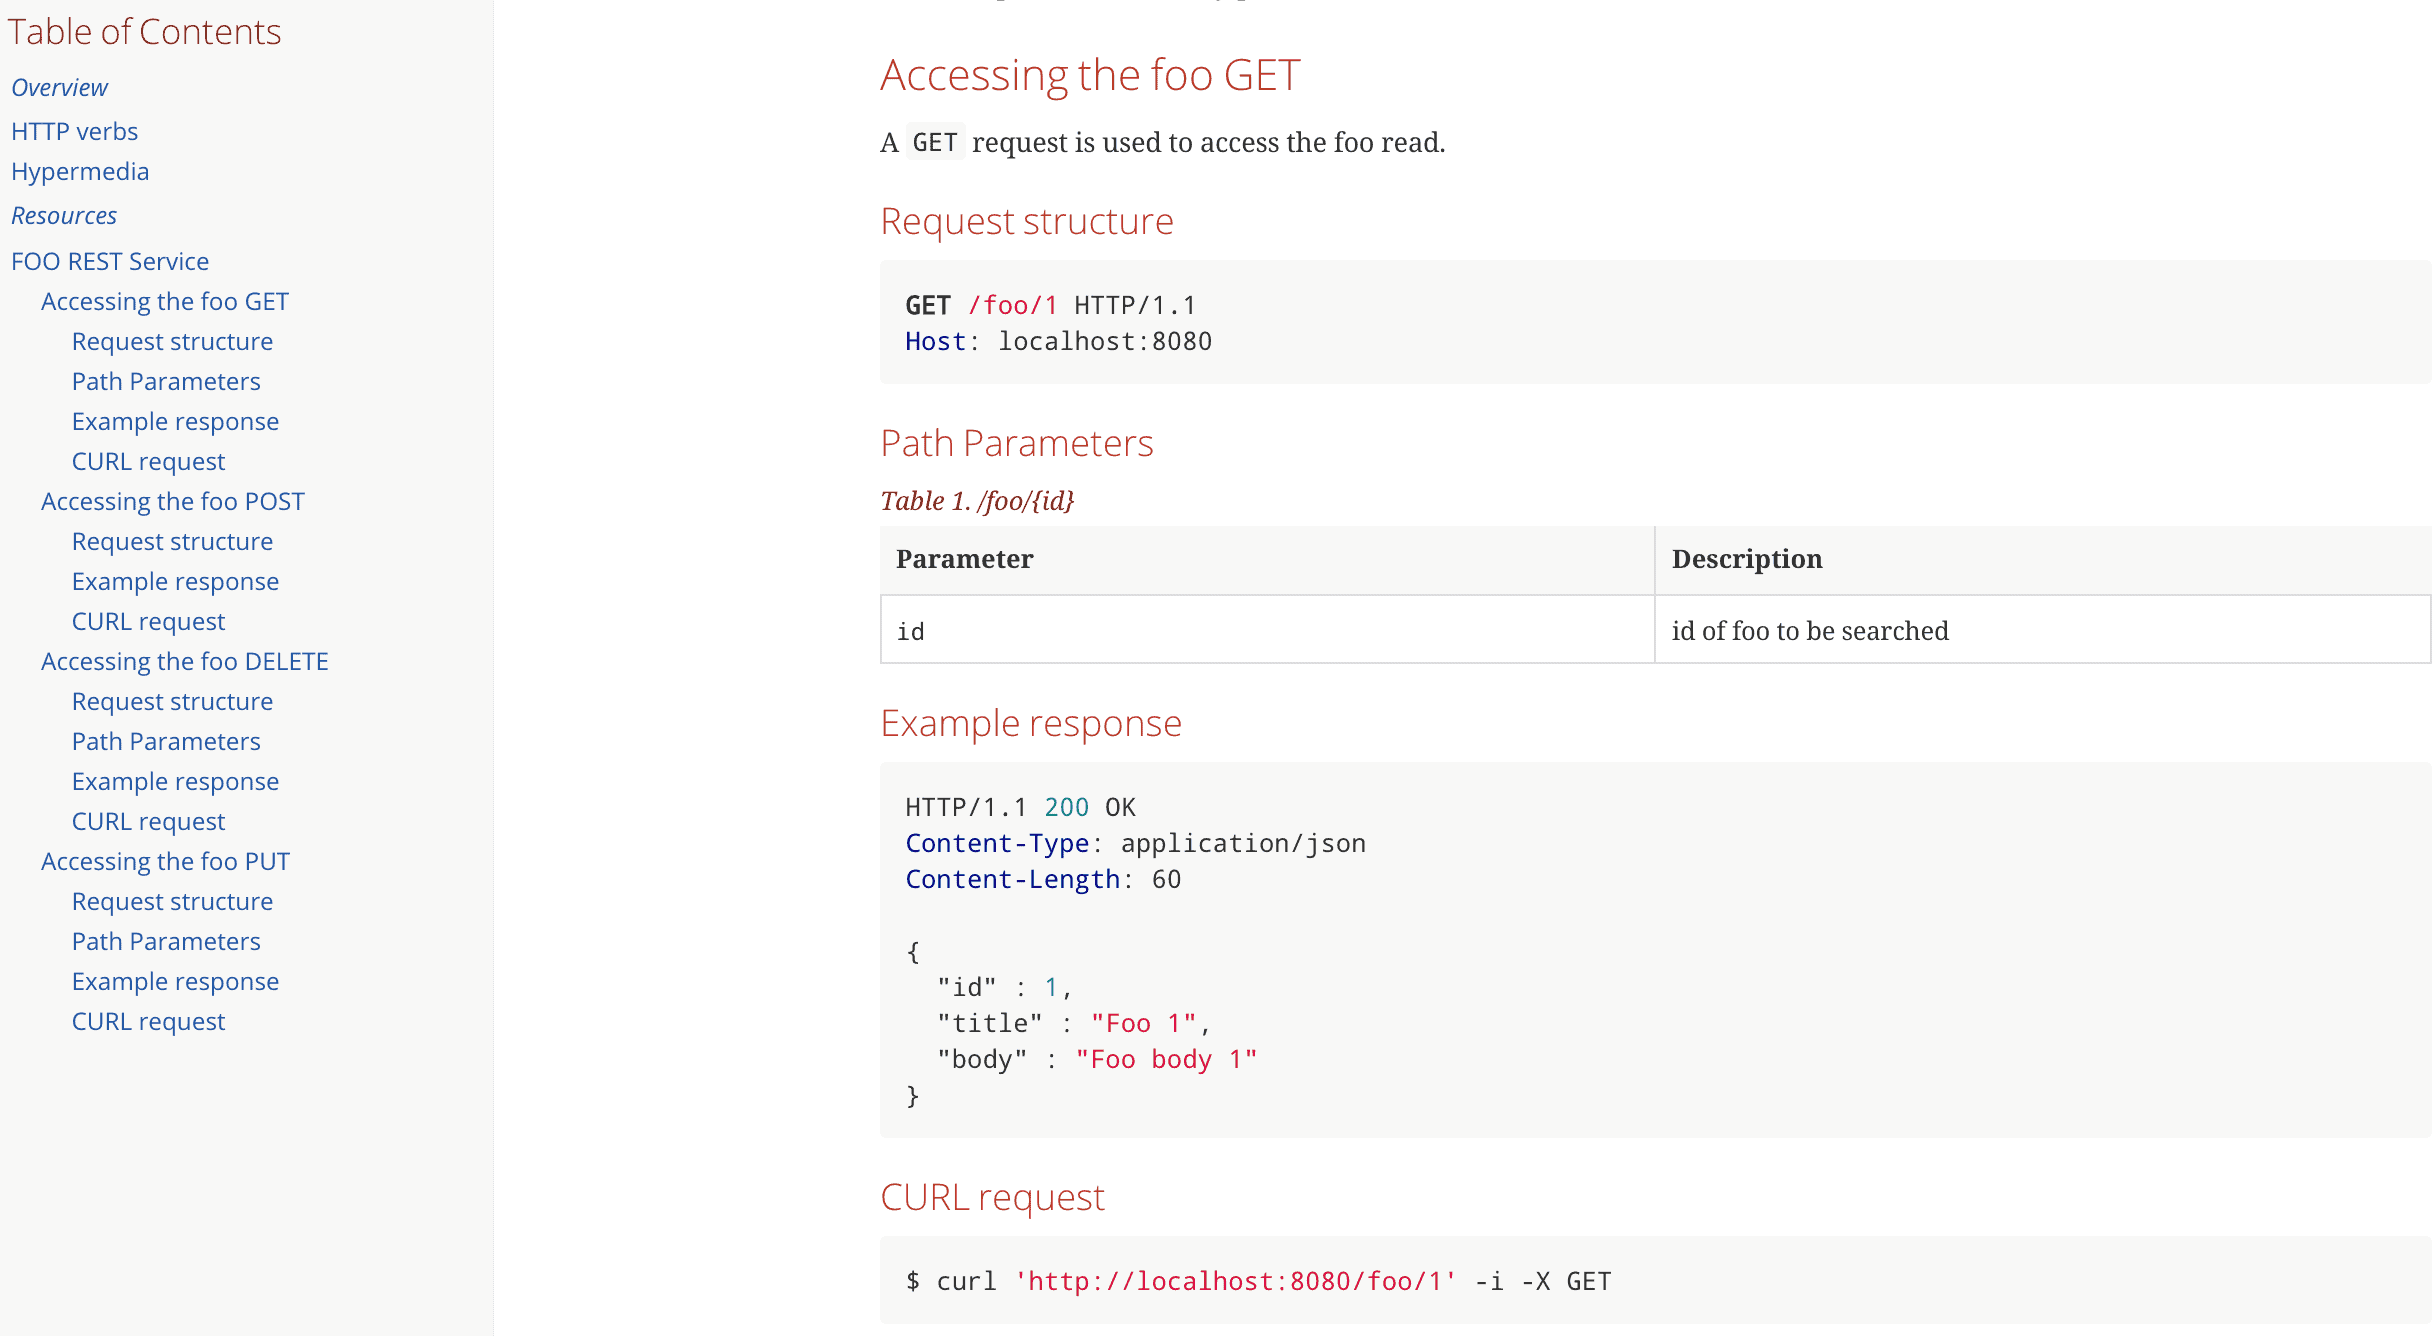
現在我們需要一個主文件,將所有這些片段編織在一起,形成一個結構良好的 HTML 文檔。
讓我們稱它為 fooapi.adoc,並查看其中一部分:
=== Accessing the foo GET
A `GET` request is used to access the foo read.

==== Request structure
include::{snippets}/getAFoo/http-request.adoc[]

==== Path Parameters
include::{snippets}/getAFoo/path-parameters.adoc[]

==== Example response
include::{snippets}/getAFoo/http-response.adoc[]

==== CURL request
include::{snippets}/getAFoo/curl-request.adoc[]
執行後 asciidoctor-maven-plugin,我們會在 target/generated-docs 文件夾中獲得最終的 HTML 文件 fooapi.html。
在瀏覽器中打開後,其顯示效果如下所示:
6. 關鍵要點
現在我們已經研究了兩種實現方案,讓我們總結一下它們的優缺點。
使用 springdoc 時,我們不得不使用的註解使我們的 REST 控制器的代碼變得混亂,降低了代碼的可讀性。 此外,文檔與代碼緊密耦合,並且會進入生產環境。
Needless to say,維護文檔本身也是一個挑戰——如果 API 發生更改,程序員是否總是會記得更新相應的 OpenAPI 註解?
另一方面,REST Docs 既不像其他 UI 那樣引人注目,也不能用於驗收測試。 但它也有它的優點。
值得注意的是,Spring MVC 測試的成功完成不僅為我們提供了片段,還驗證了我們的 API,就像任何其他單元測試一樣。 這迫使我們根據 API 修改進行文檔更改。 此外,文檔代碼完全與實現分離。
但再次來説,我們不得不編寫更多代碼來生成文檔。 首先是測試本身,這被認為是 OpenAPI 註解一樣冗長;其次是主 adoc 文件。
它還需要更多步驟來生成最終的 HTML——首先運行測試,然後運行插件。 Springdoc 只需要我們運行 Boot 應用。
7. 結論
在本教程中,我們探討了基於 OpenAPI 的 springdoc 和 Spring REST Docs 之間的差異。我們還看到了如何使用它們來為基本的 CRUD API 生成文檔。
總而言之,兩者各有優缺點,選擇使用哪一個取決於我們的具體需求。
