1. 概述
本文將介紹如何將現有的 Spring Framework 應用程序遷移到 Spring Boot 應用程序。
Spring Boot 的目標並非取代 Spring,而是使其與 Spring 的使用更加快速和便捷。因此,遷移應用程序所需的更改主要與配置相關。 大部分自定義控制器和其他組件將保持不變。
使用 Spring Boot 帶來諸多優勢:
- 更簡單的依賴管理
- 默認自動配置
- 嵌入式 Web 服務器
- 應用程序指標和健康檢查
- 高級外部化配置
2. Spring Boot Starter 模塊
首先,我們需要一組新的依賴項。 Spring Boot 提供便捷的 starter 依賴模塊,它們是依賴描述符,可以引入特定功能的全部必要技術。
這些依賴模塊具有優勢,即您無需為每個依賴項指定版本,而是讓 starter 模塊為您管理依賴項。
最快的方式是添加 spring-boot-starter-parent pom.xml:
<parent>
    <groupId>org.springframework.boot</groupId>
    <artifactId>spring-boot-starter-parent</artifactId>
    <version>1.5.6.RELEASE</version>
</parent>
這將處理依賴管理。
在下一部分,我們將探討更多啓動器,具體取決於我們將遷移的功能。 詳細列表可在此處找到:這裏。
作為一般説明,我們希望刪除任何明確定義的依賴版本,這些版本也由 Spring Boot 管理。 如果沒有,我們可能會在我們的定義版本和 Boot 使用的版本之間遇到不兼容性。
3. 應用入口
使用 Spring Boot 構建的每個應用程序都需要定義主入口點。這通常是一個帶有 main 方法的 Java 類,並使用 @SpringBootApplication 註解。
@SpringBootApplication
public class Application {
    public static void main(String[] args) {
        SpringApplication.run(Application.class, args);
    }
}
@SpringBootApplication 註解會添加以下註解:
- @Configuration – 標記該類為 Bean 定義的來源
- @EnableAutoConfiguration – 告訴框架根據類路徑上的依賴自動添加 Bean
- @ComponentScan – 掃描與Application 類相同的包或其子包中其他配置和 Bean
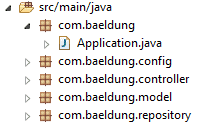
默認情況下,@SpringBootApplication 註解會掃描與Application 類相同的包或其子包中的所有類。因此,一個方便的包結構可能如下所示:
如果您的應用程序是一個非 Web 應用程序,並且創建ApplicationContext,則可以刪除此代碼並將其替換為上面的@SpringBootApplication 類。
我們可能會遇到的一個問題是,存在多個配置類衝突。為了避免這種情況,我們可以過濾掃描的類:
@SpringBootAppliaction
@ComponentScan(excludeFilters = {
  @ComponentScan.Filter(type = FilterType.REGEX,
  pattern = "com.baeldung.config.*")})
public class Application {
    //...
}
4. 導入配置和組件
Spring Boot 大量依賴註解進行配置,但你仍然可以導入現有的配置,格式為註解和 XML 兩種。
要使現有的 @Configuration 類或組件類被拾取,你有兩個選項:
- 將現有的類移動到與主 Application 類包相同的或更下的包中
- 顯式導入這些類
要顯式導入這些類,可以使用 @ComponentScan 或 @Import 註解在主類上:
@SpringBootApplication
@ComponentScan(basePackages="com.baeldung.config")
@Import(UserRepository.class)
public class Application {
    //...
}
官方文檔建議使用註解而不是 XML 配置。但是,如果您已經有不想轉換為 Java 配置的 XML 文件,仍然可以使用 @ImportResource 導入它們。
@SpringBootApplication
@ImportResource("applicationContext.xml")
public class Application {
    //...
}
5. 遷移應用程序資源
默認情況下,Spring Boot 會在以下位置查找資源文件:
- /resources
- /public
- /static
- /META-INF/resources
為了遷移,我們可以將所有資源文件移動到這些位置之一,或者通過設置 spring.resources.static-locations 屬性來自定義資源位置:
spring.resources.static-locations=classpath:/images/,classpath:/jsp/6. 遷移應用程序屬性
框架會自動加載在名為 application.properties 或 application.yml 的文件中定義的任何屬性,這些文件位於以下位置:
- 當前目錄中的 /config 子目錄
- 當前目錄
- 類路徑上的 /config 目錄
- 類路徑根目錄
為了避免顯式加載屬性,我們可以將它們移動到在以下位置的文件中,例如到 /resources 目錄,該目錄應在類路徑上存在。
我們還可以從名為 application-{profile}.properties 的文件中自動加載特定於配置文件的屬性。
此外,大量預定義的屬性名稱(見參考)可用於配置不同的應用程序行為。
您在應用程序中使用每個 Spring 框架模塊都需要進行一些小的修改,主要與配置相關。讓我們來看看一些最常用的功能。
7. 遷移 Spring Web 應用程序
This document describes how to migrate a Spring Web application to a new environment, such as a different server or version of Spring. The goal is to minimize downtime and ensure a smooth transition.
Key Considerations:
- Database Migrations: This is often the most complex part of the migration. Ensure your database schema is compatible with the target environment. Consider using database migration tools to manage schema changes.
- Configuration Changes: Review and update all configuration files (e.g.,
application.properties,application.yml) to reflect the new environment. - Dependency Management: Verify that all required dependencies are available in the target environment. Update your
pom.xml(for Maven projects) orbuild.gradle(for Gradle projects) accordingly. - Testing: Thoroughly test the application in the new environment before deploying it to production. Include unit tests, integration tests, and end-to-end tests.
Example Code Snippet (Java):
// This method handles user authentication.
public String authenticateUser(String username, String password) {
  // Implement your authentication logic here.
  // Consider using Spring Security for robust authentication.
  return "Authentication successful";
}
7.1. Web Starter
Spring Boot 提供了一個用於 Web 應用程序的 starter 包,它會引入所有必要的依賴項。這意味着我們可以從 Spring 框架中移除所有 Web 相關的依賴項,並用 spring-boot-starter-web 替換它們。
<dependency>
    <groupId>org.springframework.boot</groupId>
    <artifactId>spring-boot-starter-web</artifactId>
</dependency>
由於 Spring Boot 嘗試在基於類路徑的情況下自動配置應用程序,添加此依賴項將導致 @EnableWebMvc 註解添加到主 Application 類,並設置 DispatcherServlet Bean。
如果您有一個 WebApplicationInitializer 類,該類設置 DispatcherServlet,則不再需要,也不需要 @EnableWebMvc 註解。
當然,我們可以定義我們的 Bean 以實現自定義行為,在這種情況下,我們的 Bean 將被使用。
如果我們在 @Configuration 類上顯式使用 @EnableWebMvc 註解,則 MVC 自動配置將不再啓用。
添加 Web Starter 還確定以下 Bean 的自動配置:
- 從名為 /static、/public、/resources 或 /META-INF/resources 的類路徑目錄中提供靜態內容的支持
- 用於常見用例(如 JSON 和 XML)的 HttpMessageConverter Bean
- 一個 /error 映射,用於處理所有錯誤
7.2. 查看技術
在構建網頁方面,官方文檔建議不要使用 JSP 文件,而是使用模板引擎。以下模板引擎已包含自動配置:Thymeleaf, Groovy, FreeMarker, Mustache。 僅需添加相應的 starter 即可使用其中任何一個。
<dependency>
    <groupId>org.springframework.boot</groupId>
    <artifactId>spring-boot-starter-thymeleaf</artifactId>
</dependency>
模板文件應放置在 /resources/templates 文件夾中。
如果希望繼續使用 JSP 文件,則需要配置應用程序使其能夠解析 JSP 文件。例如,如果我們的文件位於 /webapp/WEB-INF/views 目錄下,則需要設置以下屬性:
spring.mvc.view.prefix=/WEB-INF/views/
spring.mvc.view.suffix=.jsp
7.3. 內嵌 Web 服務器
此外,我們還可以使用內嵌 Tomcat 服務器運行我們的應用程序,該服務器將在端口 8080 上自動配置。這通過添加 spring-boot-starter-tomcat 依賴項來實現:
<dependency>
    <groupId>org.springframework.boot</groupId>
    <artifactId>spring-boot-starter-tomcat</artifactId>
</dependency>
其他為 Spring Boot 提供自動配置的 Web 服務器包括 Jetty 和 Undertow。
8. 遷移 Spring Security 應用
啓用 Spring Security 的啓動器是 spring-boot-starter-security:
<dependency>
    <groupId>org.springframework.boot</groupId>
    <artifactId>spring-boot-starter-security</artifactId>
</dependency>
默認情況下,這將會創建一個名為“user”的用户,並在啓動時記錄一個隨機生成的密碼,並使用基本身份驗證安全所有端點。但是,我們通常希望添加我們的安全配置,這與默認配置不同。
因此,我們將現有的類標記為帶有 <em @EnableWebSecurity</em> 的註解,這將會創建一個 <em SecurityFilterChain</em> 類型的 Bean,並定義一個自定義配置。
@Configuration
@EnableWebSecurity
public class SecurityConfig {
    @Bean
    public SecurityFilterChain filterChain(HttpSecurity http) throws Exception {
        // ...
    }
}
9. 遷移 Spring Data 應用
根據我們使用的 Spring Data 實現,我們需要添加相應的 starter。例如,對於 JPA,我們可以添加 spring-boot-starter-data-jpa 依賴:
<dependency>
    <groupId>org.springframework.boot</groupId>
    <artifactId>spring-boot-starter-data-jpa</artifactId>
</dependency>
如果我們想要使用內存數據庫,添加相應的依賴項會啓用對 H2、Derby 和 HSQLDB 類型的數據庫的自動配置。
例如,要與內存中的 H2 數據庫一起工作,我們只需要 h2 依賴項即可:
<dependency>
    <groupId>com.h2database</groupId>
    <artifactId>h2</artifactId>
</dependency>
如果我們想要使用不同的數據庫類型和配置,例如 MySQL 數據庫,那麼我們需要相應的依賴項,並且需要定義配置。
為此,我們可以保持使用我們的 DataSource Bean 定義,或者利用預定義的屬性:
spring.datasource.driver-class-name=com.mysql.cj.jdbc.Driver
spring.datasource.url=jdbc:mysql://localhost:3306/myDb?createDatabaseIfNotExist=true
spring.datasource.username=user
spring.datasource.password=pass
Spring Boot 將Hibernate 作為默認的 JPA 提供程序自動配置,同時還會配置一個transactionManager Bean。
10. 結論在本文中,我們展示了將現有 Spring 應用遷移到最新 Spring Boot 框架時遇到的常見場景。
總的來説,您在遷移過程中獲得的經驗將當然取決於您構建的應用。
